Camera Mount - Trepied Fat Gecko - Manual de utilizare gratuit
Găsiți gratuit manualul dispozitivului Camera Mount Fat Gecko în format PDF.

Întrebările utilizatorilor despre Camera Mount Fat Gecko
0 întrebare despre acest aparat. Răspundeți la cele pe care le cunoașteți sau puneți-vă propria.
Pune o întrebare nouă despre acest aparat
Descărcați instrucțiunile pentru Trepied în format PDF gratuit! Găsiți manualul dvs. Camera Mount - Fat Gecko și luați din nou în mână dispozitivul dvs. electronic. Pe această pagină sunt publicate toate documentele necesare pentru utilizarea dispozitivului dvs. Camera Mount mărcii Fat Gecko.
MANUAL DE UTILIZARE Camera Mount Fat Gecko
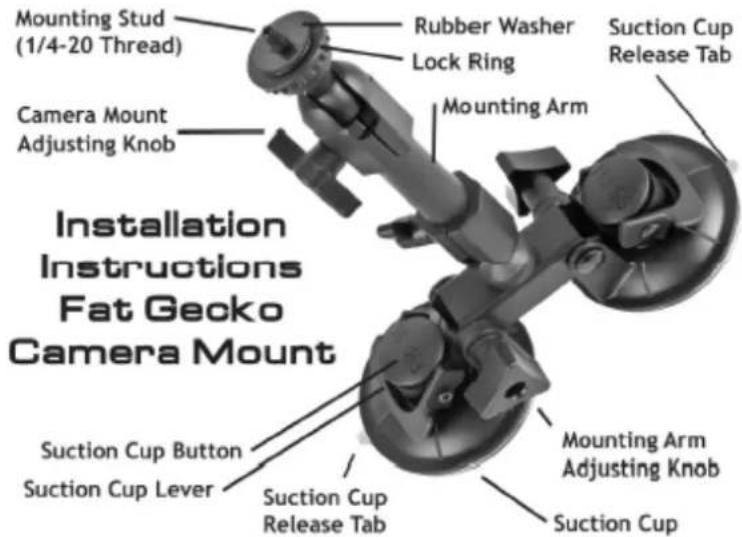
Caution - This mount is rated for cameras weighing 6 pounds or less. DO NOT OVERLOAD. Camera mounts that are improperly attached or overloaded may come lose and cause property damage or personal injury. Delkin Devices, Inc. is not responsible for lost equipment, property damage, or injury caused by use of this product. Use of the Fat Gecko camera mount is at your own risk! All surfaces must be tested prior to using.
- Thoroughly clean the smooth, non-porous mounting surface (windshield, windows, mirror etc.). The surface should be dry and free of any scratches.
- Install the camera (weighing up to 6 pounds) onto the Mounting Stud. Do not remove the Rubber Washer. Tighten the lock ring firmly.
- Loosen the Arm Adjusting Knob so the Mounting Arm moves up and down.
- Position the Suction Cup Lever in the "down" position. Note: The mounting surface and the Suction Cup should be clean and dry. Wipe with a clean, damp cloth and let dry completely. The Fat Gecko Camera Mount should be installed at room temperature (avoid extremes of heat or cold). Do not moisten the Suction Cup.
- Position the Suction Cup in your mounting area. Delkin recommends that it moves freely in a vertical line.
- Push the Suction Cup firmly against the mounting surface (the Suction Cup Lever should be in the "down" position). Press the Suction Cup Button and pull the Suction Cup Lever up and over the Button. You will feel the Button move out during this procedure; this action locks the Suction Cup into place.
- Move the Mounting Arm up and down to the desired position and lock into place with the Mounting Arm Adjusting Knob.
- Loosen the Camera Mount Adjusting Knob, position the camera, then tighten the Camera Mount Adjusting Knob.
- Attach cable leash if required.
- To release the Suction Cup, move the Suction Cup Lever back into its "down" position. Lift the Suction Cup Release Tab to help break the hold.
The Included Accessory Shoe can be attached to Fat Gecko products to enable the connection of hot shoe accessories such as flash units, remote triggers and more. To attach the included accessory shoe to DDMOUNT-SUCTION, DDMOUNT-MINI or DDMOUNT-VISE: (1) screw the acc. shoe onto the Fat Gecko's ¼-20 mounting stud (2) hold the accessory shoe in place and tighten the Fat Gecko's lock ring firmly, creating a secure connection between the Fat Gecko and the Accessory Shoe (3) attach any hot or cold shoe accessory by sliding the accessory's U-shaped shoe onto the Accessory Shoe from the back, pushing it forward until it sits firmly in place. The accessory can be adjusted to obtain the correct positioning by adjusting the joints on the Fat Gecko.
DELKIN DEVICES.
www.delkin.com | 800.637.8087
2 Year Warranty - Delkin Devices, Inc. warrants to its customers that the Fat Gecko camera mount is free from defects in materials and workmanship for a period of 2 years from the date of purchase. This warranty does not cover products damaged by mishandling or irregular use. We make no other warranty, expressed or implied, and will not assume any liability for damages, labor or delays incidental hereto.
All: 858.391.1234 | US: 800.637.8087 | EU: +44 (0)1922 636 250 | www.delkin.com | 13350 Kirkham Way | Poway, CA 92064-7117 © 2009 Delkin Devices, Inc. All rights reserved. Delkin Devices and logos are trademarks of Delkin Devices, Inc. All other logos and brand names are trademarks of their respective owners.