
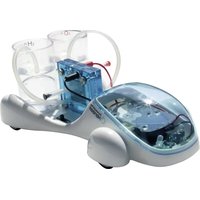
Electric Mobility Experiment Set - Kit éducatif scientifique Horizon - Bezpłatna instrukcja obsługi
Znajdź bezpłatnie instrukcję urządzenia Electric Mobility Experiment Set Horizon w formacie PDF.


| Typ produktu | Zestaw edukacyjny do eksperymentów z mobilnością elektryczną |
| Model | Electric Mobility Experiment Set (FCJJ-30) |
| Marka | Horizon |
| Wymiary (szacunkowe) | ok. 30 × 20 × 10 cm |
| Waga (szacunkowa) | ok. 1 kg |
| Zasilanie | Panel słoneczny, baterie AA (2 szt.), generator ręczny, ogniwa paliwowe (wodór, słona woda) |
| Główne funkcje | 5 eksperymentów: samochód solarny, napędzany wodorem, superkondensatorem, ogniwem słonowodnym oraz z magazynowaniem wodoru |
| Materiały | Rama samochodu z tworzywa, ogniwa paliwowe (odwracalne, mini, słonowodne), przewody, zbiorniki, kondensator, generator ręczny |
| Bezpieczeństwo | Tylko dla osób powyżej 14 lat pod nadzorem dorosłych; unikać zwarcia; nie demontować; ostrożnie z gorącą wodą (>90°C); nie ładować kondensatora odwrotnie; nie wkładać przewodów do gniazdka |
| Konserwacja | Czyścić płytę anodową po użyciu; stosować wodę destylowaną; przechowywać w suchym miejscu; przechowywać ogniwa w worku hermetycznym |
| Części zamienne i naprawialność | Dostępne oddzielnie: płyta anodowa, żarówka do generatora, ogniwa paliwowe; HYDROSTIK PRO ładowany przez HYDROFILL PRO |
| Certyfikaty | CE |
| Producent | Jiangsu Horizon New Energy Technologies Ltd., Chiny |
| Importer | Horizon Fuel Cell Europe spot. s r. o., Czechy |
Często zadawane pytania - Electric Mobility Experiment Set Horizon
Pytania użytkowników dotyczące Electric Mobility Experiment Set Horizon
0 pytanie dotyczące tego urządzenia. Odpowiedz na te, które znasz, lub zadaj własne.
Zadaj nowe pytanie dotyczące tego urządzenia
Pobierz instrukcję dla swojego Kit éducatif scientifique w formacie PDF za darmo! Znajdź swoją instrukcję Electric Mobility Experiment Set - Horizon i weź swoje urządzenie elektroniczne z powrotem w ręce. Na tej stronie opublikowane są wszystkie dokumenty niezbędne do korzystania z urządzenia. Electric Mobility Experiment Set marki Horizon.
INSTRUKCJA OBSŁUGI Electric Mobility Experiment Set Horizon

Horizon Educational
Electric Mobility Experiment Set
ASSEMBLY GUIDE
CE
Model No.: FCJJ-30

Warning
To avoid the risk of property damage, serious injury or death:
- Read carefully and fully understand the instructions before assembling this kit.
- This kit is intended only for use by persons 14 years old and up, and only under the supervision of adults who have read and understood the instructions in this user manual.
- When assembling this kit, tools may be used. Extra care should be taken to avoid personal injury.
- Some parts are small and fragile: please be careful when handling and connecting parts to avoid breakage. Handle all parts and components with care.
- Do not attempt to use any part, item, or component provided in this kit for any other purpose than what is instructed in this manual. Do not attempt to disassemble any part, item or component in this kit.
- Keep small children and animals away, because this kit contains small parts that could be swallowed.
- Save these instructions and review frequently during use.
- Wires are not to be inserted into socket-outlets.
Battery opertaion instructions:
- The removing and inserting of batteries is to be conducted by the adults only. Ensure to respect the polarity.
- Non-rechargeable batteries are not to be recharged.
- Different types of batteries such as rechargeable, alkline and standard batteries or new and used batteries are not to be mixed and should be used separately.
- The battery pack cables are not to be inserted into an AC socket.
- The supply terminals of the battery pack are not to be short-circuited.
- The two spare red&black cables are not to be inserted into an AC socket.
- Exhausted batteries are to be removed from the battery pack.
www.horizoneducational.com
300001245
Electric Mobility Experiment Set
List of Components
a. Car frame
b. Reversible fuel cell
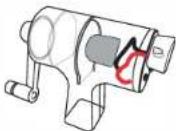
c. Hand crank generator
d. Salt water fuel cell
e. Mini fuel cell
f. Battery pack
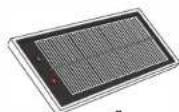
g. Solar panel
h. Super capacitor
I. HYDROTIK PRO pressure regulator
j. Solar panel support
k. HYDROSTIK PRO
I. U fixator for HYDROSTIK PRO
m. Fuel solution container
n. Water & Hydrogen tank
o. Water & Oxygen tank
p. Clamp
q. Wires
r. Syringe
s. Silicon tubes
t. Red & black pins
u. Purging valve

natural_image
Line drawing of a car chassis with wheels and a red curved cable, no text or symbols present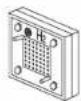
b
C

d

•

f
g

h

i

1

k

1

m

n

。

p

q

r

9

t

u
1

Horizon Educational
Solar Powered Car
What you need :
a. Car frame
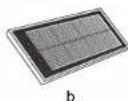
b. Photovoltaic solar panel
c. Wires
d. Solar panel support

natural_image
Line drawing of a car with wheels and a red motion arrow indicating rotation (no text or symbols)

c d
Important notes :
- You can set the wheels position using the steering on the front of the car
- Ensure that the electrical connections under the car are tight.
- For the first use, remove the shrink-wrap from the solar panel.
- The car should be run under direct strong sunlight.
Power the car with solar energy
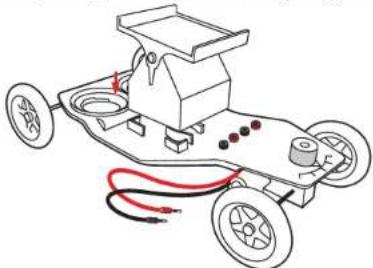
a. You have to fit the solar panel support onto the car. Ensure they strongly meet together.
natural_image
Line drawing of a four-wheeled vehicle with wheels and a red wire, no text or symbols presentb. Place the solar panel as shown in the picture below. Remind that the plugs have to be on the right side when you face the car.

natural_image
Line drawing of a small electric vehicle with a solar panel mounted on its side, connected to wheels and cables (no text or symbols)2

Horizon Educational
c. Then, connect the engine wires which exceed the bottom of the car, to the closest red and black plugs.

natural_image
Diagram of a small robotic car with a monitor and wheels, showing wiring connections (no text or symbols)d. After this, you have just to connect the solar panel and the car using the two remaining wires. Ensure to respect the polarity shown by the color code.

natural_image
Diagram of a car with solar panels connected to wheels and a red circular component (no text or symbols)e. Now you have just to place the car under direct strong sunbeams to make it run.

natural_image
Illustration of a car with solar panels and wind turbines, emitting red light rays (no text or symbols)3

Horizon Educational
Hydrogen powered car
what you need:
a. Water & hydrogen tank
b. Water & oxygen tank
c. Battery pack
d. Car frame
e. Silicon tubes
f. Reversible fuel cell
g. Syringe
h. Red & black pins for tubes
i. Wires

You will also need the following items
(not included in this kit):
- AA batteries
- Purified or distilled water
Important notes :
- Ensure that the electrical connections under the car are tight.
- Avoid any contact between the battery and water.
- Use only distilled or purified water to humidify the fuel cell with the syringe.
- You can set the wheels position using the steering on the front of the car.
- Keep the reversilbe fuel cell in a sealing bag for storage.
Preparing the fuel Cell
a. Put one 5 cm long tube on the end of the syringe as shown below.

b. Suck up some distilled or purified water and push it into the fuel cell by the nozzle which is the
closest from the red plug of oxygen side of the fuel cell. As soon as the water flows out of the cell, disconnect the syringe from the tube and let this one connected with the fuel cell.
WARNING: The polymer membrane on the oxygen side is an important part of the proton exchange membrane (PEM) fuel cell, it should be prevented from drying out.

4

Horizon
EDUCATIONAL
c. Connect the other 5 cm long tube to the opposite nozzle (closest to the black plug) and add the red and black seals on each remaining end. Place the seal in function of the plug color.

natural_image
Diagram of a rectangular electronic component with labeled pins and two wires (no readable text or symbols)d. Attach the water tank to the tank base on the car frame by pressing downward into round slots and twisting into place. Place inner gas tanks into outer water tanks minding that the gaps are not blocked by inner plastic rims.

e. Fill the containers with 40ml distilled water.
Note: You may use the syringe to suck up the air which could be trapped inside the inner gas tanks in each water tank. Ensure there is just water and no remaining air under the gas tanks.

natural_image
Illustration of a car chassis with wheels, cylinders, and wiring (no text or symbols)5

Horizon
Educational
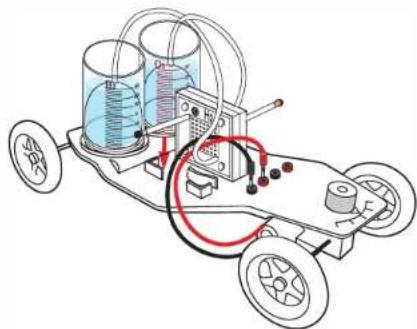
g. Fit the reversible fuel cell onto the car frame, just in front of the containers and make sure the red plug is located on the O2 container side.
h. Connect the two 20cm long tubes onto the top nozzles of the inner gas tanks, connect the tubes opposite end to the lower nozzles located on the lower positions of both "H2" and "O2" side of fuel cell shown below. Make sure the tubes are connected correctly to the corresponding sides of the fuel cell.
natural_image
Diagram of a small electric motor with wheels, battery, and wiring (no text or symbols)Create you fuel with water electrolysis and power the car.
a. Open the battery pack and insert 2 AA batteries with the correct polarity.
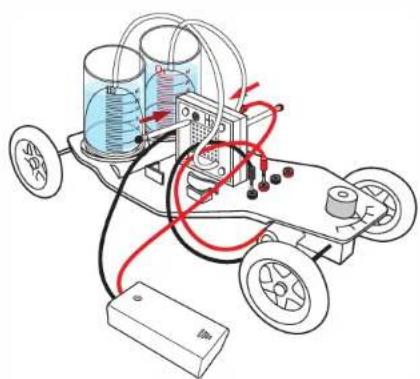
b. Connect the battery pack to the fuel cell and turn on the battery. Ensure to respect the polarity shown by the color code. You will see the inner gas tank will be filled by gas. You will also notice that the O2 volume will be two times lower than the hydrogen one. It is absolutely normal, because water molecule is made with one atom of oxygen and two of hydrogen. When you bubbles are coming out from the inner tank, it means the inner gas tank is fully filled with gas. Turn off the battery pack and disconnect it.
natural_image
Diagram of a robotic car with connected components and wiring, no visible text or symbols6
Horizon Educational
c. Then, connect the engine wires which exceed the bottom of the car, to the closest red and black plugs. d. Using the two remaining wires, connect the fuel cell to the car frame. Make sure you respect the polarity shown by the color code. The car will run until there is no more hydrogen in the inner gas tank.

natural_image
Diagram of a car with wheels and wiring, showing mechanical components and red directional arrows (no text or symbols)Troubleshooting
- The water levels do not drop when the gas outlet tubes on both sides of the fuel cell are unplugged.
Solution:
Check whether the holes on the wall of the inner cylinder are blocked. If so, turn the inner cylinder until water enters the holes and fills up the inner cylinder.
- The reversible fuel cell does not produce hydrogen and/or oxygen.
Solution:
a. Check whether the wires are appropriately connected, and whether there are any loose connections. The fuel cell could be completely destroyed if the red wire of the battery pack is connected to the black jack of the fuel cell.
b. Check whether the switch of the battery pack is in the "on" position.
- The water electrolysis process slows down.
Solution:
a. Add water to the oxygen side of the fuel cell and wait for about 5 minutes.
b. Replace old AA batteries with new AA batteries inside the battery pack.
- The car stops moving while there is still hydrogen left inside the tanks. Solution:
a. Purge the gases and perform water electrolysis for 4-5 minutes. Unplug the hydrogen gas outlet tube and oxygen gas tubes to purge the gases. Perform water electrolysis again until the hydrogen tank is filled, and connect the motor to the fuel cell. If the problem persists, go to the next step. b. Let the water electrolysis process last about 10 minutes to consume the residual water. To push water out of the fuel cell, purge the gases. Perform water electrolysis once more until the hydrogen tank is filled, then connect the motor to the fuel cell.
7
Horizon Educational
Super capacitor powered car
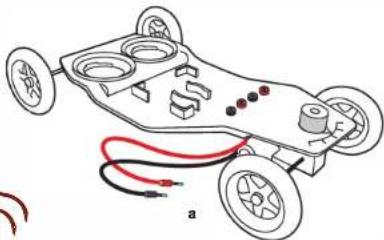
What you need:
a. Car Frame
b. Capacitor (energy storage)
c. Wires
d. Battery pack
e. Hand generator (dynamo)

b

c
natural_image
Diagram of a small electric vehicle chassis with wheels and wiring, no text or symbols present[Non-Text]

d
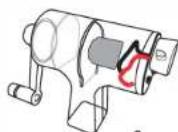
e
You will also need the following items
(not included in this kit):
- AA batteries
Important notes :
- You can set the wheels position using the steering on the front of the car.
- Ensure that the electrical connections under the car are tight.
- Do not load the capacitor if wires are connected in the wrong sense, otherwise you will broke the capacitor.
- The power stored is consequent, the car will start really fast so ensure there is free space in front of
the car before connecting it
Load the capacitor
a. Open the battery pack and insert 2 AA batteries with the correct polarity.
b. Using the wires, connect the capacitor to the battery pack and ensure to respect the polarity shown by the color code. Let the capacitor load during 1 min and then disconnect the capacitor. You can also use the hand generator to realize this operation. Connect it and ensure to respect the color code, turn the handle clockwise during 1 min with the velocity of two revolutions per second.
WARNING: 1. You are NOT allowed to rotate the arm anti-clockwise to charge the super
capacitor. Otherwise the super capacitor will be damaged by the countercurrent.
2. DO NOT crank the arm too fast otherwise the hand crank generator could be easily broken by the strong force.

natural_image
Simple line drawing of a battery connected to a terminal block with red and black wires (no text or symbols)OR

B

Horizon Educational
Power the car with the electricity stored in the capacitor
a. Fit the capacitor onto the car frame.
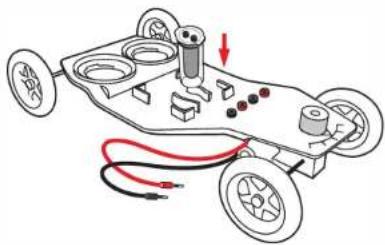
natural_image
Diagram of a small wheeled vehicle with wheels, sensors, and wiring (no text or symbols)b. Then, connect the engine wires which exceed the bottom of the car, to the closest red and black plugs.

natural_image
Diagram of a car chassis with wheels and a red-circled electrical cable, showing wiring connections (no text or symbols)c. After this, you have just to connect the capacitor and the car using the two remaining wires. Ensure to respect the polarity shown by the color code. The car will start to move immediately. If you connect wires in the wrong sense, the car will go back.

natural_image
Diagram of a car's steering wheel system with red and black wiring, showing motion trajectory (no text or symbols)9

Horizon Educational
Note:
Finding the appropriate speed and technique will take a little practice. After you have spent a little time acclimating yourself to the hand crank generator, you should develop an easy rhythm that is not strenuous to sustain.
Although the generator is easy to crank, you may eventually tire. When you find yourself slowing down, stop and take a rest, cranking slower is harder and may not generate enough power to charge the capacitor or power the load.
The generator can be cranked in either direction, with either hand. But you are NOT allowed to rotate the arm anti-clockwise to charge the super capacitor. Otherwise the super capacitor will be damaged by the countercurrent.
Try to rotate your hands around each other instead of trying to hold the generator still and moving one hand in a circle. This prevents one arm from tiring faster than the other.
Experiment with what works best for you. As long as the handle is cranked at approximately 2 revolutions per second the generator it will produce enough power to power the device provided.
ADVANTAGES of a Hand Crank Generator:
- Does not require solar, wind, or fuel to charge. Charge it anytime, anywhere!
- Does not require additional purchases of fuel during an emergency, when gasoline is scarce.
- Can be operated indoors without deadly fumes or threat of theft while outdoors.
- Easy to operate. Even children can safely operate the hand crank generator.
- Silent operation. No loud generator noise!
- Easy to set up. No confusing mounting or home alterations needed.
Conduct dozens of exciting, hands-on experiments with the science kit
Ideal as a battery replacement for a wide variety of basic electricity experiments, the hand crank generator is a low voltage power source that lets you create electrical current by simply turning a crank. This ingenious device generates student interest producing electrical energy through hands-on student effort. Student's enthusiasm is immediate, whether they are third graders lighting a bulb or college students reviewing sophisticated principles such as Ohm's Law or the electromagnetic properties of light.
Made from a sturdy, see-through ABS resin with nylon-plastic gears and handle, the kit is designed to shrug off use and abuse. It produces approximately 200mA of usable current. It is capable of producing up to 6 volts. You can reverse polarity by simply cranking the handle in the opposite direction. And, when powered by another kit or low voltage power source, it acts as a motor.
Activities and uses
Some of the activities require accessories sold separately. You can study electron flow, parallel and series circuits, Ohm's Law, motors and generators, energy transformations, and more.
Below is an activity for the kit:
Using a cellophane tap, wrap two wires onto a compass. Ensure you wrap the wires in the compass needle axis. Connect the other end of the wires to the hand crank generator. Turn the handle clockwise with different velocities. Do the same counter-clockwise. Does the defection angle is linked to the handle angular velocity? Does the deflection angle is linked with the handle sense of rotation? Explain.
Repeat the above experiment exactly, but rotate the generator counterclockwise. What is the result?
Elementary and Middle School
Electricity in circuits can produce light, heat, sound, and magnetic effects. Electrical circuits require a complete loop through which current can pass. Use electric currents to create magnetic fields.
Students know the role of electromagnets in the construction of electric motors, electric generators, and simple devices, such as doorbells and earphones.
Describe electron flow in simple circuits.
Students know how to design and build simple series and parallel circuits by using components such as wires, batteries, and bulbs.
High School
Energy is a property of many substances and is associated with heat, light, electricity, mechanical motion, sound, nuclei, and the nature of a chemical. Energy is transferred in many ways. The total energy of the universe is constant. Energy can be transferred by collisions in chemical and nuclear reactions, by light waves and other radiations, and in many other ways. however, it can never be destroyed. As these transfers occur, the matter involved becomes steadily less ordered. Electricity and magnetism are two aspects of a single electromagnetic force. Moving electric charges produce magnetic forces, and moving magnets produce electric forces. These effects help students to understand electric motors and generators. Measure the thermal and electrical conductivity of various materials and explain results.
Analyze the relationship between an electric current and the strength of its magnetic field using simple electromagnets. Investigate and compare series and parallel circuits.
FAQ
What is a capacitor, how does it work?
A capacitor is an electrical component which is composed of two plates separated by an electrical insulation. This component could function in two modes, the charge and the discharge. The charge occurs when there is a difference of potential across the conductors. It permit to store energy inside the generated electric field. In general, this kind of component is used for blocking the direct current and for letting pass the alternative one. They could be used to stabilize the voltage and the power flow in an electric power transmission.
What is a hand crank generator:
A hand crank generator is an engine which is used as a generator. It turns a mechanical energy into an electrical current. It is composed of three principal components which are the stator, the rotor and a rotary handle. The user will turn the rotary handle which will make turn a magnet inside a coil. Due to the rotation of the magnet, the electrical field turn and an electrical current will appear in the coil.
What will happen if I turn the hand crank handle in the wrong sense.
The hand crank generator could function in both senses as a lot of engine. The sense of rotation will just impact the sense of the current which is generated. However, you should be careful with the components which are connected to the generator. In fact, some components are polarized and they couldn't works in both sense.
What will happen if I connect the hand crank generator to the fan in the wrong sense?
Nothing bad, the fan is composed of a small engine which work in the same way than the generator but in the other sense (it turns an electrical current into a mechanical motion). If you pug the generator wires in the wrong sense, the fan will turn in the other sense than previously.
Do there is a special position to plug the generator to the potentiometer?
There is just one thing to know when you use a potentiometer, it should be wired in parallel with the component you want to measure the voltage.
What will happen if I connect the hand crank generator to the capacitor in the wrong sense? You will damage seriously the capacitor if you turn the handle when the wires are incorrectly plugged into the capacitor. In this way, you risk to break or crack the capacitor. Warning, if you connect the capacitor in the good way but you turn the hand crank generator handle in the wrong sense, you also risk to break the capacitor.
Troubleshooting
-
The bulb light on the hand crank generator does not work when I rotate the arm. Solution: Replace the bulb light. It could have been damaged by long time using.
-
The car does not run when I connect the capacitor to it. Solution: Charge the capacitor by using the battery pack or the hand crank generator.
Salt water fuel cell powered car
What you need:
a. Car Frame
b. Salt water fuel cell
c. Gradual container
d. Syringe and its tube
e. Wires
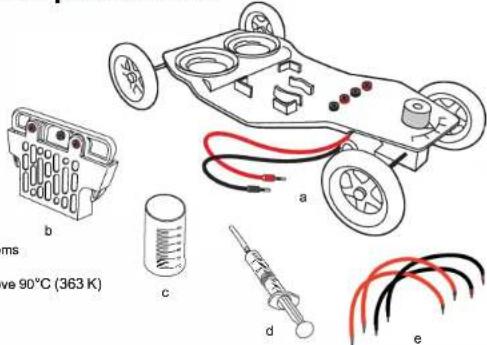
You will also need the following items
(not included in this kit):
- Purified or distilled hot water above 90°C (363 K)
- Salt (food grade) 50g
- Electronic balance
Important notes :
- Read carefully and clearly understand the instructions before assembling this kit.
- You can set the wheels position using the steering on the front of the car.
- Ensure that the electrical connections under the car are tight.
- The temperature of the purified or distilled hot water should be above 90°C.
- Take care with the hot water to not hurt yourself.
- Wearing waterproof gloves and glasses are highly recommended.
- After each use clean the anode plate to keep its best performance for later use.
- Store the anode plate and cathode tank in a dry place.
Prepare the water salted solution :
-
Weight 15 mg of salt using a balance. In the gradual container, put the salt and add 25ml of hot purified or distilled water. The water temperature should be above 90°C (363 K).
-
With a spoon, mix the container contents until the salt have been entirely melted into the water.
Sometime a small part of the salt stay in the solid state.
Preparing the fuel cell
a. Insert the fuel cell into the slot on the car frame. Press the lower part of the blue components you can see on each side of the fuel cell. By this way you can remove the fuel cell anode from the fuel cell tank.

natural_image
Diagram of a small wheeled vehicle with wheels, sensor array, and red wiring (no text or symbols)12

b. With the syringe, suck up some water salted solution and pour it into the cathode tank in order to fill 14 of the maximum tank level (about 15ml).

natural_image
Technical line drawing of a mechanical assembly with no visible text or symbolsc. Take the metal made anode and clips it into the cathode as show below

natural_image
Technical diagram of a mechanical assembly with no visible text or symbolsConnecting the wires into the cell.
a. Place the fuel cell in front of you in order to see three plugs.
b. Connect the small 10cm wire into left red plug and its other end into the right plug behind the
cell.

natural_image
Diagram of a small electric vehicle chassis with wheels and wiring, no text or symbols present13

c. Connect the car engine wires to the plugs on the car.
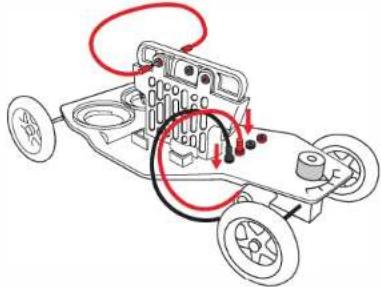
natural_image
Diagram of a car chassis with visible components and red arrows indicating motion or force (no text or symbols)d. Connect the black long wire in the central plug and the red on in the front red plug. Connect the other end of these wires into the car right plugs. The car starts to move. Ensure that you have connected the wires in the good sense. On the contrary, the car will go back.

natural_image
Diagram of a car's internal components with wiring and wheels, showing no text or symbolsNote: After long time running, the car speed will slow or stop. If you want to continue to run the car, you should pull out the anode metal plate to clean it up with the running water. Replenish some salt solution to the fuel cell tank. Place back the anode metal plate to the cathode fuel cell tank, the car will continue to run. After use, you should pull out the anode metal plate and clean up the fuel cell tank with the running water. Keep them dry for storage.
TROUBLESHOOTING
The car does not run.
Solution: 1. Make sure the connections are correctly done.
2. Try to clean the anode plate, if it still does not work polish the metal parts.
3. Change the anode plate.
4. Ensure you have replenished the salted solution into the tank.
Power a car using a fuel cell and a hydrogen storage
What you need:
a. CarFrame
b. Mini fuel cell
c. Wires
d. Tubes
e. Clamp
f. HYDROSTIK PRO
g. Purging valve
h. HYDROSTIK PRO pressure regulator
i. U fixator for HYDROSTIK PRO
You will also need the following items
(not included in this kit):
- HYDROFILL PRO for charging
the HYDROSTIK PRO
- Scissors

natural_image
Diagram of a car chassis with wheels and wiring, no text or symbols present
b

C

d e


f

g

h

1
Note: The HYDROSTIK PRO contains no hydrogen when you get it for the first time, you have to fully charge the HYDROSTIK PRO with the refilling station HYDROFILL PRO (not provided) or hydrogen charging tube (not provided). Or please contact your local dealer for detailed information.
HYDROSTIK PRO SAFETY INFORMATION
- DO NOT try to disassemble, open or repair the cartridges when broken or worn out!
• DO NOT store cartridges under direct sunlight. - Keep it away from fire. Fire Hazard!
- Keep in a safe place.
- Keep in a dry, cool place.
- Keep away from temperature above 50°C while filling, storage and using.
- Provide adequate ventilation and refrain from placing items on or around the appliance
during operation. Refrain from placing the appliance in enclosures or causing the appliance to not vent freely. - Keep away from alkaline and acidic environment.
■ This is not toy – keep away from children.
■ The cartridge must be placed horizontally when it is being charged otherwise the cartridge can crack!
■ HYDROSTIK PRO contents are flammable. Do not disassemble.
■ Avoid contact with HYDROSTIK PRO contents.
■ Remove the HYDROSTIK PRO from the pressure regulator immediately after use.
■ When using the appliance, basic safety precautions should be followed to reduce risk of fire, or personal injury. - Hydrogen shall be stored, handled and used with caution so life and health are not jeopardized and the risk
of property damage is minimized. - This appliance is not tested for use with medical devices.
■ Save these instructions and review frequently during use.
Preparing the hydrogen supply and the fuel cell
a. Pass the tube through the clamp and close this one as shown below.

b. Unscrew the bolt on the pressure regulator, and put it around the tube. Connect the end of the tube to the pressure regulator. Ensure the connection is tight, and then screw the bolt to the pressure regulator.


c. Put the purging valve on the 5 cm long tube and ensure the connection is thigh. Then, connect it to the nozzle you can see on bottom of the mini fuel cell.


d. Place the U fixator on the back of the car frame. Then put under the HYDROSTIK PRO in order to be sure that it is correctly blocked.

16

Horizon
Educational
e. Connect the other end of the pressure regulator tube to the fuel cell higher nozzle (close to the red plug). Then lightly screw the pressure regulator to the HYDROSTIK PRO. Stop to screw as soon as both parts fit together.

natural_image
Diagram of a small robot with attached wiring and a small mechanical component (no text or symbols)f. After this place the mini fuel cell on the slot located on the car frame top. Ensure they fit well.
g. onnect the car engine wires into its plugs.

h. Connect the two wires to the red and black plugs on the car frame. Connect the other end to the fuel cell. i. Open the clamp and finish to screw the pressure regulator to the HYDROSTIK PRO. Press the purging valve for two seconds and let a small amount of hydrogen pass through the mini fuel cell. The car will start to run.

natural_image
Line drawing of a small electric motor with red and black wiring, connected to wheels and a battery (no text or symbols)17

Horizon
Educational
Why Fuel Cells and Hydrogen?
Fuel cells can be thought of as alternative energy devices. They convert chemical energy into electrical energy. Hydrogen fuel cells do this very cleanly, with no toxic emissions, and with a high efficiency. Fuel cells do not generate energy out of thin air. They use hydrogen. Hydrogen is an outstanding carrier of energy. Hydrogen is non-toxic, renewable, easily obtained, and packed with energy. When it combusts with oxygen, it turns into water. This water can again be split into hydrogen and oxygen via electrolysis. The generated hydrogen can be combusted once again, thus undergoing a limitless cycle without toxic emissions. With a fuel cell, you can convert hydrogen into electric current without combustion.
Fossil fuels are converted into usable energy through combustion. The energy released during combustion is inherently difficult to capture and inefficient. It also produces carbon dioxide, which cannot easily be converted back into a usable fuel. A fossil fuel combustion engine at a power plant is only about 30 to 40% efficient. This means it coverts only 30 to 40% of the energy in the fossil fuels to usable energy (electricity). Engines in a car are even less efficient, and reach the level of 15 to 20% of efficiency. Where does the rest of the energy go? It escapes as heat, vibration, and noise.
On the other hand, fuel cells can operate at 40 to 65% efficiency. This means that they can convert 40 to 65% of the energy contained in hydrogen into electricity.

area
| Power (kW) | PEM Fuel Cell Efficiency (%) | Diesel Engine Efficiency (%) | Auto Engine Efficiency (%) | Gas Turbine Efficiency (%) | |------------|-------------------------------|-------------------------------|-----------------------------|-----------------------------| | 0 | 40 | 28 | 12 | 15 | | 10 | 50 | 30 | 15 | 20 | | 100 | 55 | 35 | 20 | 25 | | 1,000 | 60 | 40 | 25 | 30 | | 100,000 | 65 | 45 | 30 | 35 | | 100,000 | 70 | 50 | 35 | 40 |Troubleshooting
-
The car does not run after the HYDROSTIK PRO supplies hydrogen to the fuel cell. Solution: a. The car may need to be flicked with your finger to start.
b. Recharge the HYDROSTIK PRO fully.
c. Press the purging valve to purge a little bit amount of hydrogen out of the system.
d. Make sure the HYDROSTIK PRO is connected to the pressure regulator tightly. -
The car runs slower than before.
Solution: a. Recharge the HYDROSTIK PRO fully.
b. Press the purging valve to purge a little bit amount of hydrogen out of the system.

Horizon
Educational
For more information contact support@horizoneducational.com
Importer:
Horizon Fuel Cell Europe spot. s r. o.
Vadavske namešli
Praha 1, 110 00
Czech Republic
Manufacturer.
Jiangsu Horizon New Energy Technologies Ltd.
3th Floor, Block C, No.9 Guangdong Road, Zhangjiagang Free Trade Zone,
Jiangsu Province, China
www.horizonfuelcell.com

- Electric Mobility Experiment Set
- ASSEMBLY GUIDE
- CE
- Model No.: FCJJ-30
- Warning
- Battery opertaion instructions:
- List of Components
- Solar Powered Car
- What you need :
- Important notes :
- Hydrogen powered car
- what you need:
- Preparing the fuel Cell
- Troubleshooting
- Super capacitor powered car
- Load the capacitor
- Power the car with the electricity stored in the capacitor
- Note:
- ADVANTAGES of a Hand Crank Generator:
- Conduct dozens of exciting, hands-on experiments with the science kit
- Activities and uses
- High School
- FAQ
- What is a capacitor, how does it work?
- What is a hand crank generator:
- What will happen if I turn the hand crank handle in the wrong sense.
- What will happen if I connect the hand crank generator to the fan in the wrong sense?
- Do there is a special position to plug the generator to the potentiometer?
- Salt water fuel cell powered car
- Prepare the water salted solution :
- Connecting the wires into the cell.
- Power a car using a fuel cell and a hydrogen storage
- HYDROSTIK PRO SAFETY INFORMATION
- Preparing the hydrogen supply and the fuel cell
- Why Fuel Cells and Hydrogen?
- Horizon
- Educational
Marka : Horizon
Model : Electric Mobility Experiment Set
Kategoria : Kit éducatif scientifique