SFN 6040BL - Ventilateur domestique SENCOR - Bezpłatna instrukcja obsługi
Znajdź bezpłatnie instrukcję urządzenia SFN 6040BL SENCOR w formacie PDF.

| Typ produktu | Wentylator wieżowy |
| Model | Sencor SFN 6040BL |
| Wysokość | ok. 60 cm |
| Średnica podstawy | ok. 30 cm |
| Masa netto | 2,5 kg |
| Zasilanie | 220-240 V ~ 50 Hz |
| Pobór mocy | 40 W |
| Liczba prędkości | 3 (niska, średnia, wysoka) |
| Rodzaj sterowania | Pilot zdalnego sterowania i panel dotykowy |
| Oscylacja | Tak, w zakresie 80° |
| Funkcja timera | Tak, od 1 do 8 godzin |
| Tryb wiatru | Tryb normalny i tryb nocny |
| Wbudowany jonizator | Nie |
| Filtr powietrza | Brak |
| Poziom hałasu | ok. 35-50 dB (w zależności od prędkości) |
| Materiał obudowy | Tworzywo sztuczne |
| Kolor | Czarny/niebieski (BL) |
| Bezpieczeństwo | Automatyczne wyłączanie przy przewróceniu |
| Czyszczenie | Przecierać miękką, wilgotną szmatką; nie zanurzać w wodzie |
| Części zamienne | Pilot, zasilacz dostępne jako akcesoria |
| Gwarancja | 24 miesiące |
Często zadawane pytania - SFN 6040BL SENCOR
Pytania użytkowników dotyczące SFN 6040BL SENCOR
0 pytanie dotyczące tego urządzenia. Odpowiedz na te, które znasz, lub zadaj własne.
Zadaj nowe pytanie dotyczące tego urządzenia
Pobierz instrukcję dla swojego Ventilateur domestique w formacie PDF za darmo! Znajdź swoją instrukcję SFN 6040BL - SENCOR i weź swoje urządzenie elektroniczne z powrotem w ręce. Na tej stronie opublikowane są wszystkie dokumenty niezbędne do korzystania z urządzenia. SFN 6040BL marki SENCOR.
INSTRUKCJA OBSŁUGI SFN 6040BL SENCOR
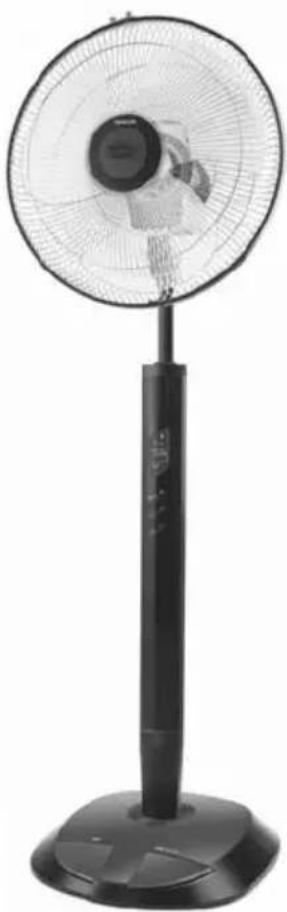
Pedestal Fan
User's manual
Z
natural_image
Black outdoor fan with a circular top and side-mounted stand, no visible text or symbolsSENCOR®
SFN 6040BL
Prior to using this appliance, please read the user's manual thoroughly, even in cases, when one has already familiarised themselves with previous use of similar types of products. Use the appliance only as described in this manual. Keep this manual for later use.
We recommend saving the original shipping cardboard box, packaging material, receipt and warranty card for the duration of warranty. In the case of transportation, pack the appliance using the original packaging materials only.
EN-1
CONTENTS
IMPORTANT SAFETY INSTRUCTIONS 3
FAN DESCRIPTION. 4
DESCRIPTION OF THE REMOTE CONTROL 5
DESCRIPTION OF THE DISPLAY AND CONTROL BUTTONS....6
FAN ASSEMBLY....7
BEFORE FIRST USE 8
FAN OPERATION....9
USE OF THE AIR FRESHENER (OPTIONAL) 11
MAINTENANCE AND CLEANING 11
TECHNICAL SPECIFICATIONS 11
INSTRUCTIONS AND INFORMATION REGARDING THE DISPOSAL OF USED PACKAGING MATERIALS . 12
DISPOSAL OF USED BATTERIES 12
DISPOSAL OF USED ELECTRICAL AND ELECTRONIC APPLIANCES 12
IMPORTANT SAFETY INSTRUCTIONS READ CAREFULLY AND STORE IT FOR FUTURE USE.
- This appliance must not be used by persons (including children) with physical or mental impairments or by inexperienced persons, unless properly trained or schooled in the safe use of the appliance, or unless they have been properly supervised by a qualified person who will be responsible for their safety.
- Children must be supervised to ensure that they do not play with the appliance or its remote control.
- Before connecting the appliance to a power socket check that the technical details on the appliance label match the electrical voltage in the socket.
- Connect the appliance only to a properly grounded socket.
• To prevent the overheating of the appliance, do not cover with any items.
• The appliance is designed for use in households, offices and similar types of areas. - Do not use the appliance in very dusty or humid rooms such as laundries or bathrooms, in areas where chemicals are stored, in industrial surroundings or outdoors!
- Do not place the appliance in the vicinity of an open flame or appliances that are sources of heat.
- Do not place the appliance on unstable surfaces such as carpets with very long and thick fibres. Always place the appliance on an even, dry surface.
- To prevent potential injury by electric shock, do not submerge any part of this appliance under water or any other liquid.
- Do not insert any items though the protective grill. A electrical short circuit could occur, a fire might start or the appliance may be damaged.
- Always turn off the appliance and disconnect from the power socket, if you will not be using it and before assembly, disassembly or cleaning.
- Do not disconnect the appliance from the power socket by pulling on the power cord. This could damage the power cord or the power socket. Disconnect the cord from the power socket by gently pulling the plug of the power cord.
• Make sure the power cord does not hang over the edge of a table, or that it is not touching a hot surface. - It is forbidden to use the appliance if it has a damaged power cord or plug. In case the power cord is damaged, have it replaced at a expert service centre.
- Do not use the appliance if it is not working correctly, if it has been damaged or has been submerged in water. To avoid the danger of injury by electrical shock, do not repair the appliance yourself or make any adjustments to it. Have all repairs or adjustments of the appliance done at an authorised service centre. Tampering with the appliance during the warranty period may void the warranty policy.
- Do not expose yourself to a cold air current for a long time. This could have a negative effect on your health.
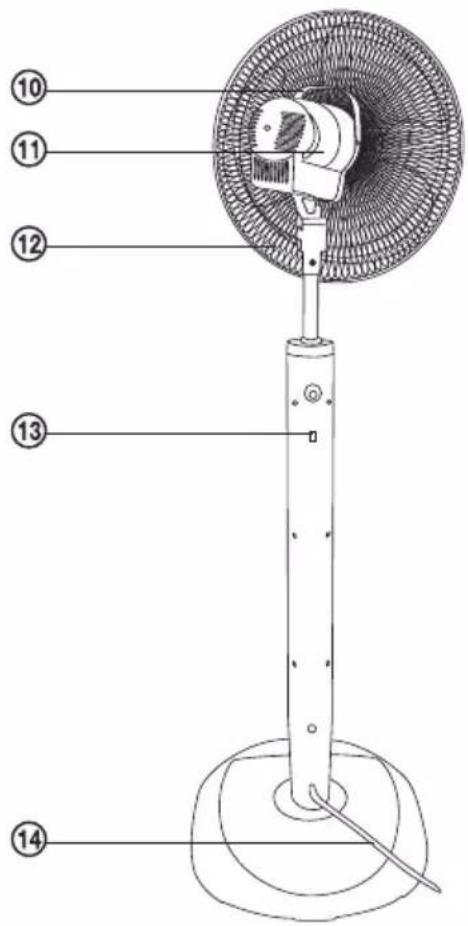
FAN DESCRIPTION
A
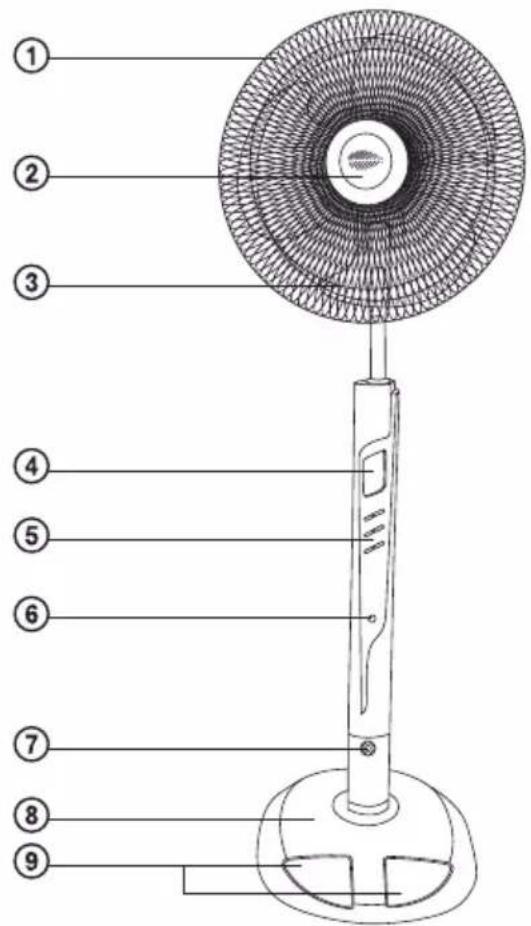
① Front protective grill
② Cover of the compartment for the placement of a solid air freshener
③ Fan blades
④ Display
⑤ Control buttons
⑥ Remote control signal receiver
⑦ Ioniser
⑧ Base
⑨ Pedal control buttons
⑩ Carry handle of the fan
⑪ Motor unit
⑫ Rear protective grill
⑬ Remote control hanging hook
⑭ Power cord
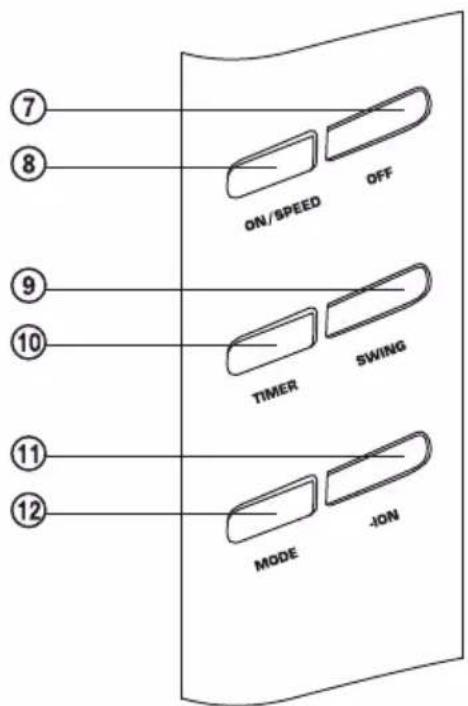
DESCRIPTION OF THE REMOTE CONTROL
B
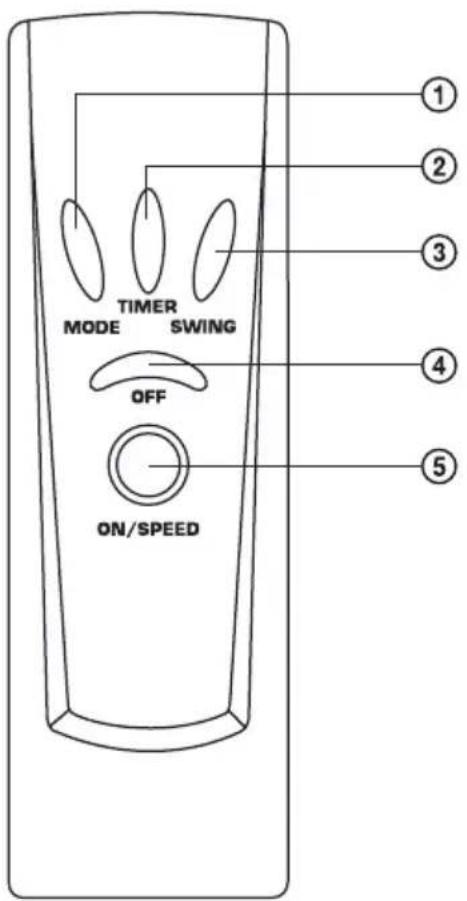
① MODE button
Setting an operating mode
② TIMER button
Setting the auto-off timer
③ SWING button
Setting automatic oscillation
④ OFF button
Turning the fan off
⑤ ON/SPEED button
Turn on the fan and set the speed
DESCRIPTION OF THE DISPLAY AND CONTROL BUTTONS
C
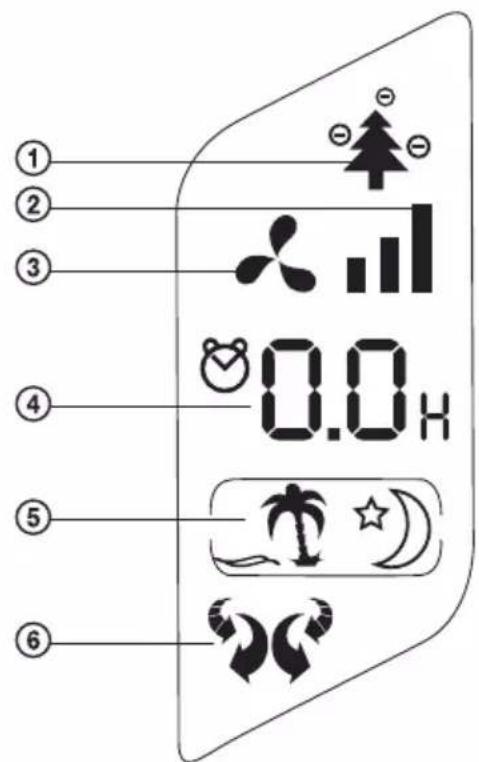
① Ionisation symbol
② Fan speed display
③ Fan On symbol
④ Display of the set automatic shut off time
⑤ Display of the operating mode
⑥ Automatic oscillation symbol
⑦ OFF button
Turning the fan off
⑧ ON/SPEED button
Turn on the fan and set the speed
⑨ SWING button
Setting automatic oscillation
⑩ TIMER button
Setting the automatic shut-off timer
⑪ -ION button
Activation of ionisation
⑫ MODE button
Setting an operating mode
FAN ASSEMBLY
D
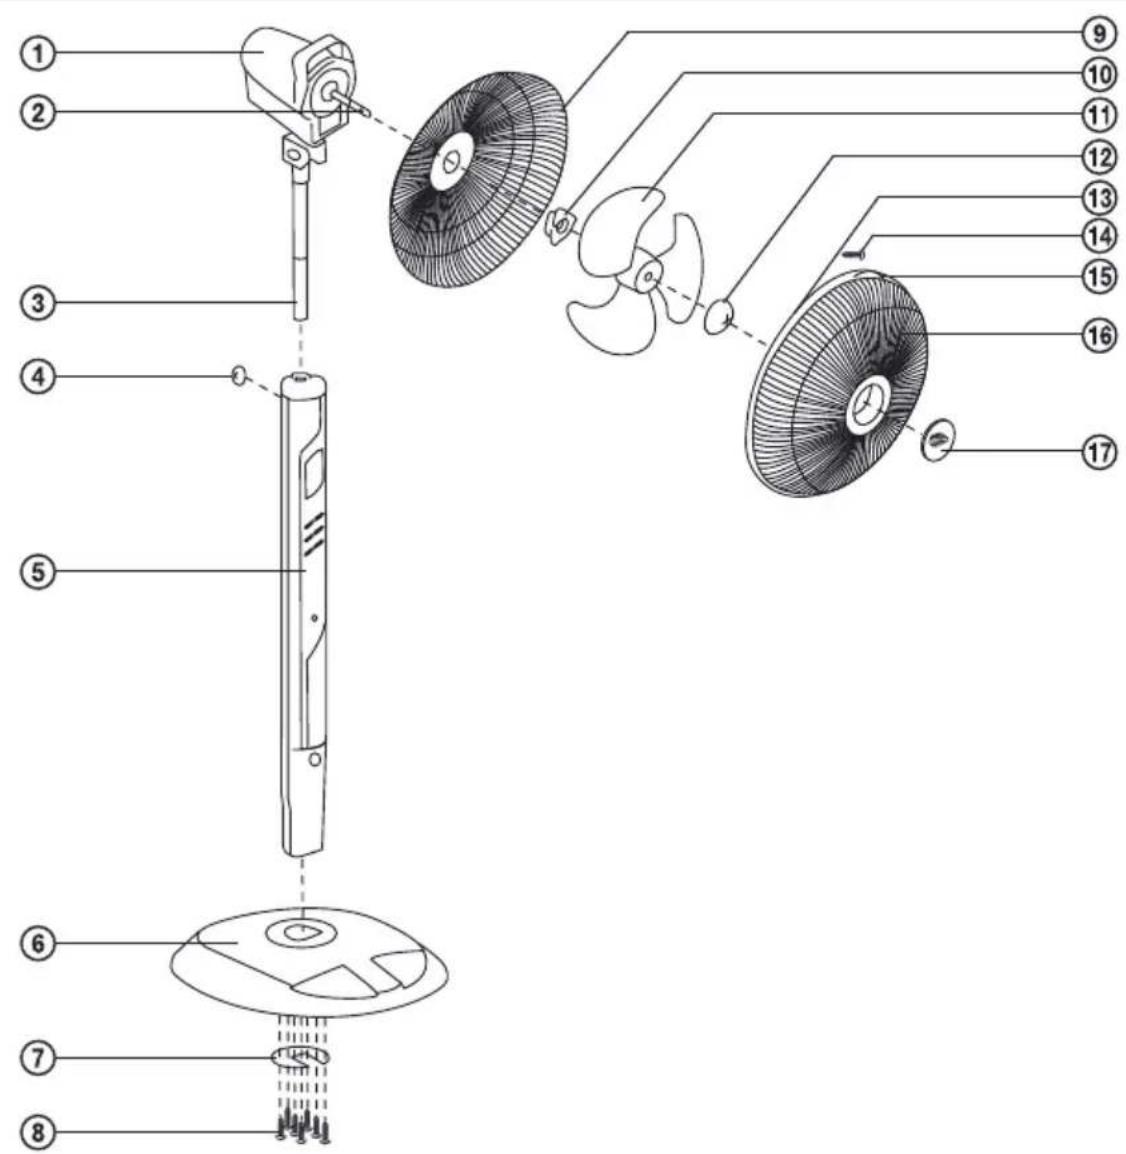
① Motor unit
② Motor shaft
③ Connecting rod
④ Fastening nut
⑤ Control panel
⑥ Base
⑦ Metal washer
⑧ Screws
⑨ Rear protective grill
⑩ Rear safety grill fastening nut
⑪ Fan blades
⑫ Fan blade fastening nut
⑬ Perimeter band for joining the front and rear grill
⑭ Screw for connecting the front and the rear grill
⑮ Connection lock for the front and the rear grill
⑯ Front protective grill
⑰ Cover of the compartment for the placement of a solid air freshener
- Insert the fan control panel ⑤ into the opening in the base ⑥. Place the metal washer ⑦ on the underside of the base. Using eight screws ⑧ attach the control panel to the fan base and with another three screws secure the metal washer. The screws must be firmly tightened to prevent the fan from falling over during operation.
- Place the base with the control panel on an even and stable surface. On to the control panel ⑤ attach the connecting rod ③ and secure it with a fastening nut ④.
- Place the rear protective grill ⑨ against the front side of the motor unit ① so that all the alignment nibs on the front side of the motor slide into the round openings in the central part of the rear grill. Using the fastening nut ⑩ fasten the rear protective grill to the motor unit.
- Slide the fan blades ⑪ on to the motor shaft ② and move them towards the motor unit until the shaft slips into the middle part of the blades. Using the fastening nut ⑫ fasten the fan blades to the shaft. Now check that the fan blades turn freely. If the blades are jamming, disassemble the assembled part and repeat the procedure.
- Using the perimeter band ⑬ attach the front protective grill ⑯ to the rear protective grill ⑨. Both grills must be firmly connected along the entire perimeter. Clamp down the connection lock ⑮ and secure using a screw ⑭.
- Before putting the fan into operation, check that it is correctly assembled and that the protective grills are firmly joined.
BEFORE FIRST USE
• Take the appliance and its accessories out of the packaging materials.
• Assemble the fan according to the instructions included in chapter Fan Assembly.
• Take the remote control and open the battery compartment cover. Insert two 1.5V AAA alkaline batteries according to the polarity shown in the battery compartment.
Note: Do not install the batteries into the remote control if you will not be using it for an extended period of time.
Remote control
E
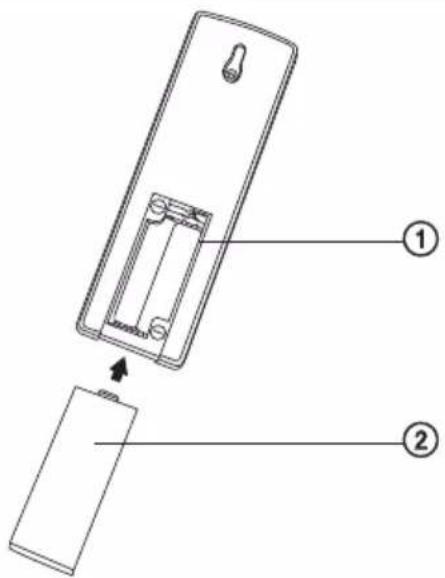
① Battery compartment
② Battery compartment cover
- Connect the fan to a power socket.
EN-8
FAN OPERATION
1. TURNING ON AND SETTING THE FAN SPEED
1.1 To turn on the appliance press the ON/SPEED button. The display will show a symbol which will be on as long as the fan is in operation.
1.2 When it is first turned on the fan will rotate at a low speed. The symbol ■ will be shown on the display.
1.3 If the ventilator is in operation, use the ON/SPEED button to control the fan speed at three levels: low, medium and high. The fan speed is shown on the display as follows:
■ (low speed), ■ (medium speed), ■ (high speed).
1.4 For easier control using your foot there is a pedal ON/SPEED button.
2. SELECTING AN OPERATING MODE
2.1 The MODE button is used to select the operating mode from the menu: natural air circulation → sleep → combination of the natural air circulation and sleep.
2.2 If you set the mode to natural air circulation the display will show the symbol 📂. With respect to the default fan speed setting this operating mode is programmed in the following three levels:
| Initial speed | Program |
| High || | The high, medium, low speeds and fan off cycle. |
| Medium || | The medium, low speeds and fan off cycle. |
| Low ■ | The low speed and fan off cycle. |
2.3 If you set the mode to sleep the display will show the symbol ⚙). With respect to the default fan speed setting this operating mode is programmed in the following three levels:
| Initial speed | Program |
| High ▪ | The fan is operating at high speed. After 30 minutes of operation the fan speed goes down to the medium speed. After another 30 minutes of the fan speed goes down to the slow speed. |
| Medium ▪ | The fan is operating at medium speed. After 30 minutes of operation the fan speed goes down to the low speed. |
| Low ▪ | The fan is operating at low speed. |
2.4 If you set the mode to a combination of natural air circulation and sleep, the display will show the symbols 📁⭐⭐⭐. With respect to the default fan speed setting this operating mode is programmed in the following three levels:
| Initial speed | Program |
| High ▪ | The high, medium, low speeds and fan off cycle. After 30 minutes of operation the medium, low speeds and fan off cycle. After a further 30 minutes the time intervals of the low speed are increased and the low, medium speeds and fan off cycle. |
| Medium ▪ | The medium, low speeds and fan off cycle. After 30 minutes of operation the time intervals of the low speed are increased and the low, medium speeds and fan off cycle. |
| Low ▪ | The low speed and fan off cycle. |
3. SETTING AUTOMATIC OSCILLATION
3.1 To activate automatic oscillation press the SWING button. The head of the fan will oscillate horizontally and symbol will be shown on the display.
3.2 By pressing the SWING button a second time you change the fan to the oscillation mode in the vertical direction. The symbol 🏠 will be shown on the display.
3.3 By pressing the SWING button a third time the horizontal and vertical functions will combine. The symbol 🎨 will be shown on the display.
3.4 By pressing the SWING button again you will turn off the automatic oscillation function and the symbol 📋 will be shown on the display.
4. SETTING THE SHUT OFF TIMER
The TIMER button is used to set the automatic shut off timer in the range of 0.5-7.5 hours. Each time the TIMER button is pressed the automatic shut off time is increased by 0.5 hours. The set time will appear on the display. Every 30 minutes the remaining time until shut off is updated on the display. After the set time is reached the fan will shut itself off.
5. IONISATION FUNCTION
5.1 Press the -ION button to activate the built-in ioniser and the symbol ⚙ will appear on the display. The negative ion symbols ⭕ will gradually turn on and off.
5.2 By pressing the -ION button again you will turn off the ionisation function and the symbol will be shown on the display.
IONISATION AND ITS POSITIVE EFFECTS
Ions are among the many factors that significantly affect air quality. Whereas in nature, such as in a forest, in the mountains, by the sea, we breathe clean air with a concentration of up to 10,000 negative ions per cm ^3 , in the polluted city air and in closed and insufficiently ventilated rooms the concentration of negatively charged ions approaches zero and there are more positive ions. The loss of negative ions caused by the use of television screens, monitors, photocopiers, printers, etc. is not insignificant. An excess of positive ions in the air which you breathe causes headaches, higher blood pressure, nervousness, fatigue, etc.
We therefore recommend the use of an ioniser, which within a short time creates a large number of negative ions that are beneficial to your health. Air that has been ionised in this way supports the function of the brain, lowers high blood pressure, improves memory and concentration.
6. TURNING OFF
6.1 The OFF button is used to turn off the fan.
6.2 For easier foot control there is the OFF pedal button.
7. USING THE REMOTE CONTROL
The functions of the remote control buttons are the same as those of the buttons on the fan's control panel. Note: Unlike the fan's control panel the remote control is not equipped with the -ION button.
If you wish to use the remote control, point it approximately to the level of the signal receiver, which is located under the control buttons of the fan. The maximum signal range of the remote control is 6 m. Note. If there are obstacles located between the remote control and the signal receiver, the signal may not be transmitted.
8. SAFETY OFF FUNCTIONS
If the fan is in operation and you touch the protective grill, the fan blades will automatically be stopped and symbols on the display will start to flash. This is a safety function. If you take your hand off the grill, the activity of the fan will restart within 5–10 seconds.
9. MANUAL SETTING OF THE AIR FLOW DIRECTION
You can change the air flow direction by turning the motor unit. The motor unit may only be moved at a limited angle. Do not turn the motor unit by force.
USE OF THE AIR FRESHENER (OPTIONAL)
To freshen the air in a room it is possible to use a solid air freshener that is commonly sold in stores. Remove cover ②, see pic. A. Insert the air freshener and close the cover.
MAINTENANCE AND CLEANING
• Before cleaning, turn off the fan and disconnect the power cord from the power socket.
- Wipe the surface of the fan using a clean and dry wipe. For cleaning do not use cleaning products causing abrasion, petrol and other solvents.
- If you will not be using the fan for an extended period of time, store it in a clean, dry place or disassemble it and put it back into the box.
TECHNICAL SPECIFICATIONS
| Nominal voltage | 220–240 V |
| Nominal frequency | 50 Hz |
| Rated power input | 60 W |
| Noise level | 50 dB(A) |
The declared noise emission level for this appliance is 50 dB(A), which represents level A of the acoustic power relative to the reference acoustic power of 1 pW.
We reserve the right to change text and technical specifications.
INSTRUCTIONS AND INFORMATION REGARDING THE DISPOSAL OF USED PACKAGING MATERIALS
Dispose of packaging material at a public waste disposal site.
DISPOSAL OF USED BATTERIES
Batteries contain environmentally damaging compounds and therefore do not belong in standard household waste. Take the batteries to an appropriate collection point, which will provide for their ecological disposal. You can obtain the contact for the nearest collection point from you town council or from your retailer.
DISPOSAL OF USED ELECTRICAL AND ELECTRONIC APPLIANCES
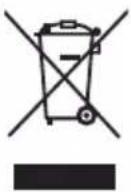
The meaning of the symbol on the product, its accessory or packaging indicates that this product shall not be treated as household waste. Please, dispose of this product at your applicable collection point for the recycling of electrical & electronic equipment waste. Alternatively in some states of the European Union or other European states you may return your products to your local retailer when buying an equivalent new product. The correct disposal of this product will help save valuable natural resources and help in preventing the potential negative impact on the environment and human health, which could be caused as a result of improper liquidation of waste. Please ask your local authorities or the nearest waste collection centre for further details. The improper disposal of this type of waste may fall subject to national regulations for fines.
For business entities in the European Union
If you wish to dispose of an electrical or electronic device, request the necessary information from your seller or supplier.
Disposal in other countries outside the European Union
If you wish to dispose of this product, request the necessary information about the correct disposal method from local government departments or from your seller.
This product meets all the basic EU regulation requirements that relate to it.