TST-60SD-18M-N-RW - Lodówka Turbo air - Bezpłatna instrukcja obsługi
Znajdź bezpłatnie instrukcję urządzenia TST-60SD-18M-N-RW Turbo air w formacie PDF.

Pytania użytkowników dotyczące TST-60SD-18M-N-RW Turbo air
0 pytanie dotyczące tego urządzenia. Odpowiedz na te, które znasz, lub zadaj własne.
Zadaj nowe pytanie dotyczące tego urządzenia
Pobierz instrukcję dla swojego Lodówka w formacie PDF za darmo! Znajdź swoją instrukcję TST-60SD-18M-N-RW - Turbo air i weź swoje urządzenie elektroniczne z powrotem w ręce. Na tej stronie opublikowane są wszystkie dokumenty niezbędne do korzystania z urządzenia. TST-60SD-18M-N-RW marki Turbo air.
INSTRUKCJA OBSŁUGI TST-60SD-18M-N-RW Turbo air
Turbo air Speeds Up the Pace of Innovation
REFRIGERATOR MANUFACTURER Turbo air
Mega Top Sandwich Salad Unit Sandwich Salad Unit Undercounter Refrigerator/Freezer Installation and Operation Manual
Please read this manual completely before attempting to install or operate this equipment!
natural_image
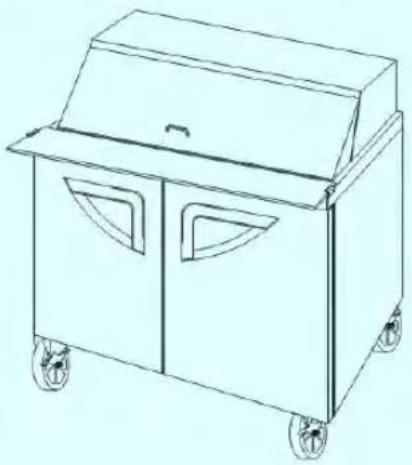
Line drawing of a two-door industrial cart with wheels and doors (no text or symbols)TST-28SD-12, TST-28SDL-12
TST-36SD-15, TST-48SD-18
TST-60SD-24, TST-72SD-30
natural_image
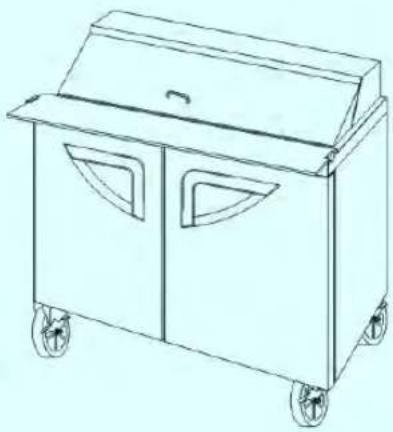
Line drawing of a two-door industrial trash bin with wheels, no text or symbols presentTST-28SD, TST-28SDL
TST-36SD, TST-48SD
TST-60SD, TST-72SD

natural_image
Line drawing of a two-door industrial cabinet with wheels, no text or symbols presentTUR-28SD*, TUR-28SDL, TUR-36SD
TUR-48SD, TUR-60SD, TUR-72SD
TUF-28SD, TUF-28SDL, TUF-48SD
TUF-60SD
Full Stainless Steel Visible Exterior
CONTENTS
PAGE
- SPECIFICATION 2
- SERIAL NUMBER 2
- INSTALLATION OF CASTORS 3
- INSTALLATION OF DRAIN PAN 4
- HOW TO CLEAN THE PAN SUPPORTER 5
- INSTALLATION 6
- CLEANING & CAUTION 7
- BASIC OPERATION 8
- BEFORE REQUESTING SERVICE 9
- WARRANTY 10\~11
- STAINLESS STEEL EQUIPMENT CARE AND CLEANING 11\~13
SPECIFICATION
Mega Top Sandwich Salad Unit
| MODEL | COMP H.P | V/Hz | REFRIGERANT | AMPS | WEIGHT |
| TST-28SD-12 | 1/3 | 115V/60Hz | R-134a | 6.6A | 220lb |
| TST-28SDL-12 | 1/3 | 115V/60Hz | R-134a | 6.6A | 220lb |
| TST-36SD-15 | 1/3 | 115V/60Hz | R-134a | 6.6A | 243lb |
| TST-48SD-18 | 1/3 | 115V/60Hz | R-134a | 6.5A | 265lb |
| TST-60SD-24 | 1/2 | 115V/60Hz | R-134a | 8.9A | 353lb |
| TST-72SD-30 | 1/2 | 115V/60Hz | R-134a | 9.9A | 397lb |
Sandwich Salad Unit
| MODEL | COMP H.P | V/Hz | REFRIGERANT | AMPS | WEIGHT |
| TST-28SD | 1/3 | 115V/60Hz | R-134a | 6.6A | 198lb |
| TST-28SDL | 1/3 | 115V/60Hz | R-134a | 6.6A | 198lb |
| TST-36SD | 1/3 | 115V/60Hz | R-134a | 6.6A | 220lb |
| TST-48SD | 1/3 | 115V/60Hz | R-134a | 6.5A | 243lb |
| TST-60SD | 1/2 | 115V/60Hz | R-134a | 8.9A | 331lb |
| TST-72SD | 1/2 | 115V/60Hz | R-134a | 9.9A | 375lb |
Undercounter Refrigerator
| MODEL | COMP H.P | V/Hz | REFRIGERANT | AMPS | WEIGHT |
| TUR-28SD* | 1/3 | 115V/60Hz | R-134a | 6.6A | 187lb |
| TUR-28SDL | 1/3 | 115V/60Hz | R-134a | 6.6A | 187lb |
| TUR-36SD | 1/3 | 115V/60Hz | R-134a | 6.6A | 198lb |
| TUR-48SD | 1/3 | 115V/60Hz | R-134a | 6.5A | 231lb |
| TUR-60SD | 1/3 | 115V/60Hz | R-134a | 8.9A | 287lb |
| TUR-72SD | 1/2 | 115V/60Hz | R-134a | 9.9A | 353lb |
Undercounter Freezer
| MODEL | COMP H.P | V/Hz | REFRIGERANT | AMPS | WEIGHT |
| TUF-28SD | 1/3 | 115V/60Hz | R-134a | 4.5A | 187lb |
| TUF-28SDL | 1/3 | 115V/60Hz | R-134a | 4.5A | 187lb |
| TUF-48SD | 1/2 | 115V/60Hz | R-404a | 8.0A | 231lb |
| TUF-60SD | 1/2 | 115V/60Hz | R-404a | 8.0A | 287lb |
SERIAL NUMBER
The serial number is located on the rating label which is on the left interior wall. Please retain the unit's serial number for service purpose.
INSTALLATION OF CASTORS
1) Screw the castor (in rear side) and the castor brakes (in front side) by using castor wrench.
2) Use the castor shims to level the cabinet, if necessary, by inserting them to stems of the castors.

text_image
CABINET DOOR ROTATION CASTOR (2EA) CASTOR(WITH BRAKE) (2EA)INSTALLATION OF DRAIN PAN
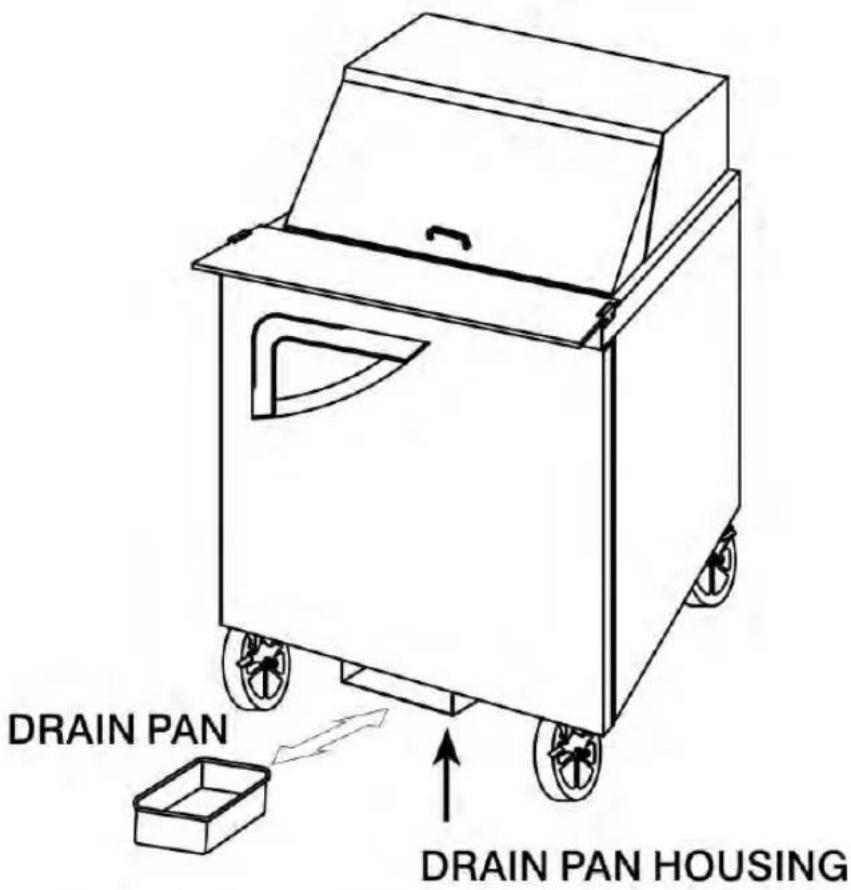
1) In damp season, when the drain water overflow the drain pan, remove the drain pan and pour the water away. And then set the drain pan back up as below drawing please. (Model:TST-28SD-12, TST-28SD, TUR-28SD*, TUF-28SD, TST-28SDL-12, TST-28SDL, TUR-28SDL, TUF-28SDL)
text_image
DRAIN PAN DRAIN PAN HOUSINGMODEL
TST-28SD-12, TST-28SDL-12
TST-28SD, TST-28SDL
TUR-28SD*, TUR-28SDL
TUF-28SD, TUF-28SDL
text_image
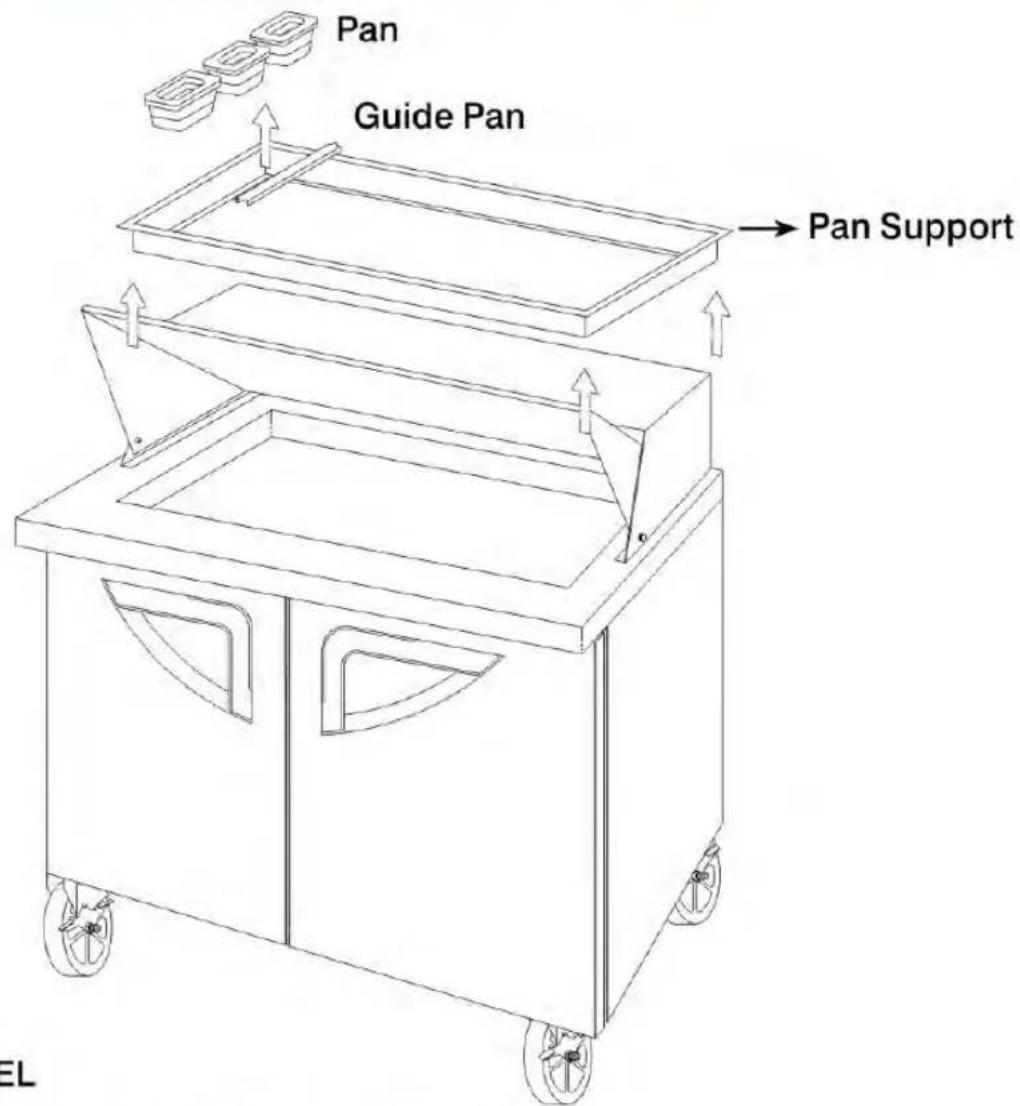
Pan Guide Pan Pan Support ELMODEL
TST-28SD-12, TST-28SDL-12, TST-36SD-15
TST-48SD-18,TST-60SD-24,TST-72SD-30
TST-28SD,TST-28SDL,TST-36SD
TST-48SD, TST-60SD, TST-72SD
1) Remove the Guide Pans and Pans. Then pull out the Pan Supporter. Clean the pan supporter and reinstall in place.
INSTALLATION
1. GOOD AIR CIRCULATION
- Be sure to avoid any object which may stop the air flow.
- Be sure that there is ample air space so that air can flow through the rear of the unit.
- Turbo Air recommends that the rear of the unit be no less than 5 inches from the wall.
2. PLACE ON STRONG GROUND
- Be sure the location chosen has a strong enough floor to support the total weight of the cabinet and any other contents.
3. DO NOT PLACE NEAR HEAT
- Be sure to avoid hot corners and locations near stoves.
- High ambient temperature will make much lower cooling efficiency.
4. INDOOR USAGE ONLY
- Be sure to install this unit indoor.
- So, it should prohibit getting wet from the rain.
5. STABILIZING
- Make sure the unit is installed in a stable conditon with the front wheels locked while in use.
6. LEVELING
- Be sure that the unit is level from front to back and side to side.
- UNIT SHOULD BE ON DEDICATED OUTLET.
CLEANING
1. CLEANING THE INTERIOR AND EXTERIOR
- The interior and exterior of the unit can be cleaned using warm water with soap.
- Do not use an abrasive cleaner because it will scratch the surface.
2. COMPRESSOR AND CONDENSER
- Be sure to keep the condenser coil must be free of dust because of cooling effect higher.
3. CLEAN THE GASKET
- The door gasket should be cleaned frequently to maintain proper sealing.
4. CHECK AFTER CLEANING
- Check the unit again for safety.
- Check that the unit is operating properly.
CAUTION
1. POWER CORD
- Be sure the power cord is connected to the proper voltage.
- A protected circuit of the correct voltage and amperage must be run for connection of the line cord.
- Turn' off 'the power switch before disconnecting the power cord, whenever performing maintenance functions or cleaning the refrigerated cabinet.
- Compressor warranties are void if compressor burns out due to low voltage.
2. RE-STARTING
- If disconnected, wait 5 minutes before re-starting.
BASIC OPERATION
TST-28SD-12, TST-28SDL-12, TST-36SD-15, TST-48SD-18, TST-60SD-24, TST-72SD-30 TST-28SD, TST-28SDL, TST-36SD, TST-48SD, TST-60SD, TST-72SD TUR-28SD*, TUR-28SDL, TUR-36SD, TUR-48SD, TUR-60SD TUR-72SD TUF-28SD, TUF-28SDL, TUF-48SD, TUF-60SD
- The controller (thermostat) is located at the top inside of the unit.
- The factory setting for the control is 'Normal'.
- Setting toward "Cool" for higher temperature and "Cold" for lower temperature.
- The thermostat controls compressor's on/off by sensing inside temperature.

text_image
NORMAL COLD COOL OFF- If thermostat knob is pointing at OFF, compressor and condenser fan motor would not run.
- Keep unit unplugged, if not in use for a long period of time.
BEFORE REQUESTING SERVICE
| SYMPTOMS | CAUSES | SOLUTIONS |
| Refrigerator(Freezer) is frozen. | The setting temperature is too low to maintain food freshness. | Turn the temperature dial to a warmer setting. |
| The unit does not refrigerate at all. | There is a power connection failure problem. | Check the power cord to make sure the unit is plugged in it correctly. |
| The unit does not refrigerate well. | The unit is in sunlight or near a heating device.The unit contains hot food or too much food.The unit door is opened too frequently or left open too long.The temp. dial is not on the correct position.The condenser is clogged. | Move out of sunlight or away from heater.Check the condition of stored food.Check the position of the temp control dial. |
| There is a loud noise. | The floor is too weak or the leveling feet are set incorrectly.The backside of the unit is too close to the wall.The tray is not in the correct position. | Check the installation and adjust the tray position. |
| There are dew-drops on the unit exterior. | High-moisture air can produce dewdrops during rainy seasons. | Wipe with a dry cloth. |
| There are dew-drops on the unit interior. | The door is opened too frequently or left open too long.Damp food is stored. | Keep the door closed to remove dewdrops. |
| The door does not close tightly. | The door is bent.The unit is not level.The door gasket has come out. | Level the unit again.Reposition the gasket. |
The following points are not malfunctions:
- A water-flowing sound can be heard when the compressor stops. This is the sound of REFRIGERANT flowing.
Warranty
REFRIGERATOR MANUFACTURER Turbo air
Warranty Claims ...
All claims for parts or labor must be made directly through Turbo Air.
All claims should include : model number of the unit,the serial number of the cabinet,proof of purchase,date of installation,
and all pertinent information supporting the alleged defect.
In case of compressor replacement under warranty, either compressor or compressor tag must be returned to Turbo Air along
with above listed information.
Failure to comply with warranty policies will result in voiding claims.
One Year Parts & Labor Warranty...
Turbo Air warrants all new refrigerated components, the cabinet and all parts, to be free from defects in materials or workmanship,
under normal and proper use and maintenance service as specified by Turbo Air and upon proper installation and start-up in
accordance with the instruction packet supplied with each Turbo Air unit. Turbo Air's obligation under this warranty is limited to
a period of one (1)year from the date of original installation or 15 months after shipment date from Turbo Air,whichever occurs first.
Any part, covered under this warranty, that are by Turbo Air to have been defective within one (1) year of original installation or fifteen
(15)months after shipment date from manufacturer, whichever occurs first, is limited to the repair or replacement, including labor
charges, of defective parts or assemblies. The labor warranty shall include standard straight time labor charges only and reasonable
travel time,as determined by Turbo Air.
Additional Four Year Compressor Warranty...
In addition to the one (1) year warranty stated above, Turbo Air warrants its hermetically sealed compressor to be free from defects in
both material and workmanship under normal and proper use and maintenance service for a period of four (4) additional years from
the date of original installation, but not to exceed five (5)years and three (3) months after shipment from the manufacturer.
Compressor determined by Turbo Air to have been defective within this extended period will, at Turbo Air's discretion, be either repaired
or replaced with a compressor or compressor parts of similar design and capacity.
The four (4)year extended compressor warranty applies only to hermetically sealed parts of the compressor and does not apply to any
other parts or components, including, but not limited to, cabinet, paint finish, temperature control, refrigerant, metering device, driers,
motor starting equipment, fan assembly or and other electrical components, etcetera.
404A / 134A Compressor Warranty...
The four-year compressor warranty detailed above will be void if the following procedure is not carefully adhered to:
- This system contains R404A or R134A refrigerant and polyol ester lubricant. The polyol ester lubricant has rapid moisture
absorbing qualities.
-
Drier replacement is very important and must be changed when a system is opened for servicing.A620 copper drier or better is highly recommended.
-
Micron level vacuums must be achieved to insure low moisture levels in the system. 500 microns or lower must be obtained.
-
When compressor is grounded, suction drier and 620 drier or better must be replaced.
-
Compressor must be obtained through Turbo Air, unless otherwise specified in writing, through Turbo Air's warranty department.
What Is Not Covered By This Warranty
What is Not Covered by this Warranty...
Turbo Air's sole obligation under this warranty is limited to either repair or replacement of parts, subject to the additional limitations below. This warranty neither assumes nor authorizes any person to assume obligations other than those expressly covered by this warranty. NO CONSEQUENTIAL DAMAGES.TURBO AIR IS NOT RESPONSIBLE FOR ECONOMIC LOSS; PROFIT LOSS OR SPECIAL,INDIRECT,ORCONSEQUENTIAL DAMAGES,INCLUDING WITHOUT LIMITATION,LOSSES, OR DAMAGES ARISING FROM FOOD OR PRODUCT SPOILAGE REGARDLESS OF WHETHER OR NOT THEY RESULT FROM REFRIGERATION FAILURE.WARRANTY IS NOT TRANSFERABLE This warranty is not assignable and applies only in favor of the original purchaser/ user to whom delivered.ANY SUCH ASSIGNMENT OR TRANSFER SHALL VOID THE WARRANTIES HEREIN AND SHALL VOID ALL WARRANTIES,EXPRESS OR IMPLIED,INCLUDING ANY WARRANTY OF MERCHANTABILITY OR LABOR COVERAGE FOR COMPONENT FAILURE OR OTHER THE WARRANTY PACKET PROVIDED WITH THE UNIT.ALTERNATION,NEGLECT,ABUSE,MISUSE,ACCIDENT,DAMAGE DURING TRANSIT OR INSTALLATION,FIRE,FOOD,ACTS OF GOD.Turbo Air is not responsible for the repair or replacement of any parts that Turbo Air determines have been subjected after the date of manufacture to alteration,neglect,abuse,misuse,accident,damage during transit or installation,fire,flood,or act of GOD.IMPROPER ELECTRICAL CONNECTIONS.TURBO AIR IS NOT RESPONSIBLE FOR THE REPAIR OR REPLACEMENT OF FAILED OR DAMAGED COMPONENTS RESULTING FROM ELECTRICAL POWER FAILURE,THE USE OF EXTENSION CORDS,LOW VOLTAGE,OR VOLTAGE DROPS TO THE UNIT.NO IMPLIED WARRANTY OF MERCHANTABILITY OR FITNESS FOR A PARTICULAR PURPOSE:THERE ARE NO OTHER WARRANTIES, EXPRESSED,IMPLIED OR STATUTORY,EXCEPT THE ONE(1)YEAR PARTS & LABOR WARRANTY AND THE ADDITIONAL FOUR(4)YEAR COMPRESSOR WARRANTY AS DESCRIBED ABOVE. THESE WARRANTIES ARE EXCLUSIVE AND IN LIEU OF ALL OTHER WARRANTIES, INCLUDING IMPLIED WARRANTY AND MERCHANTABILITY OR FITNESS FOR A PARTICULAR PURPOSE.THERE ARE NO WARRANTIES, WHICH EXTEND BEYOND THE DESCRIPTION ON THE FACE HEREOF. Outside U.S.and Canada:This warranty does not apply to,and Turbo Air is not responsible for,any warranty claims made on products sold or used outside the continent of the United States and Canada.
CHANGES MADE TO WARRANTY COMMENCED ON 11/01/2007
Stainless Steel Equipment Care and Cleaning
CAUTION: Do not use any steel wool, abrasive or chlorine based products to clean stainless steel surfaces.
Stainless Steel Opponents
There are three basic things which can break down your stainless steel's passivity layer and allow corrosion to rear its ugly head.
1) Scratches from wire brushes, scrapers, and steel pads are just a few examples of items that can be abrasive to stainless steel's surface.
2) Deposits left on your stainless steel can leave spots. You may have hard or soft water depending on what part of the country you live in. Hard water can leave spots. Hard water that is heated can leave deposits if left to sit too long. These deposits can cause the passive layer to break down and rust your stainless steel. All deposits left from food prep or service should be removed as soon as possible.
3) Chlorides are present in table salt, food, and water. Household and industrial cleaners are the worst type of chlorides to use.
8 steps that can help prevent rust on stainless steel:
1. Using the correct cleaning tools
Use non-abrasive tools when cleaning your stainless steel products. The stainless steel's passive layer will not be harmed by soft cloths and plastic scouring pads. Step 2 tells you how to find the polishing marks.
2. Cleaning along the polish lines
Polishing lines or "grain" are visible on some stainless steels. Always scrub parallel to visible lines on some stainless steels. Use a plastic scouring pad or soft cloth when you cannot see the grain.
3. Use alkaline, alkaline chlorinated or non-chloride containing cleaners
While many traditional cleaners are loaded with chlorides, the industry is providing an ever increasing choice of non-chloride cleaners. If you are not sure of your cleaner's chloride content contact your cleaner supplier. If they tell you that your present cleaner contains chlorides, ask if they have an alternative. Avoid cleaners containing quaternary salts as they can attack stainless steel, causing pitting and rusting.
4. Water Treatment
To reduce deposits, soften the hard water when possible. Installation of certain filters can remove corrosive and distasteful elements. Salts in a properly maintained water softener can be to your advantage. Contact a treatment specialist if you are not sure of the proper water treatment.
5. Maintaining the cleanliness of your food equipment
Use cleaners at recommended strength(alkaline, alkaline chlorinated or non-chloride). Avoid build-up of hard stains by cleaning frequently. When boiling water with your stainless steel equipment, the single most likely cause of damage is chlorides in the water. Heating any cleaners containing chlorides will have the same damaging effects.
6. Rinse
When using chlorinated cleaners you must rinse and wipe dry immediately. It is better to wipe standing cleaning agents and water as soon as possible. Allow the stainless steel equipment to air dry. Oxygen helps maintain the passivity film on stainless steel.
7. Hydrochloric acid(muriatic acid) should never be used on stainless steel
8. Regularly restore/passivate stainless steel
Recommended cleaners for certain situations/environments of stainless steel
A) Soap, ammonia and detergent medallion applied with a cloth or sponge can be used for routine cleaning.
B) Arcal 20, Lac-O-Nu Ecoshine applied provides barrier film for fingerprints and smears.
C) Cameo, Talc, Zud First Impression is applied by rubbing in the direction of the polished lines for stubborn stains and discoloring.
D) Easy-off and De-Grease It oven aid are excellent for removals on all finishes for grease-fatty acids, blood and burnt-on foods.
E) Any good commercial detergent can be applied with a sponge or cloth to remove grease and oil.
F) Benefit, Super Sheen, Sheila Shine are good for restoration/passivation.
CHANGES MADE TO WARRANTY COMMENCED ON 5/1/2002
Postage Required
REFRIGERATOR MANUFACTURER Turbo air
1250 VICTORIA ST.
CARSON, CA 90746-1666
REFRIGERATOR MANUFACTURER Turbo air
1250 Victoria street
Carson, CA 90746
U.S.A. & Canada Toll Free 1-800-627-0032
For Service 1-800-381-7770
TEL:310-900-1000
FAX: 310-900-1077
www.turboairinc.com
NOTE:
PRINT CLEARLY
&
MAIL CARD MMEDIATELY

This card must be mailed im mediately after installation date for warranty to be in effect.
TURBO AIR WARRANTY REGISTRATION CARD
(Name of your business)
(Tele phone)
(Address)
(City)
(State)
(Zip Code)
(Unit Model Number)
(Unit Serial Number)
(Compressor Serial Number)
This is to inform TURBO AIR That ____ have had the above (Business owner signature)
TURBO AIR UNIT installed in my business place.
(Installation dete)
The above warranties are in effect from this installation date, or 90 days after shipment from TURBO AIR, whichever comes first.