JA-88P - Kamera bezpieczeństwa Jablotron - Bezpłatna instrukcja obsługi
Znajdź bezpłatnie instrukcję urządzenia JA-88P Jablotron w formacie PDF.


| Typ produktu | Bezprzewodowy czujnik ruchu PIR zewnętrzny |
| Model | JA-88P |
| Marka | Joblotron |
| Zasilanie | 3 baterie litowe AA 3,6 V (typ LS(T)14500) |
| Żywotność baterii | około 3 lat (przy trybie oszczędzania energii 120 s) |
| Częstotliwość pracy | 868 MHz |
| Zasięg komunikacji | do 300 m (linia wzroku) |
| Zasięg detekcji | 12 m / 85° |
| Liczba segmentów detekcji | 94 |
| Zalecana wysokość montażu | 2,5–3,0 m |
| Prędkość wykrywanych obiektów | 0,3–1,5 m/s |
| Stopień ochrony obudowy | IP55 |
| Zakres temperatury pracy | -20°C do +60°C |
| Maksymalna wilgotność względna | 95% |
| Waga | 620 g |
| Funkcja antysabotażowa | Tak (tamper przedni i tylny) |
| Funkcja antymaskingowa | Tak (regulowana: wysoka, standardowa, wyłączona) |
| Tryby czułości | Niska, średnia, wysoka |
| Wskaźnik LED | Możliwość włączenia/wyłączenia |
| Klasa środowiskowa według EN 50131-1 | IV |
Często zadawane pytania - JA-88P Jablotron
Pytania użytkowników dotyczące JA-88P Jablotron
0 pytanie dotyczące tego urządzenia. Odpowiedz na te, które znasz, lub zadaj własne.
Zadaj nowe pytanie dotyczące tego urządzenia
Pobierz instrukcję dla swojego Kamera bezpieczeństwa w formacie PDF za darmo! Znajdź swoją instrukcję JA-88P - Jablotron i weź swoje urządzenie elektroniczne z powrotem w ręce. Na tej stronie opublikowane są wszystkie dokumenty niezbędne do korzystania z urządzenia. JA-88P marki Jablotron.
INSTRUKCJA OBSŁUGI JA-88P Jablotron
JA-88P outdoor wireless motion detector
The JA-88P wireless PIR detector is designed to indicate movement outside the building caused by human bodies. It is based on an outdoor detector by Optex supplemented with a transmitter compatible with JA-80 OASiS systems. Both the detector and the transmitter are powered by three lithium batteries and the low battery signal is transmitted to an control panel. The detector is equipped with two TAMPER contacts (front and rear), which immediately report opening of the detector cover or its possible tearing from the place of installation. The detector regularly performs automatic tests and reports its status to the control panel.
Installation
The following instructions should be followed when selecting a place for detector installation:
- The detector must be installed in a position where its bottom surface is parallel to the watched zone (either directly on the wall, or possibly, if a change of direction is required, the supplied joint can be used). This condition is essential for good immunity to false alarms. For more information see Fig.1.
- The detector should be installed 2.5 – 3 m above the ground.
- No other moving objects (bushes, trees, high grass, etc.) should be situated in the detection area of the detector. These objects can be masked out using the supplied foils. Avoid direct action by strong sources of light (sun reflections). You can use the supplied viewing hood for this purpose.
- When selecting the right place to install your detector, keep in mind that the best movement detection is provided when the detection zones intersect (Fig.2).
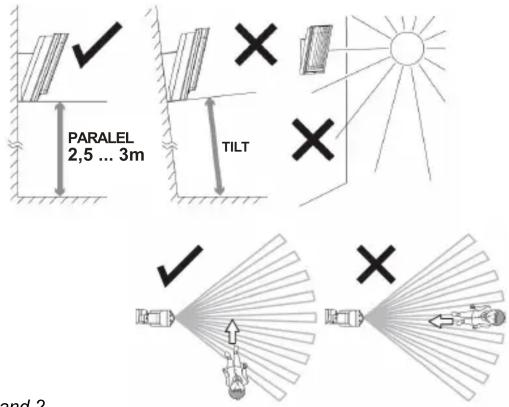
Fig.1 and 2
- Unfasten the curing screw on the bottom side of the upper cover and remove it.
- Pull the plastic tab under the lower PIR sensor slightly to remove the optical part. Warning: Do not touch the detector sensing face during handling.
- Use a screwdriver to punch a hole on the right of the bottom detector cover in order to pull the rear TAMPER cable through (supplied in the package).
When installed without the joint holder:
- Use the Base Mounting Template from the box lid.
- Pull the rear TAMPER cable through the punched hole in the bottom detector cover and fix a magnetic contact to the place according to the template (Base side).
- Mark a place on the wall where you want to install the detector – i.e. holes for the screws and the magnet (Wall side), and fix the magnet to the wall.
- Fix the rear cover on the wall while checking the position of the magnet and the reed contact (they should be as close as possible). When installed with the joint holder:
- Use the Bracket Base Mounting Template from the box lid.
- Press the plastic tab to remove the screw cover (secured with a plastic cord against falling during work).
- Unscrew the securing screw (inside under the cover) to loosen the joint and swivel it to one side to gain access to the installation holes.
- Pull the rear TAMPER cable through the cavity in the joint and fix the magnetic contact in the given place (between the plastic lugs).
- Mark a place on the wall where you want to install the detector – i.e. holes for the screws and the magnet (Wall side), and fix the magnet to the wall.
- Fix the joint holder to the wall while checking the position of the magnet and the reed contact (they must touch).
-
Now screw the bottom cover together with the joint holder. Remove the central screw which blocks vertical movement and screw it through a hole in the bottom cover.
-
Pull the rear TAMPER cable through the opening you have punched in the bottom detector cover and insert the rear TAMPER connector into the pins marked TMP IN (remove the jumper installed in production).
Enrolling the detector to the system
The signal transmitter for wireless communication is located underneath the optical part of the detector. The transmitter's battery case is not used; the batteries are inserted into the battery holder of the motion detector. Use three AA 3.6V lithium batteries by the same manufacturer and replace all three batteries at the same time. The correct position of the batteries is indicated on the battery holder. When inserting the batteries, it is necessary to remove the part of the holder held in place with a metal lug. When the batteries have been installed, the transmitter sends a signal which enrolls it to the control panel (the control panel must be in enrollment mode at that time – see the manual). Use switch no. 2 to set the system's reaction to any detected movement (ON = instant or OFF = delayed). Switch no. 1 should be left in the OFF position

Fig. 3 detector transmitter
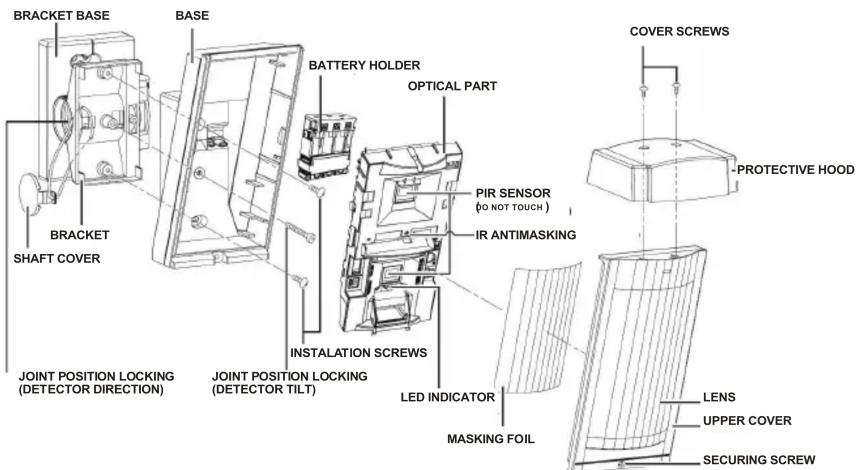
Fig.4 detector configuration
Setting up the optical part of the PIR detector
The optical part of the detector contains two PIR sensors with non-overlapping 94 lobe detection and high false alarm and pet detection immunity.
Installation at 3.0 m above the floor 12 m
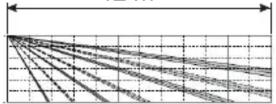
When installing the detector 2.5m above the floor, use the joint holder and swivel the detector by 2.5°(one click) upwards to achieve a 12m detection distance.

The above-mentioned detection characteristics apply if the detector is installed vertically in the guarded area. If a shorter detection range is required, do not tilt the detector on the joint. Use the supplied self-adhesive mask foils:

9 m
USE
MASK
1

5,5 m
USE
MASKS
1+2

4 m
USE
MASKS
1+2+3
Masking using strips of the supplied foil can also be used to avoid unwanted moving objects (e.g. a tree). Use the supplied protective hood for protection against sun and rain.

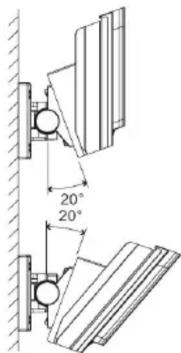
The joint can be used to adjust the detector position along two axes. When installing the detector at the height of 2.5m, swivel it by 2.5^ (one click) upwards to achieve a 12m detection range.
Setting up the electronic part of the PIR detector
It is possible to set three levels of detector sensitivity using the switch on the left of the bottom PIR – the levels are marked with letters:
L low – low sensitivity for places with false alarm risks
M middle – medium sensitivity
H high – high detection sensitivity
Other detector parameters can be set with a switch:
normal operation energy saving mode 120 s standard detection
Keep set as shown here LED indication disabled

area coverage test 5 s increased detection immunity Keep set as shown here
LED indication enabled
Area coverage test (DIP1) – the energy saving mode is not applied and each detectable movement is indicated by an LED. The alarm is always transmitted regardless of the energy saving mode settings (DIP2). The energy saving mode (DIP2) is similar to that of the JA-80P detector. When the detector is activated and transmits the information to the control panel, it stops detecting motion for a set time. The activation of the LED (DIP6) serves as an indication of the detector function – i.e. the area coverage. The detector always transmits information to the control panel – disable the LED to save the batteries in ordinary operation.
Operation testing
When the batteries are connected, the detector needs approx. 90 seconds for stabilization. The LED keeps flashing all the time. Use the switch to commence the area coverage test. Test the correct coverage of the guarded area and whether the detector detects motion outside the guarded area. Each movement is indicated by a flashing detector LED and the information is concurrently sent to the control panel.
When you have tested the correct functioning of the detector, stop the area coverage test, check whether the indication LED is off and set the energy saving mode to 120s. This is necessary to meet the declared battery lifetime.
Normal detector operation
Each time the sensor is activated, the information is transmitted by a radio signal. When the detector cover is opened or the detector is removed from the bearing plate, a tamper signal is transmitted. The detector also regularly (every 9 minutes) transmits control signals which serve the control panel to check the presence and readiness of all devices in the installed system.
The masking protection function
The detector has an anti-masking function – i.e. protection against masking of the detector's field of sight. If an object is detected in front of the detector for more than three minutes, the detector sends a tamper signal. Three short flashes of the LED indicate masking (the LED must be enabled). When the object has been removed, the indication (tamper signal) ceases after one minute.
It is possible to set three levels of this function using the switch on the right of the bottom PIR – the levels are marked with letters:
HI high – high masking detection sensitivity STD standard – standard masking detection sensitivity OFF off – function disabled (default setting)
This function is disabled as a default.
Checking the status of and replacing batteries.
The detector checks battery status automatically and if the batteries are running low, it informs the system that they need replacing. The detector remains fully functional. The batteries should be changed as soon as possible (within 1 week). Use 3.6 V AA batteries exclusively and always replace all three at the same time. When the cover has been closed, the detector switches to normal operating status.
Technical specifications
| Power supply | 3x type LS(T)14500 (AA 3.6 V 2 Ah) lithium batteries |
| Average battery lifetime | approx. 3 years (with 120 s energy saving mode) |
| Operating frequency | 868 MHz |
| Range – distance from the control panel | up to 300 m with direct visibility |
| Optex detector parameters | |
| Detection characteristics | 12 m / 85°; 94 segments |
| Recommended installation height | 2.5 – 3.0 m |
| Object motion speed | 0.3 – 1.5 ms ^-1 |
| Battery saving timer | adjustable 5 s or 120 s |
| Detector cover conformance | IP55 |
| Max. relative humidity of the environment | 95% |
| Operating temperature range | -20°C to +60°C |
| Environment class according to EN 50131-1 | IV |
| Security grade | according to OPTEX |
| Weight | 620 g |
| Comply with | ETSI EN 300220, EN 50130-4, EN 55022, EN 60950-1 |
| Can be operated according to | ERC REC 70-03 |


JABLOTRON ALARMS a.s. hereby declares that the JA-88P is in compliance with the essential requirements and other relevant provisions of Directive 1999/5/EC.
The original of the conformity assessment can be found at www.jablotron.com - Technical Support section
Note: Although this product does not contain any harmful materials we suggest you return the product to the dealer or directly to the producer after use.
JABLOTRON
JABLOTRON ALARMS a.s.
Pod Skalkou 4567/33
46601 Jablonec nad Nisou
Czech Republic
Tel.: +420 483 559 911
Fax: +420 483 559 993
Internet: www.jablotron.cz

- JA-88P outdoor wireless motion detector
- Installation
- When installed without the joint holder:
- Enrolling the detector to the system
- Setting up the optical part of the PIR detector
- Setting up the electronic part of the PIR detector
- Operation testing
- Normal detector operation
- The masking protection function
- Checking the status of and replacing batteries.
- JABLOTRON
Marka : Jablotron
Model : JA-88P
Kategoria : Kamera bezpieczeństwa