
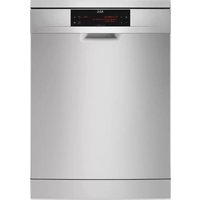
Favorit 4220 id - Zmywarka AEG - Bezpłatna instrukcja obsługi
Znajdź bezpłatnie instrukcję urządzenia Favorit 4220 id AEG w formacie PDF.


| Rodzaj produktu | Zmywarka do zabudowy |
| Model | Favorit 4220 id |
| Marka | AEG |
| Szerokość | 60 cm |
| Głębokość | 60 cm |
| Wysokość | 85 cm |
| Waga | Ok. 50 kg |
| Napięcie zasilania | 230 V / 50 Hz |
| Pobór mocy | 2200 W |
| Pojemność | 12 kompletów naczyń |
| Programy zmywania | ECO, Intensywny, Szybki, Delikatny, Automatyczny |
| System suszenia | Kondensacyjny, z wymiennikiem ciepła |
| Zabezpieczenie przed zalaniem | AquaStop (w pełni wbudowany czujnik) |
| Indykator soli i płukania | Diody na panelu przednim |
| Drzwi | Frontowe, podwójne składanie |
| Kosz górny | Regulowany pionowo |
| Kosz dolny | Zamykany, z uchwytami na talerze |
| Filtr | Samoczyszczący filtr siatkowy |
| Przyłącze wody | Zimna woda tylko |
| Długość przewodu zasilającego | 1,5 m |
| Długość węża odpływowego | 2,0 m |
| Poziom hałasu | 46 dB (A) |
| Klasa energetyczna | A+ (w starej skali) |
Często zadawane pytania - Favorit 4220 id AEG
Pytania użytkowników dotyczące Favorit 4220 id AEG
0 pytanie dotyczące tego urządzenia. Odpowiedz na te, które znasz, lub zadaj własne.
Zadaj nowe pytanie dotyczące tego urządzenia
Pobierz instrukcję dla swojego Zmywarka w formacie PDF za darmo! Znajdź swoją instrukcję Favorit 4220 id - AEG i weź swoje urządzenie elektroniczne z powrotem w ręce. Na tej stronie opublikowane są wszystkie dokumenty niezbędne do korzystania z urządzenia. Favorit 4220 id marki AEG.
INSTRUKCJA OBSŁUGI Favorit 4220 id AEG
ÖKO\_FAVORIT 4220 i
Dishwasher
Operating Instructions
Dear Customer
Before you put your dishwasher to use, please read this Instruction booklet thoroughly. It contains important information for your safety, and on the use, installation and maintenance of the machine. Your dishwasher will repay this effort with excellent performance. If you have a problem with the dishwasher, look at the chapter "Troubleshooting".
In many cases, you can solve the problem yourself and thus avoid service charges.
Take care of the Instruction booklet for later use. Pass it to any second owner.

Contents
Safety Advice 4/5
Disposal
Disposal of Packaging 6
Disposal of Old Machine 6
General Information
Economical and Environmentally Friendly Washing 7
Unsuitable Dishes 7
Suitable Dishes 7
Product Description
Interior and back of appliance 8/9
Control Panel 10/11
Programme Guide 12/13
Operation
Before first use 14
Setting the water softening unit 14/15
Refilling salt 16/17
Refilling rinse aid dispenser 18
Setting rinse aid dosage 18/19
Refilling dishwasher detergent 20
BIO programmes and Compact Cleaners 21
Loading the Dishes 22
Lower Basket 23
Cutlery Basket 24
Upper Basket 25
Switching ON/OFF
Setting wash programmes 26
Switching Off/removing dishes 27
Care and Cleaning
Care of Machine 28
Cleaning the Filters 29/30
Troubleshooting 30/31
Customer Service 32
Test Institute Information 33
Technical Data 34
Installation
Setting Up 35/36
Information for the Installer 37/38
Anti-flood device 39
Electrical connection 39/40
Connection 40
Safety Advice
The safety of AEG domestic appliances complies with the recognised technical regulations and laws regarding mechanical safety. Nevertheless, as the manufacturer, we regard ourselves as obliged to give you the following safety advice:
Use as directed.
☐ Only use the dishwasher for household dishes. If the dishwasher is misused, you will be liable for any resulting damage.
□ Alteration or conversions to the dishwashers are not allowed for safety reasons.
Before first use
☐ Check the dishwasher for transport damage. A damaged machine should never be switched on. In case of damage, contact your supplier.
☐ The dishwasher must be installed and connected properly. Read the chapter "Installation" for all you need to know about this.
Before first use, make sure that the nominal voltage and current stated on the machine's rating plate comply with the nominal voltage and current in your area.
☐ When installing the dishwasher next to a source of heat, a heat insulated plate must be installed for protection.
Child Safety
□ Pieces of packaging (e.g. foil or polystyrene) can pose a danger to children. There is danger of suffocation! Keep pieces of packaging away from children.
☐ Children often do not recognise dangers posed by machines, therefore you should keep children away from the machine when it is in operation. There is also the risk of children getting trapped in the machine.
☐ Detergents can cause irritation to the body and even lead to suffocation. Keep cleaning agents out of children's reach.
☐ Water in the dishwasher is not drinking water. During the main wash, the water will contain detergent that could be harmful if swallowed. Keep children away from the dishwasher when in use.
Everyday Use
☐ The flood protection system will only operate correctly if:
- the appliance is plugged into the socket and the electrical supply is maintained
- the dishwasher has been correctly installed
- the water supply is shut off the dishwasher is not in use for prolonged periods.
☐ Never use the dishwasher if the mains cable, inlet or drain hose are damaged, or the control panel, worktop or socket area is so damaged that the interior of the machine is exposed.
☐ In case of malfunction, first close off the water tap. Then switch off the machine and pull out the power plug. If hard wired: turn off the mains electricity, pull out the fuse and disconnect the appliance.
☐ Never pull the plug out of the socket by the cable. Always use the plug itself.
☐ Repairs to the dishwasher may only be carried out by qualified service engineers. Inappropriate repairs can cause considerable danger to the user. If there is a malfunction, please contact our Customer Service Department.
☐ Do not pour solvent into the dishwasher. Danger of explosion!
☐ Do not sit on or lean on the open door. This could tip the machine over.
☐ The heating element in the bottom of the dishwasher interior is still hot for a while after use. Danger of burns! Do not touch the heating elements.
☐ Make sure that the salt, detergent and rinse aid are designed for use in domestic dishwashers,
☐ The high temperatures around the heating element can deform or melt plastic. Do not load plastic items in the lower basket, above the heating element.
□ Always close the water tap if the dishwasher is not to be used for a length of time, e.g. holidays.
☐ The dishwasher should only be transported in an upright position. Not doing so may result in a salt water solution entering the dishwasher interior possibly causing rust marks.
☐ The dishwasher door should be kept closed except during loading or unloading as an open door can be a tripping hazard.
□ Knives stored in an upright position are a potential hazard.
☐ Long and/or sharp utensils such as carving knives and forks must be positioned horizontally in the upper basket or hand washed.
Disposal
Disposal of Packaging
AEG dishwashers require effective packaging for the rigours of transportation. We limit this to what is absolutely necessary.
Pieces of packaging (e.g. foil or polystyrene) can pose a danger to children. There is danger of suffocation! Keep pieces of packaging away from children.
All packaging materials used are environmentally friendly and recyclable. Cardboard pieces are made from used paper and wooden items are untreated. Plastic items are marked as follows:
PE = polyethylene, e.g. packing film
PS = polystyrene, e.g. packing (CFC-free)
POM = polyoxymethylene, e.g. plastic clips
By using and re-using the packaging, raw materials are saved and waste volume is decreased.
Take the packaging to the nearest recycling centre. You can find out where this is from your Local Government Office.
Disposal of Old Machines
When you stop using your old machine, you should make it safe before disposing of it.
WARNING: Children at play can lock themselves in the machine (danger of suffocation) or get into other life-threatening situations. Therefore, remove the power plug, cut off and dispose of the power cable. Destroy the door lock so that the door no long closes.
Plastic Labelling for Easy Recycling
All plastic parts in the machine are labelled with internationally recognised abbreviations (e.g. PS=polystyrene). Therefore, when disposing of the machine, you can sort the plastic parts into groups for recycling purposes. Take your old machine to the nearest recycling centre, who will dispose of it for a small charge.
General Information
Economical and Environmentally Friendly Washing
Connect the dishwasher to hot water if you have a modern, high-efficiency hot water system. Connection to the cold water supply is recommended for electrically heated water systems. Do not rinse the dishes under running water beforehand.
Try to use the dishwasher only when it is full, since this way you wash economically and in an environmentally friendly way.
Always select a wash programme which is suited to the type of crockery as well as the level of soilage (See Programme Guide).
Above all, avoid using excessive amounts of detergent, salt and rinse aid. Consult the dosing instructions in this Instruction booklet as well as the detergent manufacturer's recommendation.
Ensure that the water softening unit is correctly set.
Unsuitable for Dishwashing
Sponges, household cloths, and all objects which can become saturated with water should not be cleaned in your dishwasher.
Items unsuitable for dishwashing include:
- wooden chopping boards
- non heat-resistant plastic items
- lead crystal
- tin and copper items
- items of crockery or cutlery repaired with glue
- older cutlery containing heat sensitive compounds
- rust-sensitive steel items
-cutlery with handles made of wood, bone, porcelain or mother of pearl
Suitable for Dishwashing
Most modern tableware is suitable for dishwashing, however there are exceptions. Unless confirmed as dishwasher safe by the manufacturer, some items may be adversely affected when washed in a dishwasher, e.g.
- only wash stoneware in a dishwasher if the manufacturer confirms that it is dishwasher safe
- glazed designs fade after many machine washes
– silver and aluminium tend to discolour when washed - food remnants such as egg white, egg yolk and mustard, often cause discolouration and tarnishing of silver, therefore always clean food remnants off silverware straight away, even if you are not washing immediately.
- some types of glass go dull after many washes.
When you buy new crockery, glasses and cutlery, be sure that they are dishwasher safe.
Machine Description
Interior of Appliance

Fig. 1
GA 5 (1)

Fig. 2
Interior of Appliance
- Salt Container
- Rinse Aid Dispenser
- Detergent Dispenser
- Rating Plate
- Filters
- Spray Arm
- Top Spray
- Top Spray Arm Connector
- Water Hardness Adjustor
- Heating Element
Back of Appliance
- Inlet Hose
- Drain Hose
- Mains Cable
Machine Description
Control Panel

Fig. 3
BB 47L G8
- Programme knob

Switched off
The machine is switched on as soon as a wash programme is selected.
- Handle with flap for opening door

Fig. 3
BB 47R GB
3. Programme control knob and progress indicator
- programme control knob: for setting programme start points A and B (see also "Programme Guide")
- progress indicator: while the programme is running, the programme control knob turns and shows the stage that the programme has reached.
Programme chart
| Wash programme | Suitable for: | Set programme: | |
| Programme Progress Indicator | Programme Selector | ||
| Normal 65°C | Normal soiled tableware and cooking dishes with dried-on food. |  | Normal 65°C |
| Normal BIO 50°C | Normally soiled table- and cookware, plus heat-sensitive items (e.g. glass, plastic). Also for dishes with dried-on food, when compact detergent used. |  | Normal BIO 50°C |
| ECONOMY BIO 50°C | Normal to lightly soiled tableware, coffee and dessert dishes, plus delicate glasses. Specially suited for use with compact detergent. |  | ECONOMY BIO 50°C |
| Prewash | Used dishes, which have accumulated in the dishwasher and will be washed at a later point. |  | Prewash |
| Programme stage | Average programme length 1) in minutes using cold water connection | Average energy consumption 1) In kWh using cold water connection | Average water consumption 1) in litres |
| PrewashMain washIntermed. rinseFinal rinseDrying | 76 | 1,5 | 19 |
| PrewashMain washIntermed. rinseFinal rinseDrying | 72 | 1,4 | 19 |
| Main washIntermed. rinseFinal rinseDrying | 62 | 1,4 | 15 |
| Prewash | 10 | 0,1 | 6 |
1) Values were calculated under normal conditions. Deviations are possible in practice.
Operation
Before First Use
The dishwasher baskets are protected for transportation by special clamps. Please remove all these clamps before you use the dishwasher.
After the dishwasher is installed you must prepare it for operation. Before first use, carry out the following procedure:
- set up the water softening unit
- fill the salt container with salt
- fill the rinse aid dispenser
You will find comprehensive information on the individual point in the following chapter.
Setting the Water Softening Unit
Soft (calcium-free) water is required for machine-washing dishes in order to avoid calcium deposits on the crockery and in the dishwasher. Therefore, water with a hardness of more than 4° Clarke must be softened for using in a dish-washer.
The dishwasher has a water softening unit for this purpose. The water softening unit is automatically and regularly dosed with salt solution. The amount of salt needed for regeneration depends on local water hardness. Information on water hardness and the range of hardness in your home is obtainable from your local Water Authority.
To ensure optimum regeneration of the water softener:
- the water softening unit must be adjusted to the local water hardness
- the salt in the salt container must always be full
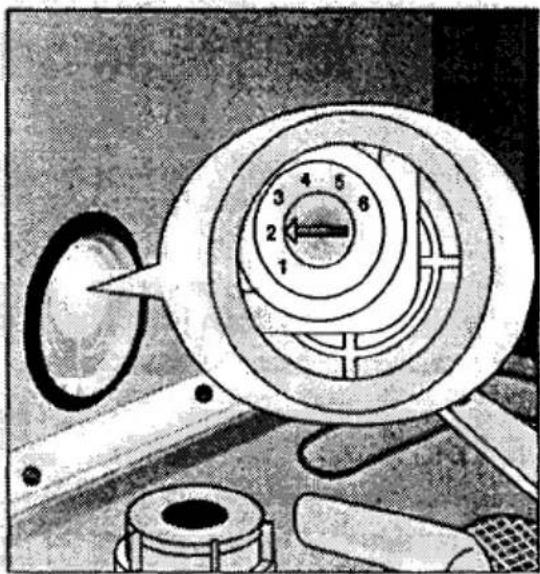
To ensure minimum salt usage and optimum cleaning results, the water softening unit has six available settings.
natural_image
Illustration of a magnifying glass with concentric rings and a central dial, alongside mechanical components (no text or symbols)Fig. 4
WHB (1)
| Range of Hardness | Water Hardness in English or Clarke degress | Water Hardness in mmcl/l1) | Setting |
| IV | 51 - 70 | 9.1 - 12.5 | 6 |
| 36 - 50 | 6.4 - 9.0 | 5 | |
| 29 - 45 | 5.1 - 6.3 | 4 | |
| 22 - 28 | 3.9 - 5.0 | 3 | |
| III | 15 - 21 | 2.6 - 3.8 | 2* |
| I/II | 4 - 14 | 0.7 - 2.5 | 1 |
| I | under 4 | under 0,7 | 1no salt required |
1) mmcl - millimol per litre, international unit of hardness
*) factory setting
Open door, take out lower basket.
Warning! Directly after wash the heating element in the bottom of the dishwasher will remain hot for a time. Danger of burns. Do not touch the heating element!
☐ Using a coin, set the water hardness adjuster to the correct hardness setting. Use the table to establish this setting for your local supply.
Operation
Refilling the Dishwasher Salt
NOTE:
If the water hardness in your home is less than 4°Clarke, you do not need to add dishwasher salt.
Warning!
Only use dishwasher salt. Other types of salt (e.g. cooking salt) often contain water insoluble components which block the softener and make it unusable.
The packaging of dishwasher salt and dishwasher detergent often appear very similar. Before each refill, check that you have a Salt packet in your hand.
Dishwasher detergent accidentally poured into the salt container will destroy the water softener!
Open door. Pull out lower basket.
Warning! Directly after wash the heating element in the bottom of the dishwasher will remain hot for a time. Danger of burns. Do not touch the heating element!
☐ Open the salt container cap in an anti-clockwise direction and remove.
When filling for the first time, pour approx 0.5 litre of water into the container.
☐ Pour the salt into the container. Capacity depends on the granule size of the salt, 1-1.5 kg. Do not overfill the salt container. Be sure that there is sufficient room for the salt indicator.

Fig. 5
SAE 1 (1)
☐ Remove any excess salt granules from around the opening of the salt container.
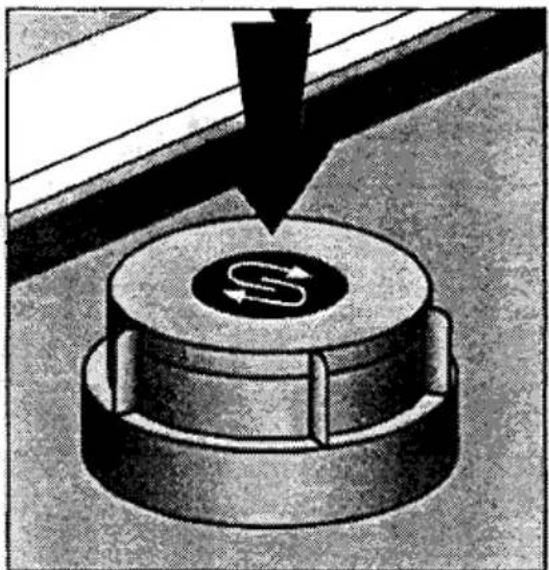
☐ Replace the cap and turn in clockwise direction to the locking position. The cap must be tightly closed otherwise salt will get into the wash water. Dull glasses can result.
☐ If you do not use the dishwasher immediately after refilling the salt, you should run a PRE WASH programme so that excess salt water and granules are washed away.
Salt Refill Indicator
The green marker beneath the cap of the salt container shows that there is still sufficient salt in the machine. If the green marker is no longer visible, you should refill with dishwasher salt. Depending on the size of the salt granules used it may take several hours for the green coloured indicator field to re-appear.
natural_image
Illustration of a mechanical component with a downward arrow and circular base (no text or symbols)Fig. 6
SNA 1 (1)
NOTE: When the water hardness is less than 4°Clarke, you do not need to add salt. In this case, the green marker beneath the salt container is not visible. The function of the machine is not affected.
Sight of the green indicator can become obscured by salt solution. In this case rinse the container cap under running order until it clears.
Operating
Filling the Rinse Aid Dispenser
Rinse aid is designed to ensure that the rins water runs off the dishes and glasses leaving them free of water marks and sparkling.
The rinse aid is automatically dispensed during the wash programme.
IMPORTANT! Only use rinse aid designed for use in domestic dishwashers. Other rinsing agents such as vinegar with a acid content greater than 5% could damage the dishwasher and in any case do not give the right results.
The accidental filling of the rinse aid compartment with detergent will damage the appliance.
The rinse aid dispenser is located on the inside of the door.
Open door
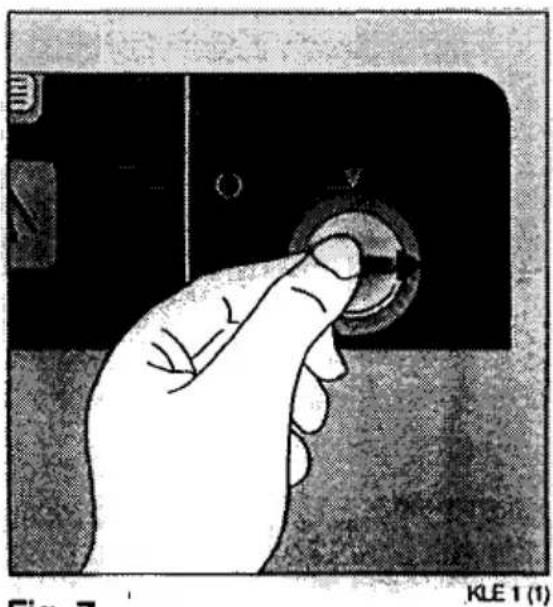
☐ To fill the dispenser, turn the locking lid of the rinse aid dispenser a quarter to a turn anti-clockwise and open.
☐ Pour in rinse aid: maximum to the indicated line. Maximum amount, approx. 150 ml.
natural_image
Hand pressing down on a device knob (no text or symbols visible)Fig. 7

natural_image
Close-up of a hand pouring liquid into a circular device with a pointer, against a dark background (no text or symbols visible)Fig. 8
☐ Replace locking lid and tighten in a clockwise direction.
☐ Wipe away any excess rinse aid with a cloth, otherwise too much foam will build up during the wash.
Refill Indicator for Rinse Aid
You should refill the rinse aid dispenser when a dark dot surrounded by a bright circle Ⓞ appears in the window of the rinse aid dispenser (Fig. 8/arrow).
When it is full, the window is completely dark.
Operating
Setting the Rinse Aid Dispenser
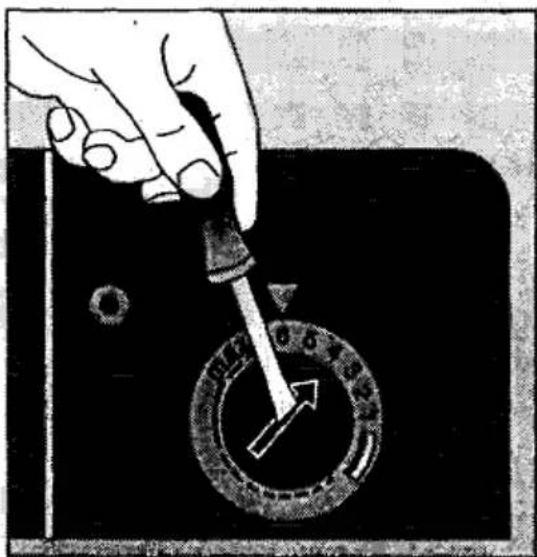
The adjuster to alter the quantity of rinse aid being dispensed is located in the opening of the dispenser. The quantity can be set from 1 to 6 (1-6 cm ^3 ).
The dosage is pre-set to 4. At this setting the full dispenser will hold sufficient rinse aid for 40 wash cycles. Do not alter this setting unless an unsatisfactory rinse result makes it necessary (see "Troubleshooting").
☐ To adjust the dispenser, turn the locking lid of the rinse aid dispenser a quarter of a turn anti-clockwise and open. (Fig. 9)
☐ Turn the adjuster to the desired setting using a screwdriver
natural_image
Hand using a dropper to adjust a circular dial (no text or symbols visible)KLD 1 (2)
Fig. 9
☐ Replace the locking lid and tighten in a clockwise direction.
☐ Wipe away any excess rinse aid with a cloth, otherwise too much foam will build up during the wash.
Operating
Refilling Dishwasher Detergent
Important!
Do not use washing up liquid in the dishwasher. This causes excessive foaming and does not clean the dishes properly. It can even damage the dishwasher. Only use detergents intended for domestic dishwashers.
Store the detergent in a dry and sealed container. Detergent which has become lumpy will no longer clean the dishes.
Detergent must be added to the dispenser before each wash. Only with the prewash programme is no detergent necessary. The detergent is automatically dispensed during the wash.
Recommended dosage (basket fully loaded):
Smaller amounts of dishes require less detergent
The efficiency of detergents varies. Take care to observe the dosing recommendations of the manufacturer.
The detergent dispenser is located on the inside of the door. If the lid is closed:
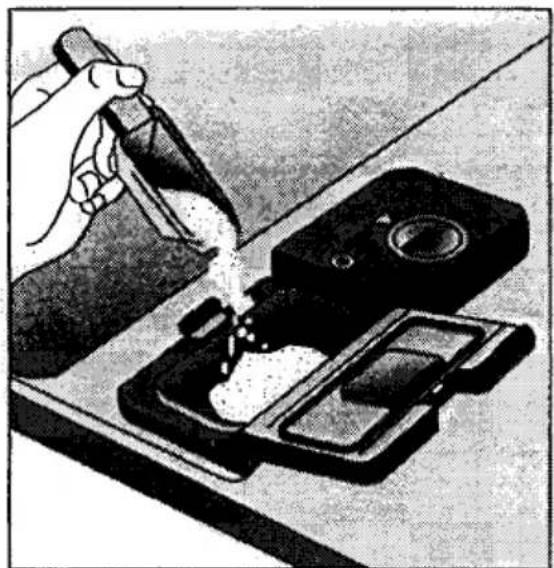
☐ Press the lever forward (Fig. 10/1). The lid springs open.
☐ Fill the dispenser with detergent. To help you use the correct amount of detergent, use the markings. MIN = approx 30 ml, MAX = approx. 40 ml

natural_image
Diagram of a device with a label and directional arrow, no readable text or symbols presentFig. 10
RME 1 (1)
natural_image
Illustration of a hand using a tool to apply liquid into a container on a table (no text or symbols visible)Fig. 11
RME 2 (1)
☐ Close the lid of the dispenser until it clicks shut. In case of heavily soiled dishes, it is possible to add extra detergent to the tray on top of the dispenser lid (Fig. 10/2). Fill until level. The extra detergent will be added during the prewash.
BIO Programmes and Compact Detergents
Dishwasher detergents fall into two basic types, depending on their chemical composition:
- traditional alkaline detergents with corrosive components
- Compact detergents with natural enzymes.
Enzymes in Compact detergents dissolve dirt and are biodegradable. The enzyme's dirt-dissolving power is activated in a water temperature range between 40°C and 55°C. BIO programmes are designed to maintain this wash temperature, thereby optimising the enzyme's cleaning power.
When used with Compact detergents, the BIO programmes achieve the same cleaning results at 50°C, which otherwise are only reached with 65°C programmes. Compact detergents, as well as being environmentally friendlier, can wash effectively at lower temperatures and also help care for your crockery.
Detergent tablets
Detergent tablets can sometimes take longer to fully resolve than powder and, for this reason, they may not utilise all their cleaning power during a Quick wash (i.e. without pre-wash).
We would therefore recommend that you only use detergent tablets during normal wash programmes with pre-wash.
Loading the Machine
Before you load the machine, remove any remaining food debris from plates and soak saucepans with burnt on food, as you would when washing by hand. The easiest way to load a basket is from back to front.
IMPORTANT! By arranging the dishes correctly, you will ensure a satisfactory result.
Cups, glasses, etc. should be inverted in the machine. Take care that no water can collect in the bottom of any items.
Dishes and cutlery should be arranged so that they do not lie together or cover each other. Load glasses so that they do not touch each other (to prevent stains and breakages), Small objects, e.g. bottlecaps, should go in the cutlery basket.
Important! Tall dishes or cutlery protruding out of the basket may obstruct the spray arms. This will detrimentally affect the wash results. Ensure that the spray arms are free to rotate.
Lower Basket
Heavily soiled large items are best cleaned in the lower basket.
Warning! High temperatures around the heating element can deform and melt plastic items. Therefore, put plastic items in the upper basket.
□ Pull out lower basket
Place larger, heavier items such as dinner plates, dishes, pots, etc. in the lower basket.

natural_image
Cross-sectional diagram of a mechanical assembly with multiple cylindrical components and internal components (no text or labels)Fig. 12
UK 1 (1)
Cutlery Basket
Place knives, forks and spoons in the cutlery basket, handle down. Distribute the cutlery loosely and position the soiled surfaces of the spoons and forks apart so that the water can reach each item.
Important! Long pieces of cutlery can block the upper spray arm. These should be laid in the top basket.
Warning! In order that the full cutlery basket does not open accidentally while you are taking it out, hold it by the two-part handle.
Coffee and teaspoons should be put in to spoon compartment on the left of the cutlery basket. For easy emptying, the cutlery basket can be removed from the dishwasher.

natural_image
Illustration of a wooden crate filled with cutlery and utensils (no text or symbols)Fig. 13

natural_image
Cross-sectional diagram of a mechanical or architectural structure with layered components (no text or symbols visible)Fig. 14
Warning! Long and/or sharp utensils such as carving knives and forks must be positioned horizontally in the upper basket or hand washed.
Warning! Knives stored in an upright position are a potential hazard.
Loading the Machine
Upper Basket
Delicate smaller items are best cleaned in the upper basket.
☐ Pull out the upper basket to its stop position.
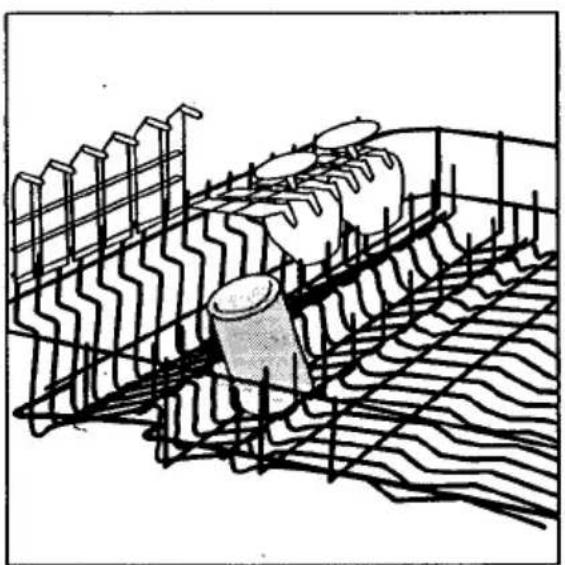
☐ Arrange smaller, lighter and more delicate items, such as cups and saucers, glasses, as well as plastic items, in the upper basket.

natural_image
Illustration of a cluttered kitchen counter with cutlery and utensils (no text or symbols)OK 1 (3)
Fig. 15
Arrange items on and underneath the fold-down cup racks so that water can reach all surfaces. For taller items, the cup racks can be folded upwards. Long-stem glasses can then be suspended from the prongs of the cup racks.
natural_image
Architectural line drawing of a building facade with grid patterns and a trash can (no text or symbols)OK 3 (1)
Fig. 16
☐ After loading, push upper basket back fully into the dishwasher.
Switching ON/OFF
Setting the wash programme:
☐ Check that the crockery and cutlery in your dishwasher are arranged so that the spray arm is not obstructed.
□ Close the door
☐ Open the water tap fully, if closed
Important! If a wash programme has started, though the water tap is closed, switch off the machine. Open the water tap and re-set the wash programme.
Setting the Programme:
☐ Turn the programme indicator clockwise, according to the Programme Guide, to A, B or C.
☐ Turn the programme selector to the desired programme (See "Programme Guide"). The programme starts. During the wash programme, the programme indicator moves step by step, showing the stage which the programme has reached. During the heating up of the main wash and rinse, the programme indicator remains stationary, until the required temperature is reached.
Programme Correction:
☐ Correct a wrongly selected programme by first switching off the machine with the programme selector (setting 0).
Important! To prevent electronic interference, only move the programme indicator when the machine is switched off, otherwise the detergent will be released accidentally.

Warning! When opening the door hot steam could escape. Danger of scalding! Open door carefully.
☐ If the programme is already in the washing stage, ensure that there is still detergent in the dispenser.
☐ Set the desired wash programme once more.
Interrupting the Programme:
☐ A wash programme in progress is interrupted when you open the door.
☐ Close the door. The wash programme will start again from the point at which it was interrupted.
Only open the door during the wash cycle when absolutely necessary. By opening and closing the door cold air enters the dishwasher and quickly heats and expands. This can cause irregular operation and may require a service call.
Switching off/ Removing the Dishes
Switching off
When the programme has ended:
Turn the programme selector to "0".
!Warning! When opening the door, directly after the end of the programme, hot steam can escape. Danger of scalding! Open door carefully.
Note:
At the end of the programme, allow the dishes to dry off completely and cool down for approx. 15 minutes in the closed machine.
You can speed up the drying and cooling if you completely open the door for a moment after the end of the programme and then leave it ajar.
If the dishwasher is installed under a kitchen worktop be sure that the escaping hot steam does not damage the worktop. The underside of the worktop must be protected against damage by means of an aluminium film.
Removing the Dishes
!Warning! Dishes are more fragile when hot. Therefore, allow the dishes to cool down before taking them out.
☐ First empty the lower basket, then the upper basket. In this way, you avoid water dripping from the upper basket onto the dry dishes below.
Care and Cleaning
Care of the machine:
The front and the control panel of the dishwasher should be cleaned only with a soft cloth and warm, clean water.
Warning! Do not use furniture polish or abrasive cleaning agents.
The spray arms do not need to be cleaned. The interior, door seal and top spray arm connection should periodically be inspected for soilage and if necessary cleaned.
Care and Cleaning
Cleaning the Filters
The filter assembly in the bottom of the dishwasher must be regularly checked for soilage and cleaned when necessary. Dirty filters reduce the efficiency of the wash.
Warning! After a wash programme is complete, the heating element at the bottom of the dishwasher remains hot. Danger of burns! Do not touch the heating element.
☐ Open the door, pull out the lower basket.
☐ The filter assembly in the dishwasher has 3 parts. (Coarse filter, microfilter and surface mesh). The complete filter assembly can be released and removed by means of the handle on the microfilter.
☐ Turn the handle of the filter assembly a quarter of a turn anticlockwise and lift out.

Fig. 17
RS 1 (1)
Care and cleaning
☐ Grip the coarse filter (1) by its handle and separate it from the microfilter (2).

Fig. 18
RS 4
☐ Thoroughly clean all filters under running water.
☐ Take surface mesh (3) out of the bottom of the dishwasher and thoroughly clean both sides.

natural_image
Hand pressing down on a mesh metal component with numbered callouts (no text or symbols)Fig. 19
RS 3 (2)
☐ Replace the surface mesh in the bottom of the dishwasher, ensuring that it is correctly positioned in the bottom of the dishwasher.
☐ Reassemble the coarse filter in the microfilter, snap together and replace the complete assembled unit into the surface mesh. Use handle to turn clockwise until locking position is found.
Troubleshooting
Please check whether you can solve the smaller problems with the machine yourself, by means of the following advice. If the advice does not help, please contact the AEG Customer Service Department.
☐ Drainage pump continually running - even when the machine is turned off.
- The flood protection system has activated. First, close the water tap, then pull out the plug. In case of hard-wiring: turn off the electricity supply, remove the fuse and disconnect. Telephone the AEG Customer Service Department to register the fault.
□ The programme does not start.
- Are the electrical fuses in good order? Is the machine connected to the mains?
- Is the door closed properly?
☐ The machine is not taking water in.
- Is the water tap open?
- Is the mesh in the pipe connection at the water tap blocked? If necessary, clean mesh.
- Is the water inlet hose kinked? Check pipe connection. (See section "Connection")
☐ Programme progress display remains at the Start position.
- Is the water tap fully open?
- Is the filter in the pipe connection to the water tap blocked? If necessary, clean filter.
- Is minimum water pressure of 1 bar available? (See section "Connection")
☐ The dishes are not being cleaned.
- have you selected a programme which is suitable for the type of dishes and their level of soilage? (See section "Programme Guide")
- have you loaded the dishes so that the water spray reaches all the items? The crockery baskets should not be overloaded (See section "Loading the Dishes")
- Were the spray arms blocked by crockery or cutlery?
- Please note: the upper spray arm tilts when not in use. This allows all the water to drip out of the spray arm. In operation, it automatically runs in a horizontal position.
- Are all filters in the filter assembly clean? Are all the filters correctly set up? (See section "Cleaning the filters")
- Have you added the correct amount of detergent? (See section "Refilling Dish-washer Detergent")
- Is the drainage pipe correctly laid out? (See section "Connection")
- Is there still salt in the salt container? Without salt, the water is not softened. Water hardness greater than 4 ^o Clarke can lead to lime formation on the dishes (See section "Refilling Salt").
Troubleshooting
☐ The dishes are not dried and have no sparkle
- have you used rinse aid?
- Is there any rinse aid left in the dispenser? (See section "Refilling Rinse Aid Dispenser")
☐ There are streaks, stripes, milky flecks or blue-shiny deposit on the glasses and dishes.
- there is too much rinse aid. Set the rinse aid dosage at a lower level. (See section "Setting Rinse Aid Dosage")
☐ There are dried-on water stains on the glasses and dishes - there is too little rinse aid. Set the rinse aid dosage higher. (See section "Setting Rinse Aid Dosage")
☐ Rust stains are visible in the interior of the machine
- the wash area is made of non-corrosive steel. Rust stains in the wash area can be attributed to external rust. (Rust particles from the water supply, from pots, cutlery etc.). Remove these flecks with a normal steel cleaner.
- have you put the right amount of detergent in? (See section "Refilling Dish-washer Detergent")
- Is there still salt in the salt container? (See section "Refilling Salt")
- Is the water softening unit correctly set up? (See section "Setting Water Softening Unit")
☐ Whistling noise during the dishwashing cycle
- You may possibly need to seek a remedy by using another branded detergent. The whistling is completely harmless.
Customer Service
The section "Troubleshooting" deals with the most common problems, many of which you can solve yourself. If you call out a Service Engineer with one of the problems listed, the cost involved will have to be passed on to you, even during the warranty period. The same applies to wrong usage or misuse of the machine. Therefore, follow the instructions in this booklet closely.
If you cannot find a solution to a particular problem in this instruction book, please contact the Customer Service Department for advice. State the model number and manufacturing number which can be found on the rating plate, which is located on the right hand, inner edge of the door.

KD1
Fig. 20
So that this information is readily available, we suggest that you note it here:
Model No.
Manufacturing No....
This information makes it possible to obtain any spare parts required so that the dishwasher can be returned to service during the engineer's first visit.
Test Institute Information
Test Standard:
IE 436-DIN 44990 (prEN50 242)
Reference programme:
65°C Normal (detergent type A)
50°C Special BIO (detergent type B)
Detergent dosage (type A)
5g in the tray, 25g in the dispenser
Detergent dosage (type B)
30g in the dispenser
Capacity
12 place setting including serving dishes, according to IEC publication 436.
Loading Example:
Upper Basket
Upper Basket

natural_image
Diagram of a multi-layered container with circular and rectangular components, no text or symbols presentFig. 21
HFP 1 (4)

natural_image
Diagram of a multi-tiered mechanical or electrical component with circular and ring components (no text or symbols)Fig. 22
HFP 2 (5)
Lower Basket

natural_image
Cross-sectional diagram of a mechanical device showing internal components and layered structure (no text or labels)Fig. 23
HFP 3 (3)
Technical Data
Capacity:
12 place settings including serving dishes
Permitted Water Pressure:
$$ 1 - 1 0 \text { bar } (1 0 - 1 0 0 \mathrm{N} / \mathrm{cm} ^ {2} = 0. 1 - 1. 0 \mathrm{MPa}) $$
Electrical Connection:
Electrical connection data is given on the rating plate.
This is located on the right hand inner edge of the door.
Dimensions:
- Freestanding 85 x 60 x 60 (H x W x D in cm)
- Build-in: please refer to separate installation instructions.
CE This appliance complies with the following EC guidelines:
-73/23/EWG (19.02.73) - Low Voltage Directive
- 89/336/EWG (03.05.1989) (Including amended guidelines 92/31/EWG on electromagnetic compatibility.
Installation
Setting Up:
The dishwasher must be positioned on a solid horizontal base. The feet of the appliance can be adjusted by approx. 5 cm. This allows:
- uneven floors to be compensated for
- the height to be adjusted to match other furniture
If you are installing the dishwasher underneath a kitchen worksurface please note the following points:
- sufficient space must be allowed for at the rear of the appliance to accommodate the drain hose, inlet hose and mains cable. They must not be kinked or jammed behind the appliance.
- with integrated and decor fronted build-under appliances, please ensure that the appliance is attached to the underneath of the kitchen worksurface or to an adjacent unit. This is essential in order to ensure that it will not accidentally tip forward.
Depending on the type of installation, the following installation procedure must be followed:
Integrated Appliances (i models)
For installation see installation template provided.
Important! The appliance door can be lined with a wood panel/furniture panel of the following dimensions:
Width: 591 mm - 594 mm
Thickness: 16 mm - 24 mm
Height: depending on:
- recess height
- plinth height
- matchup to the joint runs of adjacent furniture (e.g. drawer), though max. 600 mm
Important Note! Should the furniture panel be longer than 600 mm, the appliance door cannot be fully opened (the furniture panel bumps against the plinth). In this case the plinth must be cut out (see installation template) or overlength door hinge kit BLT 60 used. You can obtain this under E-No. 911239008.
Build-under (U models) and Build-In (E models) Appliances
For installation see installation instructions provided.
Freestanding Appliances
☐ Freestanding appliances do not need to be secured to adjacent furniture.
Note: (only applicable to freestanding appliances fitted with original worktop). If the dishwasher needs to be installed directly next to a heat source such as a cooker or water heater, an insulation plate must be positioned to protect the side of the worktop (depth 57.5 cm). The insulation plate should have aluminium foil on the heat source side.
The original worktop of freestanding appliances has a front-to-back adjustment of approx. 2 cm. This allows the worktop to be adjusted to match adjacent appliances or furniture. To do this, proceed as follows:
☐ Unscrew and remove both screws that holds the worktop in place. These are at the rear of the appliance.
□ Move worktop backwards or forwards as required.
☐ Replace and tighten both screws.
Under Worktop Installation of Freestanding Machines
Freestanding machines can be built under a work surface if the machine's original worktop has been removed.
NOTE:
The base/height of the machine is not adjustable.
Removal of the Original Worktop:
☐ Remove both screws by which the worktop is attached to the machine's rear wall,
☐ Gently push the worktop backwards and lift off.
In order to achieve a better match with the kitchen furniture, a decor panel can be added. Decor panels should be obtained from the kitchen manufacturer.
If the machine is not fitted with a decor frame as standard, one can be obtained as an optional extra from AEG through the retailer.
Dimensions of Decor Panel: H 590 mm x W 581mm
Rebate Thickness: Max 4 mm

Fig. 24
- Decor Panel
- Door front
- Decor Frame
In order to avoid the decor panel from bowing when fixed to the front of the dishwasher, you should use a double-sided tape to hold the decor panel firmly onto the appliance door.
Installation
Information for the Installer
Water Supply:
The dishwasher is constructed in compliance with the relevant technical regulations and has safety features which prevent a back-flow into the drinking water supply.
The dishwasher can be connected to cold water, or to hot water up to a maximum of 60°C.
Connection of the dishwasher to single outlet instantaneous electrical/gas heaters is not permitted.
Please ensure that you comply with the drinking water regulations of your local Water Authority. A high-pressure hose with 3/4" hose coupling, complete with sealing washer, is supplied. We recommend that you do not use other washers, which may be of inferior quality. It is sufficient to tighten the nut by hand.
The machine may be connected:
- directly to a tap with 34 " BSP thread termination
-- to a T-junction on existing tap - or, preferably, to a completely separate water supply, to avoid interference with the kitchen water supply during the operation of the machine.
Warning! The inlet hose must not be kinked or twisted. Take care to install it properly.
If a longer inlet hose is needed, it should be obtained from AEG Spare Parts Department. Never add extensions to hoses. Never shorten hoses.
Minimum water pressure: 1 bar (10 N/cm², 100 kPa)
Less than 1 bar water pressure, please contact AEG Customer Service Department for advice.
Maximum water pressure: 10 bar (100 N/cm², 1 MPa)
At more than 10 bar water pressure, a pressure relief valve must be fitted (obtainable through installer).
Water Discharge
Connection of drain hose:
Maximum permissible height: 1 metre
Minimum height required: 30 cm above the machine's lowest point
In case of extended pipes, which may be laid out to a maximum of 3 metres, the maximum permissible height for connection of the drain hose is 85 cm.

Fig. 25
Warning! The drain hose should not be kinked or twisted. Take care to install correctly.
Sink Trap Connection:
The nozzle of the drain hose (dia. 19 mm) is suitable for all types of sink trap connection. When connecting the drain hose to a sink trap, the internal dia-meter must be 15 mm minimum. The drain hose must be attached to the sink trap connection by means of the accompanying hose clamp.
Water Discharge into Sink:
If you want to run the drain hose on a freestanding machine into a sink, you should use an attachable hose bend. You can obtain this hose bend from your AEG service centre under spare part number ET 646 069 190.
Warning! Ensure that the hook is securely held in position to avoid accidental flooding. This can be achieved by attaching the hook to the tap with string.
Drain Hose Extension:
If a longer drain hose is needed, it should be obtained from AEG Spare Parts Department. The inner diameter of any drain hose extensions must be 19 mm so that the machine's function is not affected.
Installation
Anti-Flood Device
For protection against water damage, the dishwasher is equipped with an anti-flood device.
As well as an overflow for protection, which prevents the uncontrolled rise of water in the machine, there is a leakage protection (floater switch) in place. This is activated by any water leakage in the machine.
In case of leakage, the safety valve in the machine immediately interrupts the inflow of water and the drain pump switches on. As a result, no water can either leak or overflow. Residual water in the machine is automatically pumped out. This also functions when the machine is switched off. It will not, however, work if the machine is disconnected from the electrical supply.
Malfunction is indicated by a continuous tone which can be heard, even when the machine is switched off. In case of malfunction:
□ turn off the water tap, pull out the electrical plug. If hard wired: turn off the mains electricity, pull out the fuse and disconnect the appliance.
□ Contact Customer Service Department for advice.
Electrical Connection
Please note! (For users in the UK)
WARNING - THIS APPLIANCE MUST BE EARTHED.
Please ensure that the voltage and current indicated on the rating plate agrees with the voltage of your electricity supply.
220/240 volts - (i.e., 220/240 V AC).
If your appliance has been equipped with a mains lead with a moulded-on type plug, you must comply with the following regulations:
The plug moulded on to the cord incorporates a fuse. For replacement, use a 13 amp BS 1362 fuse. Only ASTA approved or certified fuses should be used. The fuse cover/carrier must be replaced in the event of changing the fuse. The plug must not be used if teh fuse cover/carrier is lost. A replacement cover/ carrier must be obtained from an electrical goods retailer. If the socket outlets in your home are not suitable for the plug fitted to the appliance, then the plug must be cut off and an appropriate one fitted. When fitting the plug please note the following points:
IMPORTANT
THE WIRES IN THE MAINS LEAD ARE COLOURED IN ACCORDANCE WITH THE FOLLOWING CODE:
GREEN and YELLOW - EARTH
BLUE - NEUTRAL
BROWN - LIVE
As the colours of the wires in the mains lead of this appliance may not correspond with the coloured markings identifying the terminals in your plug proceed as follows:
- The wire which is coloured GREEN and YELLOW must be connected to the EARTH terminal in your plug, which is marked with the letter E or by the earth symbol or coloured GREEN, or GREEN and YELLOW.
- The wire which is coloured BROWN must be connected to the LIVE terminal which is marked with the letter L or coloured RED.
- The wire which is coloured BLUE must be connected to the NEUTRAL terminal which is marked with the letter N or coloured BLACK.
When wiring the plug, ensure that all strands of wire are securely retained in each terminal. Do not forget to tighten the mains lead clamp on the plug.
WARNING! A cut off plug inserted into a 13 amp socket is a serious shock hazard. Ensure that the cut off plug is disposed off safely.
Voltage 220/240 V AC
Fuse rating 13 amps
Installation
Connection
Connection for water supply and water discharge, as well as electricity, must always be at the side of the dishwasher. There is no space behind the machine. The following diagrams (Figs AT1, AT2 and AT3) show the various ways in which the drainage and electrical installations can be carried out.
These examples are only recommendations, because actual locations may vary. Also local regulations must be adhered to.
A Water discharge
B Water inlet
C Stop valve (UP)
C1 Double valve
D Electricity supply
E Electricity connection
F Connecting piece, elbow or straight.
Outer dia. 19 mm. Length 30 mm.
F1 Two connecting pieces, elbow or straight.
Outer dia. 19 mm. Length 30 mm.
G Stop valve, e.g. integrated into the tap.

Fig. 26
AT 1(1)
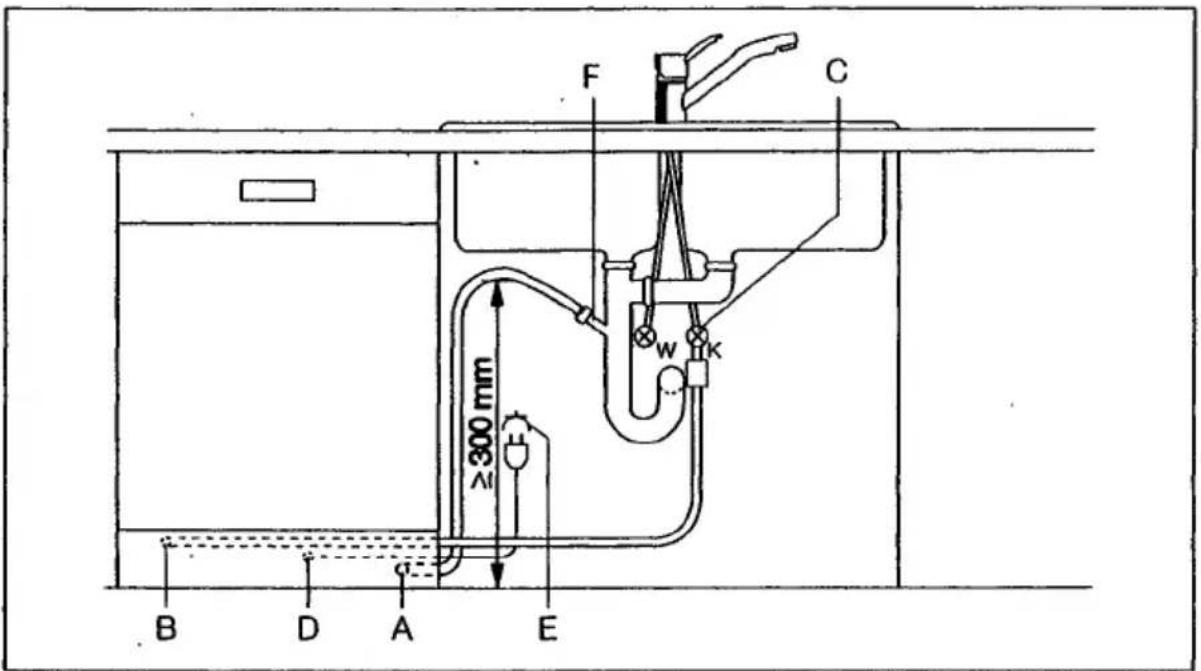
Fig. 27
AT 2(1)
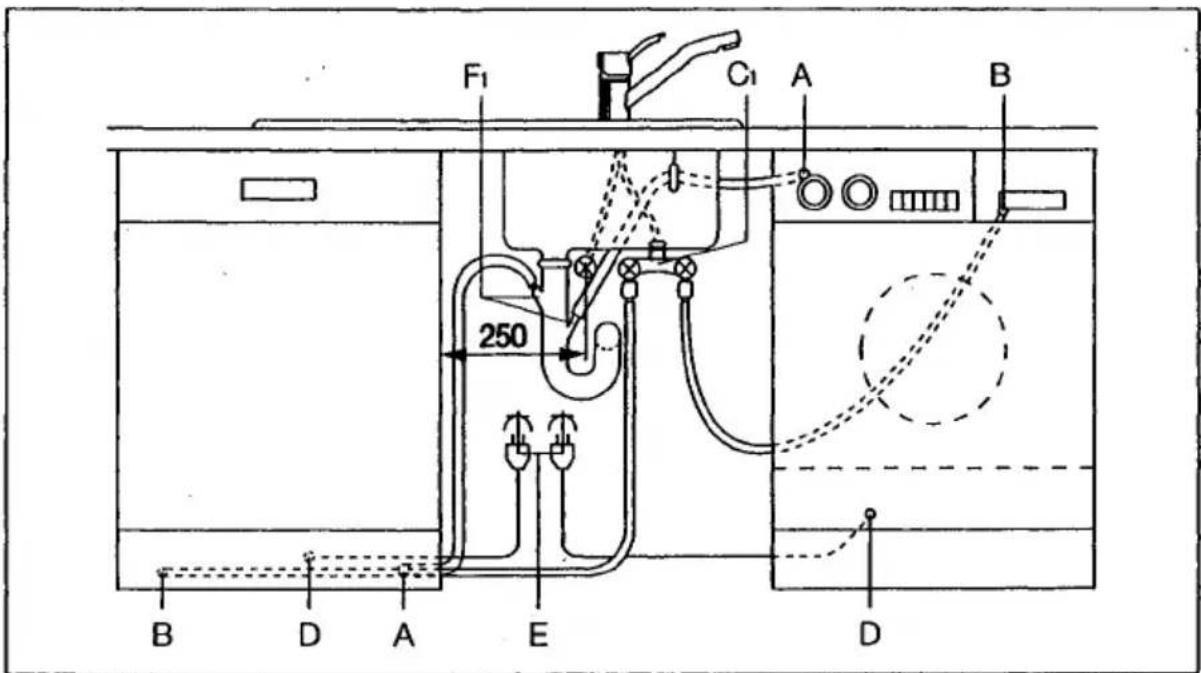
Fig. 28
AT 3
AEG Hausgeräte AG
Postfach 1036
D-90327 Nürnberg 1
© Copyright by AEG
H 241 206 640 - 07970.5/21 -
AEG Domestic Appliances Ltd
Customer Care Department
55-77 High Street
Slough
Berkshire SL1 1DZ
Telephone: 08705 350350


- ÖKO\_FAVORIT 4220 i
- Dear Customer
- Contents
- Safety Advice 4/5
- Disposal
- General Information
- Product Description
- Programme Guide 12/13
- Operation
- Loading the Dishes 22
- Switching ON/OFF
- Care and Cleaning
- Troubleshooting 30/31
- Customer Service 32
- Test Institute Information 33
- Technical Data 34
- Installation
- Safety Advice
- Use as directed.
- Before first use
- Child Safety
- Everyday Use
- Disposal of Packaging
- Disposal of Old Machines
- Plastic Labelling for Easy Recycling
- Economical and Environmentally Friendly Washing
- Unsuitable for Dishwashing
- Suitable for Dishwashing
- Machine Description
- Interior of Appliance
- Back of Appliance
- Programme control knob and progress indicator
- Programme chart
- Setting the Water Softening Unit
- Refilling the Dishwasher Salt
- NOTE:
- Warning!
- Salt Refill Indicator
- Operating
- Filling the Rinse Aid Dispenser
- Refill Indicator for Rinse Aid
- Setting the Rinse Aid Dispenser
- Refilling Dishwasher Detergent
- Important!
- BIO Programmes and Compact Detergents
- Detergent tablets
- Loading the Machine
- Lower Basket
- Cutlery Basket
- Upper Basket
- Setting the wash programme:
- Setting the Programme:
- Programme Correction:
- Interrupting the Programme:
- Switching off/ Removing the Dishes
- Switching off
- Removing the Dishes
- Care of the machine:
- Cleaning the Filters
- Troubleshooting
- Customer Service
- Test Institute Information
- Loading Example:
- Technical Data
- Setting Up:
- Integrated Appliances (i models)
- Build-under (U models) and Build-In (E models) Appliances
- Freestanding Appliances
- Under Worktop Installation of Freestanding Machines
- Information for the Installer
- Water Supply:
- Water Discharge
- Anti-Flood Device
- Electrical Connection
- Please note! (For users in the UK)
- WARNING - THIS APPLIANCE MUST BE EARTHED.
- IMPORTANT
- THE WIRES IN THE MAINS LEAD ARE COLOURED IN ACCORDANCE WITH THE FOLLOWING CODE:
- WARNING! A cut off plug inserted into a 13 amp socket is a serious shock hazard. Ensure that the cut off plug is disposed off safely.
- Connection
Marka : AEG
Model : Favorit 4220 id
Kategoria : Zmywarka