Platinum PKB2410-3-P - Grzejnik KING - Bezpłatna instrukcja obsługi
Znajdź bezpłatnie instrukcję urządzenia Platinum PKB2410-3-P KING w formacie PDF.

| Typ produktu | Grzejnik elektryczny |
| Model | Platinum PKB2410-3-P |
| Marka | KING |
| Wymiary (wys. x szer. x gł.) | Ok. 60 x 80 x 25 cm |
| Waga | Ok. 12 kg |
| Zasilanie | 230 V / 50 Hz |
| Moc grzewcza | 2000 W |
| Regulacja temperatury | Termostat z płynną regulacją |
| Programator | 24-godzinny programator dzienny |
| Funkcje dodatkowe | Funkcja antyzamarzaniowa, tryb Eco |
| Zabezpieczenia | Wyłącznik bezpieczeństwa, ochrona przed przegrzaniem |
| Materiał obudowy | Stal lakierowana |
| Montaż | Naścienny lub na nóżkach (w zestawie) |
| Czyszczenie i konserwacja | Przecierać suchą lub lekko wilgotną szmatką, nie używać środków ściernych |
| Części zamienne | Dostępne: termostat, element grzejny, kabel zasilający |
| Reparability | Możliwość wymiany uszkodzonych elementów przez autoryzowany serwis |
| Gwarancja | 2 lata |
| Certyfikaty | CE, RoHS |
Często zadawane pytania - Platinum PKB2410-3-P KING
Pytania użytkowników dotyczące Platinum PKB2410-3-P KING
0 pytanie dotyczące tego urządzenia. Odpowiedz na te, które znasz, lub zadaj własne.
Zadaj nowe pytanie dotyczące tego urządzenia
Pobierz instrukcję dla swojego Grzejnik w formacie PDF za darmo! Znajdź swoją instrukcję Platinum PKB2410-3-P - KING i weź swoje urządzenie elektroniczne z powrotem w ręce. Na tej stronie opublikowane są wszystkie dokumenty niezbędne do korzystania z urządzenia. Platinum PKB2410-3-P marki KING.
INSTRUKCJA OBSŁUGI Platinum PKB2410-3-P KING
INSTALLATION AND MAINTENANCE

king
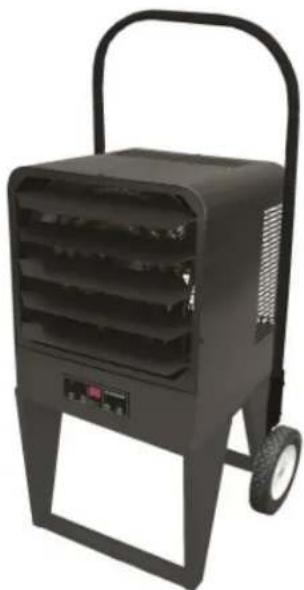
PKB PLATINUM Series Electronic Portable Heater

DANGER

ELECTRIC SHOCK OR FIRE HAZARD
READ ALL WIRE SIZING, VOLTAGE REQUIREMENTS AND SAFETY DATA TO AVOID PROPERTY DAMAGE AND PERSONAL INJURY

PLATINUM
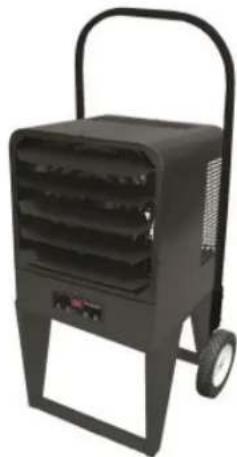
natural_image
Black portable industrial heater with handle and wheels (no visible text or symbols)
WARNING!

READ CAREFULLY - Use the heater only as described in this manual. Any other use is not recommended and could result in fire, electric shock, and personal injury. Following these instructions will prevent difficulties that might occur during the installation and use of the heater. Please study the instructions first, as they may save considerable time and trouble during use addition to providing important safety information. Make sure to save these instructions for future use.
NEVER LEAVE HEATER UNATTENDED WHILE CONNECTED TO A POWER SOURCE
Read all instructions before using this heater.

- WARNING: This heater is hot when in use. To avoid burns, do not let bare skin touch hot surfaces. Keep combustible materials, such as furniture, pillows, bedding, papers, clothes, etc. and curtains at least 3 feet (0.9 m) from the front of the heater and keep them away from the sides and rear.
- Extreme caution is necessary when heater is used by or near children or invalids and whenever the heater is left operating and unattended.
- Always unplug heater when not in use.
- WARNING: Do not operate heater with damaged cord or plug, after it malfunctions, has been dropped, or damaged in any manner. Discard heater or return to authorized service facility for examination and/or repair.
- WARNING: Do not use outdoors.
- This heater is not intended for use in bathrooms, laundry and similar indoor areas. Never locate heater where it can fall into a bathtub or other water container.
- WARNING: Do not run cord under carpeting. Do not cover cord with throw rugs, runners, or similar coverings. Do not route
cord under furniture or appliances. Arrange cord away from traffic area and where it will not be tripped over.
- To disconnect heater, turn controls to off, then remove plug from outlet.
- Connect to properly grounded outlets only.

- WARNING: Do not insert or allow foreign objects to enter any ventilation or exhaust opening as this may cause an electric shock or fire, or damage the heater.

- WARNING: To prevent a possible fire, do not block air intakes or exhaust in any manner.

- WARNING: A heater has hot and arcing or sparking parts inside. Do not use it in areas where gasoline, paint, or flammable vapors or liquids are used or stored.
- Use this heater only as described in this manual. Any other use not recommended by the manufacturer may cause fire, electric shock, or injury to persons.
- Always plug heater into a wall outlet or receptacle. Never use with an extension cord or relocatable power tap, outlet, or power strip.
KING ELECTRIC MFG CO · 9131 10TH AVENUE SOUTH · SEATTLE, WA 98108 · PH:206 762 0400 · FAX: 206 763 7738 · www.king-electric.com
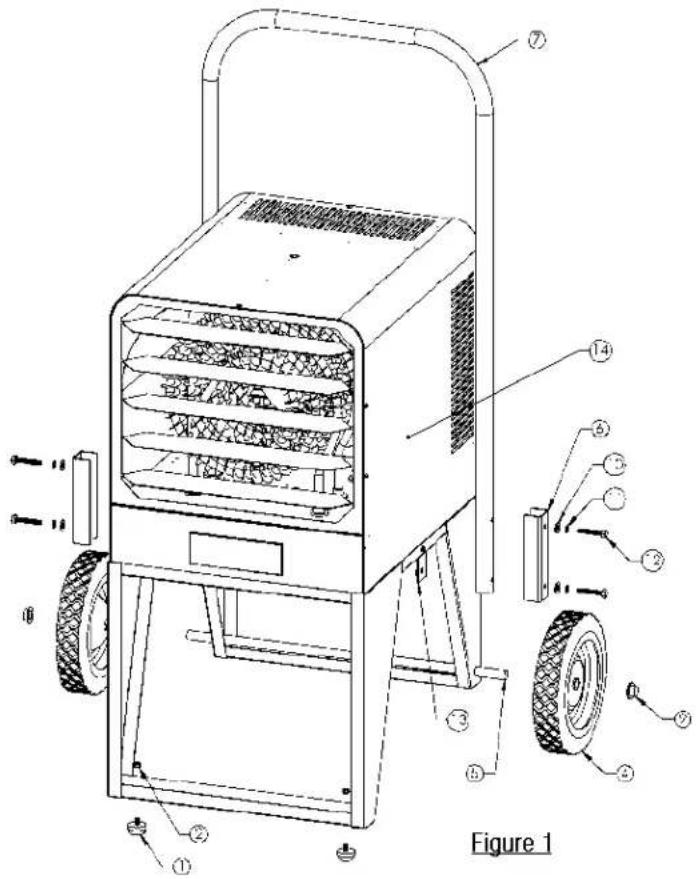
PKB PLATINUM ASSEMBLY & SETUP
CAUTION!
Remove power by unplugging the Heater while setting up or placing
| ITEM NO. | DESCRIPTION | QTY |
| 1 | Rubber Bumper Feet | 2 |
| 2 | 1/4"-20 Nuts | 2 |
| 4 | Rubber Wheels | 2 |
| 5 | Axel | 1 |
| 6 | Handle Bracket | 2 |
| 7 | Handle | 1 |
| 9 | Push Nut Caps | 2 |
| 10 | Flat Washer | 4 |
| 11 | Lock Washer | 4 |
| 12 | 1/4"-20 Hex Bolts | 4 |
| 13 | Nut Plate | 2 |
Setting up Your Heater:
Unpack & inspect your heater for any damage. For any damage call King Electrical or return to an authorized service facility immediately.
Install Wheels & Rubber Bumper Feet:
- Insert Axel (Item 5) through the back legs of the heater base.
- Install 2 pcs Rubber Wheels (Item 4) onto the ends of the Axel and use a hammer to secure the Push Nut Caps (Item 9) onto the ends.
- Insert Rubber Bumper Feet (Item 1) through the holes in the bottom of the front legs of the heater base and secure in place with the 1/4"-20 Nuts (Items 2).
Install Handle:
- Hold the Handle (Item 7) in place while positioning the Nut Plate (Item 13) on the backside of the base (smooth side facing handle) and the Handle Bracket (Item 6) on the front side of the
base. To secure, insert and tighten the 1/4"-20 Hex Bolts (Item 12) through a Lock Washer (Item 11) and a Flat Washer (Item 10) and tighten handle to the base with the following procedure:
Handle Bracket (Item 6) is designed to partially flatten the handle tube to insure a tight fit. The 1/4"-20 Hex Bolts (Item 12) should be tightened with a 7/16" box or socket wrench. Alternate the tightening sequence equally on each Hex Bolt to ensure equal deformation of the tube. When installed properly, the handle bracket will deform the tube and the side legs of the bracket will just touch the heater base. Do not tighten more than 50 in/lb. of torque or the bolt or nut could strip or break.
Pre-assemble both tube ends loosely to base before tightening bolts.
Final Setup of Heater and General Use:
- Place heater 6" min. (15cm) away from vertical surfaces and keep intake clear of obstructions. Keep all combustible materials, such as furniture, papers, clothes, drapes, and curtains at least 3 feet (0.9 m) from the front, sides and rear of the heater.
PKB PLATINUM ASSEMBLY & SETUP
- Route power cord away from traffic areas to avoid tripping. NEVER rout cord under carpets, rugs, furniture, other equipment.
- Plug power cord into a grounded wall outlet only DO NOT use an extension cord or power strip.
ADJUSTMENT OF LOUVERS:
- Adjust louvers to the desired position prior to operating. See Fig 2
WARNING:
This heater is design for floor use ONLY and should not be tipped on side, placed upside down, mounted on or inserted into a wall. A tip-over auto disconnect switch will activate when tipped more then 30°.
DO NOT use heater in areas where gasoline, paint, or other flammable liquids are used.
DO NOT use heater outdoors or in wet or moist indoor areas such as bath or laundry rooms.
Louver Adjustment: (Do not adjust while heater is operational):
The Louvers are opened during testing at factory, but may have shifted during shipping. Confirm louvers are rotated less than 45 degrees from horizontal before operation. To adjust the opening angle, grasp the left and right end of louver and twist with two hands to the desired position. CAUTION: Increasing the angle beyond 45^ degrees from horizontal may restrict air flow casing the over temperature limit to activate and shut off the heater.
Figure 2:
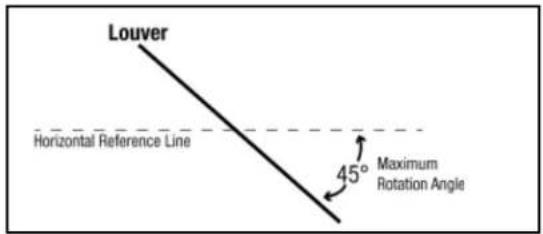
Louver Adjustment
Plug Selection:
Check rating label on heater and verify the proper voltage and SO cord type. The SO cord requires a plug per the chart in Figure 3. No adapter is available for this blade configuration, and none should be used. The type outlet required is grounding outlet. When properly installed, it provides a ground connection through the cord to the heater to protect the operator from electric shock.
Plug Specifications
| Fits Cable Dia. | Plug Type | Description | Volts | Amps | Configuration | NEMA # | ANSI # |
| .385"-.780" | Locking | 3 Pole, 4 Wire | 250 | 20 | [HAB2] | L15-20 | C73.85 |
| .385"-.780" | Locking | 3 Pole, 4 Wire | 250 | 30 |  | L15-30 | C73.86 |
| .595"-1.150" | Locking | 3 Pole, 4 Wire | 480 | 30 |  | L16-30 | C73.88 |
| .595"-1.150" | Locking | 3 Pole, 4 Wire | 600 | 30 |  | L17-30 | C73.89 |
| .750"-1.125" | Locking | 2 Pole, 4 Wire | 600 | 50 |  | — | — |
Figure 3
| .750"-1.125" | Locking | 3 Pole, 4 Wire | 600 | 50 |  | — | — |
| .625"-1.187" | Non Locking | 2 Pole, 3 Wire | 250 | 50 |  | 6-50 | C73.53 |
| .390"-.775" | Non Locking | 3 Pole, 4 Wire | 250 | 20 |  | 15-20 | C73.59 |
| .750"-1.250" | Non Locking | 3 Pole, 4 Wire | 250 | 50 |  | 15-50 | C73.61 |
PKB PLATINUM SO WIRE SIZE
| MODEL # | DESCRIPTION | KW | PHASE | VOLTS | AMPS | SO CORD SIZE |
| PKB2007-1-P- | PKB 208V 7.5KW 1 PH | 7.5 | 1 | 208 | 36.1 | 8/3 |
| PKB2007-3-P- | PKB 208V 7.5KW 3 PH | 7.5 | 3 | 208 | 20.8 | 10/4 |
| PKB2010-1-P- | PKB 208V 10KW 1 PH | 10 | 1 | 208 | 48.0 | 6/3 |
| PKB2010-3-P- | PKB 208V 10KW 3 PH | 10 | 3 | 208 | 27.7 | 8/4 |
| PKB2015-1-P-FB | PKB 208V 15KW 1-PH | 15 | 1 | 208 | 72.1 | 2/3 |
| PKB2015-3-P- | PKB 208V 15KW 3 PH | 15 | 3 | 208 | 36.1 | 6/4 |
| PKB2020-3-P-FB | PKB 208V 20KW 3-PH | 20 | 3 | 208 | 55.6 | 4/3 |
| PKB2407-1-P | PKB 240/208V 7.5/5.63KW 1-PH | 7.5/5.63 | 1 | 240/208 | 31.3 | 8/3 |
| PKB2407-3-P | PKB 240/208V 7.5/5.63KW 3-PH | 7.5/5.63 | 3 | 240/208 | 18.1 | 12/4 |
| PKB2410-1-P | PKB 240/208V 10/7.5KW 1-PH | 10/7.5 | 1 | 240/208 | 41.7 | 6/3 |
| PKB2410-3-P | PKB 240/208V 10/7.5KW 3-PH | 10/7.5 | 3 | 240/208 | 24.1 | 10/4 |
| PKB2412-1-P-FB | PKB 240/208V 12/9KW 1-PH | 12.5/9.4 | 1 | 240/208 | 52.1 | 6/3 |
| PKB2412-3-P | PKB 240/208V 12/9KW 3-PH | 12.5/9.4 | 3 | 240/208 | 30.1 | 8/4 |
| PKB2415-1-P-FB | PKB 240/208V 15/11.25KW 1-PH | 15/11.25 | 1 | 240/208 | 62.5 | 4/3 |
| PKB2415-3-P | PKB 240/208V 15/11.25KW 3-PH | 15/11.25 | 3 | 240/208 | 36.1 | 6/4 |
| PKB2420-3-P-FB | PKB 240/208V 20/15KW 3-PH | 20/15 | 3 | 240/208 | 48.2 | 4/4 |
| PKB2425-3-P-FB | PKB 240/208V 25/18.75KW 3-PH | 25/18.75 | 3 | 240/208 | 60.2 | 2/4 |
| PKB2430-3-P-FB | PKB 240/208V 30/22.5KW 3-PH | 30/22.5 | 3 | 240/208 | 72.3 | 2/4 |
| PKB4807-1-P- | PKB 480V 7.5KW 1 PH | 7.5 | 1 | 480 | 15.6 | 14/3 |
| PKB4807-3-P- | PKB 480V 7.5KW 3 PH | 7.5 | 3 | 480 | 9.0 | 16/4 |
| PKB4810-1-P- | PKB 480V 10KW 1 PH | 10 | 1 | 480 | 20.8 | 12/3 |
| PKB4810-3-P- | PKB 480V 10KW 3 PH | 10 | 3 | 480 | 12 | 14/4 |
| PKB4812-1-P- | PKB 480V 12KW 1 PH | 12.5 | 1 | 480 | 26.0 | 10/3 |
| PKB4812-3-P- | PKB 480V 12KW 3 PH | 12.5 | 3 | 480 | 15.1 | 12/4 |
| PKB4815-1-P- | PKB 480V 15KW 1 PH | 15 | 1 | 480 | 31.3 | 8/3 |
| PKB4815-3-P- | PKB 480V 15KW 3 PH | 15 | 3 | 480 | 18.1 | 12/4 |
| PKB4820-3-P- | PKB 480V 20KW 3 PH | 20 | 3 | 480 | 24.1 | 10/4 |
| PKB4825-3-P- | PKB 480V 25KW 3 PH | 25 | 3 | 480 | 30.1 | 8/4 |
| PKB4830-3-P- | PKB 480V 30KW 3 PH | 30 | 3 | 480 | 36.1 | 6/4 |
CLEANING INSTRUCTIONS
Before cleaning this heater, heating element must be cool.
- Before removing grille, turn the electrical power OFF by unplugging it. If not, electricity may still be flowing to the heater. If you are uncomfortable working with electrical appliances consult a qualified electrician. Once power is off completely, proceed to the next step.
- Remove 4 Phillips head screws located behind the louvers in the corners of the louver housing. Wipe housing with soft cloth or brush.
- Using a hair dryer or vacuum on blow cy-
cle, blow debris back through the element. Do not touch element. Vacuum lose debris without touching the elements.
- Replace louver housing and secure with screws.
- To clean the fan and motor remove the safety grill from the rear of the heater. This provides access to the fan and motor. Wash Grill with hot soapy water and dry immediately
- Wipe the fan and motor with a soft cloth or brush.
- Replace safety grill & plug the unit back in.
natural_image
Black portable heater with heat exchanger and wheels (no visible text or symbols)PLATINUM OPERATING INSTRUCTIONS
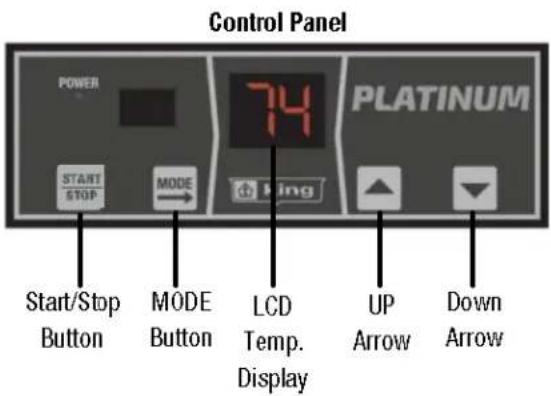

Operating Instructions
- Push the STOP button, the heater will come on and heat to the default setting of 77°F.
- Once the room temperature reaches the set point, the heater will stop running.
- In normal operation the display will show the current room temperature.

Room Temperature Selection
- During operation, push or arrow buttons to set the temperature from 45°F-99°F, Hold down the UP or DOWN arrow to speed up the selection process. The LCD will go back to display room temperature after 5 seconds.
Timer Mode Selection
- During operation, press the button 1 time, the display window will show the timer mode setup. Push the UP or DOWN arrows to set the timer from 1 hour—9 hours.

Fan Only Mode Selection
Lower thermostat temperature below the room temp. prior to Fan Only selection.
- During operation, press the MODE button 2 times, the display window will show H (Heat Mode) or F (Fan Only Mode). Push
to enter Fan Only mode. Push
to enter Heat Mode.


Factory Reset
- During operation, press the and HOLD the button for 5 seconds to reset to the factory settings.
Sensor Error Code
- During operation, if the display shows E1 that indicates an issue with the sensor. The sensor connector may have come loose from the control board. Open the wiring compartment and reseat the sensor onto the control board. Or it may be possible the sensor needs to be replaced. Contact customer support for assistance.

TROUBLESHOOTING
| SYMPTOM | PROBLEM | SOLUTION |
| BreakerTrips | 1. Short Circuit2. Overloaded Circuit3. Improper Voltage | 1. Find source of short. Trace heater circuit and verify the heater is wire properly.2. Reduce wattage in circuit. Refer to circuit sizing table for maximum wattage.3. Verify the heater voltage matches the supply voltage. |
| Heater not working - - | 1. No Power2. Loose Connections3. Defective Limit- | 1. Turn Breaker ON, turn thermostat ON, check that the breaker is position properly on panel bus bar. A 2 Pole breaker must be connected to both busbars (A&B phase) to produce 240V power.2. Tighten wire connections.3. By pass the limit to test. If heater works, replace the limit. |
| Heater Smokes | 1. Oil on Element2. Needs Cleaning | 1. It is normal for the element to burn off some light finishing oil used in the manufacturing process when first energized. Open windows and allow room to vent until it stops, usually within a few minutes.2. Remove any dust or dirt accumulations. |
| Room Temperature Does Not Match Thermostat Setting | 1. Room Temperature Measure Varies | 1. The thermostat senses the temperature at the back of the heater near the inlet air stream. If the verification measurement of room temperature was taken far away from this point the two temperatures may differ. |
| Sensor Error Code E1 | Display shows E1 Error Code | If display shows E1 that indicates an issue with the sensor.1. The sensor connector may have come loose from the control board. Open the wiring compartment and reseat the sensor onto the control board.2. The sensor is broken and needs to be replaced. Contact customer support for assistance. |
SMART LIMIT PROTECTION AND MAINTENANCE

Heater Safety Limit Tripped?
This heater is equipped with a thermal overload Smart Limit Protection which disconnects elements and motor in the event normal operating temperatures are exceeded. If thermal overload
trips due to abnormal operating temperatures, thermal overload shall remain open until manually reset by turning the heater OFF for fifteen minutes. Inspect for any objects on or adjacent to the heater that may cause high temperatures. After inspecting the heater, keep the power to the heater off for 15 minutes to reset the SLP thermal protector. If the SLP thermal protector shuts the heater off again, immediately turn the heater OFF at the circuit breaker and inspect the heater for possible fan motor failure or dirt and lint on the heating element. Repeat the starting procedure.
DO NOT TAMPER OR REMOVE THIS THIS DEVICE
Maintenance
With proper care your electric heater should last a lifetime, however, seasonal cleaning is recommended to maintain the efficiency of the heater. Keep heating element, fan and motor free of debris. Use compressed air to blow out any debris.
We're Here to Help!
For any difficulties installing or operating this product
Call Us Toll Free at:
1-800-603-5464 Ext 111
7:00 am -3:30 pm PST Mon-Fri
Visit king-electric.com
or email us at info@king-electric.com