
KV-27FX10 - Telewizor SONY - Bezpłatna instrukcja obsługi
Znajdź bezpłatnie instrukcję urządzenia KV-27FX10 SONY w formacie PDF.


| Typ produktu | Telewizor kolorowy |
| Marka | Sony |
| Model | KV-27FX10 |
| Kineskop | Microblack Trinitron 27 cali (69 cm) przekątna |
| System telewizyjny | NTSC |
| Zakres kanałów | VHF: 2-13, UHF: 14-69, kablowe: 1-125 |
| Pobór mocy | 260 W (maks.), 3,6 W (tryb gotowości) |
| Zasilanie | 120 V AC, 60 Hz |
| Dźwięk | MTS (stereo, SAP), głośniki przednie 10 W × 2, surround 7 W × 2 |
| Wejścia | S-Video (4-pin mini DIN), wideo kompozytowe (phono), audio (phono) |
| Wyjścia | Monitor (S-Video, wideo, audio), audio zmienne (phono) |
| Technologie obrazu | IDTV (Improved Definition TV), Dynamic Color, filtr kolorów, redukcja szumów |
| Funkcje dodatkowe | Zamrażanie obrazu (STILL), podwójny kanał (JUMP), wyłącznik czasowy (SLEEP), wyświetlanie zegara |
| Pilot | Programowalny pilot RM-760 z funkcją uczenia |
| Akcesoria w zestawie | Pilot RM-760, baterie AA × 4, kabel antenowy, kable głośnikowe, złączka antenowa |
| Bezpieczeństwo | Automatyczne wyłączanie przy braku sygnału, zabezpieczenie przed przegrzaniem |
| Czyszczenie | Przecierać miękką, lekko wilgotną szmatką; nie używać rozpuszczalników |
Często zadawane pytania - KV-27FX10 SONY
Pytania użytkowników dotyczące KV-27FX10 SONY
0 pytanie dotyczące tego urządzenia. Odpowiedz na te, które znasz, lub zadaj własne.
Zadaj nowe pytanie dotyczące tego urządzenia
Pobierz instrukcję dla swojego Telewizor w formacie PDF za darmo! Znajdź swoją instrukcję KV-27FX10 - SONY i weź swoje urządzenie elektroniczne z powrotem w ręce. Na tej stronie opublikowane są wszystkie dokumenty niezbędne do korzystania z urządzenia. KV-27FX10 marki SONY.
INSTRUKCJA OBSŁUGI KV-27FX10 SONY

Operating Instructions
Before operating the unit, please read this manual thoroughly and retain it for future reference.
Owner's Record
The model and serial numbers are located at the rear of the unit. Record the serial number in the space provided below. Refer to these numbers whenever you call upon your Sony dealer regarding this product.
Model No. KV-27FX10 Serial No. ____

natural_image
Line drawing of a retro television set with monitor, tower, and front panel (no text or symbols)WARNING
To prevent fire or shock hazard, do not expose the unit to rain or moisture.

CAUTION
RISK OF ELECTRIC SHOCK DO NOT OPEN

CAUTION TO REDUCE THE RISK OF ELECTRIC SHOCK.
DO NOT REMOVE COVER (OR BACK).
NO USER-SERVICEABLE PARTS INSIDE.
REFER SERVICING TO QUALIFIED SERVICE PERSONNEL

This symbol is intended to alert the user to the presence of uninsulated "dangerous voltage" within the product's enclosure that may be of sufficient magnitude to constitute a risk of electric shock to persons.

This symbol is intended to alert the user to the presence of important operating and maintenance (servicing) instructions in the literature accompanying the appliance.
CAUTION:
TO PREVENT ELECTRIC SHOCK, DO NOT USE THIS POLARIZED AC PLUG WITH AN EXTENSION CORD, RECEPTACLE OR OTHER OUTLET UNLESS THE BLADES CAN BE FULLY INSERTED TO PREVENT BLADE EXPOSURE.
Note to CATV system installer in the U.S.A.
This reminder is provided to call the CATV system installer's attention to Article 820-22 of the NEC that provides guidelines for proper grounding and, in particular, specifies that the cable ground shall be connected to the grounding system of the building, as close to the point of cable entry as practical.
Contents
Before use
Features 3
Precautions 3
Location of controls 4
Set-up
Preparing the remote commander 7
Connecting the TV antenna/cable 8
Connecting the speakers....10
Connecting other equipment....11
Presetting TV channels 14
Operation
Watching TV programs....18
Enjoying convenient features....20
Setting the clock....26
Using the programmable remote commander....28
General
Specifications....34
Troubleshooting....34
This color TV features a Microblack™ Trinitron picture tube for a high resolution, high contrast picture.
- IDTV (Improved Definition TV) assures a dense picture with beautiful details and high resolution.
- Multi-band VHF/UHF/CATV tuner receives up to 125 cable channels for a total of 181 possible off-air and cable channels.
- Built-in MTS (Multichannel TV Sound) decoder enables reception of stereo programs and Second Audio Program (SAP) broadcasts.
- S VIDEO IN jack which is connected to the S video output jack on the VCR allows superior playback pictures.
- Variable audio output jacks enable reproduction of TV or video sound through an audio system.
- Monitor output jacks allow VCR recording of the picture and sound being displayed on the TV.
- Surround (Dolby* and Hall surround and Simulated stereo) effect allows you to enjoy a program as if in a theater.
- On-screen displays
Supplied Remote Commander provides you many other convenient features.
- The programmable remote commander allows you to operate video equipment made by Sony or other manufacturers.
• Automatic programming to preset all receivable channels instantly. - JUMP button enables switching quickly between two channels.
• STILL button allows you to freeze a TV picture. - Sleep timer automatically turns off the TV after approximately one hour.
- ANT/AUX button permits one-touch selection of pay cable TV channels when a converter is connected.
- Internal clock for the current time display
- AV WINDOW buttons on the Remote Commander allow the picture and sound to be adjusted from a distance.
And other features for a high quality picture...
- New Dynamic Color system assures accurate, life-like skin tones and pure whites.
- Non-interlace system improves vertical resolution and minimizes the inter-line flickers.
- Digital color pure filter totally clears color spill or color noise and produces fine picture detail.
- Digital frame noise reduction greatly reduces picture noise level.
* "Dolby" and the double-D symbol □□ are trade marks of Dolby Laboratories Licensing Corporation.
Safety
- Operate the unit only on 120 V AC.
- One blade of the plug is wider than the other for the purpose of safety and will fit into the power outlet only one way. If you are unable to insert the plug fully into the outlet, contact your dealer.
- Should any liquid or solid object fall into the cabinet, unplug the unit and have it checked by qualified personnel before operating it any further.
- Unplug the unit from the wall outlet if it is not going to be used for several days or more. To disconnect the cord, pull it out by the plug. Never pull the cord itself.
Installation
• To prevent internal heat build-up, do not block the ventilation openings.
- Do not install the unit in a hot or humid place or in a place subject to excessive dust or mechanical vibration.
Cleaning
Clean the unit with a slightly damp soft cloth. Use a mild household detergent. Never use strong solvents such as thinner or benzine as they might damage the finish of the cabinet.
Repacking
Retain the original carton and packing materials for safe transport of this unit in the future.
Use of this television receiver for other than private viewing of programs broadcast on UHF or VHF or transmitted by cable companies for the use of the general public may require authorization from the broadcaster/cable company and/or program owner.
-
-
-
-
-
-
-
-
-
-
-
-
-
-
-
-
-
-
-
-
-
-
-
-
-
-
-
-
-
-
-
-
-
-
-
-
-
-
-
-
-
-
-
-
-
-
-
-
-
-
-
-
-
-
-
-
-
-
-
-
-
-
-
-
-
-
-
-
-
-
-
-
-
-
-
-
-
-
-
-
-
-
-
-
-
-
-
-
-
-
-
-
-
-
-
-
-
-
- 100.
-
-
-
-
-
-
-
-
-
-
-
-
-
-
-
-
-
-
-
-
-
-
-
-
-
-
-
-
-
-
-
-
-
-
-
-
-
-
-
-
-
-
-
-
-
-
-
-
-
-
-
-
-
-
-
-
-
-
-
-
-
-
-
-
-
-
-
-
-
-
-
-
-
-
-
-
-
-
-
-
-
-
-
-
-
-
-
-
-
-
-
-
-
-
-
-
-
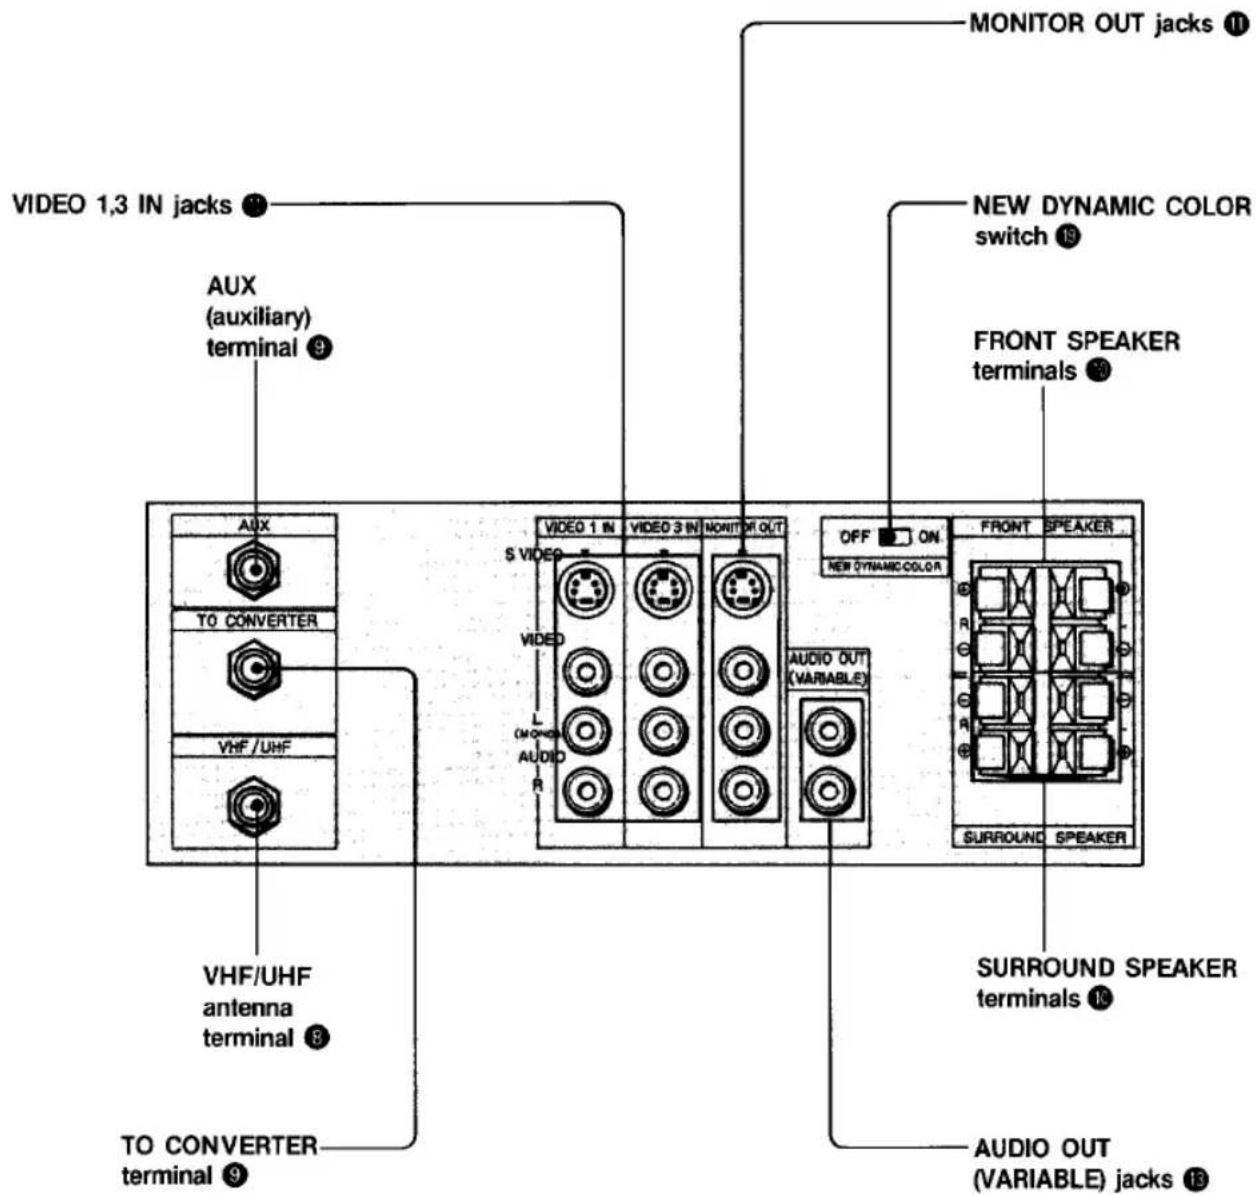
Refer to the pages indicated in ● for details.
Front

Rear
Programmable Commander RM-760
Refer to the pages indicated in ● for details.
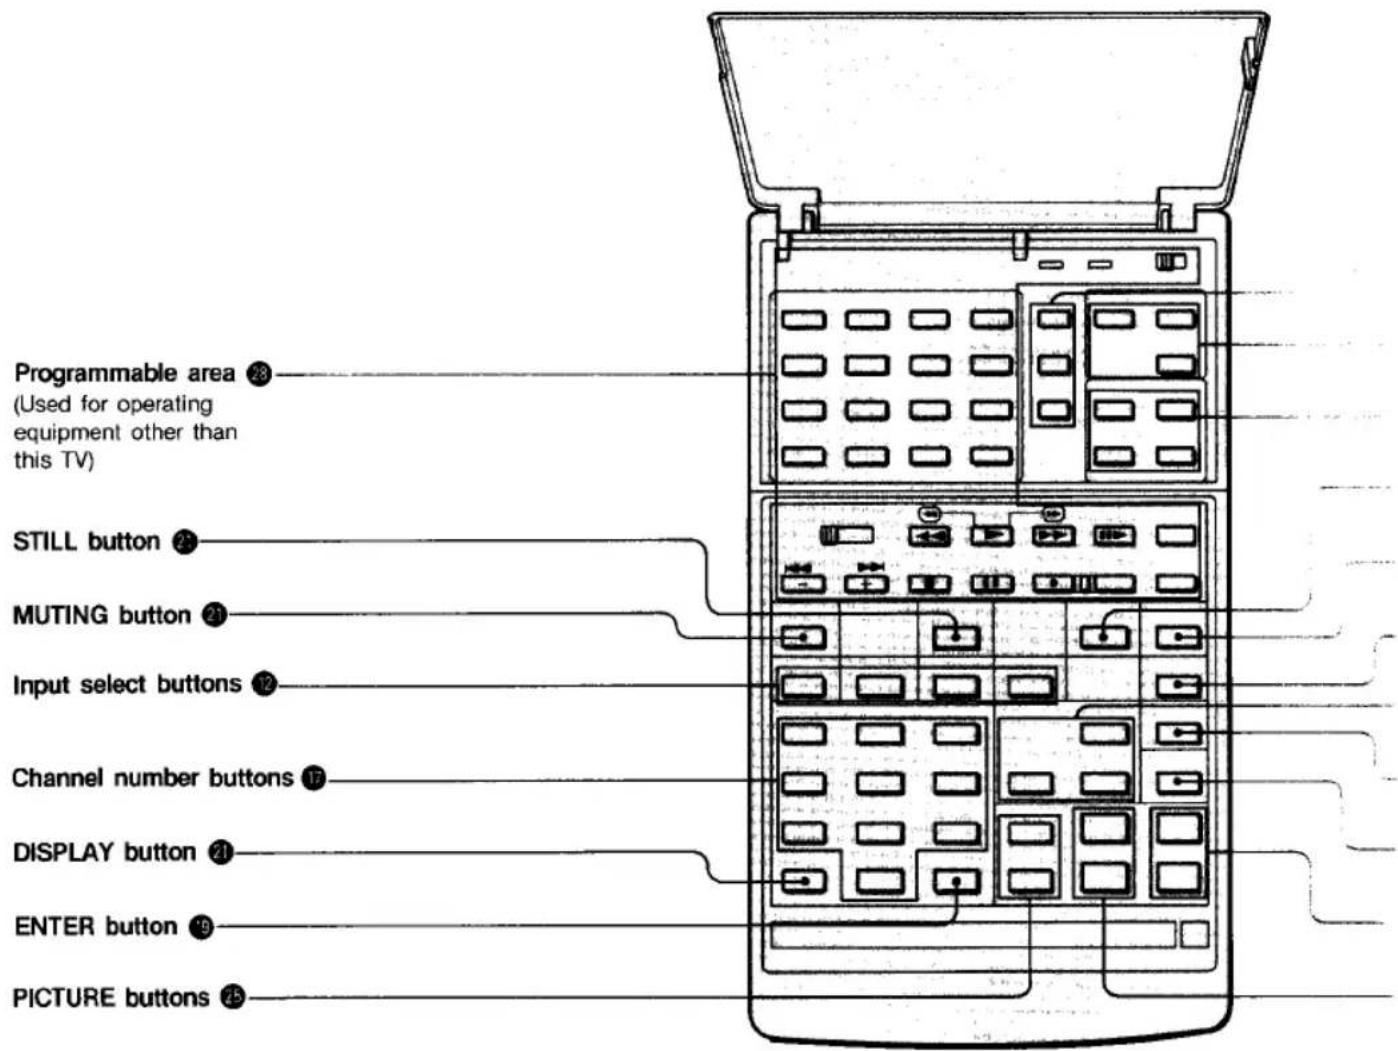
* The function of these buttons are available on the TV.
Battery Installation
1 Push to open the lid.
2 Install four size AA (R6) batteries with the correct polarity.
3 Replace the lid.
Channel presetting
buttons 15 7
Time set buttons 21
AV-WINDOW buttons 25
SLEEP button ①
POWER switch* 15
ANT/AUX button 15
SURROUND buttons 20
MTS button 21
JUMP button 21
CH (channel) scan buttons*
VOL (volume) buttons buttons* 19
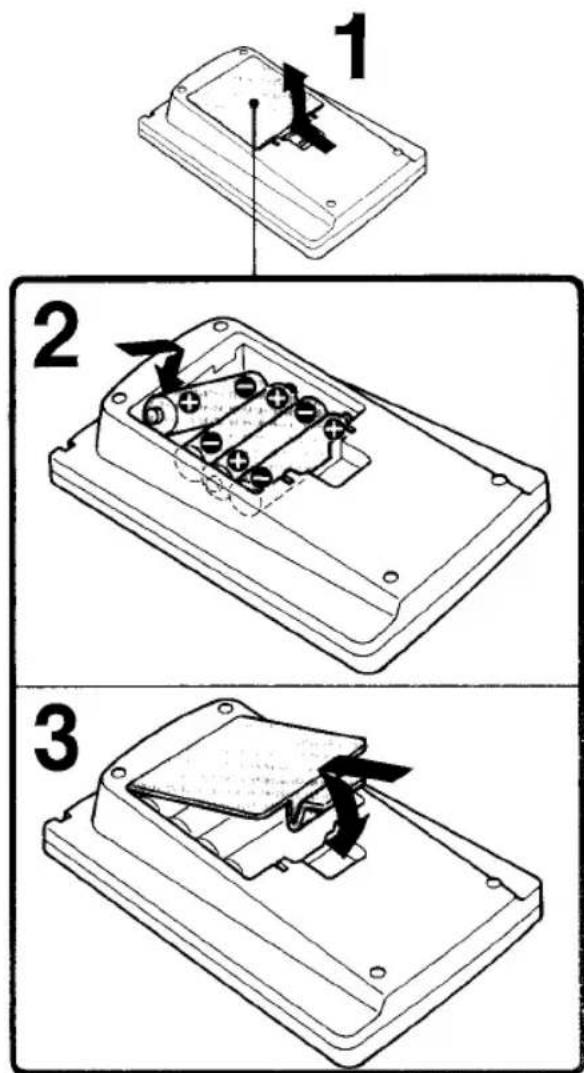
- In normal operation, batteries will last up to half a year. If the unit does not operate properly, the batteries might be exhausted. Replace them with new ones.
- To avoid damage from possible battery leakage, remove the batteries when the Commander will not be used for a long time.
Either an indoor antenna or outdoor antenna can be connected. For better quality picture, connecting an outdoor antenna is recommended.
Cable TV reception is only possible by connecting a cable supplied by your local cable operator.
To Connect a VHF, UHF, or VHF/UHF Combination Antenna\* or CATV Cable
1 Check the cable type and prepare the cable end using the appropriate connector.
2 Plug the connector into VHF/UHF on the rear of the TV.
75-ohm coaxial cable (round)

300-ohm twin-lead cable (flat)
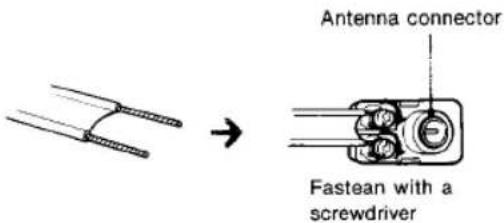
75-ohm coaxial cable (round)

300-ohm twin-lead cable (flat)

How to attach an F-type connector to the 75-ohm coaxial cable

* Most combination antennas are equipped with a signal splitter. Remove the splitter and attach the appropriate connector.
For a better quality picture, it is recommended to use the supplied cable so that the 300 ohm twin-lead cable can be kept at a distance from the TV set.

When you connect both VHF and UHF antennas
Use the optional EAC-66 U/V mixer.
1 Prepare the VHF antenna end using the appropriate connector.
2 Connect the cables to the mixer.
3 Plug the mixer to VHF/UHF.
(When using a 300-ohm twin-lead cable, use the supplied cable to connect the mixer and VHF/UHF terminal.)

When you connect a cable with a special converter/decoder\* for pay cable TV systems
Pay cable TV systems use scrambled or encoded signals and require special converters (decoders) in addition to the normal cable connection.

flowchart
graph LR
    A["AUX"] --> B["Converter/decoder"]
    C["TO CONVERTER"] --> B
    D["VHF/UHF"] --> E["Optional 75-ohm coaxial cable"]
    F["CATV cable"] --> G["Output"]
If the supplied antenna connector has a slot as illustrated below:
The antenna connector can be used also as a U/V mixer.
When connecting both 75-ohm VHF and 300-ohm UHF antennas, or 300-ohm UHF antenna only:
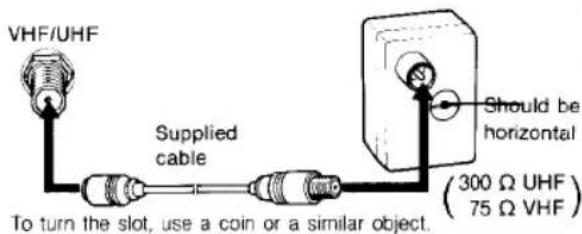
When the U/V mixer is used
Snow and noise may appear in the pictures of the cable TV channels over 37 (W+1).
* The special converter/decoder will be supplied by the cable system operator.
natural_image
Technical line drawing of a mechanical or electrical component with no visible text, numbers, or symbols.Attaching the speakers

natural_image
Technical line drawing of a mechanical component with no visible text or symbols
Adjust the angle for the best sound reproduction.
Connecting the cords
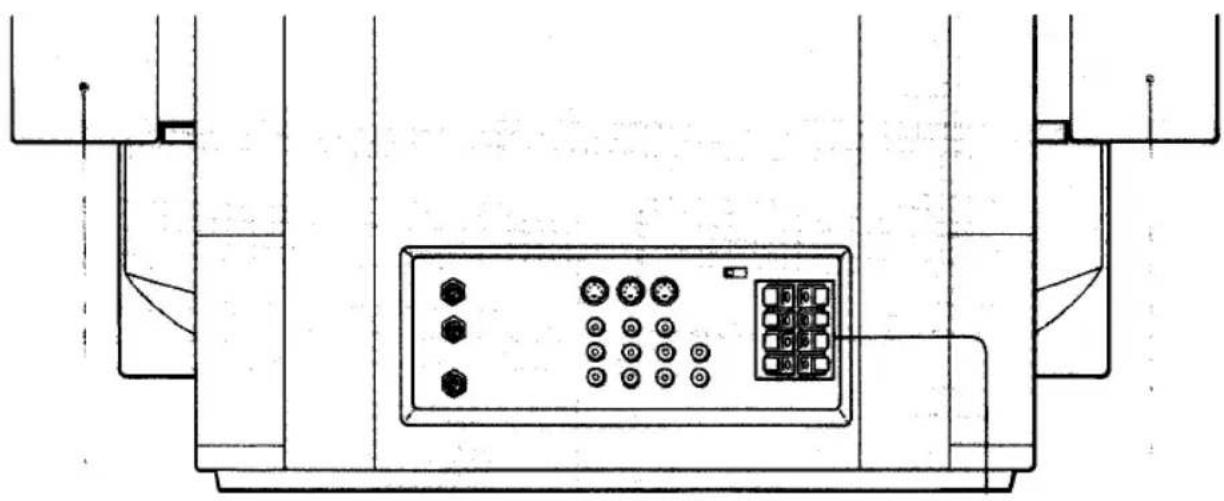
Rear of TV
For the right speaker
For the surround speakers

For the left speaker
Red striped cord: to ⊕
Black cord: to ⊖

natural_image
Diagram of a hand inserting a plug into a socket (no text or symbols present)Connect the other end of the cords to the input terminals of the corresponding speakers in the same way as above.
If you connect surround speakers,
they must be rated at 8-ohm impedance (with normal power holding capacity of more than 7W).
Phasing
Correct ⊕ ⊖ connection of both speaker systems ensures proper in-phase operation. If the speaker system is out-of phase, the bass tones seem to be missing and the position of the instruments becomes obscure.
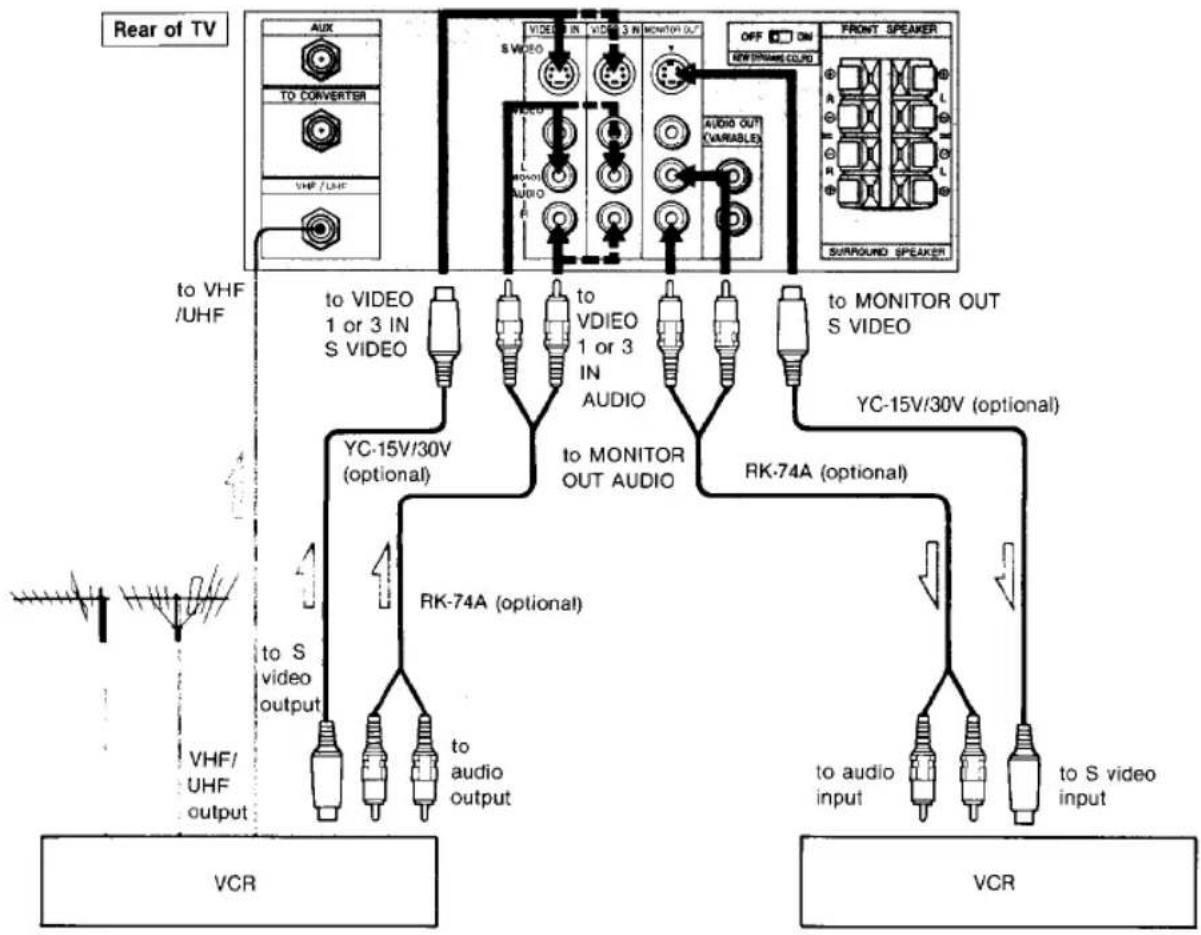
Connecting a VCR
With this connection, you will be able to...
—View the playback of video tapes
—Record TV programs
—Record a TV program while viewing another
1 Connecting VCRs with an S video output jack

signal flow
flowchart
graph TD
    A[" Rear of TV "] --> B[" FRONT SPEAKER "]
    B --> C[" VCR "]
    A --> D[" VCR "]
    D --> E[" to audio output "]
    D --> F[" to S video output "]
    A --> G[" to VIDEO 1 or 3 IN S VIDEO "]
    A --> H[" to VDIEO 1 or 3 IN AUDIO "]
    A --> I[" to MONITOR OUT S VIDEO "]
    A --> J[" to MONITOR OUT AUDIO "]
    A --> K[" to MONITOR OUT VHD "]
    A --> L[" to MONITOR OUT VHF /UHF "]
    A --> M[" to audio output "]
    A --> N[" to audio input "]
    A --> O[" to S video input "]
    P[" VCR "] --> Q[" to audio output "]
    R[" VCR "] --> S[" to audio input "]
    T[" VCR "] --> U[" to audio output "]
    V[" VCR "] --> W[" to audio input "]
    X[" VCR "] --> Y[" to audio output "]
    Z[" VCR "] --> AA[" to audio input "]
    AB[" VCR "] --> AC[" to audio output "]
    AD[" VCR "] --> AE[" to audio input "]
    AF[" VCR "] --> AG[" to audio output "]
    AH[" VCR "] --> AI[" to audio input "]
    AJ[" VCR "] --> AK[" to audio output "]
    AL[" VCR "] --> AM[" to audio input "]
    AN[" VCR "] --> AO[" to audio output "]
    AP[" VCR "] --> AQ[" to audio input "]
    AR[" VCR "] --> AS[" to audio output "]
    AT[" VCR "] --> AU[" to audio input "]
    AV[" VCR "] --> AW[" to audio output "]
    AX[" VCR "] --> AY[" to audio input "]
    AZ[" VCR "] --> BA[" to audio output "]
    BB[" VCR "] --> BC[" to audio input "]
    BD[" VCR "] --> BE[" to audio output "]
    BF[" VCR "] --> BG[" to audio input "]
    BH[" VCR "] --> BI[" to audio output "]
    BJ[" VCR "] --> BK[" to audio input "]
    BL[" VCR "] --> BM[" to audio output "]
    BN[" VCR "] --> BO[" to audio input "]
    BP[" VCR "] --> BQ[" to audio output "]
    BR[" VCR "] --> BS[" to audio input "]
    BT[" VCR "] --> BU[" to audio output "]
    BV[" VCR "] --> BW[" to audio input "]
    BX[" VCR "] --> BY[" to audio output "]
    BZ[" VCR "] --> CA[" to audio input "]
    CB[" VCR "] --> CC[" to audio output "]
    CD[" VCR "] --> CE[" to audio input "]
    CF[" VCR "] --> CG[" to audio output "]
    CH[" VCR "] --> CI[" to audio input "]
    CJ[" VCR "] --> CK[" to audio output "]
    CL[" VCR "] --> CM[" to audio input "]
    CN[" VCR "] --> CO[" to audio output "]
    CP[" VCR "] --> CQ[" to audio input "]
    CRJ[" VCR "] --> CS[" to audio output "]
    CTJ[" VCR "] --> CU[" to audio input "]
    CVJ[" VCR "] --> CW[" to audio output "]
    CXJ[" VCR "] --> CY[" to audio input "]
    CZJ[" VCR "] --> CZT[" to audio output "]
    DAJ[" VCR "] --> DAJ
    DBJ --> DBJ
    DCJ --> DCJ
    DVJ --> DVJ
    DVJ --> DVJ
    DVJ --> DVJ
    DVJ --> DVJ
    DVJ --> DVJ
    DVJ --> DVJ
    DVJ --> DVJ
    DVJ --> DVJ
    DVJ --> DVJ
    DVJ --> DVJ
    DVJ --> DVJ
    DVJ --> DVJ
    DVJ --> DVJ
    DVJ --> DVJ
    DVJ --> DVJ
A portable VCR or video camera recorder can be easily connected to VIDEO 2 IN on the front panel.
Notes
- Up to three VCRs or other equipment can be connected to VIDEO 1/2/3 IN jacks.
- If you connect a monaural VCR, connect the audio output of the VCR to the L (MONO) jack of VIDEO 1/2/3 IN of the TV. The monaural sound is heard from both speakers.
- For operation, refer to the instruction manual furnished with the VCR.
- The signals input from VIDEO 1/2/3 are not output from MONITOR OUT.
- Keep the VCR away from the TV if the picture or sound is affected.
- When the TV is in the video mode, the "VIDEO 1/2/3" indication will be displayed on the screen even though no signal is fed through the VIDEO IN jacks.
About S video input
Video input and output signals may be separated into Y (luminance or brightness) and C (chroma or color) signals. Usually these two signals are combined in a VCR and sent as one signal to a TV. Separation of the Y and C signals prevents them from interfering with one another, thereby improving picture (especially in color) quality.
This unit is equipped with an S video input jack through which these separated signal can be input directly.
2 Connecting VCRs/video disc players not equipped with an S video input jack

flowchart
graph TD
    A["VCR, Video disc player, etc."] --> B["VHF/UHF output"]
    A --> C["VMC-810S/820S (optional)"]
    A --> D["VMC-810S/820S (optional)"]
    A --> E["VCR"]
    B --> F["to audio output"]
    C --> G["to audio"]
    D --> H["to audio"]
    F --> I["VHF/UHF to video output"]
    G --> J["VHF/UHF to video output"]
    H --> K["VHF/UHF to video output"]
    L[" rear of TV "] --> M[" to VIDEO 1 or 3 IN "]
    L --> N[" to VIDEO 1 or 3 IN "]
    L --> O[" to VIDEO 1 or 3 IN "]
    L --> P[" to VIDEO 1 or 3 IN "]
    L --> Q[" to VIDEO 1 or 3 IN "]
    L --> R[" to VIDEO 1 or 3 IN "]
    L --> S[" to VIDEO 1 or 3 IN "]
    L --> T[" to VIDEO 1 or 3 IN "]
    L --> U[" to VIDEO 1 or 3 IN "]
    L --> V[" to VIDEO 1 or 3 IN "]
    L --> W[" to VIDEO 1 or 3 IN "]
    L --> X[" to VIDEO 1 or 3 IN "]
    L --> Y[" to VIDEO 1 or 3 IN "]
    L --> Z[" to VIDEO 1 or 3 IN "]
    L --> AA[" to VIDEO 1 or 3 IN "]
    L --> AB[" to VIDEO 1 or 3 IN "]
    L --> AC[" to VIDEO 1 or 3 IN "]
    L --> AD[" to VIDEO 1 or 3 IN "]
    L --> AE[" to VIDEO 1 or 3 IN "]
    L --> AF[" to VIDEO 1 or 3 IN "]
    L --> AG[" to VIDEO 1 or 3 IN "]
    L --> AH[" to VIDEO 1 or 3 IN "]
    L --> AI[" to VIDEO 1 or 3 IN "]
    L --> AJ[" to VIDEO 1 or 3 IN "]
    L --> AK[" to VIDEO 1 or 3 IN "]
    L --> AL[" to VIDEO 1 or 3 IN "]
    L --> AM[" to VIDEO 1 or 3 IN "]
    L --> AN[" to VIDEO 1 or 3 IN "]
    L --> AO[" to VIDEO 1 or 3 IN "]
    L --> AP[" to VIDEO 1 or 3 IN "]
    L --> AQ[" to VIDEO 1 or 3 IN "]
    L --> AR[" to VIDEO 1 or 3 IN "]
    L --> AS[" to VIDEO 1 or 3 IN "]
    L --> AT[" to VIDEO 1 or 3 IN "]
    L --> AU[" to VIDEO 1 or 3 IN "]
    L --> AV[" to VIDEO 1 or 3 IN "]
    L --> AW[" to VIDEO 1 or 3 IN "]
    L --> AX[" to VIDEO 1 or 3 IN "]
    L --> AY[" to VIDEO 1 or 3 IN "]
    L --> AZ[" to VIDEO 1 or 3 IN "]
    L --> BA[" to VIDEO 1 or 3 IN "]
    L --> BB[" to VIDEO 1 or 3 IN "]
    L --> BC[" to VIDEO 1 or 3 IN "]
    L --> BD[" to VIDEO 1 or 3 IN "]
    L --> BE[" to VIDEO 1 or 3 IN "]
    L --> BF[" to VIDEO 1 or 3 IN "]
    L --> BG[" to VIDEO 1 or 3 IN "]
    L --> BH[" to VIDEO 1 or 3 IN "]
    L --> BI[" to VIDEO 1 or 3 IN "]
    L --> BJ[" to VIDEO 1 or 3 IN "]
    L --> BK[" to VIDEO 1 or 3 IN "]
    L --> BL[" to VIDEO 1 or 3 IN "]
    L --> BM[" to VIDEO 1 or 3 IN "]
    L --> BN[" to VIDEO 1 or 3 IN "]
    L --> BO[" to VIDEO 1 or 3 IN "]
    L --> BP[" to VIDEO 1 or 3 IN "]
    L --> BQ[" to VIDEO 1 or 3 IN "]
    L --> BR[" to VIDEO 1 or 3 IN "]
    L --> BS[" to VIDEO 1 or 3 IN "]
    L --> BT[" to VIDEO 1 or 3 IN "]
    L --> BU[" to VIDEO 1 or 3 IN "]
    L --> BV[" to VIDEO 1 or 3 IN "]
    L --> BW[" to VIDEO 1 or 3 IN "]
    L --> BX[" to VIDEO 1 or 3 IN "]
    L --> BY[" to VIDEO 1 or 3 IN "]
    L --> BZ[" to VIDEO 1 or 3 IN "]
    L --> CA[" to VIDEO 1 or 3 IN "]
    L --> CB[" to VIDEO 1 or 3 IN "]
    L --> CC[" to VIDEO 1 or 3 IN "]
    L --> CD[" to VIDEO 1 or 3 IN "]
    L --> CE[" to VIDEO 1 or 3 IN "]
    L --> CF[" to VIDEO 1 or 3 IN "]
    L --> CG[" to VIDEO 1 or 3 IN "]
    L --> CH[" to VIDEO 1 or 3 IN "]
    L --> CI[" to VIDEO 1 or 3 IN "]
    L --> CJ[" to VIDEO 1 or 3 IN "]
    L --> CK[" to VIDEO 1 or 3 IN "]
    L --> CR[" to VIDEO 1 or 3 IN "]
    L --> CS[" to VIDEO 1 or 3 IN "]
    L --> CT[" to VIDEO 1 or 3 IN "]
    L --> CU[" to VIDEO 1 or 3 IN "]
    L --> CV[" to VIDEO 1 or 3 IN "]
    L --> CW[" to VIDEO 1 or 3 IN "]
Preparations
1 Turn on the TV.
2 Press the TV/VIDEO button on the TV or an input select button on the commander so that the "VIDEO 1", "VIDEO 2" or "VIDEO 3" indication appears on the screen.
VIDEO 1: for equipment connected to VIDEO 1 IN
VIDEO 2: for equipment connected to VIDEO 2 IN
VIDEO 3: for equipment connected to VIDEO 3 IN
Operation
For operation, refer to the instruction manual furnished with the VCR.
When using a Sony infrared remote control VCR, the VCR can be operated with the supplied Remote Commander.
See "Operating Sony Video Equipment" on page 29.
To return to the TV mode
—Press the TV/VIDEO button on the TV until a channel number appears on the screen.
—Press the TV button on the Remote Commander.
To view one TV program while recording another
Press the TV/VTR mode select button on the VCR or commander so that the VCR will be in the TV mode. Press the TV button on the commander, and select the channel you want to view.
When you cannot obtain a clear picture and/or sound
Make sure that the TV/VTR mode select button on the VCR is set to TV. Re-select the desired channel with the buttons on the TV or the Remote Commander.
Connecting an Audio System
—To listen to the TV or connected VCR sound through an audio system

To adjust sound level
Keep the amplifier volume, bass and treble controls at a medium position (usually at the certain position) and adjust the level with the VOLUME buttons on the TV or the VOL buttons on the Commander.
When an audio system is connected to AUDIO OUTPUT, be sure to set the FRONT SPEAKER switch on the TV to OFF. The sound from the TV's speakers will be cut off.
Receivable channels of this TV are:
VHF: 2-13
UHF: 14-69
Cable: 1-125
Press CH +/-
To check preset channels
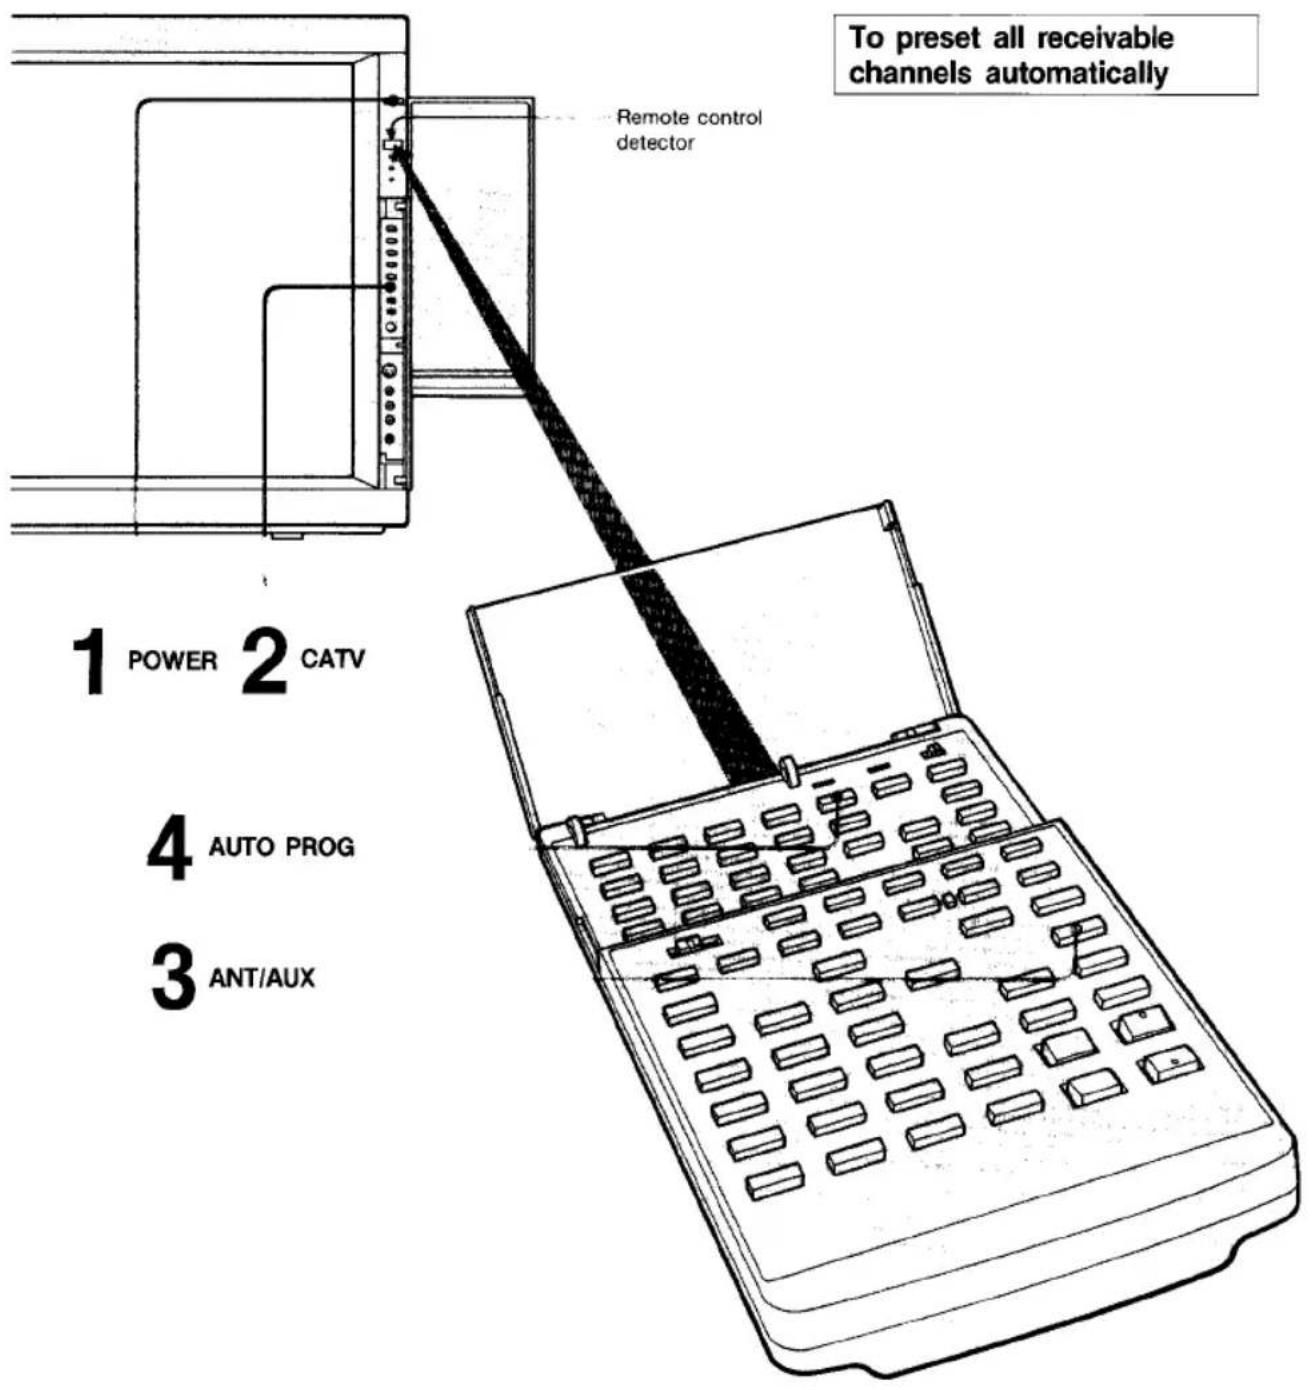
1 Turn the TV on.

2 Set CATV to the appropriate position.
To preset VHF or UHF channels

To preset cable TV channels
3 Press ANT/AUX according to the channel to be preset.
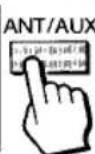

To preset VHF, UHF or regular cable TV channels
To preset pay cable TV channels
4 Press AUTO PROG.
AUTO
PROG
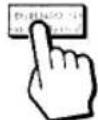
"AUTO PROGRAM" is displayed on the screen and receivable channels (other than the channels already preset) will be preset in numerical sequence. The channels preveiously preset remain in the unit's memory. When no more channels can be found, the programming stops and the lowest numbered channel is displayed.
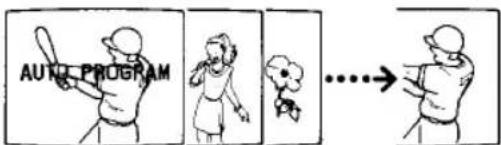
To add the channels that could not be preset with automatic programming because their signal strength was too weak, or to erase unnecessary channels, follow the steps in "To preset only the desired channels" on the next page.
If the "VIDEO" indication is displayed on the screen, press TV/VIDEO so that a channel number appears.
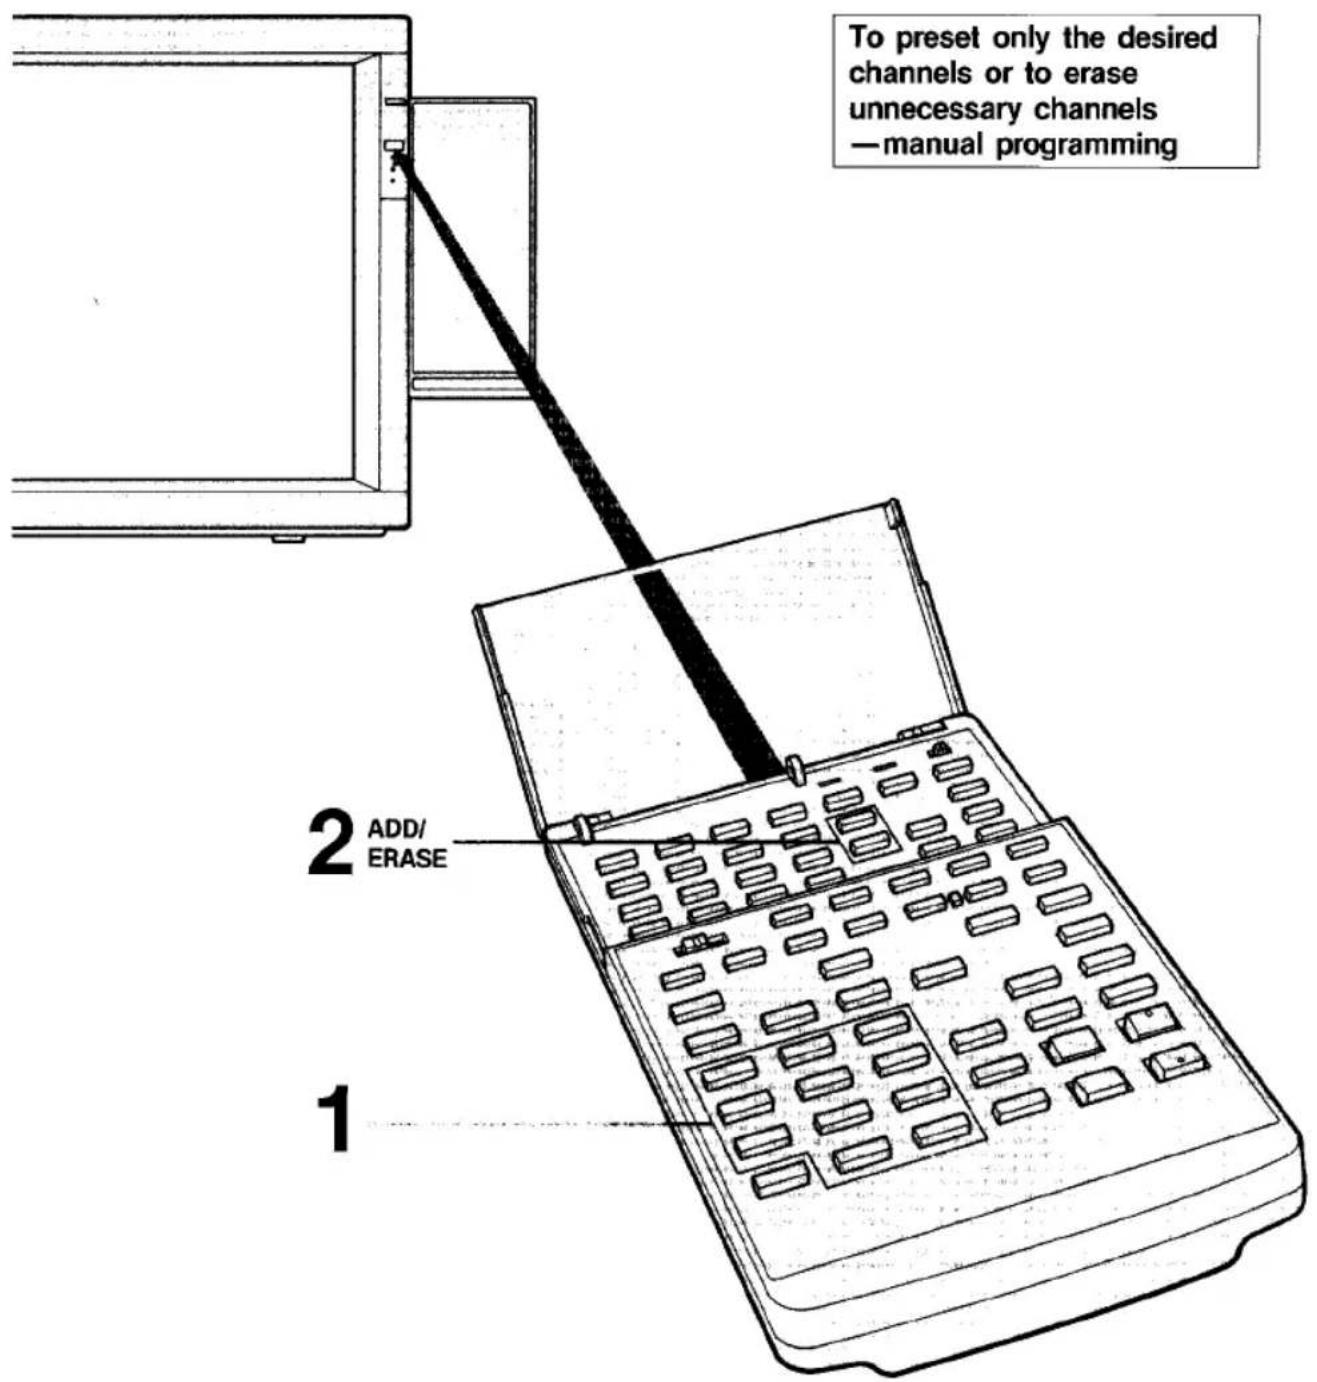
When a VHF or UHF channel is erased
The cable TV channel with the same number is also erased and vice versa.
Cable TV systems use letters or numbers to designate channels. To tune in a channel, refer to the chart on the next page.
Cable TV channel chart*
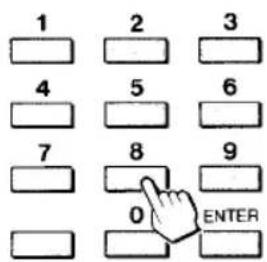
1 Press the channel number button(s) and then ENTER to select the channel to be added or erased.

natural_image
Cartoon illustration of a baseball player in mid-throw, wearing helmet and uniform (no text or symbols)2 To add channels — Press ADD.


natural_image
Cartoon illustration of a person in motion with a +3 number label (no text or symbols on the figure itself)A “+” appears for a moment.
This channel has now been added to the channel scan memory.
To erase channels — Press ERASE


A “-” appears for a moment.
This channel has now been erased from the channel scan memory.
The next time the CH +/- button is pressed, this channel will be skipped.
Repeat steps 1 and 2 for other channels to be added or erased.
| Number on this TV | 1 | 5 | 6 | 14 | 15 | 16 | 17 | 18 | 19 | 20 | 21 | 22 | 23 | 24 | 25 | 26 | 27 | 28 | 29 | 30 | |||||
| Corresponding CATV channel | A-8 | A-7 | A-6 | A | B | C | D | E | F | G | H | I | J | K | L | M | N | O | P | Q | |||||
| 31 | 32 | 33 | 34 | 35 | 36 | 37 | 38 | 39 | 93 | 94 | 95 | 96 | 97 | 98 | 99 | 100 | 101 | 102 | 123 | 124 | 125 | ||||
| R | S | T | U | V | W | W+1 | W+2 | W+3 | W+57 | W+58 | A-5 | A-4 | A-3 | A-2 | A-1 | W+59 | W+60 | W+61 | W+82 | W+83 | W+84 | ||||
Check with your local cable TV company for more complete information on the available channels.
*The designation of the cable TV channels conforms to the EIA/NCTA recommendation.
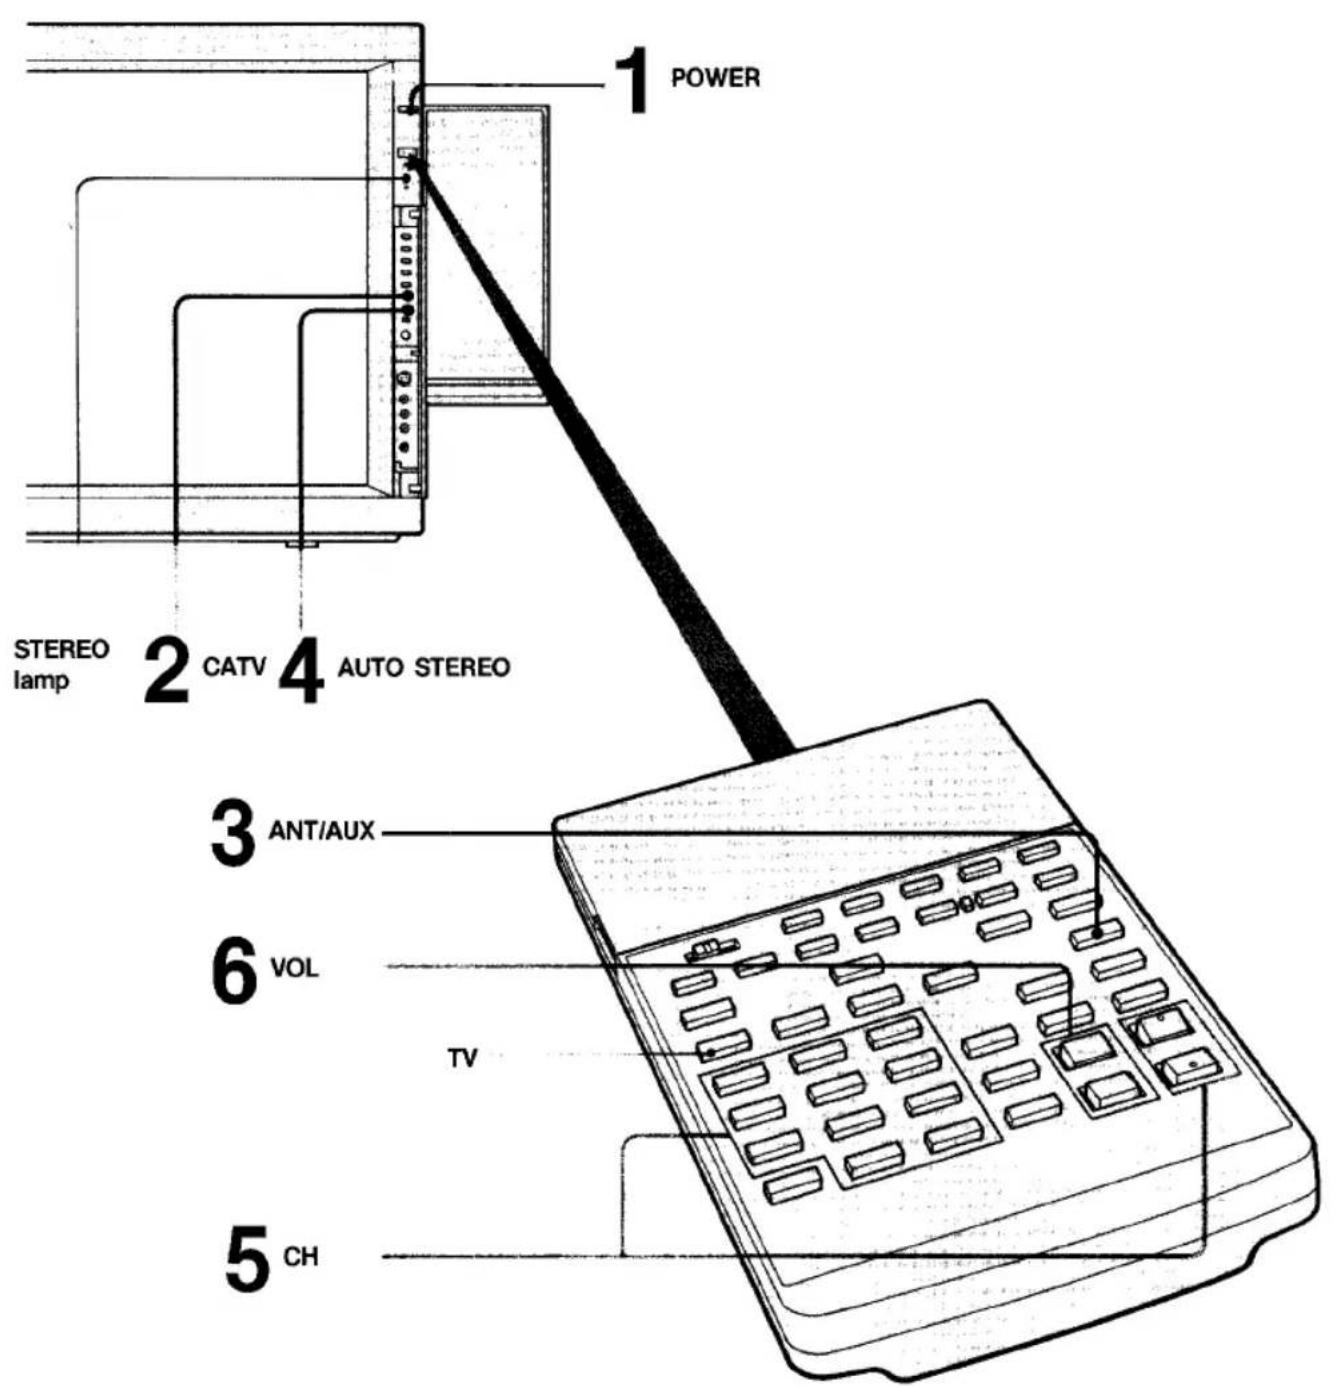
If the "VIDEO 1, 2 or 3" indication is displayed on the screen. Press the TV/VIDEO button on the TV or the TV button on the remote commander so that a channel number appears.
If noise makes it hard to receive a very weak TV stereo program
Set AUTO STEREO on the TV to OFF so that the STEREO lamp goes off.
The stereo effect will be cancelled, but reception will be stabilized and the noise will be reduced.
1 Press POWER to turn the TV on.
2 Set CATV to the appropriate position
To view VHF or UHF channels
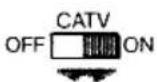
To view cable TV channels
3 Press ANT/AUX according to the channel to be watched.
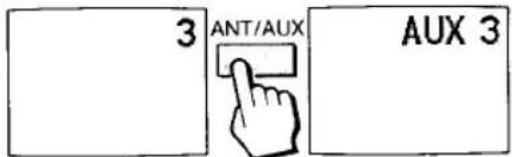
To view VHF, UHF or regular cable TV channels
To view pay cable TV channels
4 Set AUTO STEREO to ON.

To turn off the unit Press POWER again.
5 Select a channel in one of the following two ways:

To scan the preset channels in numerical sequence, press CH +/-.
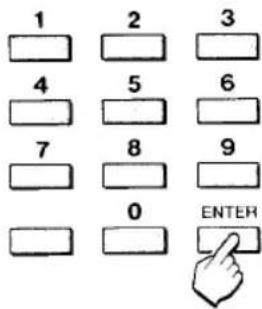
To select a channel directly, press the channel number button(s) and then ENTER. For example, to select channel 10, press 1,0 and ENTER.
6 Press VOL + or - to adjust the volume.

To enjoy life-like skin tones and pure whites Set the NEW DYNAMIC COLOR switch on the rear to ON.
- 2014年,公司与上海浦东发展银行股份有限公司上海市分行、中国民生银行股份有限公司上海市分行、中国邮政储蓄银行股份有限公司上海市分行、中国邮政储蓄银行股份有限公司上海市分行、中国邮政储蓄银行股份有限公司上海市分行、中国邮政储蓄银行股份有限公司上海市分行、中国邮政储蓄银行股份有限公司上海市分行、中国邮政储蓄银行股份有限公司上海市分行、中国邮政储蓄银行股份有限公司上海市分行、中国邮政储蓄银行股份有限公司上海市分行、中国邮政储蓄银行股份有限公司上海市分行、中国邮政储蓄银行股份有限公司上海市分行、中国邮政储蓄银行股份有限公司上海市分行、中国邮政储蓄行股份有限公司上海市分行、中国邮政储蓄银行股份有限公司上海市分行、中国邮政储蓄银行股份有限公司上海市分行、中国邮政储蓄银行股份有限公司上海市分行、中国邮政储蓄银行股份有限公司上海市分行、中国邮政储蓄银行股份有限公司上海市分行、中国邮政储蓄银行股份有限公司上海市分行、中国邮政储蓄银行股份有限公司上海市分行、中国邮政储蓄银行股份有限公司上海市分行、中国邮政储蓄银行股份有限公司上海市分行、中国邮政储蓄银行股份有限公司上海市分行、中国邮政储蓄银行

When receiving a Mutichannel TV Sound program
Each time MTS is pressed, MAIN, SAP (Second Andio Program), or both are selected in sequence.
To mute the sound
Press MUTING. The "MUTING" indication will appear on the screen. To restore the sound, press MUTING again or VOL +.
To keep the channel display on the screen
Press DISPLAY. To make the channel display disappear, press DISPLAY again.
To have the TV turn off automatically after about one hour
Press SLEEP. The "SLEEP" indication will appear on the screen for a few seconds and the SLEEP lamp on the TV will remain lit until the TV is turned off. To cancel the SLEEP timer, press SLEEP again so that the SLEEP lamp goes out, or turn off the TV.
To switch quickly between two channels
Press JUMP. Each time JUMP is pressed, the channel which appeared on the screen directly before is recalled. This button enables you to keep track of two programs alternately.
To freeze a TV picture
Press STILL. The TV picture will freeze. Since the broadcast continues normally, while the still picture is on the screen, you will miss a part of the program. To restore the normal picture, press STILL again.


To enjoy Dolby surround effect, attach surround speakers (optional).
Note on INPUT BALANCE control
Normally, set to the center detent position.
When enjoying DOLBY SURROUND, adjust the monaural sound (e.g. dialogue) heard from the right and left surround speakers to be as low as possible by turning the control.
During adjustment, set FRONT SPEAKER switch to OFF. For optimum performance of the Dolby surround effect, the monaural sound heard from the surround speakers should be minimum.

flowchart
graph LR
    A["Enjoying video programs recorded with Dolby surround system —DOLBY SURROUND—"] --> B["Improving the acoustics of your room — HALL SURROUND —"]
    B --> C["Giving a stereo effect to monoaural sources —SIMULATED STEREO—"]
    C --> D["To deactivate the surround effect"]

    subgraph A
        A1["DOLBY SURROUND — SURROUND — MODE/OFF"]
        A2["HALL SURROUND — SURROUND — MODE/OFF"]
        A3["SIMULATED STEREO — SURROUND — MODE/OFF"]
        A4["--- SURROUND — MODE/OFF"]
    end

    subgraph B
        B1["--- SURROUND — MODE/OFF"]
        B2["HALL SURROUND — SURROUND — MODE/OFF"]
        B3["SIMULATED STEREO — SURROUND — MODE/OFF"]
    end
Adjusting surround volume

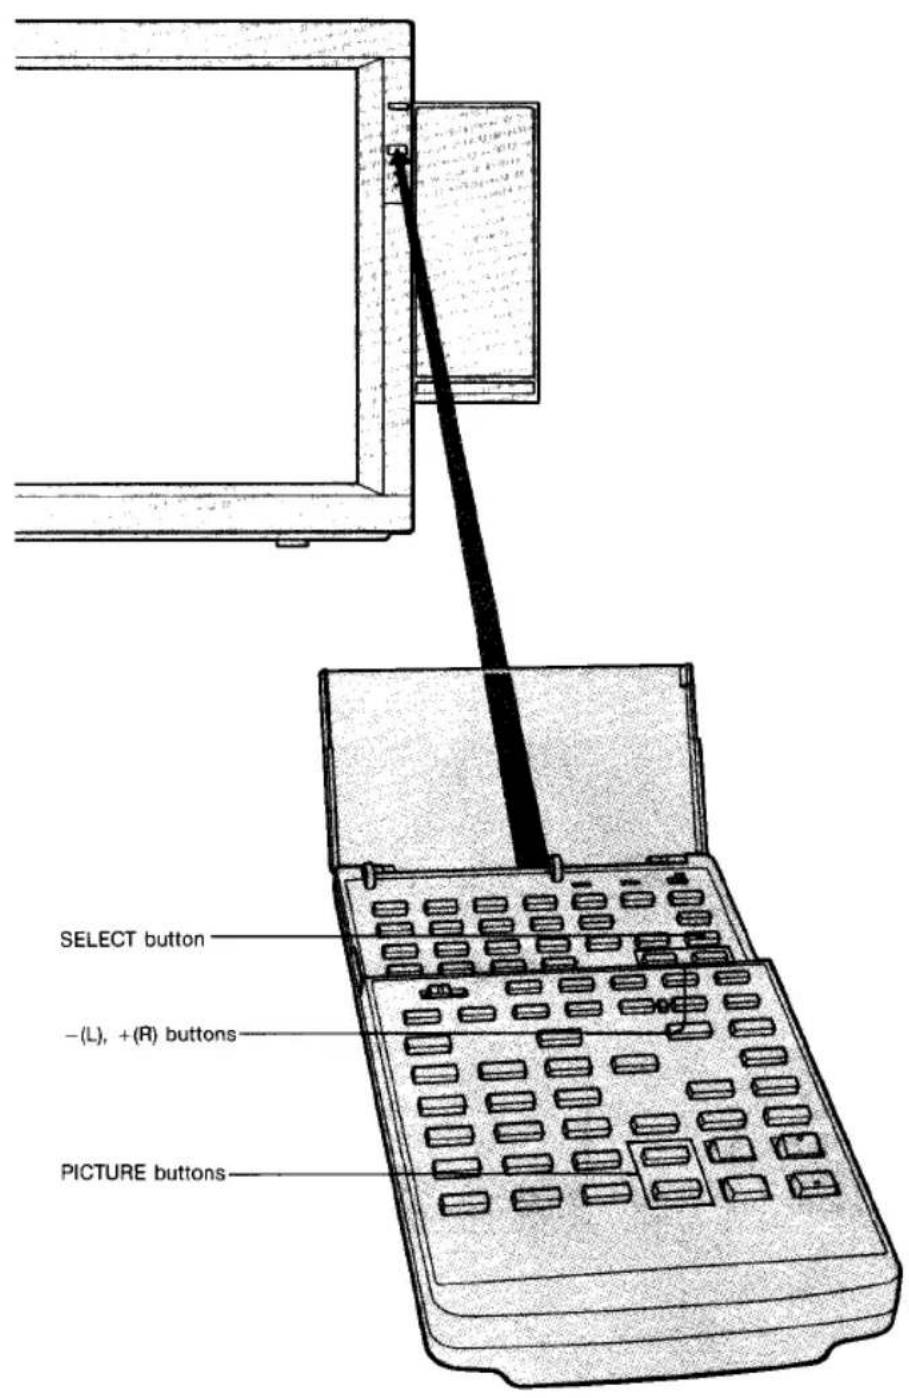


To clear the adjustment levels and restore the factory preset levels at once, press RESET.
[Unreadable]

[Unreadable]

BASS


To increase
bass
response

[Unreadable]

+(R)
To decrease
bass
response
BALANCE


To emphasize the right speaker's volume

7

To emphasize the left speaker's volume
To adjust picture contrast
Press to increase picture contrast with vivid color

PICTURE

Press to decrease picture contrast with soft color
The display will change as follows:
HUE → COLOR → BRIGHTNESS → SHARPNESS
BALANCE ← BASS ← TREBLE

- The internal clock of this TV operates on a 12-hour cycle. If a 24-hour cycle number is displayed, it will be cleared when ENTER is pressed.
- Clock setting will be erased from the unit's memory if the unit is unplugged, or if a power failure occurs.
1 Press TIME.


The indication appears in red.
2 Press 0, 8, 0, 5 (0 necessary) and AM/PM.


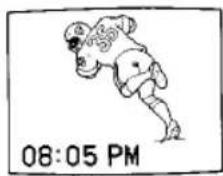
If you have made a mistake, press CLEAR within 3 seconds and repeat this step.
3 Press ENTER.


The numbers will turn green to indicate that the clock has been set. (The 0 in front will disappear, and the "AM"/"PM" indication will disappear after 2 seconds.)
To make the clock indication disappear, press TIME. To reset the clock, make the clock indication disappear and then make it appear again. Press CLEAR within 3 seconds and follow the steps above from 2.
The supplied RM-760 remote commander allows you to operate other Sony video equipment having an infrared remote control detector. Furthermore, it can "read" and "store" the functions of another remote commander having an infrared beam transmitter, not only those made by Sony but also those of other manufacturers as well. Thanks to this "learning" function, you can operate your home audio and video equipment only with one remote commander.
Parts Used for Learning Function

Operating Sony Video Equipment
The supplied remote commander allows you to operate Sony video cassette recorders (including Beta, 8mm, VHS), and video disc player (including multi disc player).
For operating video equipment manufactured by Sony, "learning" is unnecessary.
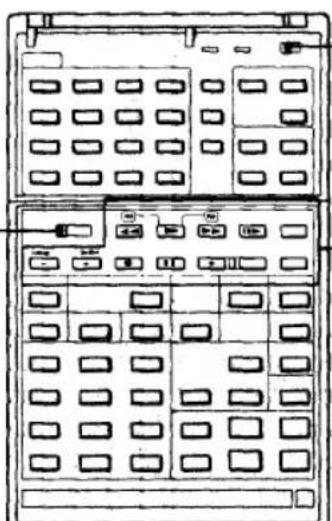
2 Set to VTR 1/2/3/MDP selector according to desired video equipment.
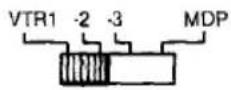
| Beta, ED Beta VCR | VTR 1 |
| 8mm VCR | VTR 2 |
| VHS VCR | VTR 3 |
| Video disc player | MDP |
natural_image
Line drawing of a multi-panel computer tower layout with no text or symbols1 Set to USE.

3 Use the buttons in this area to operate video equipment.
Operating a Video Cassette Recorder
To start playback Press ▶.
To stop playback Press ■.
To advance the tape rapidly
To rewind the tape Press ◀◀/☐.
To freeze a picture Press 11.
To view the picture at a fast speed to find a particular scene Keep pressing ▶▶/○ or ◀◀/○ during playback. To resume normal playback, release the button.
To view freeze pictures successively at specific
intervals Press ||▶ during
Press ▶▶/
Press ◀◀/⊕.
Press 11.
To resume normal playback, press again.
fast speed to find a Keep pressing ▶▶/○ or ◀◀/○ during playback. To resume normal playback, release the button.
successively at specific
Press ▶ during
playback.
Operating a Video Disc Player
To start playback
To stop playback
To freeze a picture
Press ▶.
Press ■.
Press II.
To resume normal playback, press again.
*This function is effective only for CAV (standard-play disc). With CLV (extended-play disc), the unit will go into the standby mode if is pressed.
To view the picture at a fast speed to find a
particular scene
Keep pressing ▶▶/⊕ or
◀/○ during playback. To resume normal playblak, release the button.
To view freeze pictures successively at specific
intervals
Press ▶ during playback.
- If your video equipment is furnished with VTR selector, set the selector to the same position with the VTR 1/2/3/MDP selector on RM-760.
- If the equipment does not have a certain function, the corresponding button on the remote commander is not effective.
Operating Audio and Video Equipment of Other Manufacturers, or Sony Audio Equipment
Within the programmable area, any button can memorize the function of the remote commander supplied with other manufacturer's equipment or Sony audio equipment.
A button can memorize a function having no relation to its name on the commander.
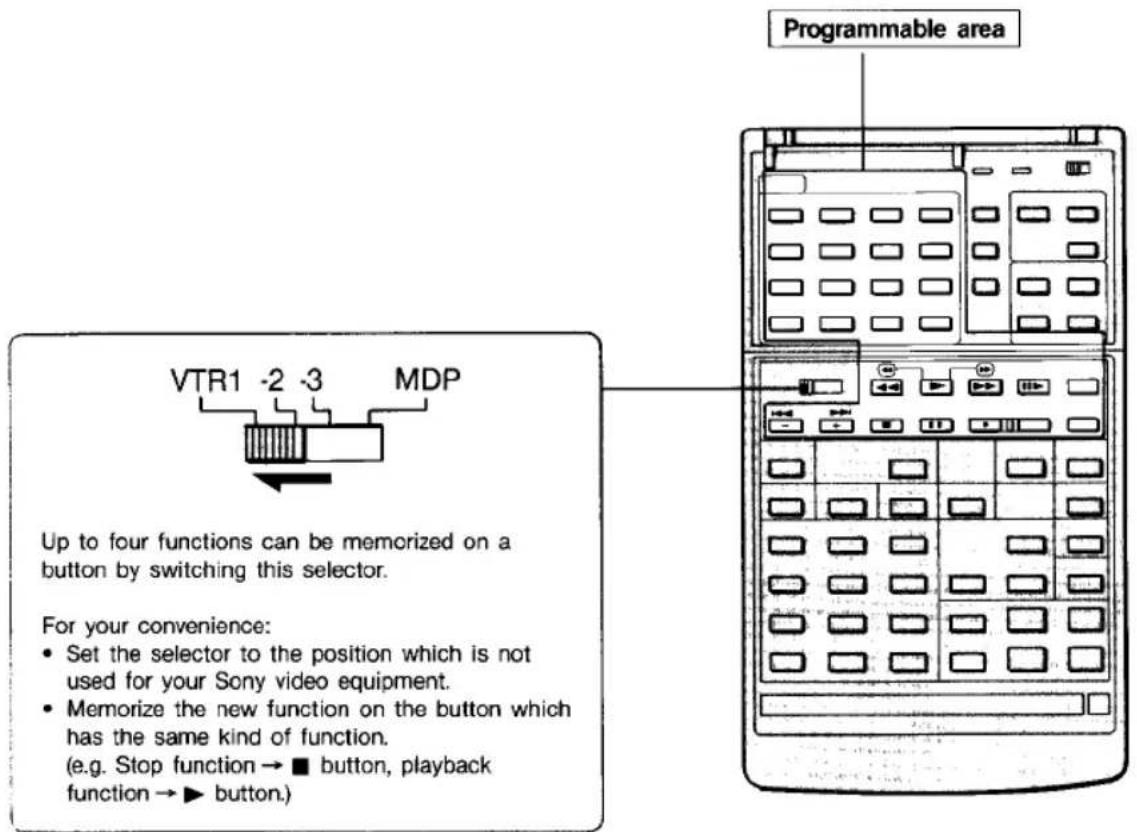
When new function is memorized on the button, the original function to operate Sony video equipment is cleared. After you clear the memorized function (see page 33), the button functions for Sony equipment again.
How to Use the Learning Function
Example: Operating the video cassette recorder of manufacturer A, when the selector is set to VTR 1.
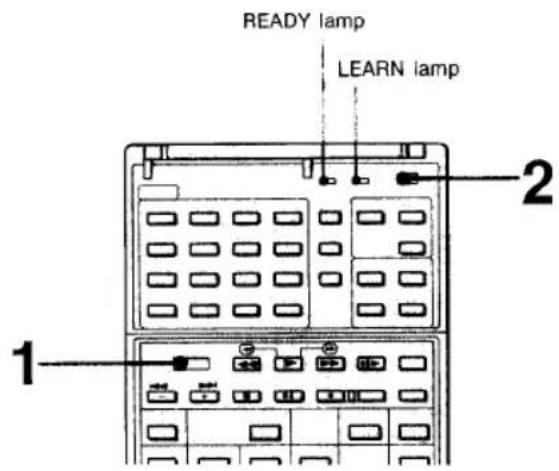
1 Set the VTR 1/2/3/MDP selector to VTR 1.

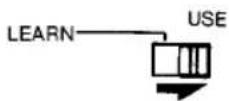
2 Set the LEARN-USE selector to LEARN.

3 Position the RM-760 and the other commander head to head.
Choose a button of the RM-760 to which a function is to be memorized. As an example, let's have the RM-760 learn the power on/off function of manufacturer A's commander.
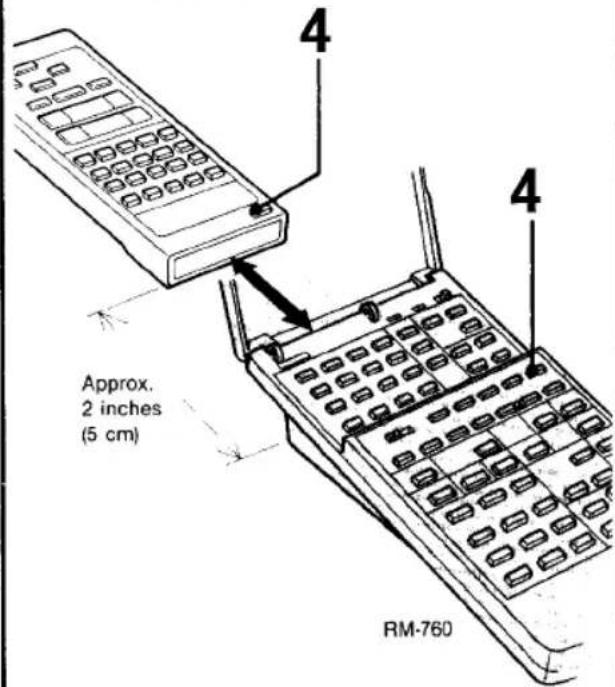
4 While keeping their POWER button pressed, press the POWER button of the manufacturer A's commander
5 When the READY lamp goes out and the LEARN lamp lights up, release both buttons.

Now, A's power on/off function has been memorized on the POWER button of the RM-760. Repeat steps 4 and 5 to continue learning other functions.
Continues on next page
For accurate learning
- Be sure that these commanders are positioned head to head exactly aligned, and approx. 2 inches (5 cm) apart.
- Do not move the commanders during the learning process.

Both READY and LEARN lamps light up if the function has not been memorized. Try again from step 3.

Next, let's have Button 1 on this commander memorize the "play" function of manufacturer A's commander.
6 While keeping Button 1 on this commander pressed, press the play button of the manufacturer A's commander.
7 When the READY lamp goes out and the LEARN lamp lights up, release both buttons.

Now, A's play function button has been memorized on Button 1 of the RM-760.
8 After learning is finished, set LEARN-USE selector to USE.
(1) 2017年1月1日
- When operating equipment with learned functions, the VTR 1/2/3 MDP selector should be set to the same position as it was when the functions were memorized. The LEARN-USE selector should be set to USE.
- The functions of other equipment can be memorized by repeating these steps for each of the positions of the VTR 1/2/3/MDP selector. Use the supplied index sheets by placing them on buttons and writing the names of memorized functions for further reference.
- The batteries will last about half a year with normal operation. Replace the batteries before they wear out.
- Replace the batteries within approximately 30 minutes. If not, the memorized function on the buttons may be erased.
- Do not use the learning function for equipment other than audio and video ones.
- Be sure to confirm that the functions have been memorized as a few of the functions of other manufacturer's commanders are not storable on RM-760.
- When you have memorized a new function on a button, the previous function is cleared automatically.
The learning function will no work in the following cases:
- There is a fluorescent lamp or equipment with infrared rays which emit noise.
→ Move the commanders away from them.
• The batteries are exhausted.
→ Replace all the batteries with new ones. - There is an obstacle between the commanders, or the commanders are not positioned head to head and exactly aligned.
→ Position the commanders properly.
Clearing Memorized Functions — Clearing memorized functions under each position on VTR 1/2/3/MDP selector
Example: Clearing functions memorized on VTR 1 position

1 Set the VTR 1/2/3/MDP selector to VTR 1.

2 Set LEARN·USE selector to LEARN.

3 While keeping CLEAR button pressed, press ◀ button.

READY lamp lights up.
READY lamp goes out.
Clearing all the memorized functions
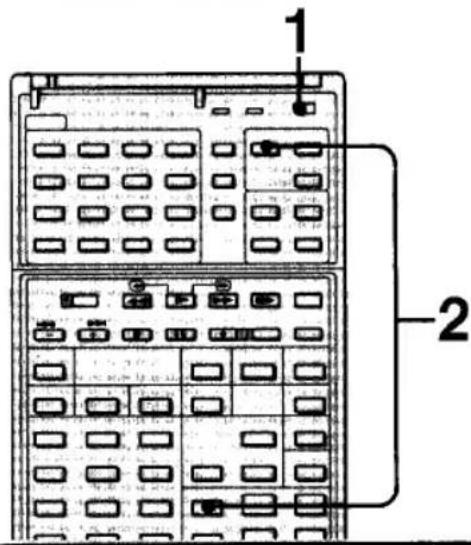
1 Set LEARN-USE selector to LEARN.

2 While keeping CLEAR button pressed, press PICTURE + button.
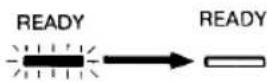
READY lamp lights up.
READY lamp goes out.
• After clearing memorized functions, the buttons function for Sony video equipment again.
| Television system | American TV standards |
| Channel coverage | VHF: 2-13UHF: 14-69Cable TV: 1-125 |
| Picture tube | Microblack Trinitron tube27-inch picture measured diagonally29-inch picture tube measured diagonally |
| Antenna | 75-ohm external antenna terminal for VHF/UHF |
| Input | VIDEO 1, 2 and 3 INS VIDEO IN (4-pin mini DIN)Y: 1 Vp-p, 75-ohms unbalanced, sync negativeC: 0.286 Vp-p (Burst signal) 75-ohmsVideo (phono jacks): 1 Vp-p, 75-ohms unbalanced, sync negativeAudio (phono jacks): 500 mVrms(100% modulation)Impedance: 47 kilohms |
| Output | MONITOR OUTPUTS VIDEO OUTPUT (4-pin mini DIN)Y: 1 Vp-p, 75-ohms unbalanced, sync negativeC: 0.286 Vp-p (Burst signal) 75-ohmsVideo (phono jacks): 1 Vp-p, 75-ohms unbalanced, sync negativeAudio (phono jacks): 500 mVrms(100% modulation)Impedance: 10 kilohmsAUDIO OUTPUT (VARIABLE) (phono jacks)More than 408 mVrms at the maximum volume setting (variable)Impedance: 10 kilohms |
| Speaker output | FRONT: 10W × 2SURROUND: 7W × 2 |
| Power requirements | 120V AC, 60Hz |
| Power consumption | 260W (max.)3.6W (in standby condition) |
| Accessories supplied | Programmable Commander RM-760 with 4 size AA (R6) bateriesAntenna connector (1)Antenna connecting cable (1)Speaker cords (2) |
| Optional accessories | U/V mixer EAC-66Connecting cordVMC-810/820SRK-A74YC-15V/30V |
Design and specifications are subject to change without notice.
Disturbances in picture and sound can often be eliminated by checking the symptoms and following the suggestions listed below.
| SYMPTOM | CHECK AND ADJUST | |
| Poor or no picture (Screen not lit), good sound | Adjust PICTURE.Adjust BRIGHT.Check antenna/cable connections. | |
| Good picture, no sound | Press VOLUME + on the TV or VOL + on the Remote Commander.Press MUTING on the Remote Commander.Check that the MTS button is set correctly.Check that the TV/VIDEO button is set correctly.Set the FRONT SPEAKER switch to ON. | |
| No picture (screen not lit), no sound | Is POWER switched on?Plug the unit into a wall outlet.Check that the TV/VIDEO button is set correctly. | |
| No color | Is it a color program?Adjust COLOR. | |
| Snow and noise only | Is it an active or the correct channel?Check the CATV switch setting.Check the ANT/AUX button setting.Check antenna/cable connections. | |
| Learning function on the commander does not work. | Check that the commanders are positioned properly.Check if the batteries are exhausted.If there is fluorescent lamp near by, move the commanders away from it. | |
 | Dotted lines or stripes | This is often caused by local interference. (e.g. cars, neon signs, hairdryers etc.) Adjust antenna for minimum interference. |
 | Double images or ghosts | Reflections from nearby mountains or buildings often cause this problem.A highly directional outdoor antenna or a CATV cable may improve the picture. |
| Try another channel. It could be station trouble. | ||
If the problem persists, contact your nearest service facility.


- Operating Instructions
- Owner's Record
- WARNING
- CAUTION
- CAUTION:
- Note to CATV system installer in the U.S.A.
- Contents
- Before use
- Set-up
- Operation
- General
- This color TV features a Microblack™ Trinitron picture tube for a high resolution, high contrast picture.
- Supplied Remote Commander provides you many other convenient features.
- And other features for a high quality picture...
- Safety
- Installation
- Cleaning
- Repacking
- Front
- Rear
- Programmable Commander RM-760
- Battery Installation
- To Connect a VHF, UHF, or VHF/UHF Combination Antenna\* or CATV Cable
- When you connect both VHF and UHF antennas
- When you connect a cable with a special converter/decoder\* for pay cable TV systems
- If the supplied antenna connector has a slot as illustrated below:
- When the U/V mixer is used
- Connecting a VCR
- Connecting VCRs with an S video output jack
- Notes
- About S video input
- Preparations
- To return to the TV mode
- Connecting an Audio System
- To adjust sound level
- Turn the TV on.
- Set CATV to the appropriate position.
- Press ANT/AUX according to the channel to be preset.
- Press AUTO PROG.
- Press the channel number button(s) and then ENTER to select the channel to be added or erased.
- To add channels — Press ADD.
- To erase channels — Press ERASE
- Press POWER to turn the TV on.
- Set CATV to the appropriate position
- Press ANT/AUX according to the channel to be watched.
- Set AUTO STEREO to ON.
- Select a channel in one of the following two ways:
- Press VOL + or - to adjust the volume.
- When receiving a Mutichannel TV Sound program
- To mute the sound
- To keep the channel display on the screen
- To have the TV turn off automatically after about one hour
- To switch quickly between two channels
- To freeze a TV picture
- Note on INPUT BALANCE control
- To adjust picture contrast
- Press TIME.
- Press 0, 8, 0, 5 (0 necessary) and AM/PM.
- Press ENTER.
- Parts Used for Learning Function
- Operating Sony Video Equipment
- Operating a Video Cassette Recorder
- Operating a Video Disc Player
- Operating Audio and Video Equipment of Other Manufacturers, or Sony Audio Equipment
- How to Use the Learning Function
- For accurate learning
- 2017年1月1日
- The learning function will no work in the following cases:
- Clearing Memorized Functions — Clearing memorized functions under each position on VTR 1/2/3/MDP selector
Marka : SONY
Model : KV-27FX10
Kategoria : Telewizor