LHD39K370WSEU - Telewizor HISENSE - Bezpłatna instrukcja obsługi
Znajdź bezpłatnie instrukcję urządzenia LHD39K370WSEU HISENSE w formacie PDF.

Pytania użytkowników dotyczące LHD39K370WSEU HISENSE
0 pytanie dotyczące tego urządzenia. Odpowiedz na te, które znasz, lub zadaj własne.
Zadaj nowe pytanie dotyczące tego urządzenia
Pobierz instrukcję dla swojego Telewizor w formacie PDF za darmo! Znajdź swoją instrukcję LHD39K370WSEU - HISENSE i weź swoje urządzenie elektroniczne z powrotem w ręce. Na tej stronie opublikowane są wszystkie dokumenty niezbędne do korzystania z urządzenia. LHD39K370WSEU marki HISENSE.
INSTRUKCJA OBSŁUGI LHD39K370WSEU HISENSE
QUICK SETUP GUIDE
Before using the TV, please read this guide thoroughly and retain it for future reference. For more detailed instructions, please see the User Manual.
Contents
Contents
Accessories List....1
Installing the Stand....2
TV Front....4
TV Rear 5
Making Connections....5
Remote Control 11
Turning the TV on for the First Time....13
Specifications 19
Accessories List
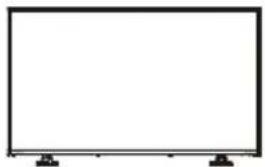
The following accessories are included with TV:
natural_image
Empty rectangular frame with two small black connectors at the bottom (no text or symbols)TV

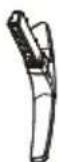
Base Stand

User Manual

European Guarantee
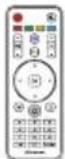
Remote Control
Quick Setup Guide


HDMI to Scart Cable x1
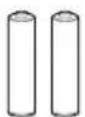
AAA Batteries × 2
(M4×12)×4
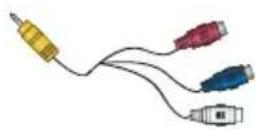
RCA jack to YPBPR Cable x 1
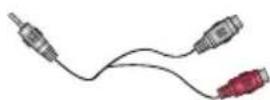
Stereo jack to Audio Cable x 1
Installing the Stand

CAUTION
- Be sure to disconnect the A/C power cord before installing a stand or Wall-Mount brackets.
- The LED display is very fragile, and must be protected at all times when installing the base stand. Be sure that no hard or sharp object, or anything that could scratch or damage the LED display, comes into contact with it. DO NOT exert pressure on the front of the TV at any time because the screen could crack.
- Lay the soft cushion on the table which can hold enough weight of the whole TV in case of causing damage to TV or person. Put the TV on the cushion, with its back upwards and the LCD downwards.
Follow the illustrations and textual instructions below to complete the installation steps:
For LHD32K370WSEU
1
text_image
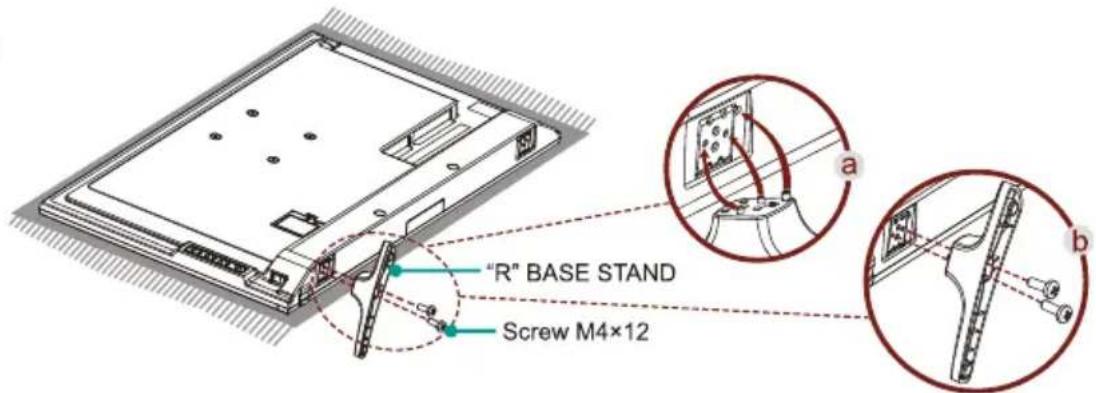
"R" BASE STAND Screw M4×12a. Install the "R" stand to the left bottom of the TV follow the instruction as figure a.
b. Fix the stand with 2 screws M4×12 in accessory tightly as figure b.
2
text_image
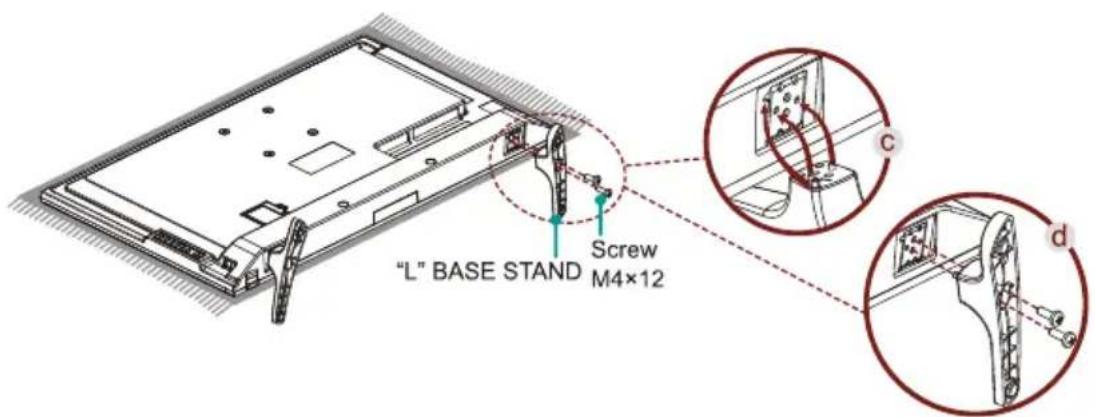
"L" BASE STAND Screw M4×12 c dc. Install the "L" stand to the right bottom of the TV follow the instruction as figure c.
d. Fix the stand with 2 screws M4×12 in accessory tightly as figure d.
For LHD39K370WSEU/LTDN40K370WSEU/LTDN50K370WSGEU
text_image
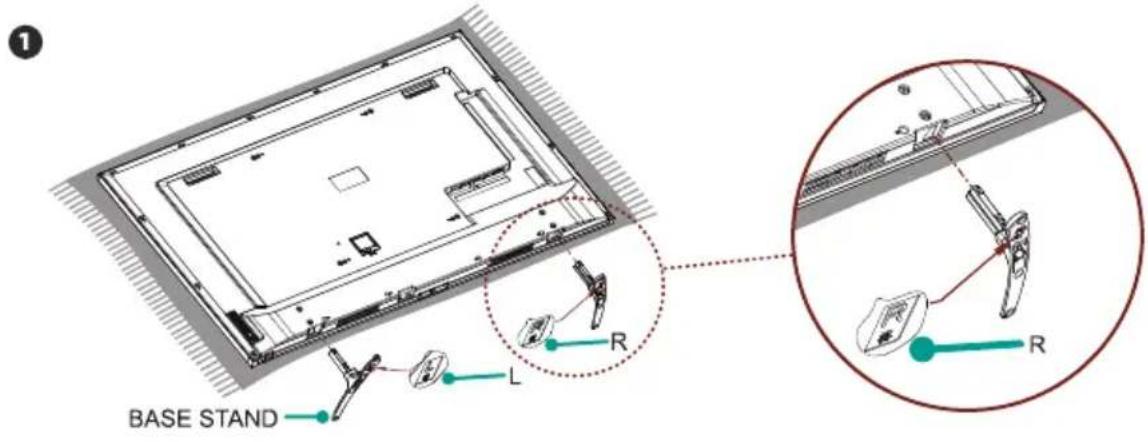
BASE STAND L R RInsert the stands into the bottom slots of the TV.
Attention: The stands need to be installed according to the direction mark on the stand surface. When face toward the back of the TV, insert the base stand marked "L" into the left slot and insert the base stand marked "R" into the right slot.
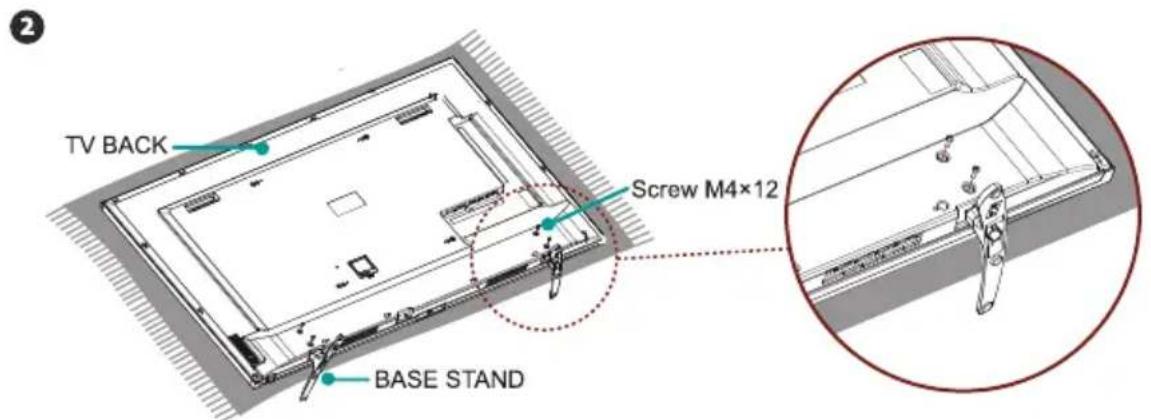
text_image
TV BACK Screw M4×12 BASE STANDAlign the BASE STAND with the screw holes on the bottom of TV BACK, secure the BASE STAND to the TV with the 4 screws M4×12 in accessory tightly.
NOTES
Product images are only for reference, actual product may vary in appearance.
TV Front
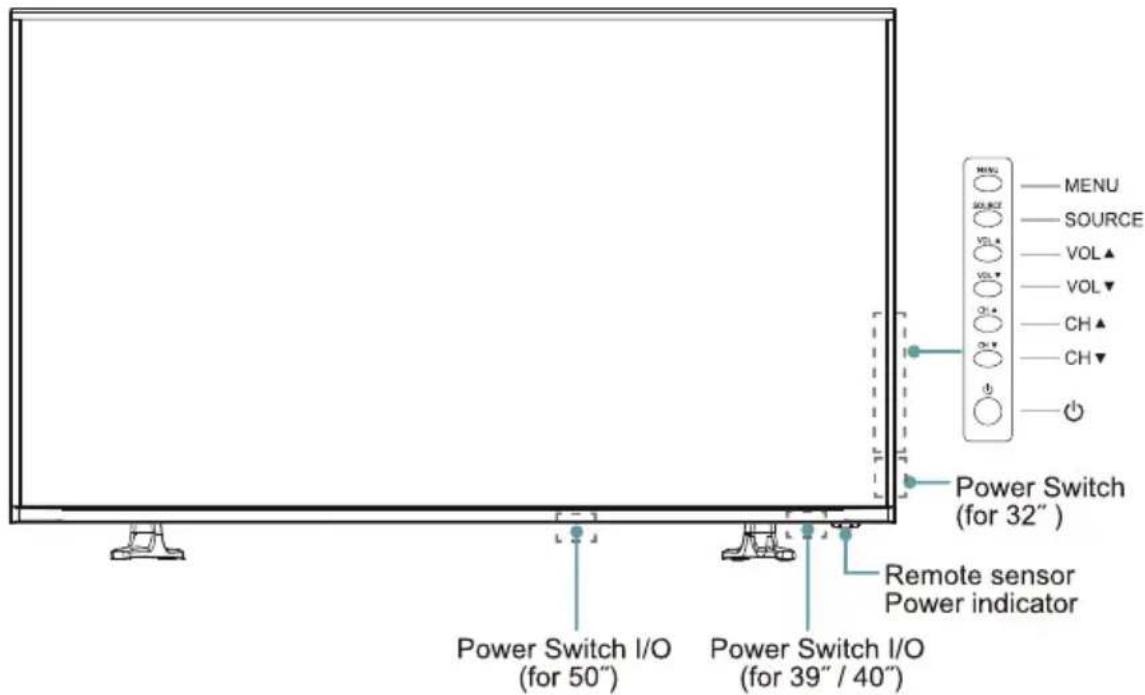
text_image
MENU SOURCE VOL▲ VOL▼ CH▲ CH▼ Power Switch (for 32") Remote sensor Power indicator Power Switch I/O (for 50") Power Switch I/O (for 39" / 40")| Item | Description |
| Power Switch I/O | Switch the I/O power ON or OFF. |
| Power Indicator | Red lights up in standby mode. Blue lights up when the TV is switched on. |
| Remote Sensor | Receives remote signals from the remote control.Caution: Do not put anything near the sensor, as its function may be affected. |
| MENU | Display an on-screen menu to setup your TV's features. |
| SOURCE | Select among the different input signal sources. |
| VOL ▲ / ▼ | Adjust the volume. |
| CH ▲ / ▼ | Switch between channels. |
| Power Button ⏻ | Turn on the TV from the standby mode or switch the TV back to standby mode.Caution: The TV consumes the power even in standby mode.Please turn the power off or unplug the power cord to save the power. |
NOTES
The Picture is Only for Reference.
- Powering on the TV requires several seconds to load program. Do not rapidly turn the TV off as it may cause the TV to work abnormally.
TV Rear
text_image
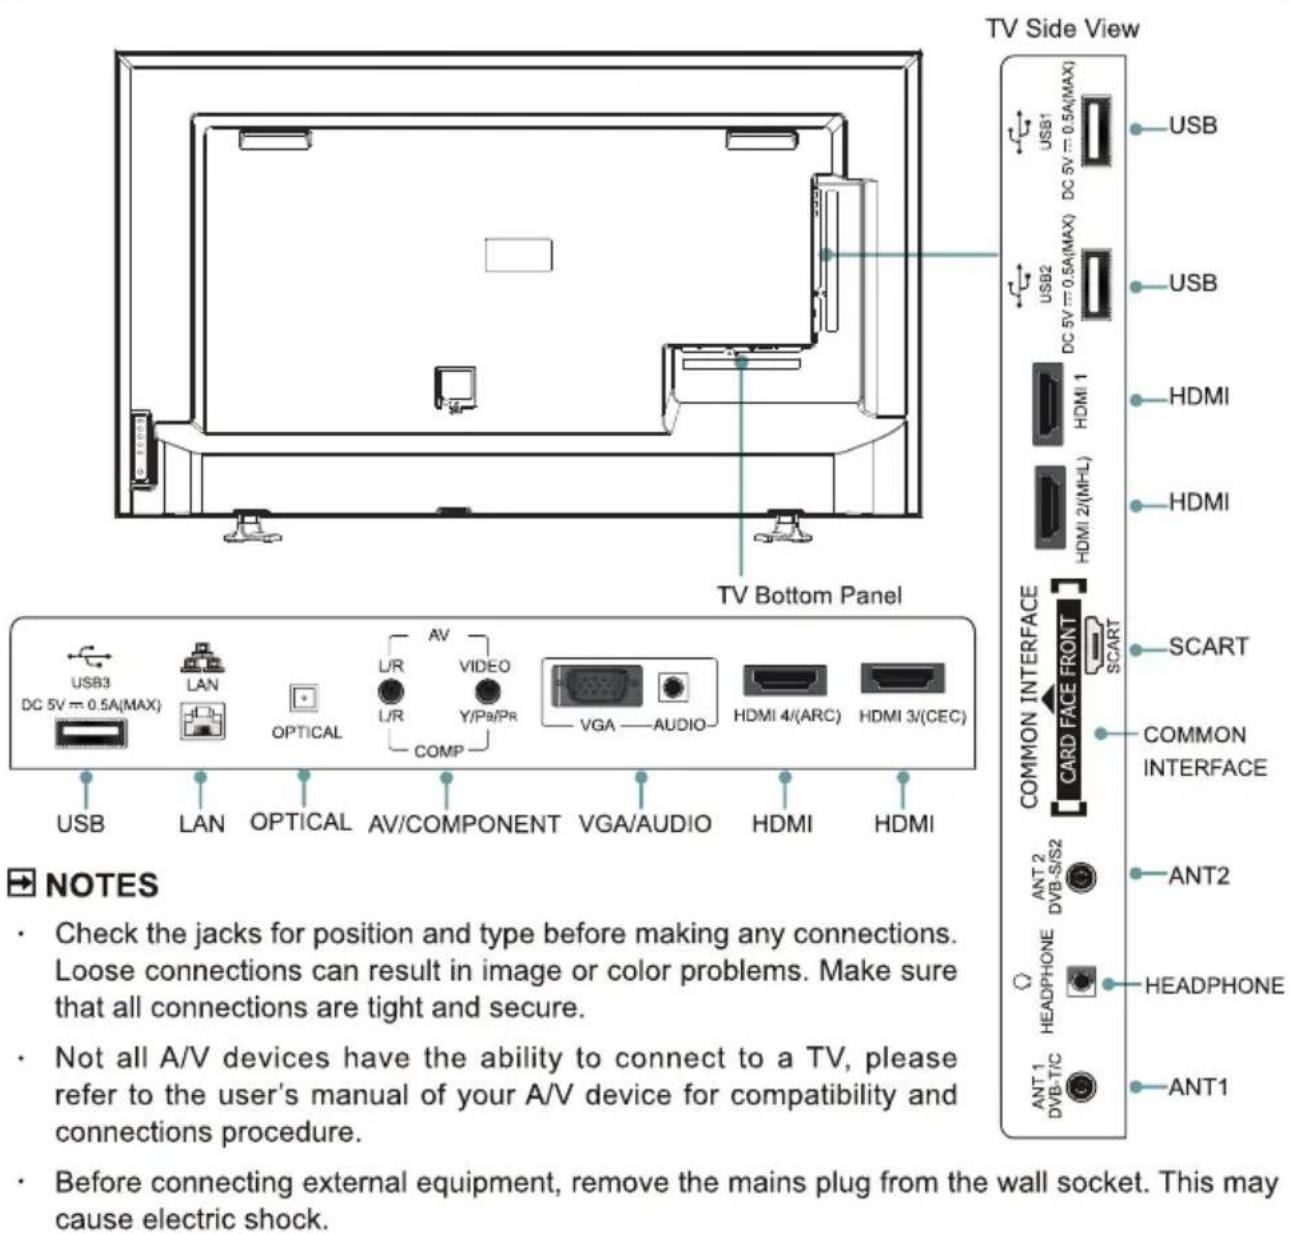
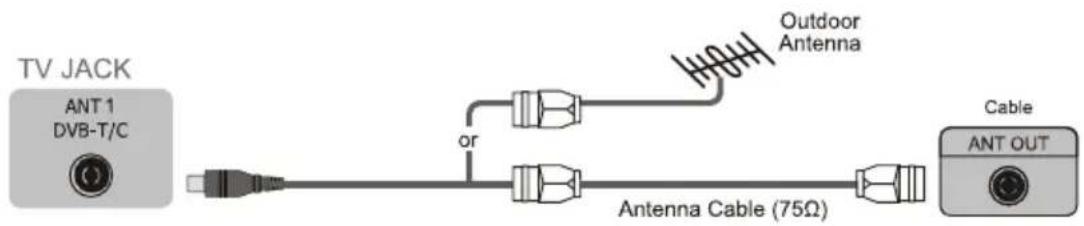
TV Bottom Panel USB3 DC 5V = 0.5A(MAX) LAN OPTICAL L/R L/R COMP AV VIDEO Y/Pa/Pr VGA — AUDIO HDMI 4/(ARC) HDMI 3/(CEC) USB LAN OPTICAL AV/COMPONENT VGA/AUDIO HDMI HDMI TV Side View USB1 USB2 USB DC 5V = 0.5A(MAX) HDMI 1 HDMI 2/(MHL) SCART COMMON INTERFACE CARD FACE FRONT SCART COMMON INTERFACE ANT2 DVB-S/S2 ANT1 HEADPHONE HEADPHONE ANT1 DVB-T/C NOTES • Check the jacks for position and type before making any connections. Loose connections can result in image or color problems. Make sure that all connections are tight and secure. • Not all A/V devices have the ability to connect to a TV, please refer to the user's manual of your A/V device for compatibility and connections procedure. • Before connecting external equipment, remove the mains plug from the wall socket. This may cause electric shock.▶ ANT 1 Connect an outdoor VHF/UHF antenna or cable.
text_image
TV JACK ANT 1 DVB-T/C or Outdoor Antenna Antenna Cable (75Ω) Cable ANT OUT▶ ANT 2 Connecting a satellite antenna.

text_image
TV JACK ANT 2 DVB-S/S2Making Connections
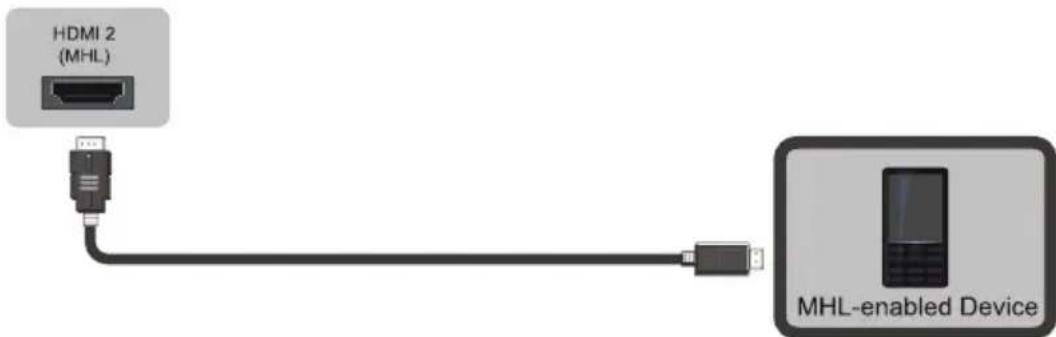
▶ MHL Connect an MHL cable (not provided) from your MHL-enabled device, such as a cell phone.
You can use [▲/▼/◄/►] and [OK] buttons to navigate on your devices.
text_image
HDMI 2 (MHL) MHL-enabled DeviceNOTE
HDMI2 is special for MHL device. Some of nonstandard DVD players may not be supported.
HDMI4 (ARC) Connect an HDMI cable from an external digital audio system.
ARC enables the TV to directly output the digital sound through an HDMI cable. Please note that it works only when the TV is connected to the audio receiver that supports the ARC (Audio Return Channel) function.
When this port is used as the ARC function, it can't be used as signal input at the same time.

text_image
TV JACK HDMI 4 (ARC) HDMI cable (not included) Audio Amplifier/Speaker HDMI▶ OPTICAL Connect an optical cable from an external digital audio system
Optical S/PDIF—is a type of digital audio interconnect cable used in consumer audio equipment to output audio over reasonably short distances. The signal is transmitted over a fibre optical cable.
Before connecting a digital audio system to the OPTICAL jack, you should decrease the volume of both the TV and the system to avoid that the volume suddenly become bigger.

text_image
TV JACK OPTICAL OPTICAL cable (not included) Audio Amplifier/Speaker▶ HEADPHONE Connect Headphone for audio out of the TV.
The built-in speakers will be disabled once the headphone is connected.

text_image
TV JACK HEADPHONE Headphone (not included)Making Connections
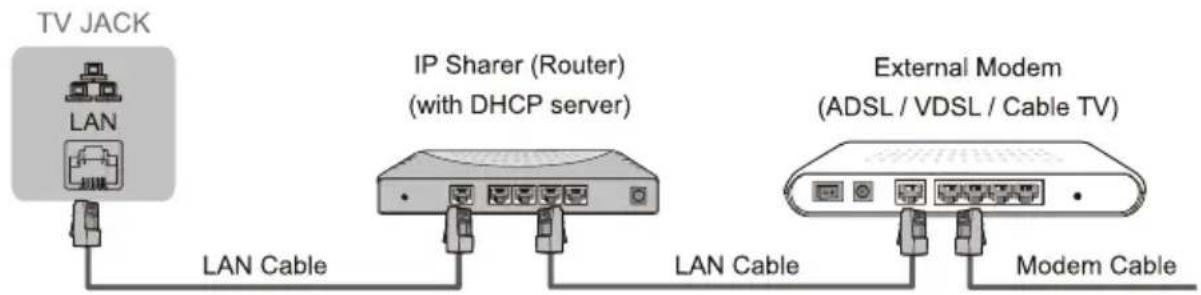
▶ LAN (Wired setup)
Connect your TV to your network by connecting the LAN port on the back of your TV to an external modem or router using a LAN (Ethernet/Cat 5) cable. See the illustration below.
- We recommend to use a modem or router that supports Dynamic Host Configuration Protocol (DHCP). Modems and routers that support DHCP automatically provide the IP address, subnet mask, gateway, and DNS, so you don't have to enter them manually. Most home networks already have DHCP.
text_image
TV JACK LAN IP Sharer (Router) (with DHCP server) External Modem (ADSL / VDSL / Cable TV) LAN Cable LAN Cable Modem CableWireless setup
Connect your TV to your network wirelessly, you need a wireless router or modem. See the illustration below.
- Hisense's built-in Wireless LAN Adapter supports the IEEE 802.11 b/g/n communication protocols. Hisense recommends using IEEE 802.11n router. Low transfer rates for b/g may have the influence on the quality of streamed videos and other media.
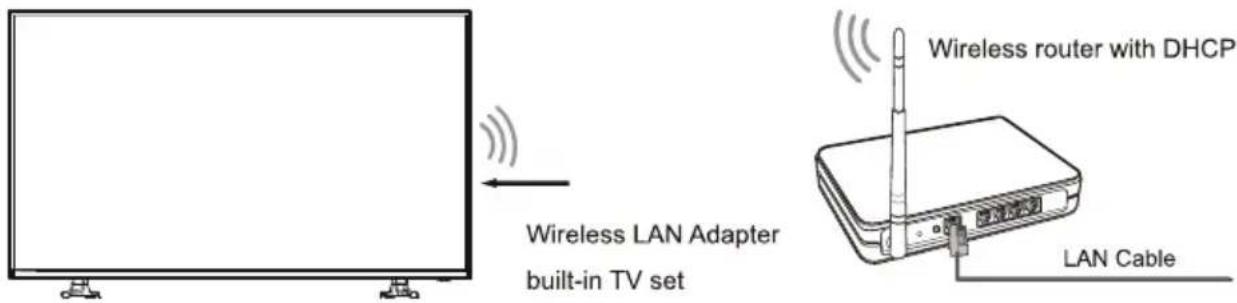
text_image
Wireless LAN Adapter built-in TV set Wireless router with DHCP LAN CableNOTES
- You must use the Hisense's built-in Wireless LAN Adapter to use a wireless network because the set doesn't support external USB network adapter.
- If the wireless router supports DHCP, your TV can connect more easily to the wireless network.
- If you apply a security system other than the systems listed below, it will not work with the TV. security system : WPA, WEP, WPA2.
- In order to guarantee smooth network, the distance between router and TV is less than 10 meters.
Making Connections
Making Video and Audio Connections
When connecting any external AV device, do not connect the mains cable to the mains jack until all other connections are complete.
| Video Effect | TV's Jacks | Signal Type | Separate audio connection required | |
| Best Video Performance |  | HDMI(480i/480p/576i/576p/720p/1080i/1080p) | No | |
 |  | Component Video(480i/480p/576i/576p/720p/1080i/1080p) | Yes | L/R |
 | VGA | Yes | AUDIO | |
| Good Video Performance |  | SCART (CVBS/RGB input)Use provided HDMI to Scart Cable to connect devices | No | |
 | Composite Video | Yes | L/R | |
HDMI Connect an HDMI cable from an external A/V equipment.
Some devices such as PVR or DVD player require HDMI signal to be set to output in the device's settings. Please consult your device user manual for instructions.
Please note that the HDMI connector provides both video and audio signals, it's not necessary to connect an audio cable.
- Press [Source] button, when the list of Input Source appears, press [▲/▼] to select the source [HDMI], then press [OK] to connect.

text_image
TV JACK HDMI (not included) DVD/Blu-Ray/AV receiver/ Set-top Box HDMIMaking Connections
HDMI 3(CEC) Connect an HDMI cable from an external A/V equipment.
This feature allows you to add devices to your TV and control them with your TV remote control.

text_image
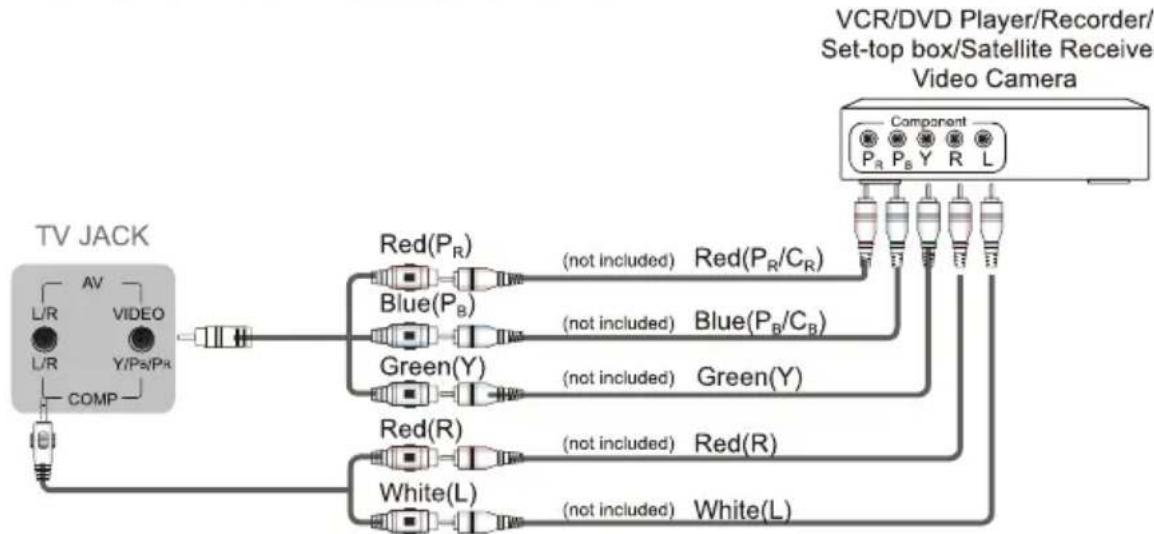
TV JACK HDMI 3(CEC) (not included) DVD/Blu-Ray/AV receiver/ Set-top Box HDMIComponent Connect a component cable and an audio cable from an external A/V Device.
The component output ports Y, P_B and P_R on the VCD or DVD can sometimes be identified as Y, C_B and C_R .
- Press [Source] button, when the list of Input Source appears, press [▲/▼] to select the source [Component], then press [OK] to connect.
flowchart
graph TD
    A["TV JACK"] --> B["COMP"]
    B --> C["AV"]
    C --> D["L/R"]
    C --> E["VIDEO"]
    C --> F["Y/Ps/Pk"]
    C --> G["Red(P_R)"]
    G --> H["Blue(P_B)"]
    H --> I["Green(Y)"]
    I --> J["Red(R)"]
    J --> K["White(L)"]
    G --> L["(not included) Red(P_R/C_R)"]
    H --> M["(not included) Blue(P_B/C_B)"]
    I --> N["(not included) Green(Y)"]
    K --> O["(not included) Red(R)"]
    L --> P["Component"]
    M --> Q["Component"]
    N --> R["Component"]
    O --> S["Component"]
    P --> T["VCR/DVD Player/Recorder/<br>Set-top box/Satellite Receiver<br>Video Camera"]
    Q --> T
    R --> T
Making Connections
▶ VGA & AUDIO Connect a VGA cable and an audio cable from the PC.
- Press [Source] button, when the list of Input Source appears, press [/] to select the source [VGA], then press [OK] to connect.
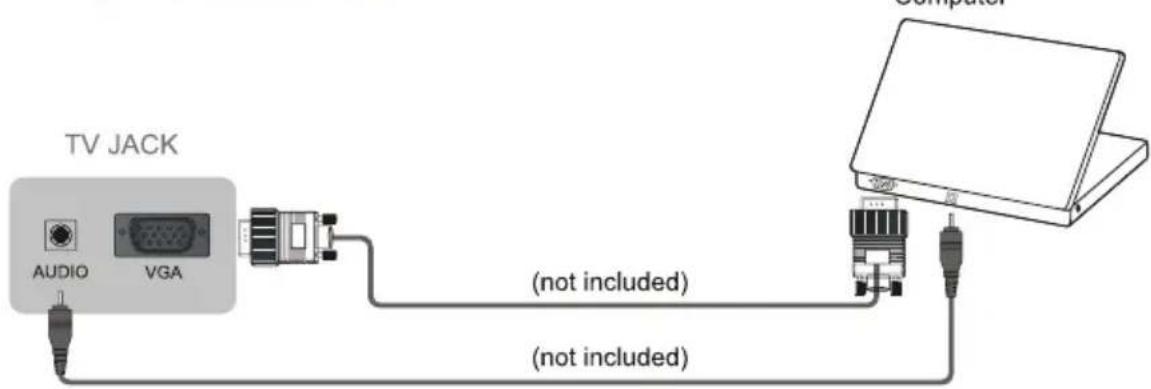
text_image
TV JACK AUDIO VGA (not included) (not included) Computer▶ SCART Connect the provided HDMI to Scart cable from an external A/V Device.
- Press [Source] button, when the list of Input Source appears, press [▲/▼] to select the source [SCART], then press [OK] to connect.

text_image
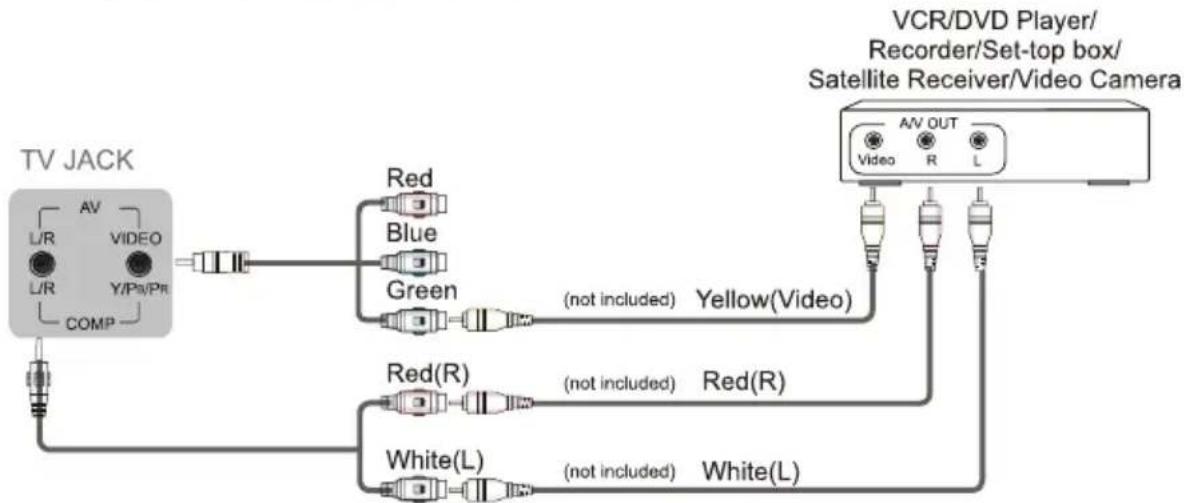
TV JACK SCART VCR/DVD Player/Recorder/ Set-top box/Satellite Receiver▶ AV Connect the Composite cable from an external A/V Device.
Use the audio and video cables to connect the external A/V device's composite video/audio jacks to the TV's jacks. (Video = yellow, Audio Left = white, and Audio Right = red)
- Press [Source] button, when the list of Input Source appears, press [▲/▼] to select the source [AV], then press [OK] to connect.
flowchart
graph TD
    A["TV JACK"] --> B["L/R AV"]
    A --> C["L/R VIDEO"]
    A --> D["Y/Ps/Pr COMP"]
    B --> E["Red"]
    C --> F["Blue"]
    D --> G["Green"]
    E --> H["(not included) Yellow(Video)"]
    F --> H
    G --> H
    H --> I["VCR/DVD Player/ Recorder/Set-top box/Satellite Receiver/Video Camera"]
    I --> J["AV OUT Video R L"]
    I --> K["Red(R)"]
    I --> L["White(L)"]
    K --> M["(not included) Red(R)"]
    L --> N["(not included) White(L)"]
COMMON INTERFACE
Insert the CI+ module for watching scrambled services like pay-tv channels or some HD channels.

flowchart
graph LR
    A["TV JACK"] --> B["CARD FACE FRONT"]
    B --> C["CAM CARD"]
    C --> D["SMART CARD"]
NOTES
- Before you insert/remove the Cl+ module, ensure that the TV is switched off. Then insert the CI card into the Cl+ module in accordance with the Service Provider's instructions.
- Do not repeatedly insert or remove the Common Access Module as this may damage the interface and cause a malfunction.
- You must obtain a CI+ module and card from the service provider of the channels you want to watch.
- Insert the CI+ module with the SmartCard in the direction marked on the module and SmartCard.
- CI+ is not supported in some countries and regions; check with your authorized dealer.
USB
Connect the USB1.1 and USB2.0 devices such as hard drives, USB sticks and digital cameras for browsing photos, listening music and watching recorded movies. You can use Timeshift and record (refer to "PVR/Timeshift"). At the same time update is also an easy thing and will be done jut by plugging the USB with the updating files into the same interface.
- Insert an USB device, the TV appears "USB device plugged ! Enter HiMedia?" then select [OK] to enter.
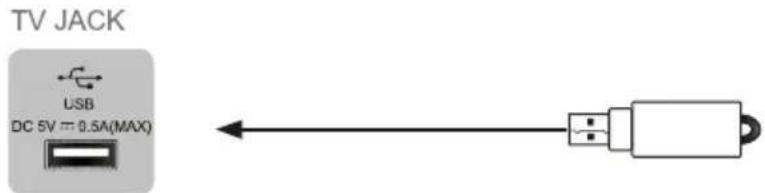
text_image
TV JACK USB DC 5V = 0.5A(MAX)NOTES
- When connecting a hard disk or a USB hub, always connect the mains adapter of the connected device to the power supply. Exceeding a total current consumption may result in damage. The maximum current consumption is 500mA.
- For individual non-standard high-capacity mobile hard disk, if it's impulse current is greater than or equal 500mA, it may cause TV-rebooting or self-locking. So the TV does not support it.
• The USB port supports a voltage of 5V.
• The maximum supported storage space of the hard disk is 1T. - If you want to store the video streaming of a DTV program, the transfer rate of the USB storage device must not be less than 5MB/s. At lease a mobile storage with more than 20G is required to Timeshift and record a 2.5 hour HD video.
Remote Control
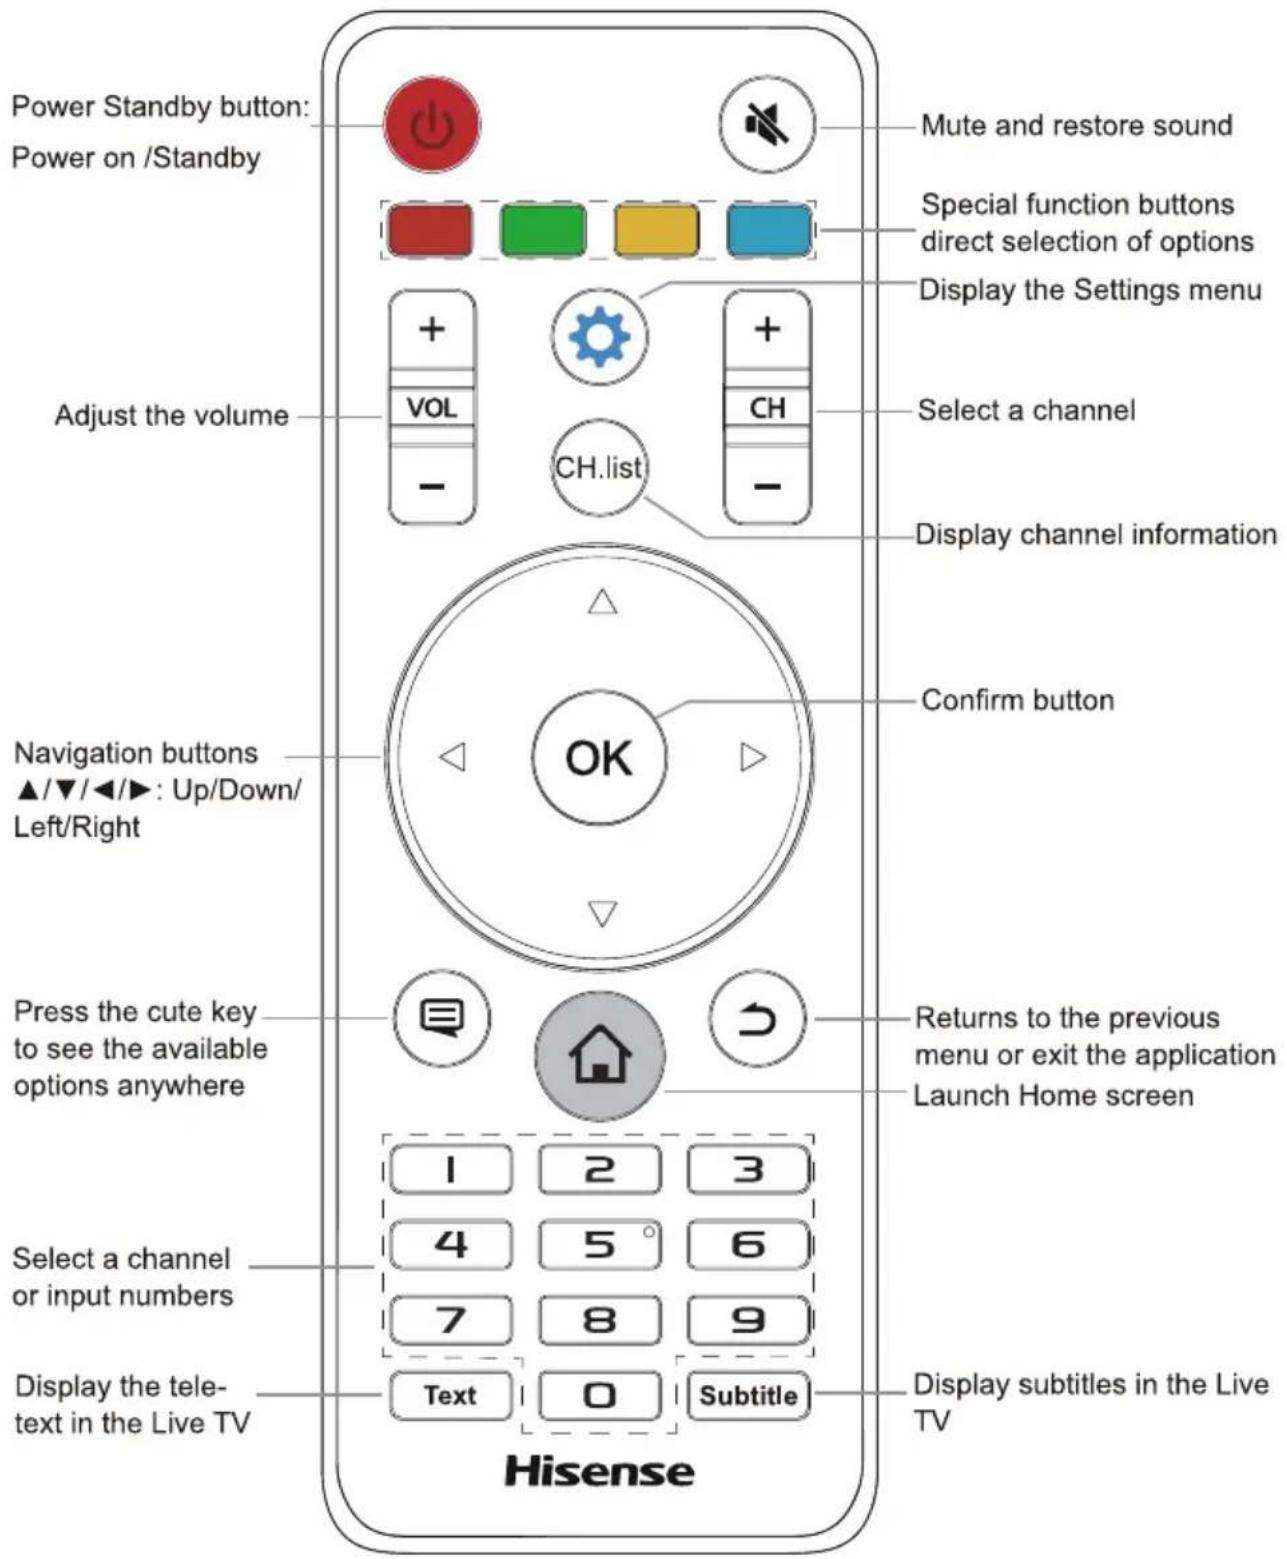
text_image
Power Standby button: Power on /Standby Adjust the volume Navigation buttons ▲/▼/◄/►: Up/Down/ Left/Right Press the cute key to see the available options anywhere Select a channel or input numbers Display the tele- text in the Live TV Mute and restore sound Special function buttons direct selection of options Display the Settings menu Select a channel CH.list CH CH.list Confirm button Returns to the previous menu or exit the application Launch Home screen 1 2 3 4 5 ° 6 7 8 9 Text 0 Subtitle Display subtitles in the Live TV HisenseRemote Control
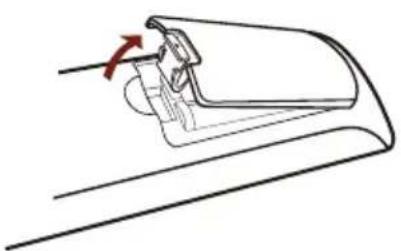
Installing Batteries in the Remote Control
- Press and lift the back cover to open the battery compartment of the remote control.
- Insert two AAA size batteries. Make sure to match the (+) and (-) ends of the batteries with the (+) and (-) ends indicated in the battery compartment.
- Close the battery compartment with the cover.
① Remove the battery compartment cover
② Insert the batteries
③ Close the battery compartment cover
natural_image
Line drawing of a mechanical component with an arrow indicating rotation (no text or symbols)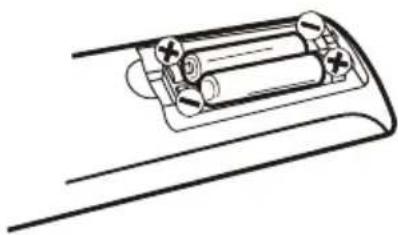
natural_image
Line drawing of a battery pack with two batteries and a switch, no text or symbols present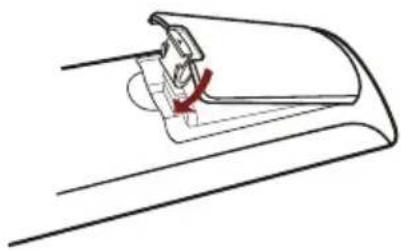
natural_image
Line drawing of a mechanical component with a red arrow indicating a turning point (no text or symbols)NOTES
- Dispose of your batteries in a designated disposal area. Do not throw the batteries into a fire.
- Do not mix battery types or combine used batteries with new ones.
- Remove depleted batteries immediately to prevent battery acid from leaking into the battery compartment.
• If you do not intend to use the remote control for a long time, remove the batteries. - Batteries should not be exposed to excessive heat, such as sunshine, heat registers, or fire.
- Battery chemicals can cause a rash. If the batteries leak, clean the battery compartment with a cloth. If chemicals touch your skin, wash immediately.
▶ Remote Control Operation Range
-
Point the remote control at the TV within no more than 5 metres from the remote control sensor on the TV and within 60° in front of the TV.
-
The operating distance may vary depending on the brightness of the room.
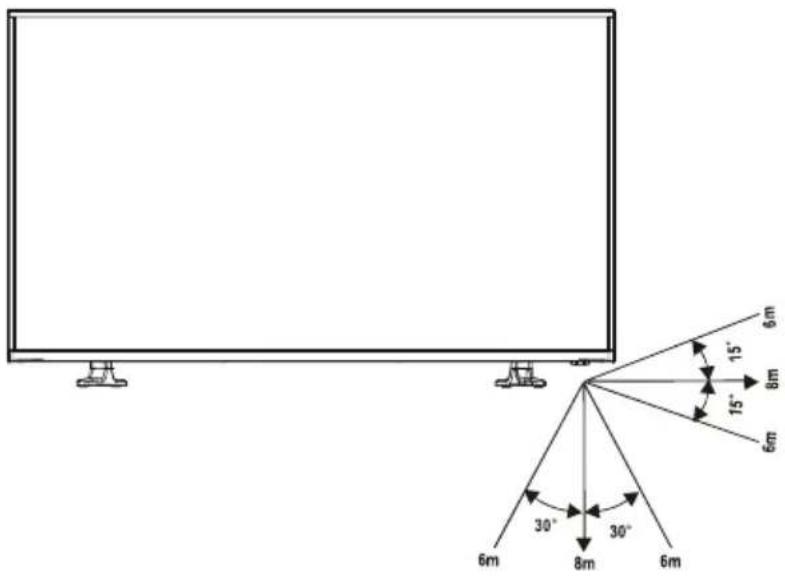
text_image
6m 15° 8m 15° 6m 30° 30° 6m 8m 6mTurning the TV on for the First Time
- Connect the mains cable to the mains socket after you have completed all the connections.
- Switch on the I/O power switch at the bottom of the TV.
- The first time you turn the TV on, it will go straight into the Installation Guide. It will assist you to specify the Language, Country, Use Mode, Network Settings and Search Channels.
NOTE
- Always disconnect the TV from the mains socket when it is not in use for a long period of time. To completely disconnect the mains power, please remove the mains plug from the mains socket or switch off the I/O power switch.
- Press the [▲/▼/◄/►] buttons to navigate the menu and change the settings. Press the [OK] button to confirm.
| Language | Select your desired language to be displayed on the menu. | |
| Country | Select the country where you will operate the TV. | |
| Use Mode | Select your Mode Setting: Home Mode, Premium Mode or Store Mode.See the Pix 1.Home Mode: Recommended mode for the home use and low power consumption.Premium Mode: Ideal picture and sound with higher power consumption.Store Mode: Optimizes the picture for store environments.Please note that Use settings are not saved after switching off the TV when you select Store Mode. | |
| Pix 1 | Pix 2 | |
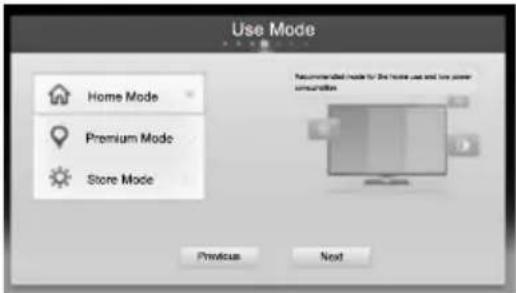 |  | |
| Network Settings | Connect your TV to access the network or the Internet. | |
| When the TV been restored to factory settings, Service Statement will appear.If “Agree” is selected, you can use the network services.(See the Pix 2). If “Not Agree” is selected, you can't use the network services, and when you enter the Network settings page, Service Statement will appear again until you choose "Agree" to use. | ||
Turning the TV on for the First Time
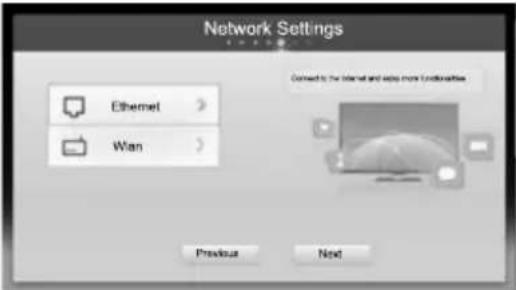
Network Settings
Set Network Type to Ethernet (a Wired Network).
Before setting, make sure your TV is connected to the network by connecting the LAN port of TV to the external modem or router using a LAN (Ethernet/Cat 5) cable. Refer to Making Connections >LAN >Wired setup.
On the Network Setting screen, press the [▲/▼] buttons to select Ethernet, then press [OK], The Ethernet Setting screen opens.
- DHCP: Automatically acquire the necessary connection values and connect your TV to a network if you are connecting the TV to a network that supports DHCP.
- Static: Manually Input the connection values such as IP Address, Subnet Mask, Default Gateway, Primary DNS and Secondary DNS to connect TV to the network. See the Pix on the right.
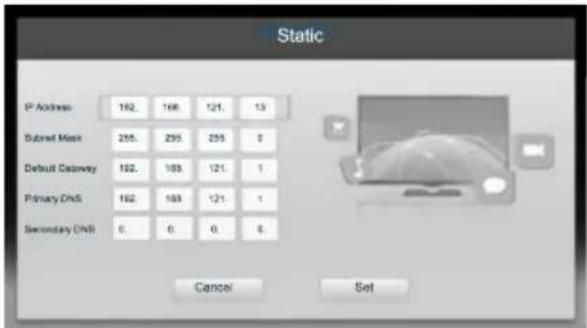
text_image
Static IP Address 162. 168. 121. 13 Subset Mask 255. 295. 255. $ Default Category 162. 168. 121. 1 Primary DNS 162. 168. 121. 1 Secondary DNS 0. 0. 0. $. Cancel SetSet Network Type to Wlan (a Wireless Network).
Before setting, Refer to Making Connections >LAN >Wireless setup.
On the Network Setting screen, press the [▲/▼] buttons to select Wlan, then press [OK], The Wlan Setting screen opens.
- Scan: Automatically display a list of available access points around. Press the [▲/▼] buttons to select the access point with your router SSID, then press the [OK] button. A screen will appear prompting you to enter the key of the corresponding security mode and press the [OK] button to connect. See the Pix 3.
- Add Network: Enter the network's SSID manually to add Network. Select Add Network, a screen will appear prompting you to enter the SSID and select the security mode for your wireless network, then enter the password for the selected network. Press the [OK] button to connect. See the Pix 4.
Pix 3
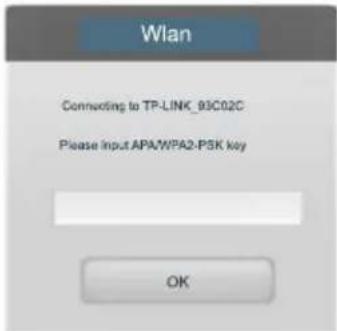
text_image
Wlan Connecting to TP-LINK_93C02C Please input APA/WPA2-PSK key OKPix 4
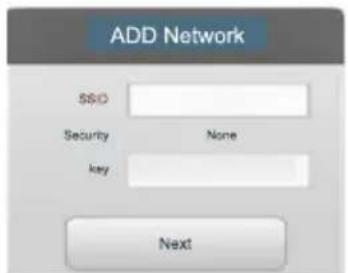
text_image
ADD Network SSID Security None key NextTurning the TV on for the First Time
Search and store the available TV channels according to the type of signal source that is specified.
Press the [▲/▼] buttons to select your Tuner Mode: Antenna, Cable, or Satellite, and then press [OK] button to enter. See the Pix on the right.

text_image
Search Channels Antenna > Cable > Satellite > Astre 19.2 > Cancel the signal reception type that you want to use to get channels Preview NextNOTES
• Astra 19.2 (LCN) may be supported depending on the selected country.
Select a preset reception type: Antenna
You can select: DTV+ATV, DTV or ATV.
Scan for channels and store all available channels.
Select a preset reception type: Cable
When The country settings are selected Austria, Germany, Switzerland, France, Hungary, Romania, the operator selection page will appear, other countries will not appear on this page.
If you select Cable, you will complete the following settings. See the Pix 5.
- Scan Mode: You can select between DTV+ATV, DTV or ATV.
Other options are not available when ATV is selected as Scan Mode.
Search Mode: You can select Quick, Full or Advance.
Scan for channels with active broadcast stations and store them in the TV.
When Quick is selected, You need to set the Network ID manually. When advance is selected, You must manually set the frequency and Network ID for a cable network search or use the default value.
Press "Search" to start the channel installation when you finish the setting.
Pix 5
Pix 6
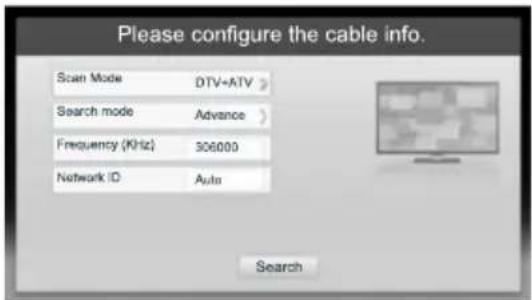
text_image
Please configure the cable info. Scan Mode DTV+ATV Search mode Advance Frequency (KHz) 306000 Network ID Auto Search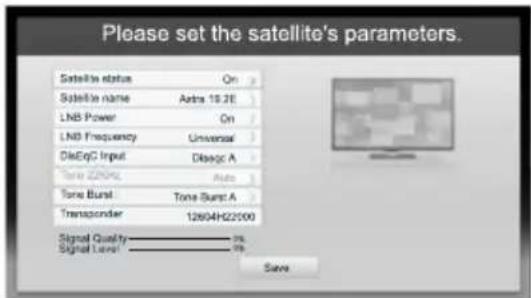
text_image
Please set the satellite's parameters. Satellite status On Satellite name Astra 15.2E LNB Power On LNB Frequency Universal DkEqC Input Disagc A Tone Z20Hz Auto Tone Burst Tone Burst A Transponder 12604HZ22000 Signal Quality———ns Signal Level———ns SaveSelect a preset reception type: Satellite
If you select Satellite, you will complete the following steps.
Search Channels
Turning the TV on for the First Time
Search Channels
-
Please set antenna type config.
-
Antenna type: Select the Antenna type you wish to receive, Universal or Single Cable, you can set Tuner and Band frequency when you select Single Cable.
- Tuner: Select the band to receive the satellite signal.
- Band frequency: Set frequency of the special band you select in the tuner item.
2. Select Satellite
You can select Satellite 1 or Satellite 2, and enter them to set the satellite's parameters. See the Pix 6.
- Satellite status: Select the satellite status on or off.
- Satellite name: Set the satellite name to you select in the item.
- LNB Power: Enable or disable the power supply for the LNB.
- LNB Frequency: Select the LNB oscillators frequency type.
- DisEqC Input : Select DisEqC mode for the selected LNB.
- Tone 22KHz : When the type of LNB frequency you select is "Single vibration" and the DisEqC input you select is "Disable", you can select the Tone 22KHz to off or on. Otherwise the Tone 22KHz item will be set to Auto.
- Tone Burst: By turning the 22KHz option "A&B" on your TV, the TV will automatically switch between two different satellite LNBs or two different DiSEqC switches.
- Transponder: Set the config of transponder for signal reception.
NOTES
- If the Antenna type is selected Single Cable, there will be 5 parameters, See the Pix below.
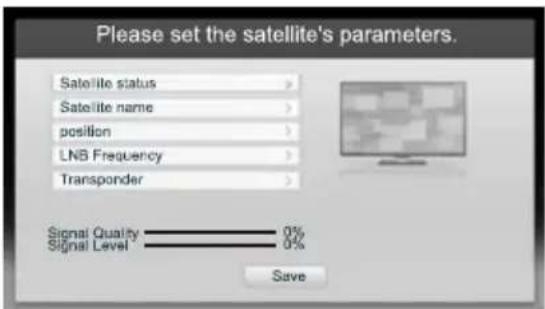
text_image
Please set the satellite's parameters. Satellite status > Satellite name > position > LNB Frequency > Transponder > Signal Quality 0% Signal Level 0% Save-
Please configure the scan info.
-
Scan Mode: You can select: Network or Full.
- Channels: Select either free or all channels to store.
- Press "Search" to set the config of Channel Scan.
Select a preset reception type: Astra 19.2
Astra 19.2 is recommended. If you select Astra 19.2, you need select operator, the following settings please see Satellite Section.
Turning the TV on for the First Time
- After scan, you will enter the finish interface. It will display "Thank you for using the navigation" and then you can press [Go] to exit the wizard sheets.
NOTE
- If you want to reboot the Installation Guide, you can start it in the System menu. Refer to the user manual.
Specifications
Features, appearance and specifications are subject to change without notice.
| Model Name | LHD32K370WSEU | LHD39K370WSEU | |
| Dimension | Without Stand | Width: 29 inches (738 mm)Height: 17 inches (434 mm)Depth: 2.3 inches (59 mm) | Width: 34.6 inches (878 mm)Height: 20.3 inches (516 mm)Depth: 2.4 inches (61 mm) |
| With Stand | Width: 29 inches (738 mm)Height: 18.4 inches (468 mm)Depth: 6.9 inches (175 mm) | Width: 34.6 inches (878 mm)Height: 21.6 inches (548 mm)Depth: 7.5 inches (190 mm) | |
| Weight | Without Stand | 13.2 lbs (6 kg) | 22.5 lbs (10.2 kg) |
| With Stand | 13.7 lbs (6.2 kg) | 23.1 lbs (10.5 kg) | |
| LED Panel Minimum size (diagonal) | 32 inches | 39 inches | |
| Screen resolution | 1366×768 | 1366×768 | |
| Audio power | 6W +6W | 7W +7W | |
| Model Name | LTDN40K370WSEU | LTDN50K370WSGEU | |
| Dimension | Without Stand | Width: 35.9 inches (911 mm)Height: 21.1 inches (536 mm)Depth: 2.6 inches (65 mm) | Width: 34.6 inches (1118 mm)Height: 20.3 inches (652 mm)Depth: 2.4 inches (60 mm) |
| With Stand | Width: 35.9 inches (911 mm)Height: 22.4 inches (568 mm)Depth: 7.5 inches (190 mm) | Width: 34.6 inches (1118 mm)Height: 21.6 inches (686 mm)Depth: 7.5 inches (215 mm) | |
| Weight | Without Stand | 24.3 lbs (11 kg) | 35.2 lbs (16 kg) |
| With Stand | 24.9 lbs (11.3 kg) | 36.4 lbs (16.5 kg) | |
| LED Panel Minimum size (diagonal) | 40 inches | 50 inches | |
| Screen resolution | 1920×1080 | 1920×1080 | |
| Audio power | 7W +7W | 10W +10W | |
| Power consumption | Please refer to the rating label. | ||
| Power supply | 220-240 V ~ 50Hz | ||
Specifications
| Receiving systems | Analog | PAL-D/K, B/G, I SECAM-D/K, B/G, L/L' |
| Digital | DVB-T, DVB-C, DVB-S/S2 | |
| Environmental conditions | Temperature: 41°F - 95°F (5°C - 35°C)Humidity: 20% - 80% RHAtmospheric pressure: 86 kPa - 106 kPa | |
| Component Input | 480 l / 60 Hz, 480 P / 60 Hz, 576 l /50 Hz, 576 P /50 Hz, 720 P / 50 Hz,720 P / 60 Hz, 1080 l / 50 Hz, 1080 l / 60 Hz, 1080 P / 50 Hz, 1080 P / 60 Hz | |
| VGA Input | VGA (640×480 / 60 Hz), SVGA (800×600 / 60 Hz),XGA (1024×768 / 60 Hz) | |
| HDMI Input | RGB / 60 Hz (640×480, 800×600, 1024×768)YUV / 60 Hz (480 l, 480 P, 720 P, 1080 l, 1080 P)YUV / 50 Hz (576 l, 576 P, 720 P, 1080 l, 1080 P) | |

natural_image
A plain gray rectangular bar with a single red horizontal line at the bottom (no text or symbols)