SL1T-X - Machine à coudre TOYOTA - Notice d'utilisation et mode d'emploi gratuit
Retrouvez gratuitement la notice de l'appareil SL1T-X TOYOTA au format PDF.

| Type de machine | Machine à coudre domestique |
| Alimentation | Électrique |
| Nombre de points | Non précisé |
| Type de points | Droit, zigzag, décoratifs |
| Vitesse de couture | Variable, jusqu'à 800 points/min |
| Enfile-aiguille | Manuel |
| Type de canette | Canette horizontale |
| Épaisseur de tissu supportée | Jusqu'à tissu moyen |
| Éclairage intégré | Oui |
| Table d'extension | Non précisé |
| Poids | Environ 6-8 kg |
| Dimensions | Compacte, adaptée au domicile |
| Accessoires inclus | Non précisé |
| Garantie | Non précisé |
| Utilisation recommandée | Usage domestique et loisirs |
FOIRE AUX QUESTIONS - SL1T-X TOYOTA
Questions des utilisateurs sur SL1T-X TOYOTA
0 question sur cet appareil. Repondez a celles que vous connaissez ou posez la votre.
Poser une nouvelle question sur cet appareil
Téléchargez la notice de votre Machine à coudre au format PDF gratuitement ! Retrouvez votre notice SL1T-X - TOYOTA et reprennez votre appareil électronique en main. Sur cette page sont publiés tous les documents nécessaires à l'utilisation de votre appareil SL1T-X de la marque TOYOTA.
MODE D'EMPLOI SL1T-X TOYOTA
Enfilage de l'aiguille de droite
- Pour faciliter l'enfilage, remonter le couteau supérieur en tirant la vis du support vers la droite pour le déverrouiller et en la tournant vers le haut.
- Prendre le fil de la 3ème bobine et l'enfiler en suivant le parcours orange, puis passer dans le chas de l'aiguille de droite, de l'avant vers l'arrière. Laisser environ 10 cm de fil après le pied de biche.
Enfilage de l'aiguille de gauche
- Prendre le fil de la dernière bobine et l'enfiler en suivant le parcours jaune. Puis passer dans le chas de l'aiguille de gauche de l'avant vers l'arrière.
text_image
E 10 cm ⑦ ⑦ A C B Couteau supérieur* Le couteau superieur étant très efile, faites attention lorsque vous deplacez cette piece.
English
Español
| English | Español | Français |
| Correct tension | Tension correcta | Tension correcte |
| • Lower looper thread and upper thread should be well balanced with same tension. (Both looper threads should make crosses at the edge of the fabric.) | • Tanto el hilo superior como el hilo inferior deben estar balanceados con la misma tensión. Ambos lazos deben enlazares al borde de la tela. | • Le fil du boucleur inférieur et le fil supérieur doivent être bien équilibrés avec la même tension. (Les deux fils de boucleur doivent se croiser à la lisière du tissu) |
| • Needle thread should not be slacken, or pulled. | • El hilo de la aguja no debe aflojarse, ni ser tirado. | • Les fils d'aiguilles ne doivent pas être trop la ches ni trop tendus. |
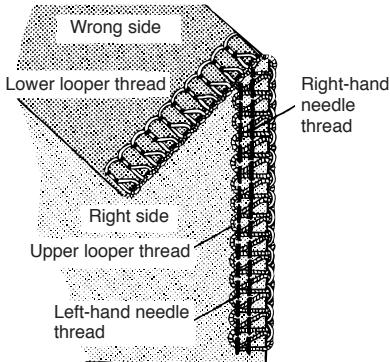
text_image
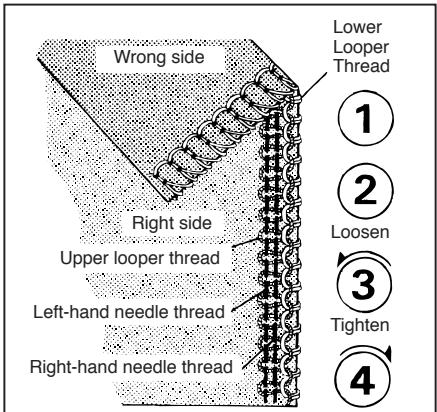
Envers Fil de boucleur inférieur Endroit Fil de boucleur supérieur Fil de l'aiguille gauche Fil de l'aiguille droite| English | Español | Français |
| Unbalanced upper looper thread wraps round and over the back | Hilo superior no balanceado se enrolla por detrás de la tela | Si le fil du boucleur supérieur est mal équilibré, il s'enroule autour et par-dessus l'envers |
| Tighten the thread tension of the upper looper (Dial 3) or loosen the thread tension of the lower looper (Dial 4). | Aumente la tensión del hilo del crochet superior (dial 3), o afloje la tensión del crochet inferior (dial 4). | Resserrer la tension du fil du boucleur supérieur (bouton 3) ou desserrer la tension du fil du boucleur inférieur (bouton 4). |
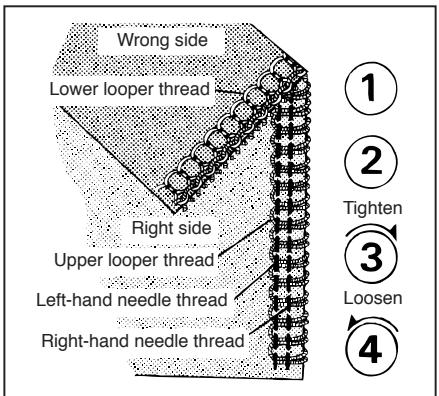
text_image
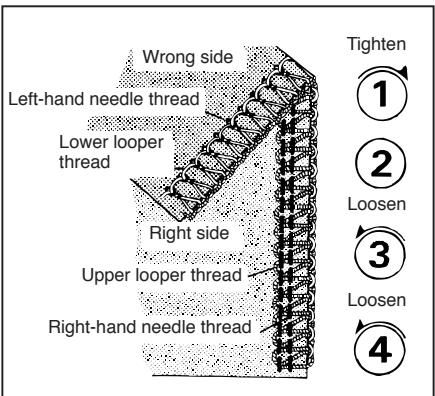
Envers Fil de boucleur inférieur Endroit Fil de boucleur supérieur Fil de l'aiguille gauche Fil de l'aiguille droite ① ② Serrer ③ Desserrer ④| English | Español | Français |
| Unbalanced lower looper thread wraps round and over the face | Hilo inferior no balanceado se enlaza sobre la cara de tela | Si le fil du boucleur inférieur est mal équilibré, il s'enroule autour et par-dessus l'endroit |
| Tighten the thread tension of the lower looper (Dial 4) or loosen the thread tension of the upper looper (Dial 3). | Aumente la tensión del hilo inferior con el botón 4 o disminuya la tensión del hilo superior (botón 3). | Resserrer la tension du fil du boucleur inférieur (bouton 4) ou desserrer la tension du fil du boucleur supérieur (bouton 3). |
text_image
Envers Endroit Fil de boucleur supérieur Fil de l'aiguille gauche Fil de l'aiguille droite Fil de boucleur inférieur ① ② Desserrer ③ Serrer ④| English | Español | Français |
| Unbalanced left needle thread too loose | Aguja izq. no balanceada, hilo demasiado flojo | Si le fil de l’aiguille gauche est trop la che |
| Tighten the thread tension of the left needle (Dial 1) or loosen both looper thread (Dial 3 and 4). | Aumente la tensión de la aguja izquierda con el botón 1 o afloje tanto el hilo 3 como el 4. | Resserrer la tension du fil de l’aiguille gauche (bouton 1) ou desserrer la tension des fils de boucleurs (boutons, 3, 4) |
text_image
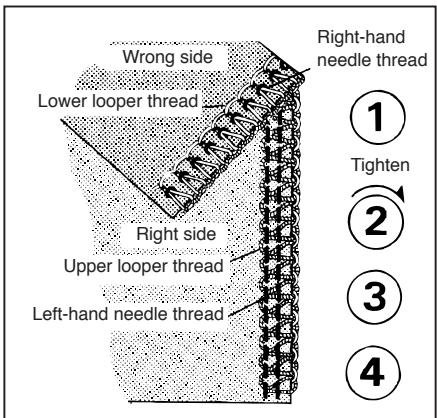
Envers Fil de l'aiguille gauche Fil de boucleur inférieur Endroit Fil de boucleur supérieur Fil de l'aiguille droite Serrer ① ② Desserrer ③ Desserrer ④| English | Español | Français |
| Unbalanced right needle thread too loose | Aguja derecha no balanceada, hilo demasiado flojo | Si le fil de l’aiguille droite est trop la che |
| Tighten the thread tension of the right needle (Dial 2). | Aumente la tensión de la aguja derecha con el (botón 2). | Resserrer la tension du fil de l’aiguille droite (bouton 2). |
text_image
Envers Fil de boucleur inférieur Endroit Fil de boucleur supérieur Fil de l'aiguille gauche Fil de l'aiguille droite ① Serrer ② ③ ④English
| MODÈLES DE POINTS | SURJET | OURLET ROULE | OURLET ROULE FIN | |
| LONGUEUR DE POINT | 2.5 - 5 mm | 1 - 1.5 mm | 1 - 1.5 mm | |
| TENSION DES FILS | Fil d'aiguille | 2 - 4 | 1 - 4 | 1 - 4 |
| Fil de boucleur supérieur | 1 - 4 | 1 - 4 | 2 - 4 | |
| Fil de boucleur inférieur | 2 - 4 | 5 - 8 | 2 - 4 | |
| English | Español | |
| SETTING WASTE TRAY (Option on some models) | INSTALANDO LA BANDEJA DE RECORTES | |
| (1) Insert the right guide @ of the waste tray to the right leg of the overlock machine as illustrated. Turn the waste tray in the direction of arrow. | (1) Inserte la guía derecha @ de la bandeja de recortes a la pata derecha de la máquina overlock de la manera ilustrada. Gire la bandeja en dirección de la flecha. | 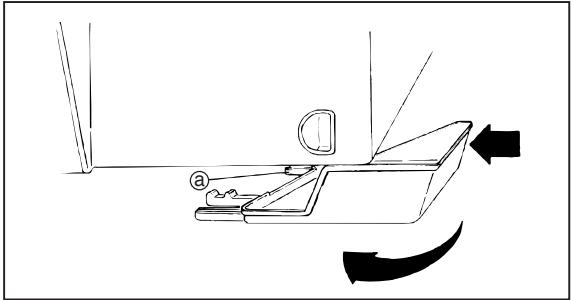 |
| (2) Push the left end of the waste tray in the direction of arrow. | (2) Empuje el extremo izquierdo de la bandeja en dirección de la flecha. |  |
| THREE THREAD OVEREDGING STITCH USING ONE NEEDLE | ORILLADO CON TRES HILOS UTILIZANDO UNA AGUJA | 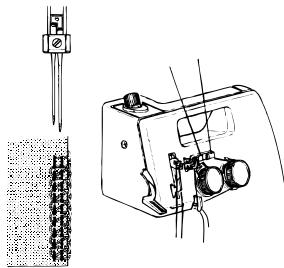 |
| Though this machine is made mainly for 4 thread stitch overedging using 2 needles, three-thread stitch overedging using 1 needle can be easily operated by just removing 1 needle. | Aunque ésta máquina ha sido diseñado principalmente para orillado de 4 hilos con dos agujas, el orillado con tres hilos y una aguja es posible con tan solo remover una aguja. | |
| (1) By removing the right needleThree-thread overedging stitch using 1 needle for as wide as a 4-thread overedging stitch using 2 needles can be achieved.Use the left thread tension. (Dial 1). the bite width is normally 5 mm.※ The differential feed ratio is normally “N”. (See p.22) | (1) Extracción de removiendo la aguja derechaEs posible obtener un orillado con tres hilos y una aguja, del mismo ancho que con 4 hilos y dos agujas.Aplique la tensión del hilo izquierdo, (botón 1), el ancho del lazo es normalmente 5 mm.※ La proporción diferencial es normalmente “N”. | English: Left needleEspañol: Aguja izquilerdaFrançais: Aiguille gaucheDeutsch: Linke nadelNederlands: LinkernaaldItaliano: Ago destro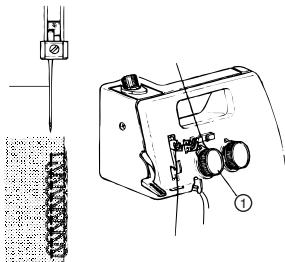 |
| (2) By removing the left needleThe right needle sews with a narrow width bite.Use the right thread tension. (Dial 2)The bite width is normally 3 mm.※ The differential feed ratio is normally “N”. (See p.22) | (2) Extracción de removieno la aguja izquierdaLa aguja derecha cose con un lazo de ancho reducido.Utilice la tensión para hilo derecho, (botón 2). El ancho normal del lazo es 3 mm.※ La proporción diferencial es normalmente “N”. | English: Right needleEspañol: Aguja derechaFrançais: Aiguille droiteDeutsch: Rechte nadelNederlands: RechternaaldItaliano: Ago sinistro  |
| TWO THREAD OVERLOCK1. Open the front cover.2. Use one needle thread (left or right needle) and lower looper thread.3. Turn the handwheel toward you to move the upper looper to the right side of the needle.4. Hold the 1 by hand and gently push it down.Warning:Pushing converter down too hard may bend converter. | REMALLADO DE DOS HILOS1. Abra la tapa frontal.2. Utilice el hilo de una aguja (izquieda o derecha) y el hilo del áncora inferior.3. Gire el volante hacia usted para mover el áncora superior hacia la derecha de la aguja.4. Sujete el 1 con la mano y empuje ligeramente hacia abajo.¡Atención!Si empuja el convertidor hacia abajo demasiado fuerte puede doblarlo. | 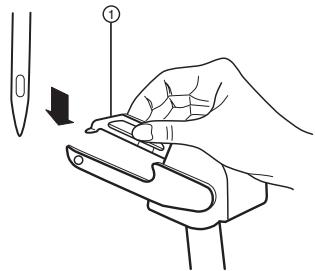 |
| 5. Insert the tip 2 of the 2-thread converter into the eye 3 of the upper looper.6. Close the front cover. | 5. Inserte la punta 2 del convertidor en el ojo 3 del áncora superior.6. Cierre la tapa frontal. | 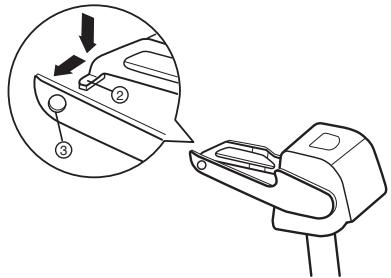 |
| For 3-thread/4-thread overlock sewing, set 2-thread overlock converter in the up position as illustrated, by removing the tip 2 out of the eye 3 of the upper looper. | Para remallado con 3 y 4 hilos, coloque el conversor de 2 hilos en posición alta como se muestra, quitando el extremo 2 del ojo de la aguja 3 del áncora superior. |  |
| English | Español | Français |
| ROLL HEMMING (Option on some models)Roll hemming is achieved by rolling the fabric and overlocking. the 2 types as illustrated on left is ideal for use with thin materials. | ORILLADO DOBLE (En opción en algunos modelos)Este orillado se obtiene enrollando la tela y cosiendo. Los tipos ilustrados a la izquierda son ideales para telas delgadas. | OURLET ROULE (En option sur certains modèles)L'ourlet roulé est effectué par roulement du tissu et surjet.Les 2 types d'ourlets roulés illustrés ci-contre sont idéals pour une utilisation sur tissus fins. |
F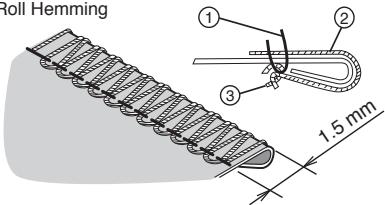 The fabric is rolled by adjusting.The thread tension and is overlocked with upper looper thread. The fabric is rolled by adjusting.The thread tension and is overlocked with upper looper thread. | 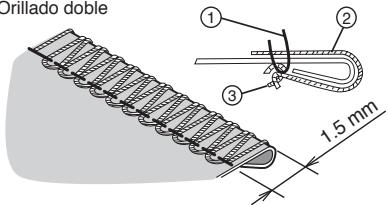 La tela es dobalda ajustando la tensión del hilo y es cosida con el hilo superior. La tela es dobalda ajustando la tensión del hilo y es cosida con el hilo superior. | C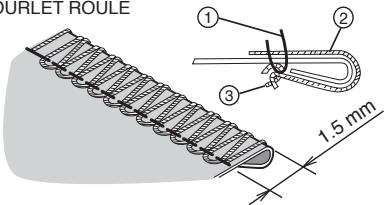 Le tissu ist roulé par le réglage de la tension de fil et est surfilé avec le fil du boucleur supérieur. Le tissu ist roulé par le réglage de la tension de fil et est surfilé avec le fil du boucleur supérieur. |
Fin Roll Hemming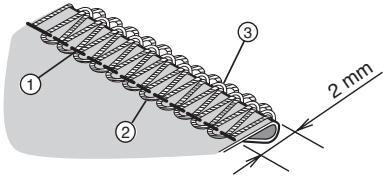 The fabric is rolled and overlocked with upper and lower looper thread. The fabric is rolled and overlocked with upper and lower looper thread. | Orillado doble fino La tela es doblada y cosida con los hilos superior e inferior. La tela es doblada y cosida con los hilos superior e inferior. | OURLET ROULE FIN Le tissu est roulé et surfilé par les fils des boucleurs supérieur et inférieur. Le tissu est roulé et surfilé par les fils des boucleurs supérieur et inférieur. |
English
Español
text_image
le bord de l'ourlet le côté de la plaque aiguille
text_image
Vis couteau inférieur Aligner Plaque aiguille Couteau inférieur| English | Español | Français |
| (1) Replacing the lower knife:Loosen the lower knife clamp screw and change the knife for a new one. Align the top of the lower knife with the top of the needle plate.(2) Replacing the upper knife:Move the upper knife to its lowest position by turning the handwheel towards you.Loosen the upper knife screw, while holding the upper knife. Change the knife for a new one. Check if the biting position ® of upper knife is positioned downwards 1.6 ~ 2.0 from the top of biting position of lower knife.Tighten the upper knife screw. | (1) Reemplazando el cuchillo inferior:Afloje el tornillo del cuchillo inferior y cambie el cuchillo por uno nuevo. Posicione la parte superior del cuchillo inferior en línea con la parte superior de la placa-aguja.(2) Reemplazando el cuchillo superior:Mueva el cuchillo superior a su posición más baja girando el volante hacia Ud.Afloje el tornillo del cuchillo superior, afirmando al mismo tiempo el cuchillo. Cambie cuchillos. Revise si la posición de corte @ del cuchillo superior está ubicada 1.6 2.0 hacia abajo desde la posición superior de corte del cuchillo inferior. Apriete el tornillo del cuchillo superior. | (1) Remplacement du couteau Inférieur:Desserrer la vis du couteau inférieur et remplacer le couteau par un nouveau. Aligner le dessus du couteau inférieur avec la surface de la plaque aiguille.(2) Remplacement du co uteau supérieur:Amener le couteau supérieur à sa position la plus basse en tournant le volant vers soi. Desserrer la vis du couteau supérieur tout en le soutenant. Remplacer le couteau par un nouveau.Vérifier que la position de coupe ® du couteau supérieur se trouve en-dessous de 1.6 ~ 2mm par rapport au niveau du couteau inférieur. Resserrer la vis du couteau supérieur. |