
KD 750 - Platine vinyle KENWOOD - Notice d'utilisation et mode d'emploi gratuit
Retrouvez gratuitement la notice de l'appareil KD 750 KENWOOD au format PDF.

| Type de produit | Platine vinyle |
| Marque | Kenwood |
| Modèle | KD 750 |
| Système d'entraînement | Quartz PLL direct drive |
| Moteur | 20 pôles, 30 encoches, DC servo sans balais (couple 1,5 kg.cm) |
| Plateau | 33 cm (13 pouces) en alliage d'aluminium, poids 2,6 kg |
| Vitesses | 33-1/3 et 45 tr/min |
| Pleurage et scintillement | Moins de 0,022 % (WRMS) |
| Rapport signal/bruit | Supérieur à 74 dB (pondéré DIN) |
| Bras de lecture | Équilibré statique, forme S, longueur effective 245 mm, porte-à-faux 15 mm |
| Force d'appui | 0 à 3 g (par pas de 0,1 g) |
| Poids de cartouche compatible | 4 à 14 g |
| Cartouche fournie | DM-11 (sauf USA, Canada, Europe, Royaume-Uni) |
| Dimensions (L x H x P) | 490 x 165 x 423 mm |
| Poids | 17,5 kg |
| Alimentation électrique | 120/220 V CA commutable, 50/60 Hz, 35 W |
| Accessoires fournis | Câbles phono basse capacité (prises dorées), adaptateur EP, tournevis, chiffon silicone, câble de terre |
| Entretien et nettoyage | Essuyer avec un chiffon sec ou silicone ; ne pas utiliser de solvants |
| Durée de vie du saphir | Environ 500 lectures de LP 30 cm |
| Sécurité | Ne pas exposer à la pluie ou à l'humidité ; débrancher avant nettoyage |
| Pièces détachées | Saphir de rechange N-11 disponible chez le revendeur |
| Informations générales | Notice complète disponible en ligne sur notice-facile.com |
FOIRE AUX QUESTIONS - KD 750 KENWOOD
Questions des utilisateurs sur KD 750 KENWOOD
0 question sur cet appareil. Repondez a celles que vous connaissez ou posez la votre.
Poser une nouvelle question sur cet appareil
Téléchargez la notice de votre Platine vinyle au format PDF gratuitement ! Retrouvez votre notice KD 750 - KENWOOD et reprennez votre appareil électronique en main. Sur cette page sont publiés tous les documents nécessaires à l'utilisation de votre appareil KD 750 de la marque KENWOOD.
MODE D'EMPLOI KD 750 KENWOOD
The home of the turntable THE VINYL ENGINE
For more turntable manuals and setup information please visit www.vinylengine.com
DIRECT-DRIVE TURNTABLE
KD-750
INSTRUCTION MANUAL

INTRODUCTION
Thank you for purchasing our turntable. Because we take great pride in the long tradition of quality components the name KENWOOD represents, your choice of our product places you in a distinguished family of connoisseurs of superb high-fidelity sound reproduction.
The purpose of this manual is to acquaint you with the operating features of your new turntable. You will notice that in every detail of planning, engineering, styling, operating convenience, and adaptability, we have sought to anticipate your needs and desires.
We suggest that you read this manual carefully. Knowing how to set up your turntable, to the best advantage, will enhance your listening pleasure right from the start. You will also become aware of the ease with which you can adjust your turntable to meet your special requirements.
SERIAL NUMBER
Record your SERIAL NUMBER on the spaces designated on the warranty card. You will find the serial number on the back of the unit.
AFTER UNPACKING
After unpacking, we recommend you inspect and examine the unit for any possible shipping damage. If your unit is damaged or fails to operate, notify your dealer immediately. If your unit was shipped to you directly, notify the shipping company without delay. Only the consignee (the person or company receiving the unit) can file a claim against the carrier for shipping damage.
We recommend you retain the original carton and packing materials to prevent any damage should you transport or ship your unit in the future.
WARNING:
TO PREVENT FIRE OR SHOCK HAZARD, DO NOT EXPOSE THIS APPLIANCE TO RAIN OR MOISTURE.
NOTES
CONCERNING LINE VOLTAGE
- Units shipped to the countries listed in the table below are designed to be operated with the AC line voltages that are shown, which are standard in those countries.
| Destination | AC Voltage |
| U.S.A. | 120V |
| CANADA | 120V |
| U.K. | 240V |
| AUSTRALIA | 240V |
- These units are therefore not equipped with an AC Voltage Selector. The owners of such units should disregard all reference to these items in this Instruction Manual.
AC VOLTAGE SELECTOR
- Units shipped to countries not listed in the above table are equipped with an AC Voltage Selector on the back of the unit that is preset at the factory to the voltage generally available in the destination area. Before operating this turntable, make sure that the position of the AC Voltage Selector matches your line voltage.
This setting is correct for 220 V AC power source.
This setting is correct for 120 V AC power source.

- If the setting of the AC Voltage Selector Switch on your unit is not set correctly to your line voltage, it must be reset.
First remove the AC plug and reset switch to your line voltage as follows:
- Remove the set screw and stopper plate.
- Switch the lever to opposite side.
- Lock the lever by attaching stopper plate with the set screw.
- Our warranty does not cover damage caused by excessive line voltage due to improper setting of the AC Voltage Selector Switch.
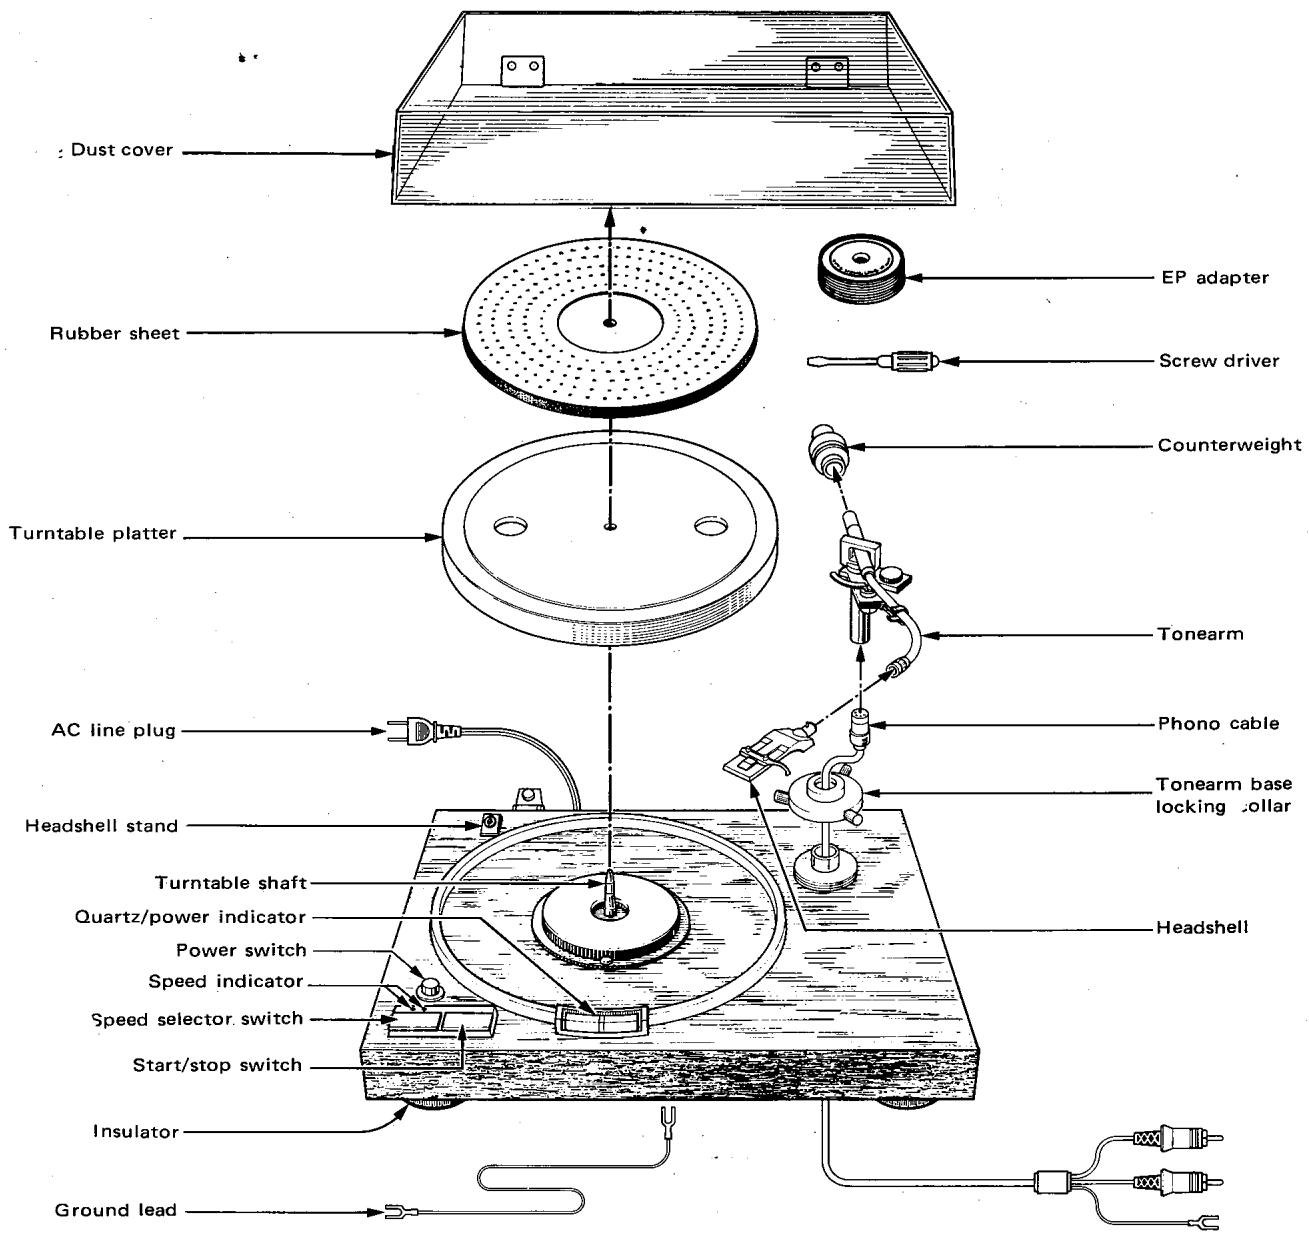
Fig. 1 Location of Parts
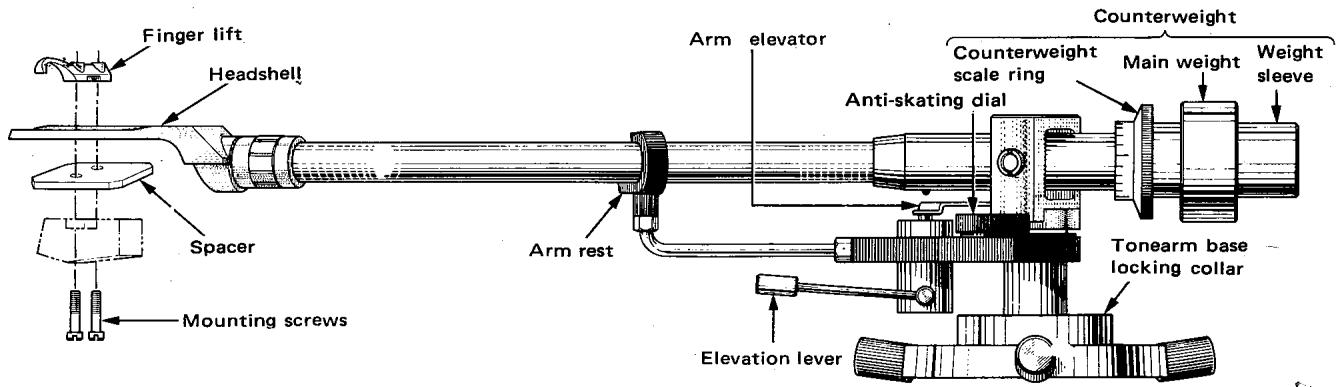
Fig. 2 Tonearm Parts Nomenclature
1
Fig. 3

Note: Do not tighten the tonearm base locking collar before inserting the tonearm.


Fig. 4
Fig. 5
② Installing Turntable Assembly
This turntable assembly is quite heavy so it should be placed in its final location before proceeding. Be sure to choose the most suitable place. See section "Place for Installation" on page 7. Install the turntable assembly with its four insulators turned fully clockwise.
(3) Connections
Connect the phono cable, ground wire, and the power supply cord to the turntable assembly.
Note: Be sure to keep the power switch at "OFF" position.
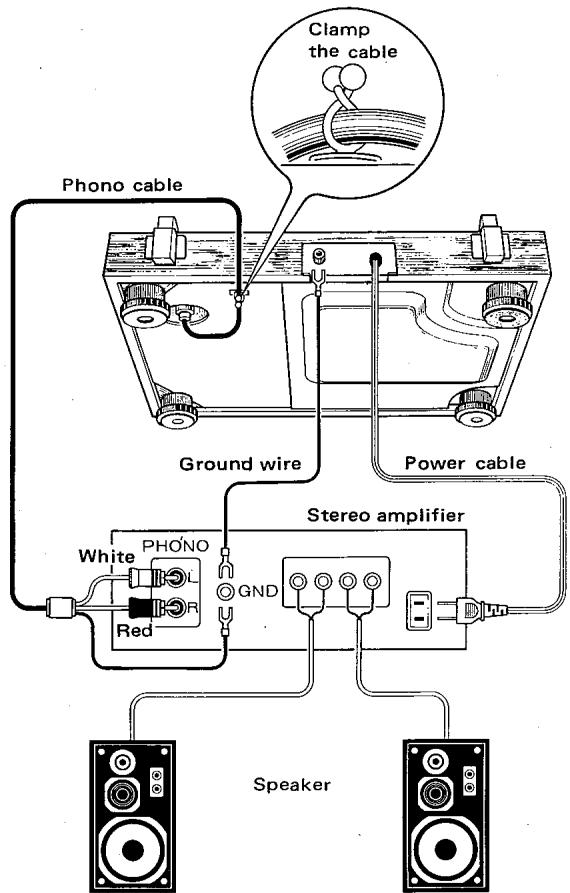
Fig. 6

④ Installing Plug-in Head
Fig. 7
⑤ Installing Counterweight

After fully pushing the counterweight into place, turn it and confirm its freedom of movement.
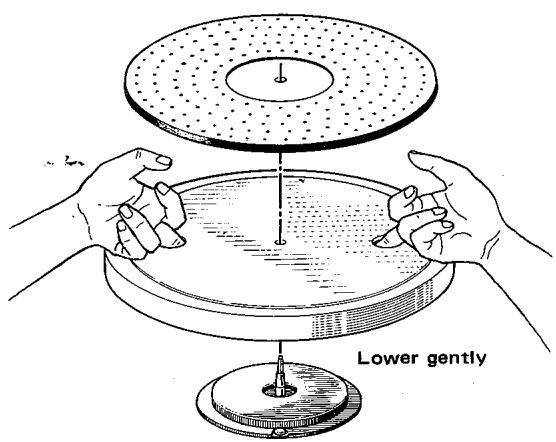
Fig. 8
6 Installing Turntable Platter
Fig. 9

⑦ Installing Dust Cover
Fig. 10 Installing Dust Cover
(8) Levelling the Assembly
Close the dust cover. Now check the turntable assembly to make sure that it is perfectly level.
To raise any corner, turn the insulator at that corner counterclockwise. Turn insulator clockwise to lower that corner.
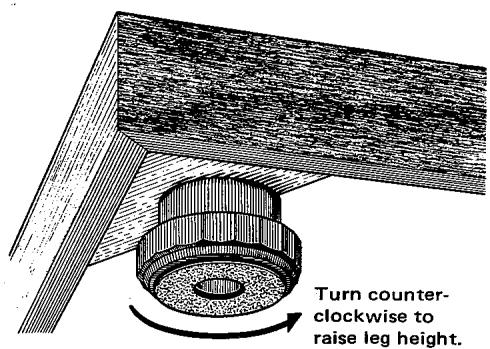
Fig. 11 Levelling the Assembly
- Cartridge is not supplied with this turntable. (Certain area model is equipped with the DM-II cartridge) Obtain one separately, and install and adjust it as follows.
- All EIA standard type headshells can be used with this turntable.
- Cartridges and headshells are available in various weights. Their combined weight must be within 15 to 25 grams to fit this turntable. When the headshell (11g) supplied with this unit is used, cartridge from 4 to 14g can be used.
① Installing Cartridge
- Use spacers supplied with this unit for shallow type cartridges that provide very low stylus height.
- Use proper length screws to fasten the cartridge.
- Fasten cartridge very lightly at first so that it can be moved and adjusted. Tighten the cartridge firmly in place parallel to the headshell only after completing adjustments described below, including the overhang.

Fig. 12
- When special cartridges such as low-level MC cartridges are used, refer to the relevant operation manual for proper connection method to the amplifier.
② Adjusting Tonearm Height
- Plug headshell, with cartridge attached, into the tone-arm. Turn the tonearm base collar counterclockwise slightly. Adjust tonearm height so that it is horizontal when the stylus contacts the record surface.
- Then lock collar tightly in place.
- Now check the action of the arm elevation lever. When it is lifted, the stylus should rise above the record surface (Fig. 14).
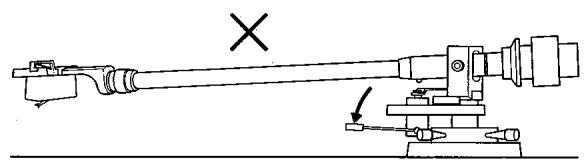
When the lever is pushed down, the arm elevator should not touch the tonearm (Fig. 13).

Fig. 13
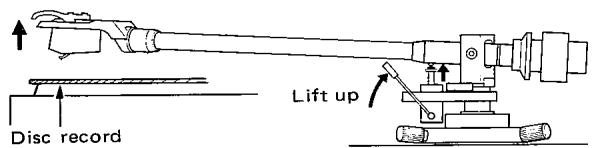
Fig. 14
Caution:
When mounting or dismounting a plug-in type head:
- First, securely clamp the tonearm in the arm rest.
- Then, either turn the volume control knob of the amplifier to the 0 position, or turn off its power supply.
③ Adjusting Overhang
- Put the EP adaptor on the turntable shaft. Move the cartridge, relative to the headshell, until the stylus coincides with the overhang line mark on the EP adaptor. Remove the headshell from the tonearm, and lock the cartridge firmly to the headshell in the adjusted position.
- You will find the graduations on the headshell helpful in making this adjustment.
- The correct tonearm overhang for this turntable is 15 mm . (9/16")

Fig. 15
The dust cover hinges are specially designed to hold the cover in place without external support when it is opened. If the cover should drop down under its own weight, tighten the screw at the bottom of both hinges as shown in Fig. 16.

Fig. 16
PLACE FOR INSTALLATION
In order to play records under the best possible conditions, observe the following points:
- Install the turntable on a stable, level surface not affected by external vibrations.
- Avoid installing the set in direct sunlight or near heat sources such as stoves.
- Avoid operating on at near freezing temperatures.
- Avoid dusty, moist places.
- Install the turntable as far from the speakers as practicable, to prevent acoustic feedback (howling).

①
First, set the counterweight centrally as shown.
Fig. 17
②
Push the arm elevation lever down, and disengage the tonearm from the arm rest. Turn the counterweight until the tonearm balances horizontally.


Fig. 18

3
Return tonearm to the arm rest. Now turn the counterweight scale ring only and set the "0" graduation to the reference line.
Fig. 19

4
Turn the counterweight clockwise until the graduation corresponding to the recommended tracking force is aligned with the reference line.
Fig. 20

5
Set the anti-skating dial also to the same tracking force value.
Fig. 21
- Check connections to the amplifier and all amplifier knob settings. Also see that the tracking force adjustment has been correctly made.
- Push the power switch on. The power indicator will light-up.
- Place a disc record on the turntable platter. Use the EP adaptor for EP discs.
- For 45 rpm disc records, push the speed selector switch once. Turntable speed is automatically set to 33-1/3 rpm when the power switch is turned on. Speed changes thereafter alternately to 45 rpm and 33-1/3 rpm each time that the speed selector switch is pushed in. The speed indicator always shows the selected speed.
- Push the start/stop switch to set the turntable platter rotating. When the correct speed is attained, the quartz indicator at the center of the power indicator lights up.
- After confirming that the arm elevation lever is in the raised position, grip the finger lift of the head-shell and bring the stylus into the start position over the disc record.
- Push the arm elevation lever down. The stylus will descend and engage the disc groove, and music will begin.
- When the music ends, raise the arm elevation lever. Grip the headshell finger lift, and return the tolearm to the arm rest.
- Push the start/stop switch to stop the turntable platter. Each time the start/stop switch is pushed, the turntable platter alternately starts and stops.
- Switch off the power switch.

Power Switch and Power Indicator
Fig. 22

- Speed Selector Switch and Speed Indicator
Fig. 23
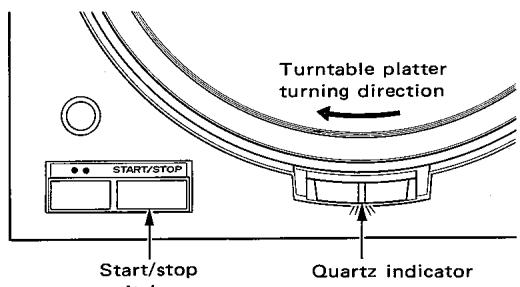
- Start/stop Switch and Quartz Indicator
Fig. 24
- Cleaning
Clean the case, cover and other surfaces with a dry cloth or silicone cloth. If the turntable is badly soiled, first, unplug the power cable, and wipe the dirt off with a piece of cloth lightly moistened with soapy water. Never use thinner, alcohol, or other volatile liquids for cleaning.
Handling and Life of the Stylus
The stylus is extremely delicate. Handle it with great care, and remove dust from it only with a soft brush.
The average life of a stylus is 500 plays of 30~cm LP disks. However, stylus life is greatly influenced by treatment during use. If the stylus becomes worn, high pitch tones tend to distort, and reproduction quality deteriorates.
Periodical Checks
When any machine is used for a long time without proper care, some trouble is bound to develop through lack of lubricants, friction, deterioration, etc.
In order to enjoy high quality, trouble-free operation, we recommend that you have it checked at least once every two years, even when there is no specific trouble. You can have your set checked at our nearest local office in your vicinity.
- Cautions When Moving Your Set
When you have to transport your turntable over a long distance, for example, in moving, pack it in the packing materials in which it was originally delivered. When no original packing material is available, be sure to pack the turntable platter, the tonearm, the counterweight, the plug-in head (shell and cartridge together) separately.
As the motor of this turntable is a DC motor, the supply frequency does not affect its performance.
How to Replace the Stylus
N-11 is the designation of the replacement stylus for that used in the DM-11 cartridge.
Replacement stylus may be obtained from the dealer from whom you purchased this turntable.
You can replace the stylus easily as shown below.
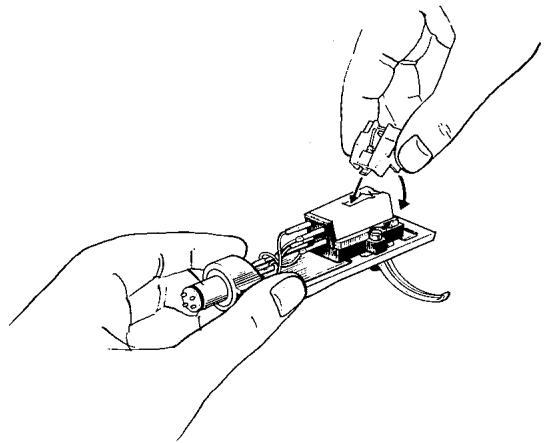
Fig. 25
TROUBLE SHOOTING
When the Speaker Hums:
- Check the phono cords and the ground lead are properly connected to the turntable and the amplifier.
- Check the plug-in head is inserted properly.
- Change the phono cord arrangement.
- Reserve the polarity of the power supply lines.
When the Speaker Howls:
- Howling is caused by the transmission of the speaker vibration to the turntable set. Set up the turntable and the speakers as far apart as feasible, or place them on a more stable floor.
PHONOMOTOR ASSEMBLY
-
S-V quartz-lock-controlled direct-drive type
-
New type 20-pole, 30-slot S-V DC servo-motor
- Newly developed quartz lock using MOS type FET LSI
- 180-slot speed proportional integration type speed detector
-
All electronic brake
-
Turntable with an overall moment of inertia of 550 kg·cm²
- Digitally controlled, single-button speed selection switch and start/stop switch
- Quartz lock indicator
- LED revolution-speed indicator
TONEARM ASSEMBLY
- All connector pins gold-plated
- Collet chuck type tonearm base
- Reactionless arm elevation mechanism
- Anti-skating mechanism
- T-shape magnesium headshell
- Low capacity phono cord with gold-plated pin plug
CABINET
- Kingrose cabinet with ARCB
ARCB = Anti-Resonance Compression Base - Dual suspension and adjustable height insulators
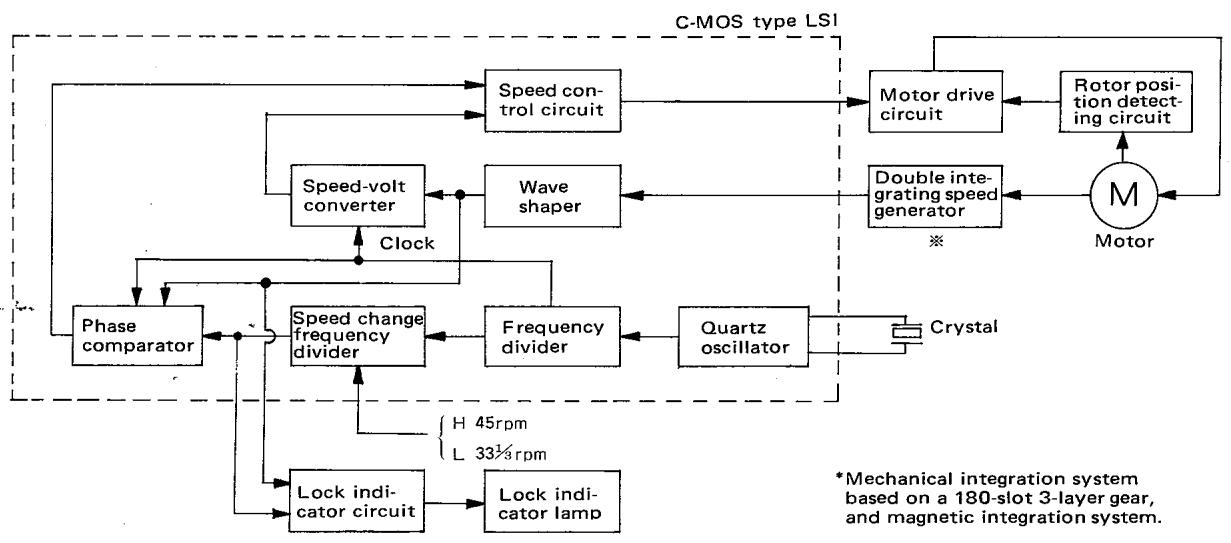
Fig. 26 KD-750 Quartz PLL Control Block Diagram
SPECIFICATIONS
MOTOR & TURNTABLE
Drive System. Quartz PLL direct drive system
Motor 20 pole, 30 slot brushless D.C.
servo motor (Starting torque 1.5 kg.cm)
Turntable Platter. 33 cm (13 inch) diameter, alumi
num alloy die-cast
Weight: 2.6 kg (5.7 lbs.)
Moment of inertia: 550kg.cm^2
Speeds 2 speeds, 33-1/3 and 45 rpm.
Wow & Flutter .Less than 0.022% (WRMS)
Bumble DIN weighted better than -74 dB
DIN unweighted better than-55 dB
Load Fluctuation 0% (within 120 g of tracking force)
Transient Load Fluctuation .Less than 0.0003% (at 33-1/3 rpm.)
400 Hz, 20 g.cm load)
Less than 0.00015% (at 33-1/3 rpm.)
1,000 kHz, 20 g.cm load)
Starting Time. Within 1.8 sec.
Platter Speed Deviation .Less than 0.002%
Time Drift. Less than 0.0002%/
Temperature Drift Less than 0.00002% /C^
TONEARM
Type Static-balanced type, S-shaped pipe
arm, EIA plug-in connector
Effective Tonearm Length 245 mm (9-5/8 inch)
Overhang 15 mm (9/16 inch)
Tracking Error +1.5 to -1.0 degree
Tracking Force Variable Range .. 0 to 3 grams (0.1 g step)
Usable Cartridge Weight . . . . 4 to 14 grams
Adjustable Height Range . . . Within 6 mm (1/4 inch)
Arm Base Collet chuck type
Headshell Magnesium alloy die-cast type
Weight: 11 g
CARTRIDGE
(U.S.A., Canada, Europe and U.K. model are not equipped with the DM-11 cartridge)
Furnished Cartridge DM-11
Stylus N-11
Frequency Response 20 Hz to 20,000 Hz
Output Voltage 3.5 mV (1,000 Hz, 5 cm/sec.)
Optimum Tracking Force 2.0 ±0.3 grams
Load Impedance 50 kohms
Channel Separation . Better than 27 dB (1,000 Hz)
Replacement Stylus N-11
MISCELLANEOUS
| Power Requirement | AC 120V, 60 Hz: U.S.A., Canada model AC 240V, 50 Hz: U.K. Australia model AC 120V/220V (switchable) 50/60 Hz: Others | |
| Power Consumption | 35.0 watts | |
| Dimensions | W 490 mm H 165 mm D 423 mm | (19-5/16") (6-1/2") (16-5/8") |
| Weight | 17.5 kg (38.6 lbs.) | |
| SUPPLIED ACCESSORIES: | Low capacitance phono cables with gold plated terminal, EP adaptor with overhang gauge, screw driver, silicon cloth, ground wire |
CABINET
| Material | Particle board laminated with pianofinished kingrose veneer and a anti-resonance compression base (ARCB) are combined in the construction of cabinet. |
Cabinet Ass' y Weight 7.5 kg (16.5 lbs.)
ARCB Weight 3.5 kg (7.7 lbs.)
ADDITIONAL FEATURES: Illuminated quartz lock and power indicator
Electric-controlled brake
Arm-height adjuster
Collet chuck arm base
Anti-skating device
Viscous-damped cueing device
LED speed indicator
Dual suspension and adjustable insulator
Free-stop action acrylic dust cover (Weight 1.2 kg)
Tracking force direct readout count
Headshell stand
Note: Kenwood follows a policy of continuous advancements in development. For this reason specifications may be changed without notice.