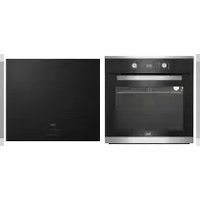
MODE D'EMPLOI FSE58300ACS BEKO
Oven
User Manual
Forno
Manuale Utente
CSG 42000 DW
natural_image
Simple line drawing of a kitchen oven with four circular indicators above the door (no text or symbols)
Please read this user manual first!
Dear Customer,
Thank you for purchasing this Beko product. We hope that you get the best results from your product which has been manufactured with high quality and state-of-the-art technology. Therefore, please read this entire user manual and all other accompanying documents carefully before using the product and keep it as a reference for future use. If you handover the product to someone else, give the user manual as well. Follow all warnings and information in the user manual.
Remember that this user manual is also applicable for several other models. Differences between models will be identified in the manual.
Explanation of symbols
Throughout this user manual the following symbols are used:

Important information or useful hints about usage.

Warning of hazardous situations with regard to life and property.

Warning of electric shock.

Warning of risk of fire.

Warning of hot surfaces.
Arçelik A.S.
Karaağaç caddesi No:2-6
34445 Süflüce/Istanbul/TURKEY
Made in TURKEY
CE
This product was manufactured using the latest technology in environmentally friendly conditions.
1 Important instructions and warnings for safety and environment 4
General safety 4
Safety when working with gas 4
Product safety 5
Intended use 7
Safety for children....7
Disposing of the old product 7
Package information 7
Future Transportation....7
Overview 8
Package contents 9
Technical specifications ....10
Injector table 10
3 Installation 11
Before installation .... 11
Installation and connection 11
Gas conversion....12
4 Preparation 15
Tips for saving energy 15
Initial use 15
First cleaning of the appliance 15
Initial heating....15
5 How to use the hob 16
General information about cooking 16
Using the hobs.... 16
6 How to operate the oven 18
General information on baking, roasting and grilling18
How to use the gas oven.... 18
Cooking times table.... 19
How to operate the gas grill 20
Cooking times table.... 20
7 Maintenance and care 21
General information.... 21
Cleaning the hob....21
Cleaning the control panel 21
Cleaning the oven 21
Removing the oven door 21
Removing the door inner glass 22
8 Troubleshooting 23
1 Important instructions and warnings for safety and environment
This section contains safety instructions that will help protect from risk of personal injury or property damage. Failure to follow these instructions shall void any warranty.
General safety
- This appliance can be used by children aged from 8 years and above and persons with reduced physical, sensory or mental capabilities or lack of experience and knowledge if they have been given supervision or instruction concerning use of the appliance in a safe way and understand the hazards involved.
Children shall not play with the appliance. Cleaning and user maintenance shall not be made by children without supervision.
- Never place the product on a carpet-covered floor. Otherwise, lack of airflow beneath the product will cause electrical parts to overheat. This will cause problems with your product.
- Installation and repair procedures must always be performed by Authorized Service Agents. The manufacturer shall not be held responsible for damages arising from procedures carried out by unauthorized persons which may also void the warranty. Before
installation, read the instructions carefully.
- Do not operate the product if it is defective or has any visible damage.
- Ensure that the product function knobs are switched off after every use.
Safety when working with gas
- Any works on gas equipment and systems may only be carried out by authorised qualified persons who are Gas Safe registered.
- Prior to the installation, ensure that the local distribution conditions (nature of the gas and gas pressure) and the adjustment of the appliance are compatible.
- This appliance is not connected to a combustion products or evacuation device. It shall be installed and connected in accordance with current installation regulations. Particular attention shall be given to the relevant requirements regarding ventilation; See Before installation, page 11
- The use of gas cooking appliance results in the production of heat and moisture in the room in which it is installed. Ensure that the kitchen is well ventilated: keep natural ventilation holes open or
install a mechanical ventilation device (mechanical extractor hood). Prolonged intensive use of the appliance may call for additional ventilation, for example increasing the level of the mechanical ventilation where present.
- Gas appliances and systems must be regularly checked for proper functioning. Regulator, hose and its clamp must be checked regularly and replaced within the periods recommended by its manufacturer or when necessary.
- Clean the gas burners regularly. The flames should be blue and burn evenly.
- Good combustion is required in gas appliances. In case of incomplete combustion, carbon monoxide (CO) might develop. Carbon monoxide is a colourless, odourless and very toxic gas, which has a lethal effect even in very small doses.
- Request information about gas emergency telephone numbers and safety measures in case of gas smell from you local gas provider.
What to do when you smell gas
- Do not use open flame or do not smoke. Do not operate any electrical buttons (e.g. lamp button, door bell and etc.) Do not
use fixed or mobile phones. Risk of explosion and toxication!
- Open doors and windows.
- Turn off all valves on gas appliances and gas meter at the main control valve, unless it's in a confined space or cellar.
- Check all tubes and connections for tightness. If you still smell gas leave the property.
- Warn the neighbours.
- Call the fire-brigade. Use a telephone outside the house.
- Do not re-enter the property until you are told it is safe to do so.
Product safety
- The appliance and its accessible parts become hot during use. Care should be taken to avoid touching heating elements. Children less than 8 years of age shall be kept away unless continuously supervised.
- Never use the product when your judgment or coordination is impaired by the use of alcohol and/or drugs.
- Be careful when using alcoholic drinks in your dishes. Alcohol evaporates at high temperatures and may cause fire since it can ignite when it comes into contact with hot surfaces.
- Do not place any flammable materials close to the product as
the sides may become hot during use.
- During use the appliance becomes hot. Care should be taken to avoid touching heating elements inside the oven.
- Keep all ventilation slots clear of obstructions.
- Do not heat closed tins and glass jars in the oven. The pressure that would build-up in the tin/jar may cause it to burst.
- Do not place baking trays, dishes or aluminium foil directly onto the bottom of the oven. The heat accumulation might damage the bottom of the oven.
- Do not use harsh abrasive cleaners or sharp metal scrapers to clean the oven door glass since they can scratch the surface, which may result in shattering of the glass.
- Do not use steam cleaners to clean the appliance as this may cause an electric shock.
-
Placing the wire shelf and tray onto the wire racks properly It is important to place the wire shelf and/or tray onto the rack properly. Slide the wire shelf or tray between 2 rails and make sure that it is balanced before placing food on it (Please see the following figure).
-
Do not use the product if the front door glass removed or cracked.
- Do not use the oven handle to hang towels for drying. Do not hang up towel, gloves, or similar textile products when the grill function is at open door.
- Always use heat resistant oven gloves when putting in or removing dishes into/from the hot oven.
- Do not close the top cover before the hotplates or burners cool down. Wipe the top cover dry before opening it in order to avoid water leakage to the rear and inner sections of the oven.
- Unattended cooking on a hob with fat or oil can be dangerous and may result in fire. NEVER try to extinguish a fire with water, but switch off the appliance and then cover flame e.g. with a lid or a fire blanket.
- Danger of fire: Do not store items on the cooking surfaces.
Prevention against possible fire risk!
- Ensure all electrical connections are secure and tight to prevent risk of arcing.
- Do not use damaged cables or extension cables.
- Ensure liquid or moisture is not accessible to the electrical connection point.
- To prevent gas leakage ensure that the gas connection is sound.
Intended use
- This product is designed for domestic use. Commercial use will void the guarantee.
- This appliance is for cooking purposes only. It must not be used for other purposes, for example room heating.
- This product should not be used for warming the plates under the grill, drying towels, dish cloths etc. by hanging them on the oven door handles. This product should also not be used for room heating purposes.
- The manufacturer shall not be liable for any damage caused by improper use or handling errors.
- The oven can be used for defrosting, baking, roasting and grilling food.
Safety for children
- Accessible parts may become hot during use. Young children should be kept away.
- The packaging materials will be dangerous for children. Keep the packaging materials away from children. Please dispose of all parts of the packaging according to environmental standards.
-
Electrical and/or gas products are dangerous to children. Keep children away from the product when it is operating and do not allow them to play with the product.
-
An additional protective means to avoid contact with the oven door is available. This part should be fitted when young children are likely to be present.
- Do not place any items above the appliance that children may reach for.
- When the door is open, do not load any heavy object on it and do not allow children to sit on it. It may overturn or door hinges may get damaged.
Disposing of the old product
- Packaging materials of the product are manufactured from recyclable materials in accordance with our National Environment Regulations. Do not dispose of the packaging materials together with the domestic or other wastes. Take them to the packaging material collection points designated by the local authorities.
Future Transportation
- Keep the product's original carton and transport the product in it. Follow the instructions on the carton. If you do not have the original carton, pack the product in bubble wrap or thick cardboard and tape it securely.
- To prevent the wire grill and tray inside the oven from damaging the oven door, place a strip of cardboard onto the inside of the oven door that lines up with the position of the trays. Tape the oven door to the side walls.
- Secure the caps and pan supports with adhesive tape.
- Do not use the door or handle to lift or move the product.

Do not place any objects onto the product and move it in upright position.

Check the general appearance of your product for any damages that might have occurred during transportation.
Overview
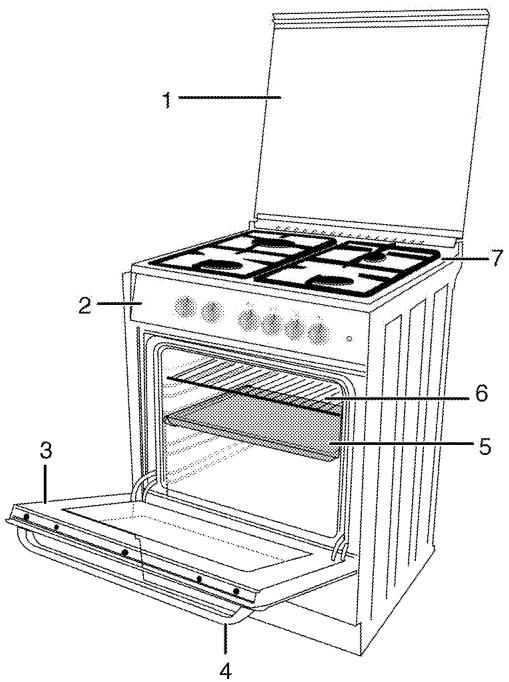
1 Top lid
2 Control panel
3 Front door
4 Handle
5 Tray
6 Wire shelf
7 Burner plate
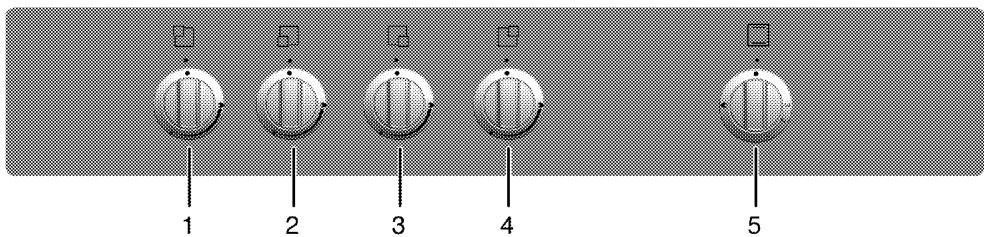
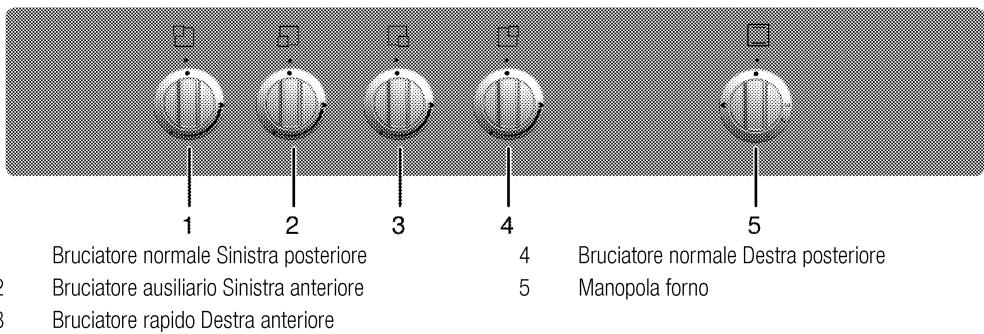
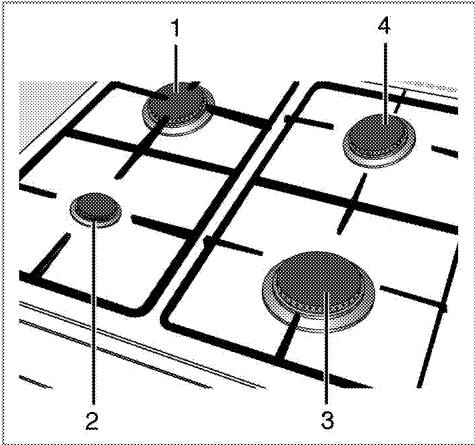
1 Normal burner Rear left
2 Auxiliary burner Front left
3 Rapid burner Front right
4 Normal burner Rear right
5 Oven knob
Package contents

Accessories supplied can vary depending on the product model. Not every accessory described in the user manual may exist on your product.
-
User manual
-
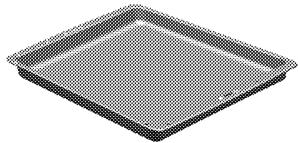
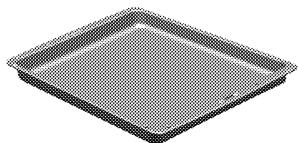
Oven tray
Used for pastries, frozen foods and big roasts.
natural_image
Simple 3D-rendered square baking tray with dotted fill (no text or symbols)
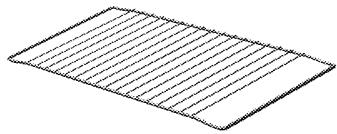
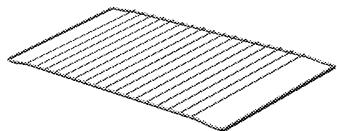
- Wire Shelf
Used for roasting and for placing the food to be baked, roasted or cooked in casserole dishes to the desired rack.
natural_image
Pure geometric diagram of a parallelogram with diagonal lines, no text or symbols present
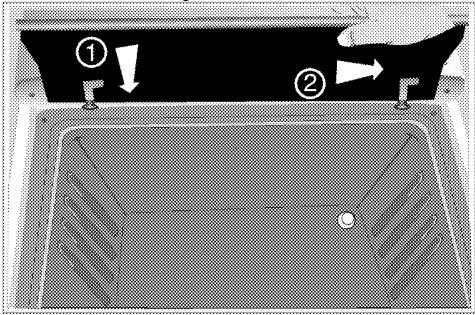
- Knob protection sheet
Used for grilling with the oven door open.
Protects the control panel and buttons against heat and soiling.
Technical specifications
| GENERAL |
| External dimensions (height / width / depth) | 850 mm/500 mm/500 mm |
| Category of gas product | II 2H3+ |
| Gas type / pressure | NG G 20/20 mbar |
| Total gas consumption | 9.5 kW |
| Converting the gas type / pressure^S | LPG G 30/28-30 mbar |
| – optional | Propane 31 /37 mbar |
| HOB |
| Burners |
| Rear left | Normal burner |
| Power | 2.0 kW |
| Front left | Auxiliary burner |
| Power | 1.0 kW |
| Front right | Rapid burner |
| Power | 2.5 kW |
| Rear right | Normal burner |
| Power | 2.0 kW |
| OVEN/GRILL |
| Main oven | Gas oven |
| Grill power consumption | 2.0 kW |
| Gas consumption of oven | 2.0 kW |

Technical specifications may be changed without prior notice to improve the quality of the product.

Figures in this manual are schematic and may not exactly match your product.

Values stated on the product labels or in the documentation accompanying it are obtained in laboratory conditions in accordance with relevant standards. Depending on operational and environmental conditions of the product, these values may vary.
Injector table
| Position hob zone | 2.0 kW Rear left | 1.0 kW Front left | 2.5 kW Front right | 2.0 kW Rear right |
| Gas type / Gas pressure |
| G 20/20 mbar | 103 | 72 | 125 | 103 |
| G 30/28-30 mbar | 72 | 50 | 80 | 72 |
| G 31/ 37 mbar | 72 | 50 | 80 | 72 |
| Gas type / Gas pressure | Gas oven | Grill |
| G 20/20 mbar | 103 | 104 |
| G 30/28-30 mbar | 71 | 71 |
| G 31/ 37 mbar | 71 | 71 |
3 Installation
Product must be installed by a qualified person in accordance with the regulations in force. The manufacturer shall not be held responsible for damages arising from procedures carried out by unauthorized persons which may also void the warranty.

Preparation of location and electrical and gas installation for the product is under customer's responsibility.

DANGER:
The product must be installed in accordance with all local gas and/or electrical regulations

DANGER:
Prior to installation, visually check if the product has any defects on it. If so, do not have it installed.
Damaged products cause risks for your safety.
Before installation
To ensure that critical air gaps are maintained under the appliance, we recommend that this appliance is mounted on a solid base and that the feet do not sink into any carpet or soft flooring.
The kitchen floor must be able to carry the weight of the appliance plus the additional weight of cookware and bakeware and food.
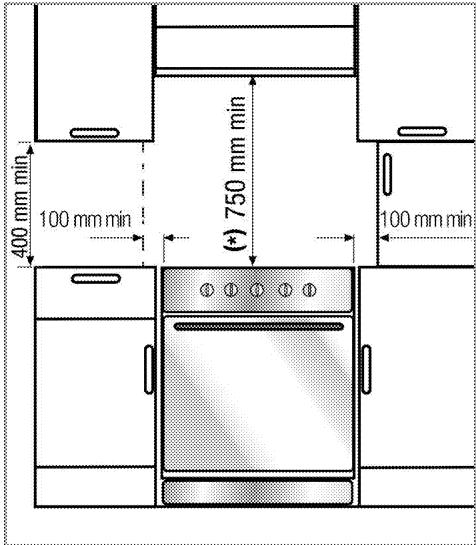
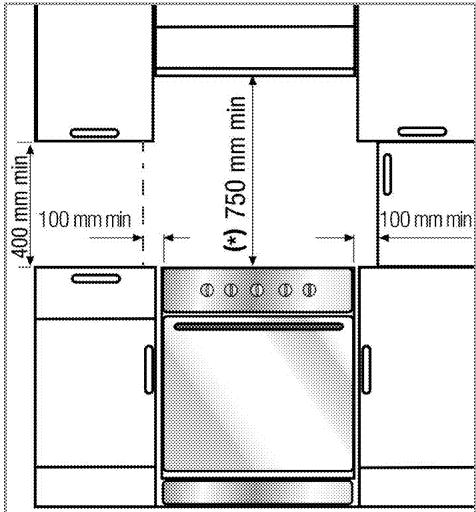
- It can be used with cabinets on either side but in order to have a minimum distance of 400mm above hotplate level allow a side clearance of
100 mm between the appliance and any wall, partition or tall cupboard.
- It can also be used in a free standing position. Allow a minimum distance of 750 mm above the hob surface.
- (*) If a cooker hood is to be installed above the cooker, refer to cooker hood manufacturer' instructions regarding installation height (min 650 mm).
- The appliance corresponds to device class 1, i.e. it may be placed with the rear and one side to kitchen walls, kitchen furniture or equipment of any size. The kitchen furniture or equipment on the other side may only be of the same size or smaller.
- Any kitchen furniture next to the appliance must be heat-resistant (100 °C min.).
Room ventilation
All rooms require an openable window, or equivalent, and some rooms will require a permanent vent as well. The air for combustion is taken from the room air and the exhaust gases are emitted directly into the room. Good room ventilation is essential for safe operation of your appliance. If there is no window or door available for room ventilation, an extra ventilation must be installed.
The appliance may be located in a kitchen, kitchen/diner or a bed-sitting room, but not in a room containing a bath or shower. The appliance must not be installed in a bed-sitting room of less than 20m^3 . Do not install this appliance in a room below ground level unless it is open to ground level on at least one side.
| Room size | Ventilation opening |
| smaller than 5 m^3 | min. 100 cm^2 |
| 5 m^3 to 10 m^3 | min. 50 cm^2 |
| greater than 10 m^3 | not required |
| In the cellar or basement | min. 65 cm^2 |
Installation and connection
Product can only be installed and connected in accordance with the statutory installation rules.

Do not install the product next to refrigerators or freezers. The heat emitted by the product will increase the energy consumption of cooling appliances.
- Carry the product with at least two persons.
- Product must be placed directly on the floor. It must not be placed onto a base or a pedestal.

Do not use the door and/or handle to carry or move the product. The door, handle or hinges get damaged.
Gas connection

DANGER:
Product can be connected to gas supply system only by an authorised and qualified person or technician with licence.
Risk of explosion or toxication due to unprofessional repairs!
Manufacturer shall not be held responsible for damages arising from procedures carried out by unauthorised or unlicensed persons.

DANGER:
Before starting any work on the gas installation, disconnect the gas supply.
There is the risk of explosion!
- Gas adjustment conditions and values are stated on labels (or ion type label).

Your product is equipped for natural gas (NG).
- Natural gas installation must be prepared before installing the product.
- There must be a flex pipe at the outlet of the installation for the natural gas connection of your product and the tip of this pipe must be closed with a blind plug. Service Representative will remove the blind plug during connection and connect your product by means of a straight connection device (coupling).
- Make sure that the natural gas valve is readily accessible.
- If you need to use your product later with a different type of gas, you must consult the Authorised Service Agent for the related conversion procedure.

DANGER:
The gas hose must not be clamped, bent or trapped or come into contact with hot parts of the product.
There is the risk of explosion due to damaged gas hose.
- Push the product towards the kitchen wall.
• Adjusting the feet of oven
Vibrations during use may cause cooking vessels to move. This dangerous situation can be avoided if the product is level and balanced.
For your own safety please ensure the product is level by adjusting the four feet at the bottom by
turning left or right and align level with the work top.
Final check
- Open gas supply.
- Check gas installations for secure fitting and tightness.
- Ignite burners and check appearance of the flame.

Flame must be blue and have a regular shape. If the flame is yellowish, check if the burner cap is seated securely or clean the burner.
Gas conversion

DANGER:
Before starting any work on the gas installation, disconnect the gas supply.
There is the risk of explosion!
In order to change your appliance's gas type, change all injectors and make flame adjustment for all valves at reduced flow rate position.
Exchange of injector for the burners
- Take off burner cap and burner body.
- Unscrew injectors by turning the counterclockwise.
- Fit new injectors.
- Check all connections for secure fitting and tightness.

New injectors have their position marked on their packing or injector table on Injector table, page 10 can be referred to.
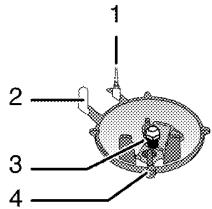
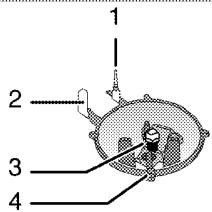
1 Flame failure device (model dependant)
2 Spark plug
3 Injector
4 Burner

Unless there is an abnormal condition, do not attempt to remove the gas burner taps. You must call an Authorised service agent if it is necessary to change the taps.
Reduced gas flow rate setting for hob taps
- Ignite the burner that is to be adjusted and turn the knob to the reduced position.
- Remove the knob from the gas tap.
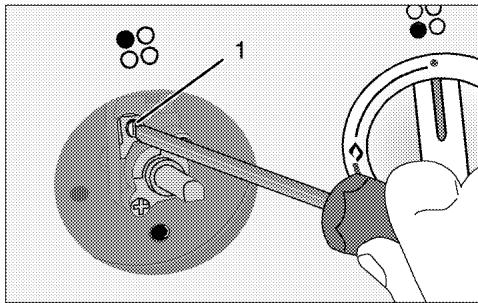
- Use an appropriately sized screwdriver to adjust the flow rate adjustment screw.
For LPG (Butane - Propane) turn the screw clockwise.
For the natural gas, you should turn the screw counter-clockwise once.
» The normal length of a straight flame in the reduced position should be 6-7 mm.
4. If the flame is higher than the desired position, turn the screw clockwise. If it is smaller turn anticlockwise.
5. For the last control, bring the burner both to high-flame and reduced positions and check whether the flame is on or off.
Depending on the type of gas tap used in your appliance the adjustment screw position may vary.
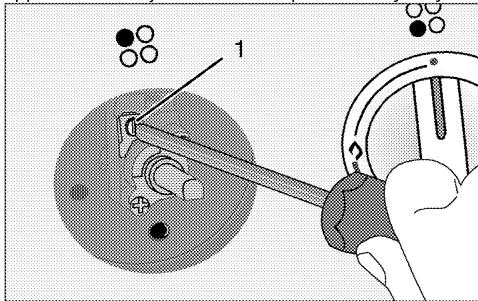
1 Flow rate adjustment screw
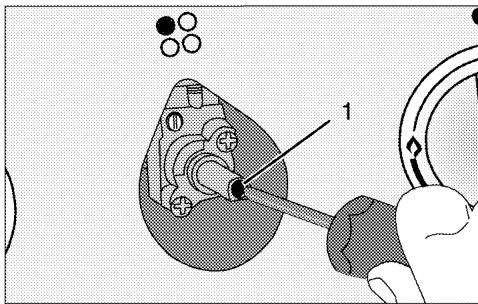
1 Flow rate adjustment screw
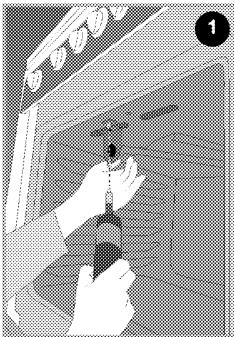
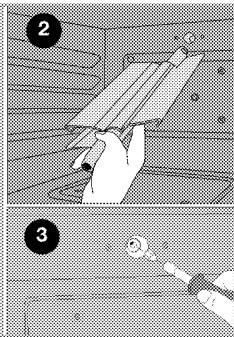
Exchange of injector for the grill
- Open front door.
- Unscrew fastening screw of the burner.
- Remove burner.
- Unscrew injector by turning counter-clockwise direction.
- Fit new injector.
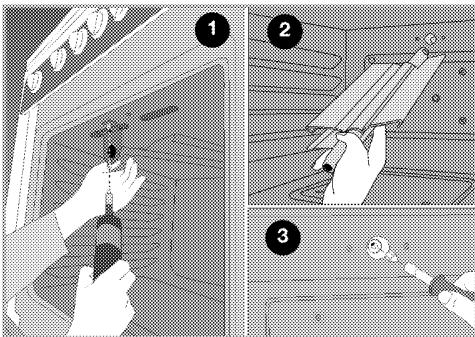
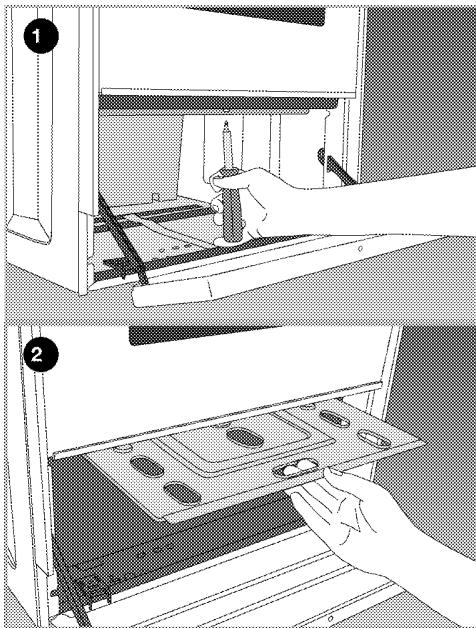
Exchange of injector for the oven
For exchanging the oven burner injector, please refer to your product specification;
- Open the bottom lid if so equipped.
- Remove the fixed bottom lid if so equipped.
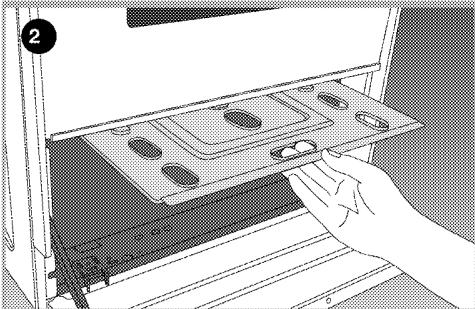
• Pull out the warmer drawer if so equipped. Then;
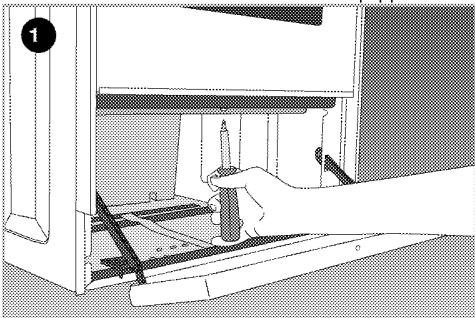
natural_image
Illustration of a hand using a pencil to adjust or install a mechanical component inside a cabinet (no text or symbols visible)
natural_image
Illustration of a hand inserting a component into a rack, showing internal slots and mounting holes (no text or symbols)
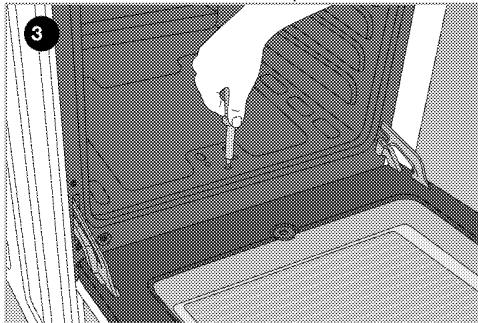
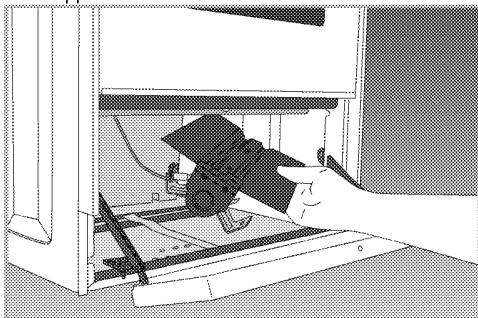
- Unscrew the screws of the oven bottom protection sheet and pull out it.
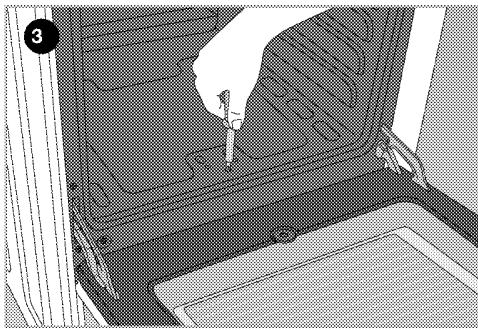
- Open the front door.
- Unscrew fastening screws of the base plate.
natural_image
Interior view of a vehicle seatbelt with hand placement, no visible text or symbols
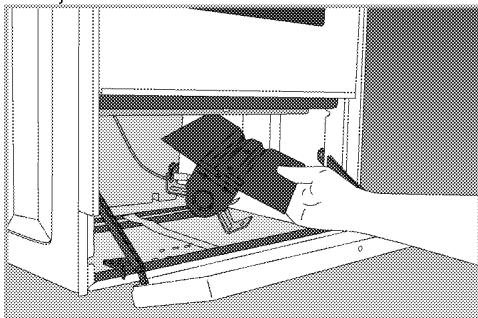
- Remove the oven burner by releasing it from the injector holder.
natural_image
Technical illustration of a mechanical assembly with a hand operating a component (no visible text or symbols)
-
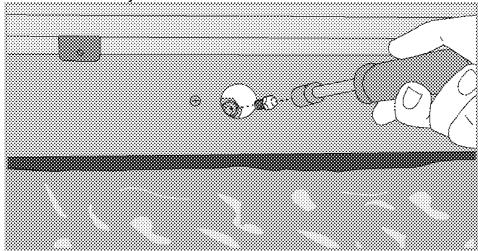
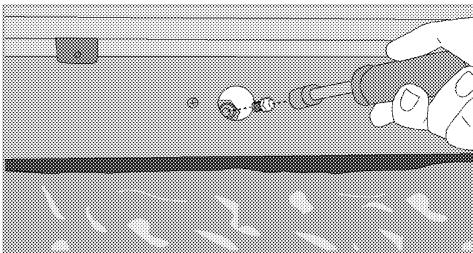
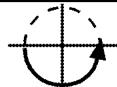
Unscrew injector by turning to counter-clockwise direction.
-
Fit new injector.
natural_image
Illustration of a hand holding a small object near a surface with a wavy line below (no text or symbols)
Reduced flow adjustment for the gas oven
For the appropriate functioning of the oven re-checking the by-pass adjustment is extremely important. In order to provide maximum security to the user these operations have to be done with care.
- Ignite the burner that is to be adjusted and turn the knob to the high flame position.
- Close the oven door and wait for 10 to 15 minutes until the oven becomes ready for adjustment.
- Take out the knob
- After 15 minutes, adjust the oven to the lowest flame position.
- Set the flame length to 2 to 3 mm by means of the screw 1 on the oven tap. Turning in clockwise direction reduces the flame, turning counterclockwise increases the flame.

If the temperature of the oven increases unintendedly, turn off the oven and call the authorised service agent to have oven thermostat repaired.
Butan/propan | Natural gas
Fasten the screw until
the end
Loosen the screw
1/2 round

If the gas type of the unit is changed, then the rating plate that shows the gas type of the unit must also be changed.
Tips for saving energy
The following information will help you to use your appliance in an ecological way, and to save energy:
- Use dark coloured or enamel coated cookware in the oven since the heat transmission will be better.
- While cooking your dishes, perform a preheating operation if it is advised in the user manual or cooking instructions.
- Do not open the door of the oven frequently during cooking.
- Try to cook more than one dish in the oven at the same time whenever possible. You can cook by placing two cooking vessels onto the wire shelf.
- Cook more than one dish one after another. The oven will already be hot.
• Defrost frozen dishes before cooking them.
- Use pots/pans with cover for cooking. If there is no cover, energy consumption may increase 4 times.
- Select the burner which is suitable for the bottom size of the pot to be used. Always select the correct pot size for your dishes. Larger pots require more energy.
Initial use
First cleaning of the appliance

The surface might get damaged by some detergents or cleaning materials.
Do not use aggressive detergents, cleaning powders/creams or any sharp objects during cleaning.
Do not use harsh abrasive cleaners or sharp metal scrapers to clean the oven door glass since they can scratch the surface, which may result in shattering of the glass.
- Remove all packaging materials.
- Wipe the surfaces of the appliance with a damp cloth or sponge and dry with a cloth.
Initial heating
Heat up the product for about 30 minutes and then switch it off. Thus, any production residues or layers will be burnt off and removed.

WARNING
Hot surfaces cause burns!
Product may be hot when it is in use. Never touch the hot burners, inner sections of the oven, heaters and etc. Keep children away. Always use heat resistant oven gloves when putting in or removing dishes into/from the hot oven.
Gas oven
- Take all baking trays and the wire grill out of the oven.
- Close the oven door.
- Select the highest flame of the gas oven; see How to use the gas oven, page 18.
- Operate the oven about 30 minutes.
- Turn off your oven; See How to use the gas oven, page 18
Grill oven
- Take all baking trays and the wire grill out of the oven.
- Select the highest flame of the grill oven; see How to operate the gas grill, page 20.
- Operate the oven about 30 minutes.
- Turn off your grill; see How to operate the gas grill, page 20

Smoke and smell may emit for a couple of hours during the initial operation. This is quite normal. Ensure that the room is well ventilated to remove the smoke and smell. Avoid directly inhaling the smoke and the smell that emits.

Never fill the pan with oil more than one third of it. Do not leave the hob unattended when heating oil.
Overheated oils bring risk of fire. Never attempt to extinguish a possible fire with water! When oil catches fire, cover it with a fire blanket or damp cloth. Turn off the hob if it is safe to do so and call the fire department.
- Before frying foods, always dry them well and gently place into the hot oil. Ensure complete thawing of frozen foods before frying.
- Do not cover the vessel you use when heating oil.
- Place the pans and saucepans in a manner so that their handles are not over the hob to prevent heating of the handles. Do not place unbalanced and easily tilting vessels on the hob.
- Do not place empty vessels and saucepans on cooking zones that are switched on. They might get damaged.
- Operating a cooking zone without a vessel or saucepan on it will cause damage to the product. Turn off the cooking zones after the cooking is complete.
- As the surface of the product can be hot, do not put plastic and aluminum vessels on it. Such vessels should not be used to keep foods either.
• Use flat bottomed saucepans or vessels only.
- Put appropriate amount of food in saucepans and pans. Thus, you will not have to make any unnecessary cleaning by preventing the dishes from overflowing.
Do not put covers of saucepans or pans on cooking zones.
Place the saucepans in a manner so that they are centered on the cooking zone. When you want to move the saucepan onto another cooking zone, lift and place it onto the cooking zone you want instead of sliding it.
Gas cooking
- Size of the vessel and the flame must match each other. Adjust the gas flames so that they will not extend the bottom of the vessel and center the vessel on saucepan carrier.
Using the hobs
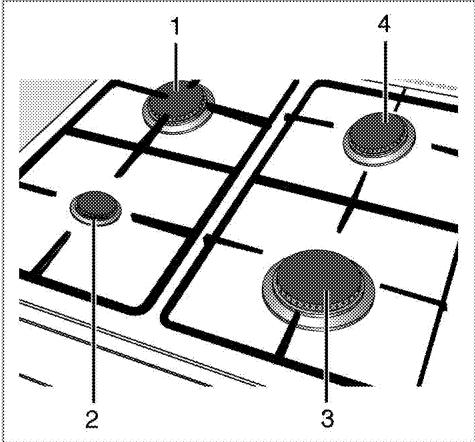
1 Normal burner 18-20 cm
2 Auxiliary burner 12-16cm
3 Rapid burner 20-22 cm
4 Normal burner 18-20 cm is list of advised diameter of pots to be used on related burners.
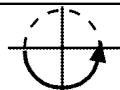
Large flame symbol indicates the highest cooking power and small flame symbol indicates the lowest cooking power. In turned off position (top), gas is not supplied to the burners.
Igniting the gas burners
Burner is not equipped with automatic ignition. Use a lighter or match.
- Keep burner knob pressed.
- Turn it counter clockwise to large flame symbol.
- Ignite the hob with lighter.
- Adjust it to the desired cooking power.
Turning off the gas burners
Turn the knob to off (upper) position.
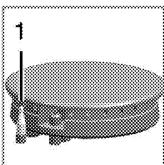
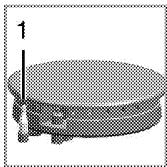
Gas shut off safety system (in models with thermic component)
natural_image
3D rendered diagram of a cylindrical object with a labeled dimension '1' (no text or symbols on the object itself)
- Gas shut off safety
As a counter measure against blow out due to fluid overflows at burners, safety mechanism trips and shuts off the gas.
- Push the knob inwards and turn it counter clockwise to ignite.
- After the gas ignites, keep the knob pressed for 3-5 seconds more to engage the safety system.
- If the gas does not ignite after you press and release the knob, repeat the same procedure by keeping the knob pressed for 15 seconds.

DANGER:
Release the button if the burner is not ignited within 15 seconds.
Wait at least 1 minute before trying again. There is the risk of gas accumulation and explosion!
6 How to operate the oven

WARNING
Hot surfaces cause burns!
Product may be hot when it is in use. Never touch the hot burners, inner sections of the oven, heaters and etc. Keep children away. Always use heat resistant oven gloves when putting in or removing dishes into/from the hot oven.

DANGER:
Be careful when opening the oven door as steam may escape.
Exiting steam can scald your hands, face and/or eyes.
Tips for baking
- Use non-sticky coated appropriate metal plates or aluminum vessels or heat-resistant silicone moulds.
• Make best use of the space on the rack.
- Place the baking mould in the middle of the shelf.
- Select the correct rack position before turning the oven or grill on. Do not change the rack position when the oven is hot.
- Keep the oven door closed.
Tips for roasting
- Treating whole chicken, turkey and large piece of meat with dressings such as lemon juice and black pepper before cooking will increase the cooking performance.
- It takes about 15 to 30 minutes longer to roast meat with bones when compared to roasting the same size of meat without bones.
• Each centimeter of meat thickness requires approximately 4 to 5 minutes of cooking time.
- Let meat rest in the oven for about 10 minutes after the cooking time is over. The juice is better distributed all over the roast and does not run out when the meat is cut.
- Fish should be placed on the middle or lower rack in a heat-resistant plate.
Tips for grilling
When meat, fish and poultry are grilled, they quickly get brown, have a nice crust and do not get dry. Flat pieces, meat skewers and sausages are particularly suited for grilling as are vegetables with high water content such as tomatoes and onions.
- Distribute the pieces to be grilled on the wire shelf or in the baking tray with wire shelf in such a way that the space covered does not exceed the size of the heater.
- Slide the wire shelf or baking tray with grill into the desired level in the oven. If you are grilling on the wire shelf, slide the baking tray to the lower rack to collect fats. Add some water in the tray for easy cleaning.

Foods that are not suitable for grilling carry the risk of fire. Only grill food which is suitable for intensive grilling heat.
Do not place the food too far in the back of the grill. This is the hottest area and fatty food may catch fire.
Install knob protection sheet.
Knob protection sheet is used for grilling with the oven door open. Protects the control panel and buttons against heat and soiling.
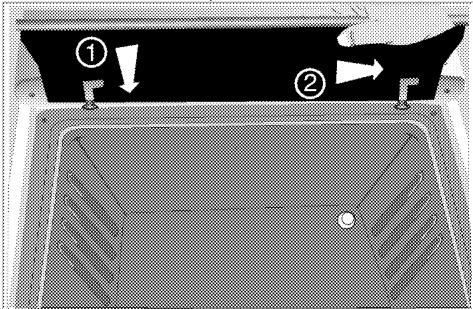
- Open the oven door and place the knob protection sheet onto the pins under the control panel.
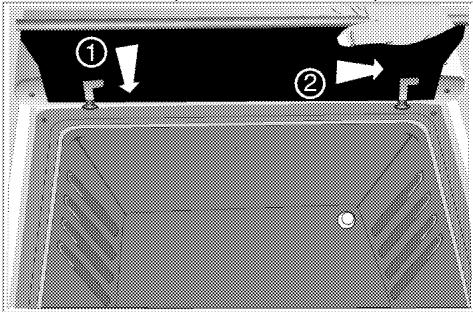
» When knob protection sheet is installed, oven door remains open.
How to use the gas oven
natural_image
Simple diagram of a circular device with a handle and indicator lights, no text or symbols present.
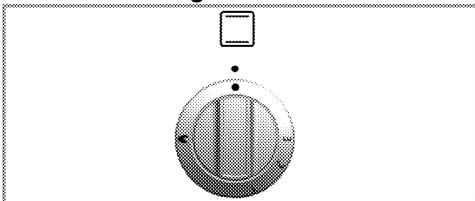
The gas oven is operated by the gas oven control knob. In off position (top) the gas supply is Off.
Switch on the gas oven
The gas oven is ignited with a gas lighter.
- Open oven door.
- Keep gas oven control knob pressed and turn it counterclockwise.
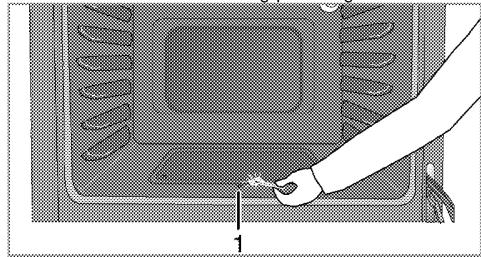
- Ignite the gas with the gas lighter from the ignition control hole.
- Keep the burner control pressed for 3 to 5 seconds.
» Be sure that gas has ignited and flame is present.
-
Keep the burner control pressed for another 3 to 5 seconds.
-
Select the desired baking power/ gas mark.
natural_image
Illustration of a hand pressing down on a rectangular appliance with coiled contents (no text or symbols visible)
1 Ignition control hole

DANGER:
There is the risk of gas compression and explosion!
Do not attempt to ignite the gas more that 15 seconds. If the burner is not ignited within 15 seconds, turn off the knob and wait for 1 minute. Ventilate the room before reattempting to ignite the burner. There is the risk of gas compression and explosion!
Switch off the gas oven
- Turn gas oven control knob to off position (top). Gas level temperature chart
Cooking times table
Stand dishes on a baking sheet to prevent spillages onto oven base and help keep oven clean.
Baking and roasting
| Food | Preheating * | Insertion level | Control knob position | Cooking time |
| Apple pie | 10 min. | 4..5 | 1 | 25..30 min. |
| Fruit tart | 10 min. | 4..5 | 1 | 25..35 min. |
| Pie | 10 min. | 3..4 | 1 | 30..40 min. |
| Cookies | 10 min. | 4..5 | 1 | 25..35 min. |
| Pastry | 10 min. | 5 | 1 | 35..45 min. |
| Cake | 10 min. | 3 | 1 | 30..40 min. |
| Biscuits | - | 4..5 | 1 | 20..30 min. |
| Roast lamb | 10 min. | 4..5 | 1 | 35..45 min. per 450 g + 30 min. |
| Roast Beef | 10 min. | 2 | 1 | 50..60 min. per 450 g + 30 min. |
| Turkey | 10 min. | 3..4 | 1 | 50..60 min. per 450 g + 30 min. |
| Poultry | 10 min. | 3..4 | 1 | 30..40 min. per 450 g + 25 min. |
| Casseroles | - | 4 | 1 | 90..120 min. |
| Fish | 10 min. | 3 | 1 | 35..45 min. |
| Macaroni | 10 min. | 3..4 | 1 | 35..40 min. |
| Small cakes | 10 min. | 4 | 1 | 30..35 min. |
| Victoria sandwich | 10 min. | 3 | 1 | 22..28 min. |
| * at control knob position 2 / depending on quantity / # depending on size |
How to operate the gas grill
natural_image
Circular mechanical component with a square top and two dots at the bottom (no text or symbols)
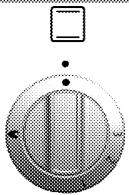
Grill is operated with Grill control knob. In turned off position (top), gas is not supplied.
Oven door must remain open while grilling.

WARNING
Hot surfaces may cause burns! Keep children away from the product.
Oven door remains slightly inclined when opened full and thus, possible splashes to not reach you.
Switching on the grill
Gas grill is ignited with a lighter or match.
- Open the oven door.
- Keep the knob pressed and turn it clockwise to the Grill symbol.
- Ignite the gas directly by bringing a lighter or match close to the grill burner.
- Keep the knob pressed for 3 to 5 seconds more.

natural_image
Top-down view of a computer monitor with a small object on top, labeled '1' (no text or symbols on the device itself)
1 Grill burner

DANGER:
There is the risk of gas compression and explosion!
Do not attempt to ignite the gas more that 15 seconds. If the burner is not ignited within 15 seconds, turn off the knob and wait for 1 minute. Ventilate the room before reattempting to ignite the burner. There is the risk of gas compression and explosion!
Switching off the grill
- Turn the Grill control knob to Off (upper) position.

Foods that are not suitable for grilling carry the risk of fire. Only grill food which is suitable for intensive grilling heat.
Do not place the food too far in the back of the grill. This is the hottest area and fatty food may catch fire.
Cooking times table

The timings in this chart are meant as a guide. Timings may vary due to temperature of food, thickness, type and your own preference of cooking.

1st rack of the oven is the bottom rack.
Grilling with gas grill
| Food | Preparation/setting | Grilling time# |
| Toasting of bread products | ...... | 3...10 min. |
| Small cuts of meat, sausages, bacon, etc. | ...... | 15...20 min. |
| Chops, gammon steaks, chicken pieces, etc. | Chicken with wire rack in upturned position. | 20...25 min. |
| Whole fish, fish fillets, fish fingers | Whole fish and fish fillets placed in the base of the grill pan. | 10...20 min. |
| Fish in breadcrumbs | ...... | 15...20 min. |
| Pre-cooked potato products | ...... | 15...20 min. |
| Pizza | Placed in the base of the grill pan. | 12...15 min. |
| Grilling/browning of food | Dish placed directly on the base of the grill compartment. | 8...10 min. |
| #depending on size resp. thickness |
7 Maintenance and care
Service life of the product will extend and the possibility of problems will decrease if the product is cleaned at regular intervals.

DANGER:
Disconnect the product from mains supply before starting maintenance and cleaning works.
There is the risk of electric shock!

DANGER:
Allow the product to cool down before you clean it.
Hot surfaces may cause burns!
- Clean the product thoroughly after each use. In this way it will be possible to remove cooking residues more easily, thus avoiding these from burning the next time the appliance is used.
- No special cleaning agents are required for cleaning the product. Use warm water with washing liquid, a soft cloth or sponge to clean the product and wipe it with a dry cloth.
- Always ensure any excess liquid is thoroughly wiped off after cleaning and any spillage is immediately wiped dry.
- Do not use cleaning agents that contain acid or chloride to clean the stainless or inox surfaces and the handle. Use a soft cloth with a liquid detergent (not abrasive) to wipe those parts clean, paying attention to sweep in one direction.

The surface might get damaged by some detergents or cleaning materials.
Do not use aggressive detergents, cleaning powders/creams or any sharp objects during cleaning.
Do not use harsh abrasive cleaners or sharp metal scrapers to clean the oven door glass since they can scratch the surface, which may result in shattering of the glass.

Do not use steam cleaners to clean the appliance as this may cause an electric shock.
Cleaning the hob
Gas hobs
- Remove and clean the saucepan carriers and burner caps.
-
Clean the hob.
-
Install the burner caps and make sure that they are seated correctly.
- When installing the upper grills, pay attention to place the saucepan carriers so that the burners are centered.
Cleaning the control panel
Clean the control panel and knobs with a damp cloth and wipe them dry.

Do not remove the control buttons/knobs to clean the control panel.
|Control panel may get damaged!
Cleaning the oven
Clean oven door
To clean the oven door, use warm water with washing liquid, a soft cloth or sponge to clean the product and wipe it with a dry cloth.

Don't use any harsh abrasive cleaners or sharp metal scrapers for cleaning the oven door.
They could scratch the surface and destroy the glass.
Removing the oven door
- Open the front door (1).
- Open the clips at the hinge housing (2) on the right and left hand sides of the front door by pressing them down as illustrated in the figure.
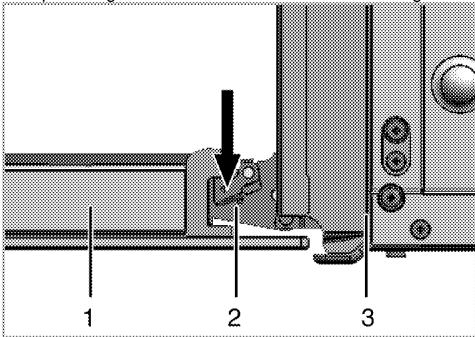
1 Front door
2 Hinge
3 Oven
natural_image
Technical diagram of a mechanical joint or bracket with bolt holes and an arrow indicating direction (no text or symbols)
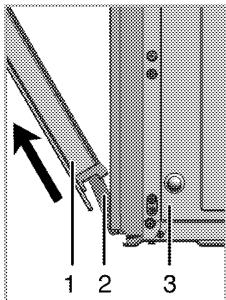
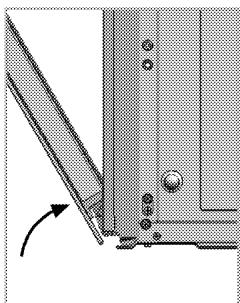
- Move the front door to half-way.
- Remove the front door by pulling it upwards to release it from the right and left hinges.

Steps carried out during removing process should be performed in reverse order to install the door. Do not forget to close the clips at the hinge housing when reinstalling the door.
Removing the door inner glass
The inner glass panel of the oven door can be removed for cleaning.
- Open the oven door.
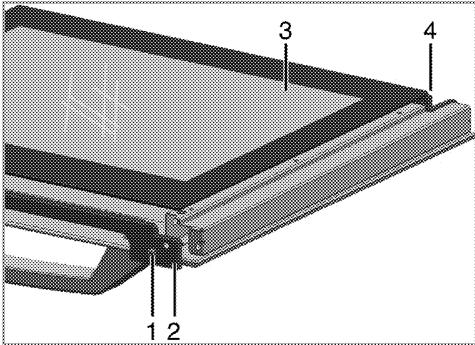
1 Screw
2 Profile
3 Inner glass pane
4 Plastic slot
2. Take out the screw(1) with a screwdriver
3. Take out the profile (2) than hold up to inner glass (3).
4. Then group the door again, put the glass pane (3) to the plastic slots (4) and group the profile.
8 Troubleshooting
Oven emits steam when it is in use.
- It is normal that steam escapes during operation. >>> This is not a fault.
- When the metal parts are heated, they may expand and cause noise. >>> This is not a fault.
There is no ignition spark.
- No current. >>> Check fuses in the fuse box.
There is no gas.
- Main gas valve is closed. >>> Open gas valve.
• Gas pipe is bent. >>> Install gas pipe properly.
Burners are not burning properly or at all.
- Burners are dirty. >>> Clean burner components.
- Burners are wet. >>> Dry the burner components.
- Burner cap is not mounted safely. >>> Mount the burner cap properly.
• Gas valve is closed. >>> Open gas valve.
• Gas cylinder is empty (when using LPG). >>> Replace gas cylinder.

Consult the Authorised Service Agent or technician with licence or the dealer where you have purchased the product if you can not remedy the trouble although you have implemented the instructions in this section. Never attempt to repair a defective product yourself.
Leggere questo manuale utente come prima cosa!
Gentile cliente,
Grazie per aver scelto un apparecchio Beko. Vi auguriamo di ottenere i migliori risultati da questo apparecchio, realizzato con tecnologia di alta qualità e di avanguardia. Pertanto, di leggere questo manuale utente e tutta la documentazione allegata con attenzione prima di usare l'apparecchio e di conservarli per riferimento futuro. Se l'apparecchio viene trasferito ad un'altra persona, bisogna consegnare anche il manuale. Seguire tutte le avvertenze e le informazioni del manuale utente.
Ricordare che questo manuale utente può essere applicabile anche a vari altri modelli. Le differenze tra i modelli sono identificate nel manuale.
Spiegazione dei simboli
In questo manuale utente si usano i simboli che seguono:

Informazioni importanti o consigli utili sull'uso.

Avvertenza per situazioni pericolose per la vita e la proprietà.

Avvertenza per shock elettrico.

Avvertenza per rischio di incendio.

Avvertenza per superfici calde.
1 Istruzioni importanti e avvertenze per sicurezza e ambiente 4
Sicurezza generale....4
Sicurezza quando si lavora con il gas ......4
Sicurezza del prodotto....5
Uso previsto 7
Sicurezza dei bambini 7
Smaltimento di vecchi prodotti....8
Smaltimento del materiale di imballaggio ....8
Smaltimento di vecchi prodotti....8
Panoramica....9
Contenuto della confezione....10
Specifiche tecniche....11
Tabella iniettori....11
3 Installazione 12
Prima della installazione....12
Installazione e collegamento....13
Conversione del gas....13
4 Preparazioni 16
Consigli per il risparmio energetico ....16
Uso iniziale....16
Prima pulizia del prodotto....16
Riscaldamento iniziale....16
5 Come utilizzare il piano cottura 17
Informazioni generali sulla cottura 17
Uso del piano cottura.... 17
6 Come utilizzare il forno 19
Informazioni generali su cottura al forno, cottura arrosto e con grill.... 19
Come utilizzare il forno a gas 20
Tabella tempi di cottura 20
Come utilizzare il grill a gas.... 21
Tabella tempi di cottura 22
7 Manutenzione e cura 23
Informazioni generali 23
Pulizia del piano cottura.... 23
Pulizia del pannello di controllo 23
Pulizia del forno 23
Rimozione dello sportello del forno. 23
Rimozione del vetro interno dello sportello ..... 24
8 Ricerca e risoluzione dei problemi 25
1 Istruzioni importanti e avvertenze per sicurezza e ambiente
Questa sezione contiene istruzioni per la sicurezza che aiutano a proteggere dal rischio di lesioni personali o danni alla proprietà. La mancata osservanza di queste istruzioni priva la garanzia di validità.
Sicurezza generale
- Questo apparecchio può essere utilizzato da bambini con età superiore agli 8 anni e da persone con capacità fisiche, sensoriali o mentali ridotte, o che manchino di esperienza e conoscenza, purché ricevano la supervisione e le istruzioni sull'uso dell'apparecchio in modo sicuro e comprendano i rischi coinvolti. I bambini non devono giocare con l'apparecchio. Pulizia e manutenzione da parte dell'utente non devono essere eseguite da bambini senza supervisione.
- Non posizionare mai l'apparecchio su un pavimento coperto da tappeto. Altrimenti la mancanza di flusso di aria al di sotto dell'apparecchio provoca il surriscaldamento delle parti elettriche. Questo provocherà problemi all'apparecchio.
- Le procedure di installazione e riparazione devono essere sempre eseguite da agenti autorizzati per l'assistenza. Il
produttore non sarà considerato responsabile dei danni derivanti da procedure eseguite da persone non autorizzate e potrebbe considerare non valida la garanzia. Prima dell'installazione, leggere le istruzioni con attenzione.
- Non utilizzare il prodotto se è difettoso o se presenta danni visibili.
- Controllare che le manopole delle funzioni dell'apparecchio siano disattivate dopo ogni uso.
Sicurezza quando si lavora con il gas
- Tutti gli interventi su apparecchi e sistemi a gas possono essere eseguiti solo da personale qualificato autorizzato.
- Prima dell'installazione, assicurarsi che le condizioni della distribuzione locale (tipo di gas e pressione del gas) e le regolazioni dell'apparecchio siano compatibili.
- Questo apparecchio non è collegato ad un dispositivo di evacuazione per prodotti a combustione. Deve essere installato e collegato secondo i regolamenti correnti per l'installazione. Bisogna prestare particolare attenzione ai requisiti pertinenti relativi alla ventilazione;
Vedere Prima della installazione, pagina 12
- L'uso di cucine a gas provoca produzione di calore e umidità e prodotti di combustione nell'ambiente in cui sono installate. Assicurare che la cucina sia ben ventilata soprattutto quando l'apparecchio è in uso: mantenere le naturali aperture di ventilazione aperte o installare un dispositivo meccanico di ventilazione (cappa meccanica). L'uso intenso prolungato dell'apparecchio può richiedere una ventilazione aggiuntiva, per esempio aumentare il livello di ventilazione meccanica dove è presente.
- Gli apparecchi e i sistemi a gas devono essere controllati regolarmente per un funzionamento corretto. Regolatore, flessibile e relativo morsetto devono essere controllati regolarmente e sostituiti secondo i periodi consigliati dai produttori o quando necessario.
- Pulire regolarmente i bruciatori a gas. Le fiamme devono essere blu e bruciare in modo uniforme.
- Una buona combustione è necessaria negli apparecchi a gas. In caso di combustione non completa, può svilupparsi
monossido di carbonio (CO). Il monossido di carbonio non ha colore, odore ed è un gas molto tossico che ha effetti letali anche a piccole dosi.
- Richiedere informazioni sui numeri di telefono di emergenza per il gas e sulle misure di sicurezza in caso di odore di gas al proprio fornitore locale di gas.
Cosa fare quando si sente odore di gas
- Non usare fiamme libere o non fumare. Non azionare i tasti elettrici (per es. luci, campanello di ingresso, ecc.). Non usare un telefono o un cellulare. Rischio di esplosione e intossicazione!
- Aprire porte e finestre.
- Chiudere tutte le valvole sugli apparecchi e sui contatori del gas.
- Controllare tutti i tubi e i collegamenti per verificarne la tenuta. Se si sente ancora odore di gas, lasciare l'appartamento.
- Avvisare i vicini.
- Chiamare i pompieri. Usare un telefono fuori dalla casa.
- Non entrare di nuovo finché non si riceve comunicazione sulla sicurezza.
Sicurezza del prodotto
- Questo apparecchio e le parti accessibili diventano caldi durante l'uso. Bisogna prestare attenzione a evitare di toccare gli
elementi che si riscaldano. I bambini di età inferiore agli 8 anni devono essere tenuti lontani a meno che non ricevano continua supervisione.
- Non usare mai il prodotto quando giudizio e coordinazione sono danneggiati dall'uso di alcool e/o droghe.
- Prestare attenzione quando si usano bevande alcoliche nei piatti. L'alcool evapora ad alte temperature e può provocare incendi poiché prende fuoco a contatto con superfici calde.
- Non mettere materiali infiammabili vicini al prodotto poiché i lati possono diventare caldi durante l'uso.
- Durante l'uso l'apparecchio diventa caldo. Bisogna prestare attenzione a evitare di toccare gli elementi che si riscaldano all'interno del forno.
- Tenere tutte le aperture di ventilazione libere da ostruzioni.
- Non riscaldare lattine chiuse e barattoli di vetro nel forno. La pressione che si può crea in contenitore/barattolo può farli esplodere.
-
Non mettere vassoi per la cottura al forno o fogli di alluminio direttamente sul fondo del forno. L'accumulo di calore può danneggiare il fondo del forno.
-
Non usare agenti pulenti abrasive o raschietti duri in metallo per pulire il vetro dello sportello del forno poiché potrebbero graffiare la superficie rovinando il vetro.
- Non usare pulitori a vapore per pulire l'apparecchio poiché ciò potrebbe provocare uno shock elettrico.
- Inserimento corretto della griglia e delle teglie
E' importante inserire la griglia e/o la teglia nelle rastrelliere laterali in maniera corretta. Far scivolare la griglia e/o la teglia sulle rastrelliere laterali verificandone la stabilità prima di posizionare le pietanze al di sopra (vedi immagine esplicativa di seguito riportata)
- Non usare il prodotto con il vetro dello sportello anteriore rimosso o lesionato.
- La maniglia del forno non serve per asciugare gli strofinacci. Non appendervi strofinacci, guanti o altri oggetti in tessuto quando la funzione grill è in corso con lo sportello aperto.
- Usare sempre guanti resistenti al calore quando si mettono o si rimuovono i piatti nel/dal forno caldo.
• Non chiudere il coperchio superiore prima che le piastre
calde o i bruciatori si siano raffreddati.
Asciugare il coperchio prima di aprirlo per evitare perdite di acqua nelle sezioni posteriore e interna del forno.
- La cottura senza supervisione su un piano cottura usando grassi o olio può essere pericolosa e provocare incendi. Non cercare MAI di estinguere il fuoco con acqua, ma spegnere l'apparecchio e poi coprire la fiamma, per es. con un coperchio o una coperta ignifuga.
- Pericolo di incendio: Non conservare oggetti sulle superfici di cottura.
Per l'affidabilità antincendio
dell'apparecchio:
- Assicurarsi che la spina si adatti bene alla presa e che non provochi scintille.
- Non utilizzare cavi danneggiati, tagliati o prolunghe: utilizzare solo il cavo originale.
- Assicurarsi che non vi sia liquido o umidità sulla presa quando viene collegata all'apparecchio.
- Assicurarsi che il collegamento del gas sia installato e che non vi siano perdite di gas.
Uso previsto
- Questo prodotto è progettato per uso domestico. L'uso commerciale non è ammesso.
- Questo apparecchio serve solo per cucinare. Non deve essere usato per altri scopi, per esempio riscaldare l'ambiente
- Questo prodotto non deve essere usato per riscaldare piatti sotto al grill, asciugare asciugamani, panni per piatti, ecc. appesi sulle maniglie, né per riscaldare.
- Il produttore non sarà responsabile per danni provocati da uso o gestione non corretti.
- Il forno può essere usato per scongelare, cuocere al forno, arrostire e cuocere con il grill gli alimenti.
Sicurezza dei bambini
- Le parti accessibili possono diventare calde durante l'uso. I bambini devono essere tenuti lontani.
- I materiali di imballaggio sono pericolosi per i bambini. Tenere i bambini lontani dai materiali di imballaggio. Smaltire tutte le parti dell'imballaggio secondo gli standard ambientali.
- Gli apparecchi elettrici e/o a gas sono pericolosi per i bambini. Tenere i bambini lontano dall'apparecchio mentre è in uso e non lasciarli giocare con lo stesso.
- È disponibile una protezione aggiuntiva per evitare il contatto con lo sportello del forno. Questa
parte deve essere montata quando vi è la presenza probabile di bambini.
- Non mettere sopra all'apparecchio alcun oggetto che possa essere raggiunto dai bambini.
- Quando lo sportello è aperto, non caricare sopra oggetti pesanti e non lasciare che i bambini vi si siedano sopra. Lo sportello potrebbe capovolgersi o i cardini dello stesso potrebbero danneggiarsi.
Smaltimento di vecchi prodotti Smaltimento del materiale di imballaggio
- I materiali di imballaggio sono pericolosi per i bambini. Tenere i materiali di imballaggio in un luogo sicuro, fuori dalla portata dei bambini. I materiali di imballaggio del prodotto sono realizzati con materiali riciclabili. Smaltirli in modo corretto e dividerli secondo le istruzioni per i rifiuti riciclabili. Non smaltirli con i normali rifiuti domestici.
Smaltimento di vecchi prodotti
- Conservare il cartone originale del prodotto e trasportare il prodotto in esso. Seguire le istruzioni sul cartone. Se non si ha il cartone originale, imballare il prodotto nella carta con le bolle o in un cartone spesso e assicurarlo con nastro adesivo.
- Per evitare che il grill metallico e il vassoio all'interno del forno danneggino lo sportello del forno, mettere una striscia di cartone sull'interno dello sportello in modo che si allinei con la posizione dei vassoi. Attaccare con del nastro adesivo lo sportello del forno alle pareti laterali.
- Assicurare i coperchi e i supporti delle pentole con nastro adesivo.
- Non usare sportello o maniglia per sollevare o spostare il prodotto.

Non mettere oggetti sull'apparecchio e spostarlo in posizione verticale.

Controllare l'aspetto generale del prodotto per eventuali danni che potrebbero essersi verificati durante il trasporto.
Panoramica
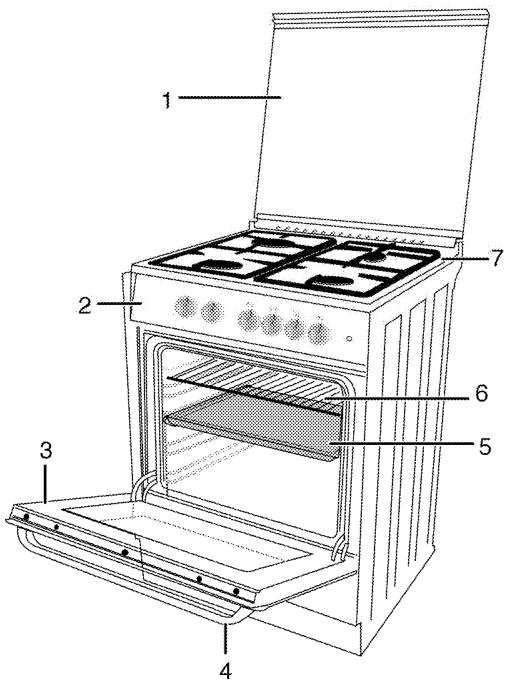
1 Coperchio superiore
2 Pannello di controllo
3 Sportello anteriore
4 Maniglia
5 Vassoio
6 Ripiano metallico
7 Piastra bruciatore
Contenuto della confezione

Gli accessori in dotazione possono variare a seconda del modello del prodotto. Non tutti gli accessori descritti nel manuale utente potrebbero esistere con il prodotto acquistato.
1. Manuale utente
2. Vassoio forno
Usato per dolci, alimenti congelati e grandi arrosti.
natural_image
Simple 3D rendering of a rectangular baking tray with no text or symbols
Usato per cottura arrosto e per posizionare gli alimenti da cuocere al forno, da arrostire o piatti da cuocere in casseruola sulla rastrelliera desiderata.
natural_image
Pure geometric diagram of a rectangular plate with horizontal lines, no text or symbols present
4. Foglio di protezione della manopola
Usato per cottura con grill con lo sportello del forno aperto. Protegge il pannello di controllo e i tasti da calore e sporco.

Si consiglia di non utilizzare vassoi e griglie a contatto diretto con gli alimenti.
Specifiche tecniche
| GENERALE |
| Dimensioni esterne (altezza/larghezza/profondita) | 850 mm/500 mm/500 mm |
| Categoria di prodotto a gas | II 2H3+ |
| Tipo di gas/pressione | NG G 20/20 mbar |
| Consumo totale gas | 9.5 kW |
| Conversione del tipo di gas/pressione$ | LPG G 30/28-30 mbar |
| – opzionale | Propano 31 /37 mbar |
| PIANO COTTURA |
| Bruciatori |
| Sinistra posteriore | Bruciatore normale |
| Energia | 2.0 kW |
| Sinistra anteriore | Bruciatore ausiliario |
| Energia | 1.0 kW |
| Destra anteriore | Bruciatore rapido |
| Energia | 2.5 kW |
| Destra posteriore | Bruciatore normale |
| Energia | 2.0 kW |
| FORNO/GRILL |
| Forno principale | Forno a gas |
| Consumo energetico grill | 2.0 kW |
| Consumo gas del forno | 2.0 kW |

Le specifiche tecniche potrebbero essere
modificate senza preavviso per migliorare la
qualità del prodotto.

Le figure in questo manuale sono schematiche e potrebbero non corrispondere esattamente al prodotto.

il valori dichiarati sulle etichette del prodotto o nella documentazione che lo accompagna si ottengono in condizioni di laboratorio secondo gli standard relativi. A seconda delle condizioni di funzionamento e ambientali del prodotto, questi valori potrebbero variare.
Tabella iniettori
| Posizione del piano cottura | 2.0 KW Sinistra posteriore | 1.0 KW Sinistra anteriore | 2.5 KW Destra anteriore | 2.0 KW Destra posteriore |
| Tipo di gas/pressione del gas |
| G 20/20 mbar | 103 | 72 | 125 | 103 |
| G 30/28-30 mbar | 72 | 50 | 80 | 72 |
| G 31/ 37 mbar | 72 | 50 | 80 | 72 |
| Tipo di gas/pressione del gas | Forno a gas | GRILL |
| G 20/20 mbar | 103 | 104 |
| G 30/28-30 mbar | 71 | 71 |
| G 31/ 37 mbar | 71 | 71 |
3 Installazione
Il prodotto deve essere installato da una persona qualificata secondo i regolamenti in vigore. Altrimenti la garanzia non sarà valida. Il produttore non sarà considerato responsabile dei danni derivanti da procedure eseguite da persone non autorizzate e potrebbe considerare non valida la garanzia.

La preparazione della posizione e l'installazione elettrica e del gas per il prodotto è responsabilità del cliente.

PERICOLO:
Il prodotto deve essere installato secondo i regolamenti locali per il gas e/o elettrici.

PERICOLO:
Prima dell'installazione, controllare
visivamente se il prodotto presenta difetti. Se è
così, non installarlo.
Prodotti danneggiati provocano rischi per la
sicurezza.
Prima della installazione
Per assicurare di mantenere importanti aperture per l'aria sotto all'apparecchio, consigliamo che l'apparecchio stesso sia montato su una base solida e che i piedini non siano posti in un tappeto o coperture morbide del pavimento.
Il pavimento della cucina deve essere in grado di portare il peso dell'apparecchio più il peso aggiuntivo di pentole e accessori per la cottura al forno e degli alimenti; vedere.
- Si può usare con alloggiamenti su entrambi i latima per avere una distanza minima di 400 mm al di sopra del livello della piastra calda, consentire una distanza laterale di 100 mm tra l'apparecchio e pareti, tramezzi o mobili alti.
- Si può usare anche in posizione free standing. Consentire una distanza minima di 750 mm sulla superficie del piano cottura.
- (*) Se la cappa deve essere installata sopra al piano cottura, vedere le istruzioni del produttore della cappa sull'altezza dell'installazione (min 650 mm).
- L'apparecchio corrisponde ad un dispositivo di classe 1, cioè può essere posto con il lato posteriore e unlato verso le pareti della cucina, i mobili della cucina o apparecchiature di qualsiasi dimensione. I mobili della cucina o le apparecchiature sull' altro lato possono essere solo della stessa dimensione o più piccoli.
- Tutti i mobili della cucina vicino all'apparecchio devono essere resistenti al calore (100 °C min.).
Ventilazione ambiente
Tutti gli ambienti richiedono una finestra apribile o equivalente, e alcune stanze richiedono anche un'apertura fissa.
L'aria per la combustione viene presa dall'aria dell'ambiente e i gas di scarico sono emessi direttamente nell'ambiente.
Una buona ventilazione dell'ambiente è essenziale per il funzionamento sicuro dell'apparecchio. Se non c'è una finestra o una porta per la ventilazione dell'ambiente, bisogna installare una ventilazione extra.
L'apparecchio può essere collocato in una cucina, in una cucina/sala da pranzo o in una camera da letto, ma non in una camera che contenga una vasca o una doccia. Il piano cottura non deve essere installato in una camera da letto più piccola di 20 m. ^3 .
Non installare questo apparecchio in un ambiente sottoterra a meno che non sia aperto all'aria da almeno un lato.
| Dimensione ambiente | Apertura ventilazione |
| inferiore a 5 m^3 | min. 100 cm^2 |
| 5 m^3 a 10 m^3 | min. 50 cm^2 |
| superiore a 10 m^3 ,den | non richiesto |
| In cantina o nel seminterrato | min. 65 cm^2 |
Installazione e collegamento
L'unità può essere installata e collegata solo secondo le norme legali sulla installazione.

Non installare l'apparecchio vicino ad un frigorifero o congelatore. Il calore emesso dall'apparecchio porta ad un accresciuto consumo energetico da parte delle unità di raffreddamento.
- Trasportare l'unità con almeno due persone.
- L'unità deve essere posta direttamente sul pavimento. Non deve essere messa su una base o un piedistallo.

Non usare sportello e/o maniglia per portare o spostare il prodotto. Sportello, maniglia o cerniere si danneggiano.
Collegamento del gas

PERICOLO:
L'apparecchio può essere collegato al sistema di alimentazione del gas solo da una persona autorizzata e qualificata.
Rischio di esplosioni o intossicazione a causa di riparazioni non professionali!
Il produttore non sarà considerato responsabile dei danni derivanti da procedure eseguite da persone non autorizzate.

PERICOLO:
Prima di avviare un lavoro sulla installazione del gas, scollegare l'alimentazione del gas. C'è il rischio di esplosione!
- Condizioni di regolazione e valori del gas sono presenti sulle etichette (o sull'etichetta tipo ioni)

L'apparecchio è impostato per gas naturale
(GN).
- L'installazione con gas naturale deve essere predisposta prima di installare l'unità.
- Ci deve essere un tubo flessibile all'uscita dell'installazione per il collegamento del gas naturale dell'unità e la punta di questo tubo deve essere chiusa con un tappo. Il rappresentante dell'assistenza rimuove il tappo durante il collegamento e collega l'unità mediante un dispositivo di collegamento diretto (accoppiamento).
- Assicurarsi che la valvola di gas naturale sia subito accessibile.
- Se è necessario usare in seguito l'apparecchio con un tipo diverso di gas, bisogna consultare l'agente autorizzato per l'assistenza per la relativa procedura di conversione.

PERICOLO:
Il flessibile del gas non deve essere
schiacciato, piegato o bloccato né deve venire
in contatto con le parti calde dell'apparecchio.
C'è il rischio di esplosione a causa del
flessibile del gas danneggiato.
- Spingere l'apparecchio verso la parete della cucina.
• Regolazione dei piedini del forno
Vibrazioni durante l'uso possono provocare lo spostamento dei contenitori della cucina. Questa situazione pericolosa può essere evitata se l'apparecchio è piano ed equilibrato.
Per la propria sicurezza, è bene assicurarsi che l'apparecchio sia piano regolando i quattro piedini sul fondo ruotando verso sinistra o destra e allineando con il piano di lavoro.
Controllo finale
- Aprire la fornitura del gas.
- Controllare le installazioni del gas per montaggio e tenuta sicuri.
- Accendere i bruciatori e controllare l'aspetto della fiamma.

La fiamma deve essere blu e avere una forma regolare. Se la fiamma tende al giallo, controllare se il coperchio del bruciatore è posizionato in modo sicuro o pulire il bruciatore.
Conversione del gas

PERICOLO:
Prima di avviare un lavoro sulla installazione del gas, scollegare l'alimentazione del gas. C'è il rischio di esplosione!
Per cambiare il tipo di gas del proprio apparecchio, cambiare tutti gli iniettori ed eseguire la regolazione della fiamma per tutte le valvole in posizione di flusso ridotto.
Cambiare l'iniettore dei bruciatori
- Estrarre la copertura e il corpo del bruciatore.
- Svitare gli iniettori ruotandoli in senso antiorario.
- Montare nuovi iniettori.
- Controllare tutte le connessioni per montaggio e tenuta sicuri.

Il nuovi iniettori hanno la loro posizione contrassegnata sulla confezione o Tabella iniettori, pagina 11 si può vedere la tabella degli iniettori.
1 Dispositivo di assenza fiamma (a seconda del modello)
2 Candela di accensione
3 Iniettore
4 Bruciatore

A meno che non vi siano condizioni anomale, non cercare di rimuovere i rubinetti del bruciatore a gas. Bisogna chiamare l'agente autorizzato per l'assistenza se è necessario cambiare i rubinetti.
Impostazione ridotta del flusso di gas per i rubinetti del piano cottura
- Accendere il bruciatore da regolare e portare la manopola in posizione ridotta.
- Rimuovere la manopola dal rubinetto del gas.
- Usare un cacciavite della dimensione giusta per regolare la vite di regolazione del flusso.
Per GPL (Butano - Propano) ruotare la vite in senso orario. Per il gas naturale, bisogna ruotare la vite in senso antiorariouna volta.
» La lunghezza normale di una fiamma diritta in posizione ridotta deve essere 6-7 mm.
- Se la fiamma è più alta della posizione desiderata, ruotare la vite in senso orario. Se è più bassa, ruotarla in senso antiorario.
- Per l'ultimo controllo, portare il bruciatore in posizione con fiamma alta e ridotta e controllare se la fiamma è presente o meno.
- In base al tipo di rubinetto del gas usato nell'apparecchio, la posizione della vite di regolazione può variare.
1 Vite di regolazione del flusso
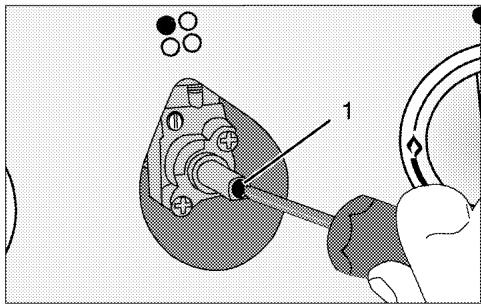
1 Vite di regolazione del flusso
Cambiare l'iniettore per il grill
- Aprire lo sportello anteriore.
- Svitare la vite di tenuta del bruciatore.
- Rimuovere il bruciatore.
- Svitare l'iniettore ruotandolo in senso antiorario.
- Montare un nuovo iniettore.
natural_image
Illustration of a hand holding a pen, with no visible text or symbols
Cambiare l'iniettore del forno
Per cambiare l'iniettore del bruciatore del forno, vedere le specifiche del prodotto;
• Aprire il coperchio di fondo, se presente.
- Rimuovere il coperchio di fondo fisso, se presente.
- Estrarre il cassetto del riscaldatore, se presente. Poi;
natural_image
Two-step diagram showing a hand installing or adjusting a device inside a cabinet, with no visible text or symbols.
- Svitare le viti del foglio di protezione sul fondo del forno ed estrarlo.
- Aprire lo sportello anteriore.
- Svitare le viti di tenuta della piastra di base.
natural_image
Interior view of a vehicle showing a hand pressing down the wheel (no visible text or symbols)
- Rimuovere il bruciatore del forno rilasciandolo dal supporto dell'iniettore.
natural_image
Illustration of a person operating a mechanical device with a cloth, no visible text or symbols
- Svitare l'iniettore ruotandolo in senso antiorario.
- Montare un nuovo iniettore.
natural_image
Illustration of a hand holding a small object near a surface, with no visible text or symbols
Regolazione di flusso ridotto per il forno a gas
Per un funzionamento appropriato del forno, ricontrollare la regolazione di by-pass è estremamente importante. Per fornire una sicurezza massima all'utente, queste operazioni devono essere fatte con attenzione.
- Accendere il bruciatore da regolare e portare la manopola in posizione alta della fiamma.
- Chiudere lo sportello del forno ed attendere da 10 a 15 minuti finché il forno diventa pronto per la regolazione.
- Estrarre la manopola.
- Dopo 15 minuti, regolare il forno alla posizione più bassa della fiamma.
- Impostare la lunghezza della fiamma da 2 a 3 mm con la vite 1 sul termostato del forno. Ruotando la vite in senso orario, si riduce la fiamma e ruotandola in senso antiorario, si accresce la fiamma.

Se la temperatura del forno aumenta in modo accidentale, spegnere il forno e chiamare l'assistenza autorizzata per far riparare il termostato del forno.
Butano/propano | Gas naturale
Stringere la vite fino alla fine
Allentare la vite
1/2 giro

Se il tipo di gas dell'unità è cambiato, allora anche la piastra con i valori nominali che mostra il tipo di gas dell'unità deve essere cambiata.
Consigli per il risparmio energetico
Le informazioni che seguono aiutano ad usare l'apparecchio in modo ecologico e a risparmiare energia:
- Usare coperchi di colori scuri e smaltati, poiché la trasmissione del calore è migliore.
- Quando si cucinano gli alimenti, eseguire un'operazione di preriscaldamento se è consigliato nel manuale utente o nelle istruzioni della cottura.
- Non aprire lo sportello del forno di frequente durante la cottura.
- Cercare di cucinare più di un piatto alla volta nel forno laddove possibile. Si può cucinare mettendo due contenitori per la cottura sul grill metallico.
- Cucinare più di un piatto uno dopo l'altro. Il forno è già caldo.
- Scongelare gli alimenti congelati prima di cuocerli.
- Usare pentole/padelle con coperchi per la cottura. Se non vi è coperchio, il consumo energetico può aumentare 4 volte.
- Selezionare il bruciatore adatto per la dimensione del fondo della pentola da usare. Selezionare sempre la dimensione corretta della pentola per i piatti. Pentole più grandi richiedono più energia.
Uso iniziale
Prima pulizia del prodotto

La superficie può danneggiarsi a causa di alcuni detergenti o materiali di pulizia. Non usare detergenti aggressivi, polvere/creme pulenti o oggetti taglienti durante la pulizia.
- Rimuovere tutti i materiali di imballaggio.
- Pulire le superfici del prodotto con un panno o una spugna umidi e asciugare con un panno.
Riscaldamento iniziale
Riscaldare il prodotto per circa 30 minuti e poi spegnerlo. Così i residui del prodotto o gli strati si bruciano e si rimuovono.

ATTENZIONE
Le superfici calde provocano ustioni!
Il prodotto può diventare caldo durante l'uso.
Non toccare mai i bruciatori caldi, le sezioni interne del forno, riscaldatori, ecc. Tenere lontani i bambini.
Usare sempre guanti resistenti al calore quando si mettono o si rimuovono i piatti nel/dal forno caldo.
Forno a gas
- Estrarre tutti i vassoi per la cottura a forno e il grill metallico dal forno.
- Chiudere lo sportello del forno.
- Selezionare la fiamma più alta del forno a gas; vedere Come utilizzare il forno a gas, pagina 20.
- Utilizzare il forno per circa 30 minuti.
- Spegnere il forno; vedere Come utilizzare il forno a gas, pagina 20
Forno con grill
- Estrarre tutti i vassoi per la cottura a forno e il grill metallico dal forno.
- Selezionare la fiamma più alta del forno con grill; vedere Come utilizzare il grill a gas, pagina 21.
- Utilizzare il forno per circa 30 minuti.
- Spegnere il grill; vedere Come utilizzare il grill a gas, pagina 21

Durante il primo funzionamento, per un paio d'ore, è possibile che siano emessi odori e fumo. È abbastanza normale. Assicurarsi che l'ambiente sia ben ventilato per rimuovere fumo e odori. Evitare di inalare direttamente fumo e odori emessi.
5 Come utilizzare il piano cottura

Non riempire mai la padella con olio per oltre un terzo. Non lasciare il piano cottura incustodito quando si riscalda l'olio. L'olio surriscaldato rappresenta un rischio di incendio. Non cercare mai di spegnere un possibile incendio con l'acqua! Quando l'olio prende fuoco, coprirlo con una coperta idonea o un panno umido. Spegnere il piano cottura se è sicuro farlo e chiamare i vigili del fuoco.
- Prima di friggere gli alimenti, asciugarli bene sempre e metterli delicatamente nell'olio caldo.
Assicurare che gli alimenti congelati siano completamente scongelati prima di friggerli.
- Non coprire il contenitore usato quando si riscalda l'olio.
- Mettere pentole e padelle in modo tale che i manici non siano sul piano cottura per evitare il riscaldamento dei manici stessi. Non mettere contenitori sbilanciati e che si inclinano facilmente sul piano cottura.
- Non mettere contenitori e padelle vuoti sulle zone di cottura accese. Potrebbero danneggiarsi.
- L'uso di una zona di cottura senza un contenitore o una padella sopra provoca danni all'apparecchio. Spegnere le zone di cottura quando la cottura è completa.
- Poiché la superficie dell'apparecchio potrebbe essere calda, non mettere contenitori in plastica e alluminio su di essa.
Tali contenitori non devono essere nemmeno usati per conservare gli alimenti.
• Usare solo padelle o contenitori con fondo piatto.
- Mettere la quantità appropriata di alimenti nelle pentole e nelle padelle. Così non bisognerà eseguire alcuna operazione di pulizia non necessaria evitando traboccamenti.
Non mettere coperchi di pentole o padelle sulle zone di cottura.
Mettere le padelle in modo tale che siano al centro della zona di cottura. Quando si desidera spostare la padella su un'altra zona di cottura, sollevarla e metterla sulla zona di cottura scelta, non trascinarla.
Cottura a gas
- La dimensione del contenitore e la fiamma devono corrispondere. Regolare la fiamma del gas in modo che non superi il fondo del contenitore e centrare il contenitore sul poggiapentola.
Uso del piano cottura
1 Bruciatore normale 18-20 cm
2 Bruciatore ausiliario 12-16cm
3 Bruciatore rapido 20-22 cm
4 Bruciatore normale 18-20 cm è il diametro consigliato per le pentole da usare sui relativi bruciatori.
Il simbolo della fiamma grande indica la massima potenza di cottura e il simbolo della fiamma piccola indica la cottura più bassa. In posizione off (superiore), il gas non è inviato ai bruciatori.
Accensione dei bruciatori a gas
Il bruciatore non è dotato di accensione automatica.
Usare un accendino o un fiammifero.
- Tenere premuta la manopola del bruciatore.
- Ruotarla in senso antiorario fino al simbolo della fiamma grande.
- Accendere il piano cottura con un accendino.
- Regolare secondo la potenza di cottura desiderata.
Spegnimento dei bruciatori a gas
Portare la manopola della zona per tenere in caldo nella posizione off (superiore).
Sistema di sicurezza di disattivazione del gas (nei modelli con componente termico)
natural_image
Simple 3D diagram of a bowl with a label '1' pointing to the side (no text or symbols on the bowl itself)
- Disattivazione di sicurezza del gas
Come contromisura di eventuali scoppi dovuti al traboccamento di liquidi sui bruciatori, si innesca un meccanismo di sicurezza e il gas viene disattivato.
- Premere la manopola e ruotare in senso antiorario per accendere.
- Quando il gas si accende, tenere la manopola premuta per 3-5 secondi ancora per impegnare il sistema di sicurezza.
- Se il gas non si accende dopo aver premuto e rilasciato la manopola, ripetere la stessa procedura tenendo la manopola premuta per 15 secondi.

PERICOLO:
Rilasciare il tasto se il bruciatore non è acceso
entro 15 secondi.
Aspettare almeno 1 minuto prima di riprovare.
C'è il rischio di accumulo di gas ed esplosione!
6 Come utilizzare il forno

ATTENZIONE
Le superfici calde provocano ustioni!
Il prodotto può diventare caldo durante l'uso.
Non toccare mai i bruciatori caldi, le sezioni interne del forno, riscaldatori, ecc. Tenere lontani i bambini.
Usare sempre guanti resistenti al calore quando si mettono o si rimuovono i piatti nel/dal forno caldo.

PERICOLO:
Prestare attenzione quando si apre lo sportello del forno perché potrebbe fuoriuscire vapore. Il vapore in uscita può ustionare mani, volto e/o occhi.
Suggerimenti per la cottura al forno
- Usare piatti in metallo con adeguato rivestimento antiaderente o contenitori in alluminio o stampi in silicone resistenti al calore.
• Usare al meglio lo spazio della rastrelliera.
- Mettere lo stampo da forno al centro della rastrelliera.
- Selezionare la posizione corretta per la rastrelliera prima di accendere forno o grill. Non cambiare la posizione della rastrelliera quando il forno è caldo.
- Tenere lo sportello del forno chiuso.
Suggerimenti per l'arrosto
- Trattare pollo e tacchino interi, pezzi grandi di carne con condimenti come succo di limone e pepe nero prima della cottura migliora la prestazione di cottura.
- Ci vogliono circa 15-30 minuti in più per arrostire la carne con osso rispetto alla cottura arrosto di carne della stessa dimensione ma senza osso.
- Ogni centimetro di spessore della carne richiede circa 4-5 minuti di cottura.
- Lasciare la carne nel forno per circa 10 minuti dopo il periodo di cottura. Il succo si distribuisce meglio per tutto l'arrosto e non fuoriesce quando si taglia la carne.
- Il pesce deve essere posto sulla rastrelliera centrale o inferiore in un piatto resistente al calore.
Suggerimenti per la cottura con grill
Quando carne, pesce e pollame sono cotti con grill, subito si rosolano, hanno una piacevole crosta e non restano secchi. Parti sottili, spiedini di carne e salsicce sono particolarmente adatti per la cottura con grill, così come verdure con alto contenuto di acqua, come pomodori e cipolle.
- Distribuire i pezzi da cuocere con grill sul grill metallico o nel vassoio per cottura al forno con il grill metallico posto in modo tale che lo spazio coperto non superi la dimensione del riscaldatore.
- Far scorrere il grill metallico o il vassoio per la cottura al forno al livello desiderato nel forno. Se si cuoce al grill sul grill metallico, far scorrere il vassoio per la cottura al forno sulla rastrelliera inferiore per raccogliere i grassi. Aggiungere dell'acqua nel vassoio per la cottura al forno per una pulizia facile.

Gli alimenti che non sono adatti alla cottura al grill rappresentano un rischio di incendio. Usare solo alimenti per cottura con grill adatti al calore intenso del grill.
Non mettere il cibo troppo lontano sul retro del grill. Questa è l'area più calda e gli alimenti grassi potrebbero prendere fuoco.
Installare il foglio di protezione della manopola.
Il foglio di protezione della manopola si usa per la cottura con grill quando lo sportello del forno è aperto. Protegge il pannello di controllo e i tasti da calore e sporco.
- Aprire lo sportello del forno e posizionare il foglio di protezione della manopola sui perni sotto al pannello di controllo.
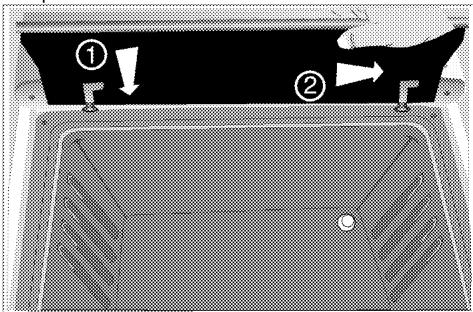
» Quando il foglio di protezione della manopola è installato, lo sportello del forno resta aperto.
Come utilizzare il forno a gas
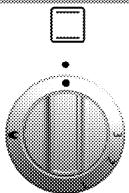
natural_image
Diagram of a rotary knob with a square head and circular dial, no text or symbols present
Il forno a gas si aziona con la manopola di controllo del forno a gas. In posizione off (superiore) l'alimentazione di gas è disattivata.
Il forno a gas si aziona con la manopola di controllo del forno a gas. In posizione off (superiore) l'alimentazione di gas è disattivata.
Accensione del forno a gas
Il forno a gas si accende con un accendigas.
- Aprire lo sportello del forno.
- Tenere la manopola di controllo del gas premuta e ruotarla in senso antiorario.
- Accendere il gas con l'accendigas dal foro di controllo dell'accensione.
- Tenere il burner control (controllo del bruciatore) premuto per 3 - 5 secondi.
» Assicurarsi che il gas si sia acceso e che la fiamma sia presente.
5. Tenere il controllo del bruciatore premuto per altri 3 - 5 secondi.
6. Selezionare forza di cottura/segno del gas desiderati.
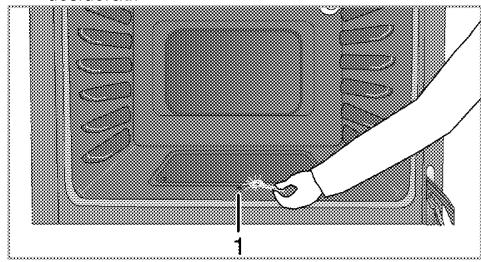
natural_image
Illustration of a hand pressing down on a rectangular object with coiled spring-like patterns (no text or symbols)
Foro di controllo dell'accensione

PERICOLO:
C'è il rischio di compressione di gas ed esplosione!
Non cercare di accendere il gas per oltre 15 secondi. Se il bruciatore non si accende entro 15 secondi, spegnere il piano cottura e aspettare 1 minuto. Ventilare l'ambiente prima di cercare di accendere di nuovo il bruciatore. C'è il rischio di compressione di gas ed esplosione!
Spegnimento del forno a gas
- Ruotare la manopola di controllo del forno a gas in posizione off (alta).
Livello di gas vuol dire:
Tabella tempi di cottura

La prima rastrelliera del forno è quella di fondo.

Carico massimo del vassoio del forno: 4 kg (8,8 lb).

I tempi in questo diagramma devono essere considerati una guida. I tempi possono variare a causa di temperatura degli alimenti, spessore, tipo e preferenze personali di cottura.
Mettere i piatti su un foglio di carta da forno per evitare schizzi sulla base del forno e aiutare a mantenere il forno pulito.
Cottura al forno e arrosto
| Alimenti | Preriscaldamento * | Livello di inserimento | Posizione manopola di controllo | Tempo di cottura |
| Torta di mele | 10 min. | 4...5 | 1 | 25...30 min. |
| Torta alla frutta | 10 min. | 4...5 | 1 | 25...35 min. |
| Torta | 10 min. | 3...4 | 1 | 30...40 min. |
| Biscotti | 10 min. | 4...5 | 1 | 25...35 min. |
| Pasta | 10 min. | 5 | 1 | 35...45 min. |
| Torta | 10 min. | 3 | 1 | 30...40 min. |
| Biscotti | - | 4...5 | 1 | 20...30 min. |
| Arrosto di agnello | 10 min. | 4...5 | 1 | 35...45 min. per 450 g 30 min. |
| Arrosto di manzo | 10 min. | 2 | 1 | 50...60 min. per 450 g 30 min. |
| Tacchino | 10 min. | 3...4 | 1 | 50...60 min. per 450 g 30 min. |
| Pollame | 10 min. | 3...4 | 1 | 30...40 min. per 450 g +25 min. |
| In casseruola | - | 4 | 1 | 90...120 min. § |
| Pesce | 10 min. | 3 | 1 | 35...45 min. |
| Pasta | 10 min. | 3...4 | 1 | 35...40 min. |
| Dolcetti | 10 min. | 4 | 1 | 30...35 min. |
| Victoria sandwich | 10 min. | 3 | 1 | 22...28 min. |
| * manopola di controllo in posizione 2 / § a seconda della quantità / # a seconda della dimensione |
Come utilizzare il grill a gas
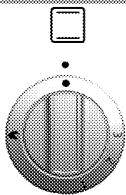
natural_image
Circular mechanical component with a central slot and mounting holes, no visible text or symbols
Il grill è azionato dalla manopola Grill control (controllo del grill). In posizione spento (superiore), non vi è alimentazione di gas.
Lo sportello del forno deve restare aperto durante la cottura con grill.

ATTENZIONE
Le superfici calde possono provocare ustioni!
Tenere i bambini lontani dall'apparecchio.
Lo sportello del forno resta leggermente inclinato quando è completamente aperto e quindi gli schizzi non raggiungono l'utente.
Accensione del grill
Il grill a gas si accende con un accendigas o un fiammifero.
- Aprire lo sportello del forno.
- Tenere la manopola premuta e ruotarla in senso orario verso il simbolo del grill.
- Accendere il gas direttamente portando un accendigas o un fiammifero vicino al bruciatore del grill.
- Tenere la manopola premuta per 3 - 5 secondi ancora.
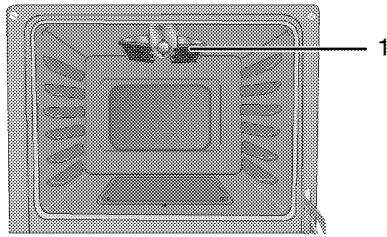
natural_image
Top-down view of a rectangular electronic device with internal components and a labeled component (no text or symbols visible)
1 Bruciatore grill

PERICOLO:
C'è il rischio di compressione di gas ed esplosione!
Non cercare di accendere il gas per oltre 15 secondi. Se il bruciatore non si accende entro 15 secondi, spegnere il piano cottura e aspettare 1 minuto. Ventilare l'ambiente prima di cercare di accendere di nuovo il bruciatore. C'è il rischio di compressione di gas ed esplosione!
Spegnimento del grill
- Portare la manopola Grill control (controllo del grill) in posizione OFF (superiore).

Gli alimenti che non sono adatti alla cottura al grill rappresentano un rischio di incendio. Usare solo alimenti per cottura con grill adatti al calore intenso del grill.
Non mettere il cibo troppo lontano sul retro del grill. Questa è l'area più calda e gli alimenti grassi potrebbero prendere fuoco.
Tabella tempi di cottura

I tempi in questo diagramma devono essere considerati una guida. I tempi possono variare a causa di temperatura degli alimenti, spessore, tipo e preferenze personali di cottura.

La prima rastrelliera del forno è quella di fondo.
Cottura con grill a gas
| Alimenti | Preparazione/impostazione | Tempo cottura grill # |
| Tostare prodotti a base di pane | ...... | 3...10 min. |
| Tagli piccoli di carne, salsicce, pancetta, ecc. | ...... | 15...20 min. |
| Costolette, bistecche di quarto, parti di pollo, ecc. | Pollo con spiedino metallico in posizione verticale verso l'alto. | 20...25 min. |
| Pesci interi, filetti di pesce, bastoncini di pesce | Pesci interi e filetti di pesce messi nella base del piatto del grill. | 10...20 min. |
| Pesce impanato | ...... | 15...20 min. |
| Prodotti precotti a base di patate | ...... | 15...20 min. |
| Pizza | Messi nella base del piatto del grill. | 12...15 min. |
| Cuocere con grill/rosolare gli alimenti | Piatti messi direttamente sulla base dello scomparto del grill. | 8...10 min. |
| * a seconda di dimensione/spessore |
La vita di servizio dell'apparecchio si allunga e problemi frequenti diminuiscono se l'apparecchio è pulito ad intervalli regolari.

PERICOLO:
Scollegare l'apparecchio dalla rete elettrica prima di avviare i lavori di manutenzione e pulizia.
C'è il rischio di shock elettrico!

PERICOLO:
Consentire all'apparecchio di raffreddarsi prima di pulirla.
Le superfici calde possono provocare ustioni!
- Pulire completamente l'apparecchio dopo ogni uso. In questo modo sarà possibile rimuovere i residui di cottura con maggiore facilità, evitando così che questi residui brucino all'uso successivo dell'apparecchio.
- Non sono necessari agenti di pulizia speciali per la pulizia dell'apparecchio. Usare acqua calda con detersivo liquido, un panno morbido o una spugna per pulire l'apparecchio e asciugare con un panno asciutto.
- Assicurare sempre che il liquido in eccesso sia completamente asciugato dopo la pulizia e che tutti gli schizzi siano immediatamente asciugati.
- Non usare agenti di pulizia che contengono acido o cloro per pulire le superfici e la maniglia in acciaio inox. Usare un panno morbido con un detergente liquido (non abrasivo) per pulire queste parti, prestando attenzione a pulire in un'unica direzione.

La superficie può danneggiarsi a causa di alcuni detergenti o materiali di pulizia.
Non usare detergenti aggressivi,
polvere/creme pulenti o oggetti taglienti
durante la pulizia.

Non usare pulitori a vapore per pulire l'apparecchio poiché ciò potrebbe provocare uno shock elettrico.
Pulizia del piano cottura
Piano cottura a gas
- Rimuovere e pulire i poggiapentola e le coperture dei bruciatori.
- Pulire il piano cottura.
-
Installare le coperture dei bruciatori e assicurarsi che siano posizionati correttamente.
-
Quando si installano i grill superiori, prestare attenzione a posizionare i poggiapentola in modo che i bruciatori siano al centro.
Pulizia del pannello di controllo
Pulire pannello di controllo e le manopole con un panno umido e asciugare.

Non rimuovere tasti/manopole per pulire il pannello di controllo.
Il pannello di controllo può danneggiarsi!
Pulizia del forno
Pulire lo sportello del forno
Per pulire lo sportello del forno, usare acqua calda con detersivo liquido, un panno morbido o una spugna per pulire l'apparecchio e asciugare con un panno asciutto.

Non usare detergenti molto abrasivi o raschietti in metallo tagliente per la pulizia dello sportello del forno. Essi potrebbero graffiare la superficie e distruggere il vetro.
Rimozione dello sportello del forno.
- Aprire lo sportello anteriore (1).
- Aprire i morsetti dell'alloggiamento della cerniera (2) sul lato destro e su quello sinistro dello sportello anteriore premendoli verso il basso come illustrato nella figura.
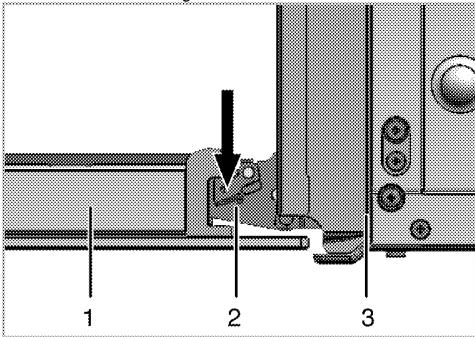
1 Sportello anteriore
2 Cardine
3 Forno
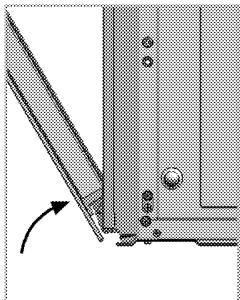
natural_image
Technical diagram of a mechanical joint or bracket with mounting holes and a rotation arrow (no text or symbols)
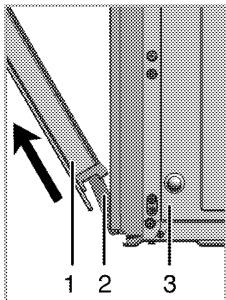
- Spostare lo sportello anteriore a metà.
- Rimuovere lo sportello anteriore tirandolo verso l'alto per farlo uscire dai cardini destro e sinistro.

I punti eseguiti durante il processo di rimozione
devono essere eseguiti al contrario per
installare lo sportello. Non dimenticare di
chiudere i morsetti dell'alloggiamento del
cardine quando si reinstalla lo sportello.
Rimozione del vetro interno dello sportello
Il pannello interno in vetro dello sportello del forno può essere rimosso per la pulizia.
- Aprire lo sportello del forno.
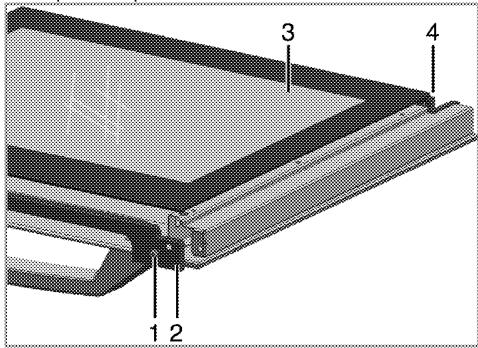
1 Vite
2 Profilo
3 Pannello interno in vetro
4 Apertura in plastica
2. Estrarre la vite (1) con un cacciavite
3. Estrarre il profilo (2), poi tenere sollevato verso il vetro interno (3).
4. Poi rimontare lo sportello, mettere il pannello in vetro (3) nelle aperture di plastica (4) e montare il profilo.
8 Ricerca e risoluzione dei problemi
Il forno emette vapore durante l'uso.
- Si tratta del normale vapore che si produce durante il funzionamento. >>> Non è guasto.
• Quando le parti di metallo si riscaldano, possono espandersi e provocare rumori. >>> Non è guasto.
Non c'è la scintilla di accensione.
• Corrente assente. >>> Controllare i fusibili nella scatola dei fusibili.
Non c'è gas.
• La valvola principale del gas è chiusa. >>> Aprire la valvola del gas.
- Il tubo del gas è piegato. >>> Installare correttamente il tubo del gas.
I bruciatori non funzionano bene o non funzionano affatto.
• I bruciatori sono sporchi. >>> Pulire i componenti dei bruciatori.
- I bruciatori sono bagnati. >>> Asciugare i componenti dei bruciatori.
- Il coperchio del bruciatore non è montato in modo sicuro. >>> Montare correttamente il coperchio del bruciatore.
• La valvola del gas è chiusa. >>> Aprire la valvola del gas.
• Il cilindro del gas è vuoto (quando si usa GPL). >>> Sostituire il cilindro del gas.

Consultare l'agente autorizzato per l'assistenza o il rivenditore dove è stato acquistato l'apparecchio se non si riesce a risolvere il problema nonostante siano state implementate le soluzioni di questa sezione. Non cercare mai di riparare da soli un apparecchio difettoso.