
E61 - Téléphone mobile BENQ-SIEMENS - Notice d'utilisation et mode d'emploi gratuit
Retrouvez gratuitement la notice de l'appareil E61 BENQ-SIEMENS au format PDF.

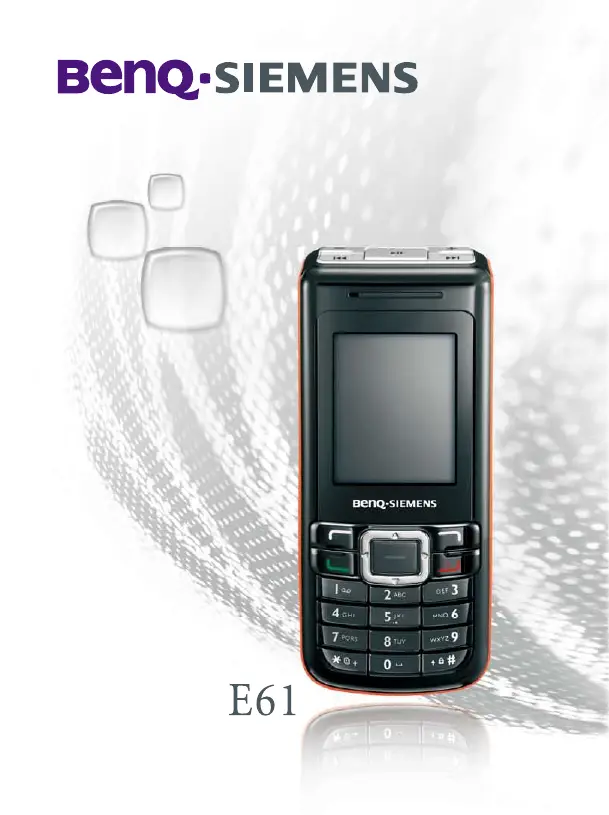

| Type de produit | Téléphone mobile |
|---|---|
| Caractéristiques techniques principales | Écran TFT de 1,8 pouces, résolution 128 x 160 pixels |
| Alimentation électrique | Batterie lithium-ion de 800 mAh |
| Dimensions approximatives | 107 x 45 x 15 mm |
| Poids | 85 g |
| Compatibilités | Réseaux GSM 900/1800 MHz |
| Type de batterie | Batterie rechargeable |
| Tension | 3,7 V |
| Fonctions principales | Appels, SMS, radio FM, jeux |
| Entretien et nettoyage | Utiliser un chiffon doux et sec, éviter les produits chimiques |
| Pièces détachées et réparabilité | Disponibilité limitée des pièces, réparation par professionnels recommandée |
| Sécurité | Éviter l'exposition à des températures extrêmes, ne pas démonter la batterie |
| Informations générales utiles | Vérifier la compatibilité avec votre opérateur avant l'achat |
FOIRE AUX QUESTIONS - E61 BENQ-SIEMENS
Questions des utilisateurs sur E61 BENQ-SIEMENS
0 question sur cet appareil. Repondez a celles que vous connaissez ou posez la votre.
Poser une nouvelle question sur cet appareil
Téléchargez la notice de votre Téléphone mobile au format PDF gratuitement ! Retrouvez votre notice E61 - BENQ-SIEMENS et reprennez votre appareil électronique en main. Sur cette page sont publiés tous les documents nécessaires à l'utilisation de votre appareil E61 de la marque BENQ-SIEMENS.
MODE D'EMPLOI E61 BENQ-SIEMENS
BenQ·SIEMENS
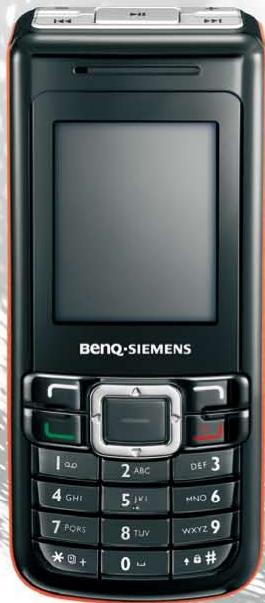
E61
BenQ·SIEMENS E61
Mobile Phone
User Manual
Copyright
© 2006. BenQ Mobile GmbH & Co. OHG. All rights reserved. No part of this publication may be reproduced, transmitted, transcribed, stored in a retrieval system or translated into any language or computer language, in any form or by any means, electronic, mechanical, magnetic, optical, chemical, manual or otherwise, without the prior written permission of BenQ Mobile GmbH & Co. OHG.
Disclaimer
BenQ Mobile GmbH & Co. OHG makes no warranty or representation, either expressed or implied, with respect to the quality, accuracy or fitness for any particular purpose of this document. The information in this document is correct at the time of printing and subject to change without notice.
Safety information
For your safety, please read the guidelines below carefully before you use your phone:
Exposure to radio frequency signals
Max. SAR measurement
EU: GSM900: 0.668 W/Kg; DCS1800: 0.154 W/Kg.
USA: PCS1900:0.366 W/Kg (head); 0.301 W/Kg (body).
Your handheld mobile phone is a low power transmitter and receiver. When it is ON, it receives and also sends out radio frequency (RF) signals. European and international agencies have set standards and recommendations for the protection of public exposure to RF electromagnetic energy.
International Commission on Non-Ionising Radiation Protection (ICNIRP) 1996
Verband Deutscher Elektroingenieure (VDE) DIN-0848
- Directives of the European Community, Directorate General V in Matters of Radio Frequency Electromagnetic Energy
- National Radiological Protection Board of the United Kingdom, GS 11, 1988
American National Standards Institute (ANSI) IEEE. C95.1- 1992
- National Council on Radiation Protection and Measurements (NCRP). Report 86
Department of Health and Welfare Canada. Safety Code 6
These standards are based on extensive scientific review. For example, over 120 scientists, engineers and physicians from universities, government health agencies and industry reviewed the available body of research to develop the updated ANSI Standard.
The design of your phone complies with these standards when used normally.
Specific operating restrictions
No metallic component allowed in body-worn accessories.
Phone operation
- Normal Position: Hold the phone as you would with any other telephone.
- To avoid potential RF interference, please do not wear the phone around your neck or in front your chest for long hours.
Batteries
- For safety concerns, when the temperature of the phone goes over 45^ (113F) or below 0^ (32F), charging will halt.
- Do not expose batteries to temperatures below -10^ (14F) or above 45^ (113F). Always take your phone with you when you leave your vehicle.
- Use only genuine batteries to ensure the phone's normal operation.
All batteries can cause property damage, injury or burns if a conductive material such as jewelry, keys or beaded chains touches exposed terminals. The material may complete the electrical circuit and become quite hot. To protect against such unwanted current drain, exercise care in handling any charged battery, particularly when placing it inside your pocket, purse or other container with metal objects. Your batteries are packaged with a protective battery cover; please use this cover for storing your batteries when not in use.
Driving
Check the laws and regulations on the use of moblie phones in the areas where you drive. Always obey them. Also, if using your phone while driving, please:
- Give full attention to driving--driving safety is your first responsibility.
- Use handsfree operation, if available.
- Pull off the road and park before making or answering a call if driving conditions so require.
Electronic devices
Most modern electronic equipment is shielded from RF signals. However, certain electronic equipment may not be shielded against the RF signals from your wireless phone.
Pacemakers
The Health Industry Manufacturers Association recommends that a minimum separation of six (6") inches be maintained between a handheld wireless phone and a pacemaker to avoid potential interference with the pacemaker. These recommendations are consistent with the independent research by and recommendations of Wireless Technology Research.
Persons with pacemakers:
- Should ALWAYS keep the phone more than six inches from their pacemaker when the phone is turned ON.
- Should not carry the phone in a breast pocket.
- Should use the ear opposite the pacemaker to minimise the potential for interference.
If you have any reason to suspect that interference is taking place, turn your phone OFF immediately.
Hearing aids
Some digital wireless phones may interfere with some hearing aids. In the event of such interference you may want to consult your hearing aid manufacturer to discuss alternatives.
Other medical devices
If you use any other personal medical device, consult the manufacturer of your device to determine if they are adequately shielded from external RF energy. Your physician may be able to assist you in obtaining this information.
Turn your phone OFF in health care facilities when any regulations posted in these areas instruct you to do so. Hospitals or health care facilities may be using equipment that could be sensitive to external RF energy.
Vehicles
RF signals may affect improperly installed or inadequately shielded electronic systems in motor vehicles. Check with the manufacturer or its representative regarding your vehicle. You should also consult the manufacturer of any equipment that has been added to your vehicle.
Posted facilities
Turn your phone OFF in any facility where posted notice so requires.
Aircraft
FCC regulations prohibit using your phone while in the air. Switch OFF your phone before boarding an aircraft.
Blasting areas
To avoid interfering with blasting operations, turn your phone OFF when in a "blasting area" or in the area posted "TURN OFF TWO-WAY RADIO." Obey all signs and instructions.
Potentially explosive atmospheres
Turn your phone OFF and do not remove the battery when in any area with a potentially explosive atmosphere and obey all signs and instructions. Sparks from your battery in such areas could cause an explosion or fire resulting in bodily injury or even death.
Areas with a potentially explosive atmosphere are often, but not always clearly marked. They include fueling areas such as gasoline stations; below deck on boats; fuel or chemical transfer or storage facilities; vehicles using liquefied petroleum gas (such as propane or butane); areas where the air contains chemicals or particles, such as grain, dust or metal powders and any other area where you would normally be advised to turn off your vehicle engine.
For vehicles equipped with an airbag
An airbag inflates with great force. DO NOT place objects, including both installed or portable wireless equipment, in the area over the airbag or in the airbag deployment area. If in-vehicle wireless equipment is improperly installed and the airbag inflates, serious injury could result.
This device complies with Part 15 of the FCC Rules. Operation is subject to the following two conditions:
- this device may not cause harmful interference, and
- this device must accept any interference received, including interference that may cause undesired operation.
Changes or modifications not expressly approved by the party responsible for compliance could void the user's authority to operate the equipment.
For body-worn operation, this phone has been tested and meets the FCC RF exposure guidelines for use with an accessory that contains no metal and that positions the handset a minimum of 1.5cm from the body. Use of other enhancements may not ensure compliance with FCC RF exposure guidelines. If you do not use a body-worn accessory and are not holding the phone at the ear, position the handset a minimum of 1.5cm from your body when the phone is switched on.
European Union Directives Conformance Statement
BenQ Corporation hereby declares that E61 is in compliance with the essential requirements and other relevant provisions of the Directives below:
R&TTE Directive(1999/5/EC), Electromagnetic Compatibility Directive(89/336/EEC), and Low Voltage Directive(73/23/EEC).
It also complies with the standards:
€0168
EN 301511
TS51.010-1
EN 50360/361
EN 60950-1
EN 301489-1&-7
EN55022

Permanent hearing loss may occur if you use ear- or headphones at high volume. You can adapt over time to a higher volume, which may sound normal but can be damaging to your hearing. Set your volume to a safe level. If you experience ringing in your ears, reduce the volume or discontinue use of your system.
All electrical and electronic products should be disposed of separately from the municipal waste stream via designated collection facilities appointed by the government or the local authorities.
This crossed-out wheelie bin symbol on the product means the product is covered by the European Directive 2002/96/EC.
The correct disposal and separate collection of your old appliance will help prevent potential negative consequences for the environment and human health. It is a precondition for re-use and recycling of used electrical and electronic equipment.
For more detailed information about disposal of your old appliance, please contact your local council, waste disposal service or the shop where you purchased the product.
Table of Contents
Safety information
1.Preparing your phone for use. 1
Inserting a SIM card 1
Installing a battery 2
Installing the back cover 2
Charging the phone 3
Turning the phone on 3
The miniSD card. 4
2. Getting to know your phone 6
Your phone at a glance. 6
Standy screen 8
Using the keys in idle mode 10
Menu navigation. 12
3. Using your phone 13
Call functions. 13
Making a phone call 13
Ending a phone call 13
Answering a phone call 13
Rejecting an incoming call. 13
Adjusting the volume 13
Making an international call. 14
Making an emergency call. 14
Dialling an extension number. 14
Speed dialling. 14
Listening to voicemails. 15
Operations during a call. 15
Phone Book. 19
Adding contacts to the Phone Book. 19
Finding contacts in the Phone Book 21
Last missed, dialled and received calls. 22
Using the silent profile 23
Camera 24
Taking photos 24
Adjusting camera mode settings. 25
Icons in camera mode 26
Managing your photos 28
MP3 player 30
Playing music 30
Uploading music to your phone 33
Shortcuts 34
Setting shortcuts 34
Using shortcuts 35
Messages 35
SMS. 35
MMS. 38
Voicemail 42
Cell Broadcast 43
Memory Status. 43
Input methods 44
Changing the input method. 44
Shifting between upper and lower case letters 44
Multitap text input 44
T9 text input 45
Numeric input 47
Entering symbols 47
4. Menu 48
Phone Book. 48
Find. 48
Add. 48
Edit 48
Copy 48
Delete. 49
Caller Group 49
Privacy Manager 49
Business Card. 49
My Number 49
Memory Status. 50
Messages 50
Calls 50
Missed 50
Received 50
Dialled 50
Cleanup All 50
Duration. 51
Cost. 51
Games 52
Entertainment 52
Camera 52
MP3 Player 52
Media Centre 53
Images 53
Music. 54
Other 55
Format miniSD. 55
Memory Status. 55
Tools 55
Alarm. 55
WorldClocks. 56
Calendar 57
To Do List 57
Note. 58
Shortcuts 58
Calculator. 58
Currency Converter. 58
Stopwatch. 59
Countdown Timer. 59
USB Connection 60
Services 61
WAP Service. 62
NAP Settings 64
Service Number 64
STK Menu 64
Settings 64
Date & Time. 64
Auto Power On/Off. 65
Profiles. 65
Display. 67
Audio. 68
Key Assignment 68
Call Settings. 69
Network. 73
Security. 74
Power Saving Mode. 76
Language 76
Input. 76
Flight Mode. 76
Restore. 76
5.Care and maintenance. 77
6.Troubleshooting. 78

Preparing your phone for use
Inserting a SIM card
Slide the entire SIM card into the slot at a 10 degree angle in the direction of the arrow shown on the compartment, with the metal contacts of the SIM card facing down and the cut corner at the bottom right as illustrated.
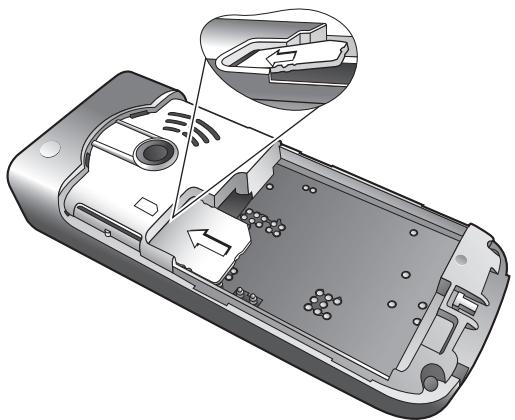
- A SIM card can be easily damaged if its metal contacts become scratched. Therefore, take special care when holding or inserting it.
- Do not try to pull out the SIM card before removing the battery, otherwise the SIM card may be damaged.

Installing a battery
- Place the battery onto the back of the phone, with the battery's contacts facing downwards and the tab on its top edge in alignment with the holes in the battery compartment.
- Push the battery against the top of the compartment and press it down to click it into the compartment.
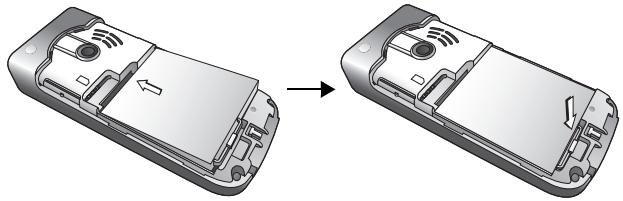

Do not remove the battery when the phone is on. Doing so could cause you to lose personal settings or data stored either on your SIM card or in the phone's memory.
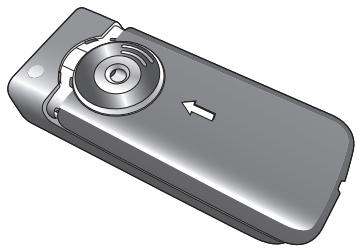
Installing the back cover
Place the back cover onto the back of your phone and slide forward until the latch catches the cover.
Charging the phone
- Insert the charger connector fully into the charger socket at the bottom of your phone. Ensure that the connector is plugged in the right way round.
- Plug the charger into a power outlet.

Do not remove the battery while the phone is charging.
- Once the phone is fully charged, remove the charger from both the power outlet and the phone.

Please note:
It takes approximately 4 hours to fully charge a battery.
- When the battery is weak, the phone will play an alert sound.
- When the battery is discharged, the charging may not start immediately when you plug in the connector. Wait 10 to 15 minutes for the phone to begin charging.
Turning the phone on
- Long-press to turn the phone on. The phone will display the welcome animation.

To set a welcome message, go to: Settings > Display > Welcome Message. For details, please refer to page 67.

In this user manual, "long-press" means to press and hold down a key for about two seconds. "Press" means to press a key and release immediately.
- Enter your PIN code and press to confirm.

The PIN (Personal Identification Number) is the password provided by your network operator. You need this password in order to use the SIM card.

If you enter the PIN incorrectly three times in a row, the SIM card will be locked. You must now enter the PUK (Personal Unblocking Key) for that SIM card in order to unlock it. Please contact your network operator to obtain a PUK.

To activate/disable PIN password authentication, go to Settings > Security > PIN Code > PIN1 Code > Set Status. See page 75.
-
When the PIN code entered has been accepted, the phone will automatically search for the designated network. This search process may take a few seconds.
-
The standby screen will be displayed, as well as network signal strength and the name of the network operator. You can now use the phone.

If the phone is not able to detect the designated network, or links to a network that you are not authorised to use, the signal strength meter will show no bars. You will only be able to make emergency calls.
The miniSD card
Your phone features a miniSD slot designed specifically for use with the miniSD card, a removable flash memory card intended to add greater storage capacity to your phone.
The miniSD card enables you to store multimedia data, including images, photos, MP3 audio files, and ringtones.
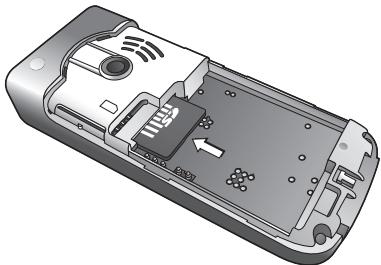
Installing the miniSD card
- Remove the back cover and the battery.
- Insert the miniSD card into the slot. Ensure that the card's metal contacts face downwards.
- Place the battery and the back cover onto the back of the phone.

Please note:
will appear in the status bar when the miniSD card is loaded.
- Your phone does not support a miniSD card which is on FAT32 or NTFS format.
Removing the miniSD card
- Remove the back cover and the battery.
- Press the miniSD card to release it.

Getting to know your phone
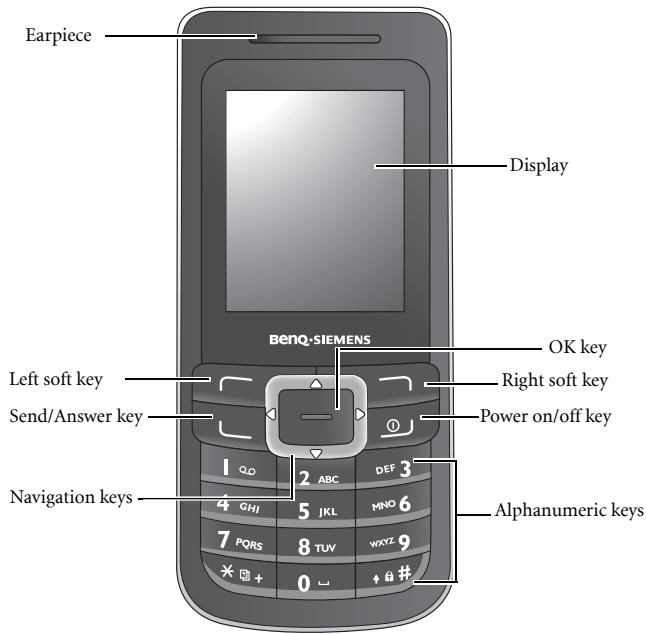
Your phone at a glance
Front view
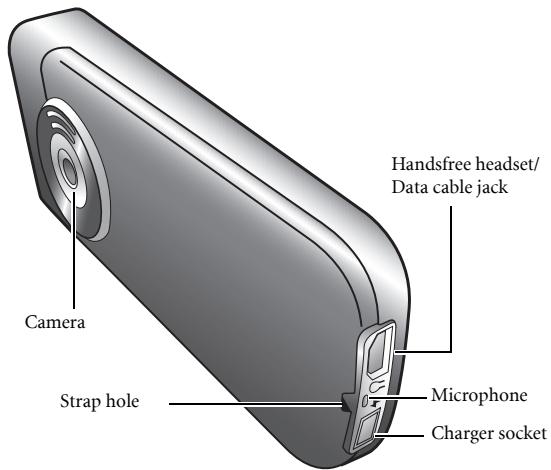
Side view
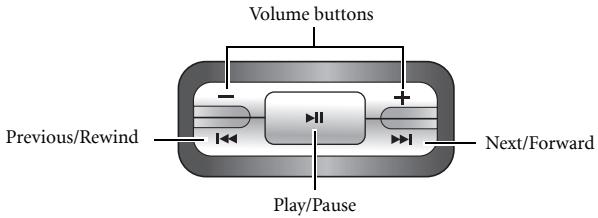
Top view (MP3 controller)
Standy screen
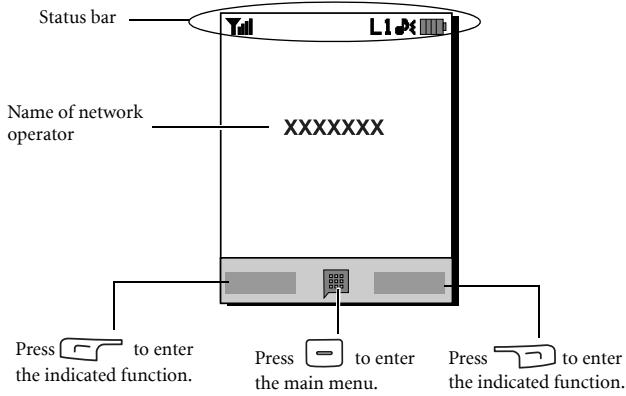

- To set the wallpaper of the display, go to Settings > Display > Wallpaper. Alternatively, you can go to Media Centre > Images. See page 53 and page 67.
- To set the theme of the display, go to Settings > Display > Theme. See page 67.
- To set the current time and date, as well as the format to be shown, go to Settings > Date & Time. See page 64.
- To enter text (such as the user name) to be displayed on the standby screen, go to Settings > Display > Personal Banner.
Icons in the status bar
| Icon | Function | Description |
| Till | Signal strength | Signal strength of the network. The more bars indicated, the stronger the signal. |
| III | Battery status | The current level of battery power. The more bars indicated, the more power remains. |
| G | GPRS in use | GPRS has been activated. |
| √ | Message | You have new or unread SMS messages. |
| √ | MMS message | You have new or unread MMS messages. |
| √ | WAP message | You have new or unread WAP messages. |
| ∞ | Voicemail | You have new voicemail messages (this icon will only appear if the function is supported by your network operator). |
| √ | Alarm | The alarm is turned on. |
| √ | Keypad lock | The keypad is locked. |
| L1 / L2 | Line1 or Line 2 in use | Shows the line now in use. |
| √ | Normal | The profile is Normal. |
| √ | Meeting | The profile is Meeting. |
| × | Silent | The profile is Silent. |
| √ | Outdoors | The profile is Outdoors. |
| Personal | The profile is Personal. | |
| Flight mode | The profile is Flight mode. | |
| Headset | A headset is connected to the phone. | |
| L1/L2 | Divert | The call divert is activated. |
| Roaming | Roaming is activated (not your regular network). | |
| miniSD Card | MiniSD card is loaded. |
Using the keys in idle mode
| Key | Commands and functions |
| 9 | Power on/off key • Long-press to turn the phone on or off. • Press to end a call, reject an incoming call, or to cancel a dialling. |
| 4 | Send/Answer key • Press to send or answer a call. • Press to access the call record list. |
| 7 | Left soft key Press to perform the function indicated on the display. |
| - | Right soft key • Press to perform the function indicated on the display. • Long-press to turn the silent profile on or off. |
| - | OK key Press to open up the main menu. |
| - | Navigation keys Press the navigation keys to perform the functions indicated. To assign the key function, go to Settings > Key Assignment. See page 68. |
| * | Asterisk key • Press to enter an asterisk " *". • To make an international call, long-press this key until the display shows "+" then enter the recipient's country code, area code and phone number. |
| |∞ | Voicemail key Long-press to dial your voicemail number. |
| + a # | # key • Press to enter "#". • For extensions: After entering a phone number, long-press to enter a "P" and then enter the extension number. • Long-press to activate the keypad lock. |
| 0~∞+g | Alphanumeric keys • Press to enter digits. • Shortcut key: Long-press a key to immediately access the function, or dial the number that it represents. See page 34, "Shortcuts". |
| - - + | • Press to adjust volume. • Long-press (-) to mute an incoming call. • Long-press (+) to reject an incoming call. |
| + | • Long-press to open the MP3 player. • Press to play or pause the MP3 playback. See page 31, "Using the MP3 controller". |
| + | Press to rewind/forward or skip to the previous/next track in MP3 player. See page 31, "Using the MP3 controller". |
Menu navigation
- In idle mode, press to bring up the main menu.
- Use to move up, down, right or left through the menu, for example, scroll to Settings, and press = to enter its menu.
- Use to scroll to a menu, for example Profiles, and press - to enter the menu item.
You can also access a menu item by pressing the corresponding menu number. In the above example, press to access Profiles.

Using your phone
Call functions
Making a phone call
In idle mode, enter the phone number. Press to dial your call.
Ending a phone call
To end a call, press ① . The display will show the total call time, and then return to idle mode.
Answering a phone call
To answer a call, press .

If you wish to press any key to answer a call, go to Settings > Call Settings > Answer Mode > Any Key.
Rejecting an incoming call
To reject an incoming call, press
Adjusting the volume
During a call, if you want to adjust the speech volume, you can press the volume buttons on the top side of the phone.

Please note:
- When there is an incoming call, you can mute the ringtone by long-pressing the volume (-) button on the top side of the phone.
- Adjusting speech volume only works during a call.
Making an international call
- Enter the outgoing international call code, or long-press until "+" appears on the display.
- Enter the recipient's country code, area code and phone number. Dial the call by pressing .
Making an emergency call
To call emergency services, enter 112 (the international emergency number) and then press to dial the call. You can make an emergency call even if your phone is locked, cannot access your network, or there is no SIM card inserted, as long as you are within range of a network of the type supported by your phone.
No call can be made if the keypad is locked.
Dialling an extension number
After you enter a telephone number, long-press until "P" appears on the display. At this point, you can enter the desired extension number, and then press to dial it.
Speed dialling
You must assign a number key as the shortcut for a particular phone number in order to use speed dialling for that phone number. For information on how to set up a shortcut, see page 58, "Shortcuts".
After you have assigned a number key to serve as the shortcut key for a particular phone number, long-press this key when the phone is in the idle mode to dial the corresponding phone number.
Listening to voicemails
Long-press to dial the voicemail phone number and listen to your voicemails.

Please note:
- If the network vendor supports it, the voicemail icon will appear on the display when you have new voicemails.
- If the voicemail number is not stored in the memory, you will not be able to access your voicemail by long-pressing 1 . In this case, you will need to manually set the number by going to Messages > Voicemail > Set Number.
Operations during a call

The following options marked with an asterisk (*) are dependent on network support and may require a subscription.
Loudspeaker
Press (Loudsp.) to turn on the loudspeaker. To turn off the loudspeaker, press (Handset).
Putting a call on hold*
- When only one call is active:
a. Press (Hold) to hold this call.
b. Press to end this call.
- When the only call is on hold:
a. Press (Unhold) to resume the call.
b. Press to end this call.
- When there is an active call and a call on hold:
a. Press (Swap) to resume the call that is on hold, and put the active call on hold.
b. Press to show a list of calls that you can end.
Making a second call*
Enter a phone number, or select one from the phone number or call record, and then press to dial it. The currently active call will automatically be placed on hold.
Call waiting*
If there is an incoming call while you are on the phone, the phone will notify you with a call waiting tone. If you want to
- Answer the waiting call: Press . The currently active call will automatically be placed on hold. However, if there is already another call on hold, a list will appear allowing you to select a call to end and then answer the waiting call.
- Reject the waiting call: Press or (End). Pressing (End) will immediately reject the waiting call; pressing will bring up a list allowing you to select a call to end.
Call menu
If you press during a call, it will bring up a call menu which provides a number of functions during a call.

Items marked with an asterisk (*) depend on network support and may require a subscription.
Use Loudspeaker/Use Handset
Switch between the loudspeaker and handset function.
Phone Book
Allows you to search for a number in the Phone Book.
Calls
Allows you to view missed, received and dialled calls.
Conference*
Conference calls allow you to converse with more than one party at a time.
Hold/Unhold/Swap*
Toggles the call status.
Join/Private
Adds a party that is on hold to the current conference call, or isolates a single party in a conference call and puts all other parties on hold.
Transfer
Allows two parties to connect, while ending one's own call (one of the two parties may be involved in an active call while the other is either on hold or being dialled), so as to allow the two parties to have their own call.
SendDTMF
When the phone is connected with other devices or services, you can send DTMF (Dual Tone Multi-Frequency) strings. DTMF strings are keypad tones that can be sent via the microphone as you dial another number. Your phone will emit the tones in order to communicate with answering machines, pagers, computerised telephone services and so forth.
Enter the number and then press = to send the DTMF string.
End Call
End All
Ends all calls, whether active or on hold.
End Active
Ends only the active call.
End Hold
Ends only a call or calls on hold.
End One
Ends only a single call by the number or the contact.
Anonymous
Ends an anonymous call.
Hold/Unhold/Swap
Toggles the call status.
Mute/Unmute
Activates/cancels the silent mode.
SMS
Allows you to read or write an SMS message during a call. For details, see page 35, "SMS".
Calculator
Allows you to use the calculator. For details, see page 58, "Calculator".
Phone Book
Adding contacts to the Phone Book
The capacity of a phone book on your SIM card depends on the type of SIM card provided by your network operator.
- In idle mode, enter the phone number that you want to save, then press (Save).
- Select the memory where the contact is to be stored. Select from either Add to SIM or Add to Phone.
- Scroll to the data field that you want to edit, and then press = to enter data.
- Press = to return to the phone book data field after filling the entry.
-
Press (Option) to
-
Save: Save the entries you have entered.
- Change Type: Change the category of the phone number (for example, from Mobile Number to Home number). This option can only be used in the phone number data field.
- Add New Field: Adds additional data fields for a contact.
-
Delete Field: Removes the selected data field.
-
Once you have completed editing, press (Option) and select Save to save contact's details.
Phone book entries on SIM card memory
| Name | The contact's name. |
| Number | The contact's phone number. |
| Caller Group | Used to select a caller group for the contact. To define each caller group, go to Phone Book > Caller Group. See page 49. |
Phone book entries on phone memory
| Name | The contact's name. |
| Mobile Number | The contact's mobile phone number. |
| Home Number | The contact's home phone number. |
| The contact's email address. | |
| Caller Group | Used to select a caller group for the contact. To define each caller group, go to Phone Book > Caller Group. See page 49. |
Additional phone book entries on phone memory
| Mobile Number | The contact's mobile phone number. |
| Home Number | The contact's home phone number. |
| Office Number | The contact's office phone number. |
| Other Number | Other phone number for the contact. |
| Home Address | The contact's home address. |
| Office Address | The contact's office address. |
| Company | The contact's company name. |
| Department | The contact's department name. |
| Position | The contact's position. |
| Note | Used to edit notes for the contact. |
| Special Day | Used to enter a special day of the contact. |
| Ring ID | Used to set a ringtone for the contact. When there is an incoming call from the contact, the phone will play this ringtone. A ringtone set in this field will replace the one associated with the contact's caller group, if any. |
| Image ID | Used to set the image that will appear on the display when there is an incoming call from the contact. The image set in this field will replace the image associated with the contact's caller group, if any. |
Finding contacts in the Phone Book
In idle mode, press (Names) to display contacts stored in the Phone Book.
-
Press the alphanumeric key that corresponds to the first letter of the name you wish to locate the appropriate number of times.
-
If necessary, scroll to the entry you want.

You can also go to Phone Book > Find, and then enter the full name or the first letter of the name to locate a contact.

will appear on the top of the screen if the contact is stored on your SIM card; will appear if the contact is stored in your phone memory.
When you have found the entry you want, you can
- Press = to view the contact's details.
- Press to dial the number. If the entry has more than one phone number, then you will be prompted to select a number.
- Press (Option) to Add, Edit, Copy to SIM/Copy to Phone, Send vCard or Delete a contact.
Last missed, dialled and received calls
There are two ways you can view the last missed, dialled and received calls on your phone.
- If there have been any missed calls, the display will show a missed call message along with the number of calls that were missed. Press = to view the missed call number.
- In idle mode, press to view the list of the most recent missed, dialled and received calls.

The icon will show beside missed calls; will show beside dialled calls; will show beside received calls.
Scroll to the number you want and then
Press to call back.
Press (Option) and select your desired function.
Using the silent profile
In idle mode, you can long-press to activate the silent profile. Once it is activated, the phone will alert you to an incoming call by vibrating without ringing.
- When you long-press to activate the silent profile, the phone will vibrate for one second. The icon will appear in the status bar.
- To turn off the silent profile, long-press
To select or define a profile, go to Settings > Profiles. See page 65, "Profiles".
Camera
Your phone features a digital camera that allows you to take a photo, and then set it as an image ID or wallpaper. You can also send a photo in an MMS.
Taking photos
- Go to Entertainment > Camera to activate camera mode. The viewfinder is then displayed.
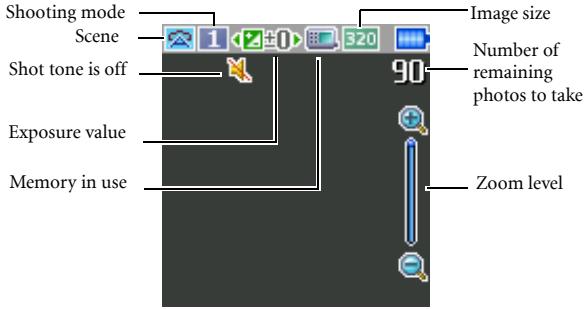
- Press (Option) to bring up the settings menu. For functions of various settings, see page 25, "Adjusting camera mode settings".
The icons on the screen will be changed according to the settings you made. For a description of each icon, see page 26, "Icons in camera mode".
3. When viewfinder appears, press the left or the right navigation key to adjust the exposure value. When the image size is set as 320 × 240 or 128 × 160 , press the up or down navigation keys to zoom in or out.
- Press to take a photo. The photo will be saved to the phone memory or to the miniSD automatically according to the setting you made. For the options of adjusting settings, see page 25, "Adjusting camera mode settings". For the options of previewing photos, see page 28, "Managing your photos".
To delete the newly saved photo, press (Delete). To return to the viewfinder without deleting the one just taken and saved, press
Adjusting camera mode settings
- Press (Option) to bring up the settings menu.
- Press the up or down navigation key to scroll to the desired option and then press = to save the setting. If you do not want to adjust the setting, press (Back) to return to the viewfinder.
Function of each option:
| Name | Functions |
| View Photos | Goes to the photos album |
| Set Self-Timer | Photo is taken a few seconds later. Choose between 5 or 10 seconds, or turn the option off. |
| Hide/Show Icons | Allows you to hide or show the icons displayed in the viewfinder. |
| Settings | Allows you to change the camera mode settings. |
- To view camera mode settings, select Settings. When the setup is done, press (Save) to save the settings.
Options of camera mode settings are
| Icon | Name | Functions |
| Image Size | Allows you to set the desired image size. | |
| Scene | Enables you to load preset settings that best suit the environment you are in. | |
| Effect | Enables you to apply a tone or colour to your photo to create an artistic effect. | |
| Shooting Mode | Allows you to select between single shot and multishots. The options appear differently depending on the image size you choose. | |
| Quality | Sets the image quality (compression ratio). | |
| Contrast | Allows you to adjust the contrast level from +2 to -2. | |
| Time Stamp | Add a time stamp to your photo. | |
| Sound | Allows you to set the shot tone on or off. | |
| Save to | Allows you to change the default memory to phone memory or miniSD. |
Icons in camera mode
The icons on the screen will be changed according to the settings you made. To hide or show the icons, press (Option) and select Hide Icons/Show Icons.
Image size
| Icon | Mode |
| 640 | 640 x 480 |
| 320 | 320 x 240 |
| 128 | 128 x 160 (Wallpaper) |
When the image size is 640 × 480 , the shooting mode of 9 MultiShot will not be available.
Scene
| Icon | Mode |
| Auto | |
| People | |
| Landscape | |
| Sunny | |
| Sunset | |
| Night | |
| Snow | |
| Text |
Self-Timer
| Icon | Function |
| 5 Seconds | |
| 10 Seconds |
Shooting Mode
| Icon | Function |
| 1 | Single |
| 4 | 4 MultiShot |
| 9 | 9 MultiShot |
Save to
| Icon | Function |
| miniSD | |
| Phone Memory |
Managing your photos
- Press (Option) to bring up the settings menu.
-
Go to View Photos. You will find a list or thumbnails of the photos taken depending on your setting.
-
Select (Option) to view the setting menu. Scroll up or down to the following options.
| Name | Options |
| Send | Allows you to send the photo by MMS. |
| Delete | Deletes the photo. |
| Set | Allows you to set the photo as Wallpaper or Image ID for a new/ existing contact. |
| Move | Allows you to move the photo to a folder, or to or from the miniSD card. |
| Copy | Allows you to copy the photo to a folder, or to or from the miniSD card. |
| Slideshow | Allows you to view photos you have taken in a slideshow. |
| Browsing Mode | Allows you to view the photos in a list or in thumbnails. |
| New Folder | Allows you to create new folders to store photos. |
| Protect | Protects the photo from deletion. |
| Unprotect | (Available when a photo is protected) Frees the protected photo. |
| Rename | Allows you to rename the photo. |
| Delete All | Deletes all the photos in the selected folder. |
| Details | Shows you the details of this photo such as name, resolution and size |
- Press = to select to the desired option.
- Press = to save the setting.
- Press (Back) to return to the viewfinder.
MP3 player
Your phone features an MP3 player which allows you to play your favourite music on the go. To access the MP3 player, go to Entertainment > MP3 Player, or long-press the play/pause button on the top of the phone.
The MP3 player plays music files stored on the miniSD card.
The MP3 player can only play audio files saved in the following formats: MP3 (MPEG1-LAYER3/MPEG2-LAYER3/OMA DRM v.1.0), AAC/AAC+ (ADTS Format (LC & HE-AAC Profile)/OMA DRM v.1.0), and BP3.
Playing music
Select and play one track from Track or from a playlist in Playlists, and all the tracks in the same folder or the same playlist will be played.
You can use the navigation keys or the MP3 controller on the top side of the phone to play music.
Using the navigation keys
Press the navigation keys to perform the functions indicated on the screen.
Below is the MP3 player screen when a music file is being played.
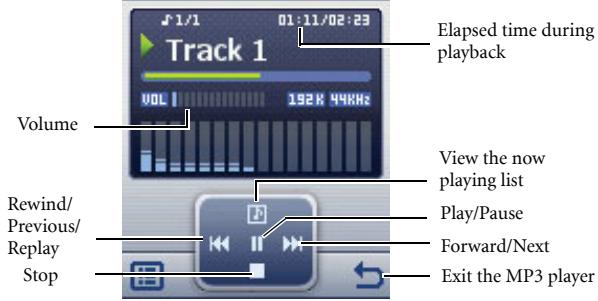
Using the MP3 controller
For the buttons of the MP3 controller, refer to page 7, "Top view (MP3 controller)".
| Button | Description |
| Volume | Press volume buttons to adjust the playback volume. |
| Rewind/ Previous/ Replay | • During playback, long-press to rewind. • During playback, if elapsed time is less than or equal to 2 seconds, press to play the previous track. • If elapsed time exceeds 2 seconds, press to replay the current track. |
| Forward/Next | • During playback, long-press to forward. • Press to go to the next track. |
| Play/Pause | • Long-press to open the MP3 player. • Press to play the current track. • Press to pause the playback; press again to resume the playback. • During playback, long-press to exit the MP3 player while the playback continues in the background. |

Tracks will be played in the sequence which they are saved in the now playing list. To play tracks in random order, press to go to Settings > Use Shuffle.
Building a playlist
- On the MP3 player screen, press (图) and select Playlists to build your playlist.
-
Press (Option) to select Add.
-
Name the playlist in the Add Playlist screen, and press = to save.
- When asked to add tracks to the new playlist, press (Yes).
- Scroll to the track you want to add, then press to select the track. Repeat the step to include multiple tracks in the playlist.
- Press (Done) to save the setting.
3 Select All to select or deselect all tracks.
Viewing the Now Playing List
If you select a track and press to play, the Now Playing List will display the tracks placed in the same playlist or folder. To view the now playing list, press in MP3 player.
If a file in the Now Playing List has been renamed or removed and thus can't be played, a question mark will display in front of it. For details, see page 81.
MP3 player settings
Press to access available settings for the MP3 player.
Viewing all tracks
To view all tracks stored on the miniSD card, press and select Track. You can press to start the playback.
Editing the playlist
Select Playlists and then press (Option) to manage your playlists and music files.
Minimising the MP3 player
During playback, select Minimise Player to close the MP3 player while the playback continues in the background.
Repeat
Go to Settings > Set Repeat to play one or all tracks repeatedly.
Play tracks randomly
Go to Settings > Use Shuffle to play tracks in a random order.
Showing lyrics
Go to Settings > Show Lyrics to have the lyrics displayed.
The supported lyrics format is ID3v2.3.
Setting the EQ (Equaliser) mode
Go to Settings > Set EQ to choose your preferred EQ mode that will influence the sound during playback.
Setting the display mode
Go to Settings > Display Mode and set the display mode of the MP3 player.
Uploading music to your phone
Uploading music to your phone is simple using the supplied data cable and a miniSD card. Refer to page 60, "Transferring data between the phone and a computer" for details.
Shortcuts
Allows you to assign 8 alphanumeric keys as shortcuts to commonly used functions or frequently dialled numbers.

is assigned to voicemail dialling and you are not allowed to change it.
Setting shortcuts
Shortcuts allows you to set up quick access functions or phone numbers.
- Scroll the selection box to the number key you wish to use as a shortcut key. You can also press the actual alphanumeric key to select it.
- To add a function, press (Option) and select Add Function. To add a phone number, press (Option) to and select Add Phone. See step 3 if Add Function is selected. See Step 4 if Add Phone is selected.
- From the function shortcuts list, scroll to select an item. Press = to save the assigned shortcut.
- From the contact list, scroll to select a contact. Press = to save the assigned shortcut.
- Repeat the above step to add or modify function shortcuts.
- To cancel a shortcut key and restore the key's original function, scroll to the shortcut key that you want to cancel, and then press (Option). Select Delete to cancel the shortcut.
Using shortcuts
There are two ways to use shortcuts:
- In idle mode, long-press an alphanumeric key to access its assigned shortcut.
- Go to Tools > Shortcuts. You can then:
a. Scroll to move the selection box to the icon corresponding to the desired key. Then press = to access its assigned shortcut.
b. Press the corresponding alphanumeric key to access its assigned shortcut.
Messages
Your phone supports various messaging services including SMS (Short Messaging Service) and MMS (Multimedia Messaging service). SMS allows you to insert simple animations and ringtones into your text messages, while MMS enables you to send photos, coloured images and music through your phone. You must have a subscription that supports MMS. Please contact your network operator for details.
SMS
Receiving a new message
- When you receive a new message, the message icon and a text message showing the number of messages received appear on the display.
- To read the message, press = . To manage the message, press (Option). For details about managing received messages, see page 36, "Managing Inbox".
Creating a new message
- To bring up the message editing screen, press idle mode, or go to SMS > New.Use the alphanumeric keys to enter text.
For information on the input method, see page 44, "Input methods". - To insert texts, images, melodies, vCard or vCalendar into the message, press (Option) and select Insert.
You can also define your own text. See page 37, "Defining quick message templates". - To align texts, press (Option) and select Alignment.
- When you finish editing the message, press to Send Message, Save to Drafts, Save to Private Folder, or Discard the message.
Managing Inbox
Your phone saves incoming messages in the Inbox. To manage Inbox messages, go to SMS > Inbox. A list of messages received appears. To view a message, scroll to it and press = . Press (Option) and select your desired function.
Read messages saved on the phone or on the SIM will be marked by l or l . Unread messages saved on the phone or on the SIM will be marked by l or l .
To decide where new messages will be saved to, go to Message > SMS > Settings > Save Msg. To.
Managing Outbox
Outbox stores failed messages and messages to be sent until they are successfully delivered. To manage Outbox messages, go to SMS >
Outbox. To view a message, scroll to it and press = . Press

(Option) and select your desired function.
Managing Sent Items
Sent folder stores messages that were successfully delivered. To manage Sent messages, go to SMS > Sent . To view a message, scroll to it and press . Press (Option) and select your desired function.
Managing Drafts
Drafts folder contains messages that you chose to save. To manage drafts, go to SMS > Drafts . To edit a message, scroll to it and press - .
Managing Private Folder
Go to SMS > Private Folder. The phone code is required to enter Private Folder.
Defining quick message templates
Templates folder contains a list of preset texts. To create your own text, go to SMS > Templates, then press (Option) and select Add to edit. To save it press = .
Cleaning up messages
To clean up messages, go to SMS > Cleanup. You can choose to delete messages by category.
Settings
Your phone is already set up to send or receive messages. Contact your network operator for details.
MMS
In order to use MMS, you have to subscribe to both GPRS and MMS services provided by your operator. Contact your operator for details on MMS settings.
Downloading new messages
If you set MMS > Settings > Deferred Download on, the operator will send you a new message notification and the handset will not download the message. Press = if you wish to download the message.
Reading a message
Having successfully downloaded the MMS message, a text message showing the sender's name or address appears on the display, press to start playing the MMS message page by page. Press
(Stop) to stop playing. Press (Option) and select your desired function.
Creating a new message
-
To write and send a new MMS message, go to MMS > New. To edit the message content, scroll to the Content: and then press = . Press = (Option) to execute the following tasks:
-
Insert: Allows you to insert photos, images, melodies, text, vCard, vCalendar or new pages.
Preview: Plays all the pages in the message in sequence. -
Remove Image: Removes the image or photo inserted in the page.
- Remove Melody: Removes the ringtone inserted in the page.
- Remove Page: Removes the current page.
- Previous/Next Page: Go to previous or next page.
- Page Duration: Sets the length of time that each page is displayed when playing the message.
- Spell: Opens the spell check box to allow you to create your own word into the dictionary.
- Symbols: Opens the symbol table.
- Input Methods: To switch to another input method.
- Cases: To switch to lower or upper cases, or to use Caps Lock.
-
T9 Settings: Enable Choice List to show the list of candidate words when you enter letters. Enable Auto Completion to complete the predicted word (if it was entered before), and use the scroll key to display alternative words.
-
After you finish creating the MMS message, press to return to the main list.
-
To: Enter the recipient's phone number or select a contact from your phone book by pressing (Browse). To send your message, this field cannot be left blank.
- Subject: Allows you to enter text for the subject.
- Content: Contains the message that you created.
- Cc: Allows you to send the message as a carbon copy to others.
- Bcc: Allows you to send the message as a confidential carbon copy to others.
-
Priority: Allows you to set the priority for this message.
-
Receipt: Allows you to set if a confirmation is to be sent back to you when the message has been delivered, read or both.
- Press (Option) and select Send Message to send the message.
Managing Inbox
Your phone saves incoming messages in the Inbox. To manage Inbox messages, go to MMS > Inbox. A list of received messages appears. To view a message, scroll to it and press = . Press (Option) and select your desired function.
Managing Outbox
Outbox stores failed messages and messages to be sent until they are successfully delivered. To manage Outbox messages, go to MMS >
Outbox. To view a message, scroll to it and press = . Press
(Option) and select your desired function.
Managing Sent Items
Sent folder stores messages that were successfully delivered. To manage Sent messages, go to MMS > Sent. To view a message, scroll to it and press . Press (Option) and select your desired function.
Managing Drafts
Drafts folder contains messages that you chose to save. To manage drafts, go to MMS > Drafts. To edit a message, scroll to it and press .
Managing Private Folder
Go to MMS > Private Folder. The phone code is required to enter Private Folder.
Templates
To use the preset MMS templates, go to MMS > Templates.
Cleaning up messages
To clean up messages, go to MMS > Cleanup. You can choose to delete messages by category.
Settings
To set up advanced settings for MMS, go to MMS > Settings.
Filter
Your phone will reject all MMS messages from the senders listed here.
Expiry
Sets the length of time your outgoing MMS message stays on the server before it reaches the recipient successfully.
Reply Type
You can determine here whether you want to use an SMS message or MMS message in reply to an MMS message you have received.
Size Limit
Sets the maximum size for a message that the phone receives. If an incoming message exceeds this size, the phone will not be able to download that message.
Server Info
Activates the MMS server used for sending and receiving MMS messages.
Deferred Download
When set to On, the phone will only download the sender's details. You can then decide whether you want to download the whole message.
Delivery Report
Asks the recipient to return a confirmation after receiving your MMS message.
Read Report
Asks the recipient to return a confirmation after reading your message.
Voicemail
Get Voicemail
Dials the voicemail number provided by your network operator to access your voicemail box.
In idle mode, long-press to access your voicemail box.
Set Number
Allows you to save your voicemail phone number.
Cell Broadcast
Cell broadcast messages are messages that your network operator broadcasts to all phones within a particular area. These messages are broadcast in numbered channels. For example, channel 030 might be for local weather, 060 for traffic reports, 080 for information about local hospitals, taxis, pharmacies and so forth. You can receive cell broadcast messages that your network operator broadcasts, and select your preferred topics and languages.

For more information about available channels and a list of the information they provide, contact your network operator.
Receive
To activate the cell broadcast feature, set this option to On.
Topics
The topics listed in the Topics list represent the broadcast information that you have selected to receive from your network operator.
Language
You can limit the cell broadcast information that you receive from your network operator to a specific language.
Memory Status
Shows the amount of used and available memory for storing messages.
Input methods
When an editing screen is displayed, the current text input method is indicated in the upper right corner of the screen. The phone has the following input methods.
| th | Multitap text input |
| 12 | Numeric input |
| 960 | T9 text input |
Changing the input method
When an editing screen is displayed, press repeatedly until your desired input method appears.
Shifting between upper and lower case letters
When an editing screen is displayed, long-press to shift between lower and upper case letters.
Multitap text input
Entering text using multitap text input
- You must press the key corresponding to the desired letter the correct number of times in order to enter the letter you want. Display letters for entry according to the order shown on each key. Pressing a key once will display the first letter listed on the key, while pressing it twice will display the second letter, and so on.
-
When you have entered a letter and wish to enter the next letter, either wait for two seconds until the cursor moves to the next text entry position, or immediately press the key for the next letter.
-
Short press to enter a space before beginning a new word. Long press to feed a new line.
- While entering text, use the scroll key to move the cursor. Press (Clear) once to delete a character; long-press (Clear) to delete all entered text.
Options when using multitap text input
When entering text using multitap text input, you can access the following options by pressing (Option).
- Insert: Allows you to insert texts, images, melodies, vCards or vCalendards.
- Alignment: Allows you to align text.
- Symbols: Opens the symbol table.
- Input Methods: To switch to another input method.
- Cases: To switch to lower or upper cases, or to use Caps Lock.
T9 text input
Entering text using T9 text input
- Press each key associated with the letter you want to enter only once. The letters you have entered appear on the display. The candidate words will change with each key you press.
-
If the first highlighted word is not the word you want, scroll to highlight the desired word.
-
If you do not find the word you want in the list of candidate words, that means the word you intend to enter is not a valid word in the dictionary. Press (Spell) to open the spell check box, which allows you to create your own word into the dictionary. The next time you enter the word, it appears as one of the candidate word.
- Once the correct word is highlighted or is entered, press = to enter the word.
- Short press to enter a space before beginning a new word. Long press to feed a new line.
- While entering text, use scroll key to move the cursor. Press (Clear) once to delete a character; long-press (Clear) to delete all entered text.
Options when using T9 text input
When entering text using T9 text input, you can access the following options by pressing (Option).
- Insert: Allows you to insert texts, images, melodies, vCards or vCalendards.
- Alignment: Allows you to align text.
- Spell: Opens the spell check box to allow you to create your own word into the dictionary.
- Symbols: Opens the symbol table.
- Input Methods: To switch to another input method.
-
Cases: To switch to lower or upper cases, or to use Caps Lock.
-
T9 Settings: Enable Choice List to show the list of candidate words when you enter letters. Enable Auto Completion to complete the predicted word (if it was entered before), and use the scroll key to display alternative words.
Numeric input
The numeric input method allows you to use the alphanumeric keys - to ^wet9 to enter numbers.
Entering symbols
To open the symbol table, press _ + . Press _ + again to open the next page. Scroll to highlight the desired symbol. Press = to place the symbol in the text.

Menu
The phone features various functions and they are organised in the menus and sub-menus. The main menu consists of nine categories. Each category has related sub-menus.
For information about navigating menus, see page 12, "Menu navigation".

Phone Book
Find
Used to locate a contact in the Phone Book. Enter the first letter to view a list of contacts beginning with the letter. Scroll to the contact you want to find. See page 21, "Finding contacts in the Phone Book" for details about what to do after locating a contact.
Add
Used to add a new contact to the Phone Book. See page 19, "Adding contacts to the Phone Book" for details.
Edit
Used to edit a selected contact.
Copy
Used to copy contacts stored in the phone to SIM card, or copy contacts stored in the SIM card to phone. You can also select to copy individual contacts.
Delete
Deletes a contact from the Phone Book. You can delete one contact at a time, or delete all contacts at once.
Caller Group
Caller groups are combinations of phone settings used to identify a particular group of contacts. Press (Option) to select the ringtone or image that belongs to a particular caller group, or to rename the caller group.
Privacy Manager
This option allows you to create a list of calls that you wish to accept (Accept List) or a list of calls that you wish to reject (Reject List). Set this function to Off if necessary.
- Scroll to highlight Accept List or Reject List, press (View).
- If the list is empty, press (Option) and select Add to add contacts to the list.
Business Card
You can use this option to enter your own business card information.
- Scroll to the data field you wish to edit, and then press = to enter text. Press = to return to the previous screen when you finish editing.
- Press (Option) and select Save to save all the entered data, or select Send vCard to send this business card in a short message.
My Number
This option allows you to store your phone number and name.
Memory Status
Shows you the number of entries that have been stored and the maximum entries that can be stored, on the SIM and on the phone.

Messages
For the description of features available in the messages menu, see page 35, "Messages".

Calls
This menu includes a list of your missed calls, dialled calls and received calls. Call costs and time are also recorded.
Missed
Shows your most recent missed calls.
See page 22, "Last missed, dialled and received calls" for details.
Received
Shows your most recent received calls.
See page 22, "Last missed, dialled and received calls" for details.
Dialled
Shows your most recent dialled calls.
See page 22, "Last missed, dialled and received calls" for details.
Cleanup All
Deletes all of the call records.
Duration

This feature is only accessible if supported by your network operator.
Last
Shows the duration of the last call.
All
Shows the total time for all calls.
Received
Shows the total time for all received calls.
Dialled
Shows the total time for all dialled calls.
Reset
Resetssall calltimerecords.
Cost

The cost calculation requires the support of the network operator. In addition, the estimated value shown is for your reference only. The real cost of calling may vary depending on the service provider the call is made through.
Last
Shows the cost of your last call.
All
Shows the total cost of all calls.
Reset
Resetssallcallcostrecords.

Requires entry of the PIN2 code.
Limit
Shows the current limit set for total call costs.
Settings
Allows you to set the unit price and a currency for calculating call costs.

Requires entry of the PIN2 code.

Games
Your phone features a number of entertaining applications and games. You can play the games that are embedded in the phone. To find out how to play these games, please read their on-screen instructions.

Entertainment
Camera
For information on using the camera, see page 24, "Camera".
MP3 Player
For information on using the MP3 player, see page 30, "MP3 player".

Digital Rights Management
This phone features the Digital Rights Management (DRM) technology. DRM allows for copyright-protected audio/visual content transmissions for playback in computers, portable devices and network devices, while protecting them from unauthorised use. Note that the phone supports playing OMA DRM v1.0 files only.
Images
Images stores photos you have taken or images saved in the phone or in the miniSD card.
- Select the desired location and scroll to the desired image.
- Press = to display the selected image. Scroll up or down to display the next or previous image.
-
Press (Option) to perform the following tasks with the image:
-
Send: Allows you to send this image in an MMS.
- Delete: Removes the image.
- Set: Allows you to set the photo as the wallpaper or an image caller ID.
- Move: Allows you to move the image from phone to miniSD, or from miniSD to phone.
- Copy: Allows you to copy the image from phone to miniSD, or from miniSD to phone.
-
Slideshow: Allows you to view the images you have taken in a slideshow format.
-
Browsing Mode: Allows you to view the photos you have taken in a list or in thumbnails.
New Folder: Allows you to create new folders to store photos. - Rename: Allows you to rename the image.
- Protect: Allows you to protect the image from deletion.
Unprotect: Frees the protected image. - Delete All: Deletes all the photos in the selected folder.
Details: Shows details of the image.
Music
Music stores ringtones and MP3 music.
MP3
MP3 stores your MP3 music files. Select an MP3 file and press
(Option) to perform the following:
- Delete: Deletes the selected MP3 file.
- Set: Allows you to set the MP3 for incoming calls or as a ring ID for a specified contact or a caller group, or as alarm tone.
- Move: Allows you to move the file from phone to miniSD, or from miniSD to phone.
- Copy: Allows you to copy the file from phone to miniSD, or from miniSD to phone.
New Folder: Allows you to create a new folder. - Protect: Allows you to protect the file from deletion.
Unprotect: Frees the protected file. - Rename: Allows you to rename the file.
- Delete All: Deletes all files.
Details: Shows details of the file.
Default
Default stores ringtones. Select a ringtone in the location desired and press (Option) to perform the following:
- Send: Allows you to send the ringtone through a short message.
- Set: Allows you to set the ringtone for incoming calls or as a ring ID for a specified contact or a caller group, or as alarm tone.
Details: Shows details of the ringtone.
Other
Other stores files downloaded through MMS or WAP whose formats are not supported by the handset.
Format miniSD
This option will delete all the files stored on the miniSD card. Phone code is required to execute this option.
Memory Status
Shows the amount of used and available memory on the phone and on the miniSD card.

Tools
Alarm
To set an alarm, follow the steps below:
- Select an alarm.
- Press to turn the status on and display the options.
- Scroll to an option and change the setting as needed.
Frequency
Allows you to select the days you want the alarm to sound.
Time
Allows you to enter the time for the alarm to sound.
Time Duration
Allows you to set the length of the alarm.
Alarm Tone
Allows you to set the ringtone of the alarm.
- To save all your current alarm settings, press Save).
- When setting is saved, will appear in the display's status bar.
Press (Snoopze) to stop the alarm. The alarm will ring again five minutes later. Press to turn off the alarm. The alarm will not ring until the next scheduled time.
World Clocks
This feature displays current local time and date for major cities around the world.
To make use of the World Clocks feature you must set your phone's time and date correctly. To do this, go to Settings > Date & Time.
To decide which cities' time and date you want to display:
- Press (Edit) to bring up a list of cities.
-
Press = to mark the cities. To unselect a city, scroll to that city and press = .
-
With desired cities selected, press (Done).
Calendar
Calendar allows you to keep track of upcoming events. You may set the alarm to ring when it comes to the date.
Creating a new memo
- When you open the Calendar, the phone will show the calendar for the current date. Scroll to the date you want to write a memo on. You can also press (Option) and select the Go to Date.
- When the desired date is highlighted, press (Option) and select Add to open the memo editor.
- Edit the data fields in the memo editor as needed. Press Save) to save the memo.
- To auto delete the memos, press (Option) and select the Delete After. Select the timeframe you want the deletion to be auto executed.
To Do List
To do list allows you to keep track of a list of tasks.
Creating a new to do item
- To add a new to do item, press (Option) and select Add.
- Write your memo. Press to save the memo.
- To edit a to do item, press (Option) and select Edit.
- To auto delete the memos, press (Option) and select Auto Delete.
Note
Note allows you to write down quick notes. You can set a password protection for the notes.
Shortcuts
For information on Shortcuts, see page 34, "Shortcuts".
Calculator
Allows you to use the phone as a calculator.
- Enter numbers using alphanumeric keys.
- Use to perform calculations. Press to perform + (add); press to perform - (subtract); press to perform / (divide); press to perform x (multiply); press to get the result (equal).
- Press (BSPACE) to delete numbers and symbols entered. Press _, or to enter a decimal point. Press (Back) to leave the calculator screen.
Currency Converter
Currency converter allows you to convert currencies and set the exchange rate.
- To set the currencies for conversion, press ~~一~ (Option) and select either Currency 1 (to set the currency at the top of the screen) or Currency 2 (to set the currency at the bottom of the screen).
-
To set the exchange rate, press (Option) and select Rate Setting.
-
Enter the amount of currency, the result will appear in the other currency field.
Stopwatch
Stopwatch allows you to measure times for sports.
- Press = to start the stopwatch.
- While the stopwatch is running, you can press (Split) to save each elapsed time.
- Press to halt the stopwatch.
- Scroll to view the list of elapsed times.
- To reset the stopwatch, press (Reset).
Countdown Timer
Countdown timer allows you to specify length of time to count down.
- Enter the length of time you want to count down.
- Press = and the timer starts counting down to zero.
- Press to halt the Countdown Timer.
- To reset the Countdown Timer, press (Reset).
USB Connection
Transferring data between the phone and a computer
- With the miniSD card inserted, turn the phone on.
- Connect the phone to the computer using the phone's data cable. Plug the cable's smaller end into the phone's data cable socket at the bottom, and the bigger end into the computer's USB port.
-
The phone will display a USB Connection menu. Select the desired task from the following:
-
Mass Storage
To transfer files between the computer and the miniSD card, select this option. See details on page 60.
Modem/PC Sync
To synchronise the phone with your computer to transfer Phone Book data or Calendar memos, select this option.
The phone can also work as a modem to let you connect your computer to the Internet.
Before activating the data synchronization or the modem function, make sure you have installed onto your computer the software tool designed for use with the phone.
- The icon will appear on the Windows status bar at the bottom right of the computer screen, indicating that the connection is successful.
Transferring files between the computer and the miniSD card
- Connect the phone to the computer using the phone's data cable.
- From the phone's USB Connection menu, select Mass Storage.
-
Once the connection is established and detected by your computer, the miniSD card will function as a removable storage device.
-
On your computer, double-click on the My Computer icon to open the My Computer panel, where the icon of a removable disk is displayed. It represents the storage capacity of the miniSD card.
- Double-click the icon that represents the miniSD card. The computer screen will display all the folders stored inside.
- Now you can start to transfer files between your PC and the specified memory using the Copy/Paste commands on your PC, or by dragging the selected files to the desired folder or disk.
When copying a file from your computer to the miniSD card, you must place the file in the folder intended for this type of file. For example, an MP3 file must be placed in the MP3 folder in order to be successfully used in the phone.

Services
Your phone features a WAP browser, allowing you to use the phone for mobile Internet connectivity. You can browse the online services offered by the network operator or ISP, such as information on financial news, sports, travel and entertainment. To use the phone to get online, necessary WAP and GPRS settings must be made.

To activate the mobile Internet connectivity, consult your network operator for WAP and GPRS services. In general, the network operator will automatically transmit the needed settings to your phone. If not, you will need to manually configure necessary settings. For further details, contact your network operator.
WAP Service
Start Browser
Starts up the browser and connects to the homepage.
Browsing a webpage
Referring to the soft key commands appearing on the screen, press 一 and 一 to perform the tasks you need while browsing a webpage. Scroll left or right to switch to different function menus; scroll up or down until the item you want is highlighted, and then press 一 to select it.
Ending the online session
While online, long-press to close the browser and return to the idle mode.
WAP Messages
When you receive a new WAP message, will be shown on the display. This option will start up the browser so you can read the WAP message.
Go to URL
Allows you to link to the URL you enter.
WAP Settings
Allows you to configure settings for different network operators' WAP servers, and then select the desired server to get online.
-
Scroll to the desired server and press (Option).
-
Select Add Profile to establish settings for a new server, or select Edit to manually configure the server's settings as follows:
-
Profile Name
GivestheWAPserveraname.
- Homepage
Sets the homepage that the browser will link to when it is started up.
- IP Address
Enter the IP address used for accessing the mobile Internet.
- Port
Enter the connection port specified by the network operator.
NAP
If you are using a GPRS network, choose to configure GPRS NAP settings or CSD NAP settings and select either type of settings to get online.
If you are using a dialup network, you are restricted to configuring only the CSD NAP settings to connect to the Internet.
For detailed information on how to configure GPRS and CSD settings properly, contact your network operator.
- Press (Save) to save the settings.
- Scroll to the server that you would like to use and press (OK) to confirm your choice.
Clear Cache
Clearly webpage content that the browser temporarily stores in memory.
NAP Settings
Used to configure GPRS or CSD settings according to the network type used by the phone.
Service Number
Provided by your network operator if the service is supported. For further details, please contact your network operator.
STK Menu
Shown only if it is provided by your SIM card. For further details, please contact your network operator.

Settings
Date & Time
Used to set the time and date, as well as the format that will be displayed on the screen.
Date
Allows you to set today's date.
Time
Allows you to set the current time.
Format
Allows you to set the format in which the date and the time will be displayed.
Time Zone
Allows you to select a time zone where you are currently.
Auto Time Zone
When turning this feature on, the time displayed on the phone will auto switch to the local time where you are currently.
Auto Power On/Off
Allows you to specify a time for the phone to be automatically turned on or off.

When on an aircraft, be sure that you deactivate the Auto Power On/Off feature.
- Select Power On or Power Off.
- Scroll to turn the status on or off.
- If status is set to On, specify a time.
Profiles
A profile is a group of settings that determine whether the phone will alert you to incoming calls through a ringtone or a vibrating alert, and how ringtones in general are used on the phone. These settings allow the phone's operations to best suit the environment you are in.
- Scroll to the desired profile and then press = to activate this profile. You can choose from among the following profiles:
Normal
This is the default profile.
Meeting
The options in this profile have been preset to suit a meeting environment.
Silent
The options in this profile have been preset to suit an environment where silence is required.
Outdoors
The options in this profile have been preset to suit an outdoor activity.
Personal
Allows you to use this profile for a group of custom settings.
- To customise settings, scroll to a profile, and then press (Edit).
You cannot modify settings in Silent mode.
Vibrate
Decides whether the phone will vibrate when there is an incoming call.
Call Ring
Allows you to set the ringtone that will sound when there is an incoming call.
Message Tone
Allows you to set the ringtone that will sound when there is a new message.
Calendar Tone
Allows you to set the ringtone that will sound when your calendar event approaches.
Keypad Tone
Decides whether keypad will sound when keys are pressed.
Ring Volume
Allows you to adjust the ring volume.
Restore
Allows you to reset the profile to its default configuration.
Display
Theme
You can change the appearance of the display. Select different themes to change the display colour and background.
Wallpaper
Designates the wallpaper used for the standby screen.
Welcome Message
Allows you to create a welcome message to be displayed when the phone is turned on.
Personal Banner
Allows you to enter text to be displayed on the standby screen.
Brightness
Allows you to adjust the brightness of the display to appear lighter or darker.
Backlight Duration
Allows you to specify how long the keypad backlight remains on after last key is pressed.
Audio
Call Ring
Allows you to set the ringtone that will sound when there is an incoming call.
Message Tone
Allows you to set the ringtone that will sound when there is a new message.
Calendar Tone
Allows you to set the ringtone that will sound when your calendar event approaches.
Keypad Tone
Decides whether keypad will sound when keys are pressed.
Ring Volume
Allows you to adjust the ring volume. Scroll up or down to adjust it.
Speech Volume
Allows you to adjust the speech volume. Scroll up or down to adjust it.
Key Assignment
Allows you to assign functions to the four navigation keys. When functions have been assigned, you can access the functions by pressing up/down/left/right in idle mode.
1.Scroll to a key and press
2. Select one function from the list and press
3. When you are ready to save the assignments, press Save).
Call Settings
Answer Mode
Any Key
Allows any key except to be used to answer an incoming call.
Send Key
Allows incoming calls to be answered only by pressing
Automatic
Auto answer the incoming call when the handsfree headset is plugged in.
For accessories that are compatible with your phone, please contact your local BenQ Mobile office to inquire about availabilities and detailed information.
Connect Alert
This feature allows the phone to ring, vibrate, or flash the backlighting when the recipient of a call has answered.
Minute Minder
If set to On, the phone will beep per minute during a call.
Show Number
Decides whether your phone number will be displayed on the recipient's phone when you make a call. Select Preset to accept the default set by the network operator.
Call Divert
This feature allows you to divert calls to a designated phone number or voicemail box.
Requires the support of the network operator.
Forward All
Diverts all incoming calls.
When Busy
Diverts incoming calls when you are in the middle of another call.
No Reply
Diverts incoming calls when you do not answer.
Not Reachable
Diverts incoming calls when your phone is turned off or outside network coverage.
Cancel All
Cancels all call divert options.
Call Barring
You can request that your network operator block the dialling or receiving of certain calls. To activate or cancel any of the options below, you must enter the network password provided by the network operator.
Requires the support of the network operator.
All Outgoing
Blocks dialling of any calls from the phone.
Intl. Out
If this option is activated, no international calls can be made with your phone.
Intl. Except Home
If this option is activated, your phone can only be used to dial local calls and calls to your home country from abroad. Other international calls will be barred.
All Incoming
Rejects all incoming calls.
Incoming When Roaming
If you are in another country (using roaming), activating this option will cause the phone to reject all incoming calls.
Cancel All
Cancel all call barring settings. You must enter the network password in order to cancel these settings.
Change Password
You can change the network password, which can be obtained from the network operator.
Call Waiting
If there is an incoming call when you are in the middle of another call, the screen will display the number/name of the incoming call and a call waiting message to alert you. You can activate, cancel or view the status of this feature from this menu.

Requires the support of the network operator.
Auto Redial
If there is no answer at a number you have dialled, the phone will automatically redial.
Fixed Dialling No.
After this feature is activated, the phone will only be able to dial numbers on the Fixed Dial Number list. If a number is not on the list, calls cannot be made to this number.
To activate or cancel this feature, you must enter the PIN2 code.

If the PIN2 code is entered incorrectly three consecutive times, the PIN2 code will be locked. You will need the PUK2 code to unlock the PIN2 code. Contact your network operator to obtain the PUK2 code.
To create a Fixed Dialling Number list,
- Press (View), then press (Option) and select Add.
- Enter the PIN2 code, and then add a new number to your Fixed Dial Number list.
Active Line
This feature allows you to use two different phone numbers on one phone. You can designate one number for dialling calls, while accepting incoming calls dialled to both numbers.
Requires the support of the network operator.
User Group
User Group
Used to create a closed group of callers based on a service provided by the network operator. The members of a User Group can call each other, but cannot conduct calls with anyone outside the group unless special provisions are made.
Outside Access
When the User Group service is activated, enabling Outside Access will allow users in the group to make calls to numbers outside the group. However, incoming calls will still be restricted to calls within the group.
Network
Generally speaking, the network that your phone uses is configured automatically. When turned on, the phone will automatically connect to the network provided by your network operator, or will automatically connect to the roaming network when you are outside the coverage of your regular network. When outside the coverage of your regular network, you can manually select the local network system.

Your network operator must be able to support network selection in order for you to use this feature.
Network Mode
Allows you to set network searching to automatic or manual.
Automatic
If this option is selected, when outside the coverage of your regular network, the phone will automatically scan for an available network.
Manual
If this option is selected, when outside the coverage of your regular network, the phone will list all the networks of telecom vendors and allow you to choose.
Available List
Allows you to manually select a network from the list.
Band Setting
Allows you to set an appropriate band in the GSM network system.
Connection
Allows you to set whether the phone will search for a GPRS network when it is turned on.
GPRS & GSM
When it is turned on, the phone will search for available GPRS and GSM networks.
GSM Only
When it is turned on, the phone will search only for a GSM network.
Security
You can use various codes and locks to prevent unauthorised use of the phone.
PIN Code
The PIN (Personal Identification Number) is the password provided by your network operator. You need this password in order to use the SIM card.

If you enter the PIN incorrectly three times in a row, the SIM card will be locked. You must now enter the PUK (Personal Unblocking Key) for that SIM card in order to unlock it. Please contact your network operator to obtain a PUK.
PIN1 Code
Used to activate, deactivate or change the PIN1 Code. To change the PIN1 Code, select Set Status and set to On. Enter PIN1.
PIN2 Code
Used to change the PIN2 code. The procedure is the same as for the PIN1 Code.
Phone Lock
Once the phone lock is activated, you will be required to enter the phone code when the phone is turned on. You must enter the correct code to unlock it (the default phone code is 1234). When the phone is locked, you will only be able to make emergency calls.
SIM Lock
When activating the SIM Lock, you must enter the previously set SIM Lock password (the default SIM Lock password is 1234). The password must be between 4 and 8 digits. Once the SIM Lock is activated, you will be required to enter the SIM Lock code to use another SIM card on your phone.
Auto Keypad Lock
Used to create a keypad lock. When you have not used the keypad for a specified period of time, the keypad will be locked. Scroll to set the status On, and select the time duration of inactivity before the keypad lock is to be activated.
Power Saving Mode
Activating this mode will turn off the keypad backlighting and the brightness of the display backlighting will be reduced to conserve battery power.
Language
Allows you to select the language that the phone will use.
Input
Allows you to set the default input methods that will be used in the text input mode.
Flight Mode
When you are on a flight, select this option so that the phone will not link to any network, and the alarm and calendar reminder will also be turned off. However, you can still use the entertainment features such as playing MP3 music or taking photos in this mode.
Restore
Restores all the settings to their factory default.
Requires entry of the phone code, which is 1234 by the default.

Care and maintenance
Take note of the points noted below to ensure that you are using the phone properly and to extend the lifespan of the phone.
- Store the phone and its accessories out of the reach of children.
- Keep the phone and accessories dry, and use the phone in environments where the temperature is between -10^ and 45^ . High or low temperatures outside this range may damage the phone.
- If possible, do not use or store the phone in excessively dusty or dirty environments.
- Do not remove the warranty seal on the phone yourself, nor allow an unauthorised dealer to do so.
- Do not use strong detergents or organic solvents to wipe or clean the phone.
- If your phone or its accessories are not operating normally, contact an authorised dealer immediately.
- Use only genuine accessories such as batteries, battery charger and handsfree kit to ensure the phone's normal operation and preserve battery life, as well as protect the safety of your person and belongings. Use of non-genuine accessories will not allow your phone to achieve optimal performance, and may cause the phone to malfunction. Any malfunctions or damage caused by the use of third-party accessories are not be covered by the terms of the product warranty, and will void the product warranty.
- Avoid allowing objects that may discharge electricity to contact the charging socket on the bottom of the phone or the metal contacts on the battery, as this may cause short circuits and put you in danger.

Troubleshooting
If you encounter problems while using the phone, or if it performs erratically, you can consult the information in the chart below. If your particular problem cannot be resolved using the information in the chart, contact the dealer where you purchased the phone.
| Problem | Possible cause | Solution |
| Poor reception | ·The network signal is too weak at your current location — for example, in a basement or near a tall building — because wireless transmissions cannot effectively reach it. | Move to a location where the network signal can be properly received. |
| ·The network is busy at the current time (during peak times, for example, there may be too much network traffic to handle additional calls). | Avoid using the phone at such times, or try again after waiting a short time. | |
| ·You are too far away from a base station for your network operator. | You can request a service area map from your network operator. | |
| Echo or noise | ·Poor network trunk quality on the part of your network operator. | Hang up the phone and dial again. You may be switched to a better-quality network trunk or phone line. |
| ·Poor local telephone line quality. | ||
| Shortened standby time | ·The standby time is related to your network operator's system configuration. The same phone used with different network operators' systems will not provide exactly the same length of standby time. | If you are located in an area where signaling is weak, temporarily shut off the phone. |
| ·The battery is depleted. In high-temperature environments, battery life will be shortened. | Use a new battery. | |
| ·If you are not able to connect to the network, the phone will continue to send out signals as it attempts to locate a base station. Doing so consumes battery power and will consequently shorten standby time. | Change your location to one where the network is accessible, or temporarily turn off your phone. | |
| You cannot switch your phone on. | ·Battery power has been depleted. | Recharge the phone's battery. |
| SIM card error | ·SIM card malfunction or damage. | Take the SIM card to your network operator for testing. |
| ·SIM card inserted improperly. | Insert the SIM card properly. | |
| ·Debris on the SIM card contacts. | Use a soft, dry cloth to clean the SIM card contacts. | |
| Unable to connect to the network. | ·SIM card invalid. | Contact your network operator. |
| ·You are not within the network's service area. | Check the service area with your network operator. | |
| ·Poor signal. | Move to an open space, or if you are inside a building, move closer to a window. | |
| You cannot answer incoming calls. | ·You have activated Accept List or Reject List in the Privacy Manager option. | Go to Phone Book > Privacy Manager and select Off in order to deactivate this option. |
| ·You have activated the Call Barring feature. | Go to Settings > Call Settings > Call Barring, and then select Cancel All. | |
| You cannot make outgoing calls. | ·You have activated the Call Barring feature. | Go to Settings > Call Settings > Call Barring, and then select Cancel All. |
| ·You have activated the Fixed Dialling Number feature. | Go to Settings > Call Settings > Fixed Dialling No. and select Off to turn this feature off. | |
| PIN Code is blocked. | ·You have entered an incorrect PIN code three consecutive times. | Contact your network operator. If the network operator provides the SIM card's PUK code, use the PUK code to unlock the SIM card. |
| Battery will not charge. | ·The battery or battery charger is damaged. | Contact the dealer. |
| ·The phone's temperature is below 0°C or higher than 45°C. | Adjust the battery charging environment to avoid extremes of temperature. | |
| ·Poor contact between the battery and charger. | Check all connectors to make sure all connections have been properly made. | |
| Unable to enter information into the Phone Book. | ·The Phone Book's memory is already full. | Delete unnecessary data from the Phone Book. |
| Unable to select certain features. | ·Your network operator does not support these features, or you have not applied for services that provide these features. | Contact your network operator. |
| Unable to play tracks in MP3 Player. | ·If a music file has been renamed or removed in Media Centre, the MP3 Player cannot locate the file and thus cannot play it. You have to update the playlist in MP3 Player. | Remove the old MP3 file from the playlist, and add the track with the updated filename to the playlist again. |

Issued by
BenQ Mobile GmbH & Co. OHG
Haidenaupplatz 1
D-81667 Munich
© BenQ Mobile GmbH & Co. OHG 2006
All rights reserved. Subject to availability.
Rights of modification reserved.
Manufactured by BenQ Mobile GmbH & Co. OHG
under trademark license of Siemens AG