A6 - Berline AUDI - Notice d'utilisation et mode d'emploi gratuit
Retrouvez gratuitement la notice de l'appareil A6 AUDI au format PDF.
| Intitulé | Détails |
|---|---|
| Type de produit | Berline de luxe |
| Caractéristiques techniques principales | Moteurs essence et diesel, transmission intégrale quattro, boîte automatique à double embrayage |
| Alimentation électrique | Non applicable (moteurs thermiques) |
| Dimensions approximatives | Longueur : 4,94 m, Largeur : 1,87 m, Hauteur : 1,46 m |
| Poids | Environ 1 600 kg |
| Compatibilités | Compatible avec divers systèmes d'infodivertissement et accessoires Audi |
| Type de batterie | Batterie plomb-acide ou lithium-ion (selon l'équipement) |
| Tension | 12 V |
| Puissance | De 150 à 600 ch selon la motorisation |
| Fonctions principales | Conduite assistée, régulateur de vitesse adaptatif, système de navigation, connectivité smartphone |
| Entretien et nettoyage | Entretien régulier recommandé tous les 15 000 km ou 1 an, nettoyage intérieur et extérieur périodique |
| Pièces détachées et réparabilité | Disponibilité des pièces chez les concessionnaires Audi et revendeurs agréés |
| Sécurité | Équipements de sécurité avancés : airbags, assistance au freinage, contrôle de stabilité |
| Informations générales utiles | Vérifier les options de garantie et d'entretien lors de l'achat, possibilité de personnalisation |
FOIRE AUX QUESTIONS - A6 AUDI
Questions des utilisateurs sur A6 AUDI
0 question sur cet appareil. Repondez a celles que vous connaissez ou posez la votre.
Poser une nouvelle question sur cet appareil
Téléchargez la notice de votre Berline au format PDF gratuitement ! Retrouvez votre notice A6 - AUDI et reprennez votre appareil électronique en main. Sur cette page sont publiés tous les documents nécessaires à l'utilisation de votre appareil A6 de la marque AUDI.
MODE D'EMPLOI A6 AUDI
Audi A6 Audi A6 Avant
Dear Audi Driver,
We are happy to welcome you into the family of Audi drivers.
This Quick Reference Guide will give you a quick and clear overview of the operation and function of your vehicle. You'll also find descriptions of some additional features. Keep in mind that not all vehicle features are described in this Quick Reference Guide.
This Quick Reference Guide is not a substitute for the Owner's Manual. The Owner's Manual contains detailed information about all your vehicle's features plus important warnings and information about passenger safety. Please read it carefully.
We wish you safe, reliable and enjoyable driving!
Always check the Owner's Manual for additional important details and safety information.
Note: * Denotes features optional or unavailable on some models.
LOCKING SYSTEM
The power locking system locks and unlocks doors, the rear lid and fuel filler flap simultaneously. You can operate the system by remote control or using the keys.
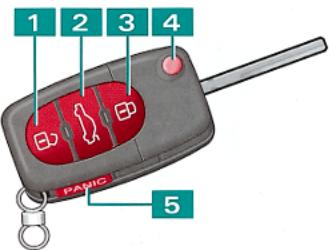
Folding master key with remote control
Press the appropriate button for about 1 second.
1 Unlock button
To unlock just the driver's door press the button once. To unlock all doors and the rear lid press the button twice.
Note: If the door or rear lid is not opened within 60 sec., the vehicle automatically relocks.
2 Rear lid button
To unlock the rear lid, press button for at least 1 second. Then open lid.
3 Lock button
If the doors and rear lid are correctly closed, all four turn signals will blink once.
4 Unfolding the master key
Press the release button.
To close the key again: press
the button and fold the key bit back in.
5 PANIC button
To activate the PANIC function (horn sounds and the vehicle lights blink), press the button. To cancel, press again.
Note: All windows will open if you insert the key in the driver's door and hold it in the position used to unlock the doors. To close all the windows, hold the key in the position used to lock the doors.
WARNING: Do not leave children inside the vehicle unsupervised. If the locking knobs of all doors are depressed, the vehicle will be locked. In an emergency, it would be impossible to open the doors from the outside without the key. Passengers locked in the vehicle could not escape in an emergency.
SEATS
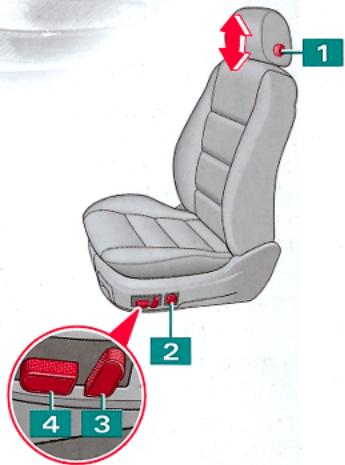
Safety belt height adjustment
Push the
adjuster up or down to adjust the height. After you've adjusted the safety belt height, pull on the belt on more time to make sure the adjuster is locked in place.
WARNING: Front seat passengers must never ride in a moving vehicle with the seatback reclined. The risk of personal injury increases with increasing rearward angle of the seatback. Safety belts only offer protection when the seatback is upright and belts are properly positioned on the body. Adjust your seats only when the vehicle is at a complete standstill.
All vehicle occupants, including those in the rear, must buckle up for safety - even if it's just a short trip. For the best possible protection by the seat belts and airbags:
Correct seat position
Do not position the front seats too close to the steering wheel or the instrument panel. Occupants should sit in an upright position. The tops of each headrest should be at the seat occupant's eye level or higher. Occupants should keep their feet in the foot well while the vehicle is being driven.
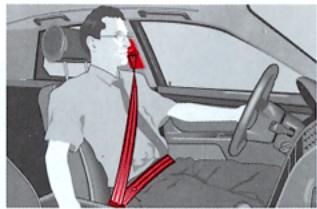
Correct safety belt position
The shoulder belt must be positioned over the center of the occupant's shoulder. The lap portion of the belt must be positioned as low as possible across the pelvis. The belts should always fit snugly (see illustration).
WARNING: The distance from the center of your breastbone to the center of the airbag-cover on the steering-wheel or instrument panel must be at least 10 inches (25 cm) or more.
WARNING: Thoroughly review your Owner's Manual for warnings and other important information about proper restraint use and reducing the risk of injury in accidents. Failure to properly use restraint systems can cause serious personal injury.
WARNING: Always fasten safety belts before driving off. Always make sure passengers are properly restrained. Children 12 years old and younger must ride in the rear seat and be properly restrained as indicated in the Owner's Manual. The airbag is supplemental and does not replace safety belt use.
WARNING: Never install rear facing child seats or infant carriers on the front passenger seat. A child will be seriously injured when the passenger airbag inflates.
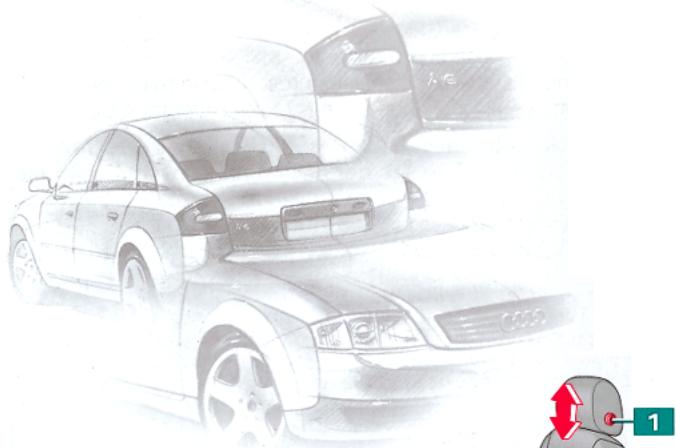
POWER ROOF*
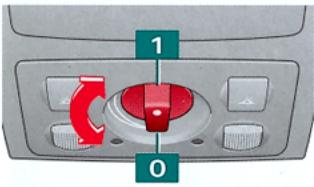
Turn the switch to open/ close the power roof:
1 Open
0 Close
Raise/ lower
Pull or push the switch to tilt the roof up or down.
WARNING: Always remove your ignition key, especially if children are left unattended in the vehicle. Unsupervised use of the power roof may cause serious injury.
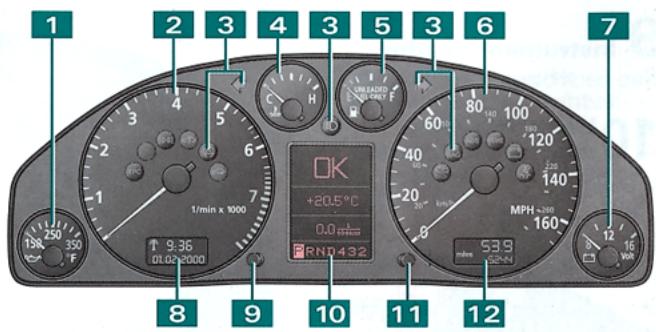
1 Engine oil temperature gauge
2 Tachometer
3 Indicator/ warning lights
EPC Electronic Power Control
≥slant 0 ≤slant Parking lights/ Headlights
Self-levelling suspension
ASR Anti-Slip Regulation or ESP Electronic Stability Program
Electronic immobilizer
Turn signals, Emergency flasher
D High beam
Malfunction indicator lamp
AIR AIRBAG system
BAG malfunction
ABS/ABS ABS Anti-Lock Brake System or EDL* Electronic Differential Lock System malfunction
1) / BRAKE Parking brake or Brake system malfunction
Generator
Fasten seat belts
4 Engine coolant temperature gauge
5 Fuel gauge
6 Speedometer
7 Voltmeter
8Clock/date display
9 Controls for:
- Scrolling through the Auto-Check System displays
Press the button while the ignition is on and the vehicle is standing still.
- Briefly display driver information
Press the button when a red symbol appears.
- Briefly illuminating the clock and odometer
Press the button when the ignition is off.
- Saving the speed warning
Briefly press the button when you reach the desired speed. To clear the speed warning, hold the button down for longer than 1 second.
- Setting the clock/ date Pull on the button as many times as needed until the desired display appears. Then adjust by turning the knob.
10 Display:
- Auto-Check System OK No malfunctions detected
Engine coolant temperature too high/ Engine coolant level too low
Engine oil pressure too low
(8) /'BRAKE/ Brake light defective
& Headlights/ Tail lights defective1)
O Brake pads worn
Low washer fluid level
Low fuel level
Battery voltage too high/ too low
Check engine oil level
Engine oil sensor defective
/ Speed warning 1 and 2
Automatic headlight adjustment control faulty Rear lid/ door open
Note: If the coolant temperature/ coolant level or engine oil pressure, generator or brake system lights come on and stay on: Stop, switch off the engine and refer to the Owner's Manual!
If one of these warning symbols comes on while you are driving, contact an Audi dealer as soon as possible.
FILLING THE TANK
Radio frequency
Outside air temperature
- Trip computer
MPG Actual fuel consumption (1/100 km) consumption
Mi (km) Miles to empty
h Travel time
MPG Average fuel
(0/100 km) consumption
MPH Average speed
(0 km/h)
Navigation data*
- Selector lever position display
Service interval display The service interval display will appear briefly if your vehicle needs to be serviced. For example: Service IN 1200 mls (2000 KM)
11 Reset button for trip odometer
12 Odometer
Upper odometer - distance driven on a single trip. Lower odometer - total distance driven.
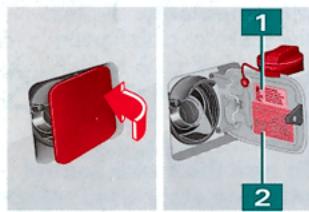
Opening the tank flap Open the filler flap as illustrated. Unscrew the filler cap and hook it onto the filler fl
Stickers for:
1 Fuel grade
2 Tyre pressures
© 2000 AUDI of America, Inc
Audi is constantly improving their products. Modifications in shape, equipment and technology are possible. No legal commitment is therefore implied by the details, illustrations and descriptions in this Quick Reference Guide. Reprinting, reproduction or translation, in whole or in part, are not permitted without written permission of Audi of America, Inc. All rights are expressly reserved by Audi of America, Inc. Subject to modification without notice. Printed in Germany. Concept and design: Pfriemer Katalogge GmbH.
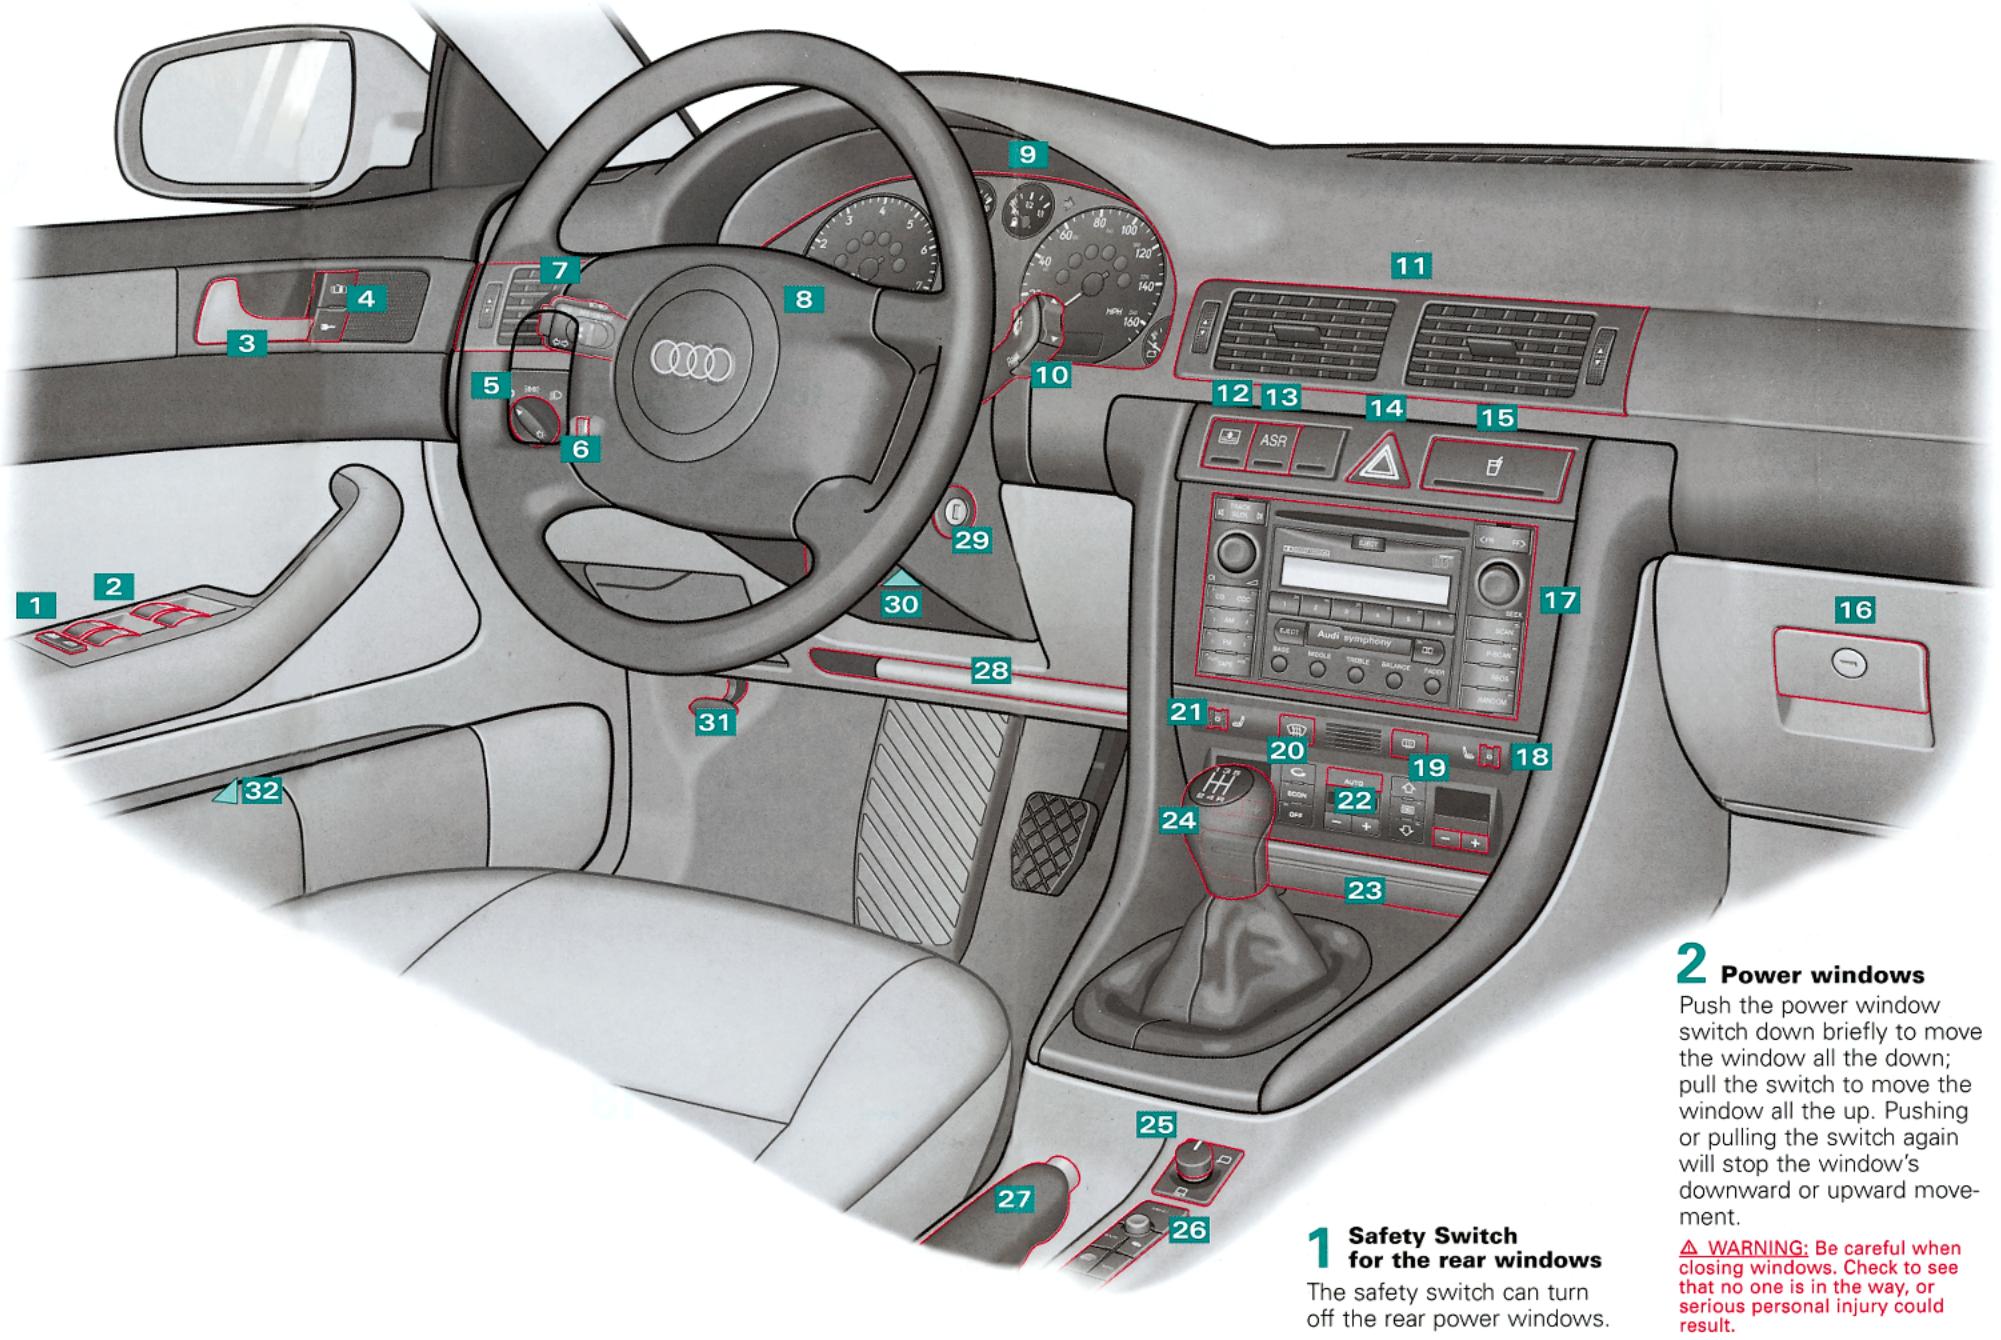
Power locks
Press either the top or bottom of the switch to unlock/lock the vehicle.
5
Light switch
O
Off
Canada models: When the ignition is switched on, the fog lights and tail lights come on (DRL's = Daytime Running Lights).

Side lights
D Low beam/ High beam
Turn the switch to the low beam position, then pull out to the
- 1st stop:
Front fog lights
- 2nd stop:
D
Front fog lights

Rear fog light
Note: Should you forget to turn off the headlights when you get out of your car, a warning chime will sound to remind you that they're still on.

Instrument cluster illumination

Turn signal and headlight dimmer switch lever
1 Right turn signal
2 Left turn signal
3 High beam
4 Highlight flasher
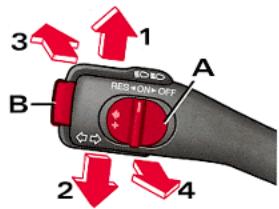
Cruise control
To turn the cruise control on: Slide switch A to ON.
Press button B to save and maintain the current vehicle speed.
To turn the cruise control off temporarily:Depress the brake or clutch pedal, or slide switch A to OFF.
To restore the stored speed: Slide switch A to RES.
To turn the cruise control off completely: Slide switch A to OFF.
WARNING: It is dangerous to use the Resume feature when the previously set speed is too fast for existing traffic conditions.
WARNING: To prevent unintended operation of cruise control, turn it off when it is not being used.

Horn

Instrument cluster
See back cover.
10 Lever for wiper and washer system
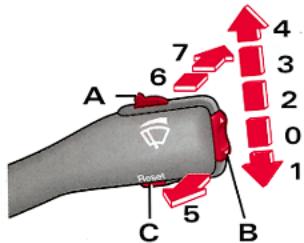
Windshield:
O Wiper OFI
1 One-tap wiping
2 Intermittent wiping
Switch A changes the wipe intervals in stages.
3 Low wiper speed
4 High wiper speed
5 Automatic wiper/washer
Pull and hold the lever.
Rear wiper
(Wagon model only):
6 Intermittent wiping: Press the lever forward.
7 Automatic wiper/washer:
Press and hold the lever.
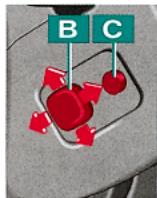
Trip computer
You can scroll through the information on the display by tapping the upper or lower edge of the rocker switch B. To reset specific stored values to zero, press and hold button C for a few seconds. Press button C to switch the display on/off.
Function buttons for the display
By tapping button C repeatedly, you can toggle between the standard displays and the navigation system*, or you can switch the display off.
11Air vent
12 Switch for electric sun blind*
(Sedan model only)
12 Switch for ASR*
13 (Anti-Slip-Regulation) or
ESP^* (Electronic Stability Program)
14 Emergency flasher
15 Cup holder release button
To open, tap the button of the lid.
16 Lockable storage compartment
17
Radio
18 Thumbwheel for seat heating (passenger's side)*
19Rear window defogger switch

Defrosting windows
21 Thumbwheel for seat heating and heated steering wheel (driver's side)*
22 Switches for air conditioning:
-
- Temperature control AUTO Automatic mode

Defog/defrost
Standard setting for year-round comfort:
Set the temperature control to 75^ (23^) and switch on the Automatic mode.
23 Ashtray with cigarette lighter and electrical socket
To open, tap the top part of the lid.
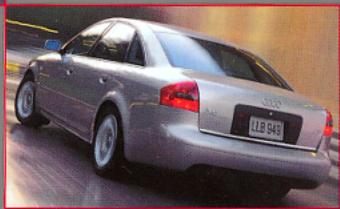
24 Gearshift lever or Selector lever
Selector lever positions on vehicles with automatic transmission
P - Park
R - Reverse
N - Neutral
D - Normal driving position
Your Audi is equipped with an autoshift lock (ASL). It locks the selector lever in the P and N positions when the ignition is on.
You can move the selector lever out of P and N only when you depress the brake pedal and press the button in the handle at the same time.
Tiptronic
The Tiptronic allows you to manually shift gears. With the selector lever in the "D" position, push the lever to right and then move it forward or backward to upshift or downshift.
Manual transmission
Shift into R only when the vehicle is not moving.
6-speed transmission: To engage R move lever to the left, press down and push forward.
Note: Start the engine with the gearshift lever in Neutral and the clutch pedal fully depressed.

Power mirrors
Turn the knob to adjust:

Left outside mirror
1 Off

Right outside mirror
Press the button in the desired direction to adjust the position of the mirror. Mirror surfaces are heated when the ignition is on.
WARNING: The right hand outside mirror has a curved (convex) surface. Always remember that objects will look smaller and appear farther away than in a flat mirror.

Navigation system*
See separate brochure! or
Cupholder*

Parking brake lever

Shelf for vehicle literature

Ignition lock

Adjustable steering column
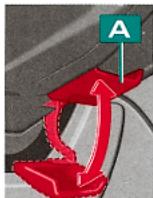
Mechanical adjustment:
Move lever A downward and adjust the steering column to the correct position for you. Then push the lever up again until it is firmly held in the upper position.
Electrical adjustment*:
Press switch B in the appropriate direction to adjust the position of the steering column.
Convenient entry function: Press button C to switch on the convenient entry function.
WARNING: The column should only be adjusted when the vehicle is at a complete standstill.
WARNING: The distance from the center of your breastbone to the center of the airbag-cover on the steering-wheel must be at least 10 inches (25 cm) or more.

Engine hood release lever
See your Owner's Manual!

Switch on driver's door pillar

Remote rear lid release

Deactivating interior motion detectors for the anti-theft system
Always check the Owner's Manual for additional important details and safety information.
Note: * Denotes features optional or unavailable on some models.