5J.J4N10.001 - Support écran plat BENQ - Notice d'utilisation et mode d'emploi gratuit
Retrouvez gratuitement la notice de l'appareil 5J.J4N10.001 BENQ au format PDF.

Questions des utilisateurs sur 5J.J4N10.001 BENQ
0 question sur cet appareil. Repondez a celles que vous connaissez ou posez la votre.
Poser une nouvelle question sur cet appareil
Téléchargez la notice de votre Support écran plat au format PDF gratuitement ! Retrouvez votre notice 5J.J4N10.001 - BENQ et reprennez votre appareil électronique en main. Sur cette page sont publiés tous les documents nécessaires à l'utilisation de votre appareil 5J.J4N10.001 de la marque BENQ.
MODE D'EMPLOI 5J.J4N10.001 BENQ
4
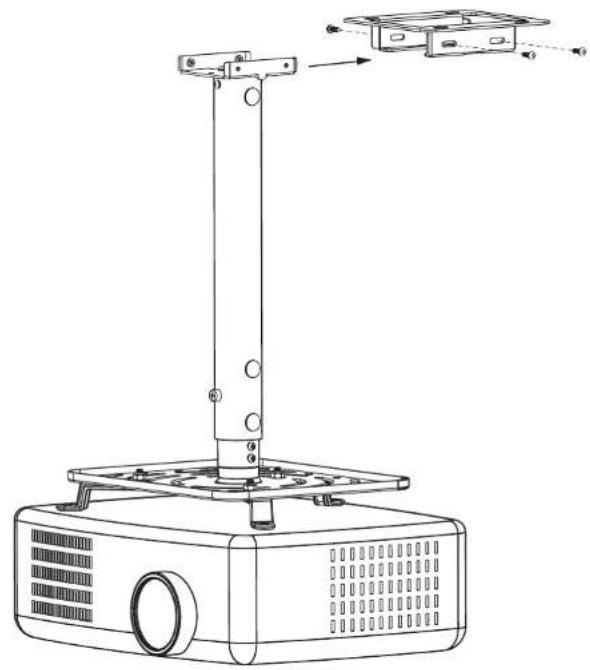
如何將投影機吊固於吊架本體
Install the hanger on the ceiling
天井吸着式ブラケットを天井に固定する
■ 將已經安裝好的投影機吊架插入吊架本體
使用螺絲將吊架及吊架本體鎖緊
Fix Inflate Screw (Part H) onto the ceiling
インフレート・ネジ (Part H) を天井板に取り付ける。
natural_image
Line drawing of a projector with a vertical support and mounting bracket (no text or symbols)
投影機吸頂式吊架安裝說明書
Ceiling Mounted Projector Hanger Installation Manual プロジェクター天井吸着式ブラケット取り付けマニュアル

natural_image
Technical line drawing of three mechanical components mounted on a brick wall (no text or symbols)
natural_image
Three circular diagrams showing different types of household appliances or devices, no text or symbols present.76P30250101A
安全警告 Caution 注意
- 為確保安全,在安裝前,請先詳細閱讀本安裝說明書並遵守內,妥善保存本安裝說明書於安全的地方,以便日後參考。
To ensure safety, please read this manual carefully before installation and follow the instructions herein. Store this manual in a secure place for future reference.
安全にお使いいただくためにも、取り付け前に本マニュアルを良くお読みになり、ここに記載された手順に従がってください。本マニュアルは、いつでも参照できるように大切に保管してください。
- 因錯誤的安裝及操作方法造成的設備毀損及人員傷本製造商將完全不承擔所衍生的相關法律責任。所
The manufacturer shall not be responsible legally for any equipment damage or personal injury caused by incorrect installation or operation not covered in this manual.
不適切な取り付けや操作に起因する機器の損害又は怪我については、メーカーは一切責任を負いません。
容
- 本吊架之設計為易安裝及拆,若因人為或天然災害:如地震、颱風…等,所造成之設備毀損及人員傷本製造而將完全不承擔所衍生的相關法律問題。
The ceiling mount bracket is designed for installing and removing easily. The manufacturer shall not be liable to the damage of equipment and personnel injuries arising out of human factors, acts of gods, such as earthquake.
このブラケットは、取り付けと取り外しが簡単にできるように設計されているため、人為的または地震などの自然災害によって発生した設備の破損及び対人傷害について、本メーカーは、完全に派生した関連法律責任を負いません。
- 安装投影機吊架需由專業人員執行安裝。
The projector hanger must be installed by professional personnel.
プロジェクターのブラケット取り付けは、必ず専門の業者が取り付けなければなりません。
或
- 無論安裝或移除本產品,至少需由2人執行,以避免沈重的物品掉落造成人員物品傷害。
At least two persons are needed to install or remove the product to avoid any hazard caused by falling objects.
物の落下による危険を避けるため、機器の取り付け/取り外しには少なくとも2名が必要となります。
- 安裝前請先確認吊架處周圍的環境:
Please check carefully the areas around where the hanger is to be installed:
ブラケットの取り付け周辺をよくチェックしてください
安全警告 Caution 注意
或
避免安裝在溫度濕度過高及任何會碰觸到水的地方。
- 請勿安裝於空調設備的出入口近附及避免大量灰塵及油煙處。
- 只能安裝於水平的天花,避免傾斜的牆面。
- 請勿安裝於振動及撞擊處。
- 請勿安裝於強光直射處。
- Avoid any places with high temperature or humidity or subject to contact with water.
- Do not install the product near the vents of air conditioners and avoid places where it is dusty and fumy.
- Only install on a horizontal ceiling and avoid slanted surfaces.
- Do not install in places subject to vibrations and shocks.
-
Do not install in places subject to direct bright light, which may cause fatigue in the eyes of users when viewing the display.
-
高温、多湿、又は水のかかる場所を避ける。
- エアコンの通気口付近、又は埃や座のある場所を避ける。
- 水平な天井板にのみ取り付け、傾斜面への取り付けは避ける。
- 振動及び衝撃を受け易い場所を避ける。
-
強い直射日光の当たる場所を避ける。
-
安裝時請於投影機周圍預留足夠的空間,以確保空氣的流通。
Remember to maintain ample space around the projector to ensure good ventilation. 気を良くするため、プロジェクター周辺に十分スペースを確保する。
- 為了安全及防止意外發生, 安裝前, 需檢查天花板的結構及選擇耐久性高的適當位置。 To ensure safety and avoid any accident, it is necessary to investigate the structure of the ceiling and select an appropriate and durable location before installation.
安全を確保し、如何なる事故も避けるため、取り付け前に天井板の構造をチェックし、耐久性のある適当な取り付け場所を選ぶ。
- 天花需能支撐投影機及吊架總重量4倍以上,且需確保有足夠的強度能承受地震及其它外彎的振動。
The ceiling should have load-carrying capability to sustain more than four times the total weight of the projector and the hanger. Also make sure it has enough strength to withstand earthquakes and other shocks.
天井板はプロジェクターとハンガーの総重量の4倍以上を支持でき、且つ地震及びその他の外からの振動に耐える強度を確保することが必要です。

安全警告 Caution 注意

- 請勿自行變更任何零件,勿使用已破損的零件,若有任何問題請與你的經銷商聯絡。
Do not modify any accessory or use broken parts. Contact the local distributors with any questions.
部品の改造や損傷した部品を使用しないこと。ご質問は、最寄の代理店にお問い合わせください。
害
- 鎖緊螺絲(切勿以過大的扭力鎖付螺絲,以免造成螺絲斷裂或螺牙的損)。
Tighten all screws (do not exert force on any screw with excess torque to avoid breaking the screw or damaging its thread).
すべてのネジを締める(ネジ又はスレッドの損傷を避けるため、過度の締め過ぎに注意)。
- 本吊架所能支撑投影機的重量為15Kg.(33 lbs.)以下。
The maximum weight of the ceiling projector that the hanger can support is below 15Kg. (33 lbs.).
本ブラケットが支持プロジェクター最大支持重量: 15Kg. (33 lbs.) 以下。
- 本掛架除了懸掛投影機,不可加掛其它物件,並嚴禁人員懸掛在本吊架上。
Do not hang any other objects except the projector on this hanger. Hanging on this hanger by any personnel is strictly prohibited.
本ハンガーにはプロジェクターを吊り下げる以外は、その他の物品を吊り下げてはなりません。また作業員が本ハンガーに吊り下がるのは厳禁。
- 日後移除投影機及吊架時,會在天花留下螺絲孔及螺栓,且因長期使用會在天花板留下污漬。
Drill holes and screws will be left on the ceiling once the projector and hanger are removed. Stains may occur after extended use.
プロジェクター及びブラケットを取り外した後は、天井板にネジ孔とネジが残ります。また、長期使用後は天井板に染みが残る場合もあります。
- 若有任何條文爭議,請以英文說明書為主。
Please consult the English language manual for any dispute on the terms.
諸条件における問題に関しては、英語版マニュアルをご参照ください。
投影機吸頂式吊架
Ceiling Mounted Projector Hanger
プロジェクター天井吸着式ブラケット
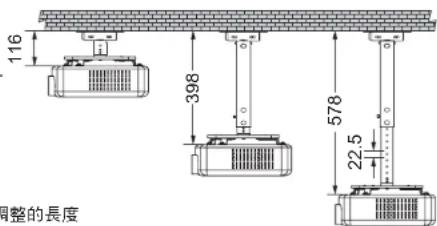
長度 / Length / 長さ
1
本吊架最短長度為116mm,最長為578mm。
■ Length of Hanger: From 116mm up to 578mm.
■ 本ブラケットの最短長さは116mm、最長は578mm。
2
另從398mm到578mm為可調整的長度(每22.5mm一格)。
■ Adjustable length: From 398mm to 578mm (spaced at every 22.5mm)
■ その外 398mm から 578mm までは調整可能な長さ(22.5mm一枠)とする。
text_image
116 398 578 22.5 调整的長度本吊架適用範圍
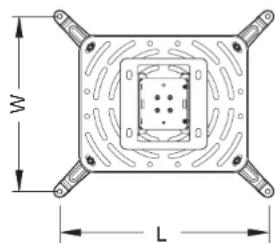
Application Scope of the Hanger
本ブラケットの適用範囲
1
長度及寬度在300mm (L) x 250mm (W)以內的投影機吊掛孔皆適用此機種。
This product is suitable for projectors with hanging holes within a size of 300mm (L) x 250mm (W).
長さ及び幅が300mm (L) × 250mm (W) 以のプロジェクターの吊り掛け孔には皆この機種を適用。
text_image
W L角 調整度 / / Adjusting angle / 角度調整
1
左右可旋轉360°。
For turning 360° degrees to left and right
左右360°旋回可能。
2
水平 / 垂直傾斜角度: ±10°。
Horizontal / Vertical inclination angle: ±10°
水平 / 垂直傾斜角度: ±10°。

text_image
10° 10°
text_image
360°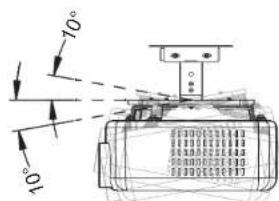
text_image
10° 10°3
此螺母可控制投影機角度的鬆緊度。
■ The nut is used to control the tightness of the projector angle.
■ このナットはプロジェクター角度の締付度を制御できる。

螺母調整須由專業人員執行。
The nut must be adjusted by a qualified person.
ナット調整は専門作業者が執行のこと。

natural_image
Technical line drawing of a rectangular electronic component with radial slots and a central circular feature (no text or symbols)螺母 / Nut / ナット
包装零件 Enclosed parts and accessories 同梱部品及びアクセサリ
ABC
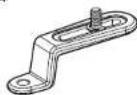
Arm - 4 pcs

Screw with fixed washer for projector housing -- 4 pcs

Nylon washer for projector housing — 8 pcs
D

natural_image
Technical line drawing of a rectangular electronic component with concentric circular patterns and a central cylindrical feature (no text or symbols)Projector bracket -- 1 pcs
E

Flat Washers — 4 pcs
F

Nylon nut (M6 type)

Ceiling mount bracket — 1 pcs
HIJ
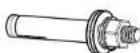
Inflate screw M6 L=50mm
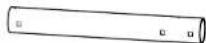
Height adjust
outside pipe -- 1 pcs

Height adjust Inside pipe ... 1 pcs
KLM

Screw with spring washer (M4 type) ... 7 pcs
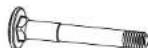
Carriage Bolt --- 3 pcs

Button screw (M4 type) --- 1 pcs

安裝投影機吸頂式吊步驟
Ceiling-mounted Projector hanger installation steps
プロジェクター天井吸着式ブラケットの取り付けステップ
1
需先將投影機支撐架,鎖固於投影機
Fix the support frame on the projector
先ずプロジェクター支持フレームをプロジェクターに固定する
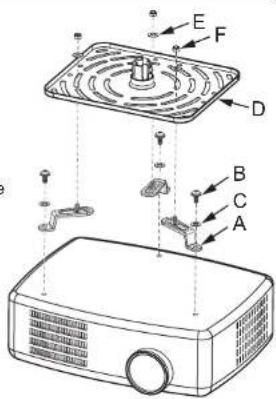
1
使用螺絲(Part B)將懸臂支架(Part A)鎖固於投影機吊掛孔,安裝時若螺絲太長,可將尼龍墊片(Part C)與螺絲一起鎖固於投影機吊掛孔。
- Lock the Arm bracket (Part A) in the projector hanging hole. If the Screw with fixed washer for projector housin (Part B) is too long, lock the supplied Nylon Pad (Part C) into the hanging hole together with the projector.
ネジ (Part B) を使用してカンチレバー (Part A) をプロジェクター吊り掛け孔に固定。取り付け時にネジが長すぎる時はナイロンワシャー (Part C) をネジと共にプロジェクター吊り掛け孔に固定する。
2
先將投影機支撐架(Part D),放置於懸臂支架(Part A)上並調整螺絲位置,再使用墊片(Part E)及螺帽(Part F)鎖固於螺絲上。
Place projector bracket (Part D) to Arm bracket (Part A) and then adjust the screws and then tighten the bolt with the Flat Washer (Part E) and the Nyllon nut (Part F).
■ プロジェクターサポート (Part D) をカンチレバーサポート (Part A) 上へ置き、ネジの位置を調整してください、次にワッシャ (Part E) 及びナット (Part F) をネジに締め付ける。
text_image
Diagram of a projector with labeled parts including fan, socket, and base components
註:使用者可自行調整懸臂支架的長方孔朝內或朝外,並調整懸背支架的螺絲位置,以配合投影機支撐架的孔位。
Note: The user may adjust the rectangular hole on the arm holder to face inward or outward and also adjust the bolt position on the arm holder to be in line with the position of the hole on the projector bracke.
註:使用者は自分で片持はりの長方形孔を内向き或は外向きに調整し、片持はりのネジ位置を調整してプロジェクター支持フレームの孔位置に合わせる。
2
選擇你所需求吊架的長度
Select the desired suspension length
必要なブラケットの長さを選ぶ
1
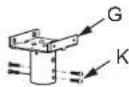
■ 當吊架長度為100mm 時
使用螺絲(Part K)將已經安裝好支架的投影機,鎖固於吸頂式吊架(Part G)。
When the pipe is 100mm long
Fix the frame-mounted projector onto Ceiling mount bracket (Part G) with Screw (Part K).
■ ブラケットの長さが 100mm の時
ネジ (Part K) を使用してカンチレバー取り付け済みのプロジェクターを天井吸着式ブラケット (Part G) に固定する。

natural_image
Line drawing of a portable projector with ventilation grilles and a central fan (no text or symbols)2
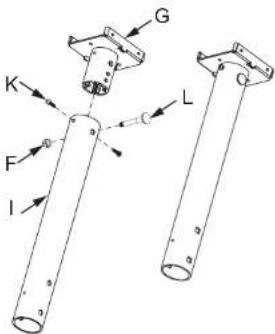
■ 當吊架長度為 380mm 以上時
■ When the pipe is over 380mm long
■ ブラケットの長さが 380mm 以上の時
2-1 先將外套筒(Part I)套入吸頂式吊架(Part G),再使用螺絲柱(Part L)穿過外套筒,再利用螺絲(Part K)鎖固於外套筒,最後使用螺帽(Part F)所僅於螺絲柱(Part L)。
[2-1] First insert the Height adjust outside pipe (Part I) in the Ceiling mount bracket (Part G), and then pass the Hexagon bolt (Part L) through the Outer Sleeve and tighten it with the Nyllon nut (Part F). Lastly, secure the Outer Sleeve with the Screw with Spring washer (Part K).
2-1 先に外スリーブ内にアッパ (Part I) 一フレーム (Part G) を組み込み、次に外スリーブに六角植込ボルト (Part L) を通してナット (Part F) で固定し、最後にネジ (Part K) で外スリーブに固定する。
text_image
G K F I L2-2 使用螺絲(Part K)將內套管(Part J)鎖固於已經安裝好支架的投影機。
2-2 Fix Height adjust Inside pipe (Part J) onto the frame-mounted projector with Screw (Part K).
2-2 ネジ (Part K) を使用して内側パイプ (Part J) をカンチレバー取り付け済みのプロジェクターに固定する。
2-3 使用者可調整投影機至適當高度,再利用螺栓(Part L)與螺帽(Part F),將內套管固定於外套管內。
2-3 The user can adjust the projector to the desired height, and then fix the Inner Sleeve in the Outer Sleeve with Carriage Bolt (Part L) and Nyllon nut (Part F).
2-3 使用者は自身でプロジェクターを適当な高さに調整した後、ボルト (Part L) とナット (Part F) を利用して、内側パイプを外側パイプ内に固定する。
2-4 最後再將螺絲(Part M)鎖固於外套管上,使外套管與內套管固定更為穩定。
2-4 Finally, lock Button Screw (Part M) on the Outer Sleeve, securing outer and inner sleeves in place firmly.
[2-4] 最後にネジ (Part M) を外側パイプ上に固定して、外側パイプと内側パイプをしっかり固定させる。

text_image
Technical diagram of a projector with labeled components including base, fan, and clamping mechanism
text_image
I M J3

固吸頂式吊架於天花板
Install the hanger on the ceiling
天井吸着式ブラケットを天井に固定する
1
螺絲(Part H)墊片的排列順序
● 安裝在天花時須注意膨脹螺絲(Part H)墊片的排列順序。
平墊片→吊架鐵件→平墊片→彈簧墊片→螺母
● 安裝時應先確認天花的種類,選擇適當的螺絲,本配件包的螺絲(Part H),只適用於水泥牆附
● 安裝在木質的天花須有足夠的強度,並且由專業人員選擇適當的螺絲。
Fix Inflate Screw (Part H) onto the ceiling
- Place the Inflate Screw (Part H) on the ceiling, in the following order:
Washer → Iron Hanger → Washer → Spring Washer → Nut.
- Select screws that are suitable for each type of ceiling. The enclosed Inflate Screw (Part H) are for installation on concrete walls only.
- In the case of installation on a wooden ceiling, make sure it is strong enough. Do not install on decorated posts or plaster boards. Consult professional personnel to select appropriate screws.
■ インフレート・ネジ (Part H) を天井板に取り付ける。
- 天井板に取り付ける時はインフレート・ネジ (Part H) ワッシャーの排列順序に注意する。
平ワッシャー → ブラケット部品 → 平ワッシャ → スプリング・ワッシャー → ナット。 - 取り付け時に天井板の種類を確認し適当なネジを選んでください。付属のネジ(Part H)はセメント壁専用です。
- 木製天井板に取り付ける場合は十分な強度が必要です。また専門作業員が適当なネジを選ぶことが必要です。