Barrea PK01845 - Baignoire à remous JACUZZI - Gratis bruksanvisning og manual
Finn enhetens veiledning gratis Barrea PK01845 JACUZZI i PDF-format.

Brukerspørsmål om Barrea PK01845 JACUZZI
0 spørsmål om dette apparatet. Svar på dem du kjenner, eller still ditt eget.
Still et nytt spørsmål om dette apparatet
Last ned instruksjonene for din Baignoire à remous i PDF-format gratis! Finn veiledningen din Barrea PK01845 - JACUZZI og ta den elektroniske enheten tilbake i hendene. På denne siden er alle dokumenter som er nødvendige for bruken av enheten din publisert. Barrea PK01845 av merket JACUZZI.
BRUKSANVISNING Barrea PK01845 JACUZZI
Dear Customer Estimado Clien ENGLISH
ESPAÑOL
Thank you for selecting our product. We are confident we can fully satisfy your expectations by offering you a wide range of technologically adva products which directly result from our many years of experience in fat and fitting production.
Muchas gracias por elegir nuestro producto. Estamos seguros que podemos satisfacer completamente sus expectativas ofreciéndole una amplia variedad de productos tecnológicamente avanzados que resultan dímente de muchos años de experiencia en grifos y su producción apropiada.
| ATTENTION | For care, use soft towel with soap and water only! Under no circumstances should you use any chemicals. |
ATENCIÓN!
Para el cuidado, utilice solamente una toalla suave con jabón y aqua! Bajo ninguna circunstancia no use productos químicos.
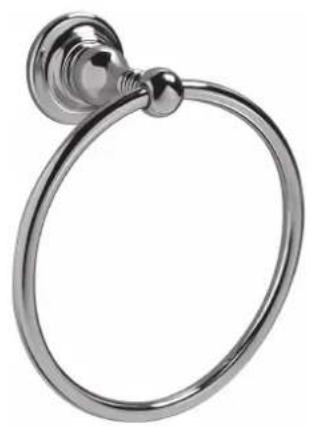
natural_image
Close-up of a metallic chrome towel bar with a circular headrest (no text or symbols visible)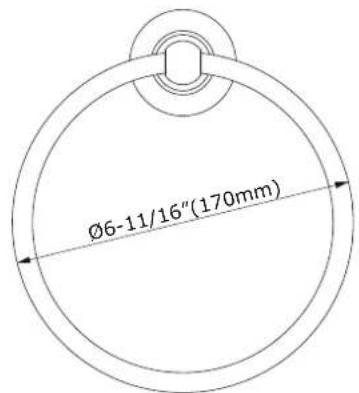
text_image
Ø6-11/16"(170mm)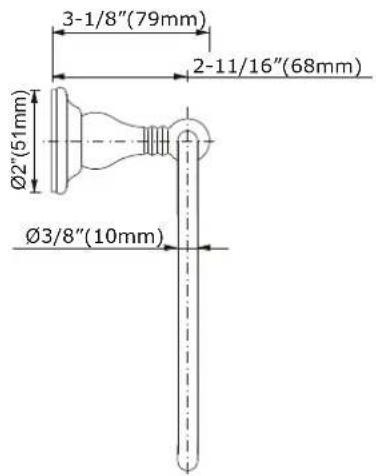
text_image
3-1/8"(79mm) 2-11/16"(68mm) Ø2"(51mm) Ø3/8"(10mm)ENGLISH
ESPAÑOL
For easy installation of your JACUZZI® accessory you will need:
- to READ ALL the instructions completely before beginning, - to READ ALL the warnings, care and maintenance information.
→ You should have the following tools:
- 1/4"(6mm) carbide drill bit, - electric drill, - Phillips screwdriver, - level.
Para la instalación fácil de su accesorios de la JACUZZI® usted necesitará:
- LEER TODAS las instrucciones completamente antes de comenzar; - LEER TODA la información sobre las advertencias, cuidado y mantenimiento.
→ Usted debe tener las herramientas siguientes:
- brocade carburo de 1/4"(6mm), - toladro electrico, - desarmador Phillips, - nivel.
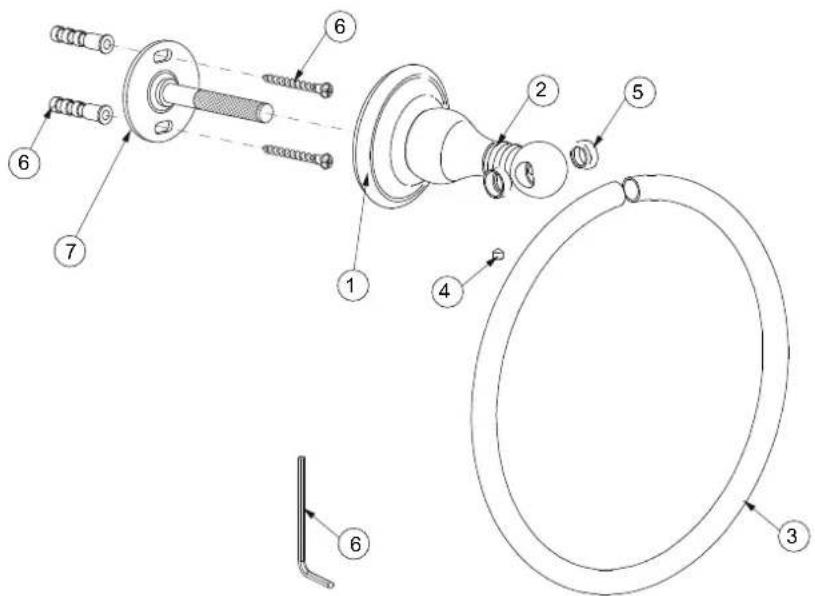
text_image
Technical diagram of a mechanical assembly with numbered components for identification1
ENGLISH
| 1 | COVER PLATE |
| 2 | BODY OF HOLDER |
| 3 | RING |
| 4 | SET SCREW |
| 5 | BUSHING |
| 6 | MOUNTING SET |
| 7 | MOUNTING PLATE |
ESPAÑOL
| 1 | CUBREPLACA |
| 2 | CUERPO DEL TITULAR |
| 3 | ARO |
| 4 | TORNILLO DE FIJACIÓN |
| 5 | COJINETE |
| 6 | JUEGO DE MONTAJE |
| 7 | PLACA DE MONTAJE |
| 1 | 2064.56 |
| 2 | 2064.89 |
| 3 | 2064.92 |
| 4 | 9903024 |
| 5 | 2064.55 |
| 6 | 2202.20 |
| 7 | 2202.16 |
INSTALLATION INSTRUCTIONS INSTRUCCIONES DE INSTALACIÓN
1
ENGLISH
ESPAÑOL
See figs. 1 Veá dis. 1
- Position fixtures in desired location on the wall.
- Lightly mark outline of each cover plate on the wall.
- Disassemble product by loosening the set screws.
- Locate mounting plates in centers of marked circles. Mark location of the mounting screws. On ceramic tile, try to locate the mounting hole locations on a grout line. However, the center-to-center measurement of the posts must be maintained as marked. If mounting into ceramic tile, place masking tape on the mounting area before marking the location to prevent the drill bit from sliding across the tile. To drill through ceramic tile, obtain a 1/4" diameter carbide drill bit.
- Drill 1/4" holes and push in anchors flush with the wall. Screw 5, mounting plates to the wall.
-
Assemble balance of parts to mounting plates as shown. Lightly 6, push fixture against the wall. Tighten set screws to grip mounting plate stems.
-
Sitúe los piezas en la posición deseada en la pared.
- Delinée o dibuje ligeramente los contornos de las cubreplacas en la pared.
- Desarme la pieza aflojando los tornillos de fijación.
-
Sitúe las placas de montaje en el centro de los círculos marcados. Marque el lugar de los tornillos de montaje. Si instala sobre azulejo, trate que los agujeros queden sobre las líneas de union del azulejo. No obstante, la medida entre los centros de los postes deberá mantenerse. Para taladrar a través del azulejo use una broca con punta de carburo 1/4" (6mm) y use masking tape para evitar que la broca se resbale.
-
Taladre huecos de 1/4" (6mm) e introduzca los taquetes hasta que estén a ras con la pared. Atornille las placas de montaje a la pared.
- Arme los demás componentes en los placas de montaje según se muestra. Presione la pieza ligeramente contra la pared. Apriete los tornillos de fijación para que agarre los vástagos de la placa de montaje.
CARE AND MAINTENANCE ● CUIDADO Y MANTENIMIENTO
2
ENGLISH
ESPAÑOL
Your Jacuzzi® product is designed and engineered in accordance with the highest quality and performance standards. Be sure not to damage the finish during installation. Care should be given to the cleaning of this product. Although its finish is extremely durable, it can be damaged by harsh abrasives or polish. Never use abrasive cleaners, acids, solvents, etc. to clean any Jacuzzi® product. To clean, simply wipe gently with a damp cloth and blot dry with a soft towel.
Su producto de la Jacuzzi está diseñado y dirigido acuerdo con los estándares de funcionamiento y calidad más altos. Este seguro no dañar las terminaciones del grifo durante la instalación. Cuide el producto manteniendolo siempre limpio. Aunque su acabado es extremadamente durable, puede ser dañado por los abrasivos o pulientes ásperos. Nunca utilice limpiadores abrasivos, ácidos, solventes, etc. para limpiar cualquier producto de la Jacuzzi.º Para limpiar, simplemente use un paño húmedo y seque con una toalla suave.
WARRANTY ● GARANTÍA
3
ENGLISH
ESPAÑOL
Warranty conditions and warranty registration card are outlined on separate sheet.
Las condiciones de la garantía y la tarjeta del registro de la garantía se encuentran en una pagina separada.