Solix Bi-Color LED - Belysning Westcott - Gratis bruksanvisning og manual
Finn enhetens veiledning gratis Solix Bi-Color LED Westcott i PDF-format.

Brukerspørsmål om Solix Bi-Color LED Westcott
0 spørsmål om dette apparatet. Svar på dem du kjenner, eller still ditt eget.
Still et nytt spørsmål om dette apparatet
Last ned instruksjonene for din Belysning i PDF-format gratis! Finn veiledningen din Solix Bi-Color LED - Westcott og ta den elektroniske enheten tilbake i hendene. På denne siden er alle dokumenter som er nødvendige for bruken av enheten din publisert. Solix Bi-Color LED av merket Westcott.
BRUKSANVISNING Solix Bi-Color LED Westcott
westcott®
SOLIX™
BI-COLOR LED
QUICK START GUIDE
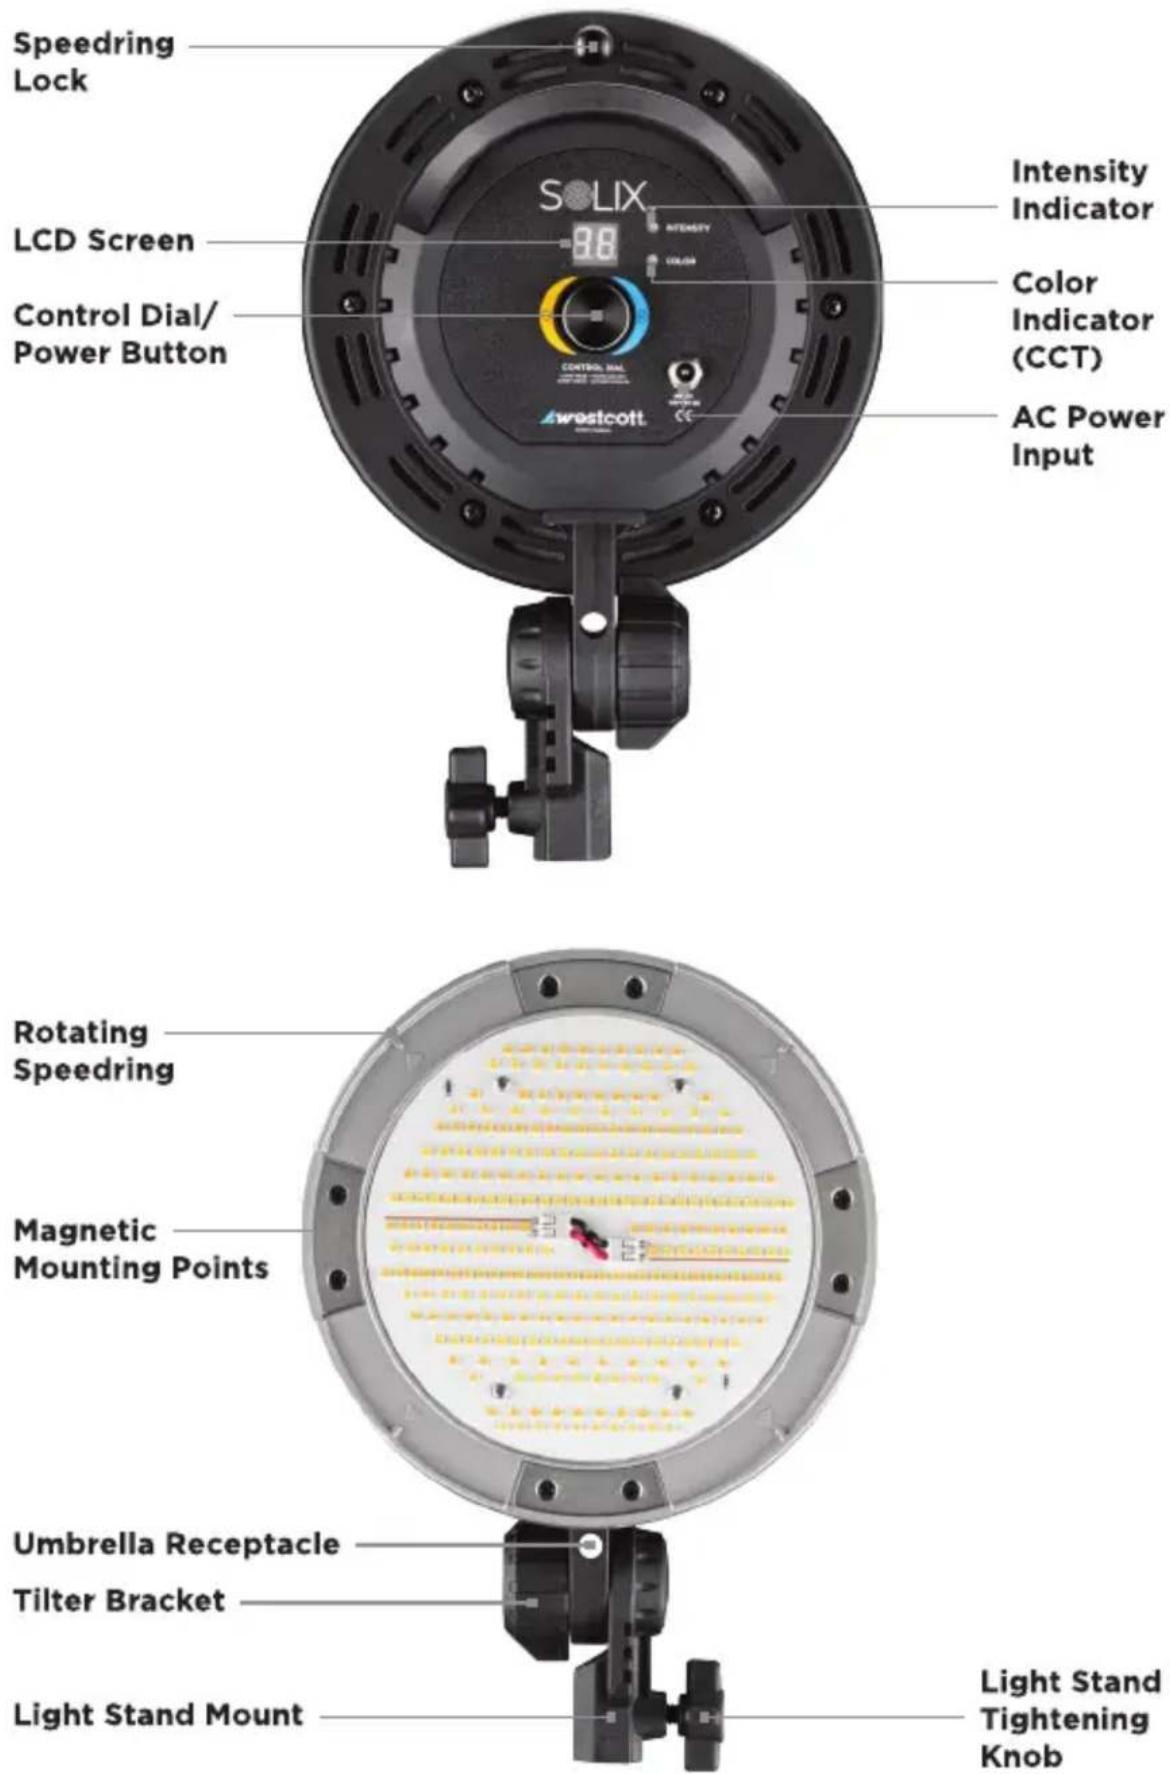
Components
Solix Bi-Color LED, AC Power Cord, Power Supply and Cable, Diffusion Cap, Barndoors, Round Collapsible Softbox (12")
Setup
The Solix was designed with simplicity and functionality in mind. Complete the following steps to prepare your Solix for operation.
- Loosen the light stand tightening knob and place the Solix on your preferred stand or arm. Tighten the knob to secure.
- Loosen the large tilter bracket knob and adjust the Solix's angle into the preferred position. Tighten the bracket to secure in place.
- Insert the AC power cord into the cord receptacle on the power supply unit.
- Insert the power cable into the power supply. Ensure that the connection is secure.
- Insert the power supply cable into the power input receptacle on the back of the Solix. Twist the cable's locking nut onto the Solix to secure. If you find it difficult to secure the locking nut, the cable's barrel may not be fully inserted into the Solix. Gently press the nut towards the Solix to secure the connection.
- Plug the AC power cord into your wall outlet.
Usage
Power
To turn the power on and off, press and hold the Control Dial on the back of the Solix.
With the Solix powered on, pressing the dial quickly will toggle between the Intensity and Color (Correlated Color Temperature, CCT) adjustment modes.
Turn the dial clockwise to increase intensity or CCT. Turn the dial counterclockwise to decrease intensity or CCT.
In Intensity mode, the digital screen will display the intensity level between 1 and 100 (HL).
In Color mode, the CCT level will display a number between 32 and 56. Multiply the displayed CCT level by 100 to determine the Kelvin output between 3200K tungsten (warmest level) up to 5600K daylight (coolest level).
Light Modification
Attaching the Hard Diffusion Cap
To diffuse the Solix, align the arrow indicators on the magnetic cap with the matching arrows on the face of the Solix's metal face plate. Press to ensure a secure mount.
Attaching the Barndoors
To direct the light output, attach the included magnetic barndoors onto the face of the Solix. These can be used in tandem with the Solix's diffusion cap. The barndoor with the logo should be positioned at the base of the Solix nearest the tilter mechanism. This will place the adjustable leafs along each side. These leafs can be extended for precise light control.
Attaching the 12" Round Collapsible Softbox
The softbox can be used with either the soft diffusion fabric, hard diffusion cap, or without diffusion. When used without diffusion, this modifier narrows the light's beam angle to increase the measured output over distance.
- Remove the barndoors from the Solix.
- Expand the collapsible softbox and place the small opening over the top of the Solix.
- While pulling the softbox forward toward the front of the Solix, place the softbox's small loop strap over the locking knob at the rear top of the Solix.
- Continue pulling the large end of the softbox forward toward the front of the Solix, bringing the small opening onto the Solix's speedring.
- IMPORTANT: With the aid of the loop strap in Step 3, adjust to align the Solix's air vents with the softbox's vent slots to allow sufficient airflow for cooling. These vents are located on the edge of the ring, just in front of the rotating portion of speedring.
- Stretch around and attach the straps of the softbox to further secure it to the Solix.
- Attach the diffusion fabric to the front of the softbox and secure with the elastic edging.
Attaching an Umbrella or Umbrella-Style Softbox
Slide the umbrella shaft into the umbrella receptacle, which is located directly above the Solix's tilter bracket. Ensure the rod is snug before moving your setup.
Attaching a Softbox to the Speedring
The Solix is equipped with a rotatable locking speedring that can be used to mount a majority of rod-based softboxes. The locking knob near the top of the unit, just behind the speedring, should be engaged to prevent the rotation of the speedring when mounting larger rod-based modifiers.
When mounting a 4-rod strip softbox, insert the rods into the speedring's rod receptacles notated with an "ST".
When mounting a 4-rod square or rectangular softbox, insert each rod into a receptacle to the left side of the "ST" notation when viewing the Solix from the rear.
When mounting an octagonal softbox, the rods will utilize 8 rod receptacles. The two "ST" receptacles lying closest to the unmarked receptacles will not be utilized.
Battery Operation
The Solix can be operated with DC power using a 14.8V D-Tap/PowerTap battery.
When powering the Solix with the Westcott Portable D-Tap Battery (#7424, sold separately), simply attach the battery's included D-Tap cable into the power input receptacle on the back of the Solix. Then, connect the D-Tap cable to the battery.
When operating the Solix with a third-party D-Tap/PowerTap battery, simply attach the Westcott D-Tap Cable (#7423, sold separately) into the power input receptacle on the back of the Solix and connect to your battery.
Care & Storage
Power off the Solix and disconnect the power source. Spot clean the Solix's external housing with a warm, damp cloth and wipe dry. The Solix's external LED array can be wiped clean with a soft, dry cloth. When not in use, store the Solix inside the included travel case in a dry environment.
- Do not store the Solix with the power cord attached to protect the power receptacle.
- Do not operate, store, or submerge the Solix in or near liquids.
- Do not utilize softboxes or other modifiers weighing more than 4.5 pounds (2 kilograms).
Warranty
Westcott's warranty obligations for this product are limited to the following terms.
The F.J. Westcott Co. ("Westcott") warrants this Westcott branded product against defects in materials and workmanship under normal use for a period of ONE (1) YEAR from the date of retail purchase from Westcott or an authorized retailer by the original end-user purchaser ("Warranty Period"). If a defect arises and a valid claim is received within the Warranty Period, at its option and to the extent permitted by law, Westcott will either (1) repair the defect at no charge, using new or refurbished replacement parts, or (2) exchange the product with a product that is new or which has been manufactured from new or serviceable used parts and is at least functionally equivalent to the original product. This Limited Warranty applies only to products manufactured by or for Westcott that can be identified by the Westcott trademark, trade name, or logo affixed to them.
This warranty does not apply to: (a) damage caused by accident, abuse, misuse, flood, fire, earthquake, mold, or other external causes; (b) damage caused by operating the product outside the permitted or intended uses described by Westcott; (c) a product or part that has been modified to alter functionality or capability without the written permission of Westcott; or (d) cosmetic damage, including but not limited to scratches, dents and broken plastic.
Disclaimer: By purchasing, borrowing and/or using this product for any event, both public or private, you, the customer, accepts all responsibility and releases Westcott, and its associates, of any and all liability in the event of manufacturer's defect, malfunction or misuse of the product which may lead to further injuries or complications unforeseen by the user. Westcott is not responsible for any potential or incurred damage caused by failure to properly mount, hang, or store the product, which includes, but is not limited to damage to cameras, electronics, electrical equipment, buildings, building materials, personal injury, death, or disability, fire damage, or any and all other damage not mentioned previously.
Please contact Westcott's Repair Department for a Return Authorization Number "RMA" prior to requesting warranty service. This RMA must be clearly written on the outside of the box to the left of the shipping label. Items sent in without pre-authorization or that do not fall under the limited warranty will be returned at the expense of the sender.
Repair Department: 800-886-1689 / 419-243-7311 (International)
Email: service@fjwestcott.com
Shipping: F.J. Westcott Co, 1425-B Holland Rd. Maumee, OH 43537
Register your new gear online at FJWESTCOTT.COM/REGISTER
Visit FJWESTCOTT.COM for videos, pro tips, inspiration, and more!
Westcott products are made to the company's traditionally high standards of quality and comply with all applicable government safety regulations and requirements. In an effort to provide the best quality products possible, we periodically make product modifications. Actual products may not be identical to items pictured. Made in China. ©F.J. Westcott Co. All rights reserved. EA0819