V7 - Tastatur Keychron - Gratis bruksanvisning og manual
Finn enhetens veiledning gratis V7 Keychron i PDF-format.

Brukerspørsmål om V7 Keychron
0 spørsmål om dette apparatet. Svar på dem du kjenner, eller still ditt eget.
Still et nytt spørsmål om dette apparatet
Last ned instruksjonene for din Tastatur i PDF-format gratis! Finn veiledningen din V7 - Keychron og ta den elektroniske enheten tilbake i hendene. På denne siden er alle dokumenter som er nødvendige for bruken av enheten din publisert. V7 av merket Keychron.
BRUKSANVISNING V7 Keychron

Keychron
V7 CUSTOMIZABLE KEYBOARD USER MANUAL
Fully Assembled Version
Keyboard
1x Fully Assembled Keyboard
Including
1x Case
1x PCB
1x Steel Plate
1x Sound Absorbing Foam
1x Silicone Bottom Pad
5 Sets x Stabilizers
1 Set x Keycaps (PBT Double-shot)
1 Set x Switches
Cable
1x Type-C to Type-C Cable
1x Type-A to Type-C Adapter
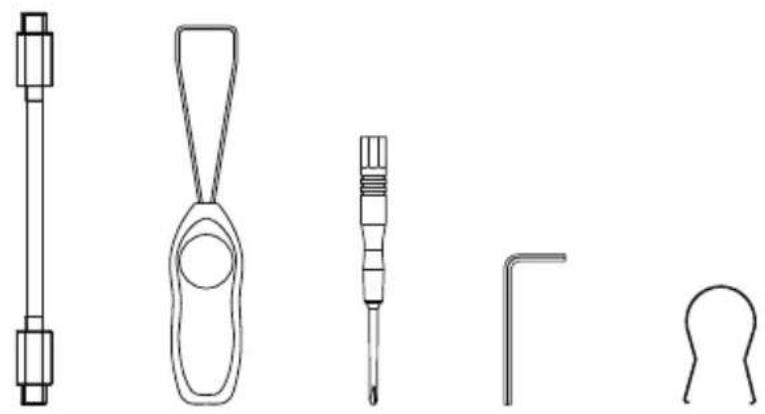
Tools
1x Switch Puller
1x Keycap Puller
1x Screwdriver
1x Hex Key
natural_image
Line drawings of five different screwdriver tools (no text or symbols)Barebone Version
Keyboard Kit
1x Keyboard Kit (Without Keycaps & Switches)
Including
1x Case
1x PCB
1x Steel Plate
1x Sound Absorbing Foam
1x Silicone Bottom Pad
5 Sets x Stabilizers
Cable
1x Type-C to Type-C Cable
1x Type-A to Type-C Adapter
Tools
1x Switch Puller
1x Keycap Puller
1x Screwdriver
1x Hex Key
natural_image
Floor plan layout with room layouts and door placements (no text or labels)
natural_image
Line drawings of five different screwdriver tools (no text or symbols)Quick Start Guide
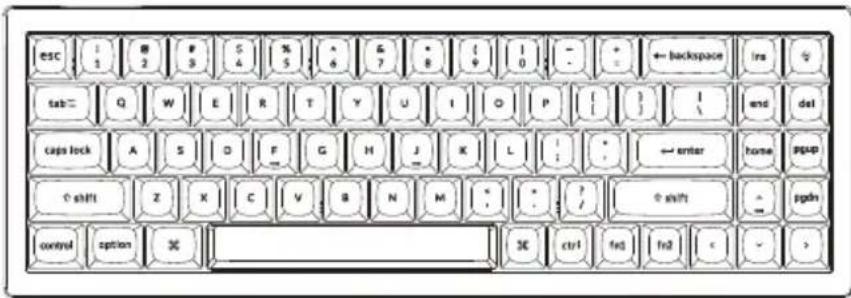
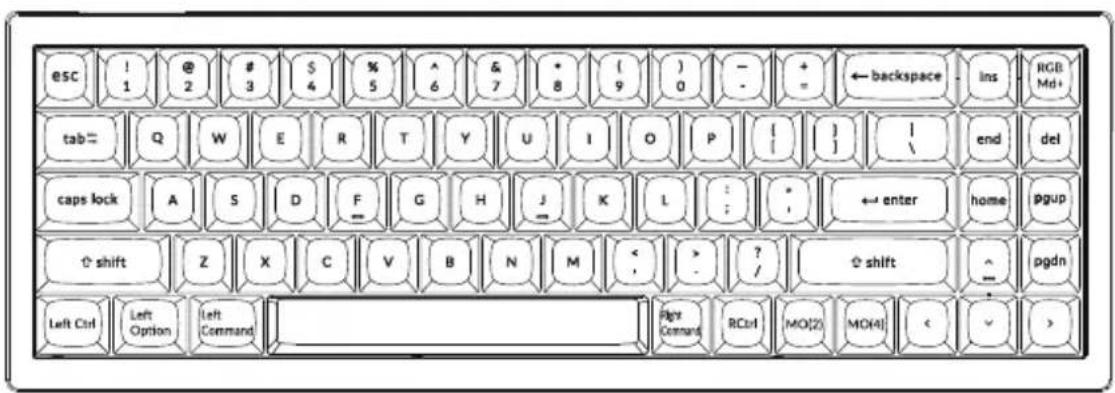
If you are a Windows user, please find the appropriate keycaps in the box, then follow the instructions below to find and replace the following keycaps.
Mac / Windows
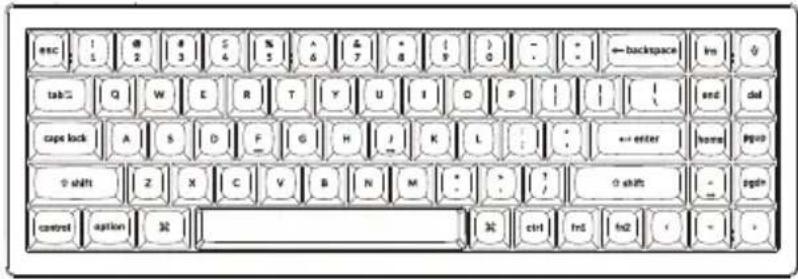
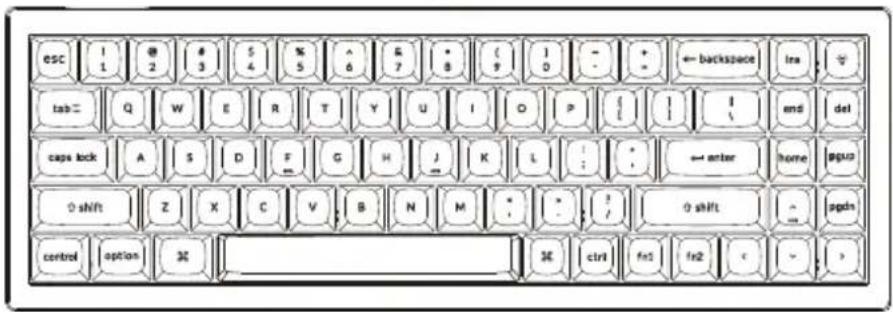
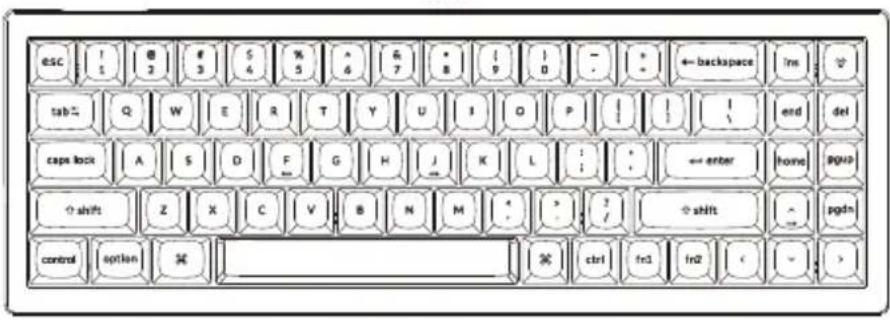
![esc ! 1 @ 2 # 3 $ 4 % 5 ^ 6 & 7 • 8 ( 9 ) 0 - + = ← backspace ins tab= Q W E R T Y U I O P [ ] I \ end del caps lock A S D F G H J K L : ; ← enter home pgup shift Z X C V B N M < ? / ↑ shift ^ pgdn control option % ctrl fn1 fn2 < > alt](/content/2026/06/1167527/images/b2e87d86bc212fba5f80ce58ab35fdc0fc0179e7d5bd6451ad246475b227f63f.jpg)
1 Switch To The Right System
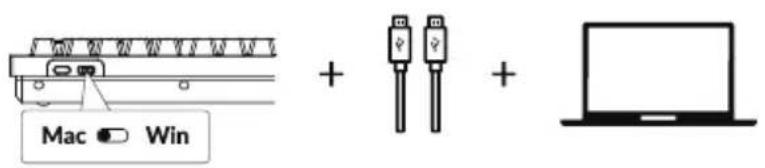
Please make sure the system toggle on the top left corner has been switched to the same system as your computer's operating system.

2 The VIA Key Remapping Software
Please visit caniusevia.com to download the latest VIA software to remap the keys. If the VIA software cannot recognize your keyboard, please reach out to our support to get the instruction.

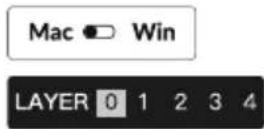
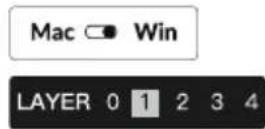
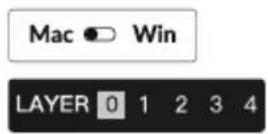
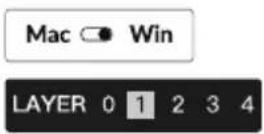
3 The Layers
There are five layers of key settings on the keyboard.
The layer 0 is for the Mac system.
The layer 1 is for the Windows system.
The layer 2 is for the Mac Multimedia keys.
The layer 3 is for the Windows Multimedia keys.
The layer 4 is for the Function keys.
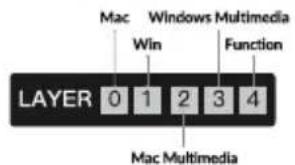
If your system toggle is switched to Mac, then the layer 0 will be activated.
If your system toggle is switched to Windows, then the layer 1 will be activated.
4 Multimedia Key and Function Key
Multimedia keys
/ / / / / / / / / / / / / / /
Function keys
F1 / F2 / F3 / F4 / F5 / F6 / F7 / F8 / F9 / F10 / F11 / F12
In order to get Multimedia Key, you need to press fn1 and ____ Key. In order to get Function Key, you need to press fn2 and ____ Key.
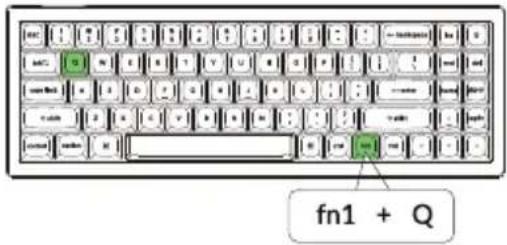
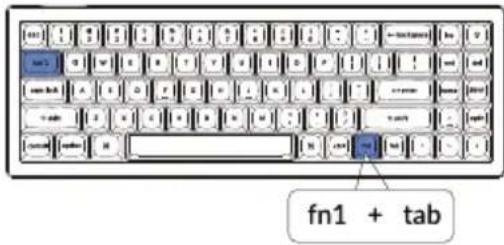
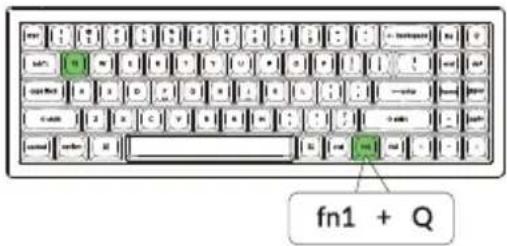
5 The Backlight
Press fn1 + Q to change the lighting effect
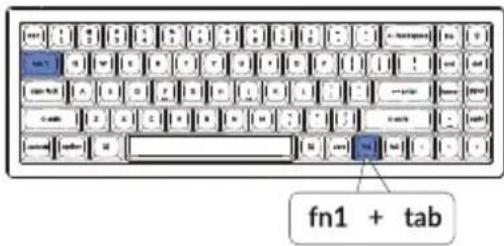
Press fn1 + tab to turn the backlight on/off
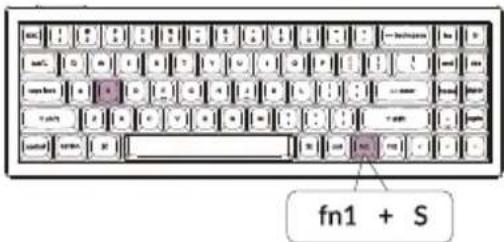
6 Adjust The Backlight Brightness
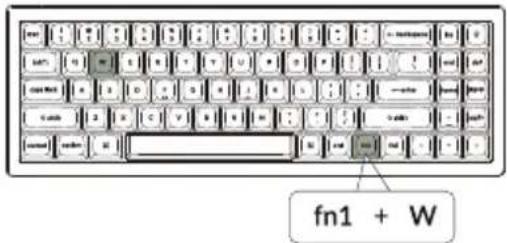
Press fn1 + W to increase the backlight brightness
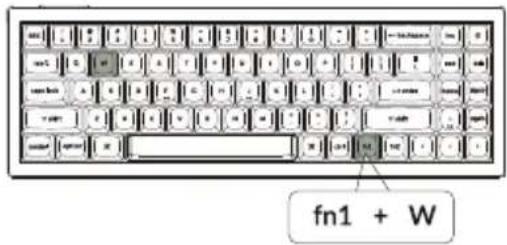
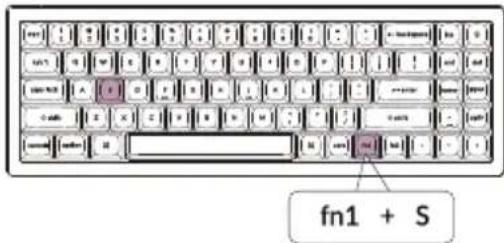
Press fn1 + S to decrease the backlight brightness
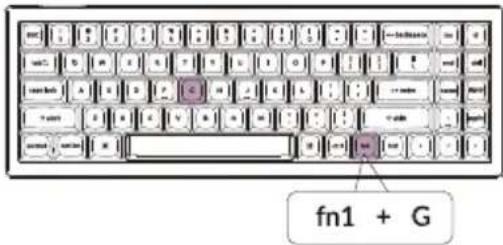
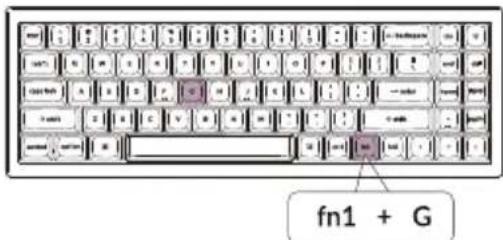
7 Adjust The Backlight Speed
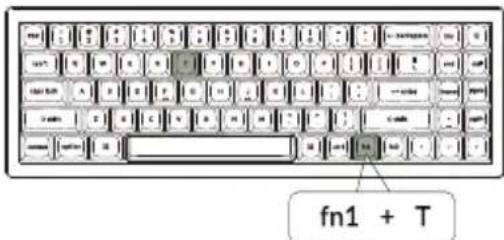
Press fn1 + T to increase the light effect speed
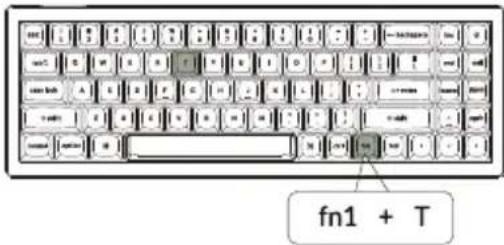
Press fn1 + G to decrease the light effect speed
8 Warranty
The keyboard is highly customizable and easy to be rebuilt. If anything goes wrong with any of the keyboard components of keyboard during the warranty period, we will only replace the defective parts of the keyboard, not the whole keyboard.

9
Watch The Building Tutorial On Our Website
If you are building the keyboard for the first time, we highly recommend you watch the building tutorial video on our website first, then start building the keyboard yourself.

10
Factory Reset
natural_image
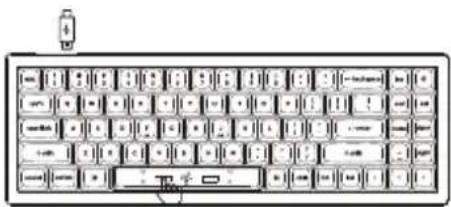
Illustration of a standard computer keyboard with no visible text or symbols on the keys or backgroundTroubleshooting? Don't know what's going on with the keyboard?
① Plug in the power cable and factory reset the keyboard by pressing fn1 + J + Z (for 4 seconds).
② Download the right firmware and QMK Toolbox from our website.
③ Unplug the power cable and remove the space bar keycap to find the reset button on the PCB.
④ Hold the reset key first, then plug in the power cable. Release the reset key, and the keyboard will now enter DFU mode.
⑤ Flash the firmware with the QMK Toolbox.
⑥ Factory reset the keyboard again by pressing fn1 + J + Z (for 4 seconds).
* Step by step guide can be found on our website.
V7 CUSTOMIZABLE KEYBOARD SPECIFICATIONS
| Specifications | |
| Layout | 70% |
| Switch type | Mechanical |
| Width | 117 mm |
| Length | 341.85 mm |
| Front height | 19.54 mm (without keycaps)29.06 mm (with keycaps installed) |
| Back height | 25.75 mm (without keycaps)36.37 mm (with keycaps installed) |
| Keyboard feet height | 2 mm |
| Angle | 3.5 / 8.01 / 11 degree |
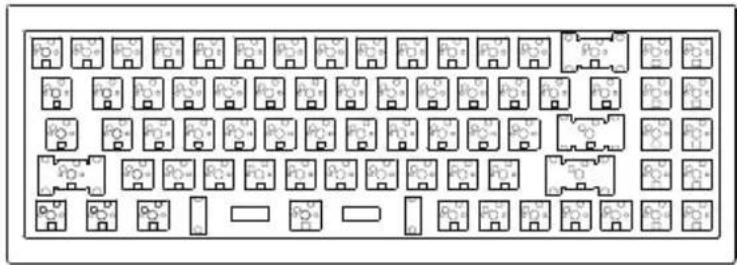
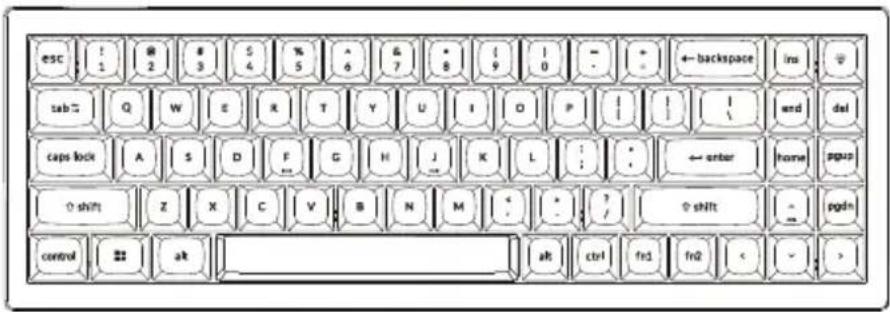
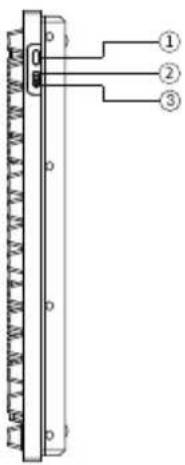
V7 MECHANICAL KEYBOARD OVERVIEW
Mac
Windows
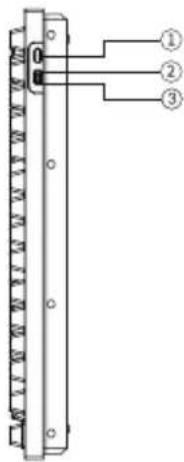
① Type-C Port
② Mac Layout
③ Windows Layout
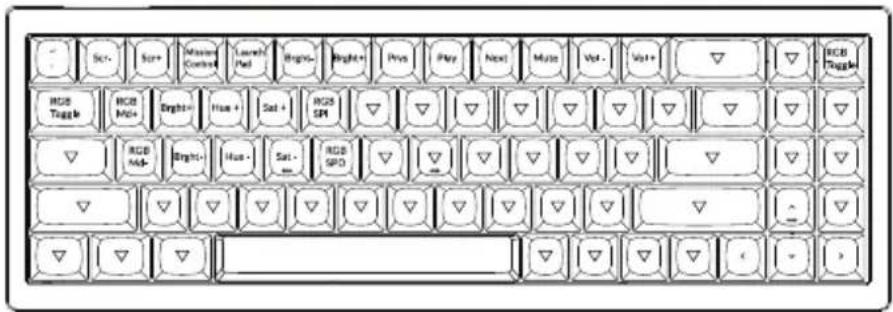
DEFAULT KEY LAYOUT:
LAYER 0: This layer will be activated when your keyboard's system toggle is switched to Mac.
LAYER 1: This layer will be activated when your keyboard's system toggle is switched to Windows.
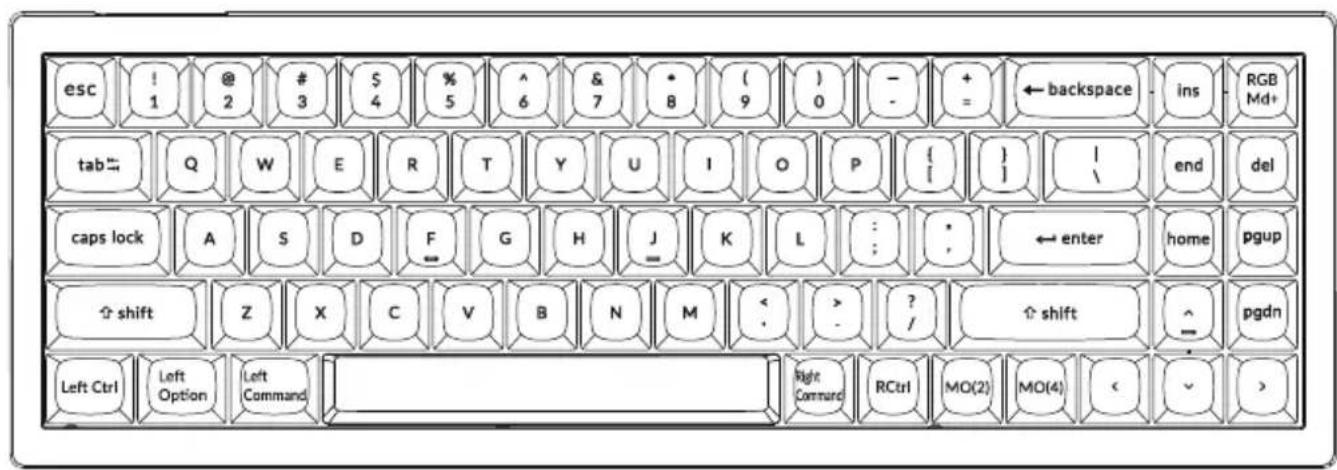
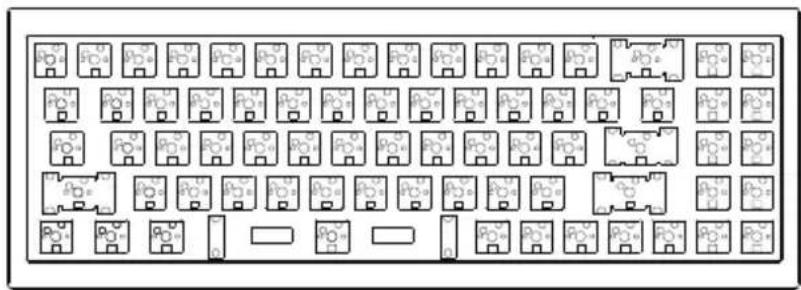
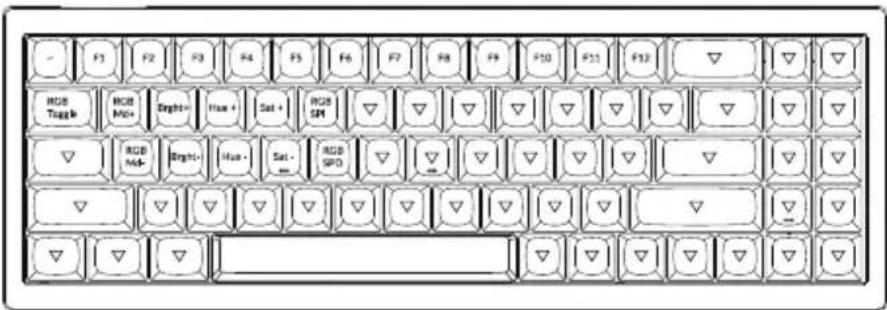
![esc ! @ # $ % ^ & * { } + ← backspace ins RGB 1 2 3 4 5 6 7 8 9 0 - - = tab Q W E R T Y U I O P [ ] end del caps lock A S D F G H J K L : : ← enter home pgup shift Z X C V B N M < ? / ↑ shift ^ pgdn Left Ctrl LWin LAIt RAlt RCtrl MO(3) MO(4) < >](/content/2026/06/1167527/images/47968e12b0628163baa1ae33ec8bfe6964104e1eff3ba2a48650986aa32b5161.jpg)
LWin = Left Windows LAIt = Left Alt RAlt = Right Alt RCtrl = Right Ctrl
LAYER 2: This layer will be activated when your keyboard's system toggle is switched to Mac and press the fn1/MO(2) key.
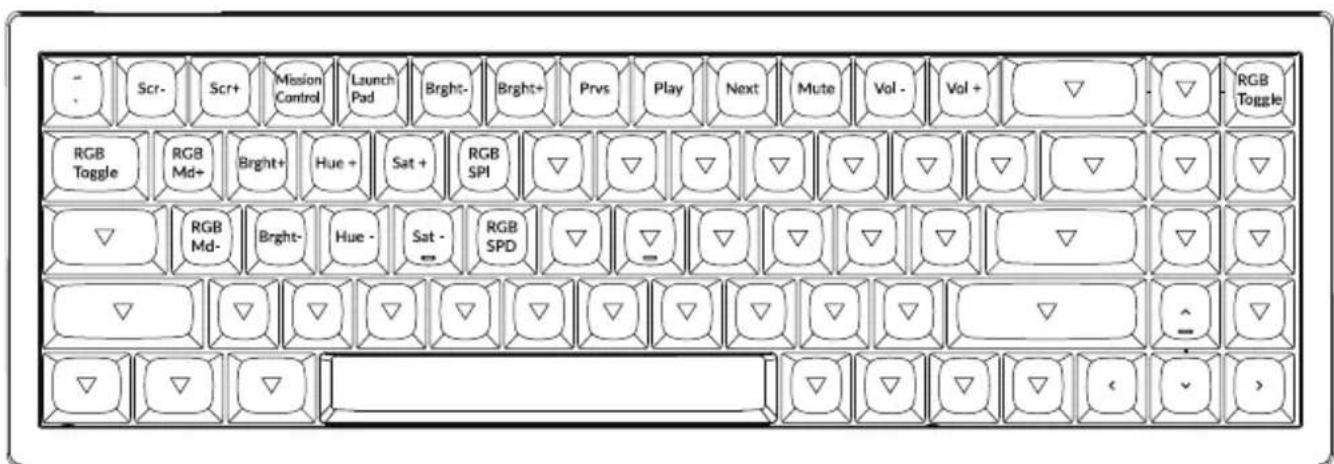
LAYER 3: This layer will be activated when your keyboard's system toggle is switched to Windows and press the fn1/MO(3) key.
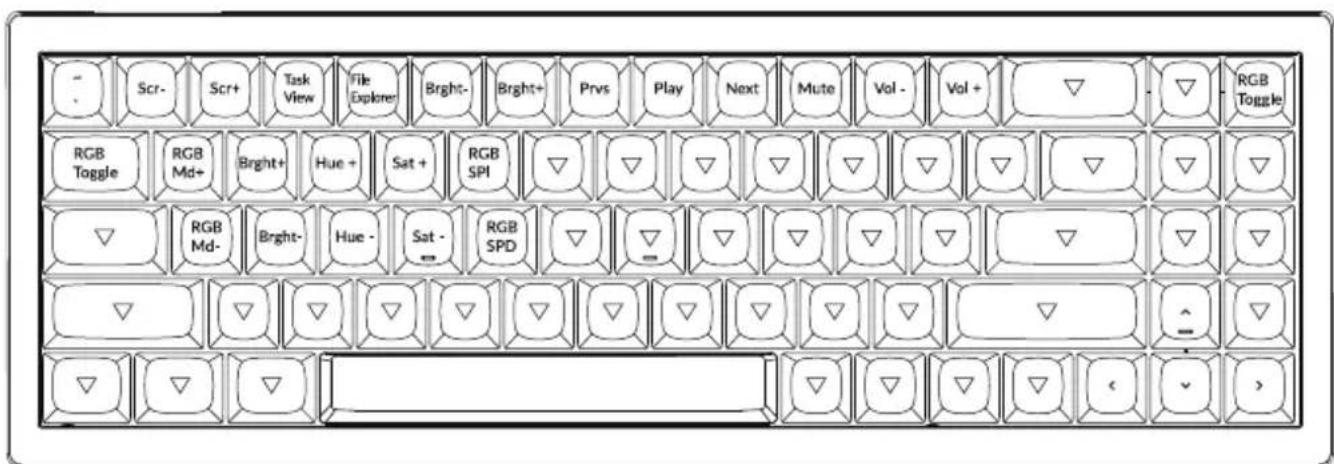
LAYER 4: This layer will be activated when you press the fn2/MO(4) key.
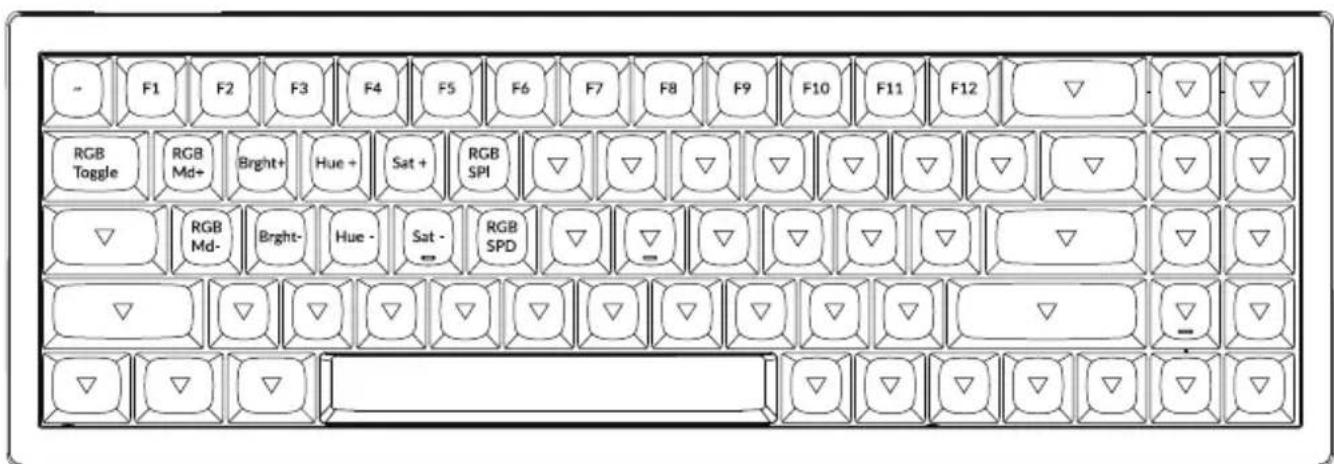
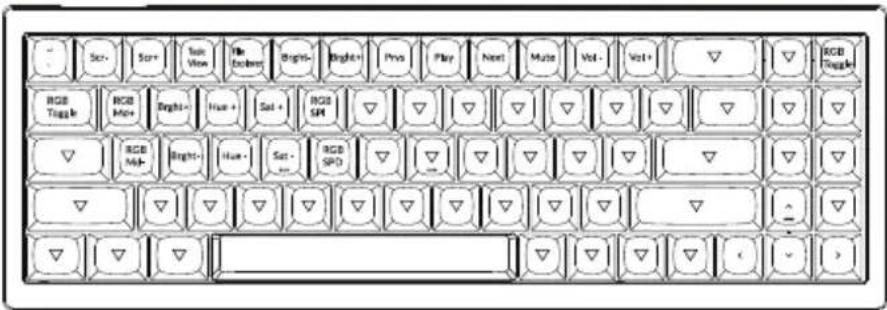
KEY DESCRIPTION
| Key Description | |
| Scr- | Screen Brightness Decrease |
| Scr+ | Screen Brightness Increase |
| Bright- | Backlight Decrease |
| Bright+ | Backlight Increase |
| Prvs | Previous |
| Play | Play/Pause |
| Next | Next |
| Mute | Mute |
| Vol- | Volume Decrease |
| Vol+ | Volume Increase |
| RGB Toggle | Turn Backlight on/off |
| Key Description | |
| RGBMd+ | RGB Mode Next |
| RGBMd- | RGB Mode Previous |
| Hue+ | Hue Increase |
| Hue- | Hue Decrease |
| RGB SPI | RGB Speed Increase |
| RGB SPD | RGB Speed Decrease |
| MO(1) | Layer 1 will be activated when holding this key |
| MO(2) | Layer 2 will be activated when holding this key |
| MO(3) | Layer 3 will be activated when holding this key |
| MO(4) | Layer 4 will be activated when holding this key |
Third-party input tools are not compatible with the keyboard.
Due to compatibility, versions, brands and drivers of Windows/macOS, functionalities of third-party input tools may be affected while using the keyboard. Please make sure your operating system and drivers are up to date.
Certain multimedia keys or function keys do not work.
Functions of certain multimedia keys may be disabled due to compatibility, versions, brands, and drivers of devices.
*Multimedia keys:
Function keys: F1 / F2 / F3 / F4 / F5 / F6 / F7 / F8 / F9 / F10 / F11 / F12
Safety Precaution:
Keep the product, accessories and packaging parts out of the reach of children to prevent any accidents and choking hazards.
Always keep the product dry to avoid corrosion.
Do not expose the product to extreme temperatures below -10^(5^) or above 50^(131^) to preserve the lifespan of the keyboard.
Keychron, Inc.
Dover, DE 19901, United States
Find us at:
https://www.keychron.com
Support@keychron.com
@keychron
@keychron
@keychronMK
Designed by Keychron
Made in China

Keychron
V7 客制化键盘用户手册
完全组装版本
键盘
1x 已组装成品键盘
包含
1x 外壳
1x PCB
1x 铁质定位板
1x 吸音泡棉
1x 硅胶底垫
5套PCB卫星轴
1套键帽(PBT材质-双色注塑)
1套机械轴体
线材
1x Type-C to Type-C 接口线材
1x Type-A to Type-C 转接头
工具
1x 拔键器
1x 拔轴器
1x 十字螺丝刀
1x 内六角螺丝刀

natural_image
Line drawings of five different screwdriver tools (no text or symbols)套件版本
键盘
1x 键盘本体 (不包含键帽、轴体)
包含
1x 外壳
1x PCB
1x 铁质定位板
1x 吸音泡棉
1x 硅胶底垫
5套PCB卫星轴
线材
1x Type-C to Type-C 接口线材
1x Type-A to Type-C 转接头
工具
1x拔键器
1x 拔轴器
1x 十字螺丝刀
1x 内六角螺丝刀
natural_image
Pure electrical circuit lines without any symbols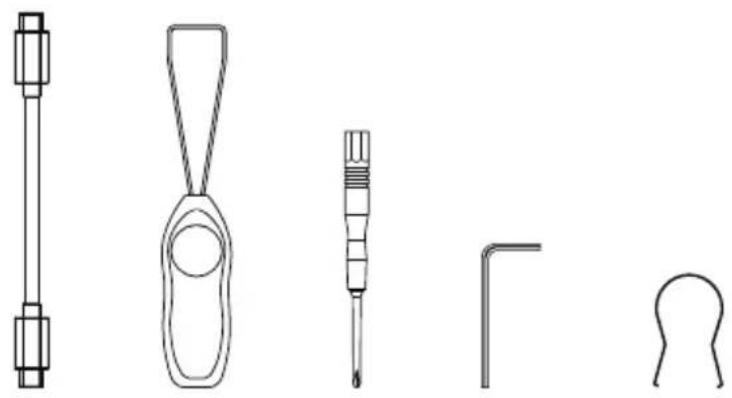
natural_image
Line drawings of five different screwdriver tools (no text or symbols)快速入门指南
如果您是Windows用户,请在包装内中找到对应的键帽,然后按照下面的说明找到并替换以下键帽。
Mac / Windows
![esc ! 1 @ 2 # 3 $ 4 % 5 ^ 6 & 7 * 8 ( 9 ) 0 - - + = ← backspace ins tab "" Q W E R T Y U I O P [ { } ] I \ end del caps lock A S D F G H J K L : : * ← enter home pgup shift Z X C V B N M < ; > ? / ↑ shift ^ pgdn control option % ctrl fn1 fn2 < alt](/content/2026/06/1167527/images/38fbc5d68c39aafd1db29c4ce89d4f8b64c948588432061e636f8f6169183af2.jpg)
1、系统切换
请确保键盘左上角的系统拨片切换到对应系统,如果没有选择正确,部分功能将无法使用。
2、关于VIA映射软件
可以访问caniusevia.com
下载最新的VIA软件,
VIA是可以映射按键的软件。
如果VIA软件不能识别你的键盘,请联系我们以获得技术支持。
3、关于键盘键层说明
键盘有五层按键设置。
层0是用于Mac系统;
层1是用于Windows系统;
层2是用于Mac系统多媒体
层3是用于Windows系统多媒体;
层4是用于功能键。

如果您的系统拨片切换到Mac档位,层0将被激活。
如果您的系统拨片切换到Win档位,层1将被激活。
4、多媒体键和功能键
多媒体键
/ / / [ ] / [ ] / [ ] / [ ] / [ ] / [ ]
功能键
F1 / F2 / F3 / F4 / F5 / F6 / F7 / F8 / F9 / F10 / F11 / F12
按击 fn1 和 就能得到多媒体键。
按击 fn2 和 就能得到功能键。
5、更改键盘背光模式以及快速关闭/开启键盘背光
组合fn1+Q键,更改键盘背光模式
组合fn1+tab键, 快速开启和关闭背光
6、调整键盘背光亮度
组合fn1+W键, 提高键盘背光亮度
组合fn1+S键, 减少键盘背光亮度
7、调整背光速度
组合fn1+T键,增加光效速度
组合fn1+G键,降低光效速度
8、保修
由于V7客制化键盘是可高度定制且易于组装的,所以键盘的任何一个部件出了问题,我们只会更换键盘有问题的部件而不是整个键盘。

9、键盘组装教程
如果您没有安装过类似产品的经验,
我们建议您观看我们网站上的键盘组装教程视频,
然后再开始进行键盘组装。

10、恢复出厂模式
如果键盘出现了故障,不知道怎么办?
① 将数据线插入键盘,并依照顺序长按fn1+J+Z(等待四秒)。
②从我们的网站为您的键盘下载正确的固件和QMK工具箱。
③ 拔掉键盘上的数据线和空格键键帽,您可以看到空格键下方的金属复位按钮。
④ 首先长按住复位按钮,然后将数据线插入键盘。放开这个复位按钮,此时键盘会进入DFU模式。
⑤ 然后您可以使用QMK工具箱进行刷新固件的操作。
⑥ 固件刷新完成后,再次将键盘恢复出厂设置长按fn1+J+Z(等待四秒)。
*步骤指南可以在我们的网站上找到。
V7客制化键盘规格
| 规格 | |
| 布局 | 70% |
| 开关类型 | 机械轴体 |
| 宽度 | 117mm |
| 长度 | 341.85mm |
| 键盘下沿高度 | 19.54mm (不含键帽) / 29.06mm (含键帽高度) |
| 键盘上沿高度 | 25.75mm (不含键帽) / 36.37mm (含键帽高度) |
| 键盘脚垫高度 | 2mm |
| 键盘倾斜角度 | 3.5° / 8.01° / 11° |
V7客制化键盘按键说明
Mac
Windows
① Type-C接口
② Mac档位
③ Windows档位
按键布局
层0: 当您的系统拨片切换到Mac档位的时候, 层0将被激活使用。
层1: 当您的系统拨片切换到Windows档位的时候, 层1将被激活使用。

LWin = Left Windows LAlt = Left Alt RAlt = Right Alt RCtrl = Right Ctrl
层2: 当您的系统拨片切换到Mac档位并组合fn1/MO(2)键的时候, 层2将被激活使用。
层3: 当您的系统拨片切换到Windows档位并组合fn1/MO(3)键的时候, 层3将被激活使用。
层4: 当您长按fn2/MO(4)键的时候, 层4将被激活使用。
V7客制化键盘多媒体按键说明
| 按键说明 | |
| Scr- | 屏幕亮度- |
| Scr+ | 屏幕亮度+ |
| Bright- | 键盘背光亮度- |
| Bright+ | 键盘背光亮度+ |
| Prvs | 上一曲 |
| Play | 播放/暂停 |
| Next | 下一曲 |
| Mute | 静音 |
| Vol- | 音量- |
| Vol+ | 音量+ |
| RGB Toggle | 关闭/开启键盘背光 |
| 按键说明 | |
| RGBMD+ | 下一个RGB灯光模式 |
| RGBMD- | 上一个RGB灯光模式 |
| Hue+ | 下一个灯光颜色 |
| Hue- | 上一个灯光颜色 |
| RGB SPI | RGB灯光速度+ |
| RGB SPD | RGB灯光速度- |
| MO(1) | 按住MO(1),层1将被激活 |
| MO(2) | 按住MO(2),层2将被激活 |
| MO(3) | 按住MO(3),层3将被激活 |
| MO(4) | 按住MO(4),层4将被激活 |
第三方输入工具与键盘不兼容。
答:由于Windows/Android操作系统的兼容性、版本、品牌和驱动程序,使用键盘时,
第三方输入工具可能会受到影响。请确保您的操作系统和驱动程序是最新的。
某些多媒体键或功能键在设备上不起作用。
答: 由于设备的兼容性, 系统版本, 驱动程序等原因, 某些多媒体键或者功能键可能无法使用。
*多媒体键:
※/※/■□/■□/■□/■□/■□/■□/■□/■□
功能键:
F1 / F2 / F3 / F4 / F5 / F6 / F7 / F8 / F9 / F10 / F11 / F12
安全预防措施:
防止儿童接触到产品、附件和包装部件,以防止任何意外和窒息的危险。
保持产品干燥,避免腐蚀。
不要将产品暴露在低于-10°C(5°F)或高于50°C(131°F)的极端温度下,以保持键盘的寿命。
Keychron, Inc.
Dover, DE 19901, United States
https://www.keychron.com
通过以下方式与我们联系
Support@keychron.com
f@keychron
@keychron
@keychronMK
Keychron设计
中国制造
中国区总代:渴创技术(深圳)有限公司
执行标准:GB/T 14081-2010
售后热线:400-0766268
地址:深圳市龙岗区坂田街道大发埔社区
大发路24号文坑工业区2栋201