
3993/CD - Hi-Fi System Marquant - Gratis bruksanvisning og manual
Finn enhetens veiledning gratis 3993/CD Marquant i PDF-format.

Brukerspørsmål om 3993/CD Marquant
0 spørsmål om dette apparatet. Svar på dem du kjenner, eller still ditt eget.
Still et nytt spørsmål om dette apparatet
Last ned instruksjonene for din Hi-Fi System i PDF-format gratis! Finn veiledningen din 3993/CD - Marquant og ta den elektroniske enheten tilbake i hendene. På denne siden er alle dokumenter som er nødvendige for bruken av enheten din publisert. 3993/CD av merket Marquant.
BRUKSANVISNING 3993/CD Marquant
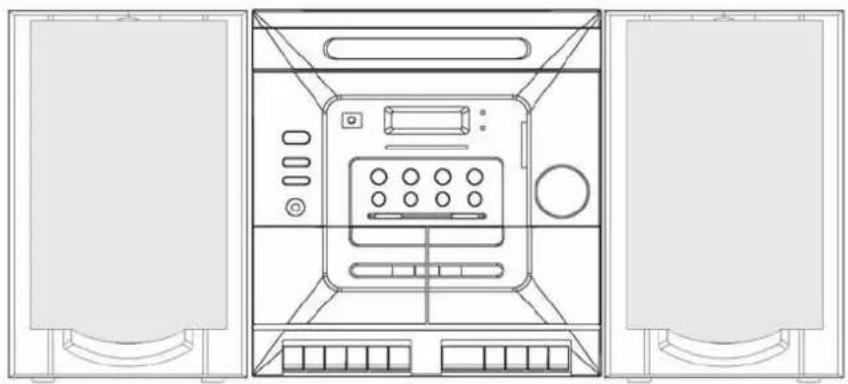
MINI SYSTEM
3993/CD
natural_image
Top-down line drawing of a front view of a multi-chamber electronic device with no visible text or symbolsUSER'S MANUAL
CAUTION
CLASS 1 LASER PRODUCT
Use of Controls or adjustments or performance of procedures other than those specified herein may result in hazardous radiation exposure.
LASER SAFETY
This unit employs a laser, only qualified service personnel should attempt repair.

DANGER: INVISIBLE LASER RADIATION WHEN OPEN AND INTERLOCK FAILED OR DEFEATED.AVOID DIRECT EXPOSURE TO BEAM.
CAUTION: HAZARDOUS LASER RADIATION WHEN OPEN AND INTERLOCK OR DEFEATED.
CAUTION
CLEANING: Always disconnect unit from mains supply before attempting to clean it. Use soft cloth moistened with soapy water. Wipe gently. Do not use solvents or abrasive materials.
Important Information
This compact disc player has built-in error compensation circuits to correct for minor defects in a disc. There are limits, however, to the amount of correction available.
In some cases, the CD player may skip some tracks on a disc during disc play. This problem may be caused by defects (such as scratches) in the disc being played, which are too large for the error compensation circuits to handle. if you encounter this problem, check the CD players operation as follows before having the unit serviced.
Play a new disc. If the CD player operates normally, the skipping problem is probably due to a defective disc or dirty disc.
SOME DO'S AND DON'T'S ON THE SAFE USE OF EQUIPMENT
This equipment has been designed and manufactured to meet European safety standards but like any electrical equipment, care must be taken if you are to obtain the best results and safety is to be assured.
Do read the operating instructions before you attempt to use the equipment.
Do ensure that all electrical connections (Including the mains plug. Extension leads and interconnections between pieces of equipment) are properly made in accordance with the manufacturer's instructions. Switch off and withdraw the mains plug when making or changing connections.
Do consult your dealer if you are ever in doubt of the installation, operating, or safety of your equipment.
Don't continue to operate the equipment if you are in any doubt about it working normally, or if it is damaged in any way-switch off. Withdraw the mains plug and consult your dealer.
Don't remove any fixed covers as this may expose dangerous voltages.
Don't leave equipment switched on when it is unattended unless it is specifically stated that it is designed for unattended operation or has a standby mode. Switch off using the switch on the equipment and make sure that your family knows how to do this Special arrangements may need to be made for infirm or handicapped people.
Don't listen to headphones at high volume, as such use can permanently damage your hearing.
Don't obstruct the ventilation of the equipment. For example with curtains or soft furnishings.
Overheating will cause damage and shorten the life of the equipment.
Don't allow electrical equipment to be exposed to rain or moisture.
Above all
—Never let anyone, especially children, push anything into holes, slots or any other opening as this could result in a fatal electric shock.
—Never guess or take chances with electrical equipment of any kind.
—It is better to be safe than sorry!
WARNING: TO REDUCE THE RISK OF FIRE OR ELECTRIC SHOCK. DO NOT EXPOSE THIS APPLIANCE TO RAIN OR MOISTURE. DANGEROUS HIGH VOLTAGES ARE PRESENT INSIDE THE ENCLOSURE. DO NOT OPEN THE CABINET. REFER SERVICING TO QUALIFIED PERSONNEL ONLY.
HELPLINE PHONE NUMBER 0871 230 1777
TABLE OF CONTENTS
Caution....1
Table of Contents....2
Location of Controls.... 3
Connection....4
General Operation....4
Tuner Operation....4
Cassette Operation....5
Cassette Playback (Deck B) (Deck A)....5
Continuous Playback (Deck B) to (Deck A) 6
Recording (Deck A)....6
Dubbing (Deck B) to (Deck A)....6
Handling Compact Discs....7
Loading CDS....7
Playing CDS....7
Repeat Disc Play....8
Track Skip 8
Caution....9
Random Play....9
Intro Play....9
Programmed Disc Play....9
Remote Control Operation....10
Specification....11
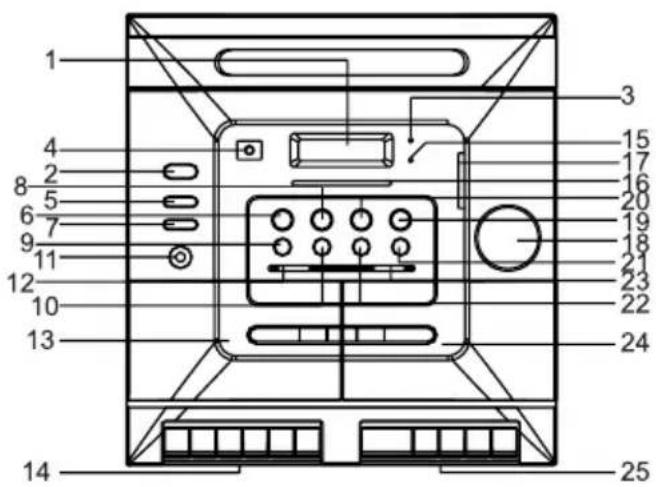
CONTROLS
- MULTI FUNCTION DISPLAY
2.POWER
- POWER INDICATOR
4.REMOTE SENSOR
5.DISC SKIP
6.SKIP
7.DBBS
8.SKIP
9.REPEAT1/ALL
10.PROGRAM
11.PHONES
12.FUNCTION SELECTOR
13.CASSETTE DOOR(A)
- DECK A CONTROL BUTTONS
15.FM STEREO INDICA TOR
16.TUNING DIAL
17.TUNING CONTROL
- VOLUME CONTROL
19.PLAY/PAUSE
20.STOP
21.OPEN/CLOSE
22.RANDOM
- BAND SELECTOR
24.CASSETTE DOOR(B)
25.DECK B CONTROL BUTTONS
26.BEAT CUT SWITCH/ HIGH/NORMAL SPEED DUBBING
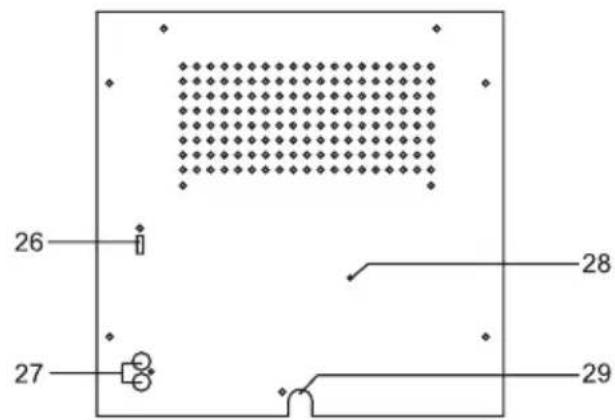
27.SPEAKERS SOCKETS
28.FM WIRE AERIAL
29.POWER CABLE
CONNECTIONS
POWER CONNECTION
Connect the power cord to AC outlet only.
SPEAKER Sockets
Connect the SPEAKER PLUGS to the SPEAKER Sockets located on the rear of the unit.
SPEAKER SOCKETS
HEADPHONE SOCKET (PHONES)
This unit will accept stereo headphones (not included)
The speakers are automatically disconnected when headphones are connected to the PHONES SOCKET
GENERAL
POWER - Press to turn unit ON or OFF. The Power Indicator LED will light when the unit is on.
VOLUME - Adjusts loudness of speakers or headphones
FUNCTION - Use to select desired source (TAPE, CD, TUNER) to be listened to. The selected source is also available for recording. Please consult RECORDING section of this manual for more details.
TUNER
1) Turn the unit "ON" using the POWER switch.
2) Select the lTuner function.
3) Set the BAND selector as desired.
4) Tune in the desired station using the Tuning Control. If the FM ST. band was chosen, the FM STEREO indicator will light up whenever a stereo broadcast is received. To listen in Mono or to improve noisy, weak-signal stereo broadcasts, set the Band selector switch to the FM position. The STEREO indicator will go off and FM Mono is now received.
5) Adjust the VOLUME, EXTRA BASS controls to the desired sound level.
HINTS FOR BEST RECEPTION :
MW: The receiver has a built-in MWbar antenna. If MWreception is weak, slight rotation or repositioning of the unit will usually improve MW reception.
During recording a beating whistle may be heard. Adjusting the BEAT CUT switch on the rear panel may reduce this.
FM: The receiver has a built-in FM wire aerial This wire should be totally unravelled and extended for best reception.
CASSETTE TAPES
Inserting and Removing the Cassette Tape
Open the cassette compartment lid by pressing the STOP/EJECT button. Insert the cassette placing the full reel on the left (visible through the window) and the exposed section of the tape at the bottom.
Close the compartment lid. Now the unit is ready for operation. To listen to the second side, press the STOP/EJECT button and remove the cassette. Turn the cassette around and reinsert it as previously described.
Recommended Cassette Tapes
In order to obtain optimum performance with the built-in cassette tape deck, it is essential to use only high quality cassette tapes. The bias and equalization of your tape deck is adjusted to yield excellent results if used with brand name tapes. Use C-30, C-60 and C-90 cassettes only. We do not recommend the C-120 cassettes because they can be subject to mechanical instability and proper constant tape tension cannot be controlled.
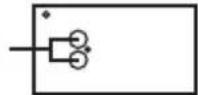
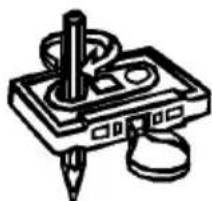
Checking the Cassette
Make sure that the cassette tape has no slack prior to inserting it int the recorder. Unless the tape is taut, it may wind around the head mechanism and trouble may result. Use a pencil as shown in the Figure to take up slack on one of the reels.
natural_image
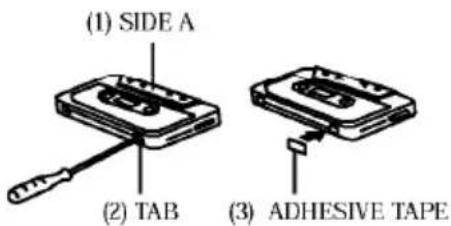
Simple line drawing of a stylus with a pen and eraser, no text or symbols presentSafeguard Against Accidental Erasure
To protect valuable recordings from accidental erasing, the tape deck and the cassette are equipped with standard safety features. To keep the recorded material, break out the tabs on the back of the cassette with a knife or screwdriver. To protect the side A (1) from accidental erasure, break out the right side tab (2). To record on a cassette whose tabs have been broken, simply attach adhesive tape (3) over the tab opening. The REC button will not lock in position when a cassette tab has been removed.
CASSETTE PLAYBACK (DECK B) (DECK A)
The TAPE B is used for playback only. The TAPE A is used both for recording and playback.
Do not turn the unit off while the tape is running. Otherwise, the pinch roller may be damaged.
- Press the POWER switch to ON.
- Select the tape function.
- Press the appropriate STOP/EJECT button and insert a cassette.
- Press the PLAY button to start playback.
- Adjust the VOLUME & DBBS controls to the desired sound level
- Press the STOP/EJECT button to stop playback at any time. When the end of the tape is reached, the automatic stop will be activated.
Fast-Forward and Rewind
For fast winding or rewinding the tape, press the F.Fwd or REW button. Press the STOP/EJECT button when the desired location has been reached.. When the end of the tape has been reached, the reels will stop. Then the STOP/EJECT button should then be pressed.
Pause
Press the PAUSE button to momentarily suspend recording or playback. Re-press the PAUSE button to resume.
CONTINUOUS PLAYBACK (DECK B) TO (DECK A)
This unit enables you to play continuously from DECK B to DECK A.
- Press the POWER switch to ON.
- Set the FUNCTION selector to TAPE.
- Insert pre-recorded cassettes to DECK A and DECK B compartments.
- Press the PAUSE button and PLAY button of DECK B.
-
Press the PAUSE button and PLAY button of DECK A.
-
Release the pause button of DECK B, DECK B will start playing.
When DECK B reaches the end of the tape. DECK B will automatically stop and then DECK A will start playing automatically. - Adjust the VOLUME & EXTRA BASS controls to the desired sound level.
RECORDING (DECK A)
This model includes ALC (automatic level control) and therefore will record at a predetermined level irrespective of the setting for the volume control
- Press the POWER switch to ON.
- Set the FUNCTION selector according to the source to be recorded.
- Press the STOP/EJECT button to insert a blank tape.
- Press the RECORD/PLAY button to start recording.
-
Since you can monitor through the speakers regardless of the recording level, adjust the VOLUME & EXTRA BASS controls to the desired sound level
-
Press the STOP/EJECT button to stop recording at any time. When the end of the tape has been reached, the automatic stop will be activated.
Note: Noise may be heard if recording from MW Radio station, to reduce this noise please Adjust the Beat Cut Switch.
DUBBING (DECK B) TO (DECK A)
This unit enables you to duplicate one tape to another tape by using the double deck mechanisms. It is performed only one way, from the DECK B (playback) to DECK A (recording).
REMARKS: HIGH-NORMAL SPEED DUBBING SWITCH IS ON THE REAR SIDE OF THE UNIT.
Dubbing at normal Speed
Note:
Be sure the HIGH SPEED DUBBING switch is set to NORMAL in order to record at normal speed.
- Press the POWER switch to ON.
- Select the tape function
- Insert a pre-recorded cassette into the DECK B and a blank cassette into the DECK A.
- Press the DECK A PAUSE button and then press the RECORD button.
- Press the DECK B PLAY button to start dubbing.
- Adjust the VOLUME & EXTRA BASS controls to desired sound level and sound equalization.
Dubbing at High Speed
This unit is equipped with a HIGH SPEED DUBBING system which allows duplicating a pre-recorded tape at approximately two-thirds the time of the duration
at normal speed.
Ensure that the HIGH SPEED DUBBING switch is set to high speed and follow the same procedure as instructed in "DUBBING AT NORMAL SPEED"
When dubbing a pre-recorded cassette tape at HIGH SPEED in TAPE function, a chattering sound is heard. To avoid this, set the VOLUME control to a minimum
Note:
When the dubbing at HIGH SPEED is in progress. do not change the position of the HIGH SPEED DUBBING siwth, since this will vary the speed of the program and ruin the recording.
HANDLING COMPACT DISCS
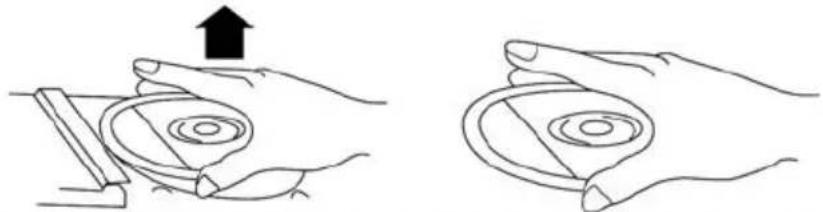
To remove a disc from its storage case, press down on the centre of the case and lift the disc out, holding it carefully by the edges.
natural_image
Two hand diagrams showing a device being held, with one upward and the other tilted (no text or symbols)Fingerprints and dust should be carefully wiped off the disc's recorded surface with a soft cloth. Unlike conventional records, compact discs have no grooves to collect dust and microscopic debris so gentle wiping with a soft cloth should remove most particles. Wipe in a straight line from the inside to the outside of the disc. Small dust particles and light stains will have absolutely no effect on reproduction quality.
Never use chemicals such as record sprays, antistatic sprays, benzine, or thinners to clean compact discs. These chemicals can irreparably damage the disc's surface.
Discs should be returned to their cases after use. This avoids serious scratches that could cause the Laser pickup to skip.
Do not expose discs to direct sunlight, high humidity, or high temperatures for extended periods. Long exposure to high temperatures can damage the disc.
Important
Since movement of the-CD mechanism and the sensitive circuitry may cause interference to a radio tuner nearby, switch this unit off white operating other radio devices.
This product utilises a laser
Danger - invisible laser radiation when opened and interlock failed or defeated.
Avoid direct exposure to the beam.
Caution - Use of controls, adjustments, or procedures not listed in this manual may result in hazardous radiation exposure.
LOADING CDS
Press the POWER Button to turn the unit on.
Select the CD FUNCTION
The CD Disc tray will revolve to check if any discs are present.
If no discs are in the tray, NO DISC will appear in the display.
Press the OPEN/CLOSE Button to open the disc compartment.
The CD tray will open, exposing the right and left disc holders. The third disc holder will remain in the unit. To expose the third disc holder, press the DISC SKIP Button.
When the CD Compartment has opened, remove a disc from its case and place it carefully in the CD tray with the label side facing up.
Press the OPEN/CLOSE Button to close the disc compartment.
This unit will allow you to open the disc tray whilst in the PLAY mode to allow you to load another one or two discs without interrupting play.
The disc compartment may be opened at any time by pressing the OPEN/CLOSE Button. Remove the CD's only after the compartment has fully opened.
PLAYING CDS
Select the CD function
Press the Disc Skip button to select the CD number you require.
After showing the disc number, total number of tracks and playing time, press the PLAY/PAUSE button to start playback
The first track will begin to play and the CD will then play all tracks on all disks, when more than one CD is loaded.
To Stop a CD Part Way Through
Press the STOP Button. Disc play will stop, and the display will show the total number of tracks and the total playing time for the CD.
To temporarily stop disc play(PAUSE mode), press the PLAY/PAUSE Button. Disc play will pause at the current play position. To resume disc play press the PLAY/PAUSE Button again.
REPEAT DISC PLAY
Press REPEAT once - REPEAT appears in the display, select a disc to play.
Select the track using the Skip/Search buttons.
Press PLAY/PAUSE The selected track will be repeated
Press REPEAT twice - REPEAT ALL appears in the display, select disc to repeat. using the DISC SKIP button
Press PLAY/PAUSE All tracks on the selected disc will be repeated
Press REPEAT again - ALL DISC appears in the display.
Press PLAY/PAUSE All tracks on all discs will be repeated
To cancel a repeat mode, keep pressing the REPEAT Button until the REPEAT indicator is no longer shown in the display
Note: Single Track Repeat function is possible in normal or programmed playback, repeat one disc
or all discs in only available in normal playback.
TRACK SKIP
Starting disc play from the beginning of a particular track
Press the SKIP ▶/SKIP ▶ Buttons to select the desired track. The number of the selected track will be shown on the CD display. Press the PLAY/PAUSE Button to start play.
To skip to the next track on a disc
For example, to skip ahead to the beginning of track 2 while track 1 is playing.
Press the SKIP▶1 Button. Disc play will resume at the beginning of track 2.
The CD player will skip ahead to the next track each time the SKIP▶Button is pressed. Repeatedly pressing the SKIP▶Button makes the CD player skip ahead through the disc track by track. Once the beginning of the last track is reached the CD player will not advance any further.
To skip back to the previous track on a disc
For example to skip back to the beginning of track 3 while track 4 is playing.
Press the Reverse SKIP/▶Button once. Disc play will resume at the beginning of track 3
The CD played will skip back one track each time the SKIP Button is pressed.
Repeatedly pressing the Reverse SKIP/▶! Button makes the CD player skip back through the disc track by track.
Once the beginning of the first track is reached, the CD played will not go back any further.
Notes: The SKIP ▶/SKIP ▶ Buttons can be used to select a desired track to play from before disc play starts. In this case the number of the selected track will be displayed until the PLAY/PAUSE Button is pressed. Tracks can be selected even when the disc compartment is open.
SEARCH DURING PLAYBACK :
To search during playback press and hold the SKIP▶1/SKIP◀◀ buttons. Once the required section is reached release the button and normal playback will resume
CAUTION
Do not put anything except a compact disc into the compartment. Foreign objects can damage the mechanism.
Do not force the compartment by hand during the opening and closing operations.
Keep the disc compartment closed when not in use to prevent dirt and dust from entering the mechanism.
Never place more than one disc in each tray at any time.
If the disc is deeply scratched, or too dirty, disc play may not start.
RANDOM PLAY
The CD player can play tracks in a randomly generated sequence.
In Stop or PLAY mode and press the Random Button once and the display will show the 1 DISC RANDOM, then the player will now select a track from the selected disc at random.
Press the Random Button again and the display will show ALL DISC RANDOM, then the player will now select a track from all 3 CDs at random.
Press the Random Button again and the Random function will be cancel.
INTRO PLAY
To listen to the first 10 seconds of each track, press the INTRO Button on the remote control. To cancel, press the STOP Button.
PROGRAMMED DISC PLAY
It is possible to prgram the tracks you wish to play in a sequence of your choose. It is not possible to enter programs during disc play.
Press the stop button first, then follow the instruction s below.
Entering a Program
Press the Program button in stop mode. The display will show P-01
Select the desired track using the skip ▶/SKIP ▶◀ buttons.
Press the PROGRAM button.
The first program selection is now stored in the program memory
Then Select the desired track again and using the Skip ▶1 /Skip ▶◀ Button and press the Program button again. Continue entering thracks in this way until all the desired tracks are stored.
Max. 14 Tracks can be programmed in this way.
Notes : If the PLAY/PAUSE button is pressed before the MEMORY Button is pressed to store a track, this track will not be programmed and the disc will start playing from the first selected track. Any track can be programmed to play more than once.
Listen to Programmed Tracks
Press the PLAY/PAUSE button.
Disc play will start at the beginning of the first programmed track.
To Clear the Program Memory :
- If the disc is playing, press the Stop button, Press the Stop button again until the
Program indicator disappears on the display.
- The program memory will also be cleared if the disc compartment is opened. If the function is changed, or if the power is switched off.
- Programme playback can only be selected for the currently selected disc
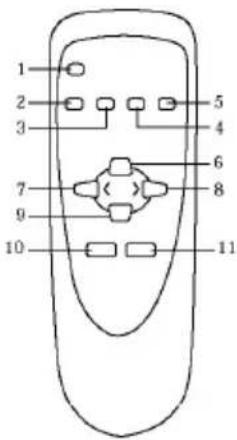
REMOTE CONTROL
This unit comes with a Remote Control which allows the user to control certain system functions from a distance of up to 3 meters.
The Remote Control requires two AAA batteries (not included).
NOTE: The Remote Control should always be aimed at the Remote Control Sensor on the unit for best performance.
INSTALLING BATTERIES (Not Included)

Slide Out Cover and install two AAA batteries with polarities as shown.
Remote Control Functions:
-
OPEN/CLOSE
-
INTRO
-
MUTE
-
DISC SKIP
-
RANDOM
-
PLAY/PAUSE
-
SKIP
-
SKIP
-
STOP
-
PROG
-
REPEAT
Troubleshooting
In the unlikely event of this unit exhibiting a problem, please consult the following troubleshooting guide before contacting the helpline or returning the unit to the place of purchase
| Symptom | Possible Cause | Solution |
| Radio | ||
| Noise or sound distorted on MW or FM broadcasts | Station not tuned properly for MW or FM | Retune into the MW or FM station |
| FM: FM Aerial is not extended | Extend FM aerial | |
| MW: Unit is not positioned correctly | Rotate unit until best reception is obtained | |
| FM Stereo Light does not illuminate | BAND SELECTOR not set correctly | Move the BAND SELECTOR to the FM ST position. |
| No sound on MW or FM receptions | FUNCTION SELECTOR in wrong position | Move FUNCTION SELECTOR to TUNER position |
| Volume at minimum | Increase Volume | |
| Cassette Player | ||
| No Sound | FUNCTION SELECTOR in wrong position | Move FUNCTION SELECTOR to TAPE position |
| Volume at minimum | Increase Volume | |
| Sound distorted | Dirty Tape Heads | Clean Tape Heads |
| Playback Speed Varies | Tape old or worn | Replace Tape |
| Compact Disc Player | ||
| CD Player will not work | FUNCTION SELECTOR in wrong position | Move FUNCTION SELECTOR to CD position |
| CD is not installed or installed incorrectly | Insert CD with label facing upwards | |
| CD Skips while playing | CD is dirty or Scratched | Clean disc or use another disc |
| Disc is inserted but CD player skips over spot or will not play | CD inserted upside down | Insert CD with label facing upwards |
| CD is dirty | Clean CD | |
| Disc is not a standard Audio CD | This unit will only play standard Audio CDs | |
TECHNICAL SPECIFICATIONS
Power supply
AC 230V \~ 50Hz
Power consumption (on):38W
Power consumption (standby):4W
Radio frequency coverage
FM 87.5 - 108 MHz
MW 540 - 1600kHz
CD player
Pick up 3-beam, Semi-conductor Laser
Recording System AC Bias
General
Speaker 4 Ohms
Headphones 3.5mm stereo jack plug
Dimension & Weight
Unit dimensio 280x354x299mm (L x W x H)
Speaker dimension 190x 174.5 x 320 mm (L x W x H)
Unit Weight 9.95kgs
Speaker Weight 11.4kgs
Due to continual improvements the specifications listed above are subject to change without notice.
- MINI SYSTEM
- CAUTION
- CLASS 1 LASER PRODUCT
- LASER SAFETY
- SOME DO'S AND DON'T'S ON THE SAFE USE OF EQUIPMENT
- Above all
- TABLE OF CONTENTS
- CONTROLS
- CONNECTIONS
- POWER CONNECTION
- GENERAL
- TUNER
- CASSETTE TAPES
- CASSETTE PLAYBACK (DECK B) (DECK A)
- CONTINUOUS PLAYBACK (DECK B) TO (DECK A)
- RECORDING (DECK A)
- DUBBING (DECK B) TO (DECK A)
- HANDLING COMPACT DISCS
- Important
- LOADING CDS
- PLAYING CDS
- REPEAT DISC PLAY
- TRACK SKIP
- RANDOM PLAY
- INTRO PLAY
- PROGRAMMED DISC PLAY
- REMOTE CONTROL
- Troubleshooting
- TECHNICAL SPECIFICATIONS
Merke : Marquant
Modell : 3993/CD
Kategori : Hi-Fi System