TN65DB - Webkamera Compro - Gratis bruksanvisning og manual
Finn enhetens veiledning gratis TN65DB Compro i PDF-format.

Brukerspørsmål om TN65DB Compro
0 spørsmål om dette apparatet. Svar på dem du kjenner, eller still ditt eget.
Still et nytt spørsmål om dette apparatet
Last ned instruksjonene for din Webkamera i PDF-format gratis! Finn veiledningen din TN65DB - Compro og ta den elektroniske enheten tilbake i hendene. På denne siden er alle dokumenter som er nødvendige for bruken av enheten din publisert. TN65DB av merket Compro.
BRUKSANVISNING TN65DB Compro

COMPRO
TECHNOLOGY

natural_image
White COSMO medical device with camera lens and base mount (no visible text or symbols)TN65 Cloud Network Camera Quick Start Guide
This Quick Start Guide includes the QR-code to install your IP camera. Please keep this guide in case of you need to reinstall the network camera.
Compro Technology, Inc. www.comprousa.com
1
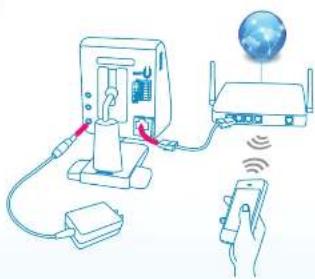
- Connect an Ethernet cable between IP camera and your network switch/router.
- Attach the power adapter to the camera's power connector and connect the power plug to a power outlet.
- Make sure your smartphone is able to access the Internet via your switch/router.
2
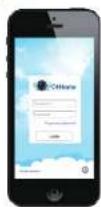
iPhone


Android

- Using iPhone or Android phone to scan the QR code above for download and install the C4Home app.
( Also you can download the C4Home app from App Store or Google Play. ) - Start the C4Home app and register your personal account.
3
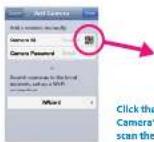
Click the QR-code icon on the "Add Camera" page of C4Home app and scan the QR-code above to add camera.
- Login the C4Home app and add new camera:
- Scan the QR code above or on the back side of camera (Or direct input the 10 digits camera ID under the QR code)
- Click "Wizard" to search/install camera from local network
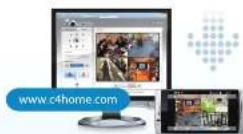
• After installation, now you can watch the live video of camera from C4Home app or login to the www.c4home.com from PC.
Name of Each Part Mount th
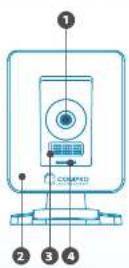
1. Lens
2. Microphone
3. Speaker
4. LED status indicator
S. Audio Output
6. Reset button
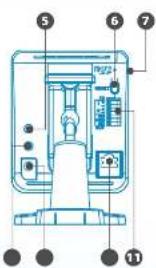
- microSD card slot
- Microphone Input
- Power connector
- Ethernet port
- Digital I/O port
amera LED Status Indicator
The instant you power on the camera, it automatically starts the booting procedure. There are one blue LED and one red LED inside the camera casing. Depending on the booting status, the LED indicator will be lit in the following way:
- About 25 seconds after powering on the IP camera, both the blue LED and red LED indicator will become lit (appears purple).
- About 35 seconds after powering on the IP camera, the red LED will be turned off.
- Camera trying to connect to network: both blue & red LED flashing at an interval of 0.5 second.
- Camera established connection: blue LED constantly on (Red LED off)
- Camera failed to connect: flashing red LED. (Blue LED off)
Red LED Blue LED Indication
| On On | System loading up | |
| OnOff | Successfully established network connection | |
| On | Off | Performing hardware test |
| Off Off | Powered off | |
| Blinking (every 0.5 sec.) | Off Failed to connect to network | |
| Blinking (every 0.5 sec.) | Blinking | Attempting to establish network connection |
When necessary, follow the steps below to mount the camera on a flat surface. Then adjust the camera to the desired viewing angle.
Detach the metal mounting plate from the bracket by inserting a flat blade screwdriver into the rectangular hole on the wide end of the bracket base and then pressing the screwdriver downward.

Place the side of the mounting plate that has protruding screw holes against the mounting surface. Screw the mounting plate into the mounting holes on the mounting surface. And fasten the bracket to the mounting plate by clicking the plate into position.
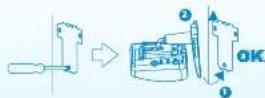
Note: When dismounting the camera, follow step 1 to detach the camera from the mounting plate. Do not pull the camera off the mounting surface by force, as doing so may damage the bracket base permanently and render future camera mounting impossible.
Compro Technical Support Information
For any problems you may encounter, please refer to the user's manual on the installation CD. If you need further assistance from Compro technology, you can fill out the online help form (www.comproussa.com/feedback/) or direct email us at support@comproussa.com.
Trademark
Copyright © 2013: Compro Technology, Inc. Compro, and the Compro logo are trademarks of Compro Technology, Inc. Callome and Callome logo are registered trademarks of AVSecur Technology, Inc. Microsoft, Windows Vista, Windows and the Windows logo are trademarks of the Microsoft group of companies SD, SDHC and microSDHC. Logos are trademarks of SD-3C, ULC Apple, Apple Logo, MAC, MAC OS, iPad, iPhone are trademarks of Apple Inc, registered in the U.S. and other countries. Android is a registered trademark of Google, Inc. Other names and marks are trademarks of their respective owners. Features, pricing, availability, and specifications are subject to change without prior notice.
Restriction & Disclaimer
No part of this document may be copied or reproduced in any form or by any means without the prior written consent of Compro Technology, Inc. Compro Technology makes no warranties with respect to this documentation and disclaims any implied warranties of merchantability, quality, or Fitness for any particular purpose. The information in this document is subject to change without prior notice.
Regulatory Notice
FCC Information: This device complies with Part 15 of the FCC Rules. Operation is subject to the following two conditions: (1) This device may not cause harmful interference, and (2) This device must accept any interference received, including interference that may cause undesired operation.
Compro Technology, Inc.
www.comprouisa.com
Tel: 886 2 2918 0159 Fax: 886 2 2915 2389
4F. No.12, Alley 6, Lane 45, Paz Shin Road, Hsinben District, New Taipei City 231, Taiwan
2013 Compro Technology, Inc. All rights reserved.