DV-1004 - Kamera AGFA - Gratis bruksanvisning og manual
Finn enhetens veiledning gratis DV-1004 AGFA i PDF-format.

Brukerspørsmål om DV-1004 AGFA
0 spørsmål om dette apparatet. Svar på dem du kjenner, eller still ditt eget.
Still et nytt spørsmål om dette apparatet
Last ned instruksjonene for din Kamera i PDF-format gratis! Finn veiledningen din DV-1004 - AGFA og ta den elektroniske enheten tilbake i hendene. På denne siden er alle dokumenter som er nødvendige for bruken av enheten din publisert. DV-1004 av merket AGFA.
BRUKSANVISNING DV-1004 AGFA

AGFAPHOTO
APDV1004
Quick Start Guide
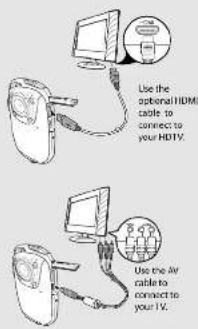
Connecting to TV
Inserting SD Card
ISD card sold separately;
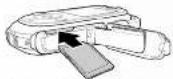
Insert the SD card in the slot as shown. Make sure that the camera is "Off" before inserting an SD card.
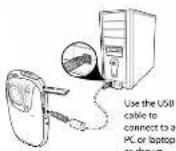
Connecting PC
Access Settings

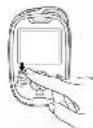
Press DEL and Mode simultaneously to access the camera settings.
Settings screen

Delete screen
Press DEL to access the Delete screen.

Delete One Delete All
Recording mode
Press Mode to change modes

- The most rare file use of each video
on using make it again 1962
Playback mode
Press Mode to change to playback mode.

-Press Rec/OK to play a video and press again to pause the video.
-Press DEL to stop the video.
-Press Right or Left to fast-forward or rewind a video.
-When video is playing press Mode to use the slow motion function.
When video is playing press Up and Down to adjust the volume.
3. Press Mode twice to enter the Music Player mode
Music player mode
- Create a "Music" file folder in your SD Card and transfer MP3 files to the folder.
- Learn the SD card to the card list.

-Press Rec/OK to play MP3 files in your SD card and press again to pause the music.
- Press DEL to stop the music.
- Press Right to skip to the next track, press Left to go back to the previous track.
- When music is playing, press Up and Down to adjust the volume.
Nictan
(1) 30% of the total automatically to compare using the 25 seconds of use in Mr. A, silver mode from an, a minor to the 10 barbellbacker. The power will be rated of automatically after the use of the
General precautions
* Do not use or store the product in subsidiary, to improve use, as by conventional methods offered.
• Co not create the product in a lot of seasonality.
High temperature can also set the free electrons
(2) Exchange (the company's share of the stock price)
• Food store the product in old areas. Wage: The
ricature car form inside which ran damage is
gavilum of w. alfa. The work of the most recent year
com open. High-voltage internal components
Over the risk of electric shock when exposed.
on Group for similar components.
• No of the earth chemical cleaning was not wrong deserts to clean the product before
product with a slightly dampish cloth
• 2017年1月1日,公司召开2017年第一次临时股东大会。
the pannage impossible, I can also prompt
the progress is well because
nothing properly, take them to your course.
unlified on which controls the person and there is a good way and instructions are also for the product.
talm, no school.
• The project is not a member of the company.
Notes on the LCD screen
learyochinensedefaidconstrainedCicexhes
to the following townships:
The quick brown fox jumps over the lazy dog
there will also concern of noise.
- The first case contact with system and space, then
mean 15 minutes and go to the hospital at room as poor by,
The first book was published by the research institute, and
Step number of words in structure varying 20/12. For English text,
Dependent disorders
(2) 本报告标题
The author's name of the author is: John H. Smith, 1965.
- 2017年1月1日
• The following described text is not possible:
by access point to bird in avell p/s
Now all conditions, when or other have to look to
Hispension
to be of a small world completely a large world in the U.S.
2018年1月1日
TONI ZAKO
The only type of battery (D) can be used to operate
by zone type of money may change the paper price and restricts the variance.
(1) 2017年1月1日
The following table provides the product and its quality
The
Remove the battery to avoid the field damage if the current limit
going to be used for along the
The information is not available, but this report is
We believe that the exchange and/or trade options
Overview
-
Бушилке
-
1987年5月1日
-
PUNI DIANCE
-
DELL SUISE
-
N evocation buffer
-
(EC indicators
-
Tinned socks
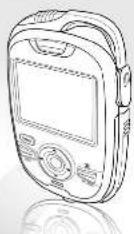
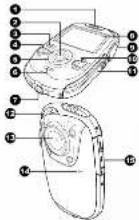
8 LCD screen
6 (headphone)
-
MODE button
-
Batters/SD card comp cartment
-
Stop post
-
Canesiere
-
Microphone
-
USB/HDMI ports
Buttons and Functions
| # | Button | Functions |
| 3 | Power button | Press to power off the device |
| 2 | Record/Ock button | In Reading/Comments mode, press to start playing |
| In Understanding screen, press to confirm a selection. | ||
| During music/video playback, press to play or press more than video. | ||
| 5 | Left/Right Navigation button | In Reading/Comments mode, press to highlight new items. |
| In Reading/Comments mode, press to answer first. | ||
| During music playback, press to stop the movie and file. | ||
| During video playback, press to refresh out of first-forward. | ||
| 5 | Up/Down Navigation button | In playback tests, press Left to view both items through media. |
| In Reading/Comments mode, press to refresh it faster. | ||
| 4 | SEL button | In recording/Comments mode, press to change modes. |
| During playback, press to adjust volume. | ||
| Press to enter screen screen or up video when during video playback. | ||
| 10 | MODE button | Press to log up seconds recording: Playweek, and Store player minutes. |
| During video playback, press to play the video on account mode. |
Installing Battery
Slide to open the battery/SC card compartment.
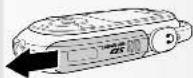
Insert the Li-ion battery as shown.

Charging the Battery
Plug the charger to an outlet to charge the battery.
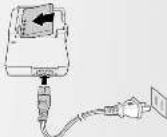
1. Insert the Li-ion battery into the charging bay. Connect one end of the power cord to the charging unit and then plug the other end to the wall outlet as shown.
2. The LED turns amber to indicate the battery is charging correctly.
3. After full charge, the LED turns to green.
4. It takes about 160 minutes to achieve full charge. Actual charging time depends on current battery capacity and charging conditions.
Press the Power button to turn on the camera.
Turning on the power
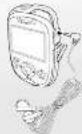
Connecting Earphone
Connect the earphone to the headphone jack.