TA-TM5 - PC-kabinett ASUS - Gratis bruksanvisning og manual
Finn enhetens veiledning gratis TA-TM5 ASUS i PDF-format.

Brukerspørsmål om TA-TM5 ASUS
0 spørsmål om dette apparatet. Svar på dem du kjenner, eller still ditt eget.
Still et nytt spørsmål om dette apparatet
Last ned instruksjonene for din PC-kabinett i PDF-format gratis! Finn veiledningen din TA-TM5 - ASUS og ta den elektroniske enheten tilbake i hendene. På denne siden er alle dokumenter som er nødvendige for bruken av enheten din publisert. TA-TM5 av merket ASUS.
BRUKSANVISNING TA-TM5 ASUS
TA-TM5 Series (Screwless Model)
A
Removing the side cover and front bezel

natural_image
Two views of a server rack showing front and side views with ventilation grilles and a highlighted internal component (no text or symbols)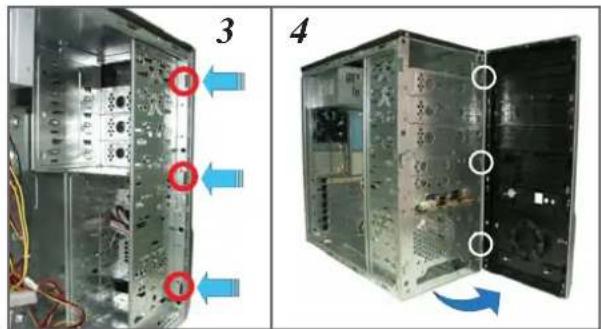
natural_image
Two views of a computer tower case showing internal components and ventilation ducts, with no visible text or symbols.B
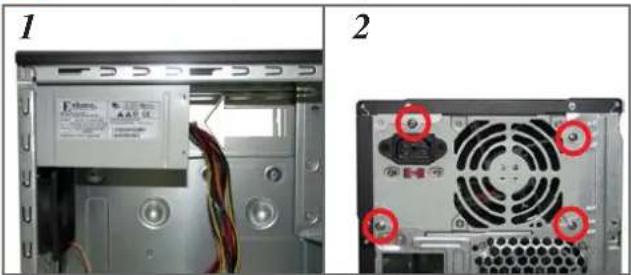
Installing the power supply unit (PSU)
natural_image
Two views of a computer tower showing front and side views with labeled components (no readable text or symbols)C
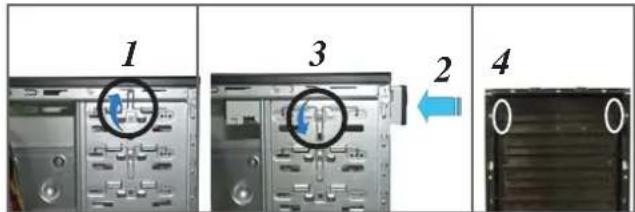
Installing an optical disk drive (ODD)
text_image
1 3 2 4Continued at the back

English
A
- Remove the screws on the rear panel.
- Push the side cover towards the rear panel.
- Release the side tabs that secure the front bezel to the chassis.
- Swing the front bezel in the direction of the arrow. Unhook the hinge-like tabs.
B
- Slide the PSU into the slot until it snugly fits the metal rail.
- Secure with screws.
C
- Push the bay lock upward.
- Insert the ODD into the bay.
- Align the ODD holes with the bay holes, then push down the bay lock to secure the ODD.
- Release the lock tabs on the front bezel to disengage the drive cover.
German
French
Spanish
Russian
Traditional Chinese
Simplified Chinese
Arabic
TA-TM5 Series (Screwless Model) continued
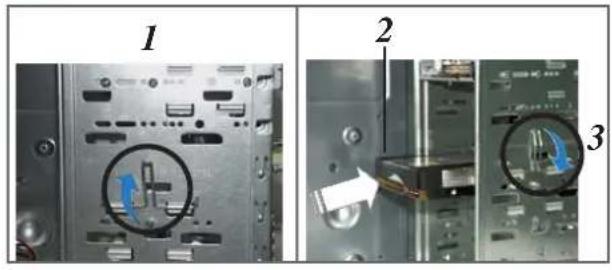
D Installing a hard disk drive (HDD)
text_image
1 2 3E Installing a floppy disk drive (FDD)
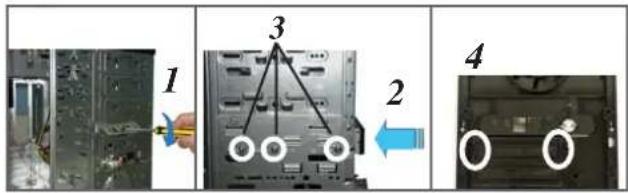
text_image
Diagram showing device port control steps with numbered labels and directional arrows indicating movementF Installing an expansion card
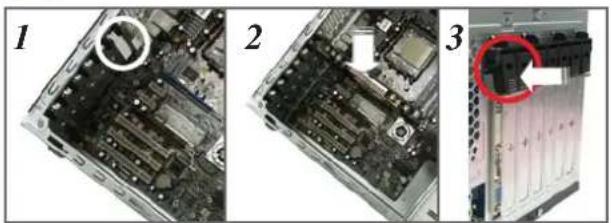
natural_image
Three-panel photo showing a computer motherboard with labeled components (no text or symbols visible)G Reinstalling the side cover and front bezel

natural_image
Three-panel image showing a computer tower with open case, internal rack, and exterior view (no text or symbols)-English
D
-
Push the bay lock upward.
-
Insert the HDD into the bay.
- Align the HDD holes with the bay holes, then push down the bay lock to secure the HDD.
E
-
Using a screwdriver, push the knock-down metal cover in and out of the chassis until it is removed.
-
Insert the FDD into the bay.
-
Secure the FDD with screws.
-
Release the lock tabs on the front bezel to disengage the drive cover.
F
-
Remove the metal cover opposite the slot that you want to use.
-
Align the card connector with the slot, then press firmly until the card is completely seated on the slot.
-
Push the expansion card lock on the rear panel to secure the slot.
G
-
Hook the hinge-like tabs to the holes on the chassis. Swing the front bezel in the direction of the arrow and push to secure the front bezel to the chassis.
-
Push the side cover towards the front bezel.
-
Drive screws on the rear panel.