
Lynx M-LYNX-15 - Skjerm MARSHALL - Gratis bruksanvisning og manual
Finn enhetens veiledning gratis Lynx M-LYNX-15 MARSHALL i PDF-format.


Brukerspørsmål om Lynx M-LYNX-15 MARSHALL
0 spørsmål om dette apparatet. Svar på dem du kjenner, eller still ditt eget.
Still et nytt spørsmål om dette apparatet
Last ned instruksjonene for din Skjerm i PDF-format gratis! Finn veiledningen din Lynx M-LYNX-15 - MARSHALL og ta den elektroniske enheten tilbake i hendene. På denne siden er alle dokumenter som er nødvendige for bruken av enheten din publisert. Lynx M-LYNX-15 av merket MARSHALL.
BRUKSANVISNING Lynx M-LYNX-15 MARSHALL
Marshall Lynx LCD Universal Monitors
User Manual

natural_image
Three black CRT monitors displaying various image views: one with a pink flower, another with a blue sky background, and one with a city skyline reflection (no visible text or symbols on screens)Marshall
Industrial Video/Security Div.
For more information, contact Marshall Electronics, Industrial Video & Security (800) 800-6608
www.mars-cam.com

CAUTION
RISK OF ELECTRIC SHOCK DO NOT OPEN

Caution: To reduce the risk of electric shock, do not remove the back. There are no user-serviceable parts inside. Always refer servicing to qualified personnel.
Graphic Symbol Explanation

The lightening flash symbol inside the triangle is intended to alert the user to the presence of un-insulated and dangerous voltage within the product's enclosure that may be of sufficient magnitude to constitute a risk of electric shock.

The exclamation point within the triangle is intended to alert the user to the presence of important operating and maintenance (servicing) instructions.
Warning- To Prevent Fire or Shock Hazard, DO NOT Expose this Monitor to Rain or Moisture
This product must be grounded.
Product specifications are subject to change without notice.
Lynx LCD Monitor User Manual
Lynx Monitors VGA Resolution Chart
| √ = Resolution Supported x = Not Supported | ||||||
| MONITOR 15" 17" | 19" 20" | 26" | ||||
| RESOLUTION | ||||||
| 800x600 | ||||||
| 60Hz √ √ √ √ | √ | |||||
| 70Hz × × | × | √ x | ||||
| 72Hz √ √ √ √ | √ | |||||
| 75Hz √ √ √ √ | √ | |||||
| 85Hz √ √ √ √ | √ | |||||
| 1024x768 | ||||||
| 60Hz √ √ √ √ | √ | |||||
| 70Hz √ √ √ √ | √ | |||||
| 72Hz √ √ √ √ | √ | |||||
| 75Hz √ √ √ √ | √ | |||||
| 85Hz √ √ √ √ | √ | |||||
| 1152x864 | ||||||
| 60Hz | × | × | × | × | × | |
| 70Hz | × | × | × | × | × | |
| 72Hz | × | × | × | × | × | |
| 75Hz √ √ √ √ | √ | |||||
| 85Hz × × | × | × | √ | |||
| 1280x720 | ||||||
| 60Hz × × | × | × | √ | |||
| 70Hz | × | × | × | × | × | |
| 72Hz | × | × | × | × | × | |
| 75Hz √ √ √ √ | × | |||||
| 85Hz | × | × | × | × | × | |
| 1280x800 | ||||||
| 60Hz | × | × | × | × | × | |
| 70Hz | × | × | × | × | × | |
| 72Hz | × | × | × | × | × | |
| 75Hz | × | × | × | × | × | |
| 85Hz | × | × | × | × | × | |
| 1280x960 | ||||||
| 60Hz √ √ √ √ | √ | |||||
| 70Hz | × | × | × | × | × | |
| 72Hz | × | × | × | × | × | |
| 75Hz | × | × | × | × | × | |
| 85Hz | × | × | × | × | × | |
| 1280x1024 | ||||||
| 60Hz √ √ √ √ | √ | |||||
| 70Hz √ √ √ √ | √ | |||||
| 72Hz | × | × | × | × | × | |
| 75Hz √ √ √ √ | √ | |||||
| 85Hz × √ × | × | √ | ||||
| 1600x1024 | ||||||
| 60Hz √ √ √ √ | √ | |||||
| 70Hz √ √ √ √ | √ | |||||
| 72Hz | × | × | × | × | × | |
| 75Hz √ √ √ √ | √ | |||||
| 85Hz × × | × | × | √ | |||
| 1600x1200 | ||||||
| 60Hz × √ √ √ | √ | |||||
| 70Hz | × | × | × | × | × | |
| 72Hz | × | × | × | × | × | |
| 75Hz | × | × | × | × | × | |
| 85Hz | × | × | × | × | × | |
Lynx LCD Monitor User Manual
Lynx LCD Monitor User Manual
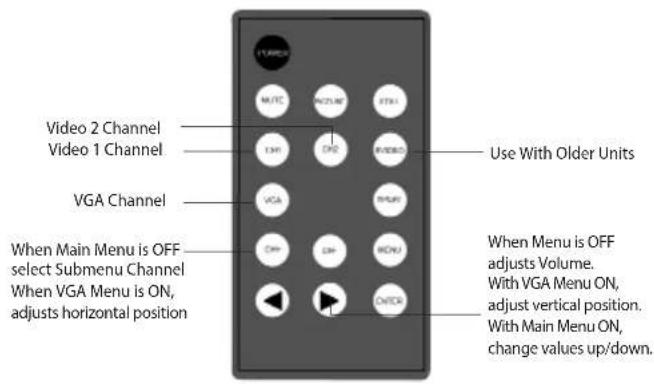
REMOTE CONTROL FUNCTIONS
Note: Remove the plastic tab in the remote to initiate contact with the battery.
This device complies with Part 15 of the FCC Ruled. Operation is subject to the following two conditions: 1) this device many not cause harmful interference, and 2) this device must accept any interference received, including interference that may cause undesired operation.
CONTENTS
Important Safegaurds....4
Introduction 6
Specifications....7
Front Panel Components and Controls....12
Setting Up the Monitor 13
Audio/Video Inputs 19
Troubleshooting 21
Remote Control Functions....22
Lynx Monitors VGA Resolution Chart....23
Lynx LCD Monitor User Manual
IMPORTANT SAFEGUARDS
Caution
Please comply with warning regarding power requirements. The power source contains high voltage parts. If the cover is removed, it may cause fire or electric shock. Do NOT remove the cover.
-
Read the Instructions: All safety and operating instructions should be read 9 before the monitor is operated.
-
Follow the Instructions: All operating and user instructions should be followed.
-
Cleaning: Unplug the monitor from the wall outlet before cleaning. 9Do not use liquid aerosol cleaners. Use only a damp, soft cloth.
-
Water and Moisture: Do not use the monitor in damp environments. For 9example, do not operate the monitor in bathrooms, 9sinks, laundry rooms, wet basements or near a 9swimming pool. Lynx monitors are not recommended for outdoor use.
-
Accessories: Always ensure that the monitor is placed on a solid, 9steady surface/stand. To avoid any possible danger 9and/or damage, do not place the monitor on an 9unsteady stand, stool, or other surface that could 9result in the monitor falling.
-
Ventilation: Slots and openings in the monitor's cabinet are provided for ventilation and ensure reliable operation of the monitor and to protect it from over-heating. These openings must never be blocked. The monitor should never be placed near or over a radiator or head register. This monitor should not be placed or built in to a rack or bookshelf unless proper ventilation is provided and supplier instructions have been adhered to.
Lynx LCD Monitor User Manual
TROUBLESHOOTING
1. No picture on the screen
9Make sure the power cord is securely connected and that the front LED is green.
2. Unable to read menu on screen.
9Adjust the resolution of the VGA Card to 1024 X 768 (15"), 1280 x 1024 9(17"/19"), 1600 x 1200 (20")
3. Color Deviation
9Check that the signal cables are securely tightened. The pins in the cable 9could be loose and causing a bad connection.
Lynx LCD Monitor User Manual
VGA Input
This 15-pin VGA cable (included) connects the monitor to computers and other devices that support VGA. The 15-pin VGA is a common connection found on most video cards, computer monitors, and high definition televisions that support VGA, etc.
HDMI
Digital Video Input supporting standard and high definition video.
Video 1 and Video 2
Two composite BNC video inputs and loop-through outputs
Audio
Mono audio input, with loop-through output via RCA connectors
Lynx LCD Monitor User Manual
-
Object and Liquid Entry: Never push any kind of object into this monitor through an opening as it may touch dangerous voltage points or short out parts that would result in fire or electric shock. Never spill liquid of any kind into the monitor.
-
Repair (Servicing): Do not attempt to repair this monitor yourself by opening or removing covers. This may expose you to dangerous voltage or other hazards. Refer to a qualified service technician if servicing is necessary. If monitor is opened by anyone other than a factory authorized service center, the warranty is voided. If serial number is removed or tampered with, the warranty is voided.
-
Parts Replacement: When part replacement is required, make sure it is performed by a qualified technician and that the parts are supported by the manufacturer.
-
Safety Check: Upon completion of any service or repair to the monitor, ask the service technician to perform a safety check to ensure that the monitor is in proper operating condition.
-
Keep the Instructions: The safety and operating instructions should be kept for future reference.
Lynx LCD Monitor User Manual
INTRODUCTION
Thank you for purchasing the Marshall Lynx LCD Monitor. The Lynx Series of Universal Monitors offers high performance features and excellent picture quality for use in a variety of industrial/commercial applications.
The information contained in this instruction manual covers the installation and operation of the monitors, and we encourage you to read it carefully. All the installation materials, wire/cables must pass quality inspections in accordance with international electrical rules and laws. When installing your monitor, remember to always adhere to local ordinances and laws concerning wire and cable installation.
Note: A/V inputs/outputs as well as optimal resolution will vary by screen size. Refer to Specifications section for more in-depth details.
Lynx LCD Monitor User Manual
Audio/Video Inputs
The rear panel of the Lynx monitor includes inputs for connection to devices such as computer networks, DVD players, cameras, etc. These inputs include:
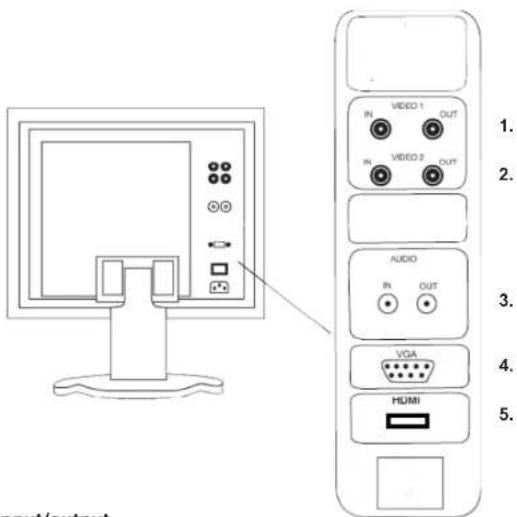
- Video 1: input/output
- Video 2 input output
- Audio In/Out
- VGA input
- HDMI input
Lynx LCD Monitor User Manual
Adjust the Setup Up Menu
To access Setup Menu, press the ↓ button on the front panel or Enter on the remote control. The settings will be highlighted (see Figure 11). Use ▶ arrow keys on the front panel or the remote control to scroll through the settings. Press Enter on the remote or ▶ on the front panel to access the settings. When finished making adjustments (◀), press the ▶ or Enter on the remote. Press Menu button on the remote or the □ button on the front panel to exit the Setup menu.
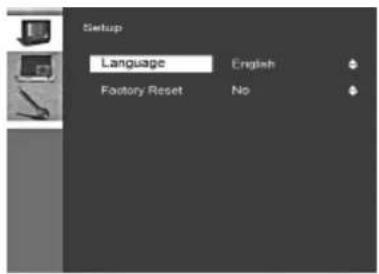
Figure 10. The Set up menu allows you to set the language of preference as well as factory presets.
Lynx LCD Monitor User Manual
SPECIFICATIONS
| Display Unit 915" 4:3 TFT/LCD | |
| Video Input/Output 92-channel 91-channel VGA input 1-channel HDMI input | multiple video BNC input/output |
| Audio Input/Output 91-channel RCA input/output | |
| Front Panel Controls 9Menu, Volume, Channel, and Stand-by Power | |
| Power Input 9AC100V ~ 230V 50 ~60Hz | |
| Power Consumption 9Max: 32W | |
| Dimensions 9356mm x 295mm x 67mm(W x H x D) 9 14" x 11.7" x 2.6" | |
| Weight 99.9 lbs/4.5kg | |
| Maximum Vertical Resolution | Max 1080 lines |
| Video System | Universal Video System |
| VGA/DVI connector | Resolution: 1024 x 768; downwards compatible |
| Speakers | Max: 2 x 1.0W |
| Maximum Brightness | 300cd/m2 |
| Maximum Contrast 9450:1 | |
| Response Time | 8ms |
| Viewing Angle | 170°/150° |
| Operating Environment 9Humidity: 10% ~ 85% | Temperature: 0°C ~ 40°C |
Lynx LCD Monitor User Manual
| Display Unit 917" 5:4 TFT/LCD | |
| Video Input/Output 92-channel 91-channel VGA input 1-channel HDMI input | multiple video BNC input/output |
| Audio Input/Output 91-channel | RCA input/output |
| Front Panel Controls 9Menu, Volume, Channel, and stand-by Power | |
| Power Input 9AC100V ~ 230V | 50 ~60Hz |
| Power Consumption 9Max: 32W | |
| Dimensions 915.2" x 13.3" x 26" / 387mm x 338mm x 67mm (W x H x D) | |
| Weight 911 lbs/5.0kg | |
| Maximum Vertical Resolution 9 | Max 1080 lines |
| Video System 9Universal Video | System |
| VGA/HDMI connector 9Resolution: 1280 x 1024; | |
| Speakers 9Max: 2 x 1.0W | |
| Maximum Brightness | 300cd/m2 |
| Maximum Contrast: | 1000:1 |
| Response Time | 8ms |
| Viewing Angle | 170°/160° |
| Operating Environment 9Humidity: 10% ~ 85% | Temperature: 0°C ~ 40°C |
Lynx LCD Monitor User Manual
Adjust the Display Settings
To select, press the ↓ button on the front panel or Enter on the remote control. The settings will be highlighted (see Figure 9). Use ▶ arrow keys on the front panel or the remote control to scroll through the settings. Press Enter on the remote or ↓ on the front panel to access the settings. When finished making adjustments (◀), press the ↓ or Enter on the remote. Press Menu button on the remote or the □ button on the front panel to exit Display Settings menu.

Figures 8 & 9. Display Settings allow you to make adjustments to the screen. (Note: PIP mode disabled)

Figures 5 & 6. Other features that can be accessed in Image Settings include MPEG Noise Reduction (MPEG NR).


Figure 7. Advanced features in Image Settings allow you to adjust the Red, Green and Blue Color Scheme.
| Display Unit 919" 5:4 TFT/LCD | |
| Video Input/Output 92-channel 91-channel VGA input 1-channel HDMI input | multiple video BNC input/output |
| Audio Input/Output 91-channel | RCA input/output |
| Front Panel Controls 9Menu, Volume, Channel, and stand-by Power | |
| Power Input 9AC100V ~ 230V | 50 ~60Hz |
| Power Consumption 9Max: 40W | |
| Dimensions 918" x 14.6" x 3"/ 458mm x 373mm x 77mm (W x H x D) | |
| Weight 911 lbs/5.0kg | |
| Maximum Vertical Resolution 9Max 1080 lines | |
| Video System 9Universal Video System | |
| VGA/DVI connector 9Resolution: 1280 x 1024; downward compatible | |
| Speakers 9Max: 2 x 1.0W | |
| Maximum Brightness 9450cd/m ^2 | |
| Maximum Contrast: | 1000:1 |
| Response Time | 8ms |
| Viewing Angle | 170°/160° |
| Operating Environment 9Humidity:10% ~ 85% | Temperature: 0°C ~ 40°C |
Lynx LCD Monitor User Manual
| Display Unit 20" 4:3 TFT/LCD | |
| Video Input/Output 2-channel multiple video BNC input/output1-channel VGA input1-channel HDMI input | |
| Audio Input/Output 1-channel RCA input/output | |
| Front Panel Controls Menu, Volume, Channel, and stand-by Power | |
| Power Input AC100V ~ 230V 50 ~60Hz | |
| Power Consumption Max: 50W | |
| Dimensions 18" x 14.6" x 3"/ 458mm x 373mm x 77mm(W x H x D) | |
| Weight 15.8 lbs/7.2kg | |
| Maximum Vertical Resolution Max 1080 lines | |
| Video System Universal Video System; downward compatible | |
| VGA/DVI connector Resolution: 1600 x 1200 | |
| Speakers Max: 2 x 1.0W | |
| Maximum Brightness 450cd/m2 | |
| Maximum Contrast: 1000:1 | |
| Response Time 8ms | |
| Viewing Angle 178°/178° | |
| Operating Environment Temperature: 0°C ~ 40°CHumidity: 10% ~ 85% |
Lynx LCD Monitor User Manual
Adjust the Image Settings
In the Image Settings Screen, you can adjust Brightness, Contrast, Sharpness, as well as more Advanced Settings like Noise Reduction and Flesh Tone. To select, press the ↓ button on the front panel or Enter on the remote control. The settings will be highlighted (see Figure 4). Use ▶ arrow keys on the front panel or the remote control to scroll through the settings. Press Enter on the remote or ↓ on the front panel to access the settings. When finished making adjustments (◀), press the ↓ or Enter on the remote. Press Menu button on the remote or the □ button on the front panel to exit Image Settings menu.

Figure 3. Pressing the ↓ button on the front panel or Enter on the remote will highlight the feature presets you want to adjust.
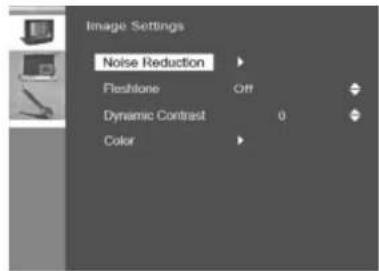
Figure 4. Advanced settings like Noise Reduction and Dynamic Contrast can also be adjusted.
Adjust the Image Settings
In the Image Settings Screen, you can adjust Brightness, Contrast, Sharpness, as well as more Advanced Settings like Noise Reduction and Flesh Tone. To select, press the ↓ button on the front panel or Enter on the remote control. The settings will be highlighted (see Figure 4). Use ▶ arrow keys on the front panel or the remote control to scroll through the settings. Press Enter on the remote or ↓ on the front panel to access the settings. When finished making adjustments (◀), press the ↓ or Enter on the remote. Press Menu button on the remote or the ☐ button on the front panel to exit Image Settings menu.

Figure 1. The Image Settings screen allows you to adjust picture settings such as brightness, contrast, sharpness, etc.
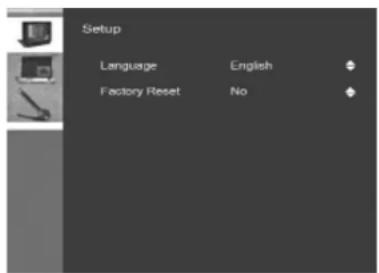
Figure 2. The Setup screen allows you to select language and reset to factory settings.
Lynx LCD Monitor User Manual
| Display Unit 926" 16:9 TFT/LCD | |
| Video Input/Output91-channel VGA input1 channel HDMI input | 2-channel multiple video BNC input/output |
| Audio Input/Output 91-channel | RCA input/output |
| Front Panel Controls 9Menu, Volume, Channel, and stand-by Power | |
| Power Input 9AC100V ~ 230V 50 ~60Hz | |
| Power Consumption 9Max: 110W | |
| Dimensions 926.4" x 16.5" x 4.9" / 673mm x 421mm x 125mm(W x H x D) | |
| Weight 927.5 lbs/12.5kg | |
| Maximum Vertical Resolution 9Max 1080 lines | |
| Video System | Universal Video System |
| VGA/DVI connector | Resolution: 1600 x 1200; downward compatible |
| Speakers | Max: 2 x 1.0W |
| Maximum Brightness | 500cd/m2 |
| Maximum Contrast: | 1000:1 |
| Response Time | 8ms |
| Viewing Angle | 176°/176° |
| Operating Environment9Humidity:10% ~ 85% | Temperature: 0°C ~ 40°C |
FRONT PANEL COMPONENTS AND CONTROLS SETTING UP THE MONITOR
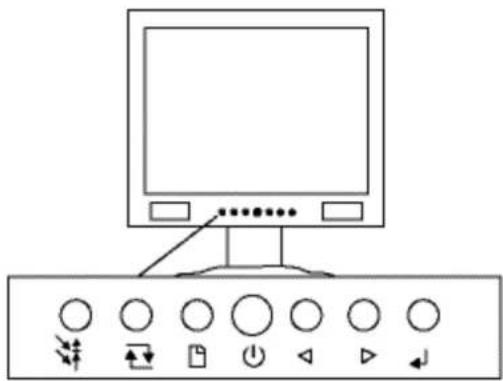

Power button (stand-by)

Exit Menu

With menu OFF, these buttons adjust volume (0 \~100).
With menu ON, use to scroll through menu.
After an item is selected, use these to change item values.

When menu is OFF, selects video input:
Video 1, Video 2, VGA, HDMI

When menu is ON, use this button to select an item
2
Carefully unpack the items from the box and take a moment to ensure that the following items are included:
- Lynx monitor
- Power cord
- VGA cable
- Remote control (Lithium battery included)
If any of these items are missing, contact customer support at 800 800-6608.
Next, take a few moments to familiarize yourself with the front and rear panel controls and inputs. The front panel of the Lynx Monitor includes hard-button controls for Menu, Volume, Channels and Power (stand-by).
The rear panel of your Lynx monitor includes S-video inputs, 2-channel multiple video BNC input/outputs, and 1 channel YPbPr input.
After finding a suitable and secure location for the monitor, plug the power cord
VOLUME CONTROL
Use the left and right arrow keys on the remote or front panel to adjust the volume.
VIDEO MAIN MENU
To access the Main Menu features, press Menu on the remote control or the button on the front panel.
The Image Settings screen will appear along with three icons on the left-hand side: Image Settings, Display Settings, and Setup. See Figures 1, 2 and 3. Use the arrow buttons on the remote control or front panel to scroll through the settings.
B


- Marshall Lynx LCD Universal Monitors
- CAUTION
- Graphic Symbol Explanation
- Lynx LCD Monitor User Manual
- REMOTE CONTROL FUNCTIONS
- CONTENTS
- IMPORTANT SAFEGUARDS
- TROUBLESHOOTING
- No picture on the screen
- Unable to read menu on screen.
- Color Deviation
- VGA Input
- HDMI
- Video 1 and Video 2
- Audio
- INTRODUCTION
- Audio/Video Inputs
- Adjust the Setup Up Menu
- Adjust the Display Settings
- Adjust the Image Settings
- FRONT PANEL COMPONENTS AND CONTROLS SETTING UP THE MONITOR
- VOLUME CONTROL
- VIDEO MAIN MENU
Merke : MARSHALL
Modell : Lynx M-LYNX-15
Kategori : Skjerm