VP3420 - Hub et station d'accueil SMK-Link - Gratis bruksanvisning og manual
Finn enhetens veiledning gratis VP3420 SMK-Link i PDF-format.

Brukerspørsmål om VP3420 SMK-Link
0 spørsmål om dette apparatet. Svar på dem du kjenner, eller still ditt eget.
Still et nytt spørsmål om dette apparatet
Last ned instruksjonene for din Hub et station d'accueil i PDF-format gratis! Finn veiledningen din VP3420 - SMK-Link og ta den elektroniske enheten tilbake i hendene. På denne siden er alle dokumenter som er nødvendige for bruken av enheten din publisert. VP3420 av merket SMK-Link.
BRUKSANVISNING VP3420 SMK-Link
Thank You
Thank you for purchasing SMK-Link's GoSpeak™ Pro ultra portable speaker system. This User's Guide is designed to help guide you through setting up your GoSpeak! Pro ultraportable speaker system. The process of setting up your GoSpeak! Pro is an easy step-by-step process. Should you need additional help, we have the following additional resources:
Additional help and resources www.smklink.com
Toll free technical support 888-696-3500
Free email technical support pcsupport@smkusa.com
Safety Information
⚠ WARNING: To reduce the risk of fire or electrical shock, do not expose the system to rain or moisture.
⚠ WARNING: To reduce the risk of electric shock, do not disassemble this system unless you are qualified. Refer servicing to qualified service personnel.
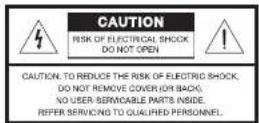

The lightning flash with arrowhead symbol within an equilateral triangle alerts the user to the presence of uninsulated, dangerous voltage within the system enclosure that may be of sufficient magnitude to constitute a risk of electrical shock.

The exclamation point within an equilateral triangle, as marked on the system, is intended to alert the user to the presence of important operating and maintenance instructions in this owner's guide.
CAUTION: Make no modifications to the system or accessories. Unauthorized alterations may compromise safety, regulatory compliance, and system performance.
CAUTION: Do not place any naked flame sources, such as lighted candles, on or near the apparatus.
CAUTION: Where the mains plug is used as the disconnect device, such disconnect device shall remain readily operable.
WARNING: Do not expose this apparatus to dripping or splashing and do not place objects filled with liquids, such as vases, on or near the apparatus As with any electronic products, use care not to spill liquids into any part of the system. Liquids can cause a failure, electric shock, and/or a fire hazard.
Additional Safety Instructions
- Road these instructions.
- Keep these instructions.
- Here all warnings.
- Follow all instructions.
- Do not use this apparatus near water.
- Clean only with a dry cloth.
- Do not black any ventilation openings. Install in accordance with the manufacturer's instructions.
- Do not recall near any heat sources, such as radiators, heat registers, stoves, or other apparatus (including amplifiers) that produce heat.
- Do not defeat the safety purpose of the polarized or grounding-type plug. A polarized plug has two blades with one wider than the other. A grounding-type plug has two bodes and a third grounding proong. The wider blade or third prong is provided for your safety. If the provided plug does not fill into your outlet, consult an electrician for replacement of the oscled to outlet.
- Protect the lower cord from being walked on or puncture, particularly at plugs, convenience receptacles, and
Agency Certifications
USA - FCC CFR 47 Part 15, Subpart B This device complies with Part 15 of the FCC Rules. Operation is subject to the following two conditions: (1) This device may not cause harmful interference, and (2) This device must accept any interference received, including interference that may cause unsecured operation. This equipment has been tested and found to comply with the limits for a class B digital device, pursuant to part 15 of the FCC Rules. These limits are designed to provide reasonable protection against harmful interference in a residential installation. This equipment generates, uses and can radiate radio frequency energy and if not installed and used in accordance with the instructions, may cause harmful interference to radio communications. However, there is no guarantee that interference will not occur in a particular installation. If this equipment does cause harmful interference to radio or television reception, which can be determined by turning the equipment off and on, the user is encouraged to try to correct the interference by one or more of the following measures:
* Recorient or relocate the receiving antenna.
increase the separation between the equipment and receiver.
* Connect the equipment into an outlet on a circuit different from that to which the receiver is connected.
* Consult the dealer or an experienced radio/TV technician for help.
Operation with non-approved equipment is likely to result in interference to radio and TV reception. The user is cautioned that changes and modifications made to the equipment without the approval of manufacturer could void the user's authority to operate this equipment. Changes or modifications not expressly approved by the party responsible for compliance could void the user's authority to operate the equipment.
Canada - ICES-003 This Class B digital apparatus complies with Canadian ICES-003. Operation is subject to the following two conditions: (1) this device may not cause interference, and (2) this device must accept any interference, including interference that may cause undesired operation of the device.
European RoHS DIR 2002/95/EC
Waste electrical and electronic products must not be disposed of with household waste. Please recycle where facilities exist. Check with your Local Authority or Retailer for recycling advice.
the aim where they exit from the apparatus. 11. Only use attachments/accessories specified by the manufacturer. 12. Unplug this apparatus during lighting storms or when unused for long periods of time. 13. Refer all servicing to qualified service personnel. Servicing is required when the apparatus has been damaged in any way, such as power-supply car or plug is damaged, liquid has been spiked or objects have fallen into the apparatus, the apparatus has been exposed to rain or moisture, soes not operate normally, or has been dropped. 14. To prevent risk of fire or electric shock, avoid oversteating wall outlets, extras on carics, or integral convenience recents. 15. See product enclosure for safety-related markings. 16. Use proper power sources: Plug the product into a proper power source, as described in the operating instructions or as marked on the product.

GoSpeak! Pro User's Guide
natural_image
Simple line drawing of an open book or notebook (no text or symbols visible)
Setting up GoSpeak! Pro
Remove speaker from carry bag and place on a sturdy surface with outside towards audience.
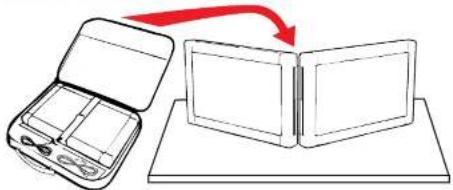
natural_image
Diagram showing a device with open lid and a closed panel connected to a tray, with a red arrow indicating transformation (no text or symbols)Connect power cord from wall outlet to speaker.
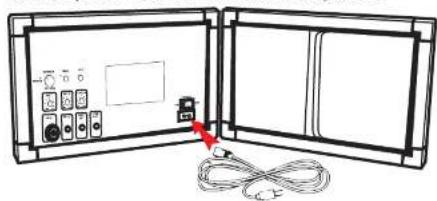
natural_image
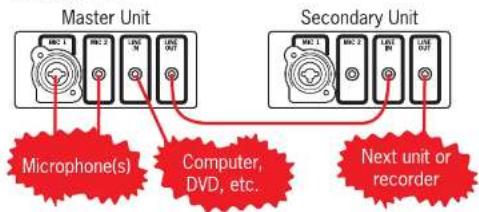
Diagram of an open electronic device with ports and cables, no text or symbols presentAttach sound cables to speaker system.
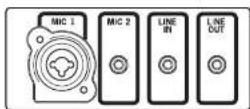
Mic 1: Combination XLR and 1/4^th microphone jack
Mic 2: 1/8^th microphone jack
Line In: 1/8 ^th input from computer, CD player, etc. or daisy chain to second GoSpeak!.
Line Out: 1/8 ^th " output to recorder or daisy chain to second GoSpeak!.
Set volume levels.
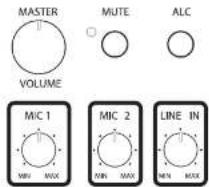
The first time you are going to use your GoSpeak Pro turn the Master Volume down to its lowest setting and set the independent volumes in the middle.
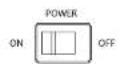
Turn on GoSpeak!
Adjust the Sound Level
The volume of each input can be set independently. Start by changing the Master Volume. Experiment until you have reached the optimum sound level for your venue.
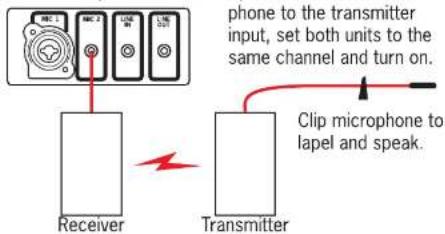
Using a Wireless Mic
To use an external wireless microphone, attach the receiver output to the Mic 2 input. Attach the micro-
Daisy Chaining GoSpeak! Pro
Multiple GoSpeak! units can be connected in series to form a daisy chain of speakers to reach a larger audience. This is particularly useful for wide rooms or long rooms.
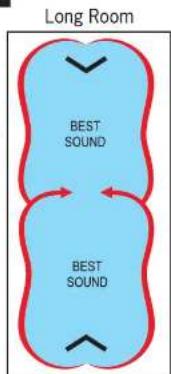
Select one unit to be the Master Unit. Plug microphone(s) into that unit. Then route the Line Out of that master unit into the Line In of the other unit. Repeat for each additional GoSpeak unit.
nxt ^® Trademark of New Transducers Limited