49 GUB 8967 - Televizors GRUNDIG - Bezmaksas lietošanas instrukcija
Atrodiet ierīces rokasgrāmatu bez maksas 49 GUB 8967 GRUNDIG PDF formātā.

Lietotāju jautājumi par 49 GUB 8967 GRUNDIG
0 jautājums par šo ierīci. Atbildiet uz tām, ko zināt, vai uzdodiet savu.
Uzdot jaunu jautājumu par šo ierīci
Lejupielādējiet instrukcijas savam Televizors PDF formātā bez maksas! Atrodiet savu rokasgrāmatu 49 GUB 8967 - GRUNDIG un atgūstiet kontroli pār savu elektronisko ierīci. Šajā lapā ir publicēti visi dokumenti, kas nepieciešami jūsu ierīces lietošanai. 49 GUB 8967 zīmola GRUNDIG.
LIETOŠANAS INSTRUKCIJA 49 GUB 8967 GRUNDIG
TV
USER MANUAL
49 GUB 8967
EN
4 SETUP AND SAFETY
6 GENERAL INFORMATION
6 Special features of your television set
6 Receiving digital stations
6 Things to do for energy saving
7 Notes on still images
8 PACKING CONTENTS
8 Standard accessories
8 Optional accessories
9 CONNECTION/
PREPARATION
9 Connecting the antenna and the power cable
10 Setting up or hanging
11 Inserting batteries into the remote control
12 OVERVIEW
12 Connections of the television set
13 Control buttons on the TV
13 Buttons of the remote control
13 Turning on the television and switching it to standby mode
13 Adjusting the volume or changing the station
14 Remote control - main functions
15 Remote control - all functions
16 SETTINGS
16 Settings for connecting to the home network
16 Tuning television channels
17 Initial set-up - overview
18 Initial Set-up
21 Channel Editor for digital channels
23 PICTURE / SOUND SETTINGS
23 Picture settings
24 Sound settings
25 FUNCTIONING OF THE TV - BASIC FUNCTIONS
25 Switching on and off
25 Selecting channels
25 Selecting channels from lists
25 Selecting a signal source
25 Adjusting the volume
25 Muting
26 Audio language
26 Subtitles
26 Swap function
26 Picture mode
26 Sound mode
26 Auto standby
27 Sleep timer
27 Changing the picture format
27 FUNCTIONING OF THE TV - ADDITIONAL FUNCTIONS
28 ELECTRONIC TV GUIDE
29 HBBTV MODE
29 What is HbbTV?
30 Disabling and enabling HbbTV
30 Using HbbTV
30 Additional functions for video indexes
31 TELETEXT MODE
31 TOP text or FLOF text mode
31 Normal text mode
31 Additional functions
32 USB PROCESS
32 File formats
33 Connecting external data media
34 File browser
34 Playback basic functions
35 Additional playback functions
36 SMART INTERACTIVE TV
36 Data Collection and Software Update Notice
36 Privacy Agreement
36 SMART Interactive TV internet applications
TABLE OF CONTENTS
37 Getting Started with Smart Interactive TV
37 Launching the Netflix application
37 Logging out of the account on Netflix application
37 How to stop the Netflix app from running in the background
38 LANGUAGE SETTINGS
38 Changing the menu language
38 Changing the audio language
38 Changing the subtitle language
39 ACCESSIBILITY FUNCTIONS
40 TIMER FUNCTIONS
40 Auto Sync
40 Time and date
40 Time Zone
40 Sleep Timer
40 Auto standby
41 LOCK SETTINGS
41 Changing the PIN code
41 Blocking a television channel
41 Watching a blocked television channel
41 Parental Guidance
42 OTHER SETTINGS
42 Software update (USB)
42 Software update (NetReady)
42 Resetting the television to its original state
43 USING EXTERNAL DEVICES
43 HDMI CEC
43 HDMI CEC connection functions of the television
44 High definition - HD ready
44 Connection options
45 Connecting an external device
45 Using a DVD recorder, DVD player, video recorder or set-top box
45 Headphones
45 Hi-fi system
47 OPERATION WITH COMMON INTERFACE
47 What is common interface?
47 Inserting the CA module
47 Access control for CA module and smart card
48 NETWORK SETUP
48 Network connection
48 Wired network
48 Wired network settings
50 Wireless network
52 DETAILED CHANNEL SETTINGS
52 Searching for all digital television channels from a satellite automatically
53 Searching for digital television channels from a satellite manually
54 LNB Settings
55 Searching for digital television channels through cable automatically
55 Searching for digital television channels through cable manually
56 Searching for digital television channels through aerial automatically
56 Searching for digital television channels through aerial manually
57 Tuning analogue television stations
58 Displaying signal information
59 Service information for authorised dealers
59 Notes for wireless (WLAN) connection
60 Disposing the packaging
60 Environmental note
61 Troubleshooting
63 GLOSSARY
66 INDEX
About your TV set
In addition to DVB-S, DVB-T and DVB-C broadcasts, you can also watch digital TV programs on your TV.
■Many features of the TV set require an Internet connection. The TV set is equipped with WLAN and a LAN port.
Intended use
■ The TV set is designed for use in dry rooms.
■Use the TV set with the supplied stand or a suitable VESA bracket.
■The TV set is primarily intended for the playback of TV programs, streaming content and music/video material from external devices. Any other use is strictly prohibited.
It is not intended as an information display or for predominant use as a computer monitor. If a still image or a non-full-format image is displayed for an extended period, visible traces may remain on the screen for some time.
This is not a defect that can be used as the basis for a warranty claim.
Interface criteria
This product has been manufactured in compatibility with Turkish Telecommunication networks.
Safety
WARNING
Risk of electrical accident
■Do not dismantle the TV set. Safety risk may arise and also the guarantee of the product can be void if the television set is opened.
■ The TV set can only be operated with the power cable or the AC/DC adapter supplied with the product.
■ Do not operate the TV set with a damaged power cable/AC/DC adaptor (if supplied).
If the plug on the TV set has an earthing contact, only insert the plug into a socket with an earthing contact.
■Plug the TV set into the mains socket only after you have connected the external devices and the antenna.
■ Protect the TV set from moisture. Do not place any vessels filled with water (such as vases) on the TV.
Fire hazard

To prevent the spread of fire, keep candles or other open flames away from this product at all times.
■ Do not cover the ventilation slots on the TV set.
■ Always unplug the power plug and antenna plug during lightning and thunderstorm.
- Keep candles or other open flames away from the TV set.
■ Do not expose the batteries to extreme heat such as sunshine, fire or the like.
■ Only use batteries of the same type (brand, size, properties). Do not use used and new batteries together.
WARNING
Injuries caused by falling TV set
Never place the TV set on an unstable surface. The TV set may fall, causing serious injury, possibly leading to death in isolated cases.
Observe the following precautions especially to protect the children from such negative incidents:
■ Only use furniture that can safely support the TV set.
■ Make sure that the TV set does not protrude beyond the dimensions of the furniture on which it is resting.
- Do not place the TV set on tall furniture that has the risk of tipping over such as cabinets, sideboards or bookcases. If you have no other choice, fix the furniture and the TV set to the wall to prevent them from tipping over.
■ Do not place the TV set on fabric or other materials located between the TV set and furniture.
■ Instruct children that there is danger associated with climbing on furniture when the TV set is to be reached.
■ Consider the above mentioned warnings whenever you change the location of the TV set.
CAUTION
Shortened service life due to high operating temperature
■ Do not place the TV set next to heating units or in direct sunlight.
■ To ensure adequate ventilation, maintain clearance of at least 10 cm around the TV set.
Discoloration of furniture due to rubber feet
■ Some furniture surfaces may discolor when they come in contact with rubber. To protect furniture, you can place a sheet made of glass or plastic under the stand. Do not use textile underlays or mats such as doilies.
Electromagnetic interference
■ Devices connected to the product (satellite receiver, DVD player, and etc.) or signal emitting devices (router and etc.) close to the product may cause disturbance in the image and noise in the sound.
■ Connection cables used on the product must be shorter than 3 m.
If the product cannot perform its function due to electrostatic discharge, the user may need to switch off and then switch on the product.
■ A shielded, HDMI-certified and ferrite cable must be used with the product.
Environmental information

Do not dispose of batteries in the household waste. Used batteries must be returned to
retail stores or public collection points. You help protect the environment in this way.
■ Be sure to dispose of packaging materials for your product separately according to the guidelines of local authorities so that they can be recycled in an environmentally safe manner.
■ Switch the TV set to stand-by if you will not use it for a while. In standby mode, the TV set uses very little energy ( ≤ 0.5 W). If you do not use the TV set for an extended period, turn it off with the power switch or unplug the power cord from the socket.
■ Select a location so that no direct sunlight falls on the screen. Thus, you can select a lower backlight and provide power saving.
Do not dispose of the product along with normal household waste at the end of its service life. Take it to a recycling center
for electrical and electronic equipment.
Special features of your television set
- Your television set enables you to receive and watch digital stations (via DVB-S, DVB-T and DVB-C), including the High Definition (HD) ones. At present, reception for these digital television stations in High Definition is only possible in some countries in Europe.
Although this television meets the current DVB-S, DVB-T and DVB-C standards as of August 2012, its compatibility with future DVB-S digital satellite broadcasts, DVB-T digital terrestrial broadcasts and DVB-C digital cable broadcasts is not guaranteed.
This television can receive and process all analogue and all unencrypted digital stations. This television set has an integrated digital and analogue receiver. The digital receiver unit converts the signals from digital stations to provide outstanding audio and picture quality.
The TV guide (only for digital stations, if provided by the broadcaster) tells you of any schedule changes at short notice, and provides an overview of all the stations' schedules for the next few days.
■ You can connect various data media, for example, an external hard drive, a USB memory stick or a digital camera to the USB socket. Using the file browser, you can then select and play the file formats you want (for example, MP4, MP3 or JPEG data).
■ Interactive applications allow you to use various Internet services easily.
Receiving digital stations
■ To receive digital satellite stations (DVB-S) you need a satellite antenna.
■ To receive digital stations (DVB-T) you need a digital rooftop or indoor antenna (passive or active indoor antenna with its own power supply).
■ The antenna cable of the cable TV network that broadcast in DVB-C must be plugged into TV in order to receive the DVB-C broadcasts.
■ Unlike analogue broadcasting, not every station has its own transmission frequency. Instead, several stations are grouped into what are known as bouquets on a regional or national level.
■ You can find the current transmission information on teletext from various broadcasters, or look in a TV guide or on the Internet.
■ Various digital television stations from private broadcasters are encrypted (DVB-S, DVB-T and DVB-C). Watching these stations and the recording and playback functions are only possible with the appropriate CI module and a SmartCard. Ask your specialist dealer.
Things to do for energy saving
Those items mentioned below will help you reduce the consumption of natural resources as well as save your money by reducing electricity bills.
If you will not be using the TV set for several days, the TV set should be disconnected from the mains for environmental and safety reasons. TV will not consume energy in this condition.
If the TV set has main switch, it will be enough to turn the TV off via main switch. TV will reduce energy consumption almost to Zero Watt.
■ TV consumes less energy on stand-by mode. However, some TV sets may have features such as on timer, that require the TV set to be left in standby to work correctly.
■ TV consumes less energy when brightness is reduced.
Notes on still images
Watching the same image for a long time on the screen may cause a still image remains feebly on the background. Feeble image(s) on the background is originated from LCD/LED technology and does not require any action under guarantee. To avoid such cases and/or minimize the impact, you may observe the tips below.
■ Do not allow the same TV channel to stay on the screen for a very long time. Channel logos may cause this situation.
- Do not allow the images, which are not full screen, to constantly stay on the screen; if not streamed in full screen format by the broadcaster, you can convert the images to full screen by changing picture formats.
■ Higher brightness and/or contrast values will lead this impact to appear faster; therefore, you are recommended to watch your TV in the lowest brightness and contrast levels.
①
natural_image
Top-down schematic of a computer monitor chassis showing front panel, rear panel, and internal components (no text or labels)③
text_image
1 2 3 4 5 6 7 8 9 FEN 0 TPT EXT 1 OK Cancel 2 Cancel + P - + - - - - - - - - - - - - - - - - - - - - - - - - - - - - - - - - - - - - - - - - - - - - - - - - - - - - - - - - - - - - - - - - - - - - - - - - - - - - - - - - - - - - - - - - - - - - - - - - - - - - - Print My Press②


④

5

6
User Manual

natural_image
Simple line drawing of three vertical wavy lines inside a rounded rectangle (no text or symbols)
Standard accessories
1 TV
2 Stand
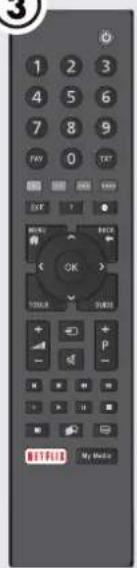
3 Remote control
4 Battery for remote control
5 Screws and installation instructions for stand
6 User manual
Optional accessories
Cleaning cloth
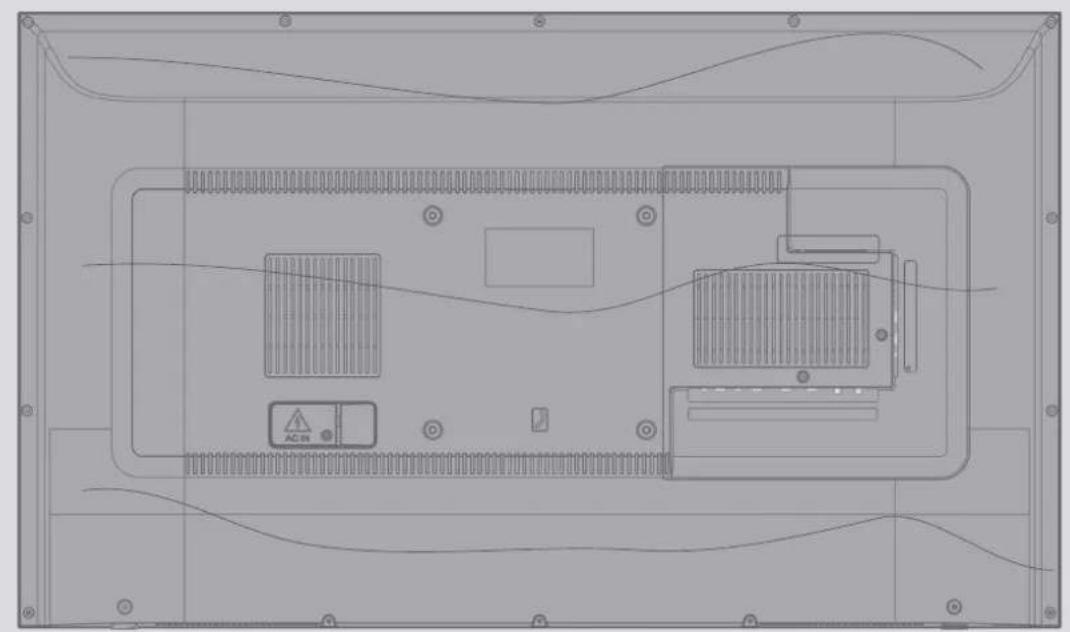
Connecting the antenna and the power cable
text_image
3 1 2 TV R SAT1 To receive digital satellite channels (DVB-S), connect the satellite antenna cable to the SATELLITE antenna socket on the television set; and / or
2a For terrestrial digital stations (DVB-T) plug the cable of the rooftop, indoor antenna (passive or active indoor antenna with its own power supply) into the antenna socket ANT IN on the television set; or
2b For digital stations of the cable TV network (DVB-C) plug the antenna cable into the antenna socket ANT IN on the television set;
or
2c For analogue stations plug the antenna cable into the antenna socket ANT IN on the television set.
Note:
■ When connecting an indoor antenna you may have to try it out at different positions until you get the best reception.
3 Plug the mains cable into the wall socket.
Note:
- Only plug the device into the mains socket after you have connected the external devices and the antenna. - Do not use an adapter plug or extension cable which does not meet the applicable safety standards. Do not tamper with the power cable.
Setting up or hanging
■ Select a location so that no direct sunlight falls on the screen.
Setting up with stand
■ To mount the stand, refer to the installation instructions included.
■ Place the TV set on a hard, level surface.
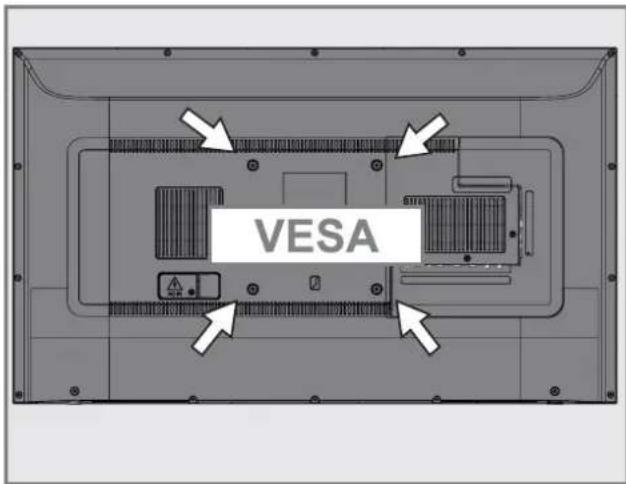
Installation preparation for VESA installation kit
Contact authorised dealer to purchase the bracket.
You will need the following:
■ A pair of scissors,
■ A cross-tip screwdriver.
Follow the installation instructions for the VESA installation kit.
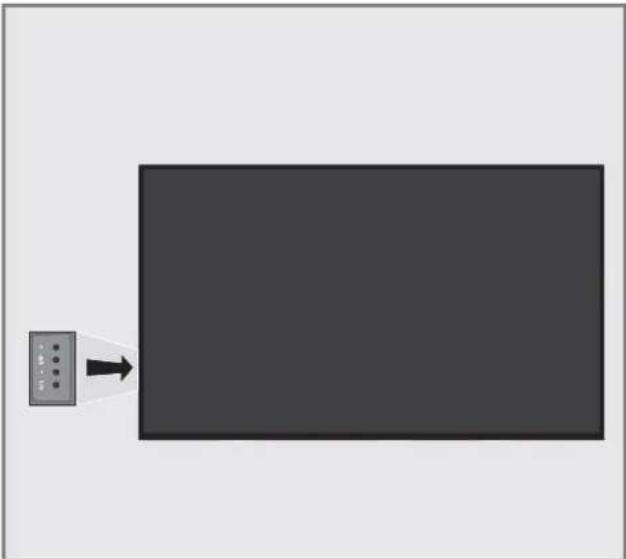
1 Place the TV set in the film on a smooth surface with the screen facing down.
2 Cut open the film on the back side using the scissors.
3 Connect the required cables to the connectors on the TV set. See the "Connections" section in this manual.
4 Tie the cables so they do not hang down onto the floor.
5 Screw the VESA bracket onto the TV set and mount it according to its installation instructions.
text_image
VESAInserting batteries into the remote control

natural_image
Illustration of hands holding a battery with a magnified view of its internal structure (no text or symbols)1 Open the battery compartment by removing the lid.
2 Insert the batteries (2 x 1.5 V micro; for example R03 or AAA). Observe the polarity (marked on the base of the battery compartment).
3 Close the battery compartment.
Note:
If the television no longer reacts properly to remote control commands, the batteries may be flat. Be sure to remove used batteries.
■ The manufacturer accepts no liability for damage resulting from used batteries
Environmental note


This symbol on the battery or on the packaging indicates that the battery provided with this product shall not be treated as
household waste. On certain batteries this symbol might be used in combination with a chemical symbol. The chemical symbols for mercury (Hg) or lead (Pb) are added if the battery contains more than 0.0005% mercury or 0.004% lead.
Batteries, including those which contain no heavy metal, may not be disposed of with household waste. Please dispose of used batteries in an environmentally sound manner. Find out about the legal regulations which apply in your area.
Connections of the television set

text_image
C AC IN HDMI1 USB1 VIP(M)+ d/1 Service LAN Optic Out USB(HDD) HDMI3(ARC) HDMI2 SATELLITE ANT-IN 13/18V max 500mA■ SERVICE: Service only.
■ LAN: Network connection.
■ Optic Out: optical audio output.
■ USB(HDD): For data media and keyboard.
■ HDMI3 (ARC): Input for digital audio and image data.
■ HDMI2: Input for digital audio and image data.
■ SATELLITE: Input for satellite antenna signal. Suitable for single-cable SCR system.
■ ANT IN: For antenna cable (terrestrial antenna or cable connection).
■ ☉: External audio output or headphone jack with adapter.
■ USB 1: For data media and keyboard.
■ HDMI1: Input for digital audio and image data.
■ Cl: For CA modules for receiving scramble channels.
Control buttons on the TV Buttons of the remote control
natural_image
Simple diagram showing a dark rectangle with a small gray box and an arrow pointing to it (no text or symbols)Turning on the television and switching it to standby mode
1 Press ⏻/I to turn on the television in the stand-by mode.
2 Press ⏻/I to switch the television to the stand-by mode.
Adjusting the volume or changing the station
1 Use V/P button to select »Set to Audio Navigation« or »Set to Channel Navigation«.
2 Press + to increase the volume/channel.
3 Press - to decrease the volume/channel.
Remote control - main functions

text_image
Directly selects the channels Displays the favorite list Exits menu and applications Displays information Opens the menu Opens the channel list Opens the quick menu Adjusts the volume Turns the sound on/off (mute) This button has no function Launches the Netflix application. Turns on/off the television set (stand-by) Switches between teletext and TV modes Menu, applications and HbbTV functions Opens the applications menu Swap function; switches the menus one level back Opens the electronic TV guide Signal source Selects the channels step by step Previous, Next, Forward, Back; Double character, Update, Pause, Answers in Teletext mode Selects subtitle Opens Media Player menu Selects audio channelCursor Control

Moves the cursor up and down in the menus.
Moves the cursor left/right in menus.
Opens channel list; activates various functions.
Remote control - all functions
- (red) Shortcut keys in Teletext/HBB TV mode;
•• (green)
••• (yellow) selects various functions on menus/
••••(blue) activates.
Selects the previous track/previous picture function in the file browser and in some video applications.
Selects the previous track/previous picture function in the file browser and in some video applications.
Shows the answers in teletext mode; starts backward picture search in the file browser and in some video applications.
Page pause in teletext mode; starts forward picture search in the file browser and in some video applications.
Starts playing in the file browser and in some video applications.
Pauses playing in the file browser and in some video applications.
Skipping the waiting time in teletext mode; ends playing in the file browser and in some video applications.
3D This button has no function.
The Television is fitted with an "installation assistant", which guides you step by step through the basic settings.
Using the screen dialogue, the user guide enables supposedly complex settings and data entries to be presented simply and clearly for everybody.
Pages and dialogue items appear on the screen, which identify the subsequent and likely operating steps.
To support this, you will also see the required button symbols of the remote control.
The basic settings in detail:
- language selection
- country selection;
- Time Setting;
- network settings (if required);
- Station settings (DVB-S, DVB-T, DVB-C and analogue channels).
The detailed settings can be found on pages 18 and 20.
Settings for connecting to the home network
Depending on the connection to the home network, you connect your television to the home network:
- via a LAN connection or
- without cable via WLAN
IPV4-IPV6 selection must be done before connecting via LAN or WLAN.
Warning:
■ To access internet via IPV6, your internet service provider and modem must be supporting IPV6. If only the modem supports IPV6, you can only connect only to the modem; you cannot have internet connection.
There are two options with the LAN connection:
Automatic connection,
all data regarding connection settings (»IP Address«, »Netmask«, »Gateway« and »DNS«) are obtained from modem automatically.
Manual connection,
all data regarding connection settings (»IP Address«, »Netmask«, »Gateway« and »DNS«) must be configured manually.
There are various options when using WLAN:
Automatic connection,
all data regarding connection settings (»IP Address«, »Netmask«, »Gateway« and »DNS«) are obtained from modem automatically.
Depending on the router, you can use the following options:
- Option "WPS-PBC" (Push Button Configuration);
- Connection with WPS PIN;
- Connection With Network Password
Tuning television channels
Depending on the type of antenna connected, you can decide which channels you would like the television to search for.
DVB-S - Tunes digital TV channels from satellite from Page 19.
You have two options for this search:
- Basic setup that presets a standard choice. For example, Astra satellite 19.2° East; You just need to start the search;
- the professional installation, which allows you to make all required settings and set parameters for your receiver system.
DVB-C - For setting up digital cable TV channels, see page 20.
DVB-T – For setting up digital terrestrial TV channels, see page 20.
To search for analogue TV channels, see section "Detailed Channel Settings" starting from page 52.
Note:
■ See "Detailed Channel Settings" section starting from page 52 for more information on digital television channel settings.
Initial set-up - overview
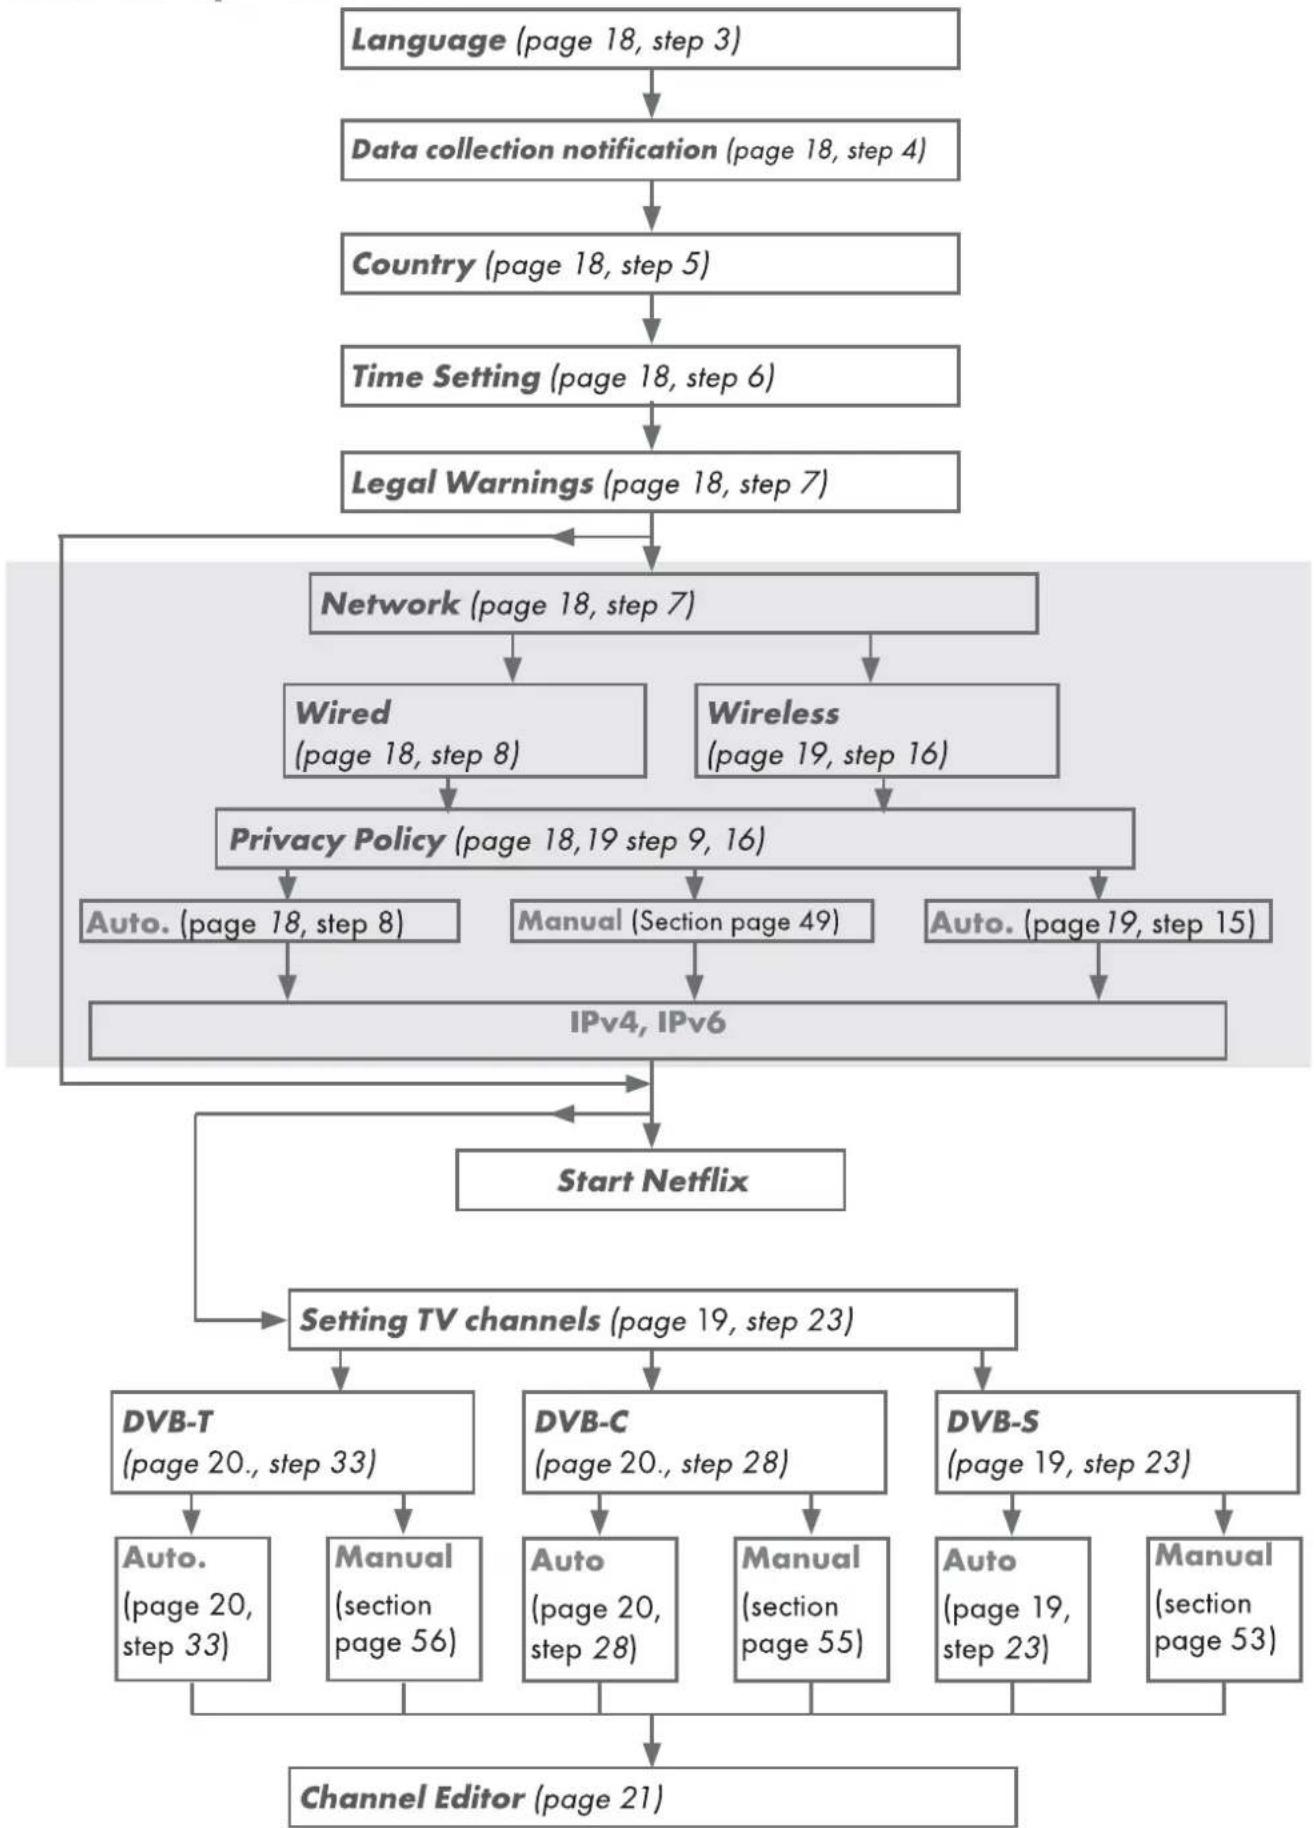
flowchart
graph TD
    A["Language (page 18, step 3)"] --> B["Data collection notification (page 18, step 4)"]
    B --> C["Country (page 18, step 5)"]
    C --> D["Time Setting (page 18, step 6)"]
    D --> E["Legal Warnings (page 18, step 7)"]
    E --> F["Network (page 18, step 7)"]
    F --> G["Wired (page 18, step 8)"]
    F --> H["Wireless (page 19, step 16)"]
    G --> I["Privacy Policy (page 18, 19 step 9, 16)"]
    H --> I
    I --> J["Auto. (page 18, step 8)"]
    I --> K["Manual (Section page 49)"]
    I --> L["Auto. (page 19, step 15)"]
    J --> M["IPv4, IPv6"]
    K --> M
    L --> M
    M --> N["Start Netflix"]
    N --> O["Setting TV channels (page 19, step 23)"]
    O --> P["DVB-T (page 20., step 33)"]
    O --> Q["DVB-C (page 20., step 28)"]
    O --> R["DVB-S (page 19, step 23)"]
    P --> S["Auto. (page 20, step 33)"]
    Q --> T["Manual (section page 56)"]
    R --> U["Auto (section page 55)"]
    S --> V["Channel Editor (page 21)"]
    T --> V
    U --> V
Initial Set-up
1 Press »©« to switch on the TV in standby mode.
- The »Welcome!« menu will appear when the TV is switched on for the first time.
Welcome!
Press OK.
After these easy setup steps, you can start using your smart TV.

Help:
If the »Welcome!« menu does not appear on the screen, make the setting by following the instructions on restoring factory defaults on page 42.
2 Step-by-step setup will be made to be able to use the television. Press »OK« to start the setup.
3 Select the menu language with »«, »«, »V« or »^« and press »OK« to confirm.
- Data collection and software update notification will be displayed.
4 Press »« or »« to select »Accept« and press »OK« to confirm. - »Country Selection« menu will be displayed.
5 Select the country in which the television set is operated with »«, »«, »V« or »A« and press »OK« to confirm.
- »Time Setting« menu will be displayed.
6 Confirm »Auto« with »OK«;
or
Use the »Manual« option to enter time and date, and press »OK« to confirm.
7 Read »Legal Notices« and press »OK« to proceed to the next step.
Notes:
■ If you want to connect your TV to home network,
- continue at point 12 for an automatic LAN
connection, or
- continue at point 16 for an automatic WLAN connection.
If it is not necessary to connect to a home network, select »Skip« and continue with the setup from point 22; 26; or 28.
Connecting to a home network with a LAN cable
8 Press »V« or »A« to select »Wired Network« and press »OK« to confirm. - »Privacy Policy« menu will be displayed.
9 To continue, read the Privacy Policy and press »« or »« to select »Accept« and press »OK« to confirm.
10 Based on your network provider, press »V«, »A« to select »IPv4« or »IPv6« and press »OK« to confirm.
11 Confirm »Auto Input« by pressing »OK«.
Note:
■ Manual LAN connection settings are on page 49.
12 Network connection will be tested and network settings will be displayed.
13 To proceed to the next step, confirm »Next« by pressing »OK«.
14 For Netflix settings, press »Start Netflix«; or
To proceed to channel search, select »Skip« and confirm with »OK«.
Note:
If you select »Start Netflix«, the initial setup will be ended. To search for channels, see the Detailed Channel Settings section on page 52.
■ If you select »Skip«, continue searching TV channels:
- point 22 for DVB-S reception;
- point 26 for DVB-C reception;
- point 28 for DVB-T reception.
Connecting automatically by entering the network password
15 Press »V« or »A« to select »Wireless Network« and press »OK« to confirm. - »Privacy Policy« menu will be displayed.
16 To continue, read the Privacy Policy and press »« or »« to select »Accept« and press »OK« to confirm.
17 Wireless networks will be scanned and displayed in the menu.
18 Select the network you want to connect with »V« or »A« and press »OK« to confirm. - Wireless connection password screen will be displayed.
19 Select the required character with »«, »«, »∨« or »∧« and move to the next character with »OK«. - Using »↑« → »OK«, you can switch between uppercase letters / numbers and lowercase letters / special characters. - Select »X« to delete the character entered and press »OK« to confirm.
20 »Connecting... « will be displayed. If the connection is successful, wireless connection details will appear on the screen.
21 To proceed to the next step, confirm »Next« by pressing »OK«.
22 For Netflix settings, press »Start Netflix«; or To proceed to channel search, select »Skip« and confirm with »OK«.
Notes:
If you select »Start Netflix«, the initial setup will be ended. To search for channels, see the Detailed Channel Settings section on page 52.
If you select »Skip«, continue searching TV channels: - point 22 for DVB-S reception; - point 26 for DVB-C reception; - point 28 for DVB-T reception.
Searching television channels with satellite signal (DVB-S/S2)
23 Press »« or »« to select »DVB-S/S2« and press »OK« to confirm.
24 Select »Satellite« with »V« or »A« and press »OK« to confirm. - Satellite list will be displayed.
25 Press »V« or »A« to select the satellite you want to search and press »OK« to check. Press »MENU« to return to the previous menu.
Notes:
■ Select Scan Mode.
To select whether you want to search for only free digital television channels (Free), only scrambled digital television channels (Scramble) or both (Free+Scramble), press »V« or »A« to select »Free«, »Scramble« or »Free+Scramble« and press »OK« to check Press »MENU« to return to the previous menu.
■ Select »Service Type«.
To select whether you want to search for only digital channels (DTV) or only radio (Radio) or both (DTV+Radio), press »V« or »A« to select »DTV«, »Radio« and/or »DTV+Radio« and press »OK« to mark. Press »MENU« to return to the previous menu.
26 To start searching, select »Search Fast Scan« and press »OK«.
- »Auto Channel Search« menu will be displayed and the channel search will start. - The scan is complete as soon as the »Completed« appears.
Tuning cable digital television channels (DVB-C)
27 Press »« or »« to select »DVB-C« and press »OK« to confirm.
28 Press »« or »« to set »Tuning Mode« to »Full« and press »OK« to confirm.
- »Auto Channel Search« menu will be displayed and the channel search will start.
- The scan is complete as soon as the »Completed« appears.
Tuning terrestrial digital television channels (DVB-T/T2)
29 Press »« or »» to select »DVB-T/T2« and press »OK« to confirm.
- »Auto Channel Search« menu will be displayed and the channel search will start.
- The scan is complete as soon as the »Completed« appears.
Channel Editor for digital channels
Channels found at the end of the search are stored in the »Channel Editor«.
In the programme table, you can delete unnecessary programmes or add programmes to your favorite list.
In Channel Editor, press »P+« to switch the channel list to the previous page, and s »P-« to switch it to the next page.
Opening the Program Edit
1 Open the menu with »MENU«.
2 Press »V« or »A« to select »Channel« menu and press »» to confirm.
3 Press »V« or »A« to select »Program Edit« and press »OK« to confirm.
- »Program Edit« menu will be displayed.
Important:
■ Programme table and favourite lists are stored separately for all sources (satellite, cable and air).
■ Programme table of the current source will be displayed when you select programme table.
Notes:
A CI module and smart card is required to watch the channel if there is a »Key/ Lock« sign next to the channel name in Programme Table.
Program Edit
| Channel List | Favorite List | |
| 10 | Channel 11 | |
| 11 | Channel 12 | |
| 12 | Channel 15 | |
| 13 | Channel 21 | |
| 14 | Channel 68 | |
| 15 | Channel 46 | |
| 16 | Channel 30 | |
| 17 | Channel 90 | |
| 18 | Channel 51 | |
| 19 | Channel 61 | |

Delete

Move

Add

Move Up/Down

Back

Exit
Deleting channels in the channel editor
1 In the »Program Edit« menu, press »V« or »A« to select the channel(s) you want to delete.
2 Press »•« (red).
3 Press »« to confirm deletion;
or
Press »»« to cancel.
4 To exit the »Program Edit« menu, press »EXIT«.
Moving the channels in the programme edit to a different position
(Satellite, Cable and Terrestrial channels except from those disabled by the broadcaster)
1 In the »Program Edit« menu, press »V« or »A« to select the channel to be moved and press »••« (green) to confirm.
2 Press »∨« or »∧« to move the channel to its new position and confirm with »••« (green).
Note:
■ Repeat steps 2 and 3 to move other channels.
3 Press »EXIT« to quit the »Program Edit«.
Creating a list of favourites
You can select your favourite channels and save them as a list.
Note:
- Favorite lists must be created separately for all sources (satellite, cable and air).
■ To select the favorite list, press »FAV«.
1 In the »Program Edit« menu, press »∨« or »∧« to select the channel(s) you want to add to the favorite list and press »•••« (yellow).
-Th channel will be marked with »♥«.
2 Name of the channel will be displayed in the »Favorite List« to the right side of the menu.
3 To exit the »Program Edit« menu, press »EXIT«.
Picture settings
1 Open the menu with »MENU«.
2 Press »V« or »A« to select »Picture« menu and press »>« to confirm.
- »Picture« menu is now active.
 | Picture |
 | Picture Mode |
 | Color Temperature. |
 | Aspect Ratio16 : 9 |
 | Noise ReductionLow |
 | MPEG Noise ReductionLow |
 | Vibrant ColourMedium |
| Dynamic ContrastOn | |
| Film ModeOff |
3 Select the required line/function with »V« or »A« and press »OK« to confirm. Select the option with »« or »» and press »BACK←« to return to »Picture Settings« menu.
4 Press »EXIT« to finish the setting.
Enhanced picture settings
The "enhanced picture settings" are in principal digital image improvements which, however, should be only used when necessary when picture quality and transmission is excellent. They may well improve the display with poor material, but may adversely affect the display where transmission and picture quality are excellent.
■ »Noise Reduction« – Reduces the visible "snow" by displaying the picture a little less sharply and creating a slight blurring. Thus, it must be used as little as possible with good picture material.
■ »MPEG Noise Reduction« -This function can only be selected with digital reception sources and AV presets. It reduces any interference from artefacts (pixel blocks) from digital programmes due to MPEG compression (such as from DVB-T receivers and lower transmission rates or DVD players).
»Vibrant Colour« – Increases the colour contrast and the contrast adjustment. This setting is mostly too strong for use with normal pictures and should only be used where necessary (low or off) otherwise nuances in the image can be suppressed.
■ »Dynamic Contrast« – The function dynamically and optimally adjusts the contrast for the respective picture content by analysing images and then altering this depending in a change in contrast. This increase in the contrast however, may also reduce the visible brightness levels in the picture.
Sound settings
1 Open the menu with »MENU«.
2 Press »V« or »A« to select the »Sound« menu and press »» to confirm.
- The »Sound« menu is not enabled.
 | Sound |
 | Sound Mode |
| Balance | |
 | Auto VolumeOff |
 | Surround SoundOff |
 | AD Switch |
 | SPDIF ModePCM |
| Advanced Effect DAP | |
 | Audio Delay |
Note:
■Additional operations are explained in the following sections.
Sound Mode
1 Press »V« and »A« to select »Sound Mode« and press »OK« to confirm.
2 Press »« or »» to select »User«, »Standard«, »Music«, »Movie« or »Sport«.
3 Press »BACK ←« to return to the previous menu.
Balance
1 Press »V« or »A« to select »Balance« and press »OK« to confirm.
- »Balance« menu will be displayed.
2 Select the setting with »« or »«.
3 Press »BACK ←« to return to the previous menu.
Auto volume
The television channels broadcast at different volumes. The Auto Volume Level Limiting (AVL) function means the volume is kept the same when you switch between channels.
1 Press »V« or »A« to select »Auto Volume« and press »OK« to confirm.
2 Press »V« or »A« to select »On«.
3 Press »BACK ←« to return to the previous menu.
Surround Sound
Surround Sound is an audio technology, which is integrated in the television set and only requires the built-in speakers to produce a Surround Sound effect.
1 Press »V« or »A« to select »Surround Sound« and press »OK« to confirm.
2 Press »V« or »A« to select »On«.
3 Press »BACK ←« to return to the previous menu.
4 Press »« or »« to select »Stand« or »Wall-Mount«.
Equalizer
Equalizer offers a sound setting that you can create.
Equalizer setting is active when »Sound Mode« is selected as »User«.
1 Press »V« and »A« to select »Sound Mode« and press »OK« to confirm.
2 Select »Sound Mode« and press »« or »»« to select »User«.
3 Press »∨« or »∧« to select »120Hz« frequency band.
Press »«« or »»« to set the preferred value.
4 Select the next frequency band with »V« or »A« to repeat the adjustment procedure.
5 To save the setting, press »BACK ←«.
FUNCTIONING OF THE TV - BASIC FUNCTIONS\_
Switching on and off
1 Press »◀« to switch on the television in standby mode.
2 Press »©« to switch the television to standby.
Selecting channels
1 Use »1...0« to select channels directly.
2 Select television channels step by step with »P+« or »P-«.
3 Open the channel list by pressing »OK«, select the channel by pressing V« or »A« buttons and confirm the channel with »OK«, then close the channel list with »EXIT«.
Notes:
■ Press »OK« to bring the channel list and switch to radio channels. To select »Radyo«, press »……« (blue), press »V« or »A« to select »Radio« and press »OK« to confirm.
■ Press »OK« again to open the channel list. Switch to TV channel list. To select »TV«, press »……« (blue), press »V« or »A« to select »TV« and press »OK« to confirm.
Selecting channels from lists
1 Press »FAV« to recall the favorite list menu.
- »Favorites« menu will be displayed.
2 Select the channel with »V« or »A« and confirm with »OK«.
3 Press »EXIT« to exit the channel list.
Selecting a signal source
1 Press »→« to open the »Source« menu.
2 Press »« or »« to select the desired AV signal source and press »OK« to confirm.
Adjusting the volume
1 Adjust the volume with »- +«.
Muting
1 Use » « to switch the sound off (mute) and to switch it on again.
Displaying information
1 Press »?« to display the information. - The menu on the screen disappears automatically after a short while.
FUNCTIONING OF THE TV - BASIC FUNCTIONS\_
Audio language
You can select various languages when watching digital channels. This depends on the programme being broadcast.
1 Press » « to open the selection menu.
2 Select the language with »V« or »A« and press »OK« to confirm.
3 Press »EXIT« to end the setting.
Subtitles
You can select various subtitles when watching digital channels. This depends on the programme being broadcast.
1 Press »—« to open the selection menu.
2 Select the language with »V« or »A« and press »OK« to confirm.
3 Press »EXIT« to end the setting.
Swap function
This function allows you to switch between the channel you are watching and the channel you watched last.
1 Use »1...0« or »P+«, »P-« to select the desired channel (e.g. channel 1).
2 Press »1...0« or »A« »V« to change the channels (e.g. channel 2)
3 To return to Channel 1, press »BACK ←«.
Under the »Tools« menu, you will find the following settings.
Picture mode
1 Press »TOOLS« to open the Quick menu.
2 Select »Picture Mode« with »V« or »A«.
3 Select the picture setting by pressing »« or »»«.
4 Press »EXIT« to end the setting.
Sound mode
1 Press »TOOLS« to open the Quick menu.
2 Select »Sound Mode« with »V« or »A«.
3 Select the audio setting by pressing »« or »»«.
- You can change the »User« audio setting; see "Equalizer" on page 24.
4 Press »EXIT« to end the setting.
Auto standby
This function will turn the television to stand-by mode in 4, 6 or 8 hours depending on your setup, unless the television receives any signal, or keys or, according to European regulations, the remote remains untouched for 10 minutes.
1 Press »TOOLS« to open the Quick menu.
2 Press »V« or »A« to select »Auto Sleep«.
3 Select the switch-off time with »« or »«.
Note:
■ Set the function to »Off« with »« or »»«.
4 Press »EXIT« to end the setting.
FUNCTIONING OF THE TV - ADDITIONAL FUNCTIONS
Sleep timer
In the »Sleep Timer« menu, you can select a time for the television to switch off. After this time has elapsed, the television switches to standby mode.
1 Press »TOOLS« to open the Quick menu.
2 Press »V« or »A« to select »Sleep Timer«.
3 Select the switch-off time with »« or »«.
Note:
■ Set the function to »Off« position with »« or »»«.
4 Press »EXIT« to end the setting.
Changing the picture format
1 Press »TOOLS« to open the Quick menu.
2 Press »V« or »A« to select »Aspect Ratio«.
3 Press »« or »» to select picture format.
4 Press »EXIT« to end the setting.
Notes:
■You can select one of the following picture formats.
»Auto« format
The picture format is automatically switched to »16:9« for 16:9 programmes.
The picture format is automatically switched to »4:3« for 4:3 programmes.
»4:3« format
The picture is shown in 4:3 format.
»16:9« format
During programmes in 4:3 format, the picture is stretched horizontally if »16:9« or »14:9« is selected.
The picture geometry is stretched horizontally. With actual 16:9 signal sources (from a set-top box on the Euro-AV socket) the picture fills the screen completely and with the correct geometry.
»Movie« format
The letterbox setting is especially suitable for programmes in 16:9
The black borders which are usually at the top and bottom of the screen are eliminated, 4:3 pictures fill the screen.
The transmitted pictures are enlarged, but are slightly cropped at the top and bottom. The picture geometry remains unchanged.
»Panorama« format
This setting is suited to films with a large width/height ratio.
During programmes in 4:3 format the picture is stretched horizontally if the »Panorama« function is selected. The picture geometry is stretched horizontally.
»Just Scan« format
When this picture format is selected in the HDMI source, high resolution pictures will be displayed in their original sizes without being cropped.
Note:
■ This format is enabled in HDMI sources only.
The electronic programme guide offers an overview of all programmes that will be broadcast in the next week (for digital stations only).
1 Press »GUIDE« to start the electronic TV guide.
- The programmes of 9 channels (in the order of the Channel Editor) are displayed.
Notes:
■ Not all channels provide a detailed TV guide.
■ Many broadcasters supply the daily programme but no detailed descriptions.
■ There are broadcasters which do not provide any information at all.
2 Select the channel with »V« or »A«.
- Information about the actual programme is displayed in the selected television channel.
Note:
■ Press »P+« or »P-« to switch between the channels in increments of 9.
3 Switch to the information about the current programme using »•••« (green).
Notes:
The programme selected can be recorded (if an external data medium is connected). To do this, press »•« (red) to go to the details page and enter the record information, and then press »•« (red) to confirm.
■ To add the selected programme to reminder timer, press »••••« (blue) to go to the details page and enter the reminder details, and then press »•« (red) to confirm.
4 Return to the programme overview with »MENU«.
5 Press »EXIT« to close the channel guide.
What is HbbTV?
With its modern structure, content and high definition (HD) pictures and videos, HbbTV is a new technology where broadcast and the broadband can be used together and which permits access to interactive applications that the broadcast provides through internet. The TV must be connected to internet to receive HbbTV broadcast.
When you switch to a TV channel that offers HbbTV service, the relevant message will be displayed.
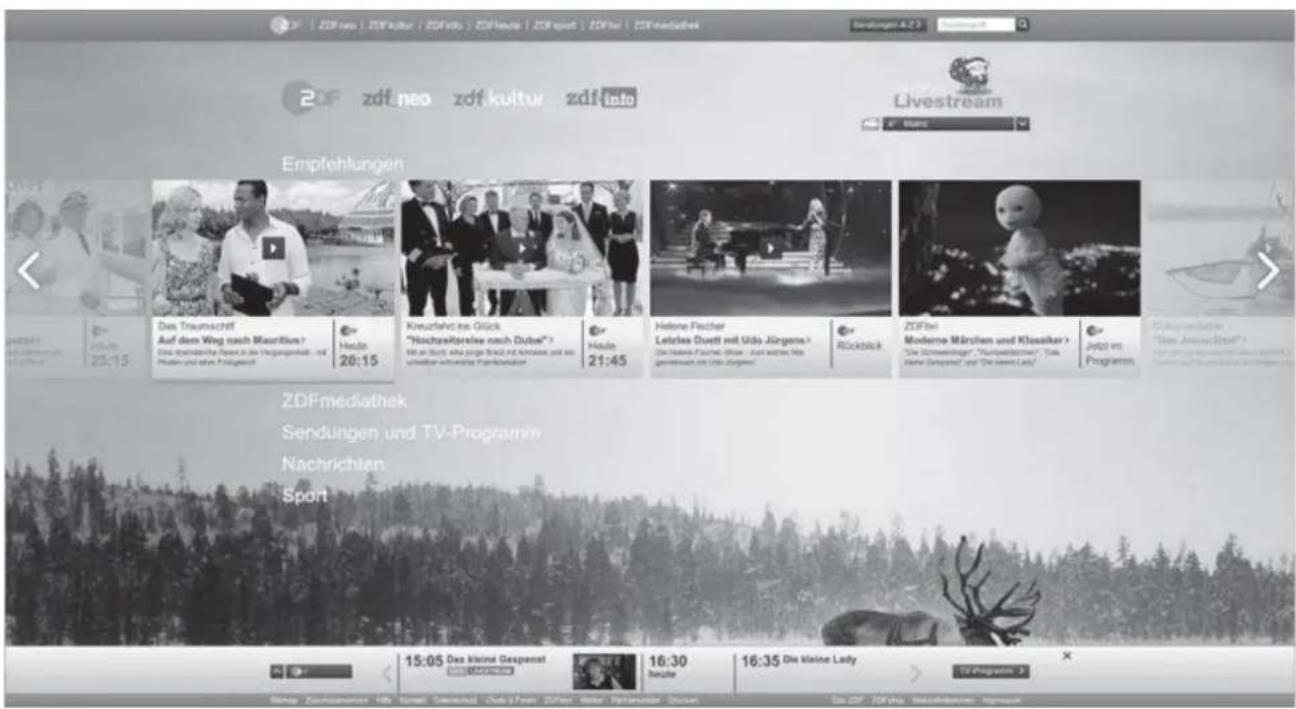
text_image
ZDF zdf neo zdf kultur zdf into Livestream Empfehlungen Das Traumschrift Auf dem Weg nach Mauritius? Die grundzeitliche Speck in die Vergangenheit, mit Pfalen und eine Afrikauss Heube 20:15 Kreuzefahr ins Glück "Hachzeltenske nach Dübel" Mit am Sport, sie jeige Bau und Aktivaus und an schnittlicher finanzielle Partikalien Heube 21:45 Helene Fischer Letzles Duett mit Udo Jürgens Die Hallein Fachtel-Blau. „Ich wirzt es genzenum und Udo Jürgens Rückblick ZDFbei Moderne München und Klassiker > „Die Schweistungen“, „Forschstätigkeit“, Tals. „Meine Sachaner“ und „Die zum Lady“ Jetzt im Programm ZDFmediathek Sendungen und TV-Programm Nachrichten Sport 15:05 Das kleine Gespernt 16:30 16:35 Die kleine Lady TV ProgrammeUsing HbbTV
When you switch to a TV program that supports HbbTV, an info message will appear stating that HbbTV broadcast is available.
1 Press »•« (red) to open HbbTV.
- Information regarding the service will appear on the screen. Additionally, colored buttons necessary for browsing the menus will also appear.
Note:
■ The range of subjects and selection of individual subjects are subject to the programme provider.
- Numeric buttons between »1« and »0« are used for additional functions.
2 Press »••• (green), »•••• (yellow) or »••••• (blue) to select the desired topic field.
3 Select the option you want with »V«, »A«, »« or »» in the selected topic field and confirm with »OK«.
4 Press »•« (red) to close HbbTV.
Note:
■ If navigation does not work in HbbTV mode, press »EXIT« to exit the function.
Additional functions for video indexes
1 Start playback with »▶«.
2 Pause playback with »«.
3 Resume playback with »▶«.
4 Press »«« to rewind, press »»« to fast forward.
5 Stop playing by pressing » ■ «.
Disabling and enabling HbbTV
This function allows you to disable HbbTV. This way, HbbTV warnings will not be displayed in channels that broadcast HbbTV.
1 Open the menu with »MENU«.
2 Press »V«, »A« to select »SETUP« and press »» to confirm.
3 Press »V« or »A« to select »HBBTV« and press »OK« to confirm.
4 Press »V« and »A« to select »On« or »Off«.
5 Press »EXIT« to end the setting.
TOP text or FLOF text mode
1 Press »TXT« to switch to teletext mode.
2 You can select teletext pages directly with »1...0« or step by step with »V« or »A«. To return to page 100, press »▶«.
Note:
At the bottom of the screen, you will see an information line consisting of a red, green and, depending on the station, yellow and blue text field. Your remote control has buttons with the corresponding colours.
3 Press »•« (red) to go to the previous page.
4 Press »••« (green) to go to the next page.
5 Press »•••« (yellow) to select partition.
6 Press »……« (blue) to select topic.
7 Press »TXT« to exit teletext mode.
Normal text mode
1 Press »TXT« to switch to teletext mode.
2 You can select teletext pages directly with »1...0«.
To return to page 100, press »▶«.
3 Press »P-« to go to the previous page.
4 Press »P+« to go to the next page.
5 Press »TXT« to exit teletext mode.
Additional functions
Skipping the waiting time
While a page is being searched for, you can switch to the television channel.
1 Enter the teletext page number with »1...0« and then press »■«. As soon as the page is found, the page number is displayed.
2 Press » « to switch to the teletext page.
Page stop
A multiple page may contain several sub-pages, which are automatically scrolled by the transmitting station.
1 Stop the sub-pages with »▶▶«.
2 Press »▶▶« to quit the function.
Calling up a sub-page directly
If the selected teletext page contains further pages, the number of the current sub-page as well as the total number of pages is displayed.
1 Press »« or »» to select a subpage.
Reveal answer
Certain teletext pages contain "hidden answers" or information which can be called up.
1 Display information with »«.
2 Conceal information with »«.
File formats
Your television can be operated via the USB input with the following file formats:
Video data
Video compression / decompression (codec) is intended for decreasing the storage area without sacrificing the picture quality. Your TV supports video data compressed with XVID, H.264/MPEG-4 AVC(L4.1, Ref. Frames:4), MPEG-4, MPEG-2, MPEG-1, MJPEG, MOV standards.
File extensions supported by the device: ".avi", "mkv", ".mp4", ".ts", ".mov", ".mpg", ".dat", ".vob", ".divx". In addition to video data, these files also contain audio data compressed and "packaged" by using MP3, AAC or Dolby Digital.
Format (codec) information is embedded within the file content and may differ depending on the file extension. ".avi", ".mkv" or ".divx" files containing divx codec within are not played back.
Audio data
Your television can play audio data coded with MP3, AAC standards.
MP3 indicates MPEG-1 Volume Level 3 and is based on the MPEG-1 standard that was developed by MPEG (Motion Picture Expert Group).
AAC indicates the Advanced Audio Coding and is developed by MPEG. AAC provides higher audio quality with the same data rate (bit rate). These formats enable audio files to be saved on storage devices with a sound quality similar to that of a CD.
File extensions supported by your device: ".mp3", ".mp2", ".m4a", ".aac", ".wav" MP3 files can be organised into folders and subfolders similar to the files on a computer.
Picture data
Your television can display picture data in JPEG, PNG and BMP formats.
JPEG stands for Joint Picture Experts Group. This process is intended to compress picture files. PNG and BMP are designed to compress picture data without any losses.
Picture files can be saved onto a data medium along with other file types.
Such files can be organised as folders and subfolders.
For DTS patents, see http://patents.dts.com. Manufactured under the license of DTS Licensing Limited.
DTS, DTS-HD, Symbol, DTS or DTS-HD and Symbol, DTS, Inc. © are registered trademarks of DTS, Inc. All
rights reserved.
Connecting external data media
It is advised to put the television on stand-by mode before connecting the External Data medium. Connect the device and then switch the television on again.
Before disconnecting the data medium, the television must first be switched to standby, otherwise files can be damaged.
Notes:
■ USB1 port of the TV supports 500 mA current according to the USB standard. Devices such as external hard disk and etc. that consume more power can only be connected to the USB(HDD) interface of the television.
If you are using a power cable for the external hard disk that you have connected to the USB(HDD) USB interface, then the power cable of the external hard disk must also be unplugged when the TV is turned off.
■ You must not disconnect the USB Device from the TV while a file on the USB Device is being read by the TV.
A bi-directional data transfer as defined for ITE (Information Technology Equipment) devices in EN 55022/EN 55024 is not possible.
■ USB transfer is not an operating mode in itself. It is only an additional function.

text_image
USB1 USB(HDD)1 Connect the USB(HDD) interface of the television and the corresponding socket on the data device (external hard drive, digital camera, card reader or MP3 player) using a USB cable;
or
plug the memory stick in one of the »USB1« socket of the television.
File browser
The file browser displays the video, audio and picture data that the external data medium provides.
The main menu of the file browser
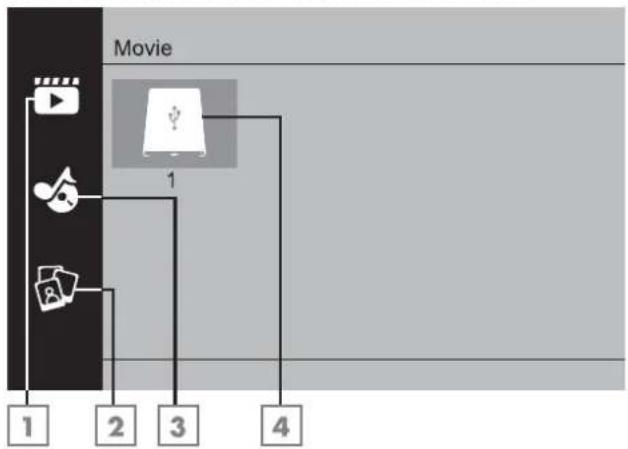
flowchart
graph TD
    A["1"] --> B["2"]
    B --> C["3"]
    C --> D["4"]
    E["Movie"] --> F["1"]
1 Movie.
2 Music
3 Photo
4 External data media
Playback basic functions
1 Press »My Media«.
- »Media Player« menu will be displayed.
2 Press »V« or »A« to select the desired filter type (Movie, Music or Photo) and press »OK« to confirm.
3 Press »>« to select the external data medium and press »OK« to confirm.
- A list of sub-directories appears.
4 Press »V«, »A«, »« or »» to select the movie, photo or music file (depending on the criterion you have selected) and press
»▶« to play.
Notes:
■ When playing picture data, press »?« to view information about the resolution and the size.
■ When playing MP3 data, album, track and singer will be displayed on the screen.
■ When playing picture data, press »MENU« to open the control panel.
5 Press »ll« to pause playback.
6 Press »▶« to resume playback.
7 Press » « to end playback.
- The file browser appears.
Notes:
It is possible that some files that are supported in USB mode do not operate due to some problems that may arise depending on how such files are created although they contain the supported file extension.
If there are more then one audio sources (audio stream) in the video files that are being played, then you can switch between the audio sources with » While the file is played in full screen mode.
Movies you will be watching from the movie file only supports subtitles with .srt, .sub, .ass, .ssa, .smi format. Names of the subtitle and movie files must be the same. Otherwise, subtitle can not be displayed.
Additional playback functions
Depending on the file formats used, the following additional functions are possible.
Playing the selected picture data
Plays only marked movies and photos.
1 Press »V«, »A«, »« or »» to select the desired video or photo and press »OK« to highlight.
2 Press »V«, »A«, »« or »» to select the other desired video or photo and press »OK« to highlight.
3 Press »▶« to start playback.
4 Press » « to end playback.
Note:
■ To remove highlight select the video or photo with ,»V«, »A«, »« or »»« and press »OK« to uncheck.
Selecting a track or picture in steps (SKIP)
1 During playback, select the next track/picture you want with »▶|«.
2 Select the previous track/picture with »|«.
- Playback begins with the track or picture you selected.
Moving to a specific part of a video
1 Press »MENU« during playback.
2 With »« or »« select ⏻ and press »OK« to confirm.
3 Enter the time that you want to move to with »1...0« and confirm with »OK«.
Searching forward
(only video and audio files)
You can select different speeds (2-fold, 4-fold, 8-fold, 16-fold and 32-fold forwards and backwards).
1 Select the playback speed during playback by pressing »«« or »»« buttons.
2 Press »▶« to resume playback.
Turning the picture display
(only picture files)
The pictures can be rotated by 90°.
1 During playback, switch on the control panel with »MENU«.
2 Press »« or »« to select »« or »« and press »OK«.
- The picture will turn by 90° clockwise or counterclockwise.
Repeat functions
- », the selected track is repeated once;
- »○«, selected tracks are repeated consecutively;
- »→«, selected tracks are repeated in mixed order;
- »→«, repeat off.
1 Press »▶« to start playback.
2 During playback, switch on the control panel with »MENU«.
3 Select »○« with »« or »» and press »OK« to confirm.
- The repeat function will change.
Replaying the marked time
1 Press »« or »« to select »«, select the time when the repeat will start and press »OK« to confirm.
- Start will be marked with »A«.
2 At the time on which you wish the repeat to end, confirm »« by pressing »OK«.
- End will be marked with »B« and the time between »A-B« will be repeated.
3 To cancel repeat, confirm »◀« by pressing »OK«.
Terms & Conditions and Privacy
On your TV, there are 2 different agreements for you to accept or decline. One of these are "Data Collection and Software Update Notice", and the other one is the "Privacy Agreement". The first agreement is the Data Collection and Software Update Notice, which is shown in the Initial Setup step.
Data Collection and Software Update Notice
This notice describes the data collected when your TV is connected to internet, processing, use and share of these data, and asks for your approval. Arçelik A.Ş. has no liability regarding the processing, use or share of the said data; the liability lies with the relevant third party. The features you will not be able to use in the case that you do not accept this agreement are stated.
Please read this notice in detail.
Privacy Agreement
You should accept the Privacy Agreement to be able to fully use the features of Smart Interactive. Every time you enter the Network settings menu to connect to internet, the Privacy Agreement will be displayed for you to accept. If you select Reject instead of Accept, you cannot connect to internet, nor can you use the functions that require internet. Please carefully read the content of the Privacy Agreement.
SMART Interactive TV internet applications
SMART Interactive TV interactive applications provides your TV with internet services and pages.
These applications are designed according to your television.
Through SMART Interactive TV feature you can run many local and global internet applications. These applications include various types such as video, picture, music, game, social networking applications, news and sports applications, weather forecast applications.
Notes:
■ Availability of SMART Interactive TV Interactive applications may change depending on the country.
■ SMART Interactive TV cannot download or save files permanently, cannot upload files to a website or cannot install add-ins except Login pages of some applications.
■ Grundig is not responsible for the content and the quality of content offered by content providers.
■ Local and global internet applications provided through your SMART Interactive TV come with your TV within the framework of special limited duration agreements entered into with the application owners. Application owners may update, modify, restrict or entirely remove those applications with their own decision. Grundig cannot be held responsible for such changes.
■ Grundig reserves the right to make all changes such as modifications, restrictions, extensions, transfers and removals on internet applications provided through your SMART Interactive TV.
Getting Started with Smart Interactive TV
1 Press »@« to open the application menu.
2 Press »« or »« to select an application and press »OK« to confirm.
- Application start screen menu will be displayed.
3 Usage of application mostly depends on application's own structure. Follow the notes on the screen.
4 Press »EXIT« to quit the application.
Note:
If your cable or wireless adapter is connected but you cannot receive IP or internet is not connected, the Interactive applications cannot be started. In this case, check Network connection settings. See page 48 or 50.
Launching the Netflix application
1 Press »@« to open the application menu.
2 Press »« or »« to select the Netflix application and press »OK« to confirm.
- Start screen of the Netflix application will be displayed.
Note:
■ You can also launch the Netflix application by pressing »NETFLIX« on the remote control.
Logging out of the account on Netflix application
You can log out of the account, with which you logged in on the Netflix application, and log in again with a different account.
1 Open the menu with »MENU«.
2 Press »V« or »A« to select »Preferences« and press »>« to confirm.
3 Press »V« or »A« to select »App Settings« and press »OK« to confirm.
4 Press »V« or »A« to select »Netflix - Netflix Deactive« and press »OK« to confirm.
5 To log out of the current account, press »«; or
press »»« to cancel.
How to stop the Netflix app from running in the background
You can stop the Netflix app from running in the background.
1 Open the menu with »MENU«.
2 Press »V« or »A« to select »Preferences« and press »>« to confirm.
3 Press »V« or »A« to select »App Settings« and press »OK« to confirm.
4 Press »V« or »A« to select »Netflix - Terminate Netflix« and press »OK« to confirm.
5 Press »◀ to stop the application; or
press »»« to cancel.
1 Open the menu with »MENU«.
2 Press »V« or »A« to select »Preferences« and press »>« to confirm.
 | Preference |
 | LanguageTürkçe |
 | Audio Languages |
 | Subtitle Languages |
| SubtitlesOff | |
| HBBTVOff | |
 | Subtitle Hearing ImpairedOff |
| Restore Default | |
 | HDMI Link |
 |
Note:
■ Additional operations are explained in the following sections.
Changing the menu language
1 Select »Language« with »V« or »A« and press »OK« to confirm.
2 Select the menu language with »V« or »A« and press »OK« to confirm.
3 Press »BACK ←« to go back one menu level or press »EXIT« to end the setting.
Changing the audio language
(only for digital television channels)
You can define a primary and a secondary audio language.
1 Select »Audio Languages« with»V« or »A« and press »OK« to confirm.
2 Select »Primary Audio Language« with »V« or »A« and press »OK« to confirm.
3 Select primary audio language with »V« or »A« and press »OK« to confirm.
4 Press »BACK ←« to go back one level in the menu.
5 Select »Secondary Audio Language« with »V« or »A« and press »OK« to confirm.
6 Select secondary audio language with»V« or »A« and press »OK« to confirm.
7 Press »BACK ←« to go back one menu level or press »EXIT« to end the setting.
Changing the subtitle language
(only for digital television channels)
You can disable subtitles, select subtitle language and assign a secondary subtitle language.
1 Select »Subtitle Languages« with»V« or »A« and press »OK« to confirm.
2 Select »Primary Subtitle Language« with »V« or »A« and press »OK« to confirm.
3 Select primary subtitle language with »V« or »A« and press »OK« to confirm.
4 Press »BACK ←« to go back one level in the menu.
5 Select »Secondary Subtitle Language« with »V« or »A« and press »OK« to confirm.
6 Select secondary subtitle language with »V« or »A« and press »OK« to confirm.
7 Press »BACK ←« to go back one menu level or press »EXIT« to end the setting.
1 Open the menu with »MENU«.
2 Press »V« or »A« to select »Preferences« and press »>« to confirm.
 | Preference |
 | LanguageTürkçe |
 | Audio Languages |
 | Subtitle Languages |
| SubtitlesOff | |
| HBBTVOff | |
 | Subtitle Hearing ImpairedOff |
| Restore Default | |
 | HDMI Link |
 |
Note:
■ Additional operations are explained in the following sections.
Subtitle Hearing Impaired
Audio description is an additional audio channel for people who are visually impaired. The activities, surroundings, scene changes or the appearance, the gestures and facial expressions of the actors are described.
This sound is transmitted at the same time as the normal sound with digital television stations. This depends on the programme being broadcast.
1 Select »Subtitle Hearing Impaired« with »V« or »A« and press »OK« to confirm.
2 Select »On« with »V« or »A« and press »OK« to confirm.
3 Press »BACK ←« to go back one menu level or press »EXIT« to end the setting.
1 Open the menu with »MENU«.
2 Press »V« or »A« to select »Time« and press »» to confirm.
 | Time |
 | Auto. Sync.Auto |
 | Time |
 | Sleep TimerOff |
| Auto SleepOff | |
| Time ZoneGMT +3 | |
 | Summer TimeOn |
 | |
 |
Note:
■ Additional operations are explained in the following sections.
Auto Sync
When the »Auto Sync« is set to »Auto«, date and time information will be received automatically from the broadcast.
Time and date
1 Press »V« or »A« to select »Auto Sync« and press »OK« to confirm.
2 Press »V« or »A« to select »Manual«.
3 Press »BACK ←« to return to the previous menu.
Note:
»Time« and »Time Zone« options are enabled when »Auto Sync« is set to »Manual«.
4 Press »V« or »A« to select »Time« and press »OK«.
5 Press »V« or »A« to select »Date«, »Month«, »year«, »Time«, »Minutes« and set with »« or »»«.
6 Press »BACK ←« to return to the previous menu or press »EXIT« to end the setting.
Time Zone
1 Press »V« or »A« to select »Time Zone« and press »OK« to confirm.
2 Press »V« or »A« to select the time zone.
3 Press »BACK ←« to return to the previous menu or press »EXIT« to end the setting.
Sleep Timer
With »Sleep Timer«, you can enter a time for the television to switch off. After this time has elapsed, the television switches to standby mode.
1 Press »V« or »A« to select »Sleep Timer« and press »OK.
2 Press »V« or »A« to select the sleep time.
Note:
■ Disable the function with »V« or »A« by switching it to »Off«.
3 Press »BACK ←« to return to the previous menu or press »EXIT« to end the setting.
Auto standby
This function will switch the television to standby mode in 4 hours according to European regulations, if no key on the keypad of the TV or the remote control is not pressed.
1 Press »V« or »A« to select »Auto Sleep« and press »OK« to confirm.
2 Press »V« or »A« to select »4 Hours«, »6 Hours«, »8 Hours« or »Off«.
3 Press »BACK ←« to return to the previous menu or press »EXIT« to end the setting.
1 Open the menu with »MENU«.
2 Press »V« or »A« to select »Advanced« and press »>« to confirm.
- »Password Entry« menu will be displayed.
Notes:
■ »Password entry« menu is displayed when »Lock System« is set to »On«.
■ The default password is »1234«. You can change it as you wish.
3 Use »1...0« keys to enter the password. - »Advanced« menu is enabled.
 | Advanced |
 | Block Program |
 | Lock SystemOn |
 | Set Password |
 | Parental GuidanceOff |
 | CI CAM PIN Code |
 |
Note:
■ Additional operations are explained in the following sections.
Changing the PIN code
Instead of the default code »1234«, you can enter a personal code. Please take note of your personal code.
1 Press »V« or »A« to select »Set Password« and press »OK« to confirm.
2 Use »1...0« to enter your current four-digit PIN code.
3 Use »1...0« to enter your new four-digit PIN code.
4 Use »1...0« to enter your personal PIN code again.
5 Press »EXIT« to finish the setting.
Blocking a television channel
You can block individual television channels which are not suitable for children using a personal PIN code.
1 Press »V« or »A« to select »Block Program« and press »OK« to confirm.
- »Block Program« menu will be displayed.
2 Press »∧« or »∨« to select the channel you want to block and press »•« (red).
3 Press »« or »« to select the block type and press »••« (green).
- The channel will be marked.
4 Press »EXIT« to finish the setting.
Watching a blocked television channel
You can watch a TV channel blocked with PIN code by selecting the TV channel and entering the PIN code.
1 Press »1...0« or »PR+«, »PR-« to select the blocked channel.
2 Enter the PIN code »1234« using »1...0« buttons on the displayed password screen. - Blocked channel will be viewed.
Note:
■ Channel will be blocked again when you change the channel.
Parental Guidance
There are movies which contain contents or scenes which are not suitable for children.
Certain programmes contain information which identifies these contents or scenes and have been given an access level from 4 to 18. You can select one of the access levels and thus authorise the playback.
1 Press »V« or »A« to select »Parental Guidance« and press »A« or »V« to select an access level.
2 Press »BACK ←« to return to the previous menu or press »EXIT« to end the setting.
1 Open the menu with »MENU«.
2 Press »V« or »A« to select »Preferences« and press »>« to confirm.
 | Preference |
 | LanguageTürkçe |
 | Audio Languages |
 | Subtitle Languages |
 | SubtitlesOff |
| HBBTVOff | |
| Subtitle Hearing ImpairedOff | |
| Restore Default | |
 | HDMI Link |
 |
Note:
■ Additional operations are explained in the following sections.
Software update (USB)
1 Plug the memory stick in one of the »USB« sockets at the side of the television.
2 From the »Preferences« menu, use »V« or »A« to select »Software Update (USB)« and press »OK« to confirm.
- The software in the USB memory stick is installed.
Software update (NetReady)
1 Press »V« or »A« to select »Software Update (NetReady)« and press »OK« to confirm.
- New software will be searched.
Note:
■ If no new software is available the menu automatically switches off.
2 If new software is available, press»••« (green) to install the software.
- The new software will be loaded.
Resetting the television to its original state
This function enables you to delete the station lists and all custom settings.
1 From the »Preferences« menu, use »V« or »A« to select »Restore Default« and press »OK« to confirm.
2 Press »« on the warning screen.
- The »Initial Setup« menu will be displayed after a short while.
3 Continue with the settings as described in the chapter on the first time installation and searching for channels on page 18.
HDMI CEC

Your television is equipped with HDMI CEC feature. This feature utilizes CEC (Consumer Electronics Control) protocol. CEC allows you to make an
HDMI connection between your TV and DVD player, STB or video recorder and control such equipment with the remote control of the television. This feature must be supported by the device you connect as well.
Your television supports the following functions. For detailed information about this function, read the user manual of the external device.
HDMI CEC connection functions of the television
Switching on the external device from standby mode
If you switch on your external device (e.g. DVD player) from standby mode, your television will also be switched on from standby and switch to the HDMI source that your television is connected to.
Depending on the features of the external device (e.g. AV receiver) can start and your television can stay on stand-by mode.
Selecting the HDMI source from the television
When you switch on your external device (e.g. DVD player), your television will switch to the HDMI source that the external device is connected to (your television must be on).
Selecting the menu language
When you select the menu language from your television menu language of the external device will change as well. (If your DVD player supports)
Switching off the device from standby mode
After switching your television to standby, your external device (e.g. DVD player) will also switch to standby if it is on.
Refer to the user manual of your external device to learn how to activate this feature on it.
Searching and selecting the active external device
1 Press »MENU« to open the menu.
2 Press »V« or »A« to select the »Preferences« menu and press »OK« to confirm.
3 Press »V« or »A« to select »HDMI Link« and press »OK« to confirm.
4 Use «« or »»« to set »HDMI Link« to »On«.
5 Press »V« or »A« to select the »Device List« and press »OK« to confirm.
- Existing devices will be searched and displayed in the menu
6 Press »V« or »A« to select the device you want to control and press »OK« to confirm.
7 Press »BACK ←« to return to the previous menu or press »EXIT« to end the setting.
High definition - HD ready
Your television can playback high-definition television signals (HDTV).
You can connect the input sources (HDTV set-top box or High Definition DVD player) to the »HDMI« socket (digital HDTV signal).
This ensures that you can view digital HDTV programmes, even if they are copy-protected (HDCP High Bandwidth Digital Content Protection).

text_image
HDMI™HIGH-DEFINITION MULTIMEDIA INTERFACE HDMI, the HDMI logo and High-Definition Multimedia Interface are trademarks or registered trademarks of HDMI Licensing LLC.
Connection options
■ Which television socket(s) you connect your external devices to depends on the sockets the external device is equipped with and the signals which are available.
Note that with many external devices the resolution of the video signal must be adapted to the input sockets on the television (check the external device's instruction manual). You can find out which values you need to set by referring to the guidelines in the section about connection options.
- Do not connect any other equipment while the device is switched on. Switch off the other equipment as well before connecting it.

text_image
SERVICE LAN Optic Out USB(HDD) HDMI3(ARC) HDMI2 SATELLITE 13/18V ANT-IN max.500mA USB1 AC IN Φ/1 -VIP(M)+■ Only plug the device into the mains socket after you have connected the external device.
Connecting an external device
With a digital audio/video signal
■ Suitable devices: Digital satellite receiver, game console, BluRay player, DVD player/recorder, set-top box, notebook, PC.
■ Video signal: digital image; definition: standard 576p; HDTV 720p, 1080i, 1080p.
■ Audio signal: digital audio (stereo, multichannel compression, uncompressed).
■ Channel position »HDMI1«, »HDMI2«, »HDMI3«.
1 Connect the HDMI1, HDMI2, HDMI3 (ARC) socket on the television and the corresponding HDMI socket on the external device using a standard HDMI cable (digital video and audio signal).
Using a DVD recorder, DVD player, video recorder or set-top box
1 Switch on the video recorder, DVD player or set-top box and select the function you wish to use.
2 Press »→«, press »« or »» to select the input signal (»HDMI1«, »HDMI2«, »HDMI3«) and press »OK« to confirm.
Headphones
Connecting headphones
1 Plug the headphone jack (3.5 mm jack plug) into the headphone socket of the television.
Hi-fi system
Connecting digital multi-channel amplifier/AV receiver
1 Connect the HDMI3 (ARC) (HDMI 1.4 Audio Return Channel) socket to the relevant socket on the HDMI ARC compliant Digital multichannel amplifier / AV receiver with a standard HDMI cable (digital audio signal); or
2 Connect the Optic Out socket on the television to the corresponding socket on the AV receiver using a standard optic digital cable (digital audio signal).
Important:
■ Do not use a HDMI cable longer than 5 m for HDMI ARC connection.
Apply the device with HDMI ARC function and confirm HDMI ARC
1 Switch on the multi-channel amplifier or the AV receiver. If a Blu-ray Player is connected on the AV receiver, the player must be switched on, too.
2 Press »MENU« to open the menu.
3 Press »V« or »A« to select »Preferences« and press »>« to confirm.
4 Press »V« or »A« to select »HDMI Link« and press »OK« to confirm.
5 Press »V« or »∧« to select »ARC« or press »« or »»« to select »On«.
6 Press »V« or »A« to select »Device List« and press »OK« to confirm.
- Audio system connected to the »HDMI3 (ARC)« source in the »Device List« menu shall be displayed in the list.
7 Select the device with »V« or »A« and press »OK« to confirm.
Notes:
If the audio system also has a playing function (e.g. Home theater system including DVD player function), two devices will be listed on the HDMI CEC list. The first one is the player, and the second one is audio player.
■ a Blu-ray Player is connected to the AV receiver, please remove the Disc from the Player during the registration.
■ The internal speakers of the television are switching off automatically.
■ AV receiver volume can be adjusted using TV remote control.
■ For switching off the HDMI ARC function, select »Off« with »« or »»«.
■ The ARC function will be deactivated while switching off the television and the internal speakers are active again.
8 Press »EXIT« to finish the setting.
Dolby, Dolby Audio double D symbol are trademarks of Dolby Laboratories.

natural_image
Top-down view of a computer monitor rear panel showing internal components and a connector (no text or symbols)What is common interface?
■ Common Interface (CI) is an interface for DVB receivers.
■ Scramble stations can only be viewed with a CA module suitable for the encoding system and the corresponding smart card.
■ The television set is equipped with a Common Interface slot into which CA modules from various providers can be inserted.
- You can insert the provider's smart card into the CA module in order to enable the encrypted stations you want to see.
Inserting the CA module
Note:
■ Switch off the appliance before inserting the CA module in the CI slot.
1 Insert the smart card into the CA module.
2 Insert the CA module with the smart card into the CI slot on the television.
Note:
To see which CA module is in the Common Interface slot, go to the »CA - Module« submenu.
■ When you insert a CA module into the CI slot on the television for the first time, wait a few moments until the television has registered the CA module.
Access control for CA module and smart card
1 Press »MENU« to open the menu.
2 Press »V« or »A« to select the »Channel« menu and press »>« to confirm.
3 Press »A« or »V« to select »CA - Module« and press »OK« to confirm.
Notes:
This menu give operating instructions and - after you enter your PIN code - access to channels of the PAY-TV provider.
■ Other settings are described in the manuals for your CA module and smart card.
■ The CA module is not supported in some countries and regions. Please consult your authorised dealer.
4 Press »EXIT« to finish the setting.
You can launch various applications on the Application Portal. These applications include various types such as video, picture, music, game, social networking applications, news and sports applications, weather forecast applications.
Network connection
You can establish a wired or wireless connection between your television and the local network.
If you want to use a wired network connection, please start with the instructions here:
If you use a wireless network connection, please follow the instructions in the "Wireless network connection" section on page 50.
Note:
The following section describes connecting to the home network if you did not carry this out during the "initial set-up".
Wired network
Wired network connection
1 Connect the output of external modem to LAN socket with Cat 5 cable.
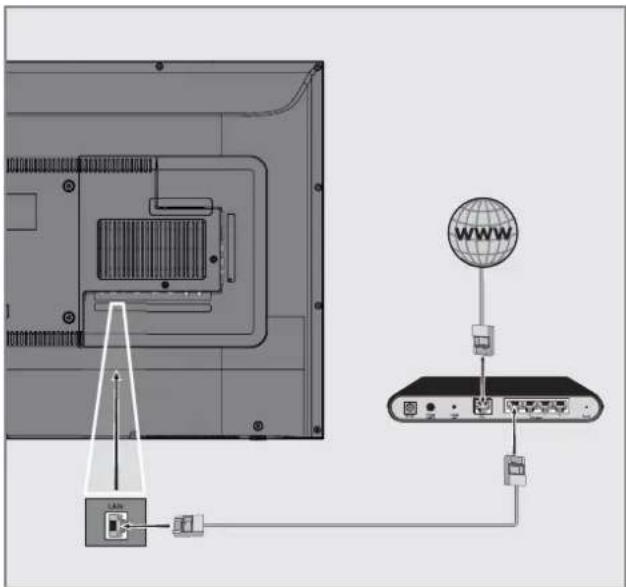
text_image
Diagram showing network connection between a monitor and a network device with labeled ports and global connectivityNote:
■ Connection cables are not supplied.
Wired network settings
There are two ways of making the wired network settings.
A Automatic connection, all data regarding connection settings (»IP Address«, »Netmask«, »Gateway« and »DNS«) are obtained from modem automatically.
B Manual connection,
all data regarding connection settings (»IP Address«, »Netmask«, »Gateway« and »DNS«) must be configured manually.
Automatic connection
Most of the home networks are Dynamic. If you have a dynamic network, you must use a DSL modem that supports DHCP. Modems and IP sharers that support DHCP obtain the »IP Address«, »Netmask«, »Gateway« and »DNS« values required for internet access automatically, and thus you are not required to enter those values manually.
1 Open the menu with »MENU«.
2 Press »V« or »A« to select »Network« and press »» to confirm.
3 Press »V« or »A« to select »Wired Network« and press »OK« to confirm.
4 To approve the Privacy Policy, press »« or »» to select »Accept« and press »OK« to confirm.
5 According to your network infrastructure, press »V« or »A« to select »IPv4« or »IPv6« and press »OK« to confirm.
Note:
To access the internet through IPv6, your internet service provider and modem must support IPv6. If only the modem supports IPv6, it can only connect to the modem; you cannot connect to internet.
6 Press »V« or »A« to select »Auto Input« and press »OK« to confirm.
- »Connecting ... « message will be displayed and if the connection is successful, »Connect Success« message will be displayed.
7 Press »EXIT« to end the setting.
Note:
If you do not have a dynamic network, follow the instructions in manual connection section.
Manual connection
Certain networks require Static IP address. If your network requires a Static IP address, you must enter the »IP Address«, »Netmask«, »Gateway« and »DNS« values manually. You can get »IP Adresi«, »Netmask«, »Gateway« and »DNS« values (ISS) from your Internet Service Provider.
1 Open the menu with »MENU«.
2 Press »V« or »A« to select »Network« and press »» to confirm.
3 Press »V« or »A« to select »Wired Network« and press »OK« to confirm.
4 To approve the Privacy Policy, press »« or »» to select »Accept« and press »OK« to confirm.
5 According to your network infrastructure, press »V« or »A« to select »IPv4« or »IPv6« and press »OK« to confirm.
Note:
To access the internet through IPv6, your internet service provider and modem must support IPv6. If only the modem supports IPv6, it can only connect to the modem; you cannot connect to internet.
6 Press »V« or »A« to select »Manual Input« and press »OK« to confirm. - »IP Address«, »Subnetwork«, »Gateway« and »DNS« options are enabled.
7 From the »IP Address« line, use »1...0« to enter the IP address.
8 From the »Subnetwork« line, use »1...0« to enter the Subnetwork address.
9 From the »Gateway« line, use »1...0« to enter the Gateway address.
10 From the »DNS1« line, use »1...0« to enter the DNS1 address.
11 From the »DNS2« line, use »1...0« to enter the DNS2 address.
12 To complete the setting process, press »OK« to confirm.
13 Press »EXIT« to end the setting.
Wireless network
Wireless network connection
1 Television includes a built-in Wireless WiFi Adapter to connect it to wireless network.

natural_image
Diagram showing a computer monitor rear panel connected to a network device with a globe icon and signal waves (no text or symbols present)Notes:
■ Wireless LAN adapter supports IEEE 802.11B/G and N communication protocols. We recommend you to use IEEE 802.11N protocol to obtain the best performance in HD video playback over wireless connection.
If you use a modem that supports IEEE 802.11B/G, video playback performance may be poor when compared to a modem that supports IEEE 802.11N since the data transfer rate of IEEE 802.11B/G protocol is lower.
It is recommended to switch off the equipment that are not in use in home network in order to avoid unnecessary network traffic.
■ Placing the modem or wireless network sharer on an elevated location will increase the wireless connection reception strength.
■ Wireless connection reception strength may vary depending on the type of the modem and the distance between the modem and television.
Connecting automatically by entering the network password
1 Open the menu with »MENU«.
2 Press »V« or »A« to select »Network« and press »» to confirm.
3 Press »V« or »A« to select »Wireless Network« and press »OK« to confirm.
4 To approve the Privacy Policy, press »« or »« to select »Accept« and press »OK« to confirm. - »Wi-Fi Network« menu will be displayed.
5 According to your network infrastructure, press »V« or »A« to select »IPv4« or »IPv6« and press »OK« to set »On«.
Note:
To access the internet through IPv6, your internet service provider and modem must support IPv6. If only the modem supports IPv6, it can only connect to the modem; you cannot connect to internet.
6 Press »V« or »A« to select »Base Station« and press »OK« to confirm.
- Wireless networks will be scanned and displayed in the »WIFI List« menu.
7 Select the network you want to connect with »V« or »A« and press »OK« to confirm.
- Wireless connection password screen will be displayed.
Note:
■ For device to discover the wireless modem on the network, the network name should support ASCII characters.
8 Select the required character with »«, »«, »V« or »A« and move to the next character with »OK«.
- Using »↑« → »OK«, you can switch between uppercase letters / numbers and lowercase letters / special characters.
- Select »X« to delete the character entered and press »OK« to confirm.
9 Press »••• (green) to connect to wireless network.
- »Connecting ... « message will be displayed and if the connection is successful, »Connect Success« message will be displayed.
10 Press »EXIT« to finish the setting.
Wireless WPS network connection by pressing a button
1 Open the menu with »MENU«.
2 Press »V« or »A« to select »Network« and press »» to confirm.
3 Press »V« or »A« to select »Wireless Network« and press »OK« to confirm.
4 To approve the Privacy Policy, press »« or »» to select »Accept« and press »OK« to confirm.
- »Wi-Fi Network« menu will be displayed.
5 According to your network infrastructure, press »V« or »A« to select »IPv4« or »IPv6« and press »OK« to set »On«.
Note:
■ To access the internet through IPv6, your internet service provider and modem must support IPv6. If only the modem supports IPv6, it can only connect to the modem; you cannot connect to internet.
6 Press »V« or »A« to select »Base Station« and press »OK« to confirm.
- Wireless networks will be scanned and displayed in the »WIFI List« menu.
7 Press »……« (blue) for the WPS connection.
8 Press »V« or »A« to select »WPS-PBC« and press »OK« to confirm.
9 Press the WPS button on the router.
10 After pressing the WPS button on the access point, press »« or »« to select »Continue« and press »OK« to confirm.
11 Press »••• (green) to make sure that the network connection is established with the current settings.
- »Connecting ... « message will be displayed and if the connection is successful, »Connect Success« message will be displayed.
12 Press »EXIT« to finish the setting.
Wireless WPS network connection with PIN
1 Open the menu with »MENU«.
2 Press »V« or »A« to select »Network« and press »» to confirm.
3 Press »V« or »A« to select »Wireless Network« and press »OK« to confirm.
4 To approve the Privacy Policy, press »« or »« to select »Accept« and press »OK« to confirm. - »Wi-Fi Network« menu will be displayed.
5 According to your network infrastructure, press »V« or »A« to select »IPv4« or »IPv6« and press »OK« to set »On«.
Note:
To access the internet through IPv6, your internet service provider and modem must support IPv6. If only the modem supports IPv6, it can only connect to the modem; you cannot connect to internet.
6 Press »V« or »A« to select »Base Station« and press »OK« to confirm.
- Wireless networks will be scanned and displayed in the »WIFI List« menu.
7 Press »……« (blue) for the WPS connection.
8 Press »V« or »A« to select »WPS-PIN« and press »OK« to confirm.
- 8-digit pin code is displayed in the wireless WPS menu.
Note:
■ Refer to the manual of your router to find out how the PIN is entered via a PC.
9 Use a computer to enter PIN to the router (e.g. AVM FRITZ!Box: menu item WLAN Settings...WPS) and save.
Note:
■ The 8-digit PIN code must be entered in the modem interface in 2 minutes; otherwise, connection of television with the modem is cut.
10 To approve the saving process, press »« or »» to select »Continue« and press »OK« to confirm.
- »Connecting ... « message will be displayed and if the connection is successful, »Connect Success« message will be displayed.
11 Press »EXIT« to finish the setting.
Searching for all digital television channels from a satellite automatically
New satellite channels are added or satellite data is changed frequently. Therefore, we recommend you to run auto search function from time to time.
All transponders are scanned for new channels.
1 Press »→« to open the »Source« menu.
2 Press »« or »« to select »DVB-S/S2« and press »OK«.
3 Press »MENU« to open the menu.
4 Press »V« or »^« to select the »Channel« menu and press »» to confirm.
5 Press »V« or »A« to select »Auto Tuning« and press »OK« to confirm.
6 Confirm »DVB-S/S2« with »OK«.
7 Press »V« or »A« to select »Operator« and press »OK« to confirm.
- »Auto Tuning« menu will be displayed.
8 Select »Satellite« with »OK« and press »V« or »A« to select the satellites you want to search.
Important:
If you want to search more than one satellite, make sure that the LNB settings of the satellites are correct.
9 Press »MENU« to return to the previous menu.
10 Press »V« or »A« to select »Scan Mode« and press »OK« to confirm. Select »Free« for free channels only, select »Scramble« for encrypted channels only and select »Free+Scramble« for all channels, and press »V« or »A«, press »MENU« to return to the previous menu.
11 Press »V« or »A« to select »Service Type«. Select »DTV« for TV channels only, select »Radio« for radio channels only, and select »DTV+Radio« for both by pressing »V« or »A«.
12 Press »MENU« to return to the previous menu.
Note:
If some of the frequencies are not stored completely due the changes in satellite parameters made by the broadcaster, it is recommended to set the Network Search option to »On«.
13 To start searching, select »Search Fast Scan« and press »OK«.
- »DVB-S/S2 Auto Tuning« menu appears and the scan for TV channels begins.
- Search may take several minutes depending on the number of television stations received.
Note:
■ The search can be aborted with »EXIT«.
14 Press »EXIT« to end searching.
Searching for digital television channels from a satellite manually
If a certain channel cannot be found with automatic search, you can search it manually by manual search function. You must enter all parameters of the channel correctly. You can obtain the current transponder information from teletext page, satellite TV magazines or Internet or you can search by selecting from the transponder list that already exists in the TV.
1 Press »→« to open the »Source« menu.
2 Press »« or »« to select »DVB-S/S2« and press »OK«.
3 Press »MENU« to open the menu.
4 Press »∨« or »∧« to select the »Channel« menu and press »〉« to confirm.
5 Press »V« or »A« to select »DTV Manual Tuning« and press »OK« to confirm.
- »DTV Manual Tuning« menu will be displayed.
6 Press »V« or »A« to select the required items and press »OK« to confirm.
Frequency
Enter the 5-digit channel frequency using »1...0«.
Symbol
Enter channel symbol rate with »1...0« as a 5-digit number.
Polarization
Press »« or »« to select channel polarization as »Vertical« or »Horizontal«.
7 Press »V« or »A« to select »Scan Mode« and press »OK« to confirm.
Select »Free« for free channels only, select »Scramble« for encrypted channels only and select »Free+Scramble« for all channels, and press »V« or »A«, press »MENU« to return to the previous menu.
8 Press »V« or »A« to select »Service Type«. Select »DTV« for TV channels only, select »Radio« for radio channels only, and select »DTV+Radio« for both by pressing »V« or »A«.
Note:
If some of the frequencies are not stored completely due the changes in satellite parameters made by the broadcaster, it is recommended to set the »Network Search« option to »On«.
9 Select »Search« with »V« or »A« and press »OK« to confirm.
10 Press »EXIT« to end searching.
LNB Settings
1 Press »MENU« to open the menu.
2 Select »Channel« with »V« or »A« and press »» to confirm.
- »CHANNEL« menu is now enabled.
3 Press »V« or »A« to select »LNB Setting« and press »OK« to confirm.
- »LNB Setting« menu is now enabled.
4 Select the required items with »V«, »∧«, »« or »».
Satellite
Select the satellite from which you want to receive digital stations from the list with »V« or »A« and confirm with »OK«.
Transponder
Press »OK« to go to the transponder list. You can select a transponder from the list, change or delete the current transponder or add a new transponder.
LNB Gücü
Select the LNB Power as »Off« or »13/18V«, »13V«, »18V« according to its type using »« or »«.
Long Cable Compensation
Select with »««, »»« and select »On« or »Off«.
LNB Tipi
Select the LNB Type with »OK« and then with »« or »«.
Note:
■ Select Universal from the list if you use universal LNB.
22KHz Tone Auto
Press »OK« and then press »V« or »A« to select »Auto«, »On« or »Off«.
Toneburst
Press »OK« and then press »V« or »A« to select »None«, »BurstA« or »BurstB«.
DiSEqC 1.0
DiSEqC 1.0 switch allows for receiving from maximum 4 satellites at the same time. LNB selection: Press »OK« and then press »V« or »A« to select »LNB1«, »LNB2«, »LNB3« or »LNB4« for the satellite that corresponds to the relevant DiSEqC positions.
5 Press »EXIT« to end searching.
Searching for digital television channels through cable automatically
1 Press »→« to open the »Source« menu.
2 Press »« or »« to select »DVB-C« and press »OK« to confirm.
3 Press »MENU« to open the menu.
4 Press »V« or »A« to select the »Channel« menu and press »» to confirm.
- »CHANNEL« menu is now enabled.
5 Press »V« or »A« to select »Auto Tuning« and press »OK« to confirm.
- »Auto Tuning« menu will be displayed.
6 Press »V« or »A« to select »Operator« and press »OK« to confirm.
7 In the »Tuning Mode«, press »« or »» to select (»Network« or »Full«) and press »OK« to confirm.
- »Network Scan« scanning function sets the channels according to the cable operator information in the broadcasting signal.
- »Full« scan function scans the entire frequency range selected. With this search option, search can take a long time. This search type is recommended.
Note:
■ You can speed up the search. To do this, frequency and network ID information are required. You can obtain such information from your cable provider or find them in Internet forums.
8 To start the search, press »OK«.
- »DVB-C Auto Tuning« menu appears and the scan for TV channels begins.
- Search may take several minutes depending on the number of television stations received.
Note:
■ The search can be aborted with »EXIT«.
9 Press »EXIT« to end searching.
Searching for digital television channels through cable manually
1 Press »→« to open the »Source« menu.
2 Press »« or »« to select »DVB-C« and press »OK« to confirm.
3 Press »MENU« to open the menu.
4 Press »√« or »^« to select the »Channel« menu and press »»« to confirm.
- »CHANNEL« menu is now enabled.
5 Press »V« or »A« to select »DTV Manual Tuning« and press »OK« to confirm.
- »DTV Manual Tuning« menu will be displayed.
6 Select »Frequency« using »V« or »A« and enter the frequency with »1...0«.
7 Press »V« or »^« to select »Modulation« and press »« or »»« to select modulation.
8 Press »V« or »A« to select »Symbol(kS/s)« and use »1...0« to enter the symbol.
9 Press »V« or »A« to select »Search« and press »OK«.
10 Press »EXIT« to end searching.
Searching for digital television channels through aerial automatically
1 Press »→« to open the »Source« menu.
2 Press »« or »« to select »DVB-T/T2« and press »OK« to confirm.
3 Press »MENU« to open the menu.
4 Press »V« or »A« to select the »Channel« menu and press »» to confirm.
- »Channel« menu is now enabled.
5 Press »V« or »A« to select »Auto Tuning« and press »OK« to confirm.
6 Confirm »DVB-T/T2« with »OK«.
- The »Channel Tuning« menu will be displayed and the search for TV stations will start.
- Search may take several minutes depending on the number of television stations received.
Note:
■ The search can be aborted with »EXIT«.
7 Press »EXIT« to end searching.
Searching for digital television channels through aerial manually
1 Press »→« to open the »Source« menu.
2 Press »« or »» to select »DVB-T/T2« and press »OK« to confirm.
3 Press »MENU« to open the menu.
4 Press »V« or »A« to select the »Channel« menu and press »» to confirm.
- »CHANNEL« menu is now enabled.
5 Press »V« or »A« to select »DTV Manual Tuning« and press »OK« to confirm.
- »DTV Manual Tuning« menu will be displayed.
6 Select »Channel« and press »« or »» to select the channel.
7 Press »∨« or »∧« to select »Frequency(KHZ)« and press »« or »»« to select the frequency.
8 Press »V« or »A« to select »Search« and press »OK«.
9 Press »EXIT« to end searching.
Tuning analogue television stations
The television channel can be set directly or using the search.
Re-tuning all analogue television channels
Note:
- Plug the rooftop antenna cable (for analogue television stations) into the »ANT IN« socket on the television.
1 Press »MENU« to open the menu.
2 Press »V« or »A« to select the »Channel« menu and press »» to confirm.
- »Channel« menu is now enabled.
3 Press »V« or »A« to select »Auto Tuning« and press »OK« to confirm.
4 Confirm »ATV« with »OK«.
- »ATV Auto Tuning« menu appears and the scan for TV channels begins.
- Search may take several minutes depending on the number of television stations received.
5 Press »EXIT« to end searching.
Tuning the analogue television channels by entering the channel numbers
1 Press »MENU« to open the menu.
2 Press »√« or »^« to select the »Channel« menu and press »>« to confirm.
- »Channel« menu is now enabled.
3 Press »V« or »A« to select »ATV Manual Tuning« and press »OK« to confirm.
- »ATV Manual Tuning« menu will be displayed.
4 In »Storage To«, press »« or »» to select the program number to which the channel will be saved.
5 Select »System» with »V« or »A«. Press »« or »» to select »BG«, »I«, »DK«or »M«.
6 Select »Search« with »V« or »A« and press »« or »» to start searching.
Notes:
■ When fine tuning is required, select »Fine-Tune« with V« or »A« and tune with »« or »»«.
■ To set other television stations, repeat steps 4 to 7.
7 To save the settings, press »•« (red).
8 Press »EXIT« to finish setting.
Displaying signal information
(only for digital television channels)
1 Press »MENU« to open the menu.
2 Press »V« or »A« to select the »Channel« menu and press »» to confirm.
- »Channel« menu is now enabled.
3 Select »Signal Information« using »V« or »A« and confirm with »OK«. - »Signal Information« menu will be displayed.
Notes:
■ Signal information changes depending on the current source.
■ The signal level not only depends on your receiver system, but also on the channel which is currently active. Remember this when aligning your antenna using the signal level display.
4 Press »EXIT« to finish the screen display.
Wireless LAN Module specification (if WiFi module is available)
Standard: IEEE802.11b/g/n
Frequency Range: Output Power (Maximum)
2400 MHz - 2483.5 MHz: <20dBm
Wireless LAN Module specification (if WiFi module is available)
Standard: IEEE802.11a/n/ac
Frequency Range: Output Power (Maximum)
5150 MHz - 5250 MHz: <23dBm
5250 MHz - 5350 MHz: <23dBm
5725 MHz - 5850 MHz: <23dBm
Bluetooth Module specification (If bluetooth module is available)
Frequency Range: Output Power (Maximum)
2400 MHz - 2483.5 MHz: <20dBm
Service information for authorised dealers

This product complies with European Union directives and regulations below:
2014 / 53 / EU Radio
equipment directive
2009/125/EC: Directive and relevant for eco-design for products using energy as well as its following sub-directives;
278/2009: Regulation regarding eco friendly design requirements regarding energy consumption of uncharged external power sources and average active efficiency (for models with AC/DC adapters);
642/2009: Regulation regarding environmentally-conscious design requirements for TVs.
801/2013 Amending regulation regarding ecodesign requirements for televisions.
2010/30/EU: Directives regarding Energy Labelling of Energy-Related products as well as its following sub-directives;
1062/2010: Regulation regarding energy labelling of televisions.
2011/65/EU: Directive on limitations on use of certain hazardous materials on electric, electronic domestic and office equipment.
To obtain a copy of declaration of compliance (DoC):
please visit http://www.grundig.com/download/doc. You can access the declaration of compliance by typing model number of your television indicated on the cover page of the instruction manual into the field where it says "Enter model number".
Notes for wireless (WLAN) connection
Notes for customers: The following information is only applicable for devices that are sold in the countries enforcing EU regulations.
TV's wireless system can only be used in the countries given in the table below.

| AT | BE | BG | CH | CY | CZ | DE | DK |
| EE | ES | FI | FR | GB | GR | HU | IE |
| IS | IT | LI | LT | LU | LV | MT | NL |
| NO | PL | PT | RO | SE | SI | SK | HR |
| EN |
The use the 5150 -5350 MHz band is restricted to indoor use only. (For Wi-Fi/Bluetooth built-in model or Wi-Fi Built-in model).
This device can also be operated in the countries outside Europe.
For the customers in Italy:
Public use is subject to service provider's permission.
For the customers in Norway:
Radio equipment use is not allowed in a graphical area within 20 km diameter of Ny-Alesund, Svalbord.
For customers in Norway:
This device's WLAN (Wifi) feature can only be used indoors. In Turkey, outdoor use is not allowed. Make sure WLAN (Wifi) feature is closed when using outdoors.
For the customers in Russia:
Short Range Device with FHSS Modulation Applications.
Maximum 2.5 mW e.i.r.p.
for collecting telemetry information for automatic tracking and source calculation systems, 100mW e.i.r.p is the maximum allowed short range device density value permitted for use on outdoor applications without any limitation on installation height. For uses with other purposes, this applies to outdoor application in which this value does not exceed 10m above the ground.
Short range device density for indoor applications is 100mW e.i.r.p maximum.
Short range device applications with broadband modulation with DSSS and other than FHSS.
The maximum average density value for short range device applications with broadband modulation with DSSS and other than FHSS is 2 mW/MHz or 100mW e.i.r.p.
For only the purpose of compiling telemetry data for automatic monitoring and source estimation systems, maximum short range device allowed to be used in outdoor applications is 20 mW/MHz or 100 mW e.i.r.p.
Maximum density value for indoor use of short range devices is 10mW/MHz or 100 mW e.i.r.p.
For the customers in Ukraine:
Maximum short range device density value for indoor uses, along with internal antenna with 6 dBi amplification factor, is 100 mW e.i.r.p.
PCB Conformity:
"Does not contain PCB (Poly-chlorinated Biphenyl)."
Disposing the packaging
The packaging materials are dangerous for children. Keep the packaging materials out of the reach of children.
The packaging of the product is manufactured from recyclable materials. Dispose of by classifying in accordance with waste regulations. Do not dispose along with normal household waste.
Environmental note
This product has been made from high-quality parts and materials which can be re-used and recycled.
Therefore, do not dispose of the product along with normal household waste at the end of its service life. Take it to a collection point for
recycling electrical and electronic devices. This is indicated by this symbol on the product, in the operating manual and on the packaging. Please find out about collection points operated by your local.
Help protect the environment by recycling used products.
Conformity with WEEE Regulation and Disposing of Waste Product
This product does not contain hazardous and prohibited substances specified in the "Regulations for Supervision of Waste Electrical and Electronic Equipment" Published by Turkish Ministry of Environment and Urban Planning. Conforms the WEEE Regulation. This product has been made from high-quality parts and materials which can be recycled and re-used. Therefore, do not throw the product away with household and other waste at the end of its life. Take it to a collection point for recycling electrical and electronic devices. Contact your local authority for the collection points in your region. Help preserve the nature and natural resources by recycling used products. For the safety of children, cut the power cord before disposal.
Troubleshooting
If the remedies given below do not work, please consult an authorised GRUNDIG dealer. Please bear in mind that malfunctions can also be caused by external devices such as video recorders or satellite receivers.
| Problem | Possible cause | Remedy |
| Screen lit (snow), but no stationPoor picture contrastInterference to picture and/or sound | Antenna cable | Is the antenna cable connected? |
| No TV station programmed | Start the channel search | |
| Picture settings incorrectly set | Adjust the brightness, contrast or colour setting | |
| Problem at station | Test with a different station | |
| Interference from other devices | Change the position of the device | |
| Ghosting, reflectionNo colourPicture but no sound | Channel setting | Automatic or manual channel setting/fine tuning |
| Antenna | Have antenna cable or system checked | |
| Colour intensity at maximum | Turn up the colour | |
| TV standard setting (if setting option is available) | Select the correct colour standard | |
| Problem at station | Test with a different station | |
| Volume set to minimum | Turn up or switch on the volume | |
| Teletext missing or faulty | Problem at station | Test with a different station |
| Television station (has no teletext) or antenna system | Test another channel for fine tuning and ghosts | |
| Station signal too weak | Check the antenna system | |
| Remote control does not work | No optical connection | Point the remote control at the television set |
| Remote control batteries | Check the batteries, change if necessary | |
| Operating condition undefined | Switch off the TV by pressing the power key (if any) or unplugging the mains plug, and leave it off for about 2 minutes. | |
| Picture is dark in PC mode | Incorrect setting for picture resolution and picture frequency on the PC | Change the setting on the PC (for example, picture resolution 1280 x 768, picture frequency 60Hz). |
| Modem do not have Internet connection or has problems | Make sure that your modem has Internet connection | |
| Videos in video applications are lagging during playback in wireless connection | Internet connection speed is low. | Low Internet speed is a problem that is related with the speed of your subscription or a failure in the Internet infrastructure. Contact with your service provided (ISP). |
| Videos in video applications are lagging during playback in cable connection | Internet connection speed is low. | Low Internet speed is a problem that is related with the speed of your subscription or a failure in the Internet infrastructure. Contact with your service provided (ISP). |
| There are connection problems in Inter@ctive applications. | This may occur due to temporary problems in servers of these applications | Try connecting to the applications again |
Explanation of the symbols which may be present on back side of the television set

Double insulation. Television set doesn't require connection to electrical earth (ground).

Alternating current. The set works only with AC line voltage in your household electricity.

Direct current. The set works only with AC/DC adapter.
Note:
This is a Class A product. During operation the device can cause radio interference. In this case the user may have to remedy this. Please contact your specialist dealer.
The features mentioned depend on the model of the TV. Your TV may lack some of these features.
ARC
With ARC (Audio Return Channel) the audio signal of the television programme can be played back via a HDMI cable or an optical cable with a multi-channel amplifier.
Backlight
Manual setting for back lighting (only active if dynamic back lighting is switched to "OFF"). This setting also directly impacts power consumption.
Block Noise Reduction
This function can only be selected with digital reception sources and AV presets. It reduces any interference from artefacts (pixel blocks) from digital programmes due to MPEG compression (such as from DVB-T receivers and lower transmission rates or DVD players).
Common Interface
It is an interface used in DVB receivers. Scrambled channels can only be viewed with a CA module suitable for the encoding system and the corresponding smart card.
Digilink
This feature utilizes CEC (Consumer Electronics Control) protocol.
CEC enables external devices that are connected to the HDMI socket with the HDMI cable to be controlled via the remote control.
DiSEqC
DiSEqC (Digital Satellite Equipment Control) is a digital system that ensures that the motorized multiple-LNB satellite systems are controlled.
DiSEqC is required when two or more satellite locations need to be controlled.
Dynamic Backlight
Here the device optimally adjusts the back lighting for the picture content by regulating the back lighting depending on the average picture brightness. If a picture has predominately dark areas, then the black level displayed is improved by downward adjustment of the back lighting (in this case the display of the dark areas is improved), and with predominantly bright picture material the back lighting is maximised in order to display these areas more brightly.
Domain name system
The domain name system (DNS) is one of the most important services on the Internet. Its main function is to convert an Internet address into the corresponding IP address.
DVB-C
DVB-C (Digital Video Broadcasting - Cable) is a type of DVB used for the transmission of radio and television signals through a cable connection.
DVB-S/S2
DVB-S/S2 (Digital Video Broadcasting - Satellite) broadcasts the DVB signals through the satellite.
DVB-T/T2
DVB-T/T2 (Digital Video Broadcasting - Terrestrial) is a type of DVB used for the transmission of radio and television signals through terrestrial channels.
Dynamic Contrast
This function dynamically and optimally adjusts the contrast for the respective picture content by analysing images and then altering this depending on a change in contrast. This increase in the contrast however, may also reduce the visible brightness levels in the picture.
Film mode
Detects and processes feature films automatically for all channel sources. This means that you get the optimum picture at all times.
This functions in the mode 480i, 576i and 1080i in TV playback and for other channel sources. If the "Movie Mode" is switched on for programmes without a feature film signal, minor problems such as picture freeze, defective subtitles or fine lines in the picture could occur.
Firmware version
Firmware is the term used for software that is embedded in a programmed chip (microcontroller). It is mostly stored in a flash memory, an EPROM or an EEPROM. The firmware contains functions for controlling the device.
Gamma
This setting establishes which brightness value should be displayed for which digital transmission value. Most recordings are transmitted with a gamma value of 2.2 (all Windows PCs and newer PCs with a MAC operating system work with this; older MAC systems and transmissions without colour profile mostly operate with a gamma value of 1.8).
Gateway
A gateway allows networks, which may be based on completely different protocols, to communicate with each other. In the home area, a combination of the router and the DSL modem are used as an Internet gateway.
Hardware version
Hardware in this context means the device. This includes all components such as processor, display, etc.
HbbTV
HbbTV is the interactive successor of video text, which has content with a modern design, high resolution images and video sequences as well as media libraries.
For full functionality of HbbTV, the TV must be connected to the Internet.
HD/Full HD/UHD
High Definition (HD) TV is a general name for the television standard that has increased vertical, horizontal and timewise definition.
Full HD is a feature of devices with HDTV that can output or record 1920x1080 pixels of definition.
HD is 3840 x 2160 for UHD.
IP Address
An IP address (Internet protocol address) is used to uniquely identify the address of computers and other devices in an IP network. The most well-known network in which IP addresses are used is the Internet. Here, for example, web servers are addressed using the IP address. The IP address can be provided automatically by the router (automatic address) or can be entered manually in the router (static address). If it is entered manually, this address must be entered in the TV set.
JPEG
JPEG stands for Joint Picture Experts Group. It is the process where the picture data are compressed.
MIRASHARE
With MiraShare, all content can be transferred between PC and TV through Wi-Fi via Miracast™ certified mobile devices (smart phone or tablet). HD content can also be transferred to the TV easily.
LNB
The Low Noise Block resides at the center of parabolic antenna.
For example: It implements the satellite frequencies that are between 10.7–11.75 or 11.8–12.75 GHz in 950 to 2150 MHz and ensures cable transmission with coaxial cables (and with fiber-optic cables recently) and reception with satellite receivers.
MP3
Compressed audio file format.
NAS (network attached storage)
The abbreviation NAS is used for devices that provide data from a hard drive to a network.
Network mask
The network mask or net mask, sometimes also referred to as a subnet mask, is a bit mask that separates an IP address into a network part and a device/host part. It is used in IP networks to make routing decisions.
Network name (SSID)
The network name (SSID - service set identifier) is the term used for the identification of a wireless network that is based on IEEE 802.11. Every wireless LAN has a configurable SSID, which uniquely identifies the wireless network. The character sequence of the network name can be up to 64 characters in length. It is configured in the base station (access point) of a wireless LAN and set on all clients which access it.
Noise Reduction
Reduces the "snow" areas by displaying the picture a bit sharper and creating a slight blur. Thus, it must be used as little as possible with good picture material.
Perfect Clear
Improves the general image by means of a gentle blue hue (giving the appearance of greater sharpness) and improves the black level by setting this entirely to black from a specific level of greyness. This reduces the visible grey values in the dark areas of the picture.
SCR (Single Channel Router)
Single Cable System EN 50494.
If your antennae system is equipped with a single cable system multi switch, the televisions which are connected to this antennae system can receive television programmes independently from one another.
Security (WEP/WPA)
WEP (wired equivalent privacy) is the standard encryption algorithm for WLAN. It controls both access to the network as well as ensuring
the confidentiality and integrity of data. This procedure is considered insecure nowadays. For this reason, more recent WLAN installations should use the more secure WPA encryption.
Symbol rate
It is the amount of the symbols transmitted in a unit of time in the digital transmission technology.
TransPonder
It is a cluster of various transmitters in a frequency.
Vibrant Colour
Improves colour contrast and contrast setting. This setting is highly powerful for use in normal pictures and it should be used only when necessary (low or off). Otherwise, slight details in the image may be repressed.
Wi-Fi
Wireless transmission of Internet and Intranet parcels.
A
Access control for CA module and smart card.....48
ACCESSIBILITY FUNCTIONS.....40
Additional functions.....32
Additional functions for video indexes.....31
Additional playback functions.....36
Adjusting the volume.....26
Apply the device with HDMI ARC function and activate HDMI ARC.....46
Audio data.....33
Audio language.....27
Automatic connection.....49
Automatic volume.....25
Auto standby.....27
B
Blocking a television channel.....42
C
Calling up a sub-page directly.....32
Changing the audio language.....39
Changing the menu language.....39
Changing the PIN code.....42
Changing the picture format.....28
Changing the subtitle language.....39
Connecting an external device.....46
Connecting automatically by entering the network password.....20, 51
Connecting digital multi-channel amplifier/AV receiver.....46
Connecting external data media.....34
Connecting headphones.....46
Connecting the antenna and the power cable.....9
Connecting to a home network with a LAN cable.....19
Connection options.....45
Connections of the television set.....12
Control buttons on the TV.....13
Creating a list of favourites.....23
D
Deleting channels in the channel editor.....23
Detailed Channel Settings.....53
Digi Link connection functions of TV.....44
Disabling and enabling HbbTV.....31
Displaying information.....26
Displaying signal information.....59
Disposing the packaging.....61
E
ELECTRONIC TV GUIDE.....29
Enhanced picture settings.....24
Environmental information.....5
Environmental note.....11, 61
Equalizer.....25
F
File formats.....33
Functioning of the TV - Basic Functions.....26
G
General Information.....6
Getting Started with Smart Inter@ctive TV.....38
GLOSSARY.....64
H
HbbTV Mode.....30
HDMI CEC.....44
Headphones.....46
Hi-fi system.....46
High definition - HD ready.....45
1
INFORMATION.....60
Initial Set-up.....19
Inserting batteries into the remote control.....11
Inserting the CA module.....48
Installation preparation for VESA installation kit.....10
L
Language Settings.....39
LNB Settings.....55
LOCK Settings.....42
M
Manual connection.....50
Moving the channels in the programme edit to a different position.....23
Moving to a specific part of a video.....36
Muting.....26
N
Network connection.....49
Network Setup.....49
Normal text mode.....32
Notes for wireless (WLAN) connection.....60
Notes on still images.....7
。
Opening the Program Edit.....22
Operation with Common Interface.....48
OTHER SETTINGS.....43
Overview.....12
P
Packing contents.....8
Page stop.....32
Parental Guidance.....42
Picture data.....33
Picture settings.....24
Picture / Sound Settings.....24
Playback basic functions.....35
Playing the selected picture data.....36
R
Receiving digital stations.....6
Remote control - all functions.....15
Remote control - main functions.....14
Repeat functions.....36
Replaying the marked time.....36
Resetting the television to its original state.....43
Re-tuning all analogue television channels.....58
Reveal answer.....32
S
Searching and selecting the active external device.....44
Searching for all digital television channels from a satellite automatically.....53
Searching for digital television channels from a satellite manually.....54
Searching for digital television channels through aerial automatically.....57
Searching for digital television channels through aerial manually.....57
Searching for digital television channels through cable automatically.....56
Searching for digital television channels through cable manually.....56
Searching forward.....36
Searching television channels with satellite signal (DVB-S).....20
Selecting a track or picture in steps (SKIP).....36
Selecting channels from lists.....26
Selecting the HDMI source from the television.....44
Selecting the menu language.....44
Service information for authorised dealers.....60
SETTINGS.....17
Settings for connecting to the home network.....17
Setting up or hanging.....10
Setting up with stand.....10
Setup and Safety.....4
Skipping the waiting time.....32
Sleep timer.....28
SMART Inter@ctive TV 4.0+ Feature.....37
SMART Inter@ctive TV 4.0+ internet applications.....37
Software update (NetReady).....43
Software update (USB).....43
Sound Mode.....25
Sound settings.....25
Special features of your television set.....6
Subtitles.....27
Switching off the device from standby mode.....44
Switching on and off.....26
Switching on the external device from standby mode.....44
T
Teletext mode.....32
Terms & Conditions and Privacy.....37
The file browser.....35
The main menu of the file browser.....35
Things to do for energy saving.....6
Timer Functions.....41
TOP text or FLOF text mode.....32
Troubleshooting.....62
Tuning analogue television stations.....58
Tuning cable digital television channels (DVB-C).....21
Tuning television channels.....17
Tuning terrestrial digital television channels (DVB-T).....21
Tuning the analogue television channels by entering the channel numbers.....58
Turning the picture display.....36
U
USB Process.....33
USING EXTERNAL DEVICES.....44
Using a DVD recorder, DVD player, video recorder or set-top box.....46
Using HbbTV.....31
V
Video data.....33
W
Watching a blocked television channel.....42
What is common interface?.....48
What is HbbTV?.....30
Wired network.....49
Wired network connection.....49
Wired network settings.....49
Wireless network.....51
Wireless network connection.....51
Wireless WPS network connection through by pressing a button.....52
Wireless WPS network connection with
PIN.....52
Grundig Intermedia GmbH • Thomas-Edison-Platz 3 • D-63263 Neu-Isenburg