
LW-B0967CL - Neklasifikuota LG - Nemokama naudojimo instrukcija
Raskite įrenginio instrukciją nemokamai LW-B0967CL LG PDF formatu.


Naudotojų klausimai apie LW-B0967CL LG
0 klausimas apie šį prietaisą. Atsakykite į tas, kurias žinote, arba užduokite savo.
Užduokite naują klausimą apie šį prietaisą
Atsisiųskite instrukciją savo Neklasifikuota PDF formatu nemokamai! Raskite savo instrukciją LW-B0967CL - LG ir vėl perimkite savo elektroninį įrenginį. Šiame puslapyje skelbiami visi dokumentai, reikalingi jūsų įrenginio naudojimui. LW-B0967CL prekės ženklo LG.
NAUDOJIMO INSTRUKCIJA LW-B0967CL LG
Room Air Conditioner OWNER'S MANUAL
Please read carefully and thoroughly the operating precautions and safety precautions before installing your room air conditioner.

CONTENTS
FEATURES 2
HOW TO OPERATE 3
TO CONTROL AIR DIRECTION....5
CARE AND MAINTENANCE 6
PLEASE CHECK BEFORE SERVICE CALL 7
FEATURES
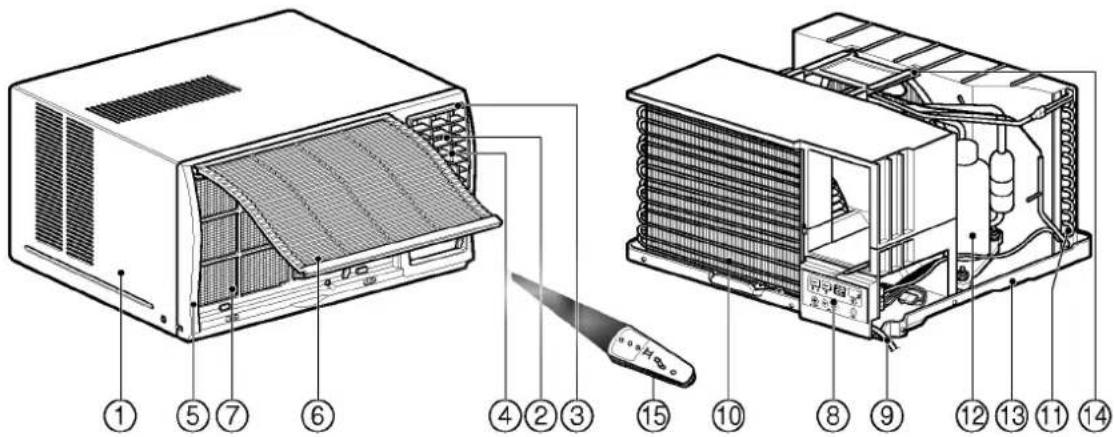
- CABINET
- VERTICAL LOUVER (HORIZONTAL AIR DEFLECTOR)
- HORIZONTAL LOUVER (VERTICAL AIR DEFLECTOR)
- AIR DISCHARGE
- FRONT GRILLE
- INLET GRILLE (AIR INTAKE)
- AIR FILTER
- CONTROL BOARD
- POWER CORD
- EVAPORATOR
- CONDENSER
- COMPRESSOR
- BASE PAN
- BRACE
- REMOTE CONTROLLER
• CAUTION
- When the air conditioner has been performing its cooling operation and is turned off or set to the fan operation, wait at least 3 minutes before resetting to the cooling operation again.
- Please, set auto restart switch to "OFF" mode when you go out.
- VENTILATION
The ventilation lever must be CLOSE position in order to maintain the best cooling conditions. When fresh air is necessary in the room, set the ventilation lever to the OPEN position. The damper is opened and room air is exhausted.
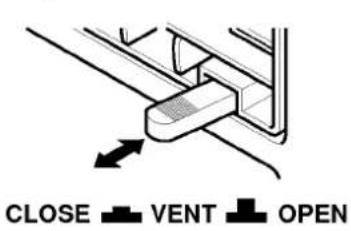
NOTE: Before using the ventilation feature, make a ventilation kit. First, pull down part to horizontal line with part .

• DISPLAY
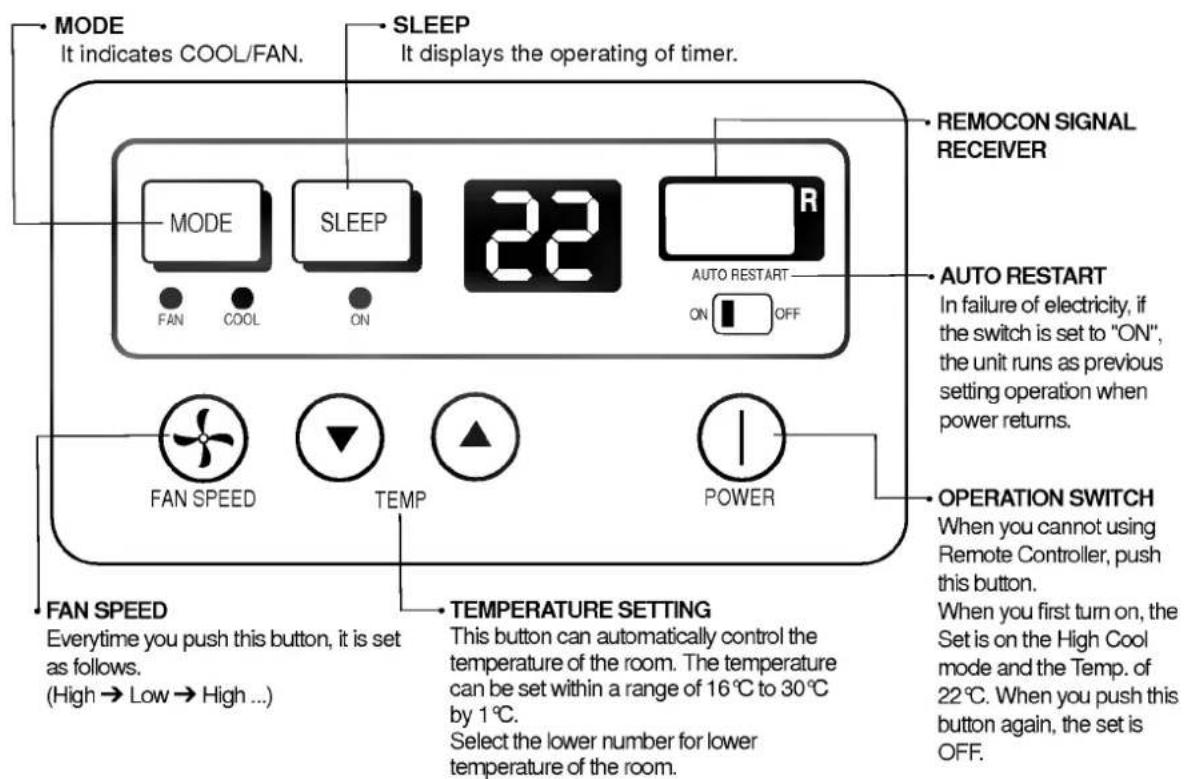
- REMOTE CONTROL
Precaution: The Remote Controller will not operate properly if strong light strikes the sensor window of the air conditioner or if there are obstacles between the Remote Controller and the air conditioner.
SLEEP
- Everytime you push this button, timer is set as follows. (1 Hour → 2 Hours → 3 Hours → 4 Hours → 5 Hours... → 12 Hours → Cancel) The time is set by 1 hour.
- The Setting Temperature will be raised by 1°C 30min. later and by 2°C 1 hour later.
COOL/FAN
- Everytime you push this button, it will be COOL and FAN only by turns.
POWER
- To turn the Set ON, push the button. To turn the Set OFF, push the button, again.
- This button takes priority of any other buttons.
- When you first turn on, the Set is on the High cool mode and the temp. of 22°C
TEMPERATURE SETTING
- This button can automatically control the temperature of the room. The temperature can be set within a range of 16°C to 30°C by 1°C. Select the lower number for lower temperature of the room.
FAN SPEED
- Everytime you push this button, it is set as follows. (High → Low → High ...)
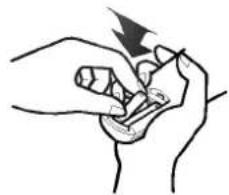
• HOW TO INSERT BATTERIES
1 Remove the cover from the back of the remote controller.
- Slide the cover according to the arrow direction.
2 Insert two battaries.
- Be sure that the (+) and (-) directions are correct.
- Be sure that both batteries are new.
3 Re-attach the cover.
- Slide it back into position.

natural_image
Illustration of a hand holding a tool with a lightning bolt indicating force (no text or symbols)
- Do not use rechargeable batteries such batteries differ from standard dry cells in shape, dimensions, and performance.
- Remove the batteries from the remote controller if the air conditioner is not going to be used for an extended length of time.
TO CONTROL AIR DIRECTION
The direction of air can be controlled whenever you want to cool by adjusting the horizontal louver and the vertical louver.
natural_image
Illustration of an air conditioner unit with a hand inserting a rack into the air gap (no text or symbols)• HORIZONTAL AIR DIRECTION CONTROL
The horizontal air direction is adjusted by moving the vertical louver right or left.

natural_image
Line drawing of a portable air conditioner with a hand pointing to the front panel (no text or symbols)• VERTICAL AIR DIRECTION CONTROL
The vertical air direction is adjusted by adjusting the horizontal louver toward or backward.
CARE AND MAINTENANCE
• HOW TO ATTACH DRAIN PIPE
The air conditioner empolys a proper drain method whereby the condensed water (a moisture removed from the air) is drained to the outside.
In very humid weather, excessive condensed water that is removed from the air conditioner may cause some water to drip off the unit.
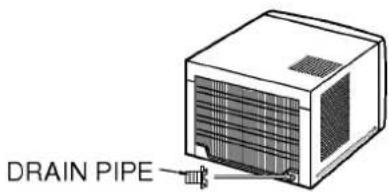
At that time, you can install the drain pipe as illustrated below.
- DRAIN PIPE
Please secure the DRAIN PIPE to the rear hole of the BASE PAN.
• AIR FILTER CLEANING
The air filter should be checked at least twice a month to see if cleaning is necessary. Trapped particles in the filter will build up and block the airflow. This reduces the cooling capacity and also causes an accumulation of frost on the cooling coils.
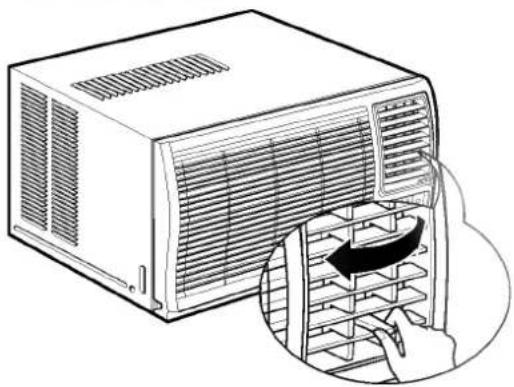
- Open the inlet grille upward by pulling out the bottom of the inlet grille.
- Remove the air filter from the front grille assembly by pulling the air filter up slightly.
- Wash the filter using lukewarm water below 40°C(104°F).
- Gently shake the excess water from the filter completely. Replace the filter.

natural_image
Illustration of a hand inserting a fan into an air conditioner unit (no text or symbols)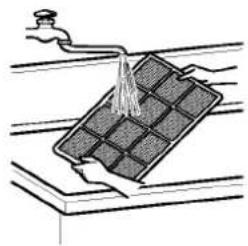
natural_image
Diagram of a solar panel being compressed into a drain, showing water flow and cooling effect (no text or symbols)• HOW TO COMBINE FRONT GRILLE WITH CABINET
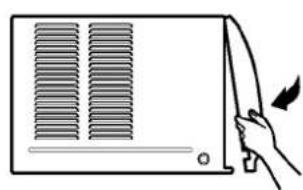
- Pull down front grille from the cabinet top.
-
Push front grille's tips toward the cabinet in order to insert front grille's tabs into the cabinet.
-
Open the inlet grille.
- Tighten the screw, which was used for fastening the cabinet's back, through the front grille into the base pan.
- Close inlet grille.

natural_image
Illustration of a hand holding a fan blade next to a rectangular panel with a grid-like structure (no text or symbols)
natural_image
Illustration of a hand inserting air filters into a rack device (no text or symbols)CAUTIONS
Listed below are important instructions which will prevent malfunctions of the unit or serious problem with your air conditioner.
- Operate the unit from a stable power supply Voltage variation must be within ±10 percent of the rated voltage.
- Do not modify any part of the unit.
- Do not put sticks, rods, etc., into any part of the unit.
- Do not operate the unit without an air filter.
-
Do not hold the power cord plug with wet hand.
-
Do not obstruct the air inflow of the evaporator, it may cause some trouble.
- Disconnect the power cord plug from wall receptacle during the cool season or when you are checking the unit.
- Close the ventilation damper on windy days and/or during heavy rains.
PLEASE CHECK BEFORE SERVICE CALL
When you find something wrong with your room air conditioner, please check carefully referring to the following items. If you can't find out the causes of trouble, get into contact with your dealer.
A. WHEN THE AIR CONDITIONER CANNOT OPERATE;
- Is the air conditioner plugged into the receptacle properly?
- Is the unit connected to a live receptacle supplying the proper voltage?
- Is the fuse blown or is the automatic circuit breaker off?
- Is there a local power failure?
- Has the air conditioner been accidentally switched off?
- Is the circuit overloaded by other devices on the same line?
- At cooling condition: Is the setting temperature set too high temperature compared with the temperature of indoor?
- If an extension cord is used, is the wire diameter large enough to carry the current?
B. AIR CONDITIONER RUNS, BUT DOES NOT COOL SUFFICIENTLY;
- Is the operation mode selection switch set properly?
- Is the setting temperature set properly to provide the desired temperature?
- Are there too more people than the usual number in the room?
- Is the air circulation impeded by drapes, furniture, etc, or by an improper vane setting?
- Are the doors or windows open, or is there an unusual heat source in the room?
- Is the ventilation damper closed for maximum cooling?
- Is the air filter clean so that it will not obstruct the air flow?
- Have all the steps outlined in the Installation Instructions been followed?

LG Electronics Inc.
- Room Air Conditioner OWNER'S MANUAL
- CONTENTS
- FEATURES
- • CAUTION
- - VENTILATION
- • DISPLAY
- - REMOTE CONTROL
- SLEEP
- COOL/FAN
- POWER
- TEMPERATURE SETTING
- FAN SPEED
- • HOW TO INSERT BATTERIES
- TO CONTROL AIR DIRECTION
- CARE AND MAINTENANCE
- • HOW TO ATTACH DRAIN PIPE
- - DRAIN PIPE
- • AIR FILTER CLEANING
- • HOW TO COMBINE FRONT GRILLE WITH CABINET
- CAUTIONS
- PLEASE CHECK BEFORE SERVICE CALL
- WHEN THE AIR CONDITIONER CANNOT OPERATE;
- AIR CONDITIONER RUNS, BUT DOES NOT COOL SUFFICIENTLY;
- LG Electronics Inc.
Prekės ženklas : LG
Modelis : LW-B0967CL
Kategorija : Neklasifikuota