
325-BBUQ - コンピューターケース DELL - 無料のユーザーマニュアル
デバイスのマニュアルを無料で見つける 325-BBUQ DELL PDF形式.

| 製品タイプ | Dell Pro ステレオサウンドバー (AE515M) ブラケット付き |
| モデル番号 | 325-BBUQ |
| 寸法 (サウンドバー) | 幅 443 mm x 高さ 35 mm x 奥行 60.43 mm |
| 寸法 (ブラケット) | 幅 230.11 mm x 高さ 56.08 mm x 奥行 63.57 mm |
| 重量 (サウンドバー) | 440 g |
| 重量 (ブラケット) | 74 g |
| 電源 | USB 経由 5V / 500 mA |
| オーディオ入力 | USB デジタルオーディオ、アナログ Aux-in (3.5 mm ジャック) |
| 出力電力 | USB 3.0: 2 × 1.8 W (≤10% THD)、USB 2.0: 2 × 1.0 W (≤10% THD) |
| 音圧レベル | 84 dB ±3 dB |
| 接続方式 | USB ケーブル、オーディオケーブル (付属) |
| 対応機能 | Skype for Business 通話応答/終了、マイクミュート、音量調節、ヘッドホン出力、デフォルト再生切替 |
| 取り付け方法 | Dell モニターのベースまたはブラケットにスライド式で装着 |
| 付属品 | サウンドバー本体、ブラケット、厚手ゴムクッション、USBケーブル、オーディオケーブル、ドキュメント |
| 保証期間 | 3年間限定ハードウェア保証 |
よくある質問 - 325-BBUQ DELL
ユーザーの質問 325-BBUQ DELL
0 質問 この機器について。知っているものに答えるか、ご自身の質問をしてください。
この機器について新しい質問をする
デバイスの取扱説明書をダウンロード コンピューターケース 無料でPDF形式で!マニュアルを見つける 325-BBUQ - DELL 電子デバイスをもとに戻しましょう。このページにはデバイスの使用に必要なすべての書類が掲載されています。 325-BBUQ ブランド DELL.
使用説明書 325-BBUQ DELL
Dell Pro Stereo Sound Bar with bracket - AE515M
User's Guide
Notes, cautions, and warnings

NOTE: A NOTE indicates important information that helps you make better use of your computer.

CAUTION: A CAUTION indicates either potential damage to hardware or loss of data and tells you how to avoid the problem.

WARNING: A WARNING indicates a potential for property damage, personal injury, or death.
Copyright © 2018 Dell Inc. All rights reserved. This product is protected by U.S. and international copyright and intellectual property laws. Dell™ and the Dell logo are trademarks of Dell Inc. in the United States and/or other jurisdictions. All other marks and names mentioned herein may be trademarks of their respective companies.
2018 - 05
Rev. A00
Contents
What's in the box.... 4
Features....5
Setting up your sound bar 6
Installing the sound bar to your Dell monitor 6
Turning on your sound bar....9
Connecting your sound bar 10
Audio-in port 10
Headphone jack.... 11
Answering Skype for Business calls 12
Making Skype for Business calls 13
Adjusting the volume.... 14
Troubleshooting.... 15
Specifications.... 18
Statutory information....19
Warranty....19
What's in the box

NOTE: The documents that are shipped with the sound bar may vary based on your region.
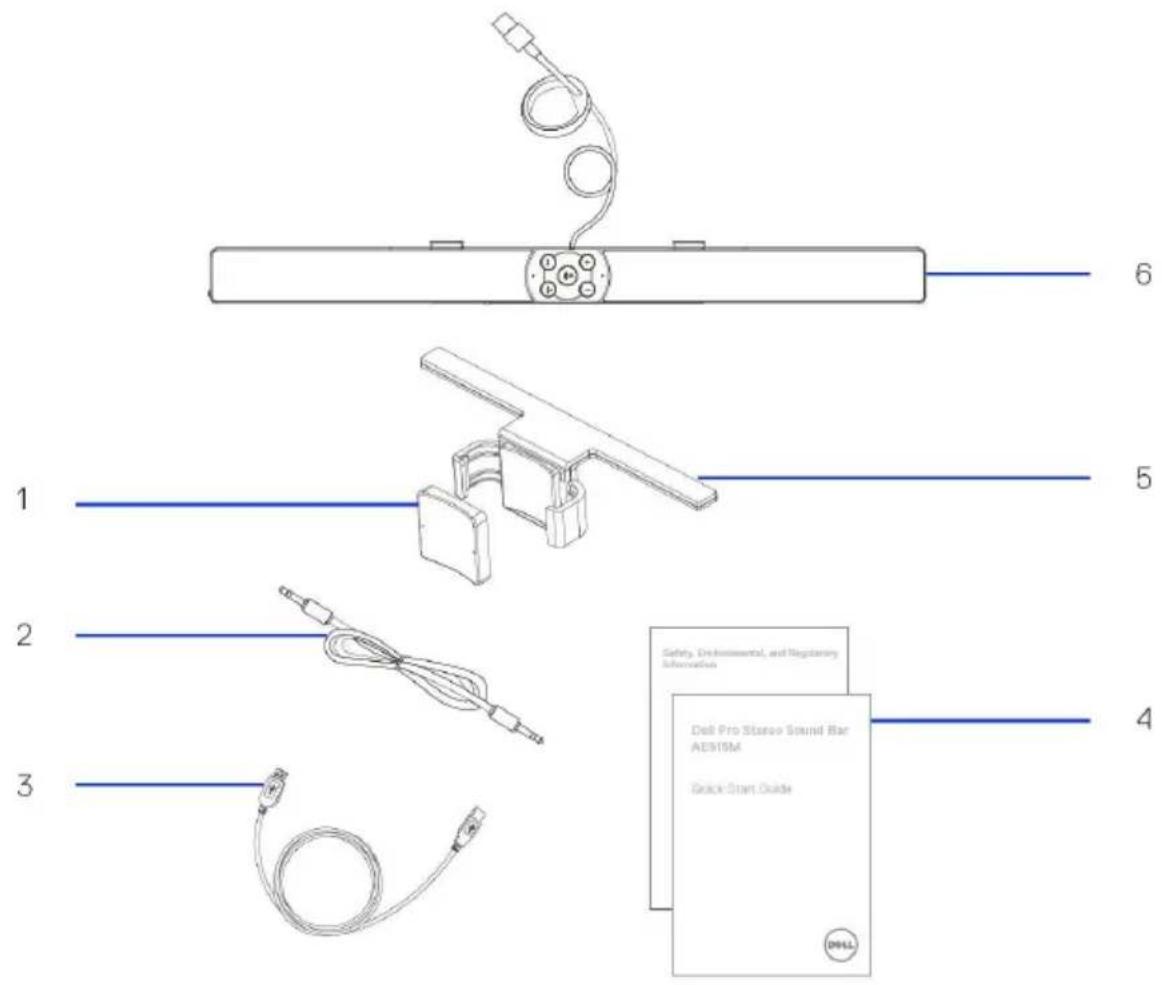
1 Thick rubber cushion
3 USB cable
5 Bracket
2 Audio cable
4 Documents
6 Sound bar
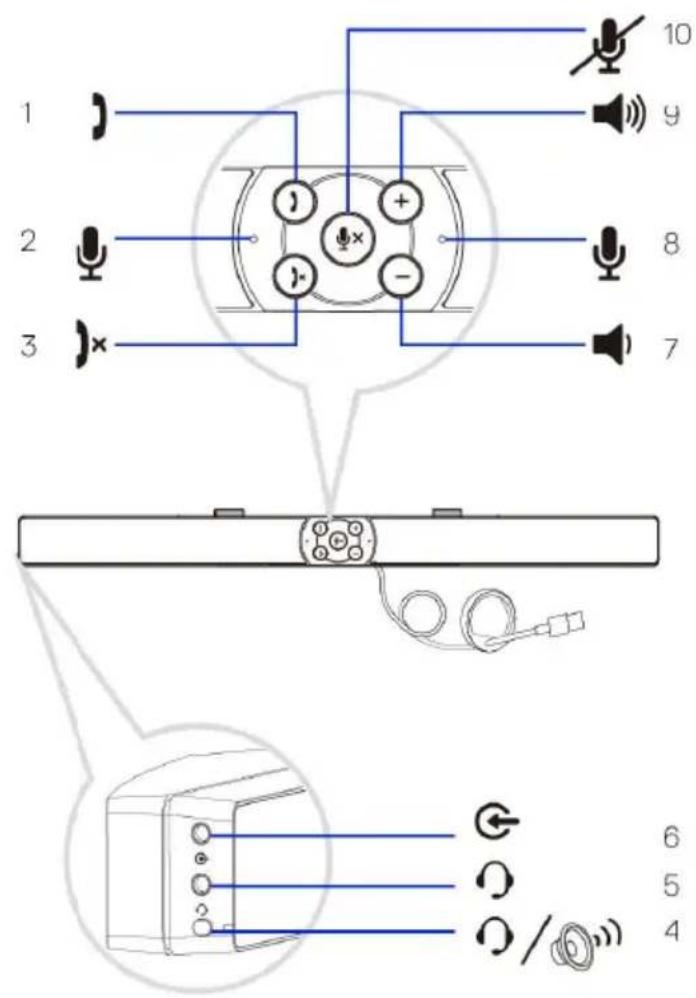
1 Call pick up
3 Call hang up
5 Headphone
7 Volume down
9 Volume up
2 Microphone
4 Default playback button
6 Aux-in
8 Microphone
10 Mic mute
Setting up your sound bar
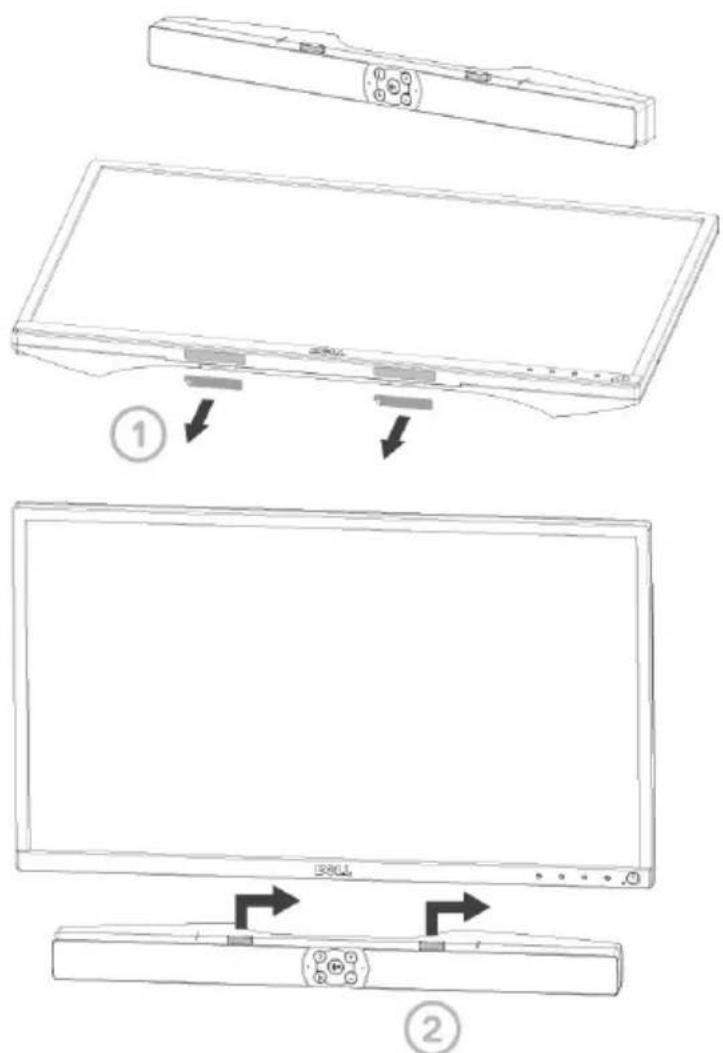
Installing the sound bar to your Dell monitor
Without bracket
1 Align the tabs on the sound bar to the slots on the monitor base.
2 Slide the sound bar to the right to secure the sound bar onto the monitor base.
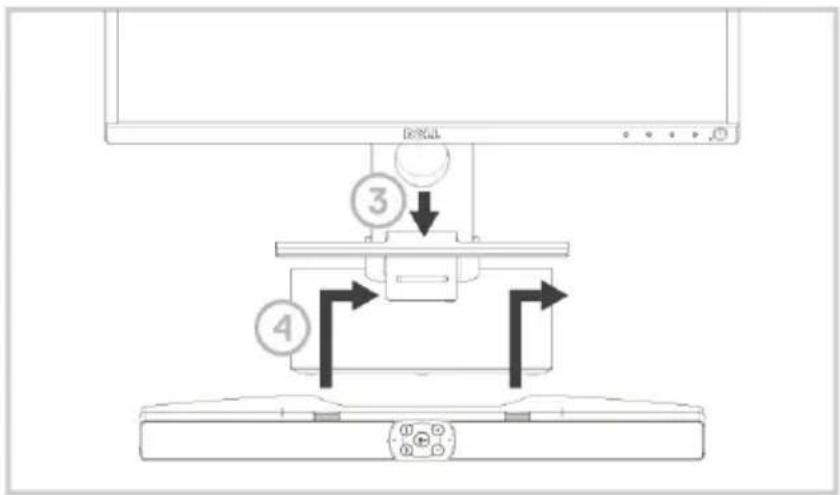
With bracket

1 Pull the bracket's clamp.

NOTE: Use the thick rubber cushion between the bracket and the non-swivel base monitor stand.
2 Secure the bracket to the monitor stand.
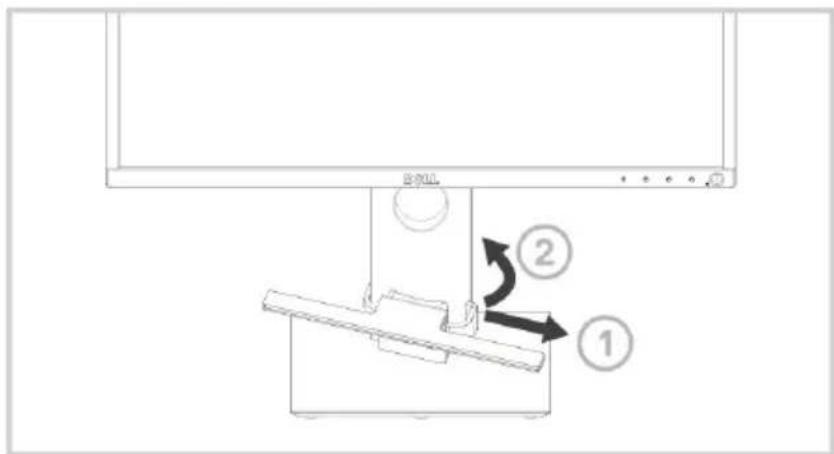
3 Push the bracket down to align it with the stand base.
4 Align the tabs on the sound bar with the slots on the bracket.
Slide the sound bar to the right to secure the sound bar to the bracket.
flowchart
graph TD
    A["顶部"] --> B["③"]
    B --> C["④"]
    C --> D["底部"]
    style A fill:#f9f,stroke:#333
    style B fill:#ccf,stroke:#333
    style C fill:#cfc,stroke:#333
    style D fill:#fcc,stroke:#333
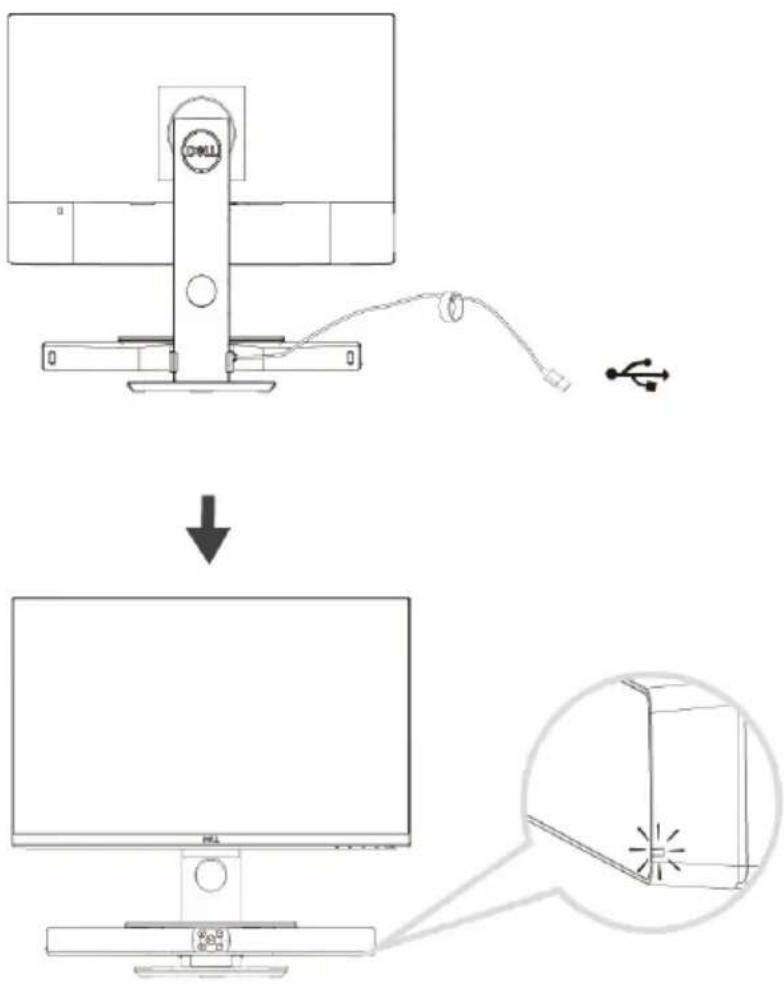
Turning on your sound bar

NOTE: If the sound bar is not detected, connect the uplink cable that came with your Dell monitor. Connect one end of the uplink cable to the USB port on the Dell monitor and the other end to the USB port on your Dell computer.
Connect the USB cable of the sound bar to the USB port of the Dell monitor.

The sound bar turns on automatically when the computer is turned on. The light on the right side of the sound bar turns solid white.
Connecting your sound bar
Use the audio in or aux-in jack to connect your audio device such as tablet or smartphone to your Dell sound bar.
Audio-in port
You can play audio using the audio-in cable that came with your sound bar.
- Connect the audio-in cable to the aux-in port on the left side of the sound bar.
- Connect the other end of the audio-in cable to your audio device.
- Play music and adjust the volume as desired.

NOTE: When audio in is the default playback device, the light on the microphone button turns solid red. The sound bar microphone cannot be used in this playback mode.

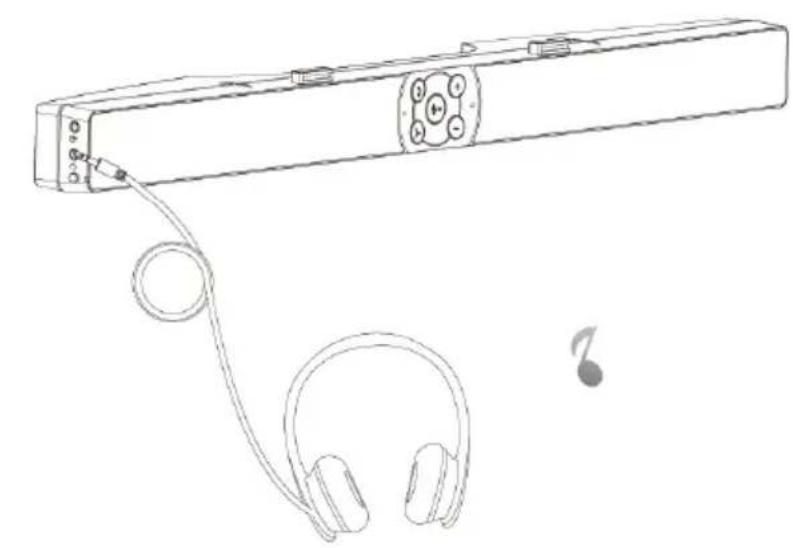
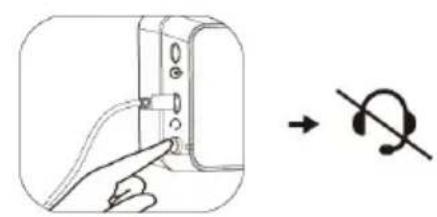
Headphone jack
1 Connect the headphone to the headphone jack on the sound bar.
2 Play music and adjust the volume as desired.
3 Press the Default playback button on the left side of the sound bar to toggle between the speaker and headphone.

NOTE: The Default playback button is disabled when the headphone is not connected to the sound bar.
natural_image
Line drawing of a remote control device with earbuds and cable, no text or symbols present
natural_image
Illustration of a hand inserting a cable into a device, with a curved arrow indicating direction (no text or symbols)Answering Skype for Business calls
1 Press the Call pick-up button.

NOTE: The light indicator on Call pick-up button blinks when there is an incoming call on Skype for Business and other supported software.
2 Press the Call hang-up button to end the call.
3 Press the Mic mute button to mute the microphone on the sound bar. Pressing the Mic mute button again will remove mute from the microphone on the sound bar.

Answering a call
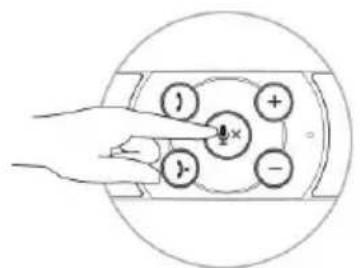
Muting the mic
Hang-up the call
Making Skype for Business calls
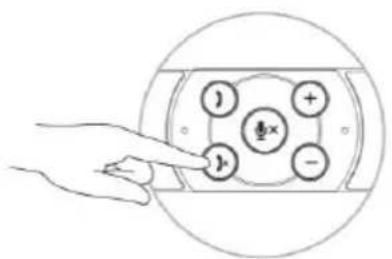
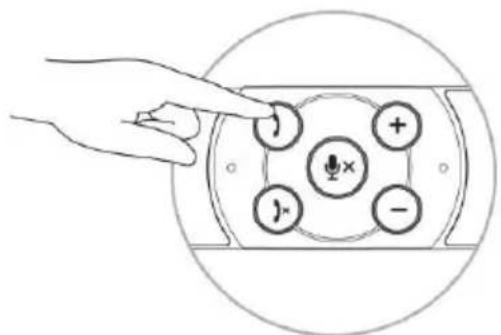
1 Press the call button to open up Skype for Business.
2 Initiate a call through the Skype for Business application on your computer.
3 Press the Call hang-up button to end the call.
4 Press the Mic mute button to mute the microphone on the sound bar. Pressing the Mic mute button again will remove mute from the microphone on the sound bar.
natural_image
Hand pointing at a device panel with labeled buttons (no text or symbols beyond basic icons)Making a call
Muting the mic

Hang-up the call
Adjusting the volume
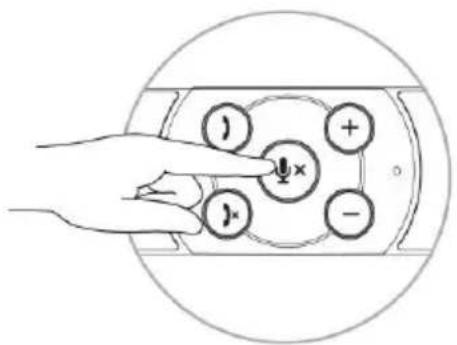
1 Press the + button to increase the volume. A soft dual tone can be heard when the sound bar is at the maximum volume.
2 Press the - button to reduce the volume. A soft single tone can be heard when the sound bar is at the minimum volume.

natural_image
Diagram of a hand pointing to a device with five labeled buttons (no text or symbols present)Increase the volume

Reduce the volume
Troubleshooting
| Problems | Possible causes | Possible solutions |
| No sound | No sound from the external audio source | Check if the 3.5 mm aux-in cable is inserted in the sound bar aux-in port.Disconnect the 3.5 mm aux-in cable from the aux-in jack and insert the cable again.Check if the audio source is turned on.Ensure that the audio device volume is not set to 0%.Try a known good speaker or audio source. |
| Abnormal sound | Distorted or buzzing sound | Clear any obstructions between the sound bar and the user.In aux-in mode, ensure that the 3.5 mm plug is completely inserted on the aux-in port of the sound card.Decrease the volume of the audio application or music player.Turn the volume level to lower setting by pressing the - button on the sound bar.Test the sound bar using another audio source (for example, a portable CD player or an MP3 player). |
| Unbalanced sound output | Sound is coming from only one side of the sound bar | Clear any obstructions between the sound bar and the user.In aux-in mode, ensure that the 3.5 mm plug is completely inserted in the aux-in port ofthe sound bar or audio source. |
| · Set the Windows audio balance controls for left and right speaker. | ||
| · Clean and reconnect all cables. | ||
| · Test the sound bar using another audio source such as a portable CD player or an MP3 player. | ||
| Low volume | Volume is too low | · Clear any obstructions between the sound bar and the user. |
| · Turn the volume to a higher level by pressing the + button on the sound bar. | ||
| · Set all Windows volume controls to their maximum. | ||
| · Increase the volume of the audio application. | ||
| · Test the sound bar using another audio source such as a portable CD player or an MP3 player. | ||
| Aux-in no sound | No sound using the aux-in mode | · Ensure that the aux-in cable is properly connected to the sound bar aux-in port and to the aux-out jack of the audio device. |
| · Try a known good aux-in cable. | ||
| · Check if the audio device is turned on or is playing music. | ||
| · Ensure that the audio device volume is not set to 0%. | ||
| · Try a known good speaker or audio source. | ||
| Aux-in distortion | Aux-in cable is not properly plugged in | · Clear any obstructions between the sound bar and the user. |
Headphone jack is connected, but no sound is heard Computer audio player is playing
Headphone abnormal Audio distortion sound
- Ensure that the aux-in plug is completely inserted into the aux-out port of the audio source.
- Decrease the volume of the audio source.
- Turn the volume level to a lower setting by pressing the – button on the sound bar.
-
Clean and reseat the cables.
• Make sure no loose objects are touching the sound bar. -
Ensure that the platform music player audio volume is not set to 0%.
- Increase the volume of the sound bar.
-
Press the default playback function button on the sound bar.
-
Check if the headphone plug is properly inserted into the sound bar headphone jack.
- Check if the headphone plug has intermittent connection.
- Check if the music file is not distorted when playing without the headphone or connected to a known good headphone.
Specifications
General
Model number
Connection type
Electrical
Operating voltage
Operating current
Audio input
Output power
Sound Pressure Level
Physical characteristics
Sound bar dimensions:
Width
Height
Depth
Weight
Bracket dimensions:
Width
Height
Depth
Weight
AE515/AE515M
USB cable
Audio cable
5 V
500 mA
USB Digital Audio input
Analog Audio Aux-in (3.5 mm jack)
2 × 1.8 W at ≤10% THD (USB 3.0)
2 × 1.0 W at ≤10% THD (USB 2.0)
84 dB ±3 dB
443 mm (17.441 in)
35 mm (1.378 in)
60.43 mm (2.379 in)
440 g (0.97 lb)
230.11 mm (9.06 in)
56.08 mm (2.21 in)
63.57 mm (2.50 in)
74 g (0.16 lb)
Statutory information
Warranty
Limited warranty and return policies
Dell-branded products carry a 3-year limited hardware warranty.
For U.S. customers:
This purchase and your use of this product are subject to Dell's end user agreement, which you can find at www.dell.com/terms. This document contains a binding arbitration clause.
For European, Middle Eastern and African customers:
Dell-branded products that are sold and used are subject to applicable national consumer legal rights, the terms of any retailer sale agreement that you have entered into (which will apply between you and the retailer) and Dell's end user contract terms. Dell may also provide an additional hardware warranty—full details of the Dell end user contract and warranty terms can be found by going to www.dell.com, selecting your country from the list at the bottom of the “home” page and then clicking the “terms and conditions” link for the end user terms or the “support” link for the warranty terms.
For non-U.S. customers:
Dell-branded products that are sold and used are subject to applicable national consumer legal rights, the terms of any retailer sale agreement that you have entered into (which will apply between you and the retailer) and Dell's warranty terms. Dell may also provide an additional hardware warranty
—full details of Dell's warranty terms can be found by going to www.dell.com, selecting your country from the list at the bottom of the "home" page and then clicking the "terms and conditions" link or the "support" link for the warranty terms.

- Dell Pro Stereo Sound Bar with bracket - AE515M
- Notes, cautions, and warnings
- Contents
- What's in the box
- Setting up your sound bar
- Installing the sound bar to your Dell monitor
- Without bracket
- With bracket
- Turning on your sound bar
- Connecting your sound bar
- Audio-in port
- Headphone jack
- Answering Skype for Business calls
- Making Skype for Business calls
- Adjusting the volume
- Specifications
- General
- Electrical
- Physical characteristics
- Statutory information
- Warranty
ブランド : DELL
モデル : 325-BBUQ
カテゴリ : コンピューターケース