ELBU-F02 - 907 YAMAHA - Panduan pengguna gratis
Temukan panduan perangkat secara gratis ELBU-F02 YAMAHA dalam format PDF.

Pertanyaan pengguna tentang ELBU-F02 YAMAHA
0 pertanyaan tentang perangkat ini. Jawab yang Anda tahu atau ajukan milik Anda sendiri.
Ajukan pertanyaan baru tentang perangkat ini
Unduh instruksi untuk 907 dalam format PDF gratis! Temukan panduan Anda ELBU-F02 - YAMAHA dan ambil kembali perangkat elektronik Anda. Di halaman ini diterbitkan semua dokumen yang diperlukan untuk penggunaan perangkat Anda. ELBU-F02 merek YAMAHA.
PANDUAN PENGGUNA ELBU-F02 YAMAHA
Please keep this manual in a safe and handy place for future reference.

CAUTION
Read these precautions carefully before you install the key cover.
These precautions are to promote safe use of the key cover and to prevent injury and damage from occurring to you and others. Following them carefully ensures that you will get long and safe usage from your key cover.
- Be careful not to confuse any of the parts, and be sure to install all parts in the correct direction and according to the sequence given below.
- Assembly should be carried out by at least two persons.
- Use only the screws specified when installing the key cover. Use of any other screws may result in an inadequate installation that may cause damage to both the keyboard and the key cover.
- Do not apply excessive force to the key cover as it may damage the cover.
- Make sure the key cover is sturdy and safe, and all screws have been tight and firm before use. If not, the key cover may drop, or may result in injury to the user.
- To disassemble, reverse the assembly sequence given below.
- Take care that the key cover does not pinch your fingers, and do not insert your finger or hand in any gaps on the key cover or instrument.
Have a Phillips-head (+) screwdriver of the appropriate size ready.

Assembly Instructions
1 Confirm that the key cover is included in the package.
If a music rest is inserted in the instrument, remove it. The key cover also functions as a music rest.
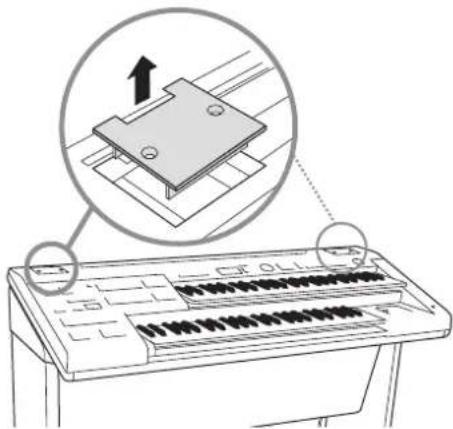
2 Remove the cover mounts from the upper left and right of the panel.
2-1 Using a screwdriver, remove the four screws using a screwdriver from the cover mounts.
Do not discard the screws; you'll need them later in step 4.

natural_image
Line drawing of a keyboard with an inset showing two screws mounted on a flat surface (no text or symbols)2-2Remove the cover mounts.
Keep the cover mounts in a safe place for future use.
text_image
Diagram showing a keyboard with an inset image of a CD-ROM drive and its mechanical component, labeled with Chinese characters.3Put the key cover in place.
Place the anchors of the key cover into the holes from which you removed cover mounts.
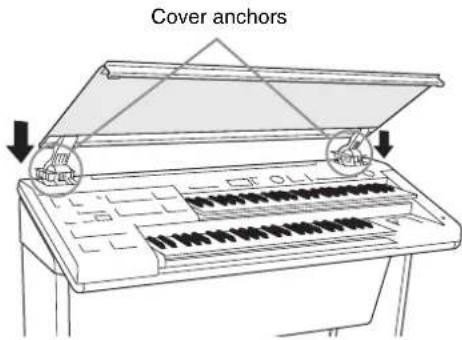
text_image
Cover anchors4Install the key cover.
Fix the key cover anchors to the instrument by securely fastening the four screws you removed in step 2-1.
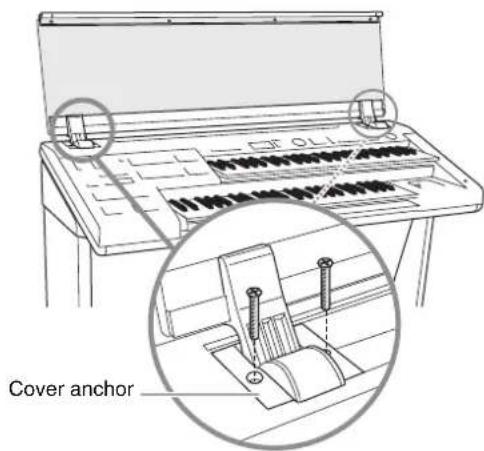
text_image
Cover anchorPost-assembly checklist
Once you've assembled the stand, check the following points:
- Are there any parts left over?
If so, read the assembly instructions again and correct any mistakes you might have made. - If the key cover makes a creaking noise or seems unsteady when you play it, refer carefully to the assembly instructions and diagrams and retighten all screws.