IHI5260RF - 88 Cylinda - Panduan pengguna gratis
Temukan panduan perangkat secara gratis IHI5260RF Cylinda dalam format PDF.

Pertanyaan pengguna tentang IHI5260RF Cylinda
0 pertanyaan tentang perangkat ini. Jawab yang Anda tahu atau ajukan milik Anda sendiri.
Ajukan pertanyaan baru tentang perangkat ini
Unduh instruksi untuk 88 dalam format PDF gratis! Temukan panduan Anda IHI5260RF - Cylinda dan ambil kembali perangkat elektronik Anda. Di halaman ini diterbitkan semua dokumen yang diperlukan untuk penggunaan perangkat Anda. IHI5260RF merek Cylinda.
PANDUAN PENGGUNA IHI5260RF Cylinda
Bruksanvisning User manual
natural_image
Simple line drawing of a kitchen appliance with oven, refrigerator, and washing machine (no text or symbols)IHI5260RF
Bästa kund,
Läs den här manualen noggrant innan produkten används.
Cylinda tack för att du valt den här produkten. Vi vill att din produkt, som tillverkas med hög kvalitet och teknik, ska ge dig bästa möjliga effektivitet. För att göra detta ska du noggrant läsa den här manualen och all annan dokumentation som tillhandahålls innan du använder produkten och spara den som referens. Om du ger produkten till någon annan ska du även ge manualen till den nya användaren. Följ instruktionerna och ta hänsyn till all information och alla varningar som anges i användarmanualen.
Beakta all information och alla varningar i användarmanualen. På så sätt skyddar du dig själv och din produkt mot de faror som kan uppstå.
Spara den här användarmanualen. Om du ger produkten till någon annan ska du även ge manualen till den nya användaren.
Användarmanualen innehåller följande symboler:

Risk som kan leda till dödsfall eller skador.
OBS! Risk som kan leda till materiella skador på produkten eller dess omgivning.

Risk som kan leda till brännskador vid kontakt med heta ytor.

Viktig information eller användningsråd.

Läs användarmanualen.
1 Säkerhetsanvisningar 4
Syftet med användningen.... 4
Säkerhet för barn, utsatta personer och husdjur....4
Elsäkerhet 5
Transportsäkerhet....6
Säkerhet vid installation....6
Säker användning....7
Temperaturvarningar....7
Användning av tillbehör......8
Säkerhet vid matlagning 8
Induktion 8
Underhålls- och rengöringssäkerhet...... 9
2 Miljöanvisningar 10
Avfallsförordning....10
I enlighet med WEEE-direktivet för hantering av avfallsprodukter....10
Förpackningsinformation 10
Rekommendationer för energibesparing. 10
3 Din produkt 11
Produktintroduktion....11
Introduktion och användning av produktens kontrollpanel....11
Kontroll av kokplattan....11
Allmän information om kokplattan......12
Tekniska specifikationer....13
4 Första användningen 14
Första rengöringen....14
5 Så här använder du hällen 15
Allmän information om användning av kokplattan....15
Kontrollpanel....17
6 Allmän information om matlagning 24
Allmänna varningar om matlagning på kokplattan....24
7 Skötsel och underhåll 25
Allmän information om rengöring .....25
Rengöring av kokplattan 26
Rengöring av kontrollpanelen....26
8 Felsökning 27
1 Säkerhetsanvisningar
- Det här avsnittet innehåller säkerhetsinstruktioner som hjälper till att förebygga risker för personskador eller materiella skador.
- Om produkten överläts till en annan person eller används i andra hand ska användarmanualen, produktetiketter, andra relevanta dokument och tillbehör levereras tillsammans med produkten.
- Vårt företag kan inte hållas ansvarigt för eventuella skador som kan uppstå till följd av att dessa anvisningar inte följs.
- Om dessa anvisningar inte följs, upphör all garanti att gälla.
- Låt alltid tillverkaren, den auktoriserade serviceverkstaden eller en av importören angiven person utföra installations- och reparationsarbeten.
- Använd endast originalreservdelar och - tillbehör.
- ⚠Försök inte att reparera eller byta ut någon del av produkten om det inte tydligt anges i användarmanualen.
• ⚠ Gör inga tekniska ändringar på produkten.
Syftet med användningen
- Den här produkten är avsedd för hemmabruk. Den är inte lämplig för kommersiellt bruk.
- Använd inte produkten i trädgårdar, balkonger eller andra utomhusmiljöer. Apparaten är avsedd att användas i hushålls- och personalkök i butiker, kontor och andra arbetsmiljöer.
- WARNING: Produkten får endast användas för matlagning. Den får inte användas för olika ändamål, t.ex. för att värma upp rummet.
⚠️ Säkerhet för barn, utsatta personer och husdjur
- Denna produkt kan användas av barn från 8 år och äldre och personer som är underutvecklade i fråga om fysiska, sensoriska eller mentala färdigheter, eller som saknar erfarenhet och kunskap, så länge de övervakas eller instrueras beträffande säker
användning och faror med produkten.
- Barn får inte leka med produkten. Rengöring och användarunderhåll bör inte utföras av barn om det inte finns någon som övervakar dem.
- Denna produkt får inte användas av personer med begränsad fysisk, sensorisk eller mental förmåga (inklusive barn), om de inte hålls under uppsikt eller får nödvändiga instruktioner.
- Barn bör övervakas så att de inte leker med produkten.
- Elektriska produkter är farliga för barn och husdjur. Barn och husdjur får inte leka med, klättra på eller gå in i produkten.
- Placera inte föremål som barn kan nå på produkten.
• Vänd handtaget på kastruller och stekpannor mot sidan av arbetsbänken så att barn inte kan ta tag i dem och bränna sig.
- WARNING: Under användning är produktens åtkomliga ytor varma. Håll alltid barn borta från produkten.
- Förvara förpackningsmaterialet utom räckhåll för barn. Det finns risk för skador och kvävning.
- (Det är inte alla produkter som levereras med en stickpropp, så om din produkt HAR en stickpropp)
För barnens säkerhet ska du koppla ur strömkontakten och göra produkten obrukbar innan produkten kasseras.
Elsäkerhet
- Anslut produkten till ett jordat uttag som skyddas av en säkring som motsvarar den strömstyrka som anges på typskylten. Låt en kvalificerad elektriker utföra jordinstallationen. Använd inte produkten utan att den är jordad i enlighet med lokala/nationella bestämmelser.
- Produktens stickkontakt eller elanslutning ska vara placerad på ett lättillgängligt ställe (där den inte påverkas av spisens låga). Om detta inte är möjligt ska det finnas en mekanism (säkring, strömbrytare etc.) på den elektriska installationen som produkten är ansluten till, i enlighet med de elektriska bestämmelserna och som skiljer alla poler från nätet.
- Produkten får inte anslutas till eluttaget under
installation, reparation och transport.
- Anslut produkten till ett uttag som uppfyller de spännings- och frekvensvärden som anges på typskylten.
- (Det är inte alla produkter som levereras med en sladd, så om din produkt INTE har en sladd) Använd endast den anslutningskabel som anges i avsnittet "Tekniska specifikationer".
- Kläm inte fast nätsladden under och bakom produkten. Placera inga tunga föremål på sladden. Strömsladden får inte böjas, krossas eller komma i kontakt med någon värmekälla.
- Använd enbart originalkabeln. Använd inte avklippta eller skadade kablar eller förlängningskablar.
- Om strömsladden är skadad måste den bytas ut av en tillverkare, en auktoriserad service eller en person som anges av importföretaget för att förhindra eventuella faror.
(Det är inte alla produkter som levereras med en stickpropp, så om din produkt HAR en stickpropp)
- Anslut inte produkten till ett uttag som är löst, har lossnat
ur sitt uttag, är trasigt, smutsigt, oljigt, med risk för vattenkontakt (t.ex. vatten som kan läcka från bänken).
- Vidrör aldrig kontakten med våta händer! Håll inte i sladden för att dra ut kontakten, utan alltid i själva kontakten.
- Se till att produktkontakten är ordentligt inkopplad i uttaget för att undvika ljusbågar.
! Transportsäkerhet
- Koppla bort produkten från elnätet innan du transporterar den.
- När du ska transportera produkten ska du slå in den med bubbelplast eller tjock kartong och tejpa fast den ordentligt. Fäst produkten ordentligt med tejp för att förhindra att produktens löstagbara eller rörliga delar eller produkten skadas.
- Kontrollera produktens övergripande utseende för att upptäcka eventuella skador som kan ha uppstått under transporten.
⚠ Säkerhet vid installation
- Innan produkten installeras ska du kontrollera att den
inte är skadad. Installera inte produkten om den är skadad.
- Installera inte produkten i närheten av värmekällor (radiatorer, kaminer etc.).
- Håll alla ventilationskanaler öppna runt produkten.

Säker användning
- Se till att produkten stängs av efter varje användning.
- Om du inte använder produkten under en längre tid ska du koppla bort den eller stänga av säkringen från säkringsfacket.
- Använd inte en defekt eller skadad produkt. Koppla i förekommande fall bort produktens el- eller gasanslutningar och kontakta auktoriserad service.
- WARNING: Om ytan är sprucken ska du stänga av apparaten för att undvika risken för elektriska stötar.
- Klättra inte på produkten för att nå något eller av någon annan anledning.
- Använd inte produkten i situationer som kan påverka ditt omdöme, till exempel om du tar droger och/eller dricker alkohol.
- Brandfarliga föremål som förvaras i
matlagningsområdet kan börja brinna. Förvara aldrig brandfarliga föremåll i matlagningsområdet.
- Gjutjärn, aluminium eller kokkärl med skadad eller grov botten kan leda till att glasytan repas. När du byter ut kokkärl ska du alltid lyfta behållarna och inte dra dem på ytan.
- Ångtryck som byggs upp på grund av fukt på kokplattans yta eller i grytans botten kan få kokkärlet att flytta sig. Se därför till att kokplattan och botten på kokkärlen alltid är torra.
- Den här produkten är inte lämplig för användning med en fjärrkontroll eller en extern klocka.

Temperaturvarningar
- WARNING: När produkten är i drift kommer de exponerade delarna att bli varma. Vidrör inte produkten och värmeelementen. Barn under 8 år bör inte befinna sig i närheten av produkten utan en vuxen.
- Placera inte brännbara/explosiva material i närheten av produkten, eftersom
kanterna blir varma när den är i drift.
- WARNING: Risk för brand: Förvara inte föremål på tillagningsytorna.

Användning av tillbehör
- WARNING: Använd endast hållskydd som konstruerats av tillverkaren av köksapparaten eller som tillverkaren av apparaten har angett i bruksanvisningen som lämpliga eller hållskydd som är inbyggda i apparaten. Användning av olämpliga skydd kan orsaka olyckor.

Säkerhet vid matlagning
· WARNING:
Tillagningsprocessen måste övervakas. Kortvariga tillagningsprocesser måste ständigt övervakas.
- WARNING: Obevakad matlagning på en kokplatta med fett eller olja kan vara farligt och kan leda till brand. Försök ALDRIG släcka en brand med vatten, utan stäng av apparaten och täck sedan lågan med t.ex. ett lock eller en brandfilt.
- Var försiktig när du använder alkohol i maten. Alkohol förångas vid höga temperaturer och kan fatta
eld när den utsätts för heta ytor, vilket kan orsaka en brand.

Induktion
- Plattorna är utrustade med induktionsteknik. Induktionshällen som både sparar tid och pengar måste användas med kastruller som passar för tillagning med induktionshäll; annars fungerar inte plattorna. Detaljerad information finns i avsnittet "Pot selection".
- Eftersom induktionshällar skapar ett magnetiskt fält, kan de orsaka skadlig påverkan för människor som använder enheterna som insulinpump eller pacemaker.
- Stäng värmeplattan från kontrollpanelen efter användning, lita inte på kruksensorn.
- Metallföremål som knivar, gafflar, skedar och lock bör inte placeras i värmeplattan eftersom de kommer att bli varma.
- Metallföremål som lagras i lådor under hällen kan bli mycket heta under lång och intensiv användning. Förvara inte metallföremål i lådor under hällen.
- Lägg inte elektroniska produkter som mobiltelefoner, surfplattor, datorer på induktionshällen. Din produkt kan vara skadad.

Underhålls- och
rengöringssäkerhet
- Vänta tills produkten har svalnat innan du rengör den. Heta ytor kan orsaka brännskador!
- Tvätta aldrig produkten genom att spruta eller hälla
vatten på den! Det finns en risk för elektrisk stöt!
- Rengör inte produkten med ångrengörare eftersom detta kan orsaka elektriska stötar.
- Salt- och sockerrester på botten av köksredskapet eller sådana partiklar på glasytan kan leda till att glaset repas och spricker. Se till att botten är ren innan du placerar ut kokkärlet. Håll glaskeramikytan ren.

Miljöanvisningar
Avfallsförordning
I enlighet med WEEE-direktivet för hantering av avfallsprodukter
Den här produkten gäller under EU WEEE-direktivet (2012/19/EU). Den här produkten är försedd med en klassificeringssymbol för avfallshantering av elektriskt och elektroniskt material (WEEE).
Denna produkt är tillverkad med delar av hög kvalitet samt material som kan återanvändas och återvinnas. Produkten får inte slängas i hushållssoporna eller i annat avfall vid livsslut. Ta den till en återvinningsstation för elektrisk och elektronisk utrustning. Kontakta din kommun för mer information om närmaste återvinningsstation.
Lämpligt avfallshantering av begagnad apparat hjälper till att förhindra potentiella negativa konsekvenser för miljön och människors hälsa.
I enlighet med RoHS-direktivet:
Produkten du har köpt gäller under EU RoHS-direktivet (2011/65/EU). Den innehåller inga av de farliga eller förbjudna material som anges i direktiven.
Förpackningsinformation
- Produktens förpackningsmaterial tillverkas av återvinningsbara material i enlighet med våra nationella miljöbestämmelser. Släng inte förpackningsmaterialet tillsammans med hushållsavfall eller annat avfall. Ta dem till de insamlingsställen för förpackningsmaterial som utsetts av de lokala myndigheterna.
Rekommendationer för energibesparing
Information om energieffektivitet enligt EU 66/2014 finns på produktbladet som medföljer produkten. Följande råd hjälper dig att använda din produkt på ett ekologiskt och energieffektivt sätt:
• Tina frysta livsmedel före tillagning.
- Stäng av produkten 5-10 minuter före matlagningens sluttid för längre matlagning. Nu kan du spara upp till 20 % el genom att använda värme.
- Använd grytor/pannor med storlek och lock som är lämpliga för tillagningsytan. Välj alltid rätt storlek på kärlet för dina måltider. För kärl av fel storlek krävs mer energi än nödvändigt.
- Håll kokplattor och kärl rena. Smuts minskar värmeöverföringen mellan kokområdet och kärlets botten.
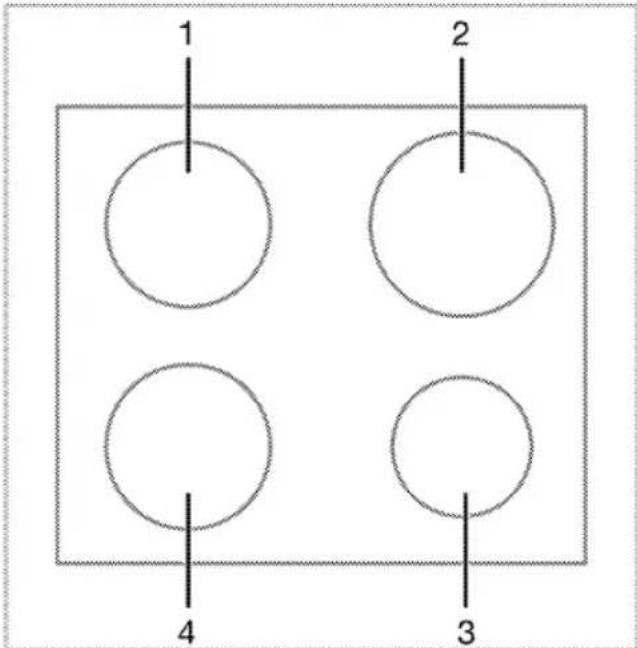
3 Din produkt
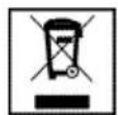
Produktintroduktion
1 Matlagningsyta av glas
2 Nedre hölje
3 Zon för induktionsmatlagning
4 Zon för induktionsmatlagning
5 Zon för induktionsmatlagning
6 Zon för induktionsmatlagning
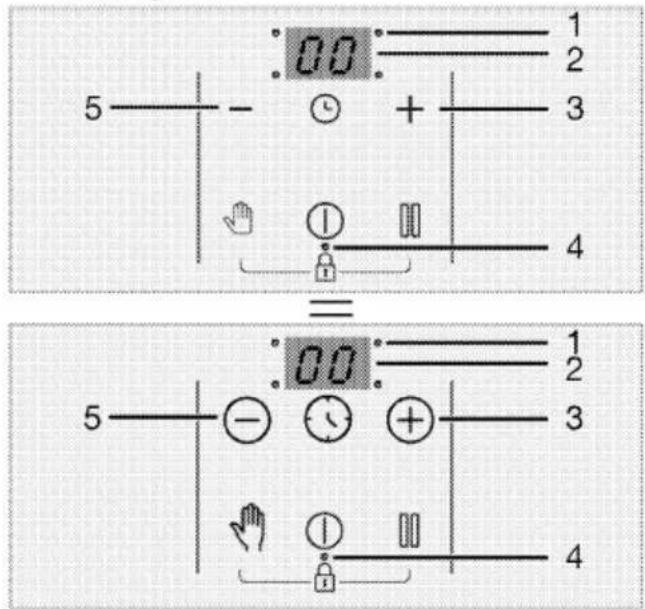
Introduktion och användning av produktens kontrollpanel
I det här avsnittet hittar du en översikt över och grundläggande användningsområden för produktens kontrollpanel. Skillnader kan förekomma i bilder och vissa funktioner beroende på produkttyp.
Kontroll av kokplattan
Knappar
① : På-/av-knapp
: Knapp för timer
: Snabbvärmeknapp/Knapp för hög
effektinställning (booster)
: Knapp för rengöringslås
: Stoppknapp
⊕ : Ökningsknapp
- : Minskningsknapp
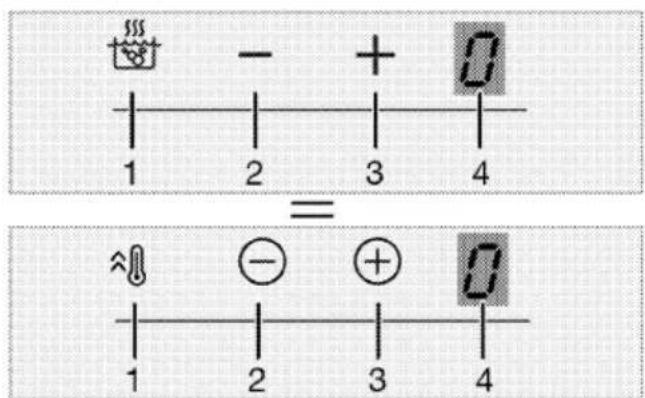
Symboler
: Symbol för knapplås

Visning av tillagningszon
1 Snabbvärmeknapp/Knapp för hög effektinställning (booster)
2 Knapp för temperaturminskning
3 Knapp för temperaturökning
4 Temperaturindikator för den aktuella matlagningszonen

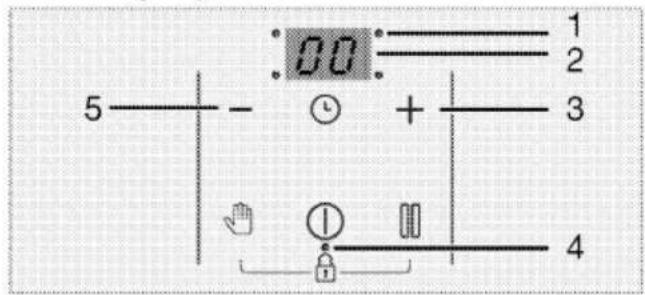
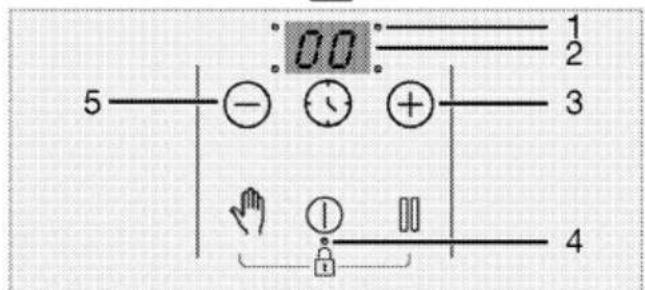
Timerindikator
1 Driftpunktsindikator för timern
2 Timerindikator
3 Knapp för tidsökning
4 Driftpunktsindikator för knapplåset/barnlåset
5 Knapp för tidsminskning
Allmän information om kokplattan
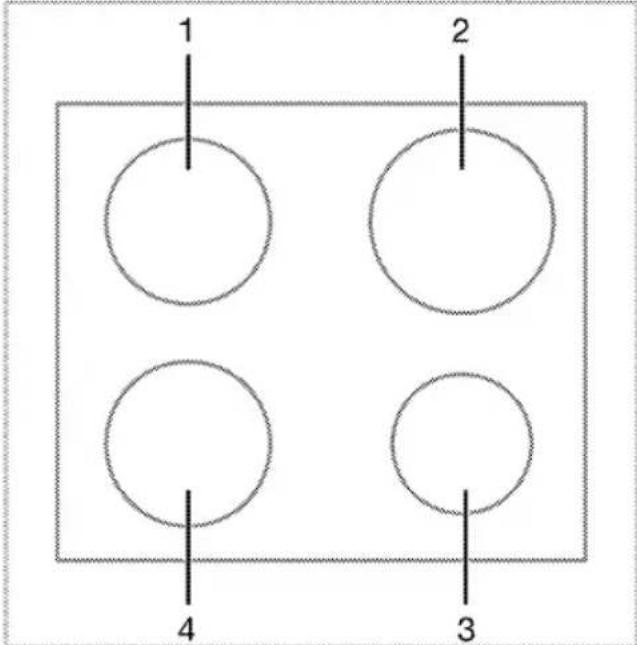
1 Bakre vänster - Zon för induktionsmatlagning
2 Bakre höger - Zon för induktionsmatlagning
3 Främre höger - Zon för induktionsmatlagning
4 Främre vänster - Zon för induktionsmatlagning
Tekniska specifikationer
| Allmänna specifikationer | |
| Produktens yttermått (höjd/bredd/djup) | 52 mm*/580 mm/510 mm (För modeller som levereras med monteringsfjädrar och tätningspackning monterade på produkten, betrakta bredd- och djupmåtten som 10 mm mer än dessa mått.) |
| Mått för installation av hällen (bredd/djup) | 560 (+2) mm /490 (+2) mm |
| Spänning/frekvens | 1N ~ 220-240 V/ 2N ~ 380-415 V ;~50 Hz |
| Kabeltyp och tvärsnitt som används / lämpar sig för användning i produkten | min.H05V2V2-F 5 x 2,5 mm^2 |
| Total strömförbrukning | max. 7,2 kW |
| Brännare | |
| Bakre vänster | Zon för induktionsmatlagning |
| Mått | 180 mm |
| Effekt | 2000W / Booster: 2300 W |
| Främre vänster | Zon för induktionsmatlagning |
| Mått | 180 mm |
| Effekt | 2000W / Booster: 2300 W |
| Främre höger | Zon för induktionsmatlagning |
| Mått | 145 mm |
| Effekt | 1600 W / Booster: 1800 W |
| Bakre höger | Zon för induktionsmatlagning |
| Mått | 210 mm |
| Effekt | 2000 W / Booster: 2300 W |
| * Höjden på kokplattan som anges i den tekniska tabellen är höjden på produktens basplåt. | |

Tekniska specifikationer kan ändras utan föregående meddelande för att förbättra produktens kvalitet.

Bilderna i den här manualen är schematiska och stämmer kanske inte exakt överens med din produkt.

De värden som anges på produktetiketter eller i den dokumentation som medföljer produkten har tagits fram under laboratorieförhållanden i enlighet med relevanta standarder. Beroende på produktens drifts- och miljöförhållanden kan dessa värden variera.
4 Första användningen
Innan du börjar använda produkten rekommenderas att du gör följande i följande avsnitt.
Första rengöringen
- Avlägsna allt förpackningsmaterial.
- Torka av produktens ytor med en våt trasa eller svamp och torka torrt med en trasa.
OBS! Ytan kan skadas av vissa rengöringsmedel. Använd inte aggressiva rengöringsmedel, skurpulver/-mjölk eller några vassa föremål under rengöring.
OBS! Doft och rök kan utvecklas under ett par timmar vid första användningen. Detta är normalt. Se till att rummet är välventilerat så att rök och lukt försvinner. Undvik direkt inandning av röken och den lukt som den sänder.
5 Så här använder du hällen
Allmän information om användning av kokplattan
Allmänna varningar
- Låt inga föremål falla ner på hällen. Även små föremål som saltshakers kan skada hällen. Använd inte spruckna hållar. Vatten kan sippra genom dessa sprickor och orsaka kortslutning. Om ytan är skadad på något sätt (t.ex. synliga sprickor) ska du först stänga av säkringen och sedan kontakta en auktoriserad service för att dra ut kontakten för att minska risken för elchock.
- Använd inte obalanserade kastruller/pannor eller såna som kan välta lätt.
- Värm inte tomma kastruller/pannor. Kastrullen och produkten kan skadas.
- Stäng alltid av kokplattans brännare efter användning.
- Produkten skadas, om kokplattan används utan kastrull/panna. Stäng alltid av kokplattorna efter användning.
- Efter varje användning blir matlagningsytan het, så lägg inte plastkrukorna / kokkärlarna på matlagningsytan. Ta bort dylik material från ytan omedelbart.
- Plötsliga temperaturförändringar på glasytans yta kan orsaka skada. Var försiktig så att du inte släpper ut kalla vätskor under tillagningen.
- Lägg passlig mängd mat i kastrullen eller pannan. På detta sätt kan du förhindra maten från att koka över och undvika onödig rengöring.
- Placera inte kastrull- eller pannlock på brännare/zoner.
- Placera kastrullen centrerad över brännare/zon. Om du vill placera kastrullen på en annan brännare/zon, dra inte den mot önskad brännare, lyft upp den istället först och placera den sedan på en annan brännare.
Induktionshällens funktionsprincip
Induktionshällen är som en öppen krets. Kretsen slutförs när en gryta / kokkärl som är lämpliga för induktionskokning placeras på den och ett elektroniskt system under glasytan genererar ett magnetfält. Krukorna / kokkärlens metallbotten värms upp genom att ta energi från detta magnetfält. På detta sätt genereras inte värmen i kokplattans yta, utan direkt på kastrullen/pannan på den. Glasytan värms upp från värmen från kastrullen/pannan.
Fördelar med induktionskokning
Induktionshällar erbjuder några fördelar då värmen överförs direkt till kastrullen/pannan.
- Mat som kokar över bränns inte fast snabbt, då glasmatlagningsytan inte värms upp direkt. Rengöring av den är lättare.
- Tillagningen är snabbare, då värmen genereras direkt på kastrullen/pannan. Detta sparar tid och energi jämfört med andra typer av kokplattor.
- Då värmen ges direkt till kastrullen/pannan, uppstår ingen värmeförlust, och tillagningen blir effektivare.
- Det faktum att värmeöverföringen slutar och matlagningsytan inte värms direkt när kastrullen/pannan tas bort från matlagningsytan, ger en säkrare användning mot möjliga olyckor under matlagningen.
Säker användning:
- Välj inte höga värmenivåer när kastruller/pannor som inte fastnar, som belagts med lite olja eller används utan olja (teflon-typ).
- Använd inte glasmatlagningsytor som avställningsytor eller som skärbräda.
- Placera inte metallobjekt så som bestick eller lock på hållens yta. De kan bli extremt varma.
- Använd aldrig aluminiumfolie under matlagningen. Placera aldrig mat inslagen i aluminiumfolie på induktionshällen.
- Håll magnetiska föremål, så som kreditkort eller tejp på avständ från kokplattan under användning.
- Om ugn finns under kokplattan och den används, kan kokplattans sensor minska matlagningsnivån eller stänga av kokplattan.
- Kokplattan har en automatisk avstängningssystem. Mer information om detta system finns i följande kapitel. Om emellertid kastruller med tunt botten används, kan dessa kastruller värmas upp snabbt och dess botten kan smälta och skada matlagningsytan och produkten innan den automatiska avstängningssystemet aktiveras.
Kastruller/pannor
Man ska använda ferromagnetiska, kvalitetskastruller/-pannor, som är utrustade med etikett eller varning, om att den lämpar sig bara för induktionsmatlagning. Generellt sett ger högre järninnehåll i kastruller/pannor bättre prestation. Kokkärlens / kokkärlens basdiameter ska matcha induktionszonen. Föreslagna storlekar är presenterade nedan.
Lämpliga kastruller/pannor:
• Gjutjärnskastruller/-pannor
- Emailjerade kastruller/pannor
- Stål och rostfria stålkastruller/pannor Med märkning eller varning om lämplighet för induktionsmatlagning).
Olämpliga kastruller/pannor:
• Aluminiumkastruller/-pannor
• Kopparkastruller/-pannor
• Mässingskastruller/-pannor
• Glaskastruller/-pannor
• Lergods
- Keramiska och porslin
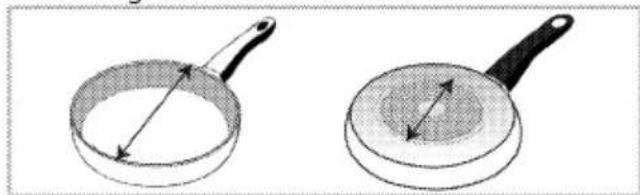
Rekommendationer:
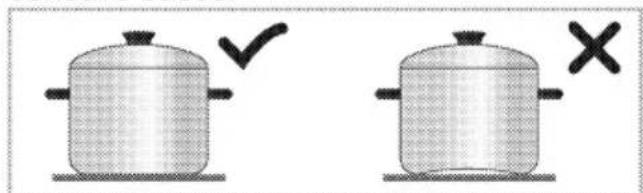
- Använd bara kastruller/pannor med platt botten. Använd inte kastruller/pannor med konvex eller konkav botten.

natural_image
Two identical cooking pots with checkmarks and X marks, no text or symbols present- Använd bara kastruller/pannor med tjock, behandlad botten. Om kastruller med tunt botten används, kan dessa kastruller värmas upp snabbt och dess botten kan smälta och skada matlagningsytan och produkten innan den automatiska avstängningssystemet aktiveras. Vassa kanter kan skrapa ytan.

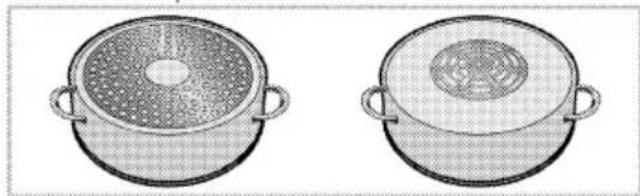
natural_image
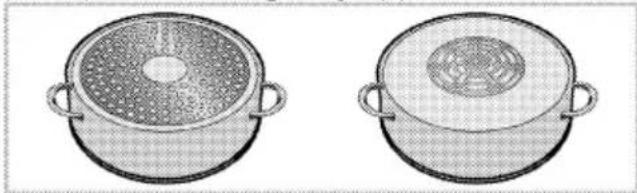
Two identical cooking pots with checkmarks and X marks, no text or symbols present- Vissa kastrullers/pannors botten har mindre ferromagnetisk fält än dess verkliga diameter. Bara denna område värms av kokplattan. Värmen fördelas därmed inte jämnt och matlagningseffekten försämras. Dessutom detekterar kanske inte större induktionshällar dessa kastruller/pannor. Därför ska kokplattan väljas enligt den ferromagnetiska fältets storlek.
natural_image
Two illustrations of cooking panes with different interior angles (no text or symbols)- Vissa kastrullers/pannors botten kan innehålla icke-ferromagnetiska material, så som aluminium. Dessa kastruller/pannor värms inte tillräckligt eller induktionshällen detekterar inte dessa alls. I vissa fall kan en dålig kastrullers/pannors visas.
natural_image
Two identical illustrations of a cooking pot with lid and side handles, shown from different angles (no text or symbols)Jämn fördelning av kokkärlen på höger och vänster mittenkokplattor för att välja kokplattor, påverkar matlagningen positivt när flera rätter lagas på induktionshällen.
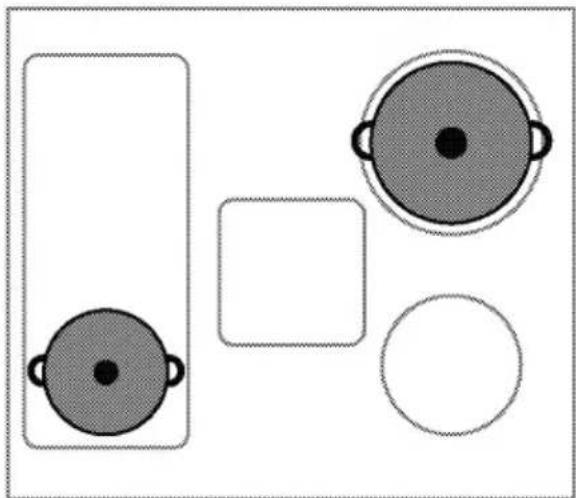
natural_image
Simple diagram with three circular shapes: a large rectangular box, a square, and a circle, all without any text or symbols.
natural_image
Four circular diagrams with shaded centers and handles, no text or symbols presentTest av kastruller/pannor
Testa om kastrullen lämpar sig för användning med induktionshäll på följande sätt.
- Den är kompatibel, om kastrullens botten kan hålla en magnet.
- Den är kompatibel, om "☐" inte blinkar när kastrullen placeras på induktionshällen och kokplattan slås på.
Rekommendationer för kastrull-/pannstorlek
| Diameter på matlagningszon - mm | Diameter på gryta - mm |
| 145 | min. 100 - max 145 |
| 180 | min. 100 - max 180 |
| Diameter på matlagningszon - mm | Diameter på gryta - mm |
| 210 | min. 140 - max 210 |
| 240 | min. 140 - max 240 |
| 280 | min. 125 - max 280 |
| 320 | min. 125 - max 320 |
| Matlagningszon med bred yta (flexi) | bredd 230 - längd 390 |
Detektering av kastruller/pannor av induktionshällen beror på den ferromagnetiska diametern och materialet i kastrullens/pannans botten. För att försäkra kastrullens/pannans detektering och uppnå effektiv matlagning, ska kastrull/panna väljas enligt kokplattans storlek. Kastrull-/pannstorlek som rekommenderas för kokplattans storlek har presenterats ovan. Kokbeteendet kan variera beroende på grytans typer, grytans storlek och kokzonens storlek. För ett mer homogent kokbeteende kan en stegvis större kokzon användas. Att använda en större kokzon orsakar inte slöseri med energi på induktionshällar, eftersom värmen bara skapas i det aktuella grytområdet.
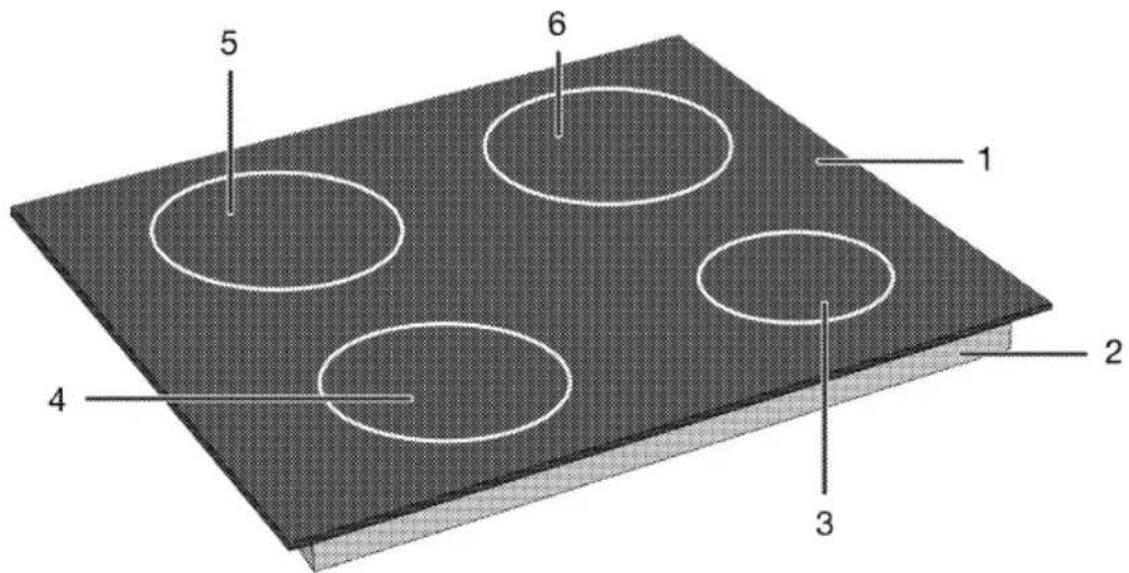
Kontrollpanel
| 00: | ||||||||||
| ^↓ | - | + | 0 | - | ÷ | + | 0 | - | + | ^↓ |
| ^↓ | - | + | 0 | 1 | || | 0 | - | + | ^↓ | |
Knappar
①
②
③
④
⑤
⑥
⑦
: På-/av-knapp
: Knapp för timer
: Snabbvärmeknapp/Knapp för hög effektinställning (booster)
: Knapp för rengöringslås
: Stoppknapp
: Ökningsknapp
: Minskningsknapp
Symboler

: Symbol för knapplås
Visning av tillagningszon
1 Snabbvärmeknapp/Knapp för hög effektinställning (booster)
2 Knapp för temperaturminskning
3 Knapp för temperaturökning
4 Temperaturindikator för den aktuella matlagningszonen
Timerindikator
1 Driftpunktsindikator för timern
2 Timerindikator
3 Knapp för tidsökning
4 Driftpunktsindikator för knapplåset/barnlåset
5 Knapp för tidsminskning
Generella varningar för kontrollpanelen
Den här produkten styrs med en pekkontrollspanel. Varje åtgärd du gör på touchpanelen bekräftas med en ljudsignal.
Håll alltid kontrollpanelen ren och torr. Fuktiga och smutsiga ytor kan orsaka problem med funktionerna.
Om ingen användning sker inom 10 sekunder återgår hällen automatiskt till standby-läge.
Om ingen knapp trycks ner under en längre tid kommer hällen av säkerhetsskäl automatiskt att slås av.
Slå på hällen:
- Slå på hällen genom att trycka på①knappen.
"0" visas på alla plattors displayer.
Slå av tillagningszonerna:
En aktiv tillagningszon kan stängas av på 3 olika sätt:
- Genom att trycka på Ⓐ-knappen Tryck på knappen Ⓐ.
- Genom att temperaturen faller till nivån "0";
Du kan stänga av tillagningszonen genom att justera temperaturinställningen till "0" läget.
- Genom att använda avstängningsfunktionen på timerläget för vald tillagningszon;
När tiden är över kommer timern att stänga av tillagningszonen som är kopplad till den. "0" eller "00" kommer att visas på relevant display.
Dessutom hörs ett ljudalarm när tiden är över. Tryck på valfri knapp på kontrollpanelen för att tysta ljudlarmet.
4. Genom att trycka på zon ⊖/⊕-knapparna samtidigt för den önskade tillagningszonen;
Du kan stänga av den aktuella tillagningszonen genom att trycka på ⊖/⊕ -knapparna samtidigt.

Om symbolen "H" eller "h" är tänd när hällen stängts av innebär det att tillagningszonen fortfarande är varm. Vidrör inte tillagningszonerna.
Restvärmeindikator
Om symbolen "H" blinkar på displayen för tillagningszonen innebär det att kokplattan fortfarande kan vara varm och kan användas för att hålla en liten mängd mat varm. Den här symbolen omvandlas snart till symbolen "h" som står för mindre het.

När strömmen stängs av tänds inte restvärmeindikatorn och användaren varnas inte för heta tillagningszoner.
Justera temperaturnivån
- Slå på hällen genom att trycka på①-knappen.
- Justera önskad temperatur genom att trycka på zon-⊖/⊕-knapparna.
» Den relevanta tillagningszonen kommer att fungera på temperaturnivån som är inställd.

Den yttre delen av tillagningszonen (av induktionshällstyp) på 280 mm (om produkten är utrustad med en sådan) aktiveras endast om en kastrull stor nog att täcka tillagningszonen placeras på tillagningszonen och temperaturen är satt till en nivå högre än 8.
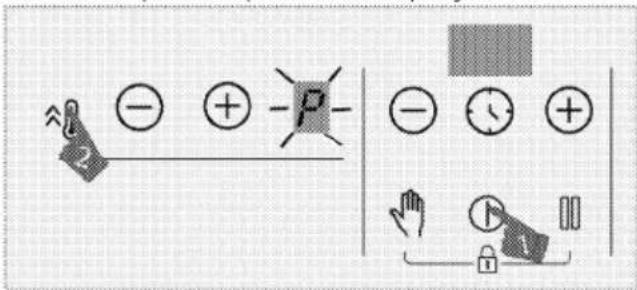
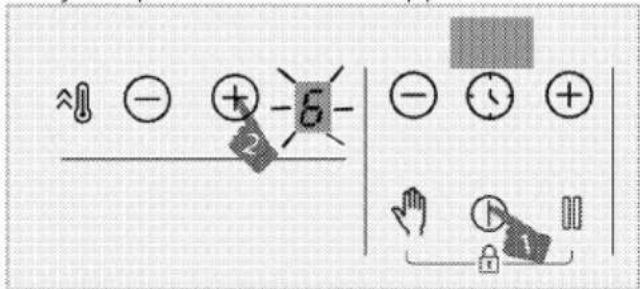
Högeffektinställning (SNABBSTART)
Använd dig av snabbstartsfunktionen för en snabb uppvärmning. Denna funktion är inte avsedd att användas vid en längre koktid. Snabbstartsfunktionen finns inte alltid tillgänglig på alla plattor.
Välja högeffektinställning (SNABBSTART):
- Slå på hällen genom att trycka på①knappen.
- Tryck på knappen ⚠ för den aktuella zonen.

» Den valda tillagningszonen går på maximal effekt och "P"-symbolen kommer synas på tillagningszonens display. Plattan slår av snabbstartsfunktionen och fortsätter att vara påslagen på läge "9".
Stänga av högeffektinställning (SNABBSTART) i förtid:
Du kan också slå av snabbuppvärmningsfunktionen genom att trycka på knappen ⏱ eller ⚠ när du vill. Plattan slår av snabbstartsfunktionen och fortsätter att vara påslagen på läge "9".
Arbetsprincip med 2 zoner som ligger i samma vertikala riktning:
Om en zon är inställd på booster-nivå och den andra zonen, som ligger i samma vertikala riktning är inställd på större än nivå 6 (7, 8 och 9), sjunker den första zonen till nivå 9 och den andra zonen kan ställas in större än nivå 6 (7, 8 och 9). Om den andra zonen är inställd på booster-nivå, kommer första zonen falla till nivå 6.
Rengöringslås
Rengöringsläset förhindrar användning av alla knappar på kontrollpanelen i 20 sekunder medan hällen är på för att göra det möjligt att snabbt rengöra hällen. Produkten drar ingen ström under den här perioden.
Aktivera rengöringsläset
- Tryck och håll in knappen 📋 tills en enkel ljudsignal hörs när en tillagningszon slås på.
En nedräkning som börjar på 20 visas på timerdisplayen på hällen. Ingen av knapparna på kontrollpanelen fungerar under den här tiden förutom Ⓐ.
Inaktivera rengöringslåset
Du behöver inte trycka på någon knapp för att avaktivera rengöringslåset. Hällen avger en ljudsignal efter 20 sekunder och rengöringslåset avaktiveras automatiskt.

Om du vill inaktivera rengöringslåset tidigare ska du trycka och hålla ned knappen 🔊 tills två signalljud hörs.
Barnlås
När tillagningszonerna är avslagna kan du skydda hällen med barnlåset för att förhindra att barn slår på tillagningszonerna. Du kan aktivera eller avaktivera barnlåset endast när tillagningszoner är avstängda (i vänteläge).
Aktivera barnlåset
- Tryck och håll in knapparna och samtidigt tills en enkel ljudsignal hörs när hällen är i standby-läge.
Barnlåset kommer att aktiveras. "L" kommer att visas på alla plattors display en stund och decimaltecknet för 🔒- tangenten kommer slås på.

Om någon knapp trycks in när barnlåsfunktionen är aktiv hörs två ljudsignaler och "L"-knappen blinkar på alla tillagningszoners display.
Inaktivera barnlåset
- Tryck och håll in knapparna och samtidigt tills två ljudsignaler hörs när barnlåset är aktivt.
» Barnlåsfunktionen kommer att inaktiveras.
"L" visas på displayen för alla tillagningszoner och indikatorn för knappen släcks.
Knapplås
Du kan aktivera knapplåset för att undvika att förhindra att funktionerna ändras av misstag när hällen används.

Knapplåset kommer att avbrytas i händelse av strömavbrott.
Aktivera knapplåset
- Tryck och håll in knapparna och samtidigt tills en enkel ljudsignal hörs. Knapplåset kommer aktiveras och decimalpunkten för knappen kommer slås på efter blinkningarna.

Du kan bara aktivera knapplåset i användningsläge. När knapplåset aktiveras blir bara knappen Ⓐ funktionsduglig. När du trycker på någon annan knapp börjar decimalpunkten för knappen 🔒 att blinka för att indikera att knapplåset är aktivt. Om du stänger av hällen när knapparna är låsta, måste du avaktivera knapplåset för att kunna slå på hällen igen. När du trycker på någon knapp utan att inaktivera knapplåset kommer "L" att blinka för alla tillagningszoner för att indikera att knapplåset är aktivt. Inaktivera knapplåset för att slå på hällen.
Inaktivera knapplåset
- Tryck och håll in knapparna och samtidigt tills två ljudsignaler hörs när knapplåset är aktivt.
» Ljuset för knappen stängs av och kontrollpanelen låses upp.
Timerfunktion
Denna funktion gör det lättare för dig att laga mat. Du kommer inte att behöva titta på hällen under hela tillagningstiden. Tillagningszonen stängs av automatiskt i slutet av den tidsperiod du har ställt in.
Aktivera timern
- Slå på hällen genom att trycka på ①- knappen.
- Justera önskad temperatur genom att trycka på zon-⊖/⊕-knapparna.
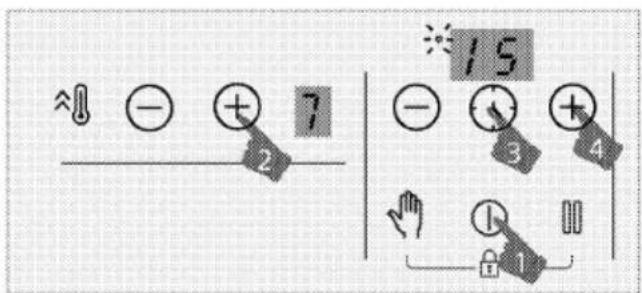
- Aktivera timern genom att trycka på ☑-knappen. "00"-symbol och decimalpunkt för vald zon kommer blinka på timerdisplayen.
- Ställ in önskad period genom att trycka på ⊖/⊕-knapparna.
- Inställningen kommer att aktiveras efter 10 sekunder. Decimalpunkt för vald zon kommer blinka på timerdisplayen.
- Upprepa åtgärderna ovan för andra tillagningszoner för vilka du vill ställa in timern.
Om mer än ett timervärde är inställt på olika zoner, visas zontimern som har minsta timervärde på timerdisplayen och decimalpunkten för den zonen blinkar. Decimalpunkterna för de andra zonerna lyser kontinuerligt.
Du kan se resterande tillagningstid genom att trycka på 📋-knappen för alla tillagningszoner. För varje tryck kommer olika zontimervärden visas. Slutligen visas det minsta timervärdet igen.
Timer kan inte ställas in utan att välja tillagninszon och dess temperaturvärde
Timern kan bara ställas in för plattor som redan är påslagna.
Inaktivera timern
När den inställda tidsperioden är slut, kommer hällen att stängas av automatiskt och den kommer att ge ett signalljud. Tryck på valfri knapp för att tysta ljudsignalen. Om du inte trycker på någon knapp avbryts signalljudet efter några minuter.
Inaktivera timers tidigare
Om du slår av timern tidigare fortsätter hällen arbeta med den inställda temperaturen tills den stängs av.
Du kan avaktivera timern tidigare på två olika sätt:
Inaktivera timern för den aktuella zonen genom att låta värdet falla ned till "00":
- Tryck på timerns ⊖/⊕-knappar tills "00" visas på displayen för den tillagningszon för vilken timern är påslagen. » Decimalpunktsymbolen för den relaterade zonen slås av permanent och timern avbryts. Inaktivera timern för den aktuella zonen genom att röra den aktuella zonens ⊖/⊕-knappar samtidigt:
- Tryck på den aktuella zonens ⏻/⊕-knappar samtidigt. » Decimalpunktsymbolen för den relaterade zonen slås av permanent och timern avbryts.
Efter detta steg kommer temperaturnivån för aktuell zon vara "0" även med timernivån.
Stoppfunktion
Du kan minska drifttemperaturnivån för tillagningszonerna till minsta nivå (nivå 1) med hjälp av denna funktion.
Om timern ställs in för valfri platta kommer den att fortsätta arbeta under stoppet.
- Tryck på 📄-knappen när någon tillagningszon är påslagen. Alla aktiva tillagningszoner kommer fungera på miniminivå (nivå 1). "☐"-symbolen kommer synas på displayen för de aktiva tillagningszonerna.
- Tryck på 📄-knappen igen för att köra om alla plattor med de tidigare inställningarna.
Effekthanteringsfunktion
Apparaten är utrustad med effekthanteringsfunktion. Du kan justera den totala effekten kokplattan utnyttjar med denna funktion. Effekthanteringsfunktionen har 8 nivåer till förfogande.
Effekthanteringsfunktion - Totaleffektsnivåer som kan ställas in
| Effekthanteringsfunktionens skärmindikator | Totaleffekt |
| 25 | 2,5 kW |
| 30 | 3 kW |
| 36 | 3,6 kW |
| 44 | 4,4 kW |
| 54 | 5,4 kW |
| 57 | 5,7 kW |
| 67 | 6,7 kW |
| 72 | 7,2 kW |
Ändra totaleffekten:
- Slå på kokplattan genom att trycka på ① knappen. Stäng av kokplattan genom att trycka på ① knappen igen.
- Tryck sedan på respektive ⚠ knapp på höger främre zon, ⏻ knapp, timer ⏱ knapp, timer ╒ knappen och slutligen den vänstra främre zonen ⚠ knapp.
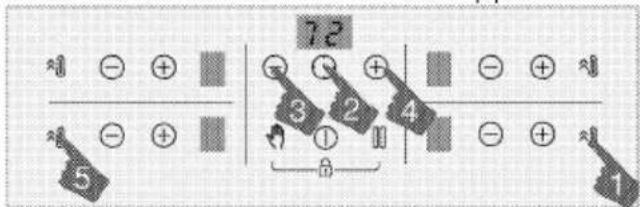
-
Inställd effekthanteringsnivå visas i timerskärmen.
-
Tryck på knappen för att byta nivå och ställ in önskad totaleffektsvärde.
-
Bekräfta inställning genom att trycka på ① knappen och stäng av kokplattan. Inställd totaleffektsvärde aktiveras.
i Temperaturnivåerna som getts kokplattan kan variera enligt inställd totaleffektsnivå. Temperaturnivån som ges till kokplattan reduceras automatiskt enligt effektinställningen som kokplattan utför. Detta är inte ett fel.
Om annan knapp än i den specificerade sekvensen trycks in när effektnivån ändras, kan inte inställningen göras. Inställningen måste börjas om från steg ett.
Använda induktionsplattorna på ett säkert och effektivt sätt
Funktionsprincip: Induktionshällen värmer direkt kokkärlet som en principfunktion. Därför har den en hel del fördelar jämfört med andra typer av hållar. Den arbetar effektivare och hållens yta är svalare. Din induktionshäll är utrustad med ett överlögset säkerhetssystem som ger dig maximal användarsäkerhet.
Hällen kan utrustas med induktionsplattor med en diameter på 145, 180, 210 och 280 mm beroende på modell. Tack vare induktionsfunktionen känner varje tillagningszon av varje kärl som placeras på den. Energin genereras bara på de ställen där kärlet kommer i kontakt med plattan och därmed minimeras energiförbrukningen.
i Produkten kan starta stopp när den arbetar i nivåer från 1 till 7, särskilt med köksredskap med liten diameter och när vattenolja är liten. Detta är inte ett fel.
Automatisk avstängningssystem
Hällen har en automatisk avstängningssystem. Om en eller flera matlagningszoner är på, stängs matlagningszonen av automatiskt efter en viss tid (se tabell-1). Om kokplattan har en timer, stängs även timerskärmen av. Tidsgränsen för automatisk avstängning beror på vald temperaturnivå. Maximianvändningsperiod används för denna temperaturnivå. Matlagningszonen kan användas igen, efter att den stängts av automatiskt, som beskrivits ovan.
Tabell -1 Automatiska avstängningsperioder
| Temperaturnivå | Automatiska avstängningsperioder - timmar |
| 0 | 0 |
| 1 | 6 |
| 2 | 6 |
| 3 | 5 |
| 4 | 5 |
| 5 | 4 |
| 6 | 1,5 |
| 7 | 1,5 |
| 8 | 1,5 |
| 9 | 30 minuter |
| P (Snabbstart) | 10 minuter (*) |
| (*) Hällen kommer sänkas till nivå 9 efter 10 minuter | |
Överhettningsskydd
Hällen är utrustad med sensorer som säkerställer skydd mot överhettning. Följande måste beaktas vid överhettning:
- Den använda tillagningszonen kan stängas av.
- Den valda nivån kan falla till nivå 7 från en högre nivå.
Säkerhetssystem för överkokning
Hällen är utrustad med ett säkerhetssystem för överkokning. Om det är något som kokar över på kontrollpanelen stänger systemet av strömmen omedelbart och slår av hällen. "E" lyser som varning på indikatorn under tiden.
Exakt ströminställning
Induktionshällen reagerar direkt som användningsprincip. Den ändrar effektinställningarna mycket snabbt. Alltså kan du undvika att ett kokkärl (innehållande vatten, mjölk eller dylikt) kokar över även när det är på väg att göra det.
Om ytan på pekkontrollspanelen är exponerad för stora mängder ångor kan hela kontrollsystemet avaktiveras och avge felsignaler.
Håll ytan på pekkontrollspanelen ren. Felaktig användning kan observeras.
6 Allmän information om matlagning
Det här avsnittet beskriver tips om beredning och tillagning av din mat.
Allmänna varningar om matlagning på kokplattan
- Fyll aldrig pannan med olja till mer än en tredjedel. Lämna inte hållen obevakad när du värmer upp olja. Överhettade oljor utgör en brandrisk. Försök aldrig släcka en eld med vatten! Om oljan fattar eld ska du täcka över den med en eldfilt eller fuktig trasa. Slå av hållen om det är säkert att göra det och kontakta brandkåren.
- Ta bort överflödigt vatten från maten och lägg den i den varma oljan försiktigt. Tina fryst mat innan tillagning.
- När du värmer olja, se till att krukan du använder är torr och håll locket öppet.
- Se rekommendationer om matlagning och energibesparing i sektionen "Miljöinstruktioner".
- Tillagningstemperatur- och tidsvärdena för livsmedel kan variera beroende på recept och mängd. Därför anges dessa värden som intervall.
7 Skötsel och underhåll
Allmän information om rengöring
Allmänna varningar
- Vänta tills produkten har svalnat innan du rengör den. Heta ytor kan orsaka brännskador!
- Använd inte rengöringsmedlen direkt på de varma ytorna. Det kan orsaka permanenta fläckar.
- Apparaten ska rengöras noggrant och torkas efter varje användning. Matrester ska därför vara lätta att rengöra och dessa rester ska förhindras att brinna när apparaten används igen senare. På så sätt förlängs apparatens livslängd och ofta förekommande problem minskar.
- Använd inte ångrengöringsprodukter.
- Vissa rengöringsmedel kan skada ytan. Använd inte slipmedel, rengöringspulver, rengöringskrämer, avkalkningsmedel eller vassa föremål under rengöringen.
- Det behövs inget särskilt rengöringsmedel för rengöring efter varje användning. Rengör apparaten med diskmedel, varmt vatten och en mjuk trasa eller svamp och torka med en torr mikrofiberduk.
- Se till att du torkar bort all kvarvarande vätska efter rengöring och rengör omedelbart all mat som stänker runt under matlagningen.
- Rengör inte någon del av apparaten i en diskmaskin.
För hällen:
- Sur smuts som mjölk, tomatpuré och olja kan orsaka permanenta fläckar på kokplattorna och komponenterna i brännarna/värmeplattorna. Rengör alla överflödiga vätskor omedelbart efter att du har kylt av kokplattan genom att stänga av den.
Rostfritt stål och rostfria ytor
- Använd inte sura eller klorhaltiga rengöringsmedel för att rengöra rostfritt stål eller rostfria ytor och handtag.
-
Rostfritt stål eller rostfria ytor kan ändra färg med tiden. Detta är normalt. Efter varje användning ska du rengöra med ett rengöringsmedel som är lämpligt för det rostfria stålet eller den rostfria ytan.
-
Rengör med en mjuk tvålduk och ett flytande (icke repande) rengöringsmedel som lämpar sig för rostfria ytor, var noga med att torka i en riktning.
- Ta bort kalk-, olje-, stärkelse-, mjölk- och proteinfläckar på rostfria ytor och glasytor omedelbart utan att vänta. Fläckar kan rosta under lång tid.
Glasytor
- När du rengör glasytor får du inte använda skrapor av hård metall eller slipande rengöringsmedel. De kan skada glasytan.
- Rengör apparaten med diskmedel, varmt vatten och en mikrofiberduk som är avsedd för glasytor och torka den med en torr mikrofiberduk.
- Om det finns rester av rengöringsmedel efter rengöring, torka av med kallt vatten och torka med en ren och torr mikrofiberduk. Rester av rengöringsmedel kan skada glasytan nästa gång.
- Under inga omständigheter får torkade rester på glasytan rengöras med tandade knivar, stålull eller liknande skrapverktyg.
- Du kan ta bort kalkfläckar (gula fläckar) på glasytan med ett kommersiellt tillgängligt avkalkningsmedel, med ett avkalkningsmedel som vinäger eller citronsaft.
- Om ytan är mycket smutsig, applicera rengöringsmedlet på fläcken med en svamp och vänta länge på att det ska verka ordentligt. Rengör därefter glasytan med en våt trasa.
- Missfärgningar och fläckar på glasytan är normala och inte defekter.
Plastdelar och målade ytor
- Rengör plastdelar och målade ytor med diskmedel, varmt vatten och en mjuk trasa eller svamp och torka dem med en torr trasa.
- Använd inte hårda metallskrapor och slipande rengöringsmedel. Det kan skada ytorna.
- Se till att leder till apparatens komponenter inte lämnas fuktiga och med rengöringsmedel. Annars kan korrosion uppstå på dessa leder.
Rengöring av kokplattan
Glasmatlagningsyta
Följ glasytans rengöringsinstruktioner i "Allmän rengöringsinformation" sektionen för rengöring av kokplattans glasyta. I speciella fall kan du följa rengöringsinstruktionerna nedan.
- Sockerbaserad mat, så som chokladsås, stärkelse och sirap ska tas bort omedelbart utan att vänta att ytan svalnar. Annars kan glasmatlagningsytan skadas permanent.
- Använd inte rengöringsmedel till rengöring när kokplattan är het, annars kan permanenta fläckar bildas.
Rengöring av kontrollpanelen
- Vid rengöring av paneler med vred, torka av panelen och vredet med en fuktig mjuk
trasa och torka sedan med en torr trasa. Ta inte bort vreden och packningarna på undersidan för att rengöra kontrollpanelen. Kontrollpanelen och vredena kan då skadas.
- Använd inte rengöringsmedel för rostfritt stål runt vreden när du rengör rostfria paneler med vred. Indikatorerna runt vreden kan försvinna.
- Rengör pekkontrollpanelerna med en fuktig mjuk trasa och torka med en torr trasa. Om produkten har en knapplåsfunktion ska du aktivera knapplåset innan du rengör kontrollpanelen. Felaktig detektering kan annars uppstå på knapparna.
8 Felsökning
Kontakta en auktoriserad serviceagent eller tekniker med licens eller den återförsäljare där du köpte produkten om du inte kan åtgärda problemet trots att du har följt instruktionerna i det här avsnittet. Försök aldrig att reparera en defekt produkt själv.
Produkten fungerar inte.
- Nätsäkringen är defekt eller har löst ut. >>> Kontrollera säkringarna i säkringsskåpet. Byt om nödvändigt ut eller återställ dem.
- Produkten är inte ansluten till ett (jordat) uttag. >>> Kontrollera kontaktens anslutning.
- Knappar/vred på kontrollpanelen fungerar inte. >>> Om din produkt är utrustad med kanpplåsfunktion kan knapplåset vara aktiverat. Avaktivera det.
- Om displayen inte lyser när du slår på hällen igen. >>> Koppla ur apparaten med kretsbrytaren. Vänta minst 20 sekunder och koppla sedan in den igen.
- Överhettningsskyddet är aktivt. >>> Låt spishällen svalna.
- Tillagningskärlet passar inte. >>> Kontrollera ditt kärl.
"☐" visas på displayen för tillagningszonen.
- Du har inte placerat kärlet på den aktiva tillagningszonen. >>> Kontrollera om det finns ett kokkärl på tillagningszonen.
- Ditt kokkärl är inte kompatibelt med induktionskokning. >>> Kontrollera om kärlet är kompatibelt med induktionshällar.
- Kokkärlet är inte centrerat på rätt sätt eller så är kärlets bottenyta inte tillräckligt bred för tillagningszonen. >>> Välj ett tillräckligt brett kokkärl och placera det rätt i mitten av tillagningszonen.
- Kärlet eller tillagningszonen är överhettade. >>> Låt dem svalna.
Den valda tillagningszonen stängs plötsligt av under drift.
- Tillagningstiden för den valda tillagningszonen kan vara över. >>> Du kan ställa in en ny tillagningstid eller avsluta tillagningen.
- Överhettningsskyddet är aktivt. >>> Låt spishällen svalna.
- Ett föremål kan täcka pekkontrollpanelen. >>> Avlägsna föremålet från panelen.
Kärlet blir inte varmt även om tillagningszonen är på.
- Ditt kokkärl är inte kompatibelt med induktionskokning. >>> Kontrollera om kärlet är kompatibelt med induktionshällar.
- Kokkärlet är inte centrerat på rätt sätt eller så är kärlets bottenyta inte tillräckligt bred för tillagningszonen. >>> Välj ett tillräckligt brett kokkärl och placera det rätt i mitten av tillagningszonen.
Kylfläkten fortsätter att fungera även om spishällen är avstängd.
- Detta innebär inget fel. Kylfläkten fortsätter att fungera tills elektroniken i hällen svalnar till en lämplig temperatur.
Ljud från spisen under matlagning
Vissa ljud kan höras från spisen under tillagningen. Dessa ljud beror på kokkärlets sammansättning. Dessa ljud är normala, de är inte ett fel och de är en del av induktionstekniken.
Möjliga ljud och orsaker
- Fläktljud: Spisen är utrustad med en fläkt som aktiveras automatiskt beroende på temperaturen i apparaten. Fläkten har olika driftsnivåer och arbetar på olika nivåer beroende på temperaturen.
- Lägre brummande som en transformators driftsljud: Detta beror på induktionstekniken. Eftersom värmen överförs direkt till botten av kokkärlet kan sådana brummande ljud höras beroende på kokkärlets material. Därför kan olika ljud höras med olika kokkärl.
- Knäppande ljud: Orsaken till detta är strukturen och materialet i kokkärlets botten. Om matlagningskärlet består av flera lager av olika material kan det uppstå ett knäppande ljud.
- Gnällande ljud: Ett gnällande ljud kan höras när två tillagningszoner på samma sida av spisen används för att laga mat med olika matlagningsnivåer.
Felkoder/orsaker och möjliga lösningar - För vred
| Felkoder | Felorsaker | Möjliga lösningar |
| E 22E 26 | Induktionshällen är överhettad. | Stäng av induktionshällen och vänta tills den har svalnat. Felet ska lösas när kokplattans temperatur sjunker under gränsvärdena. |
| E 46 | En eller flera knappar hålls intryckta i mer än 10 sekunder. Ett föremål har lämnats på kontrollpanelen eller kontrollpanelen har utsatts för ånga. | Problemet ska lösas när du tar bort handen från hållen.Problemet ska lösas när kontrollpanelen rengörs. |
| E 47 | Ett kokkärl som lämpar sig för induktionsuppvärmning används inte. | Felet ska lösas när ett kokkärl som lämpar sig för induktionsuppvärmning används. |
| E 1 - E 15 | Kommunikationsfel på induktionshällen. | Stäng av induktionshällen och sätt igång igen efter 30 sekunder. Kontakta den auktoriserade återförsäljaren om problemet kvarstår. |
| E 16 - E 21 | Temperatursensorfel på induktionshällen. | Stäng av induktionshällen och sätt igång igen efter 30 sekunder. Kontakta den auktoriserade återförsäljaren om problemet kvarstår. |
| E 23E 24 | Programvarufel på induktionshällen. | Stäng av induktionshällen och sätt igång igen efter 30 sekunder. Kontakta den auktoriserade återförsäljaren om problemet kvarstår. |
| E 25 | Fläktdriftfel på induktionshällen. | Stäng av induktionshällen och sätt igång igen efter 30 sekunder. Kontakta den auktoriserade återförsäljaren om problemet kvarstår. |
| E 31 - E 45 | Fel i elektronikkretsen på induktionshällen. | Stäng av induktionshällen och sätt igång igen efter 30 sekunder. Kontakta den auktoriserade återförsäljaren om problemet kvarstår. |
| E 48 | Sensorfel på induktionshällen. | Sensorutrustningen ska vara kompatibel för driftsförhållandena. |
| E 49 | Kontakta den auktoriserade återförsäljaren om problemet kvarstår. | |
| E 51 | ||
| E 52 - E 57 | Hög temperatur-fel på induktionshällen. | Stäng av induktionshällen och vänta tills den har svalnat. Felet ska lösas när sensorsn temperatur sjunker under gränsvärdena. Kontakta den auktoriserade återförsäljaren om problemet kvarstår. |
Arcelik A.S.
Karaağaç Caddesi No:2-6 Sütlüce, 34445, Turkiet
Tillverkad i TURKIET
Importör i Ryssland: «BEKO LLC»
Adress: Selskaya-gatan, 49, Fedorovskoe, Pershinskoe landsbygdsområde, Kirzhach-distriktet, Vladimir-regionen, Ryska federationen 601021
Tillverkningsdatumet ingår i produktens serienummer som anges på märkningsetiketten, som finns på produkten, nämligen: de två första siffrorna i serienumret anger tillverkningsåret och de två sista siffrorna månaden. Exempelvis anger "10- 100001-05" att produkten tillverkades i maj 2010.
Du kan begära certifieringsnummer från vårt kundcenter 8-800-200-23-56 Tillverkaren förbehåller sig rätten att göra ändringar beträffande modifiering, utformning och specifikation av en elektrisk enhet.
Dear Customer,
Please read this manual before using the product.
Cylinda thank you for choosing the product. We want your product, manufactured with high quality and technology, to offer you the best efficiency. To do this, carefully read this manual and any other documentation provided before using the product and keep it as a reference. If you give the product to someone else, give the manual with it. Follow the instructions, taking into account all the information and warnings stated in the user manual.
Heed all information and warnings in the user manual. This way, you will protect yourself and your product against the dangers that may occur.
Keep the user manual. If you give the product to someone else, give the manual with it.
The user manual contains the following symbols:

Hazard that may result in death or injury.
NOTICE Hazard that may result in material damage to the product or its environment.

Hazard that may result in burns due to contact with hot surfaces.

Important information or useful usage tips.

Read the user manual.
1 Safety instructions 4
Purpose of usage 4
Child, vulnerable person and pet safety ..... 4
Electrical safety....5
Transportation safety 6
Installation safety 7
Safety of use....7
Temperature warnings....7
Accessory use....8
Cooking safety 8
Induction 8
Maintenance and cleaning safety 9
2 Environmental Instructions 10
Waste regulation....10
Compliance with the WEEE Directive and Disposing of the Waste Product...... 10
Package information....10
Recommendations for energy saving..... 10
3 Your product 11
Product introduction....11
Product control panel introduction and usage....11
Hob control 11
General information on hob....12
Technical specifications....13
4 First use 14
First cleaning....14
5 How to use the hob 15
General information on hob usage.....15
Control panel 17
6 General information about cooking 24
General warnings about cooking with hob24
7 Maintenance and care 25
General cleaning information....25
Cleaning the hob 26
Cleaning the control panel 26
8 Troubleshooting 27
1 Safety instructions
• This section contains safety instructions that will help prevent any risks of personal injuries or material damage.
- If the product is transferred to another person or used second hand, the operating manual, product labels, other relevant documents and accessories should be delivered with the product.
- Our company shall not be held responsible for any damage that may occur as a result of failure to comply with these instructions.
- Failure to comply with these instructions shall render any warranty void.
• ⚠ Always have the installation and repair work performed by the manufacturer, the authorized service or a person specified by the importer.
- Use genuine spare parts and accessories only.
- Do not attempt to repair or replace any part of the product unless it is clearly specified in the operating manual.
- Do not perform technical modifications on the product.
Purpose of usage
- This product is designed for home use. It is not suitable for commercial use.
- Do not use the product in gardens, balconies or other outdoor environments. The appliance is intended to be used in household and staff kitchen areas in shops, offices and other working environments.
- WARNING: This product should be used for cooking purposes only. It should not be used for different purposes, such as heating the room.
Child, vulnerable person and pet safety
- This product can be used by children 8 years of age and older, and people who are underdeveloped in physical, sensory or mental skills, or lack of experience and knowledge, as long as they are supervised or trained about the safe use and hazards of the product.
• Children should not play with the product. Cleaning and user maintenance should not
be performed by children unless there is someone overseeing them.
- This product should not be used by people with limited physical, sensory or mental capacity (including children), unless they are kept under supervision or receive the necessary instructions.
• Children should be supervised to ensure that they do not play with the product.
• Electrical products are dangerous for children and pets. Children and pets must not play with, climb on, or enter the product.
- Do not put objects that children may reach on the product.
- Turn the handle of the pots and pans to the side of the workbench so that children can not grab and burn.
- WARNING: During use, the accessible surfaces of the product are hot. Keep children away from the product.
- Keep the packaging materials out of the reach of children. There is a hazard of injury and suffocation.
- (Not all products are supplied with a plug, so if
your product DOES have a plug) For the safety of children, disconnect the power plug and make the product inoperable before disposing of the product.
Electrical safety
- Connect the product into a grounded outlet protected by a fuse that matches the current ratings indicated on the type label. Have the grounding installation made by a qualified electrician. Do not use the product without grounding in accordance with local / national regulations.
- The plug or the electrical connection of the product should be in an easily accessible place (where it will not be affected by the flame of the stove). If this is not possible, there should be a mechanism (fuse, switch, switch, etc.) on the electrical installation to which the product is connected, in compliance with the electrical regulations and separating all poles from the network.
• The product must not be connected into the outlet
during installation, repair, and transportation.
- Connect the product into an outlet that meets the voltage and frequency values specified on the type label.
- (Not all products are supplied with a supply cord, so if your product DOES NOT have a supply cord)
Use only the connecting cable specified in the "Technical specifications" section.
- Do not jam the power cord under and behind the product. Do not put a heavy object on the power cord. The power cord should not be bent, crushed, and come into contact with any heat source.
- Use original cable only. Do not use cut or damaged cables or extension leads.
- If the power cord is damaged, it must be replaced by a manufacturer, an authorized service or a person to be specified by the importer company in order to prevent possible dangers.
(Not all products are supplied with a plug, so if your product DOES have a plug)
- Do not plug the product into an outlet that is loose, has come out of its socket, is broken, dirty, oily, with risk of water contact (for example, water that may leak from the counter).
- Never touch the plug with wet hands! To unplug, do not hold the cord, always hold the plug.
• Make sure that the product plug is securely plugged into the outlet to avoid arcing.
! Transportation safety
- Disconnect the product from the mains before transporting the product.
- When you need to transport the product, wrap it with bubble wrap packaging material or thick cardboard and tape it tightly. Secure the product tightly with tape to prevent the removable or moving parts of the product and the product from damage.
- Check the overall appearance of the product for any damage that may
have occurred during transportation.

Installation safety
- Before the product is installed, check the product for any damage. If the product is damaged, do not install it.
- Do not install the product near heat sources (radiators, stoves, etc.).
- Keep all ventilation ducts open around the product.

Safety of use
• Make sure that the product is turned off after each use.
- If you do not use the product for a long time, disconnect it or turn off the fuse from the fuse box.
- Do not operate defective or damaged product. If any, disconnect the electricity / gas connections of the product and call the authorized service.
- WARNING: If the surface is cracked, switch off the appliance to avoid the possibility of electric shock.
- Do not climb on the product to reach anything or for any other reason.
- Do not use the product in situations that may affect
your judgment, such as drug intake and / or alcohol use.
- Flammable objects kept in the cooking area may catch fire. Never store flammable objects in the cooking area.
- Cast iron, aluminum or cookware with damaged / rough bottom parts may lead to scratching the glass surface. When replacing cookware, always raise the containers, do not slide on the surface.
• Vapour pressure that build up due to the moisture on the hob surface or at the bottom of the pot can cause the pot to move. Therefore, make sure that the hob surface and bottom of the pots are always dry. - This product is not suitable for use with a remote control or an external clock.

Temperature warnings
- WARNING: While the product is operating, exposed parts will be hot. Do not touch the product and heating elements. Children under the age of 8 should not be brought close to the product without an adult.
- Do not place flammable / explosive materials near the
product, as the edges will be hot while it is operating.
- WARNING: Danger of fire: Do not store items on the cooking surfaces.

Accessory use
- WARNING: Use only hob guards designed by the manufacturer of the cooking appliance or indicated by the manufacturer of the appliance in the instructions for use as suitable or hob guards incorporated in the appliance. The use of inappropriate guards can cause accidents.

Cooking safety
- WARNING: The cooking process must be observed. Short-term cooking processes must be constantly observed.
- WARNING: Unattended cooking on a hob with fat or oil can be dangerous and may result in fire. NEVER try to extinguish a fire with water, but switch off the appliance and then cover flame e.g. with a lid or a fire blanket.
- Be careful when using alcohol in your food. Alcohol evaporates at high
temperatures and may catch fire when exposed to hot surfaces, causing a fire.

Induction
- Hotplates are equipped with "Induction" technology. Your induction hob that provides both time and money savings must be used with pots suitable for induction cooking; otherwise hotplates will not operate. For detailed information, see the section "Pot selection".
- As induction hobs create a magnetic field, they may cause harmful impacts for people who use devices such as insulin pump or pacemaker.
- Close the hotplate from its control panel after use, do not rely on the pot sensor.
• Metal objects such as knives, forks, spoons and lids should not be placed in the hotplate as they will get hot.
• Metal items stored in drawers under the hob may become very hot during long and intensive use. Do not store metal objects in drawers under the hob.
- Do not put electronic products such as mobile phones, tablets, computers
on the induction hob. Your product may be damaged.

Maintenance and
cleaning safety
- Wait for the product to cool before cleaning the product. Hot surfaces may cause burns!
-
Never wash the product by spraying or pouring water on it! There is an electric shock hazard!
-
Do not clean the product with steam cleaners as this may cause electric shock.
- Salt, sugar residues on the bottom of the cookware or such particles on the glass surface can cause the glass to scratch and crack. Make sure that the bottom is clean before placing the cookware. Keep the glass ceramic surface clean.
2 Environmental Instructions
Waste regulation
Compliance with the WEEE Directive and Disposing of the Waste Product

This product complies with EU WEEE Directive (2012/19/EU). This product bears a classification symbol for waste electrical and electronic equipment (WEEE).
This product has been manufactured with high quality parts and materials which can be reused and are suitable for recycling. Do not dispose of the waste product with normal domestic and other wastes at the end of its service life. Take it to the collection center for the recycling of electrical and electronic equipment. Please consult your local authorities to learn about these collection centers.
Appropriate disposal of used appliance helps prevent potential negative consequences for the environment and human health.
Compliance with RoHS Directive:
The product you have purchased complies with EU RoHS Directive (2011/65/EU). It does not contain harmful and prohibited materials specified in the Directive.
Package information
- Packaging materials of the product are manufactured from recyclable materials in accordance with our National Environment Regulations. Do not dispose of the packaging materials together with the domestic or other wastes. Take them to the packaging material collection points designated by the local authorities.
Recommendations for energy saving
Information on energy efficiency according to EU 66/2014 can be found on the product fiche given with the product. The following suggestions will help you use your product in an ecological and energy-efficient way:
• Defrost frozen food before cooking.
- Turn off the product 5 to 10 minutes before the end time of cooking for prolonged cooking. Now you can save up to 20% electricity by using heat.
- Use pots / pans with a size and lid suitable for the hotplate. Always choose the right size pot for your meals. More than necessary energy is needed for containers of the wrong size.
- Keep hob cooking surfaces and pot bases clean. Dirt reduces the heat transfer between the cooking area and the pot base.
3 Your product
Product introduction

1 Glass cooking surface
2 Lower housing
3 Induction cooking zone
4 Induction cooking zone
5 Induction cooking zone
6 Induction cooking zone
Product control panel introduction and usage
In this section, you can find the overview and basic uses of the product's control panel. There may be differences in images and some features depending on the type of product.
Hob control

Keys
① : On/Off key
:Timer key
: Quick Heating key/High power
setting (booster) key
: Cleaning lock key
: Stop key
⊕ : Increase key
- : Decrease key
Symbols
: Key lock symbol
Cooking zone display
1 Quick Heating key/High power setting (booster) key
2 Temperature decrease key
3 Temperature increase key
4 Temperature indicator of the relevant cooking zone
Timer indicator
1 Operation point LED for the timer
2 Timer indicator
3 Timer increase key
4 Operation point LED for the Key lock/Child lock
5 Timer decrease key
General information on hob
1 Rear left - Induction cooking zone
2 Rear right - Induction cooking zone
3 Front right - Induction cooking zone
4 Front left - Induction cooking zone
Technical specifications
| General specifications | |
| Product external dimensions (height/width/depth) | 52 mm*/580 mm/510 mm (For models that come with mounting springs and sealing gasket attached to the product, consider the width and depth measurements as 10 mm more than these measurements.) |
| Hob installation dimensions (width/depth) | 560 (+2) mm /490 (+2) mm |
| Voltage / frequency | 1N ~ 220-240 V/ 2N ~ 380-415 V ;~50 Hz |
| Cable type and cross section used / suitable for use in the product | min. H05V2V2-F 5 x 2,5 mm^2 |
| Total power consumption | max. 7,2 kW |
| Burners | |
| Rear left | Induction cooking zone |
| Dimension | 180 mm |
| Power | 2000W / Booster: 2300 W |
| Front left | Induction cooking zone |
| Dimension | 180 mm |
| Power | 2000W / Booster: 2300 W |
| Front right | Induction cooking zone |
| Dimension | 145 mm |
| Power | 1600 W / Booster: 1800 W |
| Rear right | Induction cooking zone |
| Dimension | 210 mm |
| Power | 2000 W / Booster: 2300 W |
| * The height of the hob specified in the technical table is the base cover height of the product. | |

Technical specifications may be changed without prior notice to improve the quality of the product.

Figures in this manual are schematic and may not exactly match your product.

Values stated on the product labels or in the documentation accompanying it are obtained in laboratory conditions in accordance with relevant standards. Depending on operational and environmental conditions of the product, these values may vary.
4 First use
Before you start using your product, it is recommended to do the following in the following sections.
First cleaning
- Remove all packaging materials.
- Wipe the surfaces of the product with a wet cloth or sponge and dry with a cloth.
NOTICE The surface might get damaged by some detergents or cleaning materials. Do not use aggressive detergents, cleaning powders/creams or any sharp objects during cleaning.
NOTICE Smoke and smell may emit for a couple of hours during the initial operation. This is quite normal. Ensure that the room is well ventilated to remove the smoke and smell. Avoid directly inhaling the smoke and the smell that emits.
5 How to use the hob
General information on hob usage
General warnings
- Do not let any objects to fall on the hob. Even small objects such as saltshakers may damage the hob. Do not use cracked hobs. Water may seep through these cracks and cause a short circuit. If the surface is damaged in any way (e.g. visible cracks), turn off the fuse first, then call the authorized service to unplug the product to reduce the risk of electric shock.
- Do not use unbalanced and easily tilting pots/pans on the hob.
- Do not heat the pots/pans and pots empty. The pots and the appliance may be damaged.
• Always turn off the hob's burners after each use. - You shall damage the appliance if you operate the hobs without any pot or pots/pans. Always turn off the hobs after each operation.
• After each use the cooking surface will be hot, so do not put the plastic pots/pans on the cooking surface. Clean such material on the surface immediately. - Sudden temperature changes on the glass cooking surface may cause damage, be careful not to spill cold liquids during cooking.
- Put a sufficient amount of food in pots and pans. Thus, you can prevent food from pouring forth out of the pots/pans and will not need to clean unnecessarily.
- Do not place the covers of pots and pans on burners/zones.
- Place the pots by centering them on the burners/zones. If you wish to place a pot on a different burner/zone, do not slide it towards the desired burner; rather, lift it first and then put it on the other burner.
Operating principle of the induction hob
Induction hob is like an open circuit. The circuit completes when a cooking pots/pans suitable for induction cooking is placed on it and an electronic system below the glass surface generates a magnetic field. The metal base of the pots/pans is heated by taking energy from this magnetic field. Thus, the heat is not generated on the surface of the hob, but directly on the pots/pans above it. Glass surface is heated with the heat of the cooking pots/pans.
Advantages of cooking with induction
Induction hobs offer some advantages as the heat is transferred directly to the cooking pots/pans.
- Foods that overflow during cooking do not burn rapidly as the glass cooking surface is not heated directly. It is cleaned more easily.
- Cooking shall be faster as the heat is generated directly on the cooking pots/pans. Thus, it saves time and energy with respect to other hob types.
- As the heat is given directly to the cooking pots/pans, there is no heat loss, and it provides a more efficient cooking.
- The fact that the heat transfer stops and the cooking surface is not heated directly when the cooking pots/pans is removed from the cooking surface provides a safer use against possible accidents while cooking.
For a safe operation:
- Do not select high heating levels when using non-sticking cooking pots/pans coated with little amount of oil or used without oil (teflon type).
- Do not use glass cooking surface as a surface where you can place something on it or as a cutting surface.
- Do not place metal objects such as cutlery or pot lids on your hob as they may get hot.
- Never use aluminium foil for cooking. Never place food wrapped in aluminium foil on the induction zone.
- Keep magnetic objects such as credit cards or tapes away from the hob while it is operating.
- If there is an oven under your hob and it is being operated, the sensors on the hob may reduce the cooking level or turn off the hob.
- Your hob has an automatic shut-off system. Detailed information about this system is provided in the following sections. However, if you use thin based pots for your cooking, these pots shall heat up very quickly and the bottom of the pan may melt and damage the cooking surface and the appliance before the automatic shut-off system is activated.
Cooking pots/pans
You shall use ferromagnetic, quality cooking pots/pans which bear a label or warning that it is compatible for induction cooking only with your induction hob. Generally, the higher the iron content, the better the cooking pots/pans shall perform. The base diameter of the cooking pots/pans shall match the induction zone. Suggested dimensions are listed below.
Suitable pots/pans:
- Cast iron pots/pans
- Enamelled steel pots/pans
- Steel and stainless steel pots/pans (with label or warning indicating that it is induction compatible)
Unsuitable pots/pans:
• Aluminium pots/pans
• Copper pots/pans
- Brass pots/pans
- Glass pots/pans
- Pottery
• Ceramic and porcelain
Recommendations:
- Use flat bottomed cooking pots/pans only. Do not use pots/pans with convex or concave bases.
natural_image
Two identical cooking pots with checkmarks and X marks, no text or symbols present- Use cooking pots/pans with thick, processed bases only. If you use thin based pots, these pots shall heat up very quickly and the bottom of the pan may melt and damage the cooking surface and the appliance before the automatic shut-off system is activated. Sharp edges may cause scratches on the surface.

natural_image
Two identical cooking pots with checkmarks and X marks, no text or symbols present- The bases of some cooking pots/pans have a smaller ferromagnetic field than its true diameter. Only this area is heated by the hob. Therefore, the heat is not evenly distributed and the cooking performance is decreased. Moreover, such cooking pots/pans may not be detected by large induction hobs. Thus, the cooking hob shall be selected according to the size of the ferromagnetic field.

natural_image
Two cooking pan illustrations showing different sizes of a lid (no text or symbols)- Some cooking pots/pans have a base that contains non-ferromagnetic materials such as aluminium. These types of cooking pots/pans may not heat adequately or may not be detected by the induction hob at all. In some cases, a bad pots/pans warning may appear.
natural_image
Two identical illustrations of a cooking pot with lid and side handles, shown from different angles (no text or symbols)i Equal distribution of the cookware on the right and left and center hobs for the selection of hobs affects the cooking performance positively while cooking multiple meals on the induction hobs.

natural_image
Simple diagram with three circular shapes: a rectangular box, a square, and a circle, all without any text or symbols.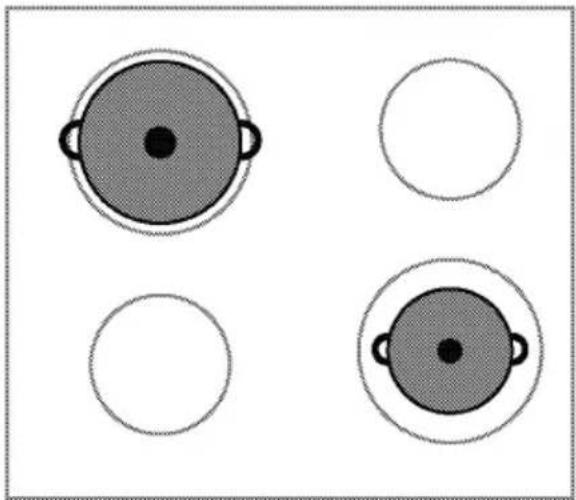
natural_image
Four circular diagrams with shaded centers and handles, no text or symbols presentCooking pots/pans test
Test whether your pot is compatible with cooking with an induction hob using the methods below.
- It is compatible if the base of your pot holds a magnet.
- It is compatible if "L" does not flash when you place your pot on the induction hob and turn on the hob.
Recommended cooking pots/pans sizes
| Diameter of cooking zone - mm | Pot diameter - mm |
| 145 | min. 100 - max 145 |
| 180 | min. 100 - max 180 |
| Diameter of cooking zone - mm | Pot diameter - mm |
| 210 | min. 140 - max 210 |
| 240 | min. 140 - max 240 |
| 280 | min. 125 - max 280 |
| 320 | min. 125 - max 320 |
| Cooking zone with wide (flexi) surface | width 230 - length 390 |
The detection of cooking pots/pans by the induction hobs depend on the diameter and material of the ferromagnetic in the base of the pots/pans. To ensure detection of the cooking pots/pans and achieve an efficient cooking, the cooking pots/pans shall be selected as per the size of your hob. The cooking pots/pans sizes recommended for hob sizes are given above.
Boiling behavior may vary depending on the pot types, size of the pot and size of the cooking zone. For a more homogenous boiling behavior, a one step larger cooking zone might be used. To use a larger cooking zone does not cause wasting of energy at induction hobs, because the heat is only created in the relevant pot area.
Control panel
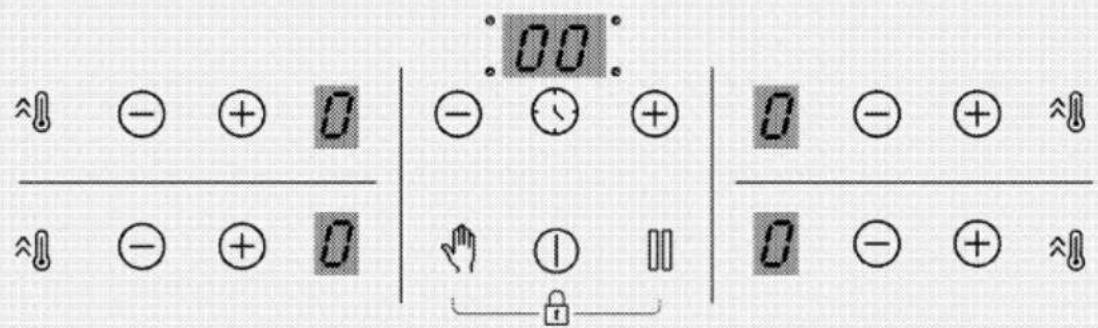
Keys
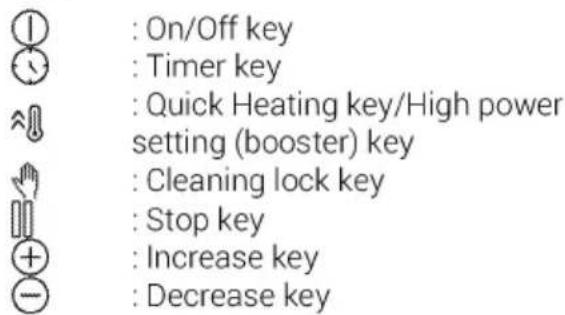
Symbols
: Key lock symbol

Cooking zone display
1 Quick Heating key/High power setting (booster) key
2 Temperature decrease key
3 Temperature increase key
4 Temperature indicator of the relevant cooking zone
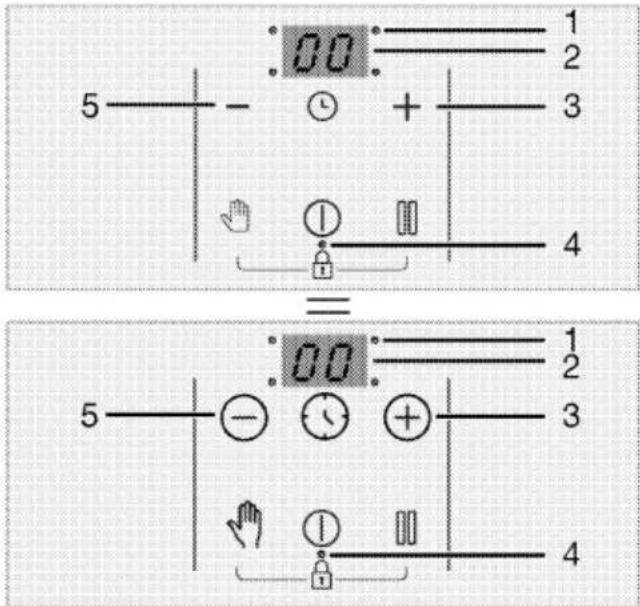
Timer indicator
1 Operation point LED for the timer
2 Timer indicator
3 Timer increase key
4 Operation point LED for the Key lock/Child lock
5 Timer decrease key
General warnings for the control panel

This product is controlled with a touch control panel. Each operation you make on your touch control panel will be confirmed by an audible signal.

Always keep the control panel clean and dry. Having damp and soiled surface may cause problems in the functions.

The hob will automatically return to Standby mode if no operation is performed within 10 seconds..

The product will switch itself off for safety reasons if no key is touched for a long time.
Switching on the hob:
- Switch on the hob by touching① key.
"0" appears on all the cooking zones display.
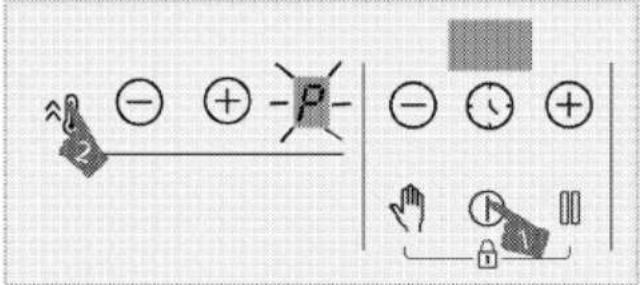
Switching off the cooking zone:
An active cooking zone can be switched off in 3 different ways:
- By touching the ① key
Touch the ① key.
-
By dropping the temperature to "0" level; You can switch off the cooking zone by adjusting the temperature setting to "0" level.
-
By using the switching off function on the timer for the desired cooking zone;
When the time is over, the timer will switch off the cooking zone assigned to it. "0" or "00" will appear on related display.
When the time is over, an audible alarm will sound. Touch any key on the control panel to silence the audible alarm.
- By touching the zone ⊖/⊕ keys simultaneously for the desired cooking zone;
You can switch off the related cooking zone by touching its ⊖/⊕ keys simultaneously.

If "H" or "h" is on after the cooking zone has been switched off, it means that the cooking zone is still hot. Do not touch the cooking zones.
Residual heat indicator
If "H" symbol is flashing on the cooking zone display, it means that the hob is still hot and can be used to keep a small amount of food warm. The symbol will soon turn to "h" symbol, which means it is less hot.

When the electricity is cut off, residual heat indicator will not light up and does not warn the user against hot cooking zones.
Adjusting the temperature level
-
Switch on the hob by touching① key.
-
Adjust the desired temperature level by touching the zone / keys.
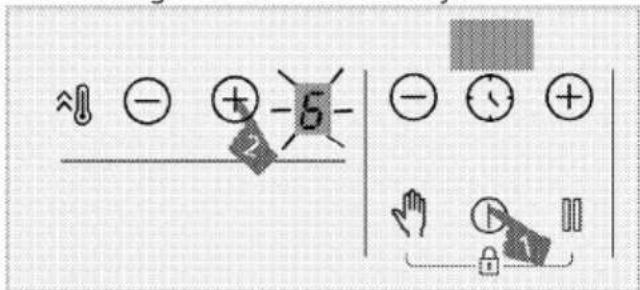
» The relevant cooking zone will start to operate at the set temperature level.

The outer section of the 280 mm induction hob cooking zone (if your product is equipped with a 280 mm induction hob cooking zone) is activated only when a saucepan large enough to cover the cooking zone is placed on the cooking zone and the temperature is set to a level higher than 8.
High power setting (BOOSTER)
You can use booster function for rapid heating. However, this function is not recommended for cooking a long time. Booster function may not be available in all cooking zones.
Selecting the high power setting (BOOSTER):
- Switch on the hob by touching① key.
- Touch the ⚠️ key of related zone.
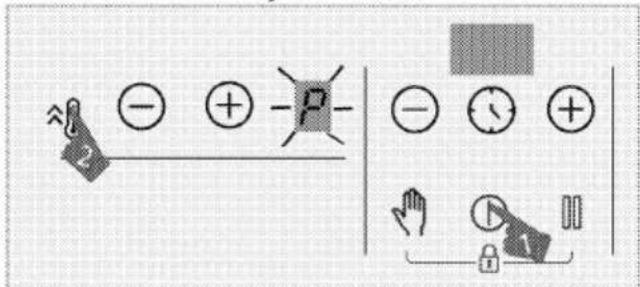
» Selected cooking zone will operate with maximum power and "P" symbol will appear on the cooking zone display. Cooking zone goes out of booster and continues to operate at level "9".
Switching off the high power setting (BOOSTER) prematurely:
You can switch off the high power setting anytime you want by touching the ⊖ or ⬇ key.
Cooking zone goes out of booster and continues to operate at level "9".
Working prencible of 2 zones which are located same vertical direction:
If one zone is set to level booster and than the other zone, which is located same vertical direction set to bigger than level 6 (7, 8 and 9), first zone drops to level 9 and the other zone can be set bigger than level 6 (7, 8 and 9). If the second zone is set to level booster, first zone drops to level 6.
Cleaning lock
The cleaning lock prevents operation of all keys on the control panel for 20 seconds while the hob is switched on to allow the user to make a short cleaning. Product will not draw any power throughout this time.
Activating the cleaning lock
- Touch and hold the √ key until a single signal sound is heard when any cooking zone is switched on.
A countdown begins from 20 on the timer display of the hob. None of the keys on the panel will function except the Ⓐ key throughout this period.
Deactivating the cleaning lock
You do not have to press any key to deactivate the cleaning lock. The hob will give a signal audio signal after 20 seconds and the cleaning lock will automatically be deactivated.

If you want to deactivate the cleaning lock earlier, touch and hold the 🔊 key until two signal sound is heard.
Child Lock
When the cooking zones are switched off, you can protect the hob with the child lock to prevent children from switching on the cooking zones. You can activate or deactivate the child lock only when the cooking zones are switched off (in the standby mode).
Activating the child lock
- Touch and hold the both ⏻ and ⏻ keys simultaneously until a single signal
sound is heard when the hob is in the standby mode.
The child lock will be activated. "L" will be displayed on all cooking zones display for a while and the decimal point of the 🔒 key will be turned on.

If any key is pressed when the child lock function is active, two signal sound will be heard and "L" will blink on all cooking zones display.
Deactivating the child lock
- Touch and hold the both 🎨 and 🔊 keys simultaneously until two signal sound is heard when the child lock is active. » The child lock function will be deactivated. "L" will blink on all cooking zones display and the light of the 🔊 key goes out.
Key Lock
You can activate the key lock in order to prevent the functions from being changed by mistake while the hob is operating.

Key lock will be cancelled in case of power failure.
Activating the key lock
- Touch and hold the both 🔔 and 🔖 keys simultaneously until a single signal sound is heard.
The Key lock will be activated and the decimal point of the ⏻ key will be turned on after blinking.

You can activate the key lock in the operation mode only. Only the ⏻ key will be functional when the key lock is active. When you touch any other button, the decimal point of the 🔊 key will blink to indicate that the key lock is active. If you switch the hob off when the keys are locked, you must deactivate the key lock in order to be able to switch on the hob again. If you touch any button without deactivating key lock, "L" will blink on all cooking zones display to indicate that the key lock is active. Deactivate the key lock to turn on the hob again.
Deactivating the key lock
- Touch the both 📋 and 🌐 keys simultaneously until two signal sound is heard when the key lock is active.
» The light of the 🔒 key will go out and the control panel will get unlocked.
Timer function
This function makes it easier for you to cook. You will not have to watch the hob for the whole cooking period. The cooking zone will be switched off automatically at the end of the time period you have set.
Activating the timer
- Switch on the hob by touching Ⓐ key.
- Adjust the desired temperature level by touching the zone⊖/⊕ keys.
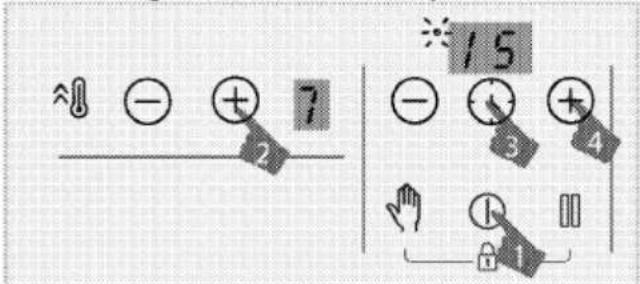
- Activate the timer by touching the ⏻ key. "00" symbol and decimal point of selected zone will blink on timer display.
- Set the desired duration by touching the timer / keys.
- After 10 second, the setting will be activated. Decimal point of selected zone will blink on timer display.
- In order to set the timers of the other cooking zones, repeat the process explained above.

If more than one timer value are set to different zones, the zone timer which has minimum timer value is displayed on the timer display and the decimal point for that zone blinks. The decimal points of the other zones illuminate continuously.
You can see the remaining cooking time by touching the ⏻ key of all cooking zone. For each touching, different zone timer value is displayed. Finally, the minimum timer value is displayed again.
Timer cannot be set without selecting the cooking zone and its temperature value
The timer can only be set for the operating cooking zones.
Deactivating the timer
Once the set time is over, the hob will be switched off automatically and give audible signal sound. Press any key to silence the audible signal sound. If you do not press any key, the signal sound will be cancel after a few minutes.
Deactivating the timers earlier
If you deactivate the timer earlier, the hob will keep on operating at the set temperature until it is switched off.
You can deactivate the timer earlier in two different ways:
Deactivating the timer for related zone by dropping its value to "00":
- Touch the timer ⊖/⊕ keys until "00" appears on the display of the cooking zone whose timer is active.
» Decimal point symbol of the related zone will permanently goes off and the timer will be canceled.
Deactivating the timer for related zone by touching the related zone / keys simultaneously:
- Touch the related zone ⊖/⊕ keys simultaneously.
» Decimal point symbol of the related zone will permanently goes off and the timer will be canceled.
After this step, the temperature level of the related zone will be "0" also with the timer level.
Stop function
You can decrease operating temperature level of the cooking zones to minimum level (level 1) by means of this function.
If the timer is set for any cooking zone, it will continue operating during stoppage.
- Touch the ☐ key when any of the cooking zones is operating.
All operating cooking zones will operate at minimum level (level 1). "☐" symbol will appear on the display of the active cooking zones. - Touch the ☐ key again to reoperate all cooking zones with their previous settings.
Power management function
Your appliance is equipped with a power management function. You may change the total power that may be drawn by the hob with this function. There are 8 levels available for the power management function.
Power management function - Total power levels that may be set
| Power management display indicator | Total power |
| 25 | 2,5 kW |
| 30 | 3 kW |
| 36 | 3,6 kW |
| 44 | 4,4 kW |
| 54 | 5,4 kW |
| 57 | 5,7 kW |
| 67 | 6,7 kW |
| 72 | 7,2 kW |
To change the total power;
- Turn the hob on by touching the ① key. Turn off the hob on by touching the ① again.
- Then touch respectively the ⚠️ key of the right front zone, the ⏻ key, the timer ⏱ key, the timer ╒ key, and finally the left front zone ⚠️ key.
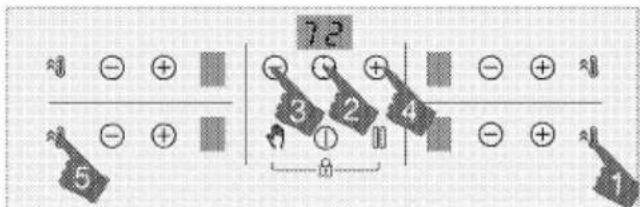
- The power management level set is displayed on the timer display.
- Touch the ☐ key to switch between levels and set the total power value you want to set.
- Confirm the setting by touching the ① key and turn off the hob. Total power value you have set shall be activated.

The temperature levels you may assign to the hobs may vary as per the total power level set. The temperature level provided to the hob be reduced automatically as per the power setting to be performed by the hob. This is not an error.

If a key other than the specified sequence is touched while changing the power level, the setting cannot be made. You have to repeat the steps from the beginning to make the setting.
Using induction cooking zones safely and efficiently
Operating principles: Induction hob directly heats the cooking vessel as a matter of principle. Therefore, it has a lot of advantages as compared with other hob types. It operates more efficiently and the hob surface is colder.
Your induction hob is equipped with superior safety systems that will provide you maximum safe usage.

Your hob can be equipped with induction cooking zones with a diameter of 145, 180, 210 and 280 mm depending on the model. Each cooking zone automatically detects the vessel placed on it thanks to the induction feature. Energy is generated only where the vessel comes into contact with the cooking zone and thus, minimum energy consumption is achieved.

The product might start-stop when it is operating on levels from 1 to 7, especially with cookware with a small diameter and when water-oil is little. This is not a fault.
Automatic turning off system
The hob control has an automatic turn off system. If one or more hob zone(s) are left on, the hob zone turns off automatically after a while (See Table-1). In case of a timer assigned to the hob, the timer screen is turned off then, too.
The time limit for automatic turn off depends on the selected temperature level. Maximum operating period is applied for this temperature level.
The hob zone may be operated by the user again after it is turned off automatically as described above.
Table-1: Automatic turning off periods
| Temperature level | Automatic turning off periods - hours |
| 0 | 0 |
| 1 | 6 |
| 2 | 6 |
| 3 | 5 |
| 4 | 5 |
| 5 | 4 |
| 6 | 1,5 |
| 7 | 1,5 |
| 8 | 1,5 |
| 9 | 30 minutes |
| P (Booster) | 10 minutes (*) |
| (*) The hob will drop to level 9 after 10 minutes | |
Overheating protection
Your hob is equipped with some sensors which provide protection against overheating. Following may be observed in case of overheating:
- Operating cooking zone may get switched off.
- Selected level may drop to level 7 from higher level.
Overflow safety system
Your hob is equipped with an overflow safety system. If there is any overflow that spills onto the control panel, the system will cut the power connection immediately and switch off your hob. "E" warning appears on the indicator during this period.
Precise power setting
Induction hob reacts the commands immediately as an operating principle. It changes the power settings very fast. Thus, you can prevent a cooking pot (containing water, milk and etc.) from overflowing even if it was just about to overflow.
If the surface of the touch control panel is exposed to intense vapor, entire control system may become deactivated and give error signal.
Keep the surface of the touch control panel clean. Erroneous operation may be observed.
6 General information about cooking
This section describes tips on preparing and cooking your food.
General warnings about cooking with hob
- Never fill the pan with oil more than one third of it. Do not leave the hob unattended when heating oil. Overheated oils bring risk of fire. Never attempt to extinguish a possible fire with water! When oil catches fire, cover it with a fire blanket or damp cloth. Turn off the hob if it is safe to do so and call the fire department.
- Before frying foods, always remove their excess water and put them inside the heated oil slowly. Make sure that frozen foods are defrosted before frying.
- When heating oil, make sure that the pot you use is dry and keep its lid open.
- For recommendations on cooking with power saving, refer to the "Environmental Instructions" section.
- The cooking temperature and time values given for foods may vary depending on the recipe and amount. For this reason, these values are given as ranges.
7 Maintenance and care
General cleaning information
General warnings
- Wait for the product to cool before cleaning the product. Hot surfaces may cause burns!
- Do not apply the detergents directly on the hot surfaces. This may cause a permanent stains.
- The appliance shall be thoroughly cleaned and dried after each operation. Thus, food residues shall be easily cleaned and these residues shall be prevented from burning when the appliance is used again later. Thus, the service life of the appliance extends and frequently faced problems are decreased.
- Do not use steam cleaning products for cleaning.
- Some detergents or cleaning agents may damage the surface. Do not use abrasive detergents, cleaning powders, cleaning creams, descalers or sharp objects during cleaning.
- There is no need for a special cleaning agent for cleaning after each use. Clean the appliance using dish soap, warm water and a soft cloth or sponge and dry with a dry microfiber cloth.
- Be sure to completely wipe off any remaining liquid after cleaning and immediately clean any food splashing around during cooking.
- Do not wash any component of your appliance in a dishwasher.
For the hob:
- Acidic dirt such as milk, tomato paste and oil may cause permanent stains on the hobs and components of the burners/hotplates, clean any overflown fluids immediately after cooling down the hob by turning it off.
Inox and stainless surfaces
- Do not use acid or chlorine-containing cleaning agents to clean stainless or inox surfaces and handles.
-
Stainless or inox surface may change colour in time. This is normal. After each operation, clean with a detergent suitable for the stainless or inox surface.
-
Clean with a soft soapy cloth and liquid (non-scratching) detergent suitable for inox surfaces, taking care to wipe in one direction.
- Remove lime, oil, starch, milk and protein stains on the inox-stainless and glass surfaces immediately without waiting. Stains may rust under long periods of time.
Glass surfaces
- When cleaning glass surfaces, do not use hard metal scrapers and abrasive cleaning materials. They can damage the glass surface.
- Clean the appliance using dishwashing detergent, warm water and a microfiber cloth specific for glass surfaces and dry it with a dry microfiber cloth.
- If there is residual detergent after cleaning, wipe it with cold water and dry with a clean and dry microfiber cloth. Residual detergent residue may damage the glass surface next time.
- Under no circumstances should the dried-up residue on the glass surface be cleaned off with serrated knives, wire wool or similar scratching tools.
- You can remove the calcium stains (yellow stains) on the glass surface with the commercially available descaling agent, with a descaling agent such as vinegar or lemon juice.
- If the surface is heavily soiled, apply the cleaning agent on the stain with a sponge and wait a long time for it to work properly. Then clean the glass surface with a wet cloth.
• Discolorations and stains on the glass surface are normal and not defects.
Plastic parts and painted surfaces
- Clean plastic parts and painted surfaces using dishwashing detergent, warm water and a soft cloth or sponge and dry them with a dry cloth.
- Do not use hard metal scrapers and abrasive cleaners. It may damage the surfaces.
- Ensure that the joints of the components of the appliance are not left as damp and
with detergent. Otherwise, corrosion may occur on these joints.
Cleaning the hob
Glass cooking surface
Follow the cleaning steps described for the glass surfaces in the "General cleaning information" section for the cleaning of glass cooking surface. You may complete your cleaning as per the information below for special cases.
- Sugar-based foods such as dark cream, starch and syrup should be cleaned immediately, without waiting for the surface to cool. Otherwise, the glass cooking surface may be permanently damaged.
- Do not use cleaning agents for cleaning operations you perform while the hob is
hot, otherwise permanent stains may occur.
Cleaning the control panel
- When cleaning the panels with knob control, wipe the panel and knobss with a damp soft cloth and dry with a dry cloth. Do not remove the knobs and gaskets underneath to clean the control panel. The control panel and knobs may be damaged.
- While cleaning the inox panels with knob control, do not use inox cleaning agents around the knobs. The indicators around the knobs may be deleted.
- Clean the touch control panels with a damp soft cloth and dry with a dry cloth. If your product has a key lock feature, set the key lock before performing control panel cleaning. Otherwise, incorrect detection may occur on the keys.
8 Troubleshooting
Consult the Authorised Service Agent or technician with license or the dealer where you have purchased the product if you cannot remedy the trouble although you have implemented the instructions in this section. Never attempt to repair a defective product yourself.
Product does not operate.
- The mains fuse is defective or has tripped. >>> Check fuses in the fuse box. If necessary, replace or reset them.
- Product is not plugged into the (grounded) socket. >>> Check the plug connection.
- Buttons/knobs/keys on the control panel do not function. >>> If your product equipped with key lock function,keylock may be enabled. Please disable it.
- If the display does not light up when you switch the hob on again. >>> Disconnect the appliance at the circuit breaker. Wait minimum 20 seconds and then reconnect it.
• Overheat protection is active. >>> Allow your hob to cool down.
• The cooking pot is not suitable. >>> Check your pot.
"■" symbol appears on the cooking zone display.
- You have not placed the pot on the active cooking zone. >>> Check if there is a pot on the cooking zone.
- Your pot is not compatible with induction cooking. >>> Check if your cooking pot is compatible with induction hob.
- The cooking pot is not centered properly or the bottom surface of the pot is not wide enough for the cooking zone. >>> Choose a pot wide enough and center the pot on the cooking zone properly.
- Cooking pot or cooking zone is overheated. >>> Allow them to cool down.
Selected cooking zone suddenly turns off during operation.
- Cooking time for the selected cooking zone may be over. >>> You may set a new cooking time or finish cooking.
• Overheat protection is active. >>> Allow your hob to cool down. - An object may be covering the touch control panel. >>> Remove the object on the panel.
The pot does not get warm even if the cooking zone is on.
- Your pot is not compatible with induction cooking. >>> Check if your cooking pot is compatible with induction hob.
- The cooking pot is not centered properly or the bottom surface of the pot is not wide enough for the cooking zone. >>> Choose a pot wide enough and center the pot on the cooking zone properly.
Cooling fan continues operating although the hob is turned off.
- This is not a fault. Cooling fan will continue operating until the electronics in the hob cools down to a suitable temperature.
Noise from the cooker during cooking
Some sounds may be heard from the cooker while cooking. These sounds are due to the composition of the cooking vessel. These sounds are normal, they are not a malfunction and they are a part of induction technology.
Possible noises and reasons
- Fan noise: The cooker is equipped with a fan that activates automatically according to the temperature of the appliance. The fan has various operating levels and operates at different levels as per the temperature.
- Lower buzz like the operating noise of a transformer: This is due to the nature of the induction technology. As the heat is transmitted directly to the base of the cooking vessel, such buzz sounds may be heard as per the material of the cooking vessel. Thus, different noises may be heard with different cookware.
- Cracking noise: The reason of this is the structure and material of the base of the cooking vessel. A cracking sound may be heard if the cooking vessel is made of various layers with different materials.
- Whining noise: A whining sound may be heard when two cooking zones on the same side of the cooker are used to cook with different cooking levels.
Error codes/reasons and possible solutions - For hob
| Error codes | Error reasons | Possible solutions |
| E 22E 26 | Induction hob is overheated. | Turn the induction cooker off and wait until it is cooled down. The error shall be resolved when temperature of the hob comes down below the limits. |
| E 46 | One or more keys are kept pressed for more than 10 seconds.An object is left on the control panel or the control is exposed to vapour. | The problem shall be resolved when you remove your hand from the hob.The problem shall be resolved when the control panel is cleaned. |
| E 47 | A pot suitable for induction heating is not used. | The error shall be resolved when a pot suitable for induction heating is used. |
| E 1 - E 15 | Communication error on induction hob. | Turn the induction hob off and operate again after 30 seconds. Contact the authorized dealership if the issue is resumed. |
| E 16 - E 21 | Temperature sensor error on induction hob. | Turn the induction hob off and operate again after 30 seconds. Contact the authorized dealership if the issue is resumed. |
| E 23E 24 | Software error on induction hob. | Turn the induction hob off and operate again after 30 seconds. Contact the authorized dealership if the issue is resumed. |
| E 25 | Fan operation error on induction hob. | Turn the induction hob off and operate again after 30 seconds. Contact the authorized dealership if the issue is resumed. |
| E 31 - E 45 | Electronic board hardware error on induction hob. | Turn the induction hob off and operate again after 30 seconds. Contact the authorized dealership if the issue is resumed. |
| E 48E 49E 51 | Sensor error on induction hob. | Sensor equipment shall be rendered compatible for the operating conditions. Contact the authorized dealership if the issue is resumed. |
| E 52 - E 57 | High temperature error on induction hob. | Turn the induction hob off and wait until it is cooled down. The error shall be resolved when temperature of the sensor comes down below the limits. Contact the authorized dealership if the issue is resumed. |
Service
Vi har service i hela Sverige/ Nationwide service in Sweden
Besök www.cylinda.se / Visit www.cylinda.se
Ring 0771-25 25 00 (endast lokaltaxa) / Call 0771-25 25 00
Uppge / Declare
Maskintyp / Model code
Serienummer / Serial number
Inköpsdatum / Purchase date
Problembeskrivning / Problem description
Namn och adress / Name and address
Ditt telefonnummer / Phone number
Kontakta oss / Contact us
www.cylinda.se