5VI311AU - Tulostin BLAUPUNKT - Ilmainen käyttöohje ja opas
Löydä laitteen käyttöohje ilmaiseksi 5VI311AU BLAUPUNKT PDF-muodossa.

Käyttäjien kysymyksiä aiheesta 5VI311AU BLAUPUNKT
0 kysymys tästä laitteesta. Vastaa tuntemiisi tai esitä omasi.
Esitä uusi kysymys tästä laitteesta
Lataa ohjeet laitteellesi Tulostin PDF-muodossa ilmaiseksi! Löydä käyttöohjeesi 5VI311AU - BLAUPUNKT ja ota elektroninen laitteesi takaisin hallintaan. Tällä sivulla julkaistaan kaikki laitteidesi käyttöön tarvittavat asiakirjat. 5VI311AU merkiltä BLAUPUNKT.
KÄYTTÖOHJE 5VI311AU BLAUPUNKT
Instructions for installation and use
Dishwasher
5VI311AU
CONTENTS
01
4 USING YOUR DISHWASHER
4 Control Panel
6 Preparing And Loading Dishes
9 Function Of The Rinse Aid And Detergent
10 Filling The Rinse Aid Reservoir
11 Filling The Detergent Dispenser
12 PROGRAMMING THE DISHWASHER
12 Wash Cycle Table
13 Starting A Cycle Wash
13 Changing The Program Mid-cycle
14 Forget To Add A Dish?
02
03
04
15 ERROR CODES
16 TECHNICAL INFORMATION

NOTE:
- If you cannot solve the problems by yourself, please ask for help from a professional technician.
- The manufacturer, following a policy of constant development and updating of the product, may make modifications without giving prior notice.
- If lost or out-of-date, you can receive a new user manual from the manufacturer or responsible vendor.
QUICK USER GUIDE
Please read the corresponding content on the instruction manual for detailed operating method.
natural_image
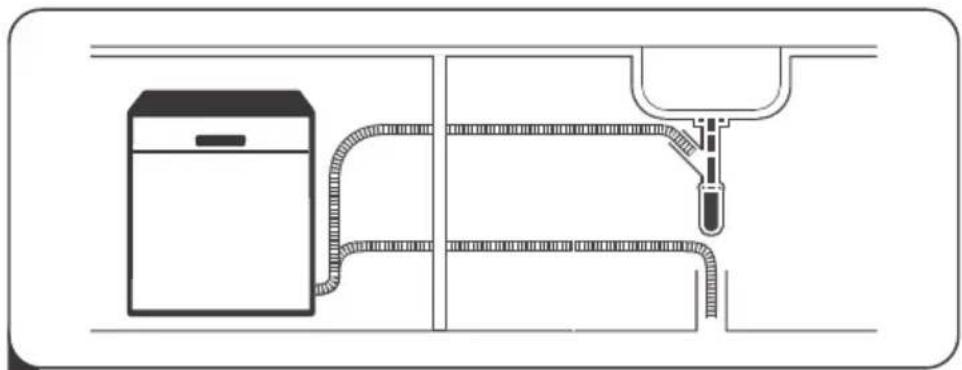
Pure technical diagram of a piping system with a cabinet and outlet (no text or symbols)1 Install the dishwasher
(Please check the section 5 "INSTALLATION INSTRUCTION")
of PART I : Generic Version.)

natural_image
Simple line drawing of a fish and a circular object on a surface, no text or symbols present2 Removing the larger residue on the cutlery

text_image
Inside → Outside3 Loading the baskets

natural_image
Illustration of a hand using a power tool to clean or spray liquid from a microwave oven (no text or symbols)4 Filling the dispenser
natural_image
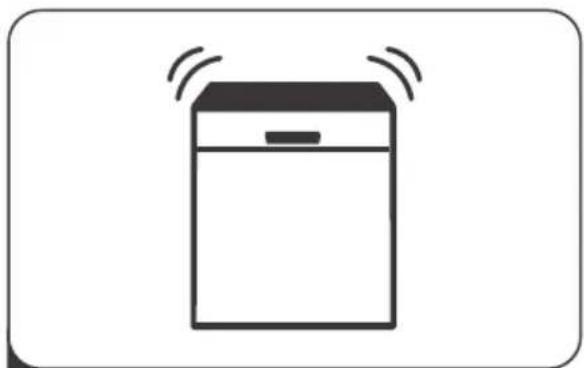
Simple line drawing of a refrigerator with sound waves (no text or symbols)5 Selecting a program and running the dishwasher
USING YOUR DISHWASHER
Control Panel
text_image
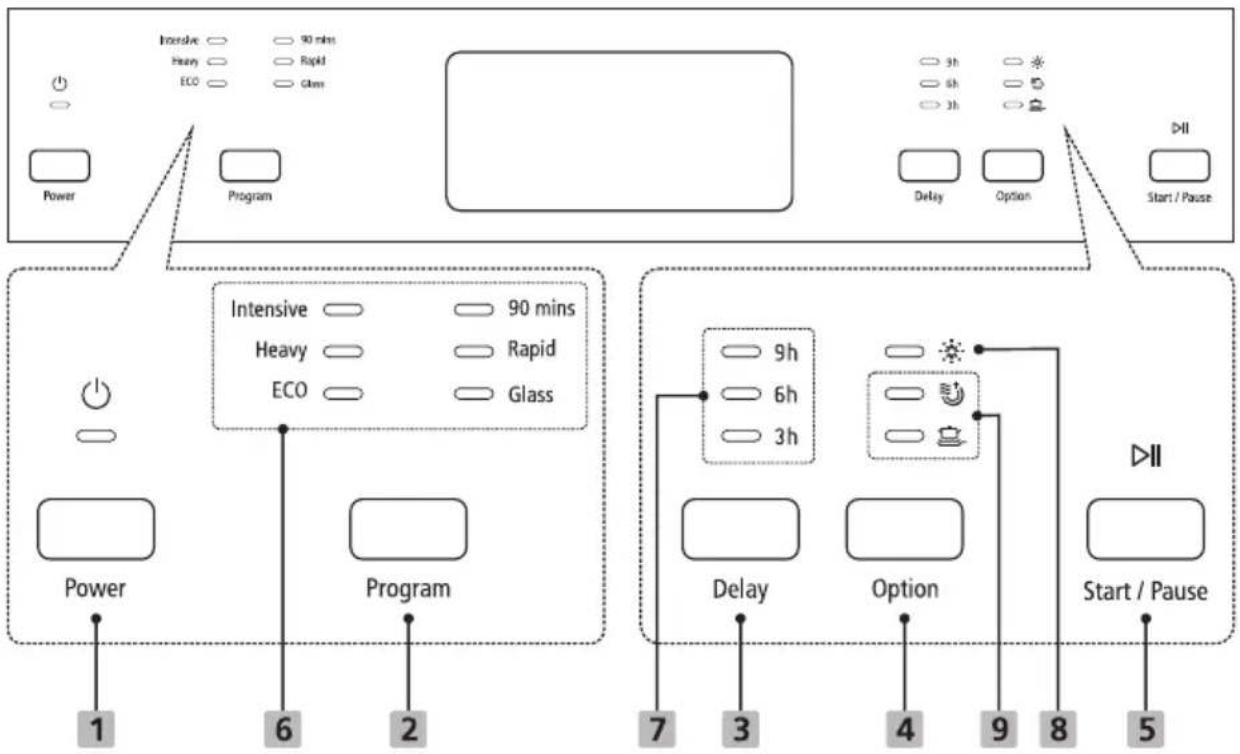
Intensive 90 mins Heavy Rapid ECO Glass Power Program Delay Option Start / Pause Intensive 90 mins Heavy Rapid ECO Glass Power Program Delay Option Start / PauseOperation (Button)
| 1 Power | Press this button to turn on your dishwasher. |
| 2 Program | Press this button to select the appropriate washing program, corresponding indicator will be lit. |
| 3 Delay | Press the button to set the delay time. (3h/6h/9h) |
| 4 Option | Press the button to select a function, corresponding indicator will be lit. |
| 5 Start / Pause | To start the selected washing program or pause it when the dishwasher is working. |
Display
| 6 Program indicator | IntensiveFor heaviest soiled crockery, such as pots, pans,casserole dishes and dishes that have been sitting with dried food on them for a while.HeavyFor heavily soiled loads, such as pots, plates, glasses and lightly soiled pans.ECOFor normally soiled loads, such as pots, plates, glasses and lightly soiled pans, standard daily cycle.90 minsFor lightly soiled plates and pans that need quick wash.RapidA shorter wash for lightly soiled loads that do not need drying.GlassFor lightly soiled crockery and glass. |
| 7 Delay time indicator | To show the delay time. (3h/6h/9h) |
| 8 Warning indicator | Rinse AidIf the “ ” indicator is lit, it means the dishwasher is low on dishwasher rinse aid and requires a refill. |
| 9 Option indicator | Extra DryingTo dry dishes more completely. ( It can only be used with Intensive, Heavy, ECO, 90mins, Glass.)Extra CleanningTo wash very dirty, hard to clean dishes.( It can only be used with Intensive, Heavy, ECO, 90mins, Glass.) |
Preparing And Loading Dishes
- Consider buying utensils which are identified as dishwasher-proof.
- For particular items, select a program with the lowest possible temperature.
- To prevent damage, do not take glass and cutlery out of the dishwasher immediately after the program has ended.
For washing the following cutlery/dishes
Are not suitable
• Cutlery with wooden, horn china or mother-of-pearl handles
• Plastic items that are not heat resistant
- Older cutlery with glued parts that are not temperature resistant
• Bonded cutlery items or dishes
- Pewter or cooper items
- Crystal glass
• Steel items subject to rusting
- Wooden platters
- Items made from synthetic fibres
Are of limited suitability
• Some types of glasses can become dull after a large number of washes
• Silver and aluminum parts have a tendency to discolour during washing
- Glazed patterns may fade if machine washed frequently
Recommendations for loading the dishwasher
Scrape off any large amounts of leftover food. Soften remnants of burnt food in pans. It is not necessary to rinse the dishes under running water.
For best performance of the dishwasher, follow these loading guidelines.
(Features and appearance of baskets and cutlery baskets may vary from your model.)
Place objects in the dishwasher in following way:
- Items such as cups, glasses, pots/pans, etc. are faced downwards.
- Curved items, or ones with recesses, should be loaded aslant so that water can run off.
- All utensils are stacked securely and can not tip over.
-
All utensils are placed in the way that the spray arms can rotate freely during washing.
-
Load hollow items such as cups, glasses, pans etc. With the opening facing downwards so that water cannot collect in the container or a deep base.
- Dishes and items of cutlery must not lie inside one another, or cover each other.
• To avoid damage, glasses should not touch one another. - The upper basket is designed to hold more delicate and lighter dishware such as glasses, coffee and tea cups.
- Long bladed knives stored in an upright position are a potential hazard!
- Long and / or sharp items of cutlery such as carving knives must be positioned horizontally in the upper basket.
- Please do not overload your dishwasher. This is important for good results and for reasonable consumption of energy.

NOTE:
Very small items should not be washed in the dishwasher as they could easily fall out of the basket.
Removing the dishes
To prevent water dripping from the upper basket into the lower basket, we recommend that you empty the lower basket first, followed by the upper basket.
⚠ WARNING

Items will be hot! To prevent damage, do not take glass and cutlery out of the dishwasher for around 15 minutes after the program has ended.
Loading the upper basket
The upper basket is designed to hold more delicate and lighter dishware such as glasses, coffee and tea cups and saucers, as well as plates, small bowls and shallow pans (as long as they are not too dirty). Position the dishes and cookware so that they will not get moved by the spray of water.

natural_image
Technical line drawing of a mechanical component with rollers and housing (no text or symbols)Loading the lower basket
We suggest that you place large items and the most difficult to clean items are to be placed into the lower basket: such as pots, pans, lids, serving dishes and bowls, as shown in the figure below. It is preferable to place serving dishes and lids on the side of the racks in order to avoid blocking the rotation of the top spray arm.
The maximum diameter advised for plates in front of the detergent dispenser is of 19 cm, this not to hamper the opening of it.
natural_image
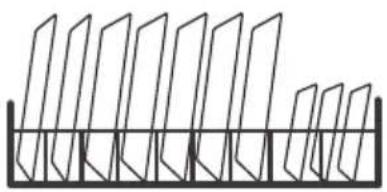
Pure geometric diagram of vertical planes mounted on a horizontal base (no text or symbols)Loading the cutlery basket
Cutlery should be placed in the cutlery rack separately from each other in the appropriate positions, and do make sure the utensils do not nest together, this may cause bad performance.
⚠ WARNING

natural_image
Circular diagram with grid lines and a cross symbol (no text or labels)Do not let any item extend through the bottom.
Always load sharp utensils with the sharp point down!

For the best washing effect, please load the baskets refer to standard loading options on last section of PART I : Generic Version
Function Of The Rinse Aid And Detergent
The rinse aid is released during the final rinse to prevent water from forming droplets on your dishes, which can leave spots and streaks. It also improves drying by allowing water to roll off the dishes. Your dishwasher is designed to use liquid rinse aids.
⚠ WARNING
Only use branded rinse aid for dishwasher. Never fill the rinse aid dispenser with any other substances (e.g. Dishwasher cleaning agent, liquid detergent). This would damage the appliance.
When to refill the rinse aid dispenser
Unless the rinse-aid warning light ( ✉ ) on the control panel is on, you can always estimate the amount from the color of the optical level indicator located next to the cap. When the rinse-aid container is full, the indicator will be fully dark. The size of the dark dot decreases as the rinse-aid diminishes. You should never let the rinse aid level be less than 1/4 full.
As the rinse aid diminishes, the size of the black dot on the rinse aid level indicator changes, as illustrated below.
Full
3/4 full
1/2 full
1/4 full
○ Empty
Function of detergent
The chemical ingredients that compose the detergent are necessary to remove, crush and dispense all dirt out of the dishwasher. Most of the commercial quality detergents are suitable for this purpose.
⚠ WARNING
• Proper Use of Detergent
Use only detergent specifically made for dishwashers use. Keep your detergent fresh and dry.
Don't put powdered detergent into the dispenser until you are ready to wash dishes.

Dishwasher detergent is corrosive! Keep dishwasher detergent out of the reach of children.
Filling The Rinse Aid Reservoir

text_image
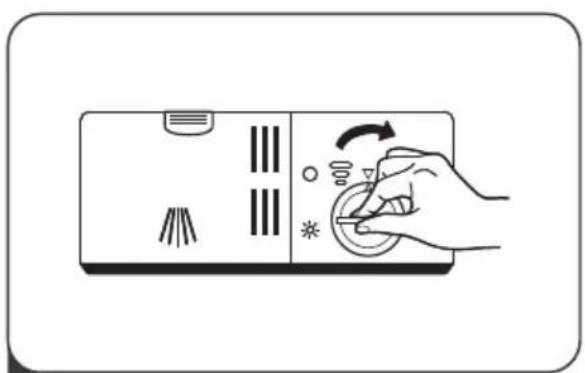
Rinse-Aid indicator1 To open the dispenser, turn the cap to the "open" (left) arrow and lift it out.

natural_image
Illustration of a hand pressing down on a device panel with buttons and indicators (no text or symbols)2 Carefully pour in the rinse-aid into its dispenser, whilst avoiding it to overflow.
natural_image
Illustration of a hand pressing down on a device panel with icons for buttons and indicators (no text or symbols)3 Replace the cap by inserting it aligned with "open" arrow and turning it to the closed (right) arrow.
NOTE:
Clean up any spilled rinse aid with an absorbent cloth to avoid excessive foaming during the next wash.
Adjusting the rinse aid reservoir
text_image
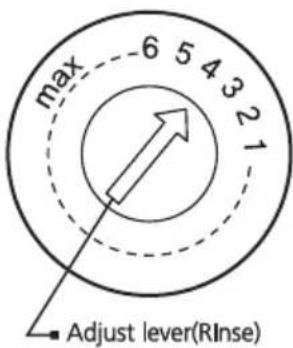
max 6 5 4 3 2 1 Adjust lever(RInse)Turn the rinse aid indicator dial to a number between 1 and 6. The higher the number, the more rinse aid the dishwasher uses. If the dishes are not drying properly or are spotted, adjust the dial to the next higher number until your dishes are spot-free. Reduce it if there are sticky whitish stains on your dishes or a bluish film on glassware or knife blades.
Filling The Detergent Dispenser
text_image
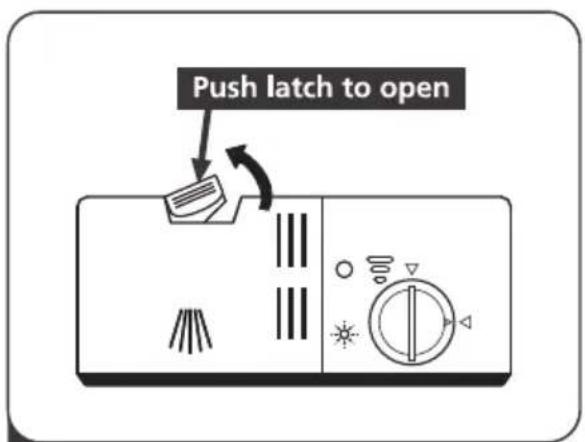
Push latch to open1 Press the release catch on the detergent dispenser to open the cover.

text_image
A B2 Add detergent into the larger cavity (A) for the main wash cycle. For more heavily soiled wash loads, also add some detergent into the smaller cavity (B) for the pre-wash cycle.

natural_image
Illustration of a hand pressing down on a kitchen control panel with directional arrows (no text or symbols)3 Close the cover and press on it until it locks into place.

NOTE:
- Be aware that depending on the soiling of water, setting may be different.
- Please observe the manufacturer's recommendations on the detergent packaging.
PROGRAMMING THE DISHWASHER
Wash Cycle Table
The table below shows which programs are best for the levels of food residue on them and how much detergent is needed. It also show various information about the programs.
(●) Means: need to fill rinse into the Rinse-Aid Dispenser.
| Program | Description Of Cycle | Detergent Pre/Main | Running Time(min) | Energy (Kwh) | Water (L) | Rinse Aid |
| Intensive | Pre-wash(50°C)Wash(60°C)RinseRinseRinse(65°C)Drying | 5/27.5g(Or all in 1) | 170 | 1.5 | 17.5 | ● |
| Heavy | Pre-wash(45°C)Wash(55°C)RinseRinse(65°C)Drying | 5/27.5g(Or all in 1) | 160 | 1.3 | 13.5 | ● |
| ECO*AS/NZS 2007.1) | Pre-washWash(45°C)Rinse(50°C)Drying | 5/27.5g(Or all in 1) | 170 | 0.71 | 12.5 | ● |
| 90 mins | Wash(65°C)RinseRinse(65°C)Drying | 25g(Or all in 1) | 90 | 1.2 | 11.5 | ● |
| Rapid | Wash(40°C)RinseRinse(45°C) | 25g | 30 | 0.6 | 11.5 | ○ |
| Glass | Pre-washWash(42°C)RinseRinse(60°C)Drying | 5/27.5g(Or all in 1) | 125 | 0.8 | 13 | ● |

NOTE:
AS/NZS 2007.1: This program is the test cycle. The information for comparability test in accordance with AS/NZS 2007.1.
Starting A Cycle Wash
- Draw out the lower and upper basket, load the dishes and push them back. It is commended to load the lower basket first, then the upper one.
- Pour in the detergent.
- Insert the plug into the socket. The power supply refer to last page "Product fiche". Make sure that the water supply is turned on to full pressure.
- Close the door, press the Power button, to switch on the machine.
- Choose a program, the response light will turn on. Then press the Start/Pause button, the dishwasher will start its cycle.
Changing The Program Mid-cycle
A wash cycle can only be changed if it has been running for a short time otherwise, the detergent may have already been released and the dishwasher may have already drained the wash water. If this is the case, the dishwasher needs to be reset and the detergent dispenser must be refilled. To reset the dishwasher, follow the instructions below:
- Press the Start/Pause button to pause the washing.
- Press Program button for more than 3 seconds - the program will cancel.
- Press the Program button to select the desired program.
- Press the Start/Pause button, after 10 seconds, the dishwasher will start.

flowchart
graph LR
    A["Hand icon"] --> B["3 sec finger"]
    B --> C["Intensive ○ Heavy ○ ECO"]
    C --> D["Hand icon with string"]
Forget To Add A Dish?
A forgotten dish can be added any time before the detergent dispenser opens. If this is the case, follow the instructions below:
- Press the Start/Pause button to pause the washing.
- Wait 5 seconds then open the door.
- Add the forgotten dishes.
-
Close the door.
-
Press the Start/Pause button after 10 seconds, the dishwasher will start.

flowchart
graph LR
    A["Foot"] --> B["After 5 sec"]
    B --> C["Brush"]
    C --> D["Bar Chart"]
    D --> E["Machine"]
    E --> F["Bag"]
⚠ WARNING
natural_image
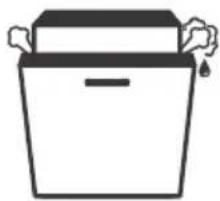
Simple line drawing of a box with a lid and handle (no text or symbols)It is dangerous to open the door mid-cycle, as hot steam may scald you.
ERROR CODES
If there is a malfunction, the dishwasher will display error codes to identify these:
| Codes | Meanings | Possible Causes |
| The Glass light flicker fleetly | Longer inlet time. | Faucets is not opened, or water intake is restricted, or water pressure is too low. |
| The Rapid, Glass light flicker fleetly | Not reaching required temperature. | Malfunction of heating element. |
| The 90 mins light flicker fleetly | Overflow. | Some element of dishwasher leaks. |
| The ECO light flicker fleetly | Failure of water diverter. | Open circuit or break of Water Diverter. |
⚠ WARNING
- If overflow occurs, turn off the main water supply before calling a service.
- If there is water in the base pan because of an overfill or small leak, the water should be removed before restarting the dishwasher.
TECHNICAL INFORMATION
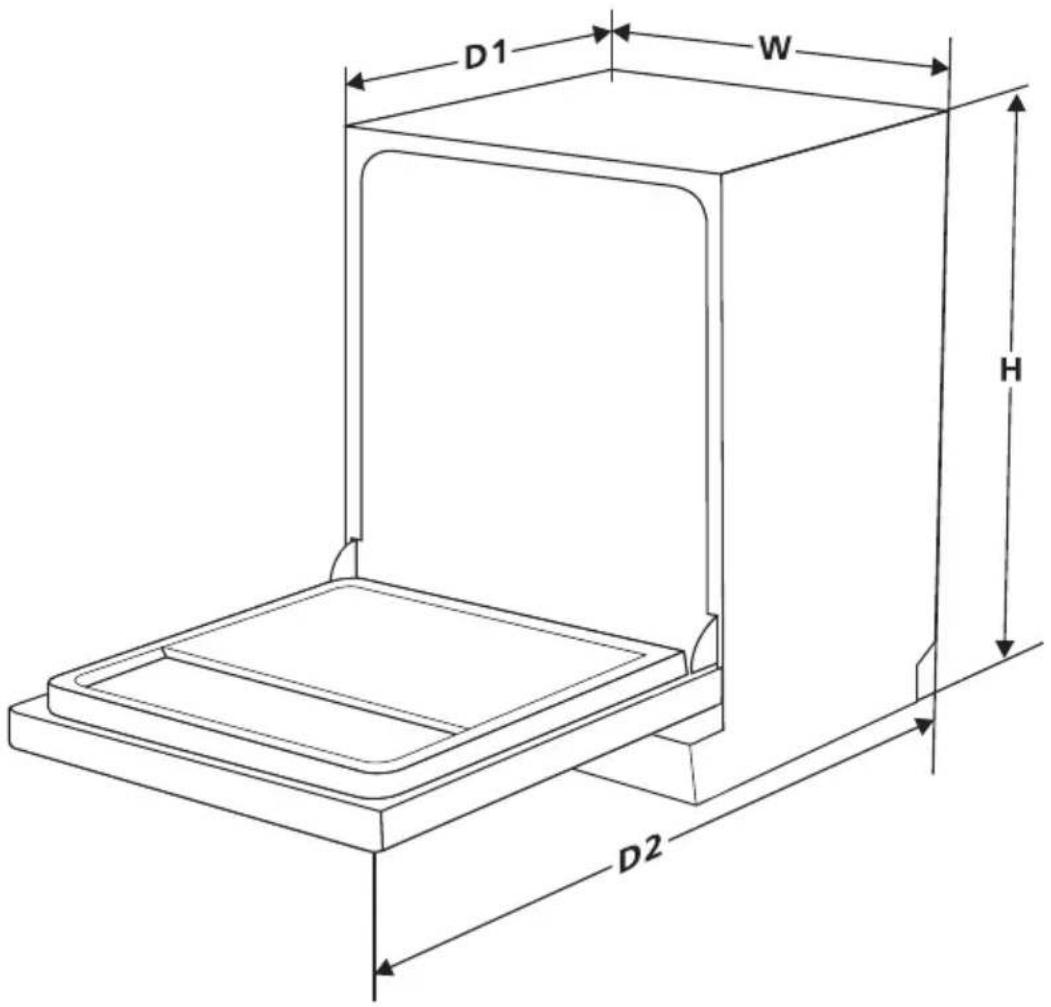
text_image
D1 W H D2| Height (H) | 815mm |
| Width (W) | 598mm |
| Depth (D1) | 570mm (with the door closed) |
| Depth (D2) | 1175mm (with the door opened 90° ) |
Product fiche
| Manufacturer | Blaupunkt | |
| Type / Description | 5VI311AU | |
| Standard place settings | 14 | |
| Energy efficiency class |  | 3.5 |
| Water consumption class |  | 4.5 |
| Standard cleaning cycle | ECO | |
| Energy consumption of the standard cleaning cycle | 0.71 kWh | |
| Water consumption of the standard cleaning cycle | 12.5 liter | |
| Program duration of the standard cleaning cycle | 170 min | |
| Noise level | 49 dB(A) re 1 pW | |
| Mounting | Free standing | |
| Could be built-in | YES | |
| Power consumption | 1760-2100W | |
| Rated voltage / frequency | AC 220-240V/50Hz | |
| Water pressure (flow pressure) | 0.04-1.0MPa=0.4-10 bar | |
Service

text_image
BLAUPUNKT
www.blaupunkt-einbaugeraete.com

1800 252 878 658
Australia
CustomerCare@blaupunktAU.com
