
BLN1E - Sauvasekoitin HITACHI - Ilmainen käyttöohje ja opas
Löydä laitteen käyttöohje ilmaiseksi BLN1E HITACHI PDF-muodossa.

Käyttäjien kysymyksiä aiheesta BLN1E HITACHI
0 kysymys tästä laitteesta. Vastaa tuntemiisi tai esitä omasi.
Esitä uusi kysymys tästä laitteesta
Lataa ohjeet laitteellesi Sauvasekoitin PDF-muodossa ilmaiseksi! Löydä käyttöohjeesi BLN1E - HITACHI ja ota elektroninen laitteesi takaisin hallintaan. Tällä sivulla julkaistaan kaikki laitteidesi käyttöön tarvittavat asiakirjat. BLN1E merkiltä HITACHI.
KÄYTTÖOHJE BLN1E HITACHI

HITACHI

natural_image
Line drawings of three different kitchen appliances: a blender, a blender with a handle, and a blender with a lid (no text or symbols present)GLASS JUG BLENDER
& METAL COCKTAIL JUG &COFFEE GRINDER

Safety first!
Always remove the mains plug from the socket when you have:
1) Finished using the blender, before you clean the blender.
2) Before you put on or remove the jar.
3) If any fault occurs.
To protect against risk of electrical shock, do not put the blender base containing motor and cord in water or other liquid.
Do not operate any appliance with damaged cord or plug, or after the appliance malfunctions, or is dropped or damaged in any manner.
If the supply cord is damaged, it must be replaced by a qualified person to avoid a hazard.
The use of attachments, including canning jars, not recommended or sold by the manufacturer may cause fire, electric shock or injury.

Children should never be allowed to use the blender.
Never leave the appliance plugged in when there are young children around.
- The Blender has been designed for household use only.
This unit is not suitable for commercial use. - Avoid contact with moving parts. Wait until the blades have stopped rotating before you remove the jar.
- Do not put your hands or any utensils such as forks or spoons into the jar while the blades are rotating.
• Always operate the blender with lid in place. - Do not let cord hang over edge of table or counter, or touch hot surfaces, including the stove.
- When filling the blender jar, do not exceed the Max mark indicated on the jar (52 oz, or 1500ml)
- Do not use outdoors.

• Repairs must only be carried out by qualified service engineers.
Never use the blender if it is not working properly, or it has been dropped or damaged.
- Blades are sharp. Handle carefully.
Do not use hot liquid in your blender as this may affect the security of the lid when in use and in some circumstances could allow the contents to be ejected.
Know your Liquid Blender
Please read the instructions and have a good look at the illustrations before using the blender :
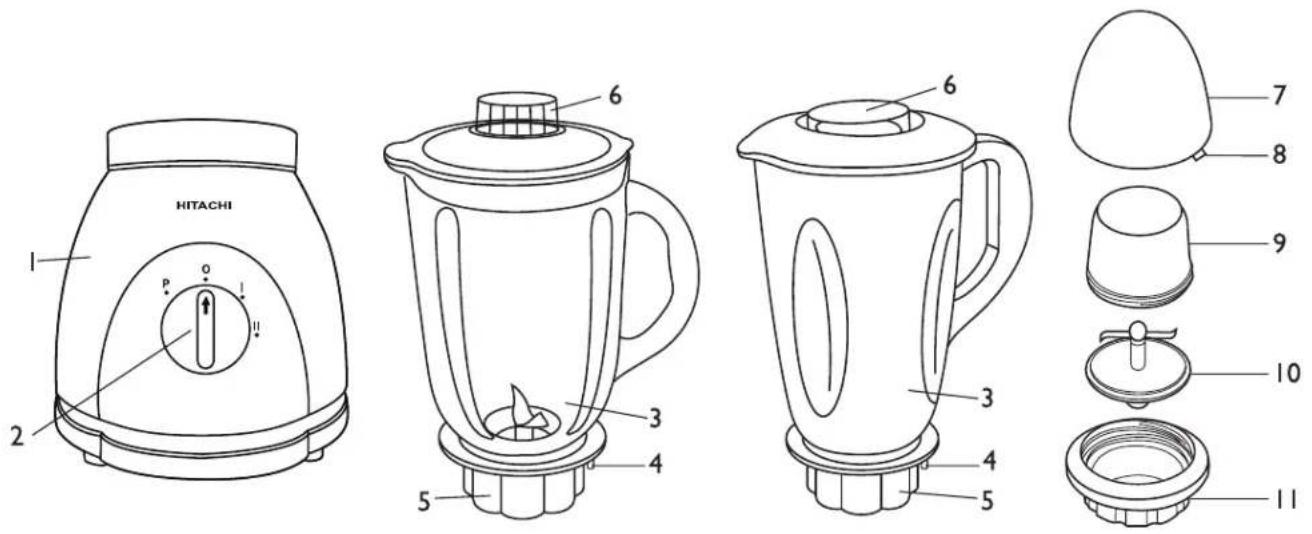
I. Blender Base
2.4 Setting Switch
3. Glass Jar/ Stainless-steel Jar
- Safety Pin
- Blade Collar
-
Filler Cap
-
Safety cover
- Safety lug
-
Cup
-
Cutter
II. Cup set
Before using .....
Place the blender on a flat level surface. Always operate blender on a clean, dry surface.

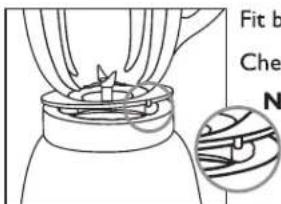
natural_image
Line drawing of hands holding a small object, possibly a tool or device, with no visible text or symbols.Clean the jar in the water.
Fit blender jar securely onto blender base.
Check the switch pin.
Note: You may have to twist the collar to correctly align the pin with the switch.

natural_image
Line drawing of a blender with three layers and arrows indicating transformation (no text or symbols)Turn the blender jar upside down and ensure that the rubber sealing ring is on the inside. of the blender jar collar around the blade.
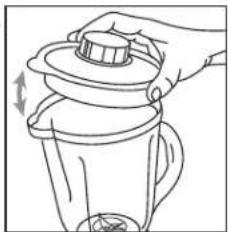
natural_image
Line drawing of a hand holding a lid atop a container with a handle, showing mechanical components (no text or symbols)Place the blender jar lid inside the top of the jar. Push it securely to prevent leaks and splashing.
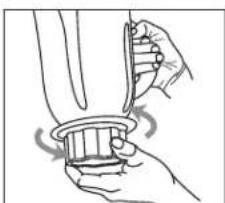
natural_image
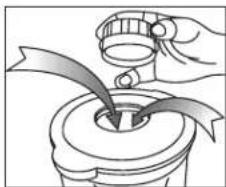
Illustration of a hand holding a small object with motion lines indicating rotation (no text or symbols)Twist the collar onto the blender jar carefully. Be sure to engage the collar thread securely and properly. Turn until tight.
Caution

Never place the blade assembly on blender base without the jar being completely assembled and securely tightened.
Do not operate blender without lid in place.
How to use your Liquid Blender:
Blade assembly must be securely tightened to the blender jar before placing any food or liquid inside the Jar.

natural_image
Simple line drawing of an electrical outlet with a plug and arrow indicating direction (no text or symbols)Connect the plug to the mains socket.

natural_image
Illustration of a glass with liquid and a lid pouring liquid into it, showing motion (no text or symbols)Add ingredients to be processed, and place lid on blender jar. Be sure lid is fully seated.
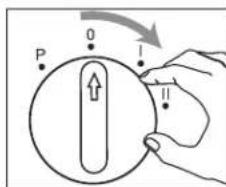
Switch on by turning the dial (see next fig.) to either of the position. (P 0 I II setting)

0 = OFF
I = LOW speed
II = HIGH speed
P = PULSE blending (The dial returns to '0' setting as soon as you release it)
The 'P' pulse setting is ideal for crushing ice.
natural_image
Illustration of a hand pouring liquid into a cylindrical container with a tool, no text or symbols presentIf necessary, you can add extra ingredients through the refill hole and place the filler cap back in the lid before activating blender.

When the blending is finished, switch the dial back to '0' setting.
WARNING

Do not exceed the Maximum level.
Always hold the lid down when starting to blend.
Do not operate the blender longer than 2 minutes. After each 2 minute session the blender must be allowed to cool down for at least 10 minutes.
A small quantity of water must be added to the ice when crushing ice alone. Ice will not crush without some form of liquid.
Do not use hot liquid in your blender as this may affect the security of the lid when in use and in some circumstances could allow the contents to be ejected.
How to use your Coffee Grinder :
Blade assembly must be securely put into the Blade Collar before placing coffee bean.

natural_image
Simple line drawing of a plug with an outlet symbol and an upward arrow, no text or labels present.Connect the plug to the mains socket.

natural_image
Line drawing of a hand holding a cylindrical object with a lid, no text or symbols presentFill coffee bean in the mill cup, and then lock the mill cup and blade assembly together.

Put the safety cover on the grinder. Note: Pls insure that the safety pin is put in the hole correctly.
natural_image
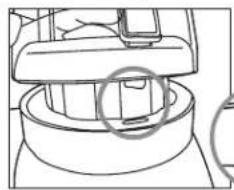
Technical line drawing of a mechanical assembly with no visible text or symbolsFit grinder securely onto blender base. Note: The safety pin must be aligned to the safety switch.


Switch on by turning the dial (see next fig.) to either of the position. (P 0 I II setting)
Note: Espresso requires a finer grind than regular coffee. Maximum capacity = 80 grams/3 ounces.
Clean your Liquid Blender and Coffee Grinder:

natural_image
Simple line drawing of an electrical outlet with a plug and arrow indicating downward motion (no text or symbols)Disconnect from the main socket before cleaning.
natural_image
Line drawing of a hand holding a small object, possibly a tool or device, with no visible text or symbols.Remove the jar and disassemble the parts, lid, small filler cap, gasket collar and blade assembly. Wash in warm and soapy water.

natural_image
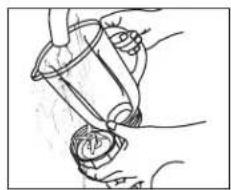
Line drawing of a hand pouring liquid into a container with a lid, next to a pipe (no text or symbols)Remover the grinder and disassemble the parts, cup, blade assembly, gasket collar. Wash in warm and soapy water.

natural_image
Line drawing of a hand holding a small object into a container (no text or symbols)Wipe the stainless steel base with a slightly damp cloth. Dry thoroughly.
Note: This product is exclusively available through Dixons Stores Group. In the unlikely event of a problem with your product please return to the store where the purchase was made.
All components of the jar assembly are dishwasher safe; however the lid should be placed only in the upper part of the dishwasher.
Caution Blades are sharp. Please handle carefully. Do not immerse the blender base in water or any other liquid. Do not use abrasive cleaners on any part of the blender.
Nominal Specifications
Power Supply: 230V \~ 50Hz
Power Consumption : 450W
Selected Recipes
Lemony Margaritas
How about Key lime margaritas instead? Substitute about 4 Key limes (or 1/2 cup Key lime juice) for the two lemons. Or just use regular limes; you'll need about three of them.
2 large lemons, cut in half
Coarse salt
2 cups ice cubes
I 1/4 cups tequila
1/3 cup colorless orange-flavored liqueur
Rub the rims of 8 stemmed glasses with 1 lemon half. Dip the rims of glasses into shallow dish of coarse salt.
Squeeze juice from lemon halves to measure 1/2 cup. Place juice and remaining ingredients in blender. Cover and blend using "PULSE" setting until the ice is crushed. Blend on 'HIGH' speed until foamy.
Pour into glasses.
Make 8 servings
Banana-Orange Sunrise
The cranberry juice cocktail slowly sinks down into the slushy orange juice mixture to resemble a beautiful sunrise.
3 cups orange juice
1/4 cup honey
2 medium sized bananas, coarsely sliced Ice cubes
Cranberry juice cocktail
Place orange juice, honey and bananas in blender. Add ice cubes until the carafe is nearly full. Cover and blend using the "PULSE" setting until ice is crushed. Blend on "HIGH" speed until smooth. Pour into
8 glasses. Pour desired amount of cranberry juice cocktail on top.
Makes 8 servings.
Banana-Berry Smoothie
Use the 'PULSE' setting when blending frozen fruit into smoothie-type drinks. Pieces will blend more quickly and uniformly.
I cup vanilla yogurt
I medium sized banana, cut into chunks
1/2 cup frozen berries (such as raspberries or blueberries)
1/4 cup orange juice
Place all ingredients in blender, then cover. Set at 'PULSE' for a few seconds, then blend on "HIGH" speed for about 30 seconds or until smooth. Serve immediately.
Makes 2 servings.
Farfalle with Cilantro Pesto
Pesto, whether made with the more traditional basil or with cilantro, (as in this version) will add to the flavor of pasta dishes like this one.
And a spoonful of pesto is always welcome in a bowl of minestrone and adds a zesty flavor to bean soups as well.
3 cups uncooked farfalle (bow-tie) pasta (6 ounces) Cilantro pesto (below)
2 teaspoons olive or vegetable oil
I 1/2 cups cut-up cooked chicken or turkey (8 ounces)
2 medium yellow summer squash or zucchini, cubed (3 cups)
8 cherry tomatoes, cut into fourths
Cook and drain pasta as directed on package. Make Cilantro pesto.
Heat oil in 10-inch skillet over medium heat. Cook the chicken and squash in oil, stirring occasionally, until the squash is crisp-tender.
Stir in pesto, pasta and tomatoes; cook until hot.
Makes 4 servings.
Cilantro Pesto
2 tablespoons olive or vegetable oil
3 tablespoons plain yogurt
2 teaspoons lime juice
1/4 cup grated Parmesan cheese
I tablespoon slivered almonds
2 cloves garlic
1/8 teaspoon pepper
I cup firmly packed fresh cilantro
Place all ingredients in blender. Cover and blend, alternating between "LOW" and "PULSE" settings. Stop blender occasionally to scrape sides. Continue until almost smooth.
Sun-Dried Tomato Dip
Try serving with pita crisps or sesame crackers. Lots of entertaining occasions can use a dip like this-from summer meals with an Italian theme to holiday parties when this warm red dip with flecks of green lends just the right festive touch.
8 sun-dried tomato halves (not oil-packed)
1/4 cup coasely chopped fresh parsley
I tablespoon fresh or I tablespoon freeze-dried chives
I tablespoon olive or vegetable oil
2 teaspoons lemon juice
I teaspoon red wine vinegar
1/2 teaspoon salt
1/2 teaspoon pepper
I clove garlic, cut into fourths
3/4 cup plain fat-free yogurt
3/4 cup reduced-fat sour cream
Place tomato halves in 1 inch water in 11/2-quart saucepan. Heat to boiling; reduce heat to medium. Simmer uncovered about 5 minutes or until water has evaporated.
Place tomatoes and remaining ingredients except yogurt and sour cream in blender. Cover and blend on "HIGH" until smooth. Pour tomato mixture into medium glass or plastic bowl. Stir in yogurt and sour cream. Cover and refrigerate about 2 hours or until chilled.
Makes about 2 1/4 cups dip


- Safety first!
- Know your Liquid Blender
- Before using .....
- Caution
- How to use your Liquid Blender:
- WARNING
- How to use your Coffee Grinder :
- Clean your Liquid Blender and Coffee Grinder:
- Nominal Specifications
- Selected Recipes
- Lemony Margaritas
- Banana-Orange Sunrise
- Banana-Berry Smoothie
- Farfalle with Cilantro Pesto
- Cilantro Pesto
- Sun-Dried Tomato Dip
Merkki : HITACHI
Malli : BLN1E
Kategoria : Sauvasekoitin