FX11 BASS - Kategooriata FLAMMA - Tasuta kasutusjuhend
Leidke seadme juhend tasuta FX11 BASS FLAMMA PDF-formaadis.

Kasutajate küsimused teemal FX11 BASS FLAMMA
0 küsimus selle seadme kohta. Vastake nendele, mida teate, või esitage oma.
Esita uus küsimus selle seadme kohta
Laadige alla juhend oma Kategooriata PDF-formaadis tasuta! Leidke oma juhend FX11 BASS - FLAMMA ja võtke oma elektrooniline seade uuesti kätte. Sellel lehel on avaldatud kõik teie seadme kasutamiseks vajalikud dokumendid. FX11 BASS kaubamärgi FLAMMA.
KASUTUSJUHEND FX11 BASS FLAMMA
FLAMMA
FX11BASS
Portable Modeling Headphone Amps
Owner's Manual
目录
PRECAUTIONS 01
Features----02
Layout 03-04
Instructions---- 05-14
Specifications----15
PRECAUTIONS
*Please read the manual carefully before use.*
*Please follow the instructions carefully while using the device.*
*Please keep the manual carefully. *
Power Supply
Please use 5V 1A USB-A adaptor for charging. Incorrect power supply may cause unexpected issue.
Please unplug the power supply from the socket if it is idle for a long time or during a thunderstorm.
Warning
- Please do not use the device in a humid environment.
Clean only with a soft, dry cloth. If necessary, slightly moisten the cloth.
Radios and televisions placed nearby may experience reception interference.
Operate this unit at a suitable distance from radios and televisions.
Please do not press the power switch or control knobs heavily.
Please do not let scraps of paper, metal or any other objects be thrown into the device.
Please do not let the device fall from height, push, or hit the device heavily.
Features
- 7 different amp models individual save function for each
• 7 built-in effects with parameter adjustment - 5 levels of TONE color
- 28 different drum groove options to select from
- Compatible with Bluetooth for audio playback
• Supports USB AUDIO recording and audio playback
Layout
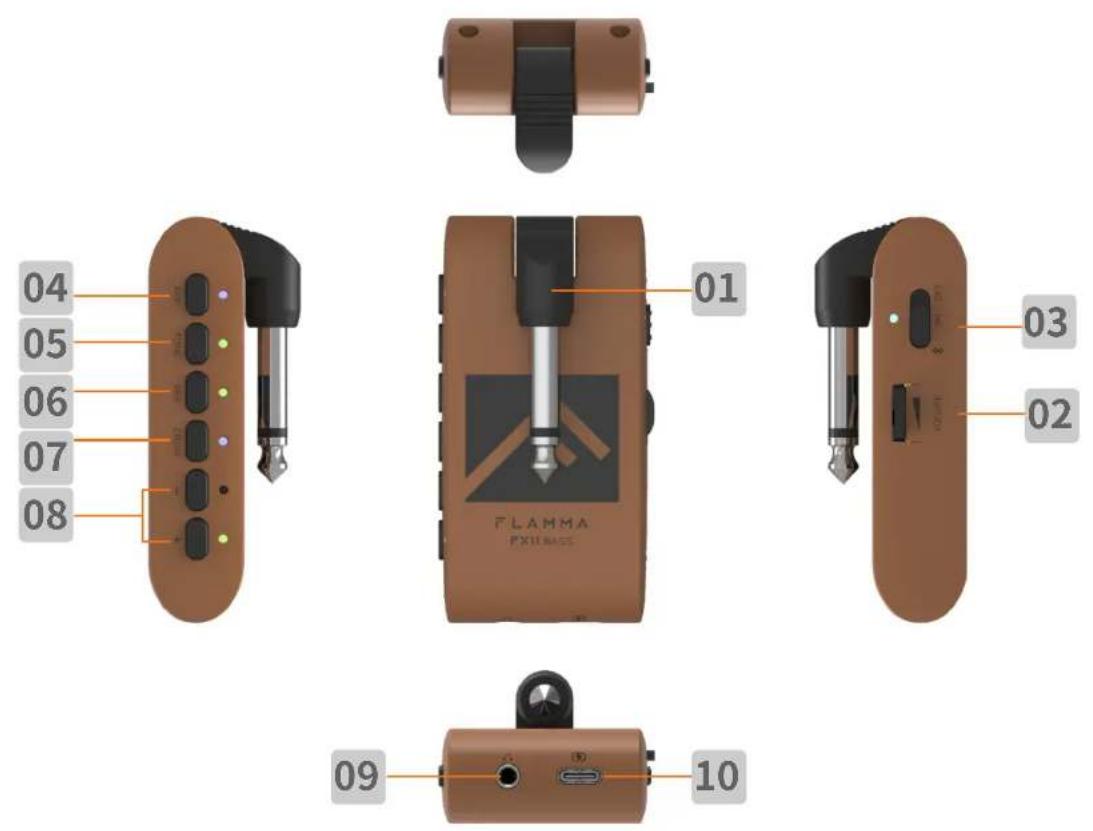
01 1/4"instrument input jack. Connect to the output of the guitar.
02 Volume control: Rotate to adjust the volume level of the guitar and drum machine.
03 Three-way Power Switch. OFF: Power off. ON: Power on (Bluetooth off). BT ON: Bluetooth on. The power indicator will show current power status.
04 AMP button: Press to select AMP module (preset patch), then press the -/+ buttons to select between 7 different amp models. The color of LED indicator will show currently selected amp model.
05 TONE button: Press to select TONE module. Press -/+ buttons to switch between 5 different tone colors.
06 EFX button
a. Press to select EFFECT module. Press the -/+ buttons to switch between different effects
b. When the EFFECT module is selected, press the EFX button to bypass effect.
c. When the EFFECT module is selected, press and hold the EFX button to enter hidden mode.
07 DRUM button
a. Press DRUM to turn on the drum machine. You can press and hold DRUM to turn off the drum machine. The LED indicator will show the On/Off status of the drum machine.
b. When drum machine is on, press DRUM to switch between three parameter adjustment modes. The color of the LED indicator will show current select mode: RED for drum groove, GREEN for volume level of drum machine, BLUE for speed of drum machine. You can adjust those parameters via -/+ button.
08 -/+ button: Adjust currently selected modules (AMP/TONE/EFX/DRUM).
09 1/8" TRS headphone jack, connect to headphone device.
10 USB-C port for charging and OTG function (support USB audio recording and playback).
Instructions
1. Start:
Toggle the power switch to the ON position. The power indicator will illuminate and turn blue for when power is on. You can toggle the switch to Bluetooth icon to turn on Bluetooth Audio function.

natural_image
Close-up of a brown electronic device with a black tip and two labeled buttons (no readable text or symbols)2、Tone/Effect Adjustment
a. Select amp model: Press AMP to select AMP module (preset patch), then press the -/+ buttons to select between 14 different amp models. The color of LED indicator will show currently selected amp model.
b. Adjust tone color: Press TONE to select TONE module, then press -/+ buttons to switch between 5 different tone colors.
c. Select EFX: Press EFX to select EFFECT module, then press the -/+ buttons to switch between 7 different effects.
d. EFX adjustment: Each effect in the EFFECT module has a hidden parameter adjustment mode and the selected effect can be adjusted between 10 different levels. When EFFECT module is selected, press and hold EFX to enter hidden parameter adjustment mode, then press the -/+ buttons to adjust it. The color of LED indicator will show currently selected level.
| BUTTON | — | + | ||||||||
| COLOR | ● | ● | ● | ● | ● | ● | ● | ● | ● | ● |
| VALUE | 1 | 2 | 3 | 4 | 5 | 6 | 7 | 8 | 9 | 10 |
e. Bypass EFFECT: When the EFFECT module is selected (LED indicator is on), press the EFX button to bypass EFFECT module.
f. Saving: When the parameter adjustment is complete, current tone will be saved into the currently selected AMP module as a preset patch, which includes AMP type, TONE color, EFX On/Off, EFX type, and EFX hidden parameter.
Note: When a module (AMP/TONE/EFX) is selected, the corresponding LED indicator will illuminate completely, otherwise it will illuminate in half brightness.
3.Drum Machine
a. Press DRUM to turn on the drum machine. You can press and hold the DRUM to turn off the drum machine, the LED indicator will show the On/Off status of drum machine.
b. Select drum groove
FX10 has 28 different drum grooves. When drum machine is on, press the DRUM to switch between three parameter adjustment modes. The color of the LED indicator will show the currently selected mode. RED indicates drum groove. Please refer to the groove list in the next session for use.
c. Adjust volume level of drum machine
When the DRUM is selected, press DRUM several times to enter volume level adjustment mode (LED indicator illuminate as GREEN). You can press the -/+ buttons to adjust the volume level of drum machine. Please refer to the color of LED indicator for adjustment.
| BUTTON | — | + | ||||||||
| COLOR | ● | ● | ● | ● | ● | ● | ● | ● | ● | ● |
| VALUE | 1 | 2 | 3 | 4 | 5 | 6 | 7 | 8 | 9 | 10 |
d. Adjust drum machine speed
When the DRUM is selected, press the DRUM for several times to enter speed adjustment mode (LED indicator will blink as BLUE). Press -/+ button to adjust the speed via 1 BPM each time. Press and hold -/+ to increase or decrease the speed quickly. The speed of drum machine ranges from 40 BPM to 260 BPM.
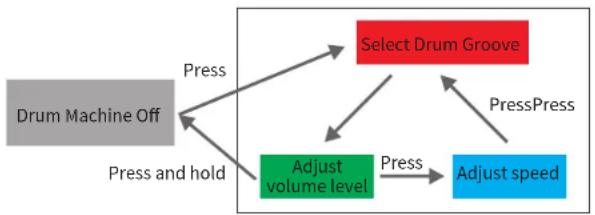
flowchart
graph TD
    A["Drum Machine Off"] -->|Press| B["Select Drum Groove"]
    A -->|Press and hold| C["Adjust volume level"]
    B -->|Press| D["Adjust speed"]
    C -->|Press| B
    C -->|Press| B
    B -->|PressPress| D
(Drum machine operation diagram)
4、Effect List
a、AMP:
| Number | LED Color | Tone Name | Description |
| 1 | [5A4Z] | Clean | Based on Ampeg® SVT preamp +Ampeg®SVTB10 cabinet +Neumann®U47 microphone clean tone setting |
| 2 | [8BKT] | Slap | Based on Ampeg® SVT preamp +Aguilar®DB115 cabinet +Neumann®U47 microphone slap tone setting |
| 3 | [5A4Z] | Jazz | Based on Ampeg® SVT preamp +Ampeg®SVTB10 cabinet +Shure®SM7B microphone jazz tone setting |
| 4 | [2YVT] | Metal Rhythm | Based on Ampeg® SVT preamp +Ampeg®SVTB10 cabinet +Neumann®U47 microphone metal tone setting |
Instructions
| 5 | Solo Time | Based on MarkBass® Little Marcuspreamp +Aguiar®DB115 cabinet +Royer®R-121 microphone solo tone setting | |
| 6 | Dyna Wah | Based on MarkBass® TA501preamp +Hartke®45XL cabinet + Shurer®SM7B microphone filter tone setting | |
| 7 | Fuzz | Based on Ampeg® SVT preamp +Ampeg®SVT810 cabinet +Royer®R-121 microphone fuzz tone setting |
*NOTES: All product names belong to their owners and are only used in this product and manual as a reference to tone types.
b、Tone
| Number | LED Color | Descriptions |
| 1 | Darker | |
| 2 | Dark | |
| 3 | Flat | |
| 4 | Bright | |
| 5 | Brighter |
c、EFX
| Number | LED Color | Tone Name | Hidden Parameters |
| 1 | Flanger | Effects Mix | |
| 2 | Phaser | Effects Level | |
| 3 | Echo | Time | |
| 4 | Room Reverb | Effects Level | |
| 5 | Hall Reverb | Effects Level |
Instructions
| 6 | AnaDly+PlateRev | Delay Level | |
| 7 | Chorus+PlateRev | Reverb Level |
d、Drum machine list
| Number | LED Color | Groove | Rhythm |
| 1 |  | POP1 | 4/4 |
| 2 |  | POP2 | 4/4 |
| 3 |  | POP3 | 4/4 |
| 4 |  | POP 4 | 6/8 |
| 5 |  | POP 5 | 3/4 |
| 6 |  | BLUES 1 | 4/4 |
| 7 |  | BLUES 2 | 4/4 |
| 8 |  | BLUES 3 | 4/4 |
| 9 |  | BLUES 4 | 6/8 |
Instructions
| 10 |  | BLUES 5 | 6/8 |
| 11 |  | PUNK 1 | 4/4 |
| 12 |  | PUNK 2 | 4/4 |
| 13 |  | PUNK 3 | 6/8 |
| 14 |  | ROCK 1 | 4/4 |
| 15 |  | ROCK 2 | 4/4 |
| 16 |  | ROCK 3 | 6/8 |
| 17 |  | ROCK 4 | 6/8 |
| 18 |  | METAL 1 | 4/4 |
| 19 |  | METAL 2 | 4/4 |
| 20 |  | METAL 3 | 4/4 |
| 21 |  | METAL 4 | 6/8 |
| 22 |  | FUNK 1 | 4/4 |
| 23 |  | FUNK 2 | 4/4 |
Instructions
| 24 |  | FUNK 3 | 4/4 |
| 25 |  | FUNK 4 | 4/4 |
| 26 |  | JAZZ 1 | 4/4 |
| 27 |  | JAZZ 2 | 4/4 |
| 28 |  | JAZZ 3 | 3/4 |
4、Bluetooth Audio
FX11 Bass supports Bluetooth which allows connecting to an external Bluetooth device for practice or performance. Below is the setup procedure:
- Toggle the power switch to BT ON to turn on Bluetooth module.
- Open the Bluetooth menu of your smart device and select pair new device
• Find the "FX11 Bass" - Confirm connection
• After pairing is complete, you can hear the audio tracks from the external Bluetooth device.
Notes: To adjust the volume level of the playback tracks, please adjust it on your external Bluetooth device. The volume level knob of FX11 Bass can only control the volume level of guitar signal and drum machine.
5、OTG (USB AUDIO) Recording/Playback
The USB port of the FX11 Bass supports USB AUDIO function. You can use the USB cable that comes with the device and connect to the OTG cable (needs to be purchased separately) with your smart phone for recording or audio playback.
Instructions
Notes:
- The USB AUDIO function is for audio recording or playback on mobile device for practice or directly recording on social media. However, it cannot take the place of professional audio interface. If you would like to use the FX11 Bass with the DAW on your Window device, a third-party ASIO driver is needed. It might be an incompatibility issue or driver issue during use.
- To adjust the volume level of the playback tracks, please adjust it on your mobile device. The volume level knob of FX11 Bass can only control the volume level of guitar signal and drum machine.
6. Battery and Charging
When the battery is low, the power LED indicator will start to blink in blue, the battery will be run out in 30 minutes. Recommend to charge your device in time.
When the FX11 Bass is Off for charging, the power indicator will illuminate and stay RED and turn GREEN when charging is complete. When the FX11 Bass is charging, the power LED indicator will blink in BLUE and RED, then turn to GREEN and BLUE when charging is complete.
Specifications
Number of AMP models: 7
Number of EFFECT modules: 7
Number of DRUM groove: 28
Bluetooth function: Audio playback
USB: USB-C port charging/OTG (USB audio)
Battery Capacity: 720mAh
Battery Life: Up to 4 hours
Charging Requirements: 5V 1A
Charging Time: Approximate 2.5 hours
Angle of Plugin Jack: 270°
Dimensions: 82mm (D) * 40mm (W) * 30mm (H)
Weight: 59g
Accessories: Quick guide, USB-C cable