DIY-DW120 - Valgustus LYYT - Tasuta kasutusjuhend
Leidke seadme juhend tasuta DIY-DW120 LYYT PDF-formaadis.

Kasutajate küsimused teemal DIY-DW120 LYYT
0 küsimus selle seadme kohta. Vastake nendele, mida teate, või esitage oma.
Esita uus küsimus selle seadme kohta
Laadige alla juhend oma Valgustus PDF-formaadis tasuta! Leidke oma juhend DIY-DW120 - LYYT ja võtke oma elektrooniline seade uuesti kätte. Sellel lehel on avaldatud kõik teie seadme kasutamiseks vajalikud dokumendid. DIY-DW120 kaubamärgi LYYT.
KASUTUSJUHEND DIY-DW120 LYYT
DIY LED TAPE KIT – CW/WW
153.739UK User Manual
DIY LED TAPE KIT – 5m Cool white & Warm White
Introduction:
Thank you for purchasing the Lyyt DIY CW/WW LED Tape. LED tape is ideal for use on the underside of a counter tops, shelves, cupboards, around window frames or in an alcove of a ceiling to name just a few examples.
Before starting please ensure that you have read this instruction leaflet carefully. If you are unsure about anything please have the tape installed by a competent installer.
Contents:
1 x 5m reel of CW/WW LED tape
1 x UK power adaptor
1 x Control Box with IR remote handset
Possible required tools: Scissors, Craft knife, Soldering iron and solder, 4 core DC wire and heat shrink tube.
Step 1: Preparation
Ensure the surface you are attaching to is clear of dust and dirt. Clean thoroughly and leave to dry before fitting the tape.
Step 2: Connecting IR Controller:
Connect the 4pin connector to the control box and then to the LED tape (FIG 1). Plug in the power supply and use the IR remote control to select the various functions (Fig 2).
Unravel the tape to check that all the LEDs are functioning correctly. If there are any faults return to your retailer without delay.
FIG 1:

flowchart
graph LR
    A["Power IN"] --> B["Control Box"]
    B --> C["IR Receiver"]
    B --> D["Connector"]
    D --> E["LED Tape"]
    E --> F["Output"]
FIG 2:
IR remote function
The remote control has altogether 16 different colour temperatures to choose from, with other function keys as shown below:
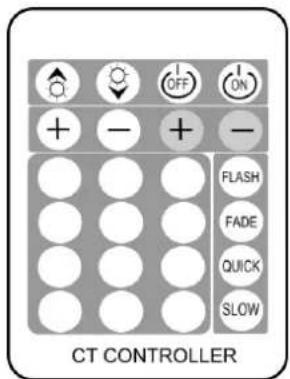
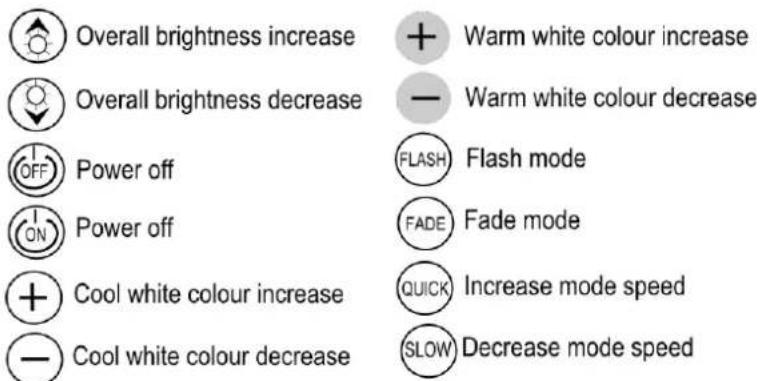
* Fade mode: Press once for fade on both colours. Press twice for fade on cool white. Press 3 times for fade on warm white.
Step 2: Cutting
WARNING: Disconnect from the power supply before attempting any cutting.
Measure out each section and cut with sharp scissors only at the marked 10cm intervals. Do not discard any excess tape as it can be easily reconnected and used again (see FIG 4).
Step 3: Fitting:
Clear the area you wish to install and remove the backing paper, exposing the adhesive tape. Push tape firmly onto the surface. It is recommended to work on 50cm sections at a time in order to ensure a professional finish. When you reach the end of your installation cut at the marked cutting point. The tape can be terminated at highlighted 10cm cut intervals if less than 5m is required.
FIG 3:

You may also reconnect the two pieces by soldering the point connections together. The tape has 3 tracks for the DC voltage:
To re-attached use a craft knife to cut the Epoxy coating from the terminals.
Use a soldering iron and solder to connect the DC wire to the relative terminals be sure not to cause a short circuit in the process as it will not work.
FIG4:

natural_image
Pure electrical circuit lines without any symbolsWARNING: Only cut the tape on the highlighted intervals. Cutting the tape in other parts without due care will permanently damage that section of the tape and will result in malfunction.
Points to remember when using this tape
1) Only cut the tape at the highlighted 10cm intervals.
2) Do not connect another reel and operate from a single power supply as this will seriously affect the performance.
3) Ensure you connect the correct wires otherwise the tape will not work.
4) Ensure that there are no short circuits when soldering.
5) We recommend use of heat shrink tubes to protect the connection.
6) Check that everything operates correctly before installing.
FAQ:
Q) Can you cut a 5m tape in many of different sections then solder connect them all together?
A) Yes as long as you cut the tape at 10cm intervals highlighted.
Q) Can I connect the tape together to form a loop?
A) Yes you can as long as both sides have a sufficient power supply it is possible.
Q) Can I use the tape outdoors?
A) Yes the tape is IP65 rated. Ensure though that the terminated ends are heat shrink protected.
Q) Can I use the LED tape without a controller?
A) Yes you can but you can only have a choice of cool white and/or warm white. It would be better to buy single colour tape.
Specifications
| Voltage | 12Vdc |
| Current consumption | 300mA/m |
| Power consumption | 3.6W/m |
| Number of LEDs | 60/m |
| LED Spacing | 16mm |
| Cut intervals | 10cm |
| Beam angle | 120° |
| LED type | SMD3528 |
| IP rating | IP65 |
Errors and omissions excepted. Copyright© 2017 AVSL Group Ltd.