WF-NP1206MW - Pesumasin LG - Tasuta kasutusjuhend
Leidke seadme juhend tasuta WF-NP1206MW LG PDF-formaadis.

Kasutajate küsimused teemal WF-NP1206MW LG
0 küsimus selle seadme kohta. Vastake nendele, mida teate, või esitage oma.
Esita uus küsimus selle seadme kohta
Laadige alla juhend oma Pesumasin PDF-formaadis tasuta! Leidke oma juhend WF-NP1206MW - LG ja võtke oma elektrooniline seade uuesti kätte. Sellel lehel on avaldatud kõik teie seadme kasutamiseks vajalikud dokumendid. WF-NP1206MW kaubamärgi LG.
KASUTUSJUHEND WF-NP1206MW LG
MFL69380505
| RELEASING THIS DRAWING WITHOUT PERMISSION Electronics SHOULD BEACCUSED ACCORDING TO THE LAWS ADN COMPANY RULES. |
| 同比为107%修正,非法流通时,根据相关法律许可有关规定变更法律责任 |
| SEC.WORK | 甲 | 乙丙 | PRINTING DEGREE | MATERIAL AND PRINTING DESCRIPTION | LG.MOCEL NAME | SUFFIX | LANGUAGE | PAGE | REMARK | ||
| BRAND | MODEL | PINO. | EXTERIER | INTERIER | |||||||
| 05 | LG | WF-NF100MM/WF-NF120MM | MFL69380505ver.101315.00 | 1 | 1 | 材质:70g 双层纸 | FH096NDP3.ABWPEHKFI12B0NDP.ABWPEHK | ABWPEHK | Chinese/English | 60 | Mega 2 440PostDDEnglish/Chinese Panel |
text_image
<<备注 >>
- 材质,印刷,尺寸参照作业表.
- 印刷,文字大小和线条以LG设计基准.
- 数字大小依据一般规格.
- 批量生产前取的设计限度.
- 本部品不应含有禁止物质(Pb, Cd, Hg, Cr+6, PBB, PBDE),详细内容满足LGBPN-Z-1023.
<< NOTES >>
- Material, printing and exterior size are refer to work tables.
- Printing, tsxt size and line are based on LG desing film.
- Exterier size on the drawing is cutting line.
- Before product controlled by criteria sample.
- The part should not contain prohibited substances(Pb,Cd,Hg,Cr+6,PBB,PBDE) and detailsShould comply with LGEPN-Z-1023.
| REV. No. | REVISION DESCRIPTION | SER. NO. | DATE | PREPARED | APPROVED BY |
| Unit | mm SCALE | TITLE | MANUAL,OWNER'S | ||||
| MODELLING OUSKINED | REVIEWED | CHECKED | APPROVALLED | ||||
| 张月程 | 宏睿 | 薛秀超 | 李揆喆 | DRUM-EXPORT | 1/1 | ||
| LGEPNLG Electronics Inc. | RELATED DRAWING | OWB.No. | MFL69380505 | ||||
用戶手冊
洗衣機
在開始安裝之前,請仔細閱讀此手冊。這樣有助於簡化安裝程式,並且確保洗衣機能正確及安全安裝。安裝之後,將此手冊放在洗衣機旁邊,以備日後參考使用。
WF-NP1006MW
WF-NP1206MW

text_image
Black and white barcode image with vertical lines and patternsMFL69380505
ver.101315.00
產品細節
變頻直驅系統
先進的直驅摩打,可直接驅動滾桶,無需使用皮帶及滑輪推動。
妙手六重洗
洗衣機可執行各種滾桶動作,或因應所選的洗衣程序,結合不同的動作。預設轉速及滾桶的左右旋轉更大幅提升了機體的洗衣效率,為您提供最佳的洗衣效果。
防皺保護
交替式滾桶旋轉,將皺摺減到最少。
內置發熱系統
內部的發熱器,可按所選程序,加熱至最佳水溫。
更經濟的智能洗衣系統
智能洗衣系統會感應衣物重量及水溫,然後決定最合適的水位和洗衣時間,務求把用水和耗電量減至最低。
兒童安全裝置
兒童安全裝置,能防止小孩觸及按鈕,避免運作途中改變洗衣程序。
低噪音速度控制系统
系統能感應衣物重量及平衡,並將重量平均分佈,讓旋轉時發出的噪音減至最低。
自動重新啟動程式
當電力不足時,程式會自動重新啟動,由停止時的那個洗衣階段,繼續執行洗衣程式。


目錄
警告 3
產品規格 4
安装 5
洗衣前護理 11
加入洗衣劑 12
功能 14
如何使用洗衣機 15
維修保養 22
解決問題指引 26
保固事項 30
警告
- 使用洗衣機前請細閱此說明書。

為確保閣下安全,必須依照說明書指示,以減低火警或爆炸,觸電的危險,或防止人命或財產損失。
重要安全指南
警告:為減低火警、觸電、或人身損傷的危險,請依照以下基本預防措施:
· 切勿將洗衣機放在露天地方。
· 切勿擅自更改洗衣機裝置。
- 切勿更換或維修洗衣機任何部分。除用戶維修指南及修理指南內提供的建議外,切勿自行維修此機,維修時請確保閣下有足夠技巧進行。
- 確保洗衣機底或附近沒有可燃物體如紗布、紙張、碎布和化學物品等。
如小童或體弱人士需要操作洗衣機時,或洗衣機在他們附近時,請加以看管他們。切勿讓他們把玩洗衣機各部分或其他電器。
· 確保洗衣機遠離火種。
· 切勿讓洗衣機門長期開啓,這會令小童緊握機門或爬進洗衣機內。
· 切勿接觸操作中的洗衣機,應等待滾桶完全停止轉動。
· 洗衣程度會減低衣物纖維的防火能力。
· 為防止引起火警或爆炸,切勿清洗或弄乾
曾利用易燃或爆炸性物品(如蠟、油、油漆、電油、去油劑、乾洗溶劑、石蠟等)處理過的衣物。
當完成整個程序後,油漬或會留在槽內。進行乾衣時,可能會引起火警。所以,切勿放置有油漬的衣物。
· 為防止火警或爆炸,請依照衣物生產商的清洗及護理指南。
- 切勿用力關機門,或在機門鎖上時強行開啓,這會引致機器損壞的。
- 為免觸電,清潔或維修洗衣機前,請先截斷電源。
- 洗衣機如有損壞、故障、安裝不妥、或機件殘缺(包括損壞的電線或插頭),切勿嘗試啟動。
· 乾衣機只適用於弄乾沾濕的紡織衣物。
· 當產品被水淹浸時,請聯絡服務中心。有觸電及火警危險。
保留以下指南
接駁地線指南
此機必須接駁地線。如機器出現故障,接駁地線可以減少觸電危險。此機配備裝有接地導體的電線及接地插頭,插頭必須連接正規及接地的插座。
· 為防止接地插頭受損,切勿使用萬能插頭。
· 如閣下沒有正規插座,請聯絡技術員。
警告:接地導體接駁不正確會引起觸電,如有疑問,請聯絡技術員檢查閣下的電器是否適當地接駁地線。切勿更改供應商提供的插頭,如該插頭不適用於屋內的插座,請聯絡技術員安裝合適的插座。
產品規格

text_image
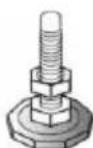
運輸螺絲 洗衣劑分配盒 [存放洗衣劑和衣物柔順劑] 排水喉 機門 可調校機腳 電源插頭 如果電源線損壞,為了避免危險,必須由廠商、維修代理或合資格的電器技工,進行更換。 控制面板 滾桶 排水泵過濾器 排水塞 下方機蓋■ 名 稱 : 前置式洗衣機
■ 電源 : 220-240V\~,50Hz
■ 外形尺寸(寬×深×高) : 600 毫米(闊)×440 毫米(深)×850 毫米(高)
■ 净重量 : 60kg
■ 洗滌容量 : 6kg
■ 最大耗電量 : 1700W
■ 標準水壓 : 1.0–10kgf/cm²(100\~1000kpa)
■ 脫水轉數 : 免排水/免脫水/400/800/1200
免排水/免脱水/400/800/1000
* 為提升產品質素,洗衣機外觀或規格可能稍作更改而毋須另作聲明。
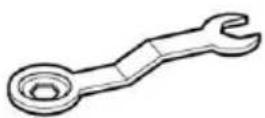
配件
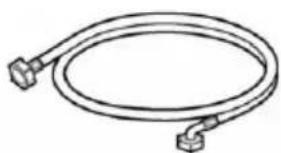
natural_image
Simple line drawing of a coiled cable or hose with two connectors (no text or symbols)入水管(1件)

扳鉗(1件)
安裝
切勿將洗衣機放在露天或溫度低於零度的地方。
將洗衣機接駁地線以符合法例要求。
如將洗衣機放在地氈上,請保持機底下的空氣流通。
如在可能出現蟑螂或其他蟲患的地方使用本產品,請在任何時間,均須確保洗衣機及四周保持清潔。本產品的保養,並不包括任何由蟑螂其他害蟲造成的損毀。
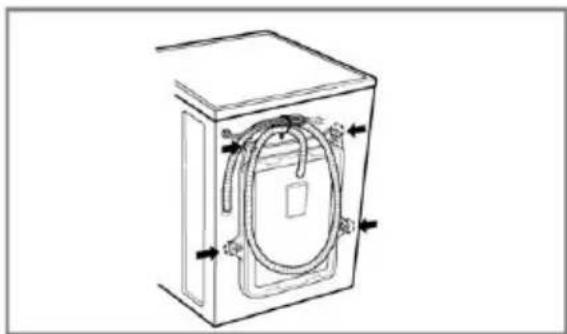
運輸螺栓
為防止搬運洗衣機時造成內部損害,此機裝有運輸螺栓。
- 使用洗衣機前,請取出所有包裝物料及運送用的螺栓。
在取出洗衣機底部的包裝物料時,必須先在包裝底部的中間位置拆下附加的包裝承托物。

text_image
洗衣機 底部包裝物料移除運輸螺栓
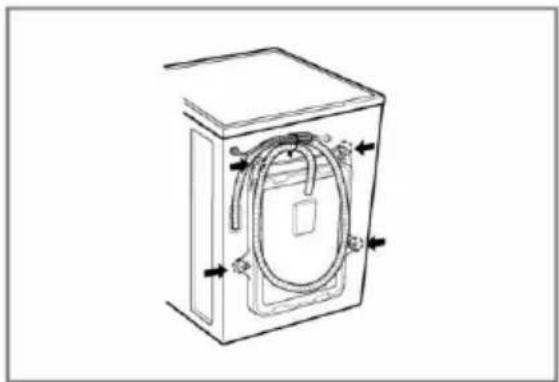
natural_image
Technical line drawing of a rectangular enclosure with internal tubing and mounting holes (no text or symbols)- 為了防止運輸時引起機器內部損壞,四個螺栓均被鎖上。使用洗衣機前,移除螺栓,只保留橡膠栓子。
- 如閣下未能將螺栓移除,會引起機身嚴重震動、噪音及故障。
- 使用隨機附送的扳鉗,鬆開四個螺栓。

natural_image
Diagram of a device with tubing and a hand inserting a cable, showing internal components (no text or symbols)- 將四個螺栓拿走,只保留橡膠栓子,只需將栓子輕輕扭曲便可。保留四個螺栓以便日後使用。
- 每次搬運洗衣機時,必須再次鎖上運輸螺栓。
- 使用附送的蓋子,關閉孔口。
安裝
安裝地點要求

text_image
排水管 洗水盆 約2cm平地:
許可斜度為 1 度。
電力輸出處:
必須在洗衣機兩側 1.5 米範圍內, 切勿接駁多於一件電器。
足夠空間:
供貼牆、貼門及地面的洗衣機型號參考。
(10cm:背部/2cm:右及左)
任何時候均不可將衣物擺放或儲存在洗衣機頂部,這會損壞機身或操縱裝置。
安裝位置
請把洗衣機安裝在平坦及堅硬的地板上。
切勿將洗衣機放置在靠近地毯或方塊氈的地方,以防空氣不流通。
- 切勿試圖以木塊,硬卡紙或類似的物料放在機腳下,來解決地板不平的問題。
- 如果必須將洗衣機放置在煤氣爐或炭爐的旁邊,請把鋁箔紙製的隔熱物(85×60cm)放在洗衣機及煮食爐或炭爐之間。
- 切勿把洗衣機放置在室溫低於 0℃的地方。
- 安裝洗衣機後,請預留足夠的空間,讓維修技師在產品損壞時,可以自由進入維修。
- 安裝洗衣機時,請使用附上的扳鉗和螺栓調校四隻機腳,確保洗衣機平穩地放在地上,並在洗衣機頂部及工作臺之間預留大約20毫米的空間。
安裝
接駁電源
- 切勿使用伸延電線或萬能插頭。
- 如電線已損壞,必須由生產商或其服務代理或合格技術員更換,以免發生危險。
- 每次使用洗衣機後,必須將電源及水源關上。
- 根據現行法例,閣下的洗衣機必須連接至接駁地線的插座上。
-
洗衣機必須放在方便閣下接觸插頭的地方。
-
必須由合資格人士維修本洗衣機。由缺乏經驗的人士進行維修,可能會造成人身損傷,或會令洗衣機出現嚴重故障。
- 切勿把洗衣機安放在溫度低於冰點的地方。結了冰的喉管或會因受壓而爆裂,而低於冰點的溫度亦會降低電子控制組件的可靠性。
- 如在冬季或在低於冰點的溫度下搬運洗衣機,請先把洗衣機安放在室溫下數小時,方可開始操作。
電源線
電源線注意事項:
大部分家庭電器生產商都推薦用戶使用專用線路。專用線路是指一個電源插座祇供電子一種電器使用,沒有其他額外插座或分支電路,詳細資料可參閱此說明書的規格部分。
切勿超出牆壁插座的電源負荷。超出牆壁插座的電源負荷、鬆脫或損壞牆壁插座、加長電線、破損電線和破裂絕緣線,均屬危險。以上任何情況可引致觸電或火災。請定期檢查電器的電線,若電線有損壞或老化,請拔出插頭,並停止使用該電器及聯絡認可的維修人員,更換合規格的電源線。
請保護電源線,以免它受損壞或機械性濫用、扭曲、打結、插壓、被門夾著或在其上踐踏。
請特別注意插頭、插座和電器伸延的接線點的安全。
如洗衣機內附延伸電線或可攜式電源插座接駁設備,請確保延伸電線或可攜式電源插座接駁設備,應遠離濺水或潮濕的位置安裝。
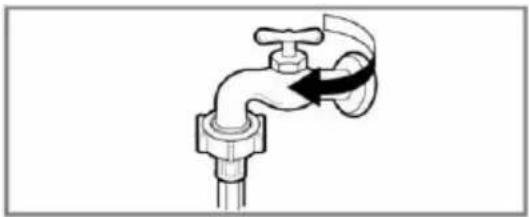
洗衣機須接駁使用新水管的水龍頭。
接駁水源水管
text_image
Diagram illustrating a water supply system with labeled components including faucet, valve, and hose connection.▶水壓必須在 100kPa 至 1000kPa 之間(1.0\~10kgf/cm²)。
▶接駁入水管至活瓣時切勿讓活瓣鬆脫或移位。
▶如供水水壓超過 1000kpa,請安裝減壓器。
- 為免漏水,我們提供兩個橡膠圈給閣下接駁水管用。
- 確保水喉連接是充分緊繫的。
- 定期檢查水管情況,如有需要,請將它更換。
- 確保水管沒有打結及被壓。
注意
完成連接後,如水管漏水,重復同一的步驟。使用最常見的供水龍頭。假若龍頭是方形或太大,請在龍頭插入轉接器前先移去定距圈。
安裝
一般水喉及無螺紋絲入水管
- 鬆開固定的螺絲接駁水喉。

text_image
顶部接驳器 橡胶圈 固定螺絲- 將接駁器向上推,直至橡膠圈緊貼水喉。將4顆螺絲鎖緊。
text_image
橡膠圈 頂部接駁器- 將供水管垂直向上推,直至水管內的橡膠圈完全緊貼水喉,將水管向右扭緊。

text_image
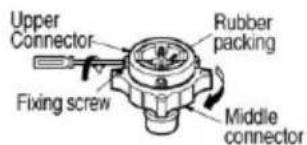
頂部接駁器 托盤 供水管一般水喉及無螺紋即合入水管
- 鬆開頂部接駁器螺絲。

text_image
顶部接驳器 橡胶圈 固定螺絲 接驳器- 將頂部接駁器向上推,直至橡膠圈緊貼水喉。將四顆螺絲鎖緊。

text_image
橡膠圈 頂部接駁器 中層接駁器- 將供水管接駁至中層接駁器,將托盤向上推。
text_image
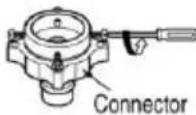
頂部接駁器 托盤 供水管- 如水喉直徑較大請移除導入托盤。

- 將中層接駁器扭緊防止漏水。
- 確保橡膠圈在水管接駁器內。
- 要分開供水管及中層接駁器,只需關掉水喉,將托盤推下,拉下供水管便可。

text_image
水管接驳器 橡胶圈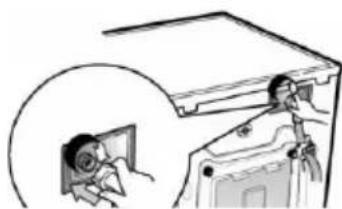
natural_image
Illustration of a person using a computer to clean or install a device, with an inset showing a close-up of the device (no text or symbols present)| 使用垂直水喉 | |
| 垂直水喉 |  |
| 伸延水喉 | 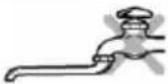 |
| 方型水喉 | 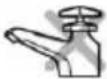 |
- 閣下的洗衣機只能接駁冷水。
- 確保水管沒有打結或被壓。
安裝
本產品並不適合在航海或其他流動地方使用,如在車隊或飛機上使用。
如長時間閒置洗衣機(如假期時),特別是附近地面並無去水通道(溝渠),請先關掉龍頭。棄置舊洗衣機時,請切斷主電線,毀壞插頭及弄壞門鎖,以免小孩被困在內。包裝物料(如膠膜或發泡膠)可能會對小孩造成危險,或引致窒息!
請把包裝物料遠離小孩
安裝排水管
text_image
about 100 cm about 145 cm max 100 cm about 105 cm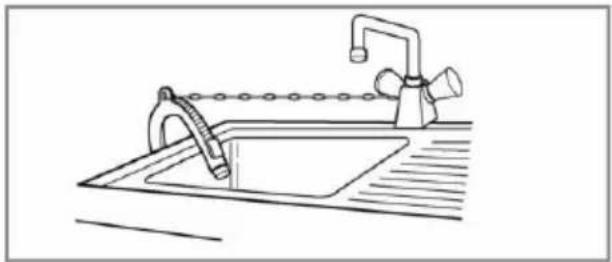
natural_image
Line drawing of a kitchen sink with faucet and plate (no text or symbols)- 安裝排水管至洗手盤時,用繩將它緊繫。
- 緊繫排水管可防止漏水破壞地板。

text_image
about 100 cm about 145 cm about 105 cm max. 100 cm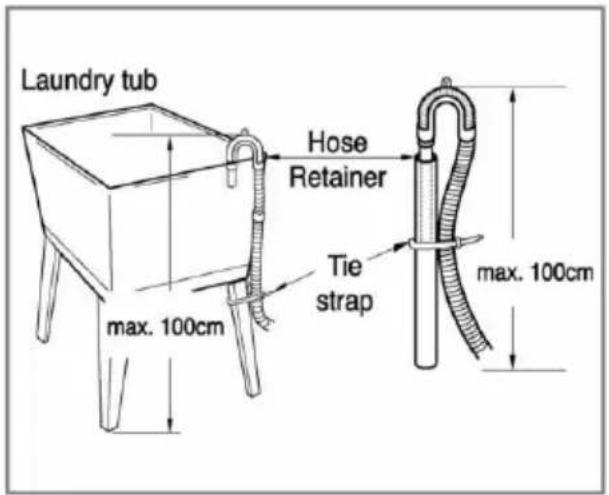
text_image
Laundry tub max. 100cm Hose Retainer Tie strap max. 100cm- 切勿將排水管放在離地 100 厘米的高度。
- 洗衣機不能排水或慢慢地排水。
- 將排水管繫緊能避免漏水破壞地板。
- 如排水管過長,切勿將它塞進洗衣機,這會引起雜聲。
安裝
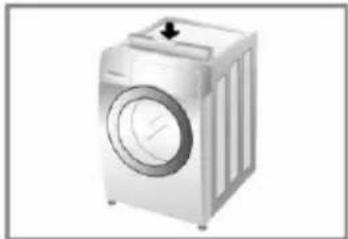
機身平衡
natural_image
Illustration of a silver washing machine with a circular vent and top handle (no text or symbols)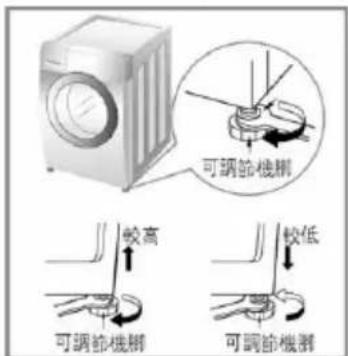
text_image
可調節機側 較高 可調節機側 較低 可調節機側
natural_image
Illustration of a white washing machine with ventilation slots and mounting features (no text or symbols)- 調校機身,防止過多噪音及震動。
將洗衣機安裝在平地上,最好放在房間的角落。
注意
木造或懸空性地臺,可能會導致嚴重的震動,或出現失去平衡的故障。
- 如地面不平, 調校可調節機腳。(切勿利用木塊等物件墊高)確保四隻機腳平穩安放在地上, 檢查機身是否平衡。(利用心理水平尺)。
※ 將洗衣機調校至水平位置後,將鎖緊的螺絲帽朝向洗衣機底部的方向擰緊。
必須鎖緊所有螺絲帽朝向。
注意
如果洗衣機被放於墊高的臺階上,請確保機身已被固定,避免洗衣機意外墮下。
對角檢查
* 將洗衣頂板對角壓下,洗衣機應不會上下搖擺。(請檢查兩個對角)如機身出現搖晃,請再次調校機腳。
■ 混凝土地板
- 安裝表面必須要清潔,乾爽及平坦。
- 把洗衣機擺放在平坦堅硬的地板上。
■ 瓷磚地板(易滑地板)
- 在每一機腳下貼上防滑貼(將防滑貼剪裁成 70×70mm 大小並固定在機腳及乾的瓷磚上)。
※ 防滑貼是自動黏貼且有防滑作用的物料,一般用於梯子及梯級上。
■ 木地板
- 木地板特別容易受震動影響。
- 為避免震動,我們建議在每隻機腳套上膠杯,確保在洗衣機下至少有15毫米的厚度,並用螺絲釘固定在至少兩條木板上。
- 盡可能將洗衣機擺放在房間的角落位置,這樣較為穩固。
※ 套上膠杯,令洗衣機減少震動。
※ 膠杯可在 LG 代理商的零件部門購買(零件號碼:4620ER4002B)。
橡膠杯

重要事項!
* 正確擺放及穩固洗衣機,可確保其耐用,穩定和可靠性。
* 必須確保洗衣機是水平擺放及安裝穩固。
* 洗衣機不可在放入衣物後,在地板上左搖右擺的移動。
* 安裝表面必須清潔,沒有地蠟或其他潤滑覆蓋物。
* 切勿弄濕機腳,因可能令洗衣機滑動。
洗衣前護理
首次清洗
選擇洗衣模式(棉質 60℃,加入半機份量洗衣劑)讓洗衣槽在沒有衣服下運作。此做法可以清除洗衣槽內的渣滓。
洗衣前護理
1. 護理標籤
查看閣下衣物的護理標籤,上面印有衣物纖維類別及清洗方法。
2. 分類
為達到最佳效果,請在每次清洗過程中清洗同類型衣物。不同衣物清洗方法各有不同,包括水溫及脫水速度。切記將深淺衣物分開清洗,防止白色衣物染色。在可能情況下,切勿同時清洗嚴重染污及輕微染污衣物。
污漬(嚴重,一般,輕微)
根據污漬嚴重程度分類。
顏色(白色,淺色,深色)
將白色及顏色衣物分開。
毛頭(製造毛頭衣物,易黏毛頭衣物)
將製造毛頭衣物及易黏毛頭衣物分開清洗。
3. 放入衣物前護理
■ 將大小衣物混合清洗,先放大件衣物,但大件衣物不能超過洗衣量的一半。切勿清洗一件衣物,這會引起衣物不平均,可加入一至兩件類似衣物。

natural_image
Illustration of a pair of jeans with decorative items and directional arrows indicating movement (no text or symbols)
natural_image
Line drawing of a hand pouring liquid from a bottle onto a surface (no text or symbols)
natural_image
Line drawings of four different garment types: a skirt, a t-shirt, a shirt, and a collared shirt, with no text or symbols present.
natural_image
Anatomical illustration of a human eye with magnified detail showing internal structures (no text or labels)
natural_image
Cross-sectional illustration of a biological cell or organelle structure (no text or symbols)- 檢查所有袋口,確保沒有雜物,如鐵釘、髮夾、火柴、原子筆、硬幣及鎖匙等物件,因這些物件會對洗衣機及衣物造成損害。
- 利用稀釋的洗衣劑預先處理袖口及衣領,減低污漬程度。
- 將拉鏈、扣子及繩繫好,防止衣物被劃破。
- 檢查彎曲膠邊(灰色)的摺處和移取任何細小物件,如有。
- 為下一次洗衣過程,需檢查滾筒內裡和移取任何遺留的物件。
- 移取任何在彎曲膠邊上的衣物或物件,防止對衣物和膠邊的破壞。
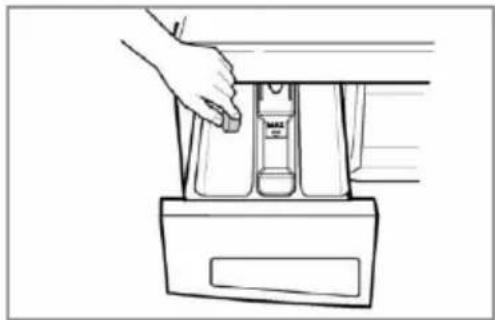
加入洗衣劑
加入洗衣劑和衣物柔順劑
1. 洗衣劑分配盒

text_image
洗衣劑 衣物柔順劑 預洗清潔劑 ( ) ( ) ( )- 只供主洗用
- 預洗+主洗 → ⊥·⊥⊥
警告
- 將洗衣劑放置在小孩接觸不到的地方,因爲有中毒危險。
- 洗衣劑、漂白劑或柔順劑使用過多,可能會有溢出的風險。
- 請確保使用適量的洗衣劑。
2. 加入衣物柔顺劑

text_image
( ) MAX 125 ml MAX 125 ml- 切勿超過限量線。過多衣物柔順劑,會使衣物染上污漬。然後慢慢合上洗衣劑分配盒。
- 切勿將衣物柔順劑,放在洗衣劑分配盒中超過2天(衣物柔順劑會變硬)。
- 衣物柔順劑會在最後過水程序時自動加入。
- 加水時,切勿打開洗衣劑分配盒。
- 切勿使用苯之類的溶劑。
① 注意
- 切勿將衣物柔順劑直接倒在衣物上。
加入洗衣劑
3. 洗衣劑份量
· 應根據洗衣劑廠商的指示,使用適量的洗衣劑。
· 如果使用了適量的洗衣劑,會產生過多泡沫,降低清洗效果或加重摩打的負擔。
· 建議使用粉狀洗衣劑,以獲得最佳效果。
· 如果想要使用液體洗衣劑,請根據洗衣劑廠商提供的指示操作。
· 如果想立即開始洗衣程序,可將液體洗衣劑,直接倒入主洗衣劑分配盒。
- 如果使用預約功能,或者已選擇“預洗”功能,請勿使用液體洗衣劑,因爲液體洗衣劑可能會變硬。
· 如果產生過多的泡沫,請減少洗衣劑的用量。
- 洗衣劑用量可能需要根據水溫、水硬度、衣物大小、以及衣物的髒污程序進行調校。如果獲得最佳的效果,請避免產生過多的泡沫。
警告
- 切勿讓洗衣劑變硬。 洗衣劑變硬可能會導致堵塞、過水性能差或產生異味。
① 注意
- 全機衣物量:根據廠商建議。
- 部分衣物量: 正常份量的 3/4。
- 最少衣物量:全機衣物量的一半。
· 在洗衣程式開始時,從洗衣劑分配盒中加入洗衣劑。
4. 加入水軟化劑
natural_image
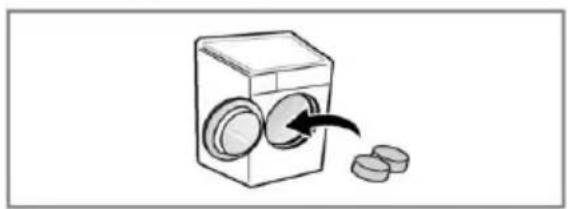
Line drawing of a hand placing a container labeled 'MAX' into a box (no text or symbols on the diagram itself)5. 使用固體洗衣劑

natural_image
Simple line drawing of a washing machine with a circular component and two smaller parts nearby (no text or symbols)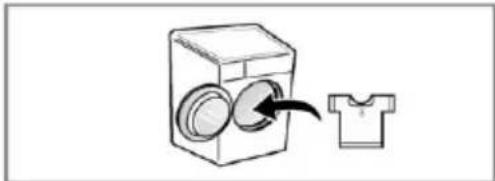
natural_image
Simple line drawing of a washing machine with a T-shirt, showing the process from inside to outside (no text or symbols)-
可在極度硬水區,使用去垢劑(例如:六偏磷酸鈉)一類的水軟化劑,以減少洗衣劑份量。 請根據包裝上規定的份量,加入洗衣機內。首先加入洗衣劑,然後再加入水軟化劑。
· 洗衣劑用量,跟軟水區一樣。 -
打開洗衣機門,將洗衣劑藥片放入滾桶中。
-
將衣物放入滾桶,然後關上洗衣機門。
功能
根據衣物種類建議清洗方法
| 程序 | 描述 | 衣物類型 | 合適水溫 | 最大洗衣量 |
| 棉質衣物 | 配合各種滾筒動作,提供出色的洗衣效果 | 不褪色衣服(恤衫、睡袍、睡衣等)和一般髒污的棉質衣物(內衣物) | 40°C(冷水至95°C) | 根據標籤數值 |
| 特大棉質 | 適合洗滌大量衣物,同時節省能源 | 60°C(冷水至60°C) | ||
| 簡易 | 此程序適合那些洗滌之後,免熨燙的休閒衣物 | 錦綸、腈綸、濺綸 | 40°C(冷水至60°C) | 少於3.0公斤 |
| 混合洗 | 同時洗滌各種衣物 | 各種纖維衣物,不含特殊衣物質料(絲綢/纖維、運動衣物、深色衣服、羊毛衣物、羽絨衣物/窗簾) | 40°C(冷水至40°C) | |
| 超柔呵護洗 | 去除固體和蛋白污漬,並提供更好的過水性能 | 輕度污染的嬰兒衣物 | 60°C(60°C至95°C) | 少於4.0公斤 |
| 護膚洗 | 有效去除衣物上殘留的洗滌劑 | 直接接觸皮膚的衣物,如內衣、尿布、毛巾及床上用品。 | 40°C(冷水至60°C) | 根據標籤數值 |
| 大件 | 此程序適合大型衣物,如床罩、枕頭、沙發套等 | 棉質寢具,不包括有填充物料的特殊寢具(纖細棉被/羊毛、絲綢等):羽絨被、枕頭、毛氈、含有少量填充物料的沙發套 | 40°C(冷水至40°C) | 單件 |
| 運動裝 | 此程序適合運動衣物,如緩跑衣服和田徑衣服 | Coolmax、Gore-tex、抓毛衣服、以及 Sympatex | 少於2.0公斤 | |
| 柔軟衣服 | 此程序適合內衣物或女性衣物 | 柔軟、容易損壞衣物 | 20°C(冷水至40°C) | 少於2.0公斤 |
| 羊毛 | 能夠清洗羊毛衣物(請使用機洗羊毛衣物專用的洗滌劑) | 只適合那些純新羊毛的機洗毛鐵品 | 40°C(冷水至40°C) | 少於2.0公斤 |
| 30分鐘快速洗 | 此程序可快速洗滌少量衣物和輕度髒污的衣物 | 輕度髒污的顏色衣物 | 20°C(冷水至40°C) | |
| 強力洗60 | 以最佳效能在60分鐘內清洗衣服 | 棉質、混合纖維 (一般髒污衣物的60分鐘特別洗滌程序) | 60°C(冷水至60°C) | 少於3.0公斤 |
| 過水+脫水 | 供只需水洗衣物或為衣物加入柔順劑後過水之用 | 一般可根洗纖維 | - | 根據標籤數值 |
* 水溫:根據衣物生產商的衣物保護標籤選擇適合的洗衣水溫。
* 深層清潔:如果衣服過多或污染嚴重,選擇深層清潔程序會使效果更好。
* 預洗:對污染嚴重的衣物進行預處理。
* 活性過水: 在使用過水程序時, 為了高效和更清潔, 可以選擇活性過水程序。
* 防皱: 此功能防止衣物褶皱, 使衣物更平整。
* 程序設定至“特大棉質60℃+深層清潔”,按照 IEC60456 標準進行測試。
* 注意: 使用中性洗涤剂。
羊毛洗的特徵是輕柔洗和低轉速脫水以保護衣物。
如何使用洗衣機
擁有 SmartDiagnosis™ 標記的洗衣機,才具有 SmartDiagnosis™ 功能。
text_image
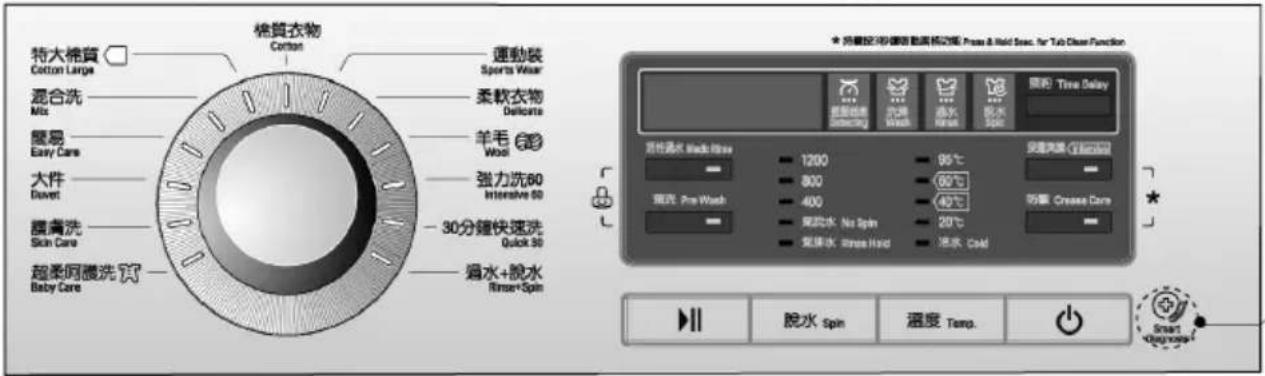
特大棉質 Cotton Large 混合洗 Mix 雙易 Easy Care 大件 Davet 複黃洗 Skin Care 超柔阿濃洗 Baby Care 棉質衣物 Cotton 運動裝 Sports Wear 柔軟衣物 Delicate 羊毛 Wool 強力洗60 Intensive 50 30分鐘快速洗 Quick 30 過水+脫水 Rimax Spin * 為鍍按24秒鐘動動滑動功能: Press & Hold Spec. for Tub Clear Function 原汁過水 Black Wash 1200 95℃ - 800 60℃ - 400 40℃ - 雨流水 No Spin 20℃ - 楊排水 Rinse Hold 泣水 Cold 換熱時調溫度溫度 Temp. 防塵 Crosse Care 脫水 Spin 温度 Temp. Smart Diagnose1. 接通電源後自動選擇棉質衣物程序
- 按電源鍵開始。
- 按啟動/暫停鍵。
-
初始狀態
-
洗滌: 主洗
- 過水:3 次
-
脫水:
-
1200rpm
• 1000rpm
- 水温: 40^ C
- 程序: 棉質衣物
2. 使用指南
- 按電源鍵開始。
- 通過按各鍵選擇你所需的狀態。詳細信息請參考第 16\~21 頁。
- 再按啟動/暫停鍵。
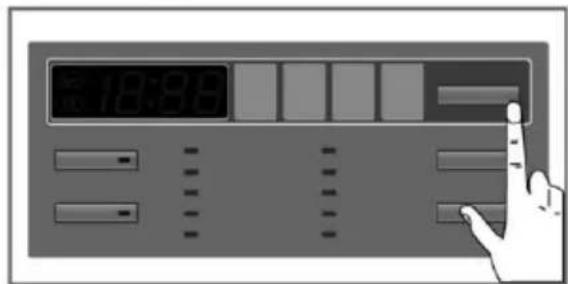
3. 蜂鳴開/關

text_image
16:06- 在洗衣開電源開啟時,同時按住預約(Time Delay)按鈕和防皺(Crease Care)按鈕三秒,即可設置蜂鳴聲的開/關功能。
- 蜂鳴聲開關功能一旦設置完畢,即使在電源關閉狀態下,洗衣機也會記憶其設定。
- 如要關掉蜂鳴聲,只需重複上述步驟即可。
如何使用洗衣機

text_image
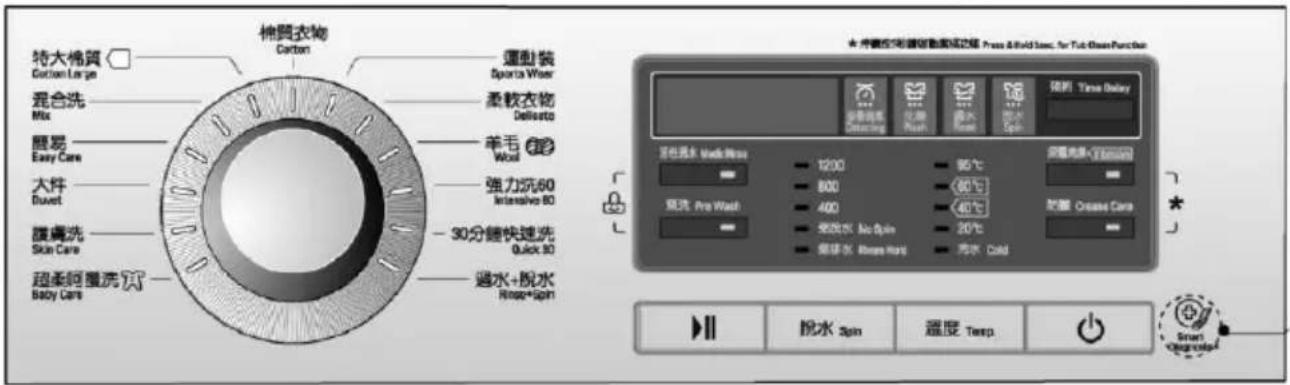
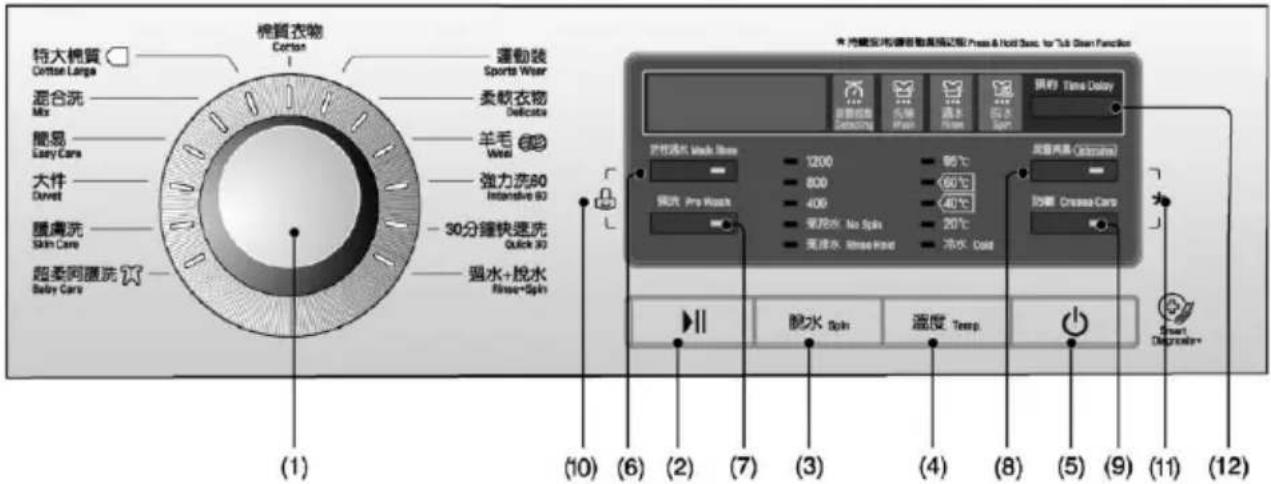
特大棉質 Cotton Large 混合洗 Mix 簡易 Easy Care 大件 Duvet 膿霜洗 Side Care 超柔間覆洗 Baby Care (1) (2)旋鈕:程式 (3)按鈕:啟動/暫停 (4)按鈕:溫度 機質衣物 Cotton 運動裝 Sports Wear 柔軟衣物 Delicate 羊毛 Wool 強力洗60 Intensive 60 30分鐘快速洗 Quick 30 過水+脫水 Rose+Spin (5)按鈕:電源 (6)按鈕:活性過水 (7)按鈕:預洗 (8)按鈕:深層清潔 * 内鑑至5號器自動開拓功能 Press & Hold Size, For Tub Clean Function (10) (6) (2) (7) (3) (4) (8) (5) (9) (11) (12) (9)按鈕:防皺 (10)兒童安全鎖 (11)潔桶 (12)按鈕:預約電源

1. 電源
- 按電源鍵來開關電源。
- 要取消預約洗功能需按電源按鈕。
2. 初始程式
- 按電源鍵後洗衣機自動準備好棉質衣物程式。其他的初始狀態列舉如下。
- 如果你不改變程式減少洗滌周期,只需直接按啟動/暫停鍵,洗衣機就開始工作了。
■ 初始程式
- 棉質衣物程式 / 主洗 / 一般過水 / 1200rpm/40℃
- 棉質衣物程式 / 主洗 / 一般過水 / 1000rpm/40℃
程式
text_image
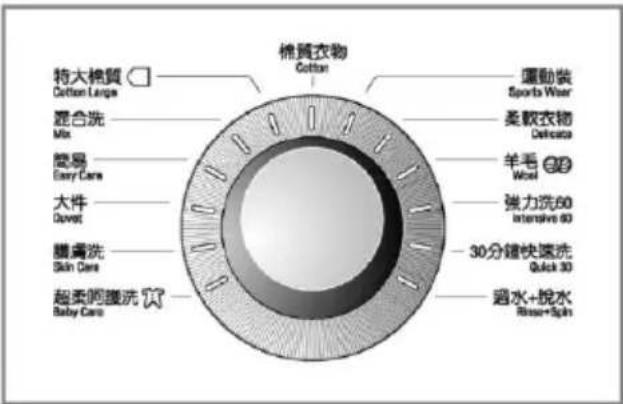
特大棉質 Cotton Large 混合洗 Mix 简易 Easy Care 大件 Davet 膿癆洗 Skin Care 超柔的暖洗 Baby Care 棉質衣物 Cotton 運動裝 Sports Wear 柔軟衣物 Delicate 羊毛 Wool 強力洗60 Intensive 60 30分鐘快速洗 Quick 30 過水+脫水 Riser+Spin- 根據衣物的種類不同,有 13 種程式可供選擇。
- 選擇了一個程式後其對應的指示燈會亮。
- 按啟動 / 暫停鍵後, 洗衣機會自動選擇棉質衣物程序。
- 通過旋轉程序旋鈕依次選擇程序“棉質衣物 - 運動裝 - 柔軟衣物 - 羊毛 - 強力洗 60 - 30 分鐘快速洗 - 過水 + 脫水 - 超柔呵護洗 - 護膚洗 - 大件 - 簡易 - 混合洗 - 特大棉質”。
詳細信息請參考第 14 頁。
如何使用洗衣機
啟動/暫停

1. 啓動
- 啟動 / 暫停按鈕用來啟動洗滌或暫停洗滌。
2. 暫停
- 如果需要暫時停止洗滌, 就按啟動 / 暫停按鈕。
- 在暫停狀態下,洗衣機將在 4 分鐘後自動關閉電源。
- 注意: 選擇暫停或洗滌結束後的 1 至 2 分鐘內, 門打不開。
重量感應

text_image
18:00 重置格地 Defecting 洗漱 Wash 漏水 Rinse 脱水 Spin- 當“重量感應”顯示在顯示板上,洗衣機會慢慢的轉動及測試滾筒內的衣物重量,需要幾秒的時間進行。
- 適用于棉質衣物、超柔呵護洗、護膚洗、簡易、混合洗和特大棉質。
門鎖

text_image
18:88 重量燃油 Detecting 污水 Wash 漏水 Rinse 控水 Spin- 機門被鎖上後,燈會亮起。
- 按啟動 / 暫停鍵便可以停止洗衣,門鎖亦會被開啓。
- 過一段時間後,門便可打開。
選項
活性過水 Medic Rinse

預洗 Pre Wash

深層清潔 Intensive

防皱 Crease Care

- 按下各選項按鍵選擇相應功能。
1. 活性過水
- 為使過水效果更加有效,可以選擇活性過水。
- 適用于除運動裝, 柔軟衣物, 羊毛, 強力洗 60,30 分鐘快速洗, 大件的其它所有程序。
2. 預洗
- 如果衣服污染比較嚴重,選擇此項功能進行洗滌。
3. 深層清潔
- 如果衣服污染比較嚴重,選擇此項功能進行洗滌。
- 根據所選的程序不同,選擇深層清潔功能後,洗滌時間會有不同程度的延長。
4. 防皱
- 此功能可防止衣服褶皱,使衣服更加平整。 燈號亮着,表明該功能已被選。
如何使用洗衣機
兒童安全鎖()

選擇此功能,鎖定控制裝置上的按鈕,防止所選程序被改變。
- 按住活性過水和預洗3秒鐘可設定此功能。

text_image
活性炭水 Modic Rinse 预洗 Pre Wash → 18:00- 按住活性過水和預洗3秒鐘可解除此功能。
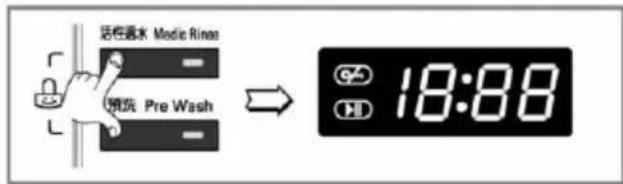
text_image
活性器X Modic Rinse 预洗 Pre Wash → 18:88- 在童鎖模式下,改變設定的程序:
-
同時按住活性過水和預洗大約三秒,取消童鎖。
-
按啟動/暫停鍵。
-
選擇需要的程序後再次按下啟動/暫停鍵。

flowchart
graph LR
    A["Pre-Wash"] --> B["→"]
    B --> C["Change the desired program"]
    C --> D["→"]
- 兒童安全鎖可隨時設定,並會在操作出現故障時取消。兒童安全鎖在關掉電源後亦能運作。
潔桶 (\*)

同時按住深層清潔和防皱大約3秒,可選擇潔桶功能。
當潔桶程序運行時屏幕顯示“bcl”,所有的按鍵失去作用。

潔桶程序是專門用來清潔洗衣機內部的。使用較高的水位和轉速。請定期運行該程序。
怎樣使用潔桶程序:
- 從洗衣機中取出所有物品,關閉洗衣機門。
- 打開洗滌劑分配盒,在主洗格中放入液體漂白劑。
注意: 不要再洗滌劑盒中加入洗滌劑, 否則可能產生大量的泡沫從洗衣機中溢出。
- 慢慢關閉洗滌劑盒。
- 打開電源後,按住深層清潔和防皱按鍵大約3秒,LED上將會顯示“ヒヒL”。
- 按啟動/暫停鍵開始運行。
- 潔桶程序結束,桶中水排出後,打開洗衣機門使機體內部幹燥,防止門密封橡膠變形。
注意:如果有兒童,注意不要開門時間太長,防止兒童進入滾筒中發生意外。
如何使用洗衣機
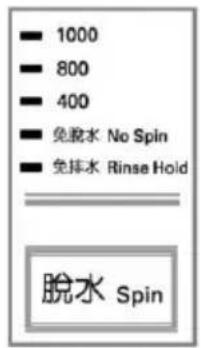
脱水(跑)

text_image
1200 800 400 免脱水 No Spin 免排水 Rinse Hold 脱水 Spin[WF-NP1206MW]

text_image
1000 800 400 免脱水 No Spin 免排水 Rinse Hold 脱水 Spin[WF-NP1006MW]
- 旋轉脫水旋鈕選擇脫水轉速。
1. 脫水轉速選擇
- 各程序可選轉速如下:
[WF-NP1206MW]
- 棉質衣物,強力洗 60,30 分鐘快速洗,過水+脫水,護膚洗,混合洗,特大棉質免排水-免脫水-400-800-1200
- 運動裝, 柔軟衣物, 羊毛, 超柔呵護洗, 大件, 簡易 免排水 - 免脫水 - 400 - 800
[WF-NP1006MW]
- 棉質衣物,強力洗 60,30 分鐘快速洗,過水+脫水,護膚洗,混合洗,特大棉質免排水-免脫水-400-800-1000
- 運動裝, 柔軟衣物, 羊毛, 超柔呵護洗, 大件, 簡易 免排水-免脫水-400-800
2. 免脱水
- 選擇免脫水後,洗衣機將在排水後結束運行。
3. 免排水
- 多次重復按下脫水按鍵,選擇免排水。此功能將在過水後不進行脫水。
- 可旋轉旋鈕或按下脫水按鍵結束免排水程序,程序結束後可排水或脫水。
燈號亮着,表示該功能已被選。
如何使用洗衣機
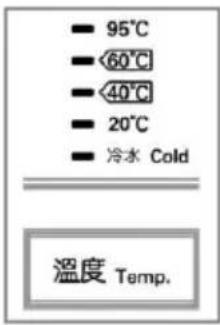
溫度

text_image
95°C 60°C 40°C 20°C 冷水 Cold 温度 Temp.- 按溫度鍵選擇水溫。
- 冷水
-20℃/40℃/60℃/95℃
- 各程序可選擇不同的水溫
燈號亮着,表示該功能已被選。
詳細信息請參考第 14 頁。
預約
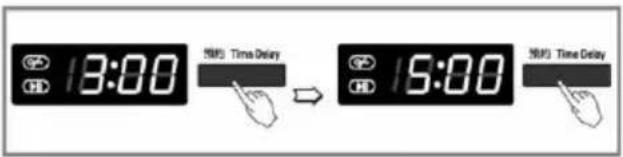
text_image
13:00 15:00 15:00 15:00 Time Delay開始“預約”前先準備好衣物。
- 開啓水龍頭。
- 放入衣物,關上機門。
- 放入洗滌劑及衣物柔順劑在洗滌劑盒內。
- 如何設定“預約”
- 按電源鍵。
- 轉動程式旋鈕選擇所需程式。
- 按預約鍵設定所需時間。
- 按啟動 / 暫停鍵。
- 如果預約鍵按下,洗衣機會顯示“3:00”。最長延時19小時,最短時間為3小時。
- 每次按鍵會將時間延長1小時。
- 按電源鍵取消預約功能。
- 預約是即時至洗滌程式或選擇過程(洗滌、過水、脫水)結束時的“預期時間”。
延長時間及實際洗衣時間會受不同供水情況及水溫的影響。
如何使用洗衣機
顯示

text_image
18:88 重量供给 Detecting 洗濯 Wash 過本 Rinse- 廢本 Spin1. 特別功能顯示
- 當童鎖開啓後,將顯示“[L]”。
- 選擇預約洗衣功能後,洗衣機會顯示直至完成所需程序的剩餘時間。
2. 自我判斷顯示
- 洗衣機如出現故障,會顯示故障類型。
“PE”:水壓問題
“FE”:注水過多
“dE”:機門未關
“!E”:注水問題
“OE”:排水問題
“UE”:衣物擺放不均
“E”:水溫問題
“CE”:發動機負荷問題
“LE”:發動機負荷過重
如洗衣機顯示以上故障字樣,請參考第26頁的解決方法。
3. 洗衣程序完結
- 洗衣程式完結時,將顯示“End”。
4. 剩餘時間
- 洗衣時,洗衣機會顯示剩餘所需時間。
| 棉質衣物 | 74' |
| 特大棉質 | 116' |
| 混合洗 | 69' |
| 簡易 | 95' |
| 大件 | 100' |
| 護膚洗 | 86' |
| 超柔呵護洗 | 125' |
| 運動裝 | 54' |
| 柔軟衣物 | 47' |
| 羊毛 | 37' |
| 強力洗 60 | 60' |
| 30 分鐘快速洗 | 30' |
| 過水 + 脫水 | 18' |
- 洗衣時間會隨著衣物量、水壓、水溫及其他洗衣情況而改變。
- 如衣物擺放不均或去泡程式運作中,洗衣時間或會較長。
維修保養
* 清潔洗衣機內部時,請先將電源截斷,防止觸電危險。
* 當棄置洗衣機時,請先截斷主電線,毀壞插頭和破壞門鎖以防小朋友被困在機內。
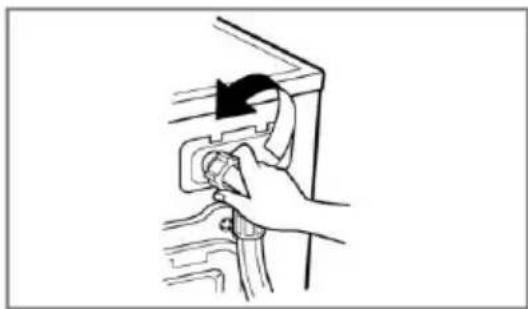
入水過濾器
- 如水不能進入洗衣劑分配盒,控制面板上會閃動著“I E”字樣。
- 如注入的水為硬水或含有少量石灰,入水過濾器或會淤塞,建議閣下經常清潔入水過濾器。
natural_image
Simple line drawing of a faucet with a curved arrow indicating rotation or movement (no text or symbols)- 關掉水喉。

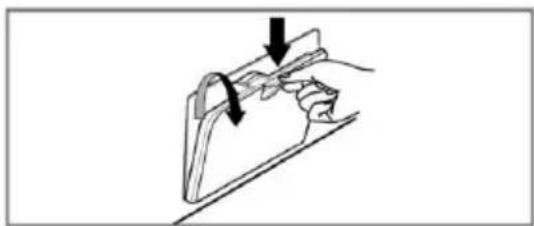
natural_image
Line drawing of a hand inserting a small component into a device (no text or symbols)- 鬆開入水管。
natural_image
Illustration showing a hand inserting a plug into a device, then to add a coin (no text or symbols present)- 利用硬短毛刷清潔過濾器。
* 如果進水閥拿不下來,就直接用剛毛刷清洗過濾網。
natural_image
Line drawing of a hand inserting a plug into a refrigerator (no text or symbols)- 將入水管扭緊。
維護保養
排水泵過濾器
* 排水過濾器收集衣物的毛頭及小型物件。經常檢查過濾器清潔,確保洗衣機操作順利。
警告
首先利用排水管排水,然後打開水泵過濾器清除阻礙物。
排水時小心水溫過熱。
* 清理排水泵前,請先將水冷卻。

natural_image
Illustration of a hand holding a tool with an arrow indicating direction (no text or symbols)- 打開下方機蓋。拉出水喉。
text_image
② 排水用的容器。 ①- 拔掉排水塞。 向左扭開過濾器。

text_image
Diagram illustrating a mechanical or electronic component with an arrow pointing to a magnified view of internal components, possibly indicating a process or assembly.- 從排水泵過濾器中清除異物)。

natural_image
Illustration of a hand using a tool to lift a circular component (no text or symbols visible)- 清潔之後,請順時針方向轉動排水泵過濾器,並插入排水塞。

natural_image
Hand holding a device with arrows indicating motion or force (no text or symbols)- 關閉下方機蓋。
維修保養
洗衣劑分配盒
* 洗衣劑及衣物柔順劑會累積在分配盒內。
- 定期利用噴射式開水清潔。
- 如有需要,可將分配盒按下拉出。
- 為方便清潔,衣物柔順劑盒頂部可移除。

text_image
Diagram illustrating three steps of a water treatment procedure: hand press, liquid transfer, and fluid injection.洗衣劑分配盒窩
* 洗衣劑亦會積聚在分配盒窩裡,請定期利用舊牙刷清潔。
- 清潔完畢後,放回分配盒並進行一次脫水程序(不加入衣物)。
natural_image
Line drawing of a hand holding a tool near a vehicle door (no text or symbols)洗衣滚桶
如閣下住在硬水區,石灰片會在隱敞的地方積聚並難於清理。
- 積聚過多石灰片會阻塞洗衣機。如長期缺乏檢查,或會產生昂貴的保養或維修。
- 雖然滾桶以不銹鋼製成,若滾桶內留有小型金屬物件(萬字夾,扣針),仍會引起銹漬。
- 滾桶應經常清洗。
- 請使用適用於洗衣機的除污劑、染料或漂白劑。
* 除污劑或含破壞洗衣機的成分。
* 利用不銹鋼清潔劑清理污漬。
* 切勿利用銅絲清潔。
維修保養
清潔洗衣機
1. 外殼
小心保養閣下的洗衣機會令它更耐用。
洗衣機外殼可用暖水及中性不粗糙的家用清潔劑清潔。
利用微濕的布立即抹掉任何溢出的清潔劑。
小心勿讓鋒利物件撞擊洗衣機表面。
* 重要:切勿使用燃料酒精、稀釋液或類似產品。
2. 内部
經常清潔機門開口、彈性密封墊及機門玻璃,確保洗衣時不會漏水。
利用熱水進行一次洗衣程序。
如有需要重覆以上程序一次。
注意 清理硬水殘積物時,請利用適用於洗衣機的清潔劑。
低溫環境
如在零度以下的地方存放或搬運洗衣機,請依照以下指示以免損壞洗衣機:
- 關上水喉。
- 拔去水管,并將水管內的積水弄乾。
- 把插頭連接正規的接地插座。
- 把一加侖(三點八升)無毒防凍劑注入空的滾桶內,然後關上機門。
- 設定脫水程式,讓洗衣機旋轉一分鐘以弄乾水份。此舉不會去除所有防凍劑。
- 截斷電源,弄乾滾桶內部,然後關上機門。
- 弄乾洗衣劑分配盒內過多的水份。
- 洗衣機必須垂直放置。
- 存放後要重新使用時,先清理洗衣機內的防凍劑,並以洗衣劑進行一次洗衣程序,但不要加入衣物。
解決問題指引
* 此機配備自動安全功能,可以感應故障原因,及早作出反應。
如洗衣機不能正常或完全不能操作,聯絡技術員之前請檢查下列各項。
■ 故障判斷
| 故障現象 | 可能成因 | 解決方法 |
| 嘎嘎聲及叮噹聲 | ·滾桶或泵內可能有硬幣或扣針等外物。 | 停止洗衣並檢查滾桶及排水過濾器。如果重新啟動洗衣機後,仍聽見聲音,請聯絡當地認可的客戶服務中心。 |
| 撞擊聲 | ·過多衣物可能引起撞擊聲,此屬正常情況。 | 如果聲音持續,洗衣機可能失去平衡。請停止洗衣並重新擺放衣物。 |
| 震動聲 | ·是否已將所有的運輸螺栓和包裝拆除?·是否所有的機腳穩放在地面? | 如果安裝期間未移除運輸螺絲,請參考安裝指南,將運輸螺絲移除。滾桶內的衣物可能沒有擺放均勻。請停止清洗並重新擺放衣物。 |
| 漏水 | ·水龍頭或洗衣機的入水喉或排水喉是否鬆脫。·屋內排水喉堵塞。 | 檢查並扭緊水喉接駁位。清理堵塞的排水喉。如有必要,聯絡通渠人員。 |
| 泡沫過多 | 使用過多或不合適的洗衣劑,可能會產生過多的泡沫,從而引致漏水。 | |
| 不能注水或注水速度慢 | ·供水不足。·水龍頭沒有完全開啟。·入水喉打結。·入水喉過濾器堵塞。 | 檢查屋內另一水龍頭。將水龍頭完全開啟。將水喉弄直。檢查入水喉過濾器。 |
| 不能排水或排水速度慢 | ·排入水喉打結或堵塞。·排水過濾器堵塞。 | 清潔並將排水喉弄直。清潔排水過濾器。 |
解決問題指引
| 故障現象 | 可能成因 | 解決方法 |
| 洗衣機不能啟動 | · 電源線可能沒有插入或接駁位可能鬆脫。 · 屋內保險絲燒毀,斷路器跳閘,或者停電。 · 水龍頭沒有開啟。 · 檢查洗衣機門是否關緊。 | 確保插頭牢固地插入電源插座。 重設斷路器或更換保險絲。切勿加大保險絲容量。如果電力負荷過重,請聯絡合資格的電器技工更正。開啟供水龍頭。 關閉洗衣機門並按下啟動/暫停按鈕。在按下啟動/暫停按鈕之後,洗衣機可能需要數分鐘才能脫水。脫水之前必須將洗衣機門鎖上。添加一件或兩件衣物,幫助平衡洗衣量。請重新擺放衣物,讓其正確脫水。 |
| 洗衣機不脫水 | ||
| 洗衣機門打不開 | 基於安全考慮,啟動洗衣機後,機門不能打開。檢查「門鎖」圖標是否發亮。在「門鎖」圖標消失後,便可安全打開洗衣機門。 | |
| 洗衣程序時間順延 | 清洗時間可能會隨衣物數量、水壓、水溫以及其它使用條件而變化。如果感應到衣物擺放不均勻或泡沫清除程序開啟,清洗時間會延長。 | |
| 衣物柔順劑溢出 | 太多柔順劑可能會導致溢出。 | 根據柔順劑使用指南,確保使用適量的柔順劑。 切勿超過最大注入線。 |
| 過早加入柔順劑 | 慢慢地關上洗衣劑分配盒。清洗期間,切勿打開洗衣劑分配盒。 |
解決問題指引
| 問題 | 可能成因 | 解決方法 |
| IE | 供水不足。水喉並不完全開啓。入水管打結。入水管過濾器淤塞。 | 檢查屋內另一水喉。完全開啓水喉。將水管變直。檢查入水管過濾器。 |
| OE | 排水管打結或淤塞。排水過器淤塞。 | 清理並將排水管變直。清理排水過濾器。 |
| UE | 太少衣物。衣物擺放不均。此機有衣物平衡感應及更正系統,機內如有大件衣物如浴室地氈、浴衣等,此系統或會令洗衣機停止脫水甚或妨礙脫水系統。如衣物在完成洗衣程序後仍然很濕,可加入小型衣物作平衡,重新脫水程式。 | 加入一至兩件衣物幫助平衡。重新擺放衣物。 |
| dE |  機門是否已關? 機門是否已關? | 關上機門。*如機身仍有顯示“dE”字樣,可聯絡技術員。 |
| LE | 拔掉插頭並聯絡技術員。 | |
| FE | 如因損壞的活瓣引起注水過多,洗衣機會顯示“FE”字樣。 | 開上水喉。拔掉插頭。聯絡技術員。 |
| PE | 水位感應器出現故障,洗衣機會出現“PE”字樣。 | |
| CE | 發動機負荷過重 | |
| LE | 發動機負荷過重。 | 關上水喉。拔掉插頭。聯絡技術員。 |
解決問題指引
① 注意
- 只標有SmartDiagnosis™ 標誌的洗衣機,才具有SmartDiagnosis™ 功能。如果手機設置了靜態選項,SmartDiagnosis™ 功能可能不會運作。
■ 使用SmartDiagnosis™
- 只按照客戶服務中心指示操作的情況下,才使用此功能。
傳送聲音類似傳真機的聲音。因此只對客戶服務中心有意義。
- 如果洗衣機沒有接駁電源,SmartDiagnosis™功能將無法啟動。
如果出現此種情況,必須在不使用 SmartDiagnosis™ 功能的情況下,進行疑難排解。
如果閣下的洗衣機出現故障,請與客戶資訊中心聯絡。
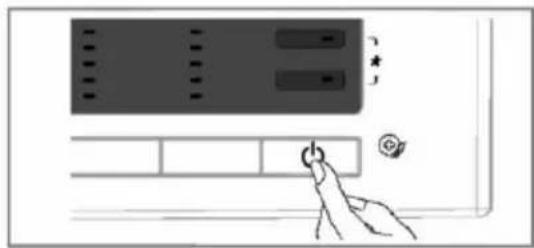
當有要求時,按照客戶中心代表的指示,並且根據下列步驟操作:
text_image
Diagram showing a person interacting with a device interface, with labeled buttons and a timer icon- 按下電源按鈕,啟動洗衣機。切勿按下任何其它按鈕或轉動洗衣程序選擇旋鈕。
text_image
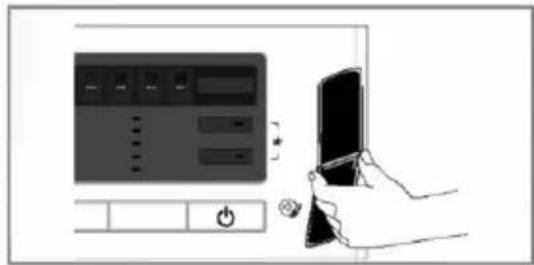
Diagram showing a hand holding a smartphone with control panel and battery, next to a device interface panel with buttons and display screen.- 當接到客戶服務中心的指示時,請將閣下手機的話筒,靠近電源按鈕。

text_image
Diagram showing a power button and a mobile phone with a plus button, likely illustrating a basic computer interface.
text_image
最大10毫米-
在將手機的話筒靠近此圖標或電源按鈕的同時,按住 Temp (溫度) 按鈕3秒鐘。
-
將手機放置適當位置,直至聲音傳送完成。
此過程需要約 6 秒鐘,顯示器會倒數計時。
- 為了達到最佳效果,切勿在傳送聲音的過程中移動手機。
- 如果客戶服務中心代表,無法獲得準確的數據記錄,可能會要求閣下再試一次。
-
在聲音傳送期間,按下電源按鈕,將會關閉SmartDiagnosis™功能。
-
當倒數結束且聲音停止時,請重新與客戶服務中心代表聯絡。客戶服務中心代表,將協助閣下把已傳送用於分析的資訊,轉交給客戶資訊中心。
保固事項
棄置閣下的舊洗衣機

natural_image
Symbol of a trash bin with crossed lines indicating no waste or discharge (no text or labels)- 當洗衣機上標有劃交叉的輪式垃圾桶時,表示此洗衣機符合歐洲指令2002/96/EC。
- 所有的電器和電子產品,均要和城市垃圾分開處理,應將它們放入政府或當地政府指定的專門回收設施處理。
- 正確處理閣下的舊洗衣機,將有助於防止對環境和人類健康,造成潛在的負面影響。
- 有關處理舊洗衣機的詳細資訊,請閣下聯絡市政府、垃圾處理服務中心或購買洗衣機的商店。
注意
當棄置本產品時,請切斷電源線、毀壞電源插頭、破壞門鎖,防止小孩被困在洗衣機內。
以下各項,均不在保養範圍內:
- 上門教授如何使用本產品。
- 將本產品連接至規格牌以外的電壓。
- 因意外、疏忽、誤用或天災所引致的故障。
- 正常使用或根據使用說明書操作以外的其它因素所引致的故障。
- 提供產品使用說明或變更產品設定。
- 因有害動物或昆蟲,如老鼠、蟑螂等所引致的故障。
- 正常的噪音或震動情況,如排水聲、脫水聲或警示用的蜂鳴聲。
- 安裝的修正工作。例如:調較產品水平度、排水量調整等。
- 使用說明書中建議的正常保養工作。
- 更換保險絲或修正房屋的電路或水喉系統。
- 修正未獲授權的維修。
- 由本產品潛在的瑕疵所造成的附帶或引起個人財物損失。
· 本產品如果用於商業用途,將不會給予保養。
(例如:公共浴室、宿舍、訓練中心、宿舍等公共場所)。
- 從洗衣機內,包括水泵及入水喉過濾器,清除異物/物質,如砂礫、釘子、胸罩金屬絲、鈕扣等。
如本產品安裝在正常服務區域範圍外,任何包括產品修理、或更換損壞零件等所產生的運送成本,均由產品所有人負擔。
Owner's Manual
WASHING
MACHINE
Before beginning installation, read these instructions carefully. This will simplify installation and ensure that the washer is installed correctly and safely. Leave these instructions near the washer after installation for future reference.
WF-NP1006MW
WF-NP1206MW

text_image
Black and white barcode image with vertical lines and patternsMFL69380505
ver.101315.00
Product Features


■ Protection against creases
With the alternate rotation of the drum, creasing in the laundry is minimized.
■ Built-in heater
Internal heater automatically heats the water to the best temperature on selected cycles.
■ More economical by Intelligent Wash System
Intelligent Wash System detects the amount of load and water temperature, and then determines the optimum water level and washing time to minimize energy and water consumption.
■ Child-Lock
The child-lock system is to be used for preventing children from pressing any button to change the program during operation.
■ Low noise speed control system
By sensing the amount of load and balance, it evenly distributes load to minimize the spinning noise level.
■ Direct Drive System
The advanced Brushless DC motor rotates the drum directly without belt and pulley.
■ 6 motion
Washer is able to perform various drum actions or a combination of different actions depending on the wash program selected. Combined with a controlled spin speed and the ability of the drum to rotate both left and right, the wash performance of the machine is greatly improved, giving you perfect results every time.
■ Auto Restart
Auto Restart allows the program to restart all by itself in case of power failure. It does from the stage where it stopped.
Contents
Warnings....3
Specifications....4
Installation....5
Care before washing....11
Adding detergent 12
Function 14
How to use washer 15
Maintenance 22
Troubleshooting guide 26
Terms of Warranty 30

WARNING!
For your safety, the information in this manual must be followed to minimize the risk of fire or explosion, electric shock, or to prevent property damage, personal injury, or loss of life.
IMPORTANT SAFETY INSTRUCTIONS
WARNING: To reduce the risk of fire, electric shock, or injury to persons when using the washer, follow basic precautions, including the following:
- Before installation, check exterior damages. If it has, do not install.
- Do not install or store the washer where it will be exposed to the weather.
- Do not tamper with controls.
- Do not repair or replace any part of the washer or attempt any servicing unless specifically recommended in the user-maintenance instructions or published user-repair instructions that you understand and have the skills to carry out.
- Keep the area underneath and around your appliances free of combustible materials such as lint, paper, rags, chemicals, etc.
- Close supervision is necessary if this appliance is used by or near children. Do not allow children to play on, with, or inside this or any other appliance.
- Keep small animals away from the appliance.
- Do not leave the washer door open. An open door could entice children to hang on the door or crawl inside the washer.
- Never reach into washer while it is moving. Wait until the drum has completely stopped.
- The laundry process can reduce the flame retardant of fabrics.
- To avoid such a result, carefully follow the garment manufacturer's wash and care instructions.
- Do not wash or dry articles that have been cleaned in, washed in, soaked in, or spotted with
combustible or explosive substances (such as wax, oil, paint, gasoline, degreasers, dry-cleaning solvents, kerosene, etc.) which may ignite or explode. Oil may remain in the tub after a whole cycle resulting in fire during drying. So, do not load oiled clothes.
- Do not slam the washer door closed or try to force the door open when locked. This could result in damage to the washer.
- When the machine runs high temperature, the front door may be very hot. Don't touch it.
• To minimize the possibility of electric shock, unplug this appliance from the power supply or disconnect the washer at the household distribution panel by removing the fuse or switching off the circuit breaker before attempting any maintenance or cleaning. - When unplugging power cord, do not pull out by grasping the cord. Otherwise, the power cord may be damaged.
- Never attempt to operate this appliance if it is damaged, malfunctioning, partially disassembled, or has missing or broken parts, including a damaged cord or plug.
- Before discarding an old machine unplug it. Render the plug useless. Cut off the cable directly behind the appliance to prevent misuse.
- When a product was under water, Please call service center. The risk of electric shock and fire.
* Do not push down the door excessively, when washer door open. This could topple over the washer.
SAVE THESE INSTRUCTIONS
GROUNDING INSTRUCTIONS
This appliance must be grounded. In the event of malfunction or breakdown, grounding will reduce the risk of electric shock by providing a path of least resistance for electric current. This appliance is equipped with a cord having an equipment-grounding conductor and grounding plug. The plug must be plugged into an appropriate outlet that is properly installed and grounded in accordance with all local codes and ordinance.
- Do not use an adapter or otherwise defeat the grounding plug.
- If you don't have the proper outlet, consult an electrician.
WARNING: Improper connection of the equipment-grounding conductor can result in risk of electric shock. Check with a qualified electrician or serviceman if you are in doubt as to whether the appliance is properly grounded. Do not modify the plug provided with the appliance - if it does not fit the outlet, have a proper outlet installed by a qualified electrician.
Specifications

text_image
Power Plug • If the supply cord is damaged, it must be replaced by the manufacturer or its service agents or a similarly qualified person in order to avoid a hazard. Drain Hose Drum Drain Pump Filter Door Lower cover Adjustable Feet Drain Plug Lower Cover Cap■ Name : Front loading washing machine
■ Power supply : 220-240V\~,50Hz
■ Size : 600mm(W) ×440mm(D) ×850mm(H)
■ Weight : 60kg
■ Max.Watt : 1700W
■ Wash capacity :6kg
■ Spin speed : Rinse Hold/No Spin/400/800/1000
Rinse Hold/No Spin/400/800/1200
■ Permissible water pressure : 1.0-100 kgf/cm² (100-1000kPa)
* The appearance and specifications may be varied without notice to raise the units quality.
Accessories

natural_image
Simple line drawing of a coiled cable or hose with two connectors (no text or symbols)Inlet hose 1EA
Spanner

installation
Install or store where it will not be exposed to temperatures below freezing or exposed to the weather.
Properly ground washer to conform with all governing codes and ordinances.
The base opening must not be obstructed by carpeting when the washing machine is installed on a carpeted floor.
In countries where there are areas which may be subject to infestation by cockroaches or other vermin, pay particular attention to keeping the appliance and its surroundings in clean condition at all times.
Any damage which may be cause by cockroaches or other vermin will not be covered by the appliance guarantee.
■ Transit bolts
The appliance is fitted with transit bolts to prevent internal damage during transport.
- Packing and all transit bolts must be removed before using the washer.
When unpacking the base, be sure to remove the additional packing support in the middle of the base packing.

text_image
Washer Base Packing Packing Support (Packing support may not be used depending on models.)■ Removing transit bolts
natural_image
Technical line drawing of a rectangular enclosure with internal components and arrows indicating flow or movement (no text or symbols)- To prevent internal damage during transport, the special 4 bolts are locked. Before operating the washer, remove the bolts along with the rubber bungs.
- If they are not removed, it may cause heavy vibration, noise and malfunction.
- Unscrew the 4 bolts with the spanner supplied.

natural_image
Diagram of a mechanical device with internal tubing and a magnified inset showing internal components (no text or symbols)- Take out the 4 bolts along with the rubber bungs by slightly twisting the bung. Keep the 4 bolts and the spanner for future use.
- Whenever the appliance is transported, the transit bolts must be refitted.
- Close the holes with the caps supplied.

installation
■ Installation place requirement

text_image
Washer Drain Hose Laundry Tub approx. 2cmLevel floor :
Allowable slope under entire washer is 1°
Power outlet :
Must be within 1.5 meters of either side of location of washer. Do not overload the outlet with more than one appliance.
Additional Clearance :
For wall, door and floor modeling is required.
(10cm : rear /2cm:right & left side)
Do not place or store laundry products on top of washer at any times.
They can damage the finish or controls.
■ Positioning
Install the washer on a flat hard floor.
Make sure that air circulation around the washer is not impeded by carpets, rug etc.
- Never try to correct any unevenness in the floor with pieces of wood, cardboard or similar materials under the washer.
- If it is impossible to avoid positioning the washer next to a gas cooker or coal burning stove, an insulation(85x60cm) covered with aluminum foil on the side facing the cooker or stove, must be inserted between the two appliance.
- The washer must not be installed in rooms where the temperature can drop below 0^ .
- Please ensure that when the washer is installed, it is easily accessible for the engineer in the event of a breakdown.
- Adjust all four feet using the transit bolt spanner provided ensuring the appliance is stable, and a clearance of approximately 20mm is left between the top of the washer and the underside of the work-top.

nstallation
■ Electrical connection
- Do not use an extension cord or double adapter.
- If the supply cord is damaged, it must be replaced by the manufacturer or its service agents or similarly qualified person in order to avoid a hazard.
- Always unplug the machine and turn off the water supply after use.
- Connect the machine to an earthed socket in accordance with current wiring regulations.
-
The appliance must be positioned so that the plug is easily accessible.
-
Repairs to the washing machine must only be carried out by qualified personnel. Repairs carried out by inexperienced persons may cause injury or serious malfunctioning. Contact your local service center
- Do not install your washing machine in rooms where temperature below freezing may occur. Frozen hoses may burst under pressure. The reliability of the electronic control unit may be impaired at temperatures below freezing point.
- If the appliance is delivered in the winter months and temperatures are below freezing: Place the washing machine at room temperature for a few hours before putting it into operation.
CAUTION
This appliance is not intended for use by young children or infirm persons without supervision. Young Children should be supervised to ensure that they do not play with appliance.
CAUTION
CAUTION concerning the Power Cord
Most appliances recommend they be placed upon a dedicated circuit; that is, a single outlet circuit which powers only that appliance and has no additional outlets or branch circuits. Check the specification page of this owner's manual to be certain.
Do not overload wall outlets. Overloaded wall outlets, loose or damaged wall outlets, extension cords, frayed power cords, or damaged or cracked wire insulation are dangerous. Any of these conditions could result in electric shock or fire. Periodically examine the cord of your appliance, and if its appearance indicates damage or deterioration, unplug it, discontinue use of the appliance, and have the cord replaced with an exact replacement part by an authorized servicer.
Protect the power cord from physical or mechanical abuse, such as being twisted, kinked, pinched, closed in a door, or walked upon. Pay particular attention to plugs, wall outlets, and the point where the cord exits the appliance.
■ Washing Machine is to be connected to the water mains using new hose-sets and old hose-sets should not be used.
■ Connecting water supply hose

text_image
Diagram illustrating a hygiene or plumbing system with labeled components including hose connector, sealing washer, and water pump.▶ Water supply pressure must be between 100kPa and 1000kPa (1.0\~10kgf/cm²)
▶ Don't strip or crossthread when connecting Inlet hose to the valve.
▶ If the water supply pressure is more than 1000kPa, a decompression device should be installed.
- Two rubber seals are supplied with the water inlet hoses. They are used for preventing water leaks.
- Make sure the connection to taps is tight enough.
- Periodically check the condition of the hose and replace the hose if necessary.
- Make sure that there is no kink on the hose and that it is not crushed.
NOTE
After completing connection, if water leaks from the hose, repeat the same steps. Use the most conventional type of faucet for water supply. In case the faucet is square or too big, remove the spacing ring before inserting the faucet into the adaptor.

installation
■ Normal Tap without thread & screw type inlet hose
- Unscrew the fixing screw to attach the tap.

text_image
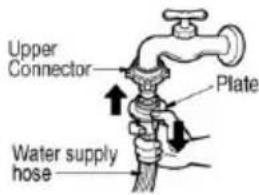
Upper Connector Fixing screw Rubber packing- Push the connector up till the rubber packing is in tight contact with the tap. Then tighten the 4 screws.

text_image
Rubber packing Upper Connector- Push the water supply hose vertically upwards so that the rubber packing within in the hose can adhere completely to the tap and then tighten it by screwing it to the right.

text_image
Upper Connector Plate Water supply hose■ Normal Tap without thread & one touch type inlet hose
- Untighten the upper connector screw.
text_image
Upper Connector Rubber packing Fixing screw Middle connector• In case the diameter of the tap is large remove the guide plate.

- Push the upper connector up till the rubber packing is in tight contact with the tap. Then tighten the 4 screws.

text_image
Rubber packing Upper Connector Middle connector- Turn the middle connector not to have water leaked.
• Make sure that the rubber seal is inside the hose connector.

text_image
Hose connector Rubber seal- Connect the water supply hose to the middle connector, pushing the plate down.
text_image
Upper Connector Plate Water supply hose• To separate the water supply hose from the middle connector shut off the tap. Then pull the inlet hose down, pushing the plate down.

natural_image
Illustration of a person using a computer in a desktop, with an inset showing a close-up of the screen (no text or symbols present)- Your machine comes with only cold water connection. - Make sure that there are no kinks in the hose and that it is not crushed.
Used the horizontal tap
Horizontal tap

Extension tap

Square tap


nstallation
This equipment is not designed for maritime use or for use mobile installations such as caravans, aircraft etc.
Turn off the stopcock if the machine is to be left for any length of time (e.g. holiday), especially if there is no floor drain(gully) in the immediate vicinity.
When disposing of the appliance, cut off the mains cable, and destroy the plug Disable the door lock to prevent young children being trapped inside.
Packaging material (e.g. Films, Styrofoam) can be dangerous for children. There is a risk of suffocation!
Keep all packaging well away from children
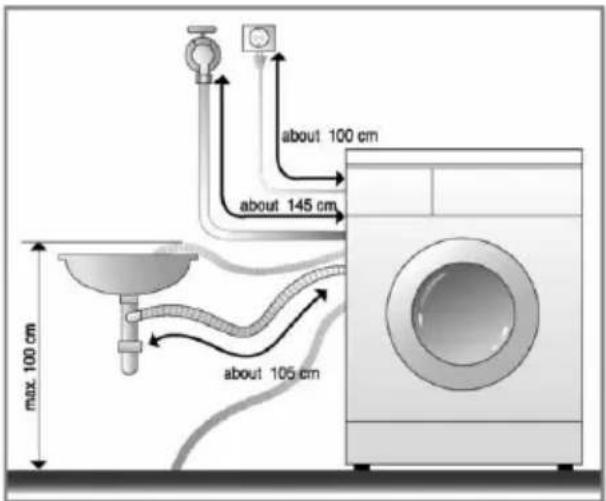
■ Installation of drain hose

text_image
about 100 cm about 145 cm max. 100 cm about 105 cm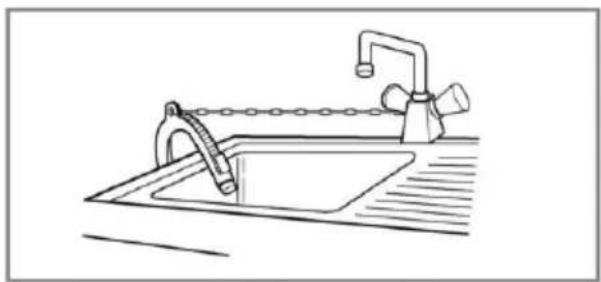
natural_image
Line drawing of a stainless steel kitchen sink with faucet and faucet (no text or symbols)- When installing the drain hose sink, secure it tightly with a string.
- Proper securing of the drain hose will protect the floor from damage due to water leakage.
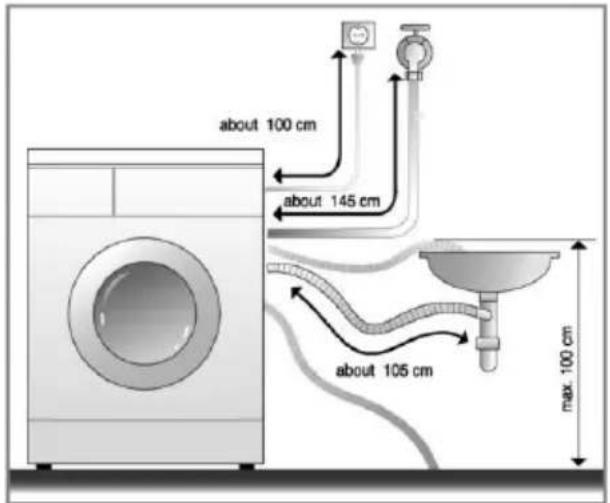
text_image
about 100 cm about 145 cm about 105 cm max 100 cm• The drain hose should not be placed higher than 100 cm above the floor. Water in the washer does not drain or drains slowly.
- Proper securing of the drain hose will protect the floor from damage due to water leakage.
- When the drain hose is too long, do not force back into the washer. This will cause abnormal noise.

text_image
Laundry tub Hose Retainer Tie strap max. 100cm max. 100cm
installation
■ Level adjustment
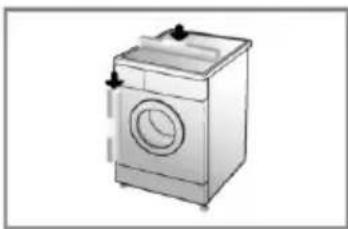
natural_image
Illustration of a single washing machine with front panel and side door (no text or symbols)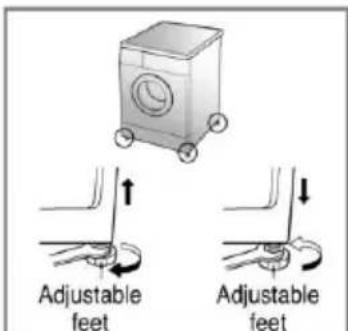
text_image
Adjustable feet Adjustable feet
natural_image
Illustration of a single washing machine with front panel and side door (no text or symbols)- Adjusting the washing machine level properly prevents excessive noise and vibration. Install the appliance on a solid and level floor surface, preferably in a corner of the room.

Timber or suspended type flooring may contribute to excessive vibration and unblance errors.
- If the floor is uneven, adjust the adjustable feet as required. (do not insert pieces of wood etc. under the feet) Make sure that all four feet are stable and resting on the floor and then check that the appliance is perfectly level. (use a spirit level)
※ After the washer is level, tighten the lock nuts up towards of the base of the washer. All lock nuts must be tightened.

In the case that the washing machine is installed on a raised platform, it must be securely fastened in order to eliminate the risk that it might fall off.
* Diagonal Check
When pushing down the edges of the washing machine top plate diagonally, the machine should not move up and down at all. (Please, check both of two directions) If machine rocks when pushing the machine top plate diagonally, adjust the feet again.
■ Concrete floors
• The installation surface must be clean, dry and level.
• Install washer on a flat hard floor.
■ Tile floors (Slippery floors)
- Position each foot on the Tread Mate and level the machine to suit. (Cut Tread Mate into 70x70 mm sections and stick the pieces on to the dry tile where machine is to be placed.)
※ Tread Mate is a self adhesive material used on ladders & steps that prevents slipping.
■ Wooden floors (Suspended floors)
- Wooden floors are particularly susceptible to vibration.
• To prevent vibration we recommend you place rubber cups under each foot, at least 15mm thick under the washer, secured to at least 2 floor beams with screws. - If possible install the washer in one of the corners of the room, where the floor is more stable.
※ Insert the rubber cups to reduce vibration.
※ You can obtain the rubber cups (p/no.4620ER4002B) from the LG spares dept.
Rubber Cup


Important!
- Proper placement and levelling of the washer ensure long,regular and reliable operation.
• The washer must be absolutely horizontal and stand firmly in position. - It must not "Seesaw" across corners under load.
- The installation surface must be clean, free from floor wax and other lubricant coatings.
- Do not let the feet of the washer get wet. If feet of the washer get wet, slipping may occur.

are before washing
■ Before the first washing
Select a cycle (COTTON 60°C, add a half load of detergent) allow the unit to wash without clothing. This will remove residues and water from the drum that may have been left during manufacturing.
■ Caring before washing
1. Care Labels
Look for a care label on your clothes. This will tell you about the fabric content of your garment and how it should be washed.
2. Sorting
To get the best results, Sort clothes into loads that can be washed with the same wash cycle. Water temperature and spin speed and different fabrics need to be washed in different ways. Always sort dark colors from pale colors and whites. Wash separately as dye and lint transfer can occur causing discoloration of white etc. If possible, do not wash heavily soiled items with lightly soiled one.
Soil (Heavy, Normal, Light) Separate clothes according to amount of soil.
Color (White, Lights, Darks) Separate white fabrics from colored fabrics.
Lint (Lint producers, Collectors) Wash lint producers and lint collectors separately.
3. Caring before loading
■ Combine large and small items in a load. Load large items first. Large items should not be more than half the total wash load. Do not wash single items. This may cause an out-of-balance load. Add one or two similar items.

natural_image
Illustration of a person's pants with arrows indicating movement or process (no text or symbols)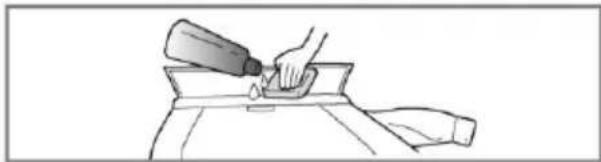
natural_image
Line drawing of a hand pouring liquid into a container (no text or symbols)
natural_image
Illustration of four different shirt designs with tarric marks, no text or symbols present
natural_image
Medical illustration showing a cross-sectional view of internal organs with a magnified inset highlighting tissue layers (no text or labels)
natural_image
Cross-sectional view of a biological cell or vesicle with internal structures and a marked region (no text or symbols)- Check all pockets to make sure that they are empty. Items such as nails, hair clip, matches, pens, coins and keys can damage both your washer and your clothes.
- Close zippers, hooks and strings to make sure that these items don't snag on other clothes.
- Pre treat dirt and stains by brushing a little detergent dissolved in water onto stains like collars and cuffs to help shift dirt.
- Check the folds of the flexible gasket (gray) and remove any small articles, if any.
- Check inside of the drum and remove any left items in it for next wash cycle.
- Remove any clothing or items on the flexible gasket to prevent clothing and the gasket damages.

dding detergent
■ Adding detergent and fabric softener
1. The Dispenser Drawer
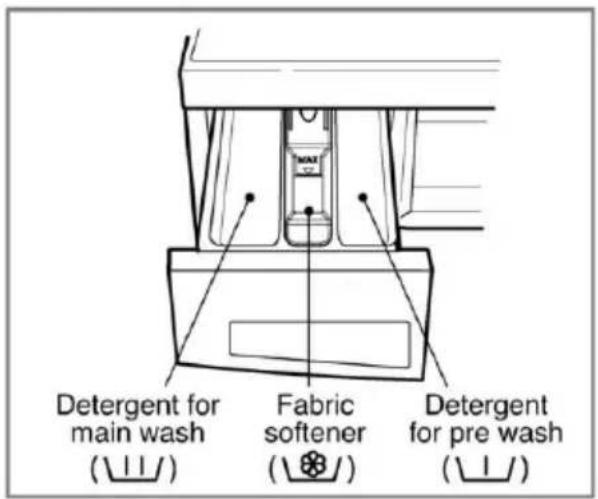
text_image
Detergent for main wash (⊥⊥/) Fabric softener (⊥⊗/) Detergent for pre wash (⊥⊥/)• Main wash only → ∪
• Pre Wash + Main Wash → ∪ ∨ • ∥ ∥
Warning
Keep all washing detergents away from children as there is danger of poisoning. Too much detergent, bleach or softener may cause an overflow.
Be sure to use the appropriate amount of detergent.
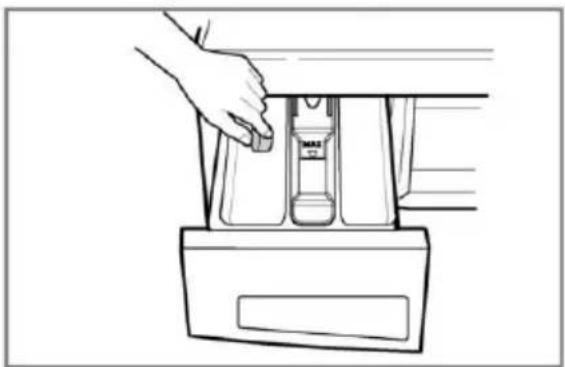
2. Adding Fabric Softener

text_image
(SOFTENER MAX) MAX MAX O X- Do not exceed the maximum fill line. Close the dispenser drawer slowly. Overfilling can cause early dispensing of the fabric softener which could stain clothes.
- Do not leave the fabric softener in the detergent drawer for more than 2 days. (Fabric softener could harden)
- Softener will automatically be added during the last rinse cycle.
- Do not open the drawer when water is supplied.
- Solvents(benzene, etc) are not allowable.
NOTE Do not pour fabric softener directly on the cloths

dding detergent
3. Detergent dosage
- Detergent should be used according to the instruction of the detergent manufacture.
- If too much detergent is used, too many suds can occur and this will decrease the washing result or cause heavy load to the motor.
- It is recommended that you use powdered detergent for best results.
- If you wish to use liquid detergent follow guidelines provided by the detergent manufacturer.
- You can pour liquid detergent directly into the main detergent drawer if you are starting the cycle immediately.
- Please do not use liquid detergent if you are using 'time delay' as the liquid may harden, or if you have selected 'PRE-wash'.
- If too many suds occur, please reduce the detergent amount.
- Detergent usage may need to be adjusted for water temperature, water hardness, size and soil level of the load. For best results, avoid oversuding.
Warning
Do not let the detergent harden.
Doing so may lead to blockages, poor rinse performance or bad odor.

- Full load: according to manufacturer's recommendation.
• Part load : 3/4 of the normal amount.
• Minimum load : 1/2 of full load.
- Detergent is flushed from the dispenser at the beginning of the cycle.
4. Adding water softener
natural_image
Line drawing of a hand holding a container with liquid inside, no text or symbols present- A water softener, such as Anti-limescale (e.g. Calgon) can be used to cut down on the use of detergent in extremely hard water areas.
Dispense according to the amount specified on the packaging.
First add detergent and then the water softener. - Use the quantity of detergent as for soft water.
5. Using tablet
natural_image
Simple line drawing of a washing machine with a bag and two coins, no text or symbols present.1) Open the door and put tablets into the drum.
2) Load the laundry into the drum and close the door.

natural_image
Simple line drawing of a washing machine with a T-shirt, showing clothing transfer from a front view to a back (no text or symbols)
unction
■ Recommended courses according to the laundry type
| Program | Description | Fabric type | Proper Temp. | Maximum Load |
| Cotton | Provides better performance by combining various drum motions. | Color fast garments (shirts, nightdresses, pajamas, etc) and normally soiled cotton load (underwear). | 40°C(Cold to 95°C) | Rating |
| Cotton Large | Provides optimized washing performance for a large amount of laundry with less energy consumption. | 60°C(Cold to 60°C) | ||
| Easy Care | This cycle is suitable for casual shirts that do not need ironing after washing. | Polyamide, Acrylic, Polyester. | 40°C(Cold to 60°C) | Less than 3.0kg |
| Mix | Enables various fabrics to be washed simultaneously. | Various kind of fabrics except special garments. (Silk/delicate, sports wear, dark clothes, wool, Duvet/Curtains). | 40°C(Cold to 40°C) | |
| Baby care (页) | Remove solid and protein stain and provide better rinse performance | Lightly soiled baby wear | 60°C(60°C to 95°C) | Less than 4.0kg |
| Skin Care | Remove efficiently detergent residue in clothes | Fabrics which will be in direct contact with the skin, e.g. underwear, nappies, towelling, bed linen, pillow and mattress covers | 40°C(Cold to 60°C) | Rating |
| Duvet | This cycle is for large items such as bed cover, pillows, sofa covers, etc. | Cotton bedding except special garments (delicates, wool, silk, etc.) with filling: duvets, pillows, blankets, sofa covers with light filling. | 40°C(Cold to 40°C) | 1 single size |
| Sports Wear | This cycle is suitable for sports wear such as jogging clothes and running wear. | Coolmax, Gore-tex, fleece and Sympatex. | Less than 2.0kg | |
| Delicate | This cycle is for delicate clothes such as underwear, blouse, etc. | Delicate, easily damaged laundry. | 20°C(Cold to 40°C) | |
| Wool | Enable to wash wool fabrics. (Please use detergent for machinewashable woolens). | Machine washable woolens with pure new wool only. | 40°C(Cold to 40°C) | |
| Quick 30 | This cycle provides fast washing time for small loads and lightly soiled clothes. | Colored laundry which is lightly soiled fast. | 20°C(Cold to 40°C) | |
| Intensive 60 | Within 60mins provide better washing performance and energy efficiency. | Cotton and mix fabrics. (Special PROGRAM within 60 mins for normally soiled laundry). | 60°C(Cold to 60°C) | Less than 3.0kg |
| Rinse+Spin | Use for laundry that need rinsing only or to add rinse-added fabric softener to laundry. | Normal fabrics which can be washable. | - | Rating |
* Water Temperature : Select the water temperature to the wash cycles.
Always follow garment manufacture's care label or instructions when laundering.
* Intensive : When washing heavily soiled laundry you can increase effectiveness by choosing "Intensive" option.
* Pre Wash : If the laundry is heavily soiled, "Pre Wash" Course is recommended.
* Crease Care : If you want to prevent crease, select Crease Care button.
* Medic Rinse : For high effectiveness or more purity in rinse operation you can choose Medic Rinse option.
* Program setting with "Cotton large 60°C+Intensive" option for test in accordance or in conformity with IEC60456.
* Notes : Neutral detergent is recommended. The wool cycle features gentle tumbling and low-speed spin for garment care.

ow to use washer
SmartDiagnosis™ function is available only for the products with a SmartDiagnosis™ mark.
text_image
特大棉質 Carbon Large 混合洗 Mix 麗易 Easy Care 大件 Duvet 護膚洗 Skin Care 超柔阿里洗汽 Baby Care 棉質衣物 Carbon 運動裝 Sports Wear 柔軟衣物 Delisato 羊毛 Wool 強力沉60 Intensive 80 30分鐘快速洗 Quick 50 過水+脱水 Rings+Spin ★ 序鍊型控制器動脈功能 Press & Hold Size, for Tub Clean Function 其他洗水 Wash 飛洗 1200 800 400 免洗/Pre Wash 免洗/No Spin 免排水/Rings/Nan 免水 Cold 防風光線-7.5mm 防風光線-7.5mm 防風Ossive Care 脱水 Spin 溫度 Temp. Smart Charged1. Cotton automatically selected upon power on.
- Press the Power button to start.
- Press the Start/Pause button.
-
Initial conditions
-
Wash ( ☎ ): main wash
-Rinse( ) : 3 times - Spin ( ☑ ) :
• 1200rpm [WF-NP1206MW]
• 1000rpm [WF-NP1006MW]
- Water temperature : 40°C
- Program : Cotton
2. Manual Selecting
- Press the Power button to start.
- Select the conditions which you want to use, by turning the program dial and pressing each button.
For selecting the each conditions, please refer to the page16\~page21
- Press the Start/Pause button.
3. Beep on/off
text_image
18:96• The Beep on/off function can be set by pressing Time Delay button+ Crease Care button, when the washing machine is working.
(About three seconds.)
- Once the Beep on/off function is set, the setting is memorized even after the power is turned off.
• If you want to turn the Beeper on, simply repeat this process.

ow to use washer
text_image
特大棉質 Cotton Large 混合洗 Mix 簡易 Lazy Care 大件 Duvet 腰痛洗 Skin Care 超柔阿腰洗 Baby Care (1) 桃質衣物 Cotton 運動裝 Sports Wear 柔軟衣物 Delicative 羊毛 Wear 強力洗90 Intensive 80 30分鐘快速洗 Quick 30 強水+脫水 Rise+Spin (10) (6) (2) (7) (3) (4) (8) (5) (9) (11) (12) *光纜安片松頭自動車場記載/Press & Hold See, for Pull Down Function 預約 Time Delay 2000 800 400 常用水 No Spin 無排水 Inside Roll 20°C 40°C 20°C 冷水 Cold 反風風量 Colorative 防禍 Crises Cars (10) (6) (2) (7) (3) (4) (8) (5) (9) (11) (12)(1) Dial : Program
(2) Button : Start/Pause
(3) Button : Spin
(4) Button : Temperature
(5) Button : Power
(6) Button : Medic Rinse
(7) Button: Pre Wash
(8) Button : Intensive
(9) Button : Crease Care
(10) Child Lock
(11) Tub Clean
(12) Button : Time Delay
Power

1. Power
- Press the Power button to turn power on and off.
- To cancel the Time Delay function, the power button should be pressed.
2. Initial Program
- When the Power button is pressed, the washer is ready for Cotton program. And the other initial conditions as follows.
- So, if you want to advance into the washing cycle without changing the program, just press the Start/Pause button and then the washer will proceed.
■ Initial program
· [WF-NP1206MW]
- Cotton Program / Main wash / Normal Rinse / 1200 rpm / 40°C
• [WF-NP1006MW]
- Cotton Program / Main wash / Normal Rinse / 1000 rpm / 40°C
Program

text_image
特大棉質 Cotton Large 混合洗 Mix 简易 Easy Care 大件 Duvet 腰痛洗 Gen Care 超柔阿腻洗 Baby Care 棉質衣物 Cotton 運動裝 Sports Wear 柔軟衣物 Delicate 羊毛 Wool 強力洗60 Intensive 96 30分鐘快速洗 Quick 36 過水+脫水 Rinse+Spin- 13 programs are available according to the laundry type.
- Lamp will light up to indicate selected program.
- When Start/Pause button is pressed, the Cotton program is automatically selected.
- By turning the Program dial, the program is selected in order of "Cotton-Sports Wear-Delicate-Wool-Intensive 60-Quick 30-Rinse+Spin-Baby Care Skin Care-Duvet-Easy Care-Mix-Cotton Large".
Regarding to the laundry type for each program Please refer to the page14.

ow to use washer
Start/Pause

1. Start
- This Start/Pause button is used to start wash cycle or pause the wash cycle.
2. Pause
- If temporary stop of wash cycle is needed, press the Start/Pause button.
- When in Pause, the power is turned off automatically after 4 minutes.
- NB. The door will not open before 1 to 2 minutes when Pause is selected, or at the end of the wash cycle.
Door Lock

text_image
18:88 重量检测 Detecting 洗碗 Wash 漏水 Rinse 防水 Spin• Lights whenever the door of the washer is locked
• The door can be unlocked by pressing the Start/Pause button to stop the washer.
• The door can be opened after a short delay.
Detecting

text_image
18:00 重置器 Detecting 洗漱 Wash 透水 Rinse 脱水 Spin- While the "Detecting" is shown in the display the machine rotates slowly and detects how many laundries are loaded in the drum. It will take a few seconds.
• Available in Cotton, Baby Care, Skin Care, Easy care, Mix, Cotton Large.
Option
活性過水 Medic Rinse

預洗 Pre Wash

深層清潔 Intensive

防皺 Crease Care

- By pressing the Option button, all Option functions may be selected.
1. Medic Rinse
- For high effectiveness or more purity in rinse operation you can choose Medic Rinse option.
- It can be chosen in all course with the exception of Sports Wear, Delicate, Wool, Intensive 60, Quick 30, Duvet.
2. Pre Wash
- If the laundry is heavily soiled, "Pre Wash" course is effective.
3. Intensive
- If the laundry is heavily soiled "Intensive" option is effective.
- By selecting the Intensive option, the wash time may be extended, depending on the program selected.
4. Crease Care
- If you want to prevent crease, select this button with spin speed.
The required lamp will light up for identification.

ow to use washer
Child Lock( )

If you choose to lock the buttons on the control assembly to prevent tampering this function may be selected.
- Child Lock can be set by pressing the Medic Rinse button and Pre Wash button simultaneously. (About three seconds)

text_image
活性酒水 Medic Rinse 预洗 Pre Wash → 18:68• To deactivate Child Lock system, press Medic Rinse and Pre Wash buttons simultaneously again. (About three seconds)

text_image
活性漏水 Medic Rinse 预洗 Pre Wash → 18:88• To change to the desired program, whilst in child lock mode.
1. Press both Medic Rinse and Pre Wash together once again.
(About three seconds)
2. Press the Start/Pause button.
3. Select the desired program and press the Start/Pause button again.

flowchart
graph LR
    A["Start"] --> B["Change the desired program"]
    B --> C["End"]
- The child lock can be set at any time and it can be deactivated only by using child lock cancel process. Turning the power off and operational errors will not affect child lock.
Tub Clean(\*)

Tub Clean course can be set by pressing and holding Intensive and Crease Care button simultaneously.
When Tub Clean course is set, display "tcl", and all buttons are inoperable.

TUB CLEAN is special cycle to clean the inside of the washer. This cycle uses higher water level with higher spin speed. Perform this cycle regularly.
How to use the Tub Clean cycle:
- Remove any clothing or items from the washer and close the door.
- Open the dispenser drawer and add Anti limescale (Calgon) to the Main wash compartment.
NOTE: Do not add any detergent to the detergent compartments. Excessive suds may generate and leak from the washer.
- Close the dispenser drawer slowly.
- Power On and then press and hold Intensive and Crease Care button for 3 seconds, then "LCL" is displayed in LED.
- Press the Start/Pause button to start.
- After the cycle is complete, leave the door open to dry around the washer door opening, flexible gasket and door glass.

CAUTION: If there is a small child, be careful not to leave the door open for too long.

ow to use washer
Spin( )

text_image
1200 800 400 免脱水 No Spin 免排水 Rinse Hold 脫水 Spin[WF-NP1206MW]
text_image
1000 800 400 免脱水 No Spin 免排水 Rinse Hold 脱水 Spin[WF-NP1006MW]
After selecting the spin course, the spin speed can be chosen by pressing the spin button.
1. Spin selection
- Spin Speed is available according to the program as follows.
[WF-NP1206MW]
-Cotton, Intensive 60, Quick 30, Rinse+Spin, Skin Care, Mix, Cotton Large
Rinse Hold-No Spin-400-800-1200
-Sportswear, Delicate, Wool, Baby Care
Duvet, Easy care
Rinse Hold-No Spin-400-800
[WF-NP1006MW]
-Cotton, Intensive 60, Quick 30, Rinse+Spin, Skin Care, Mix, Cotton Large
Rinse Hold-No Spin-400-800-1000
-Sportswear, Delicate, Wool, Baby Care
Duvet, Easy care
Rinse Hold-No Spin-400-800
2. No spin
- If No spin is selected, the washer stops after draining water.
3. Rinse Hold
- Rinse Hold is selected by pressing the spin button repeatedly this function leaves clothes in the machine; suspended in the water after a rinse without entering into spin. - To proceed through to a drain or spin, once the rinse hold function is completed using to Program dial and Spin button to the required program. (Spin)
The required lamp will light up for identification.

ow to use washer
Water Temp.
text_image
95°C 60°C 40°C 20°C 冷水 Cold 温度 Temp.- By pressing the Temp. button, the water temperature can be selected.
- Cold
-20℃/40℃/60℃/95℃
• Water temperature can be selected according to the program.
The required temperature lamp will light up for identification.
For the more detailed information, please refer to the page14.
Time Delay

text_image
13:00 24/92 Time Delay 15:00 24/92 Time DelayPreparing washing before starting "Time Delay"
- Turn on the water tap.
- Load laundry and close the door.
- Place the detergent and fabric softener in the drawer.
• How to set "Time Delay"
- Press Power button.
- Turn the Program dial to select the program you require.
- Press Time Delay button and set the desired time.
-
Press the Start/Pause button. (":" blinks.)
-
If Time Delay button is pressed, "3:00" is displayed. The maximum delayed time is 19 hours and the minimum time is 3 hours.
• Each pressing of the button advances on time delay by one hour. - To cancel the time delay, press the Power button.
- Time Delay is 'expected time' from the present to the completion of washing cycle or selected process (Wash, Rinse, Spin).
- According to the condition of water supply and temperature, the delayed time and the actual washing time may vary.

ow to use washer
Display

text_image
18:88 重量控爆 Detecting 洗碗 Wash 漏水 Rinse 陀水 Spin1. Special function display
- When child lock is selected, the " [L ]" is displayed.
- When time delay is selected, it shows the remaining time to finish the selected program.
2. Self diagnosis display
- If the machine encounters a fault during operation, the associated fault will be displayed.
"PE": Water pressure sensing error
“FE”: Problem of overfilling water
"dE": Door is not closed
“ I E ”: Water inlet trouble
"OE": Drainage trouble
"UE": Unbalanced load
“E E ”: Water temperature trouble
“CE”: Over load in motor
"LE": Over load in motor
3. Completion of washing
- When washing cycle is completed, "End" is displayed on the "Multi display".
4. Time left
- During washing cycle, the remaining washing time is displayed.
• Recommended program by manufacturer.
| Cotton | 74' |
| Cotton Large | 116' |
| Mix | 69' |
| Easy Care | 95' |
| Duvet | 100' |
| Skin Care | 86' |
| Baby Care | 125' |
| Sports Wear | 54' |
| Delicate | 47' |
| Wool | 37' |
| Intensive 60 | 60' |
| Quick 30 | 30' |
| Rinse+Spin | 18' |
- The washing time may vary by the amount of laundry, water pressure, water temperature and other washing conditions.
- If an unbalanced load is detected or if the suds removing program operates, the wash time may be extended.
If these error letters are displayed, please refer to the troubleshooting page 26 and follow the guide.

aintenance
* Before cleaning the washer interior, unplug the electrical power cord to avoid electrical shock to avoid electrical shock hazards.
* When disposing of the appliance, cut off the mains cable, and destroy the plug Disable the door lock to prevent young children being trapped inside.
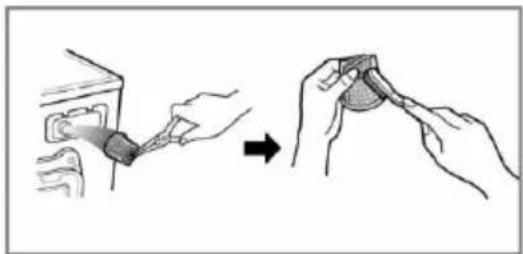
■ The water inlet filter
- "IE" error message will blink on the control panel when water does not enter the detergent drawer.
- If water is very hard or contains traces of lime deposit, the water inlet filter may become clogged.
It is therefore a good idea to clean it from time to time.

natural_image
Simple line drawing of a faucet with a handle and valve, showing fluid flow direction (no text or symbols)- Turn off the water tap.
natural_image
Line drawing of a hand inserting a plug into a device (no text or symbols)- Unscrew the water inlet hose.

natural_image
Illustration showing a hand holding a small object before and after a process, with no visible text or symbols.- Clean the filter using a hard bristle brush.

natural_image
Line drawing of a hand inserting a plug into a device (no text or symbols)- Tighten up the inlet hose.

aintenance
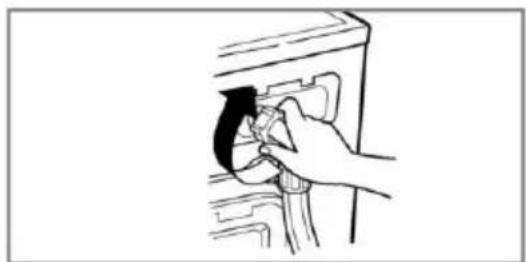
■ The drain pump filter
* The drain filter collects threads and small objects left in the laundry. Check regularly that the filter is clean to ensure smooth running of your machine.

CAUTION
First drain using the drain hose and then open the pump filter to remove whatever any threads or objects. Be careful when draining if the water is hot.
* Allow the water to cool down before cleaning the drain pump, carrying out emergency emptying or opening the door in an emergency.
natural_image
Illustration of a hand holding a clipboard with arrows indicating motion (no text or symbols)
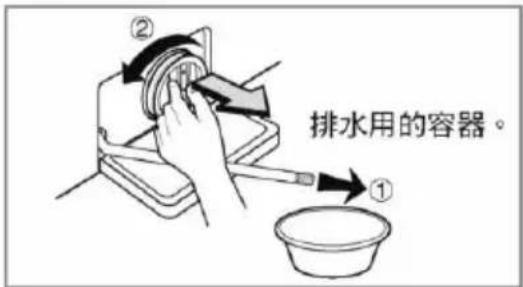
text_image
Container to collect the drained water. ①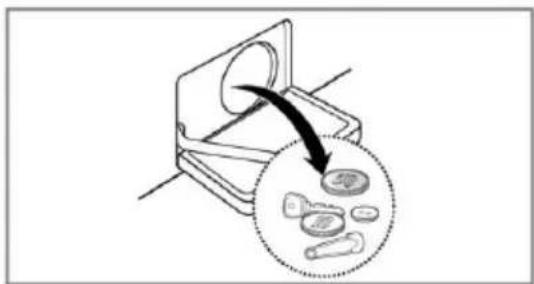
text_image
Diagram illustrating a mechanical device with a magnified view of internal components, showing a curved arrow and a magnified circular detail.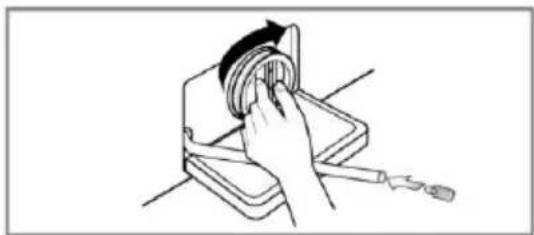
natural_image
Illustration of a hand holding a circular object with a tool, no text or symbols present
natural_image
Illustration of a hand holding a tablet device with arrows indicating rotation (no text or symbols)-
Open the lower cover cap. pull out the hose.
-
Unplug the drain plug. Open the filter by turning to the left.
-
Remove any extraneous matter from the pump filter.
-
After cleaning, turn the pump filter and insert the drain plug.
-
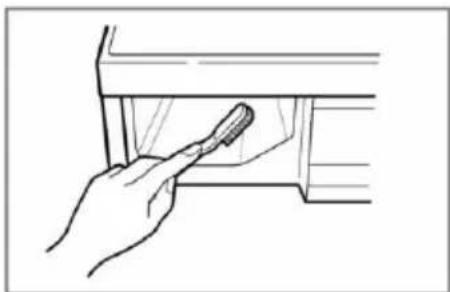
Close the lower cover cap.

aintenance
■ Dispenser drawer
* After a while detergents and fabric softeners leave a deposit in the drawer.
- It should be cleaned from time to time with a jet of running water.
- If necessary it can be removed completely from the machine by pressing the catch downwards and by pulling it out.
- To facilitate cleaning, the upper part of the fabric softener compartment can be removed.

natural_image
Illustration of hands operating a car infotainment device with a downward arrow (no text or symbols)
natural_image
Illustration of hands using a tool to lift a submerged object in water (no text or symbols)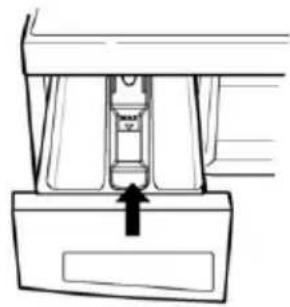
natural_image
Diagram of a mechanical component with an arrow indicating upward motion (no text or symbols present)■ The drawer recess
* Detergent can also accumulate inside the recess which should be cleaned occasionally with an old toothbrush.
- Once you have finished cleaning, replace the drawer and run a rinse cycle without laundry.

natural_image
Line drawing of a hand holding a tool inside a container (no text or symbols)■ The washing drum
- If you live in a hard water area, limescale may continuously build up in places where it cannot be seen and thus not easily removed.
Over time the build up of scale clogs appliances, and if it is not kept in check these may have to be replaced.
- Although the washing drum is made of Stainless steel, specks of rust can be caused by small metal articles (paper clips, safety pins) which have been left in the drum.
• The washing drum should be cleaned from time to time. - If you use descaling agents, dyes or bleaches, make sure they are suitable for washing machine use.
* Descaler may contain chemicals that may damage part of your washing machine.
* Remove any spots with a stainless steel cleaning agent.
* Never use steel wool.

aintenance
■ Cleaning your washer
1. Exterior
Proper care of your washer can extend its life.
The outside of the machine can be cleaned with warm water and a neutral non abrasive household detergent.
Immediately wipe off any spills. Wipe with damp cloth.
Try not to hit surface with sharp objects.
* IMPORTANT: Do not use methylated spirits, diluents or similar products.
2. Interior
Dry around the washer door opening, flexible gasket and door glass.
Run washer through a complete cycle using hot water.
Repeat process if necessary.
NOTE Remove hard water deposits using only cleaners labeled as safe for washing machine.
■ Winterizing instructions
If the washer is stored in an area where freezing may occur or moved in freezing temperatures, follow these instructions to prevent damage to the washer:
- Turn off water supply tap.
- Disconnect hoses from water supply and drain water from hoses.
- Plug electrical cord into a properly grounded electrical outlet.
- Add 1gallon(3.8L) of nontoxic recreational vehicle(RV) antifreeze into an empty wash drum. Close the door.
- Set spin cycle and let washer spin for 1 minute to drain out all water.
Not all of the RV antifreeze will be expelled. - Unplug electrical power cord, dry the drum interior, and close the door.
- Remove dispenser drawer, drain and dry excessive water from the compartments.
- Store washer in an upright position.
- To remove antifreeze from washer after storage, run empty washer through a complete cycle using detergent. Do not add wash load.

roubleshooting guide
* This washing machine is equipped with automatic safety functions which detect and diagnose faults at an early stage and react appropriately
When the machine does not function properly or does not function at all, check the following points before you contact your service provider.
| Symptom | Possible Cause | Solution |
| Rattling and clanking noise | ·Foreign objects such as coins or safety pins maybe in drum or pump. | Stop washer and check drum and drain filter.If noise continues after washer is restarted, call your authorised service centre. |
| Thumping sound | ·Heavy wash loads may produce a thumping sound. This is usually normal. | If sound continues, washer is probably out of balance. Stop and redistribute wash load. |
| Vibrating noise | ·Have all the transit bolts and packing been removed?·Are all the feet resting firmly on the ground? | If not removed during installation. Refer to Installation guide for removing transit bolts.Wash load may be unevenly distributed in drum. Stop washer and rearrange wash load. |
| Water leaks. | ·Fill hoses or drain hose are loose at tap or washer. | Check and tighten hose connections. |
| ·House drain pipes are clogged. | Unclog drain pipe. Contact plumber if necessary. | |
| Oversudsing | Too much detergent or unsuitable detergent may cause excessive foaming which may result in water leaks. | |
| Water does not enter washer or it enters slowly | ·Water supply is not adequate in area. | Check another tap in the house. |
| ·Water supply tap is not completely open. | Fully open tap. | |
| ·Water inlet hose(s) are kinked. | Straighten hose. | |
| ·The filter of the inlet hose(s) clogged. | Check the filter of the inlet hose. | |
| Water in the washer does not drain or drains slowly. | ·Drain hose is kinked or clogged. | Clean and straighten the drain hose. |
| ·The drain filter is clogged. | Clean the drain filter |

roubleshooting guide
| Symptom | Possible Cause | Solution |
| Washer does not start. | Electrical power cord may not be plugged in or connection may be loose.House fuse blown, circuit breaker tripped,or a power outage has occurred.Water supply tap is not turned on.Check that the door is firmly shut. | Make sure plug fits tightly in wall outlet.Reset circuit breaker or replace fuse. Do not increase fuse capacity. If problem is a circuit overload, have it corrected by a qualified electrician.Turn on water supply tap.Close the door and press the Start/Pause button. After pressing the Start/Pause button, it may take a few moments before the clothes washer begins to spin. The door must lock before spin can be achieved.Add 1 or 2 similar items to help balance the load.Rearrange load to allow proper spinning. |
| Washer will not spin. | ||
| Door does not open. | Once machine has started, the door cannot be opened for safety reasons. Check if the “Door Lock” icon is illuminated. You can safely open the door after the “Door Lock” icon turns off. | |
| Wash cycle time delayed. | The washing time may vary by the amount of laundry, water pressure, water temperature and other usage conditions.If the imbalance is detected or if the suds removing program works, the wash time shall be increased. | |
| Fabric softener overflow. | Too much softener may cause an overflow. | Follow softener guidelines to ensure appropriate amount is used.Do not exceed the maximum fill line. |
| Softeners dispensed too early. | Close the dispenser drawer slowly.Do not open the drawer during the wash cycle. |

roubleshooting guide
| Symptom | Possible Cause | Solution |
 | ·Water supply is not adequate in area.·Water supply taps are not completely open.·Water inlet hose(s) are kinked.·The filter of the inlet hose(s) are clogged. | Check another tap in the house.Fully open tap.Straighten hose(s).Check the filter of the inlet hose. |
 | ·Drain hose is kinked or clogged.·The drain filter is clogged. | Clean and straighten the drain hose.Clean the drain filter. |
 | ·Load is too small.·Load is out of balance.·The appliance has an imbalance detection and correction system. If individual heavy articles are loaded (ex. bath mat, bath robe, etc.) this system may stop spinning or even interrupt the spin cycle altogether.·If the laundry is still too wet at the end of the cycle, add smaller articles of laundry to balance the load and repeat the spin cycle. | Add 1 or 2 similar items to help balance the load.Rearrange load to allow proper spinning |
 |  ·Is the door opened? ·Is the door opened? | Close the door.* If “dE” is not released, call for service. |
 | Unplug the power plug and call for service. | |
 | ·Water overfills due to the faulty water valve. | Close the water tap.Unplug the power plug.Call for service. |
 | ·Water level sensor has malfunctioned. | |
 | ·Over load in motor. | |
 | ·Over load in motor. |

roubleshooting guide

SmartDiagnosis™ function is available only for the products with a SmartDiagnosis™ mark. In case of a mobile phone with static option, the smart diagnosis function might not operate.
■ Using SmartDiagnosis™
- Only use this feature when instructed to do so by the call center.
The transmission sounds similar to a fax machine, and so has no meaning except to the call center. - SmartDiagnosis™ cannot be activated if the washer does not power up.
If this happens, then troubleshooting must be done without SmartDiagnosis™.
If you experience problems with your washer, call to Customer information center.
Follow the call center agent's instructions, and do the following steps when requested:
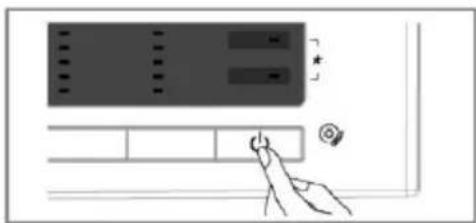
text_image
Diagram showing a hand pressing a button on a device panel with control buttons and a star indicator.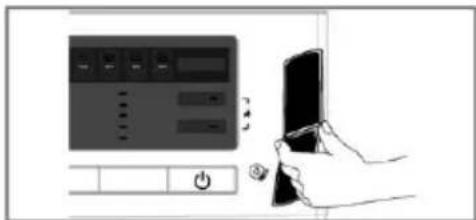
text_image
Diagram showing a device panel with control buttons and a hand holding a smartphone, likely illustrating a mobile phone interface or control system.
text_image
Max. 10 mm-
Press the Power button to turn on the washer. Do not press any other buttons or turn the cycle selector knob.
-
When instructed to do so by the call center, place the mouthpiece of your phone very close to the Power button.
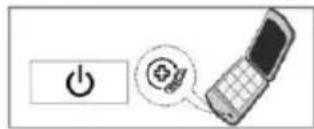
text_image
Diagram showing a power button and a mobile phone with a plus button, likely illustrating a basic electrical or digital interface.-
Press and hold the "Temp." button for three seconds, while holding the phone mouthpiece to the icon or Power button.
-
Keep the phone in place until the tone transmission has finished.
This takes about 6 seconds, and the display will count down the time.
- For best results, do not move the phone while the tones are being transmitted.
- If the call center agent is not able to get an accurate recording of the data, you may be asked to try again.
-
Pressing the Power button during the transmission will shut off the SmartDiagnosis™.
-
Once the countdown is over and the tones have stopped, resume your conversation with the call center agent, who will then be able to assist you using the information transmitted for analysis at the call to Customer information center.

erms of Warranty
Disposal of your old appliance

natural_image
Symbol of a trash bin crossed with two diagonal lines, no text or numbers present- When this crossed-out wheeled bin symbol is attached to a product it means the product is covered by the European Directive 2002/96/EC.
- All electrical and electronic products should be disposed of separately from the municipal waste stream via designated collection facilities appointed by the government or the local authorities.
- The correct disposal of your old appliance will help prevent potential negative consequences for the environment and human health.
- For more detailed information about disposal of your old appliance, please contact your city office, waste disposal service or the shop where you purchased the product.
What Is Not Covered:
• Service trips to your home to teach you how to use the product.
- If the product is connected to any voltage other than that shown on the rating plate.
- If the fault is caused by accident, neglect, misuse or Act of God.
- If the fault is caused by factors other than normal domestic use or use in accordance with the owner's manual.
- Provide instruction on use of product or change the set-up of the product.
- If the fault is caused by pests for example, rats or cockroaches etc..
- Noise or vibration that is considered normal for example water drain sound, spin sound, or warming beeps.
- Correcting the installation for example, levelling the product, adjustment of drain.
- Normal maintenance which recommended by the owner's manual.
- Removal of foreign objects / substances from the machine, including the pump and inlet hose filter for example, grit, nails, bra wires, buttons etc.
- Replace fuses in or correct house wiring or correct house plumbing.
• Correction of unauthorized repairs.
- Incidental or consequential damage to personal property caused by possible defects with this appliance.
- If this product is used for commercial purpose, it is not warranted.
(Example : Public places such as public bathroom, lodging house, training center, dormitory)
If the product is installed outside the normal service area, any cost of transportation involved in the repair of the product, or the replacement of a defective part, shall be borne by the owner.