DBB23TL - Järelevalvekaamera Digimerge - Tasuta kasutusjuhend
Leidke seadme juhend tasuta DBB23TL Digimerge PDF-formaadis.

Kasutajate küsimused teemal DBB23TL Digimerge
0 küsimus selle seadme kohta. Vastake nendele, mida teate, või esitage oma.
Esita uus küsimus selle seadme kohta
Laadige alla juhend oma Järelevalvekaamera PDF-formaadis tasuta! Leidke oma juhend DBB23TL - Digimerge ja võtke oma elektrooniline seade uuesti kätte. Sellel lehel on avaldatud kõik teie seadme kasutamiseks vajalikud dokumendid. DBB23TL kaubamärgi Digimerge.
KASUTUSJUHEND DBB23TL Digimerge
Camera Specifications
| Image Sensor 1/4" High Resolution Color | |
| Video Format / Pixels | NTSC: 656(H) x 492 (V) |
| Horizontal Resolution | 480 TVL |
| Sync. & Scan. Systems | Internal; 2:1 Interlace |
| S/N Ratio | → 48dB |
| Iris & Shutter Speed AES: 1/60 ~ 1/50,000 sec. | |
| Minimum Illumination | 0.6 LUX @ F1.2 (IR off)0 LUX (IR LEDs on) |
| Video Output | Comp. 1.0 Vpp @ 75ohm |
| Lens / Lens Mount | 5.1 mm F2.8/ Fixed |
| FOV (diagonal) | 50 Degrees |
| Termination | Video: BNC FemalePower: Barrel Female |
| IR / Night Vision Range | 18 IR LEDs/850nm/50' (15m) |
| Power Requirement 12V DC ±10% | |
| Power Consumption | 250 mA or 3W max |
| Operating Temp. | 14°F ~ 122°F[-10°C ~ 50°C] |
| Weight (with stand) 0.6 lbs. / 0.26 kg | |
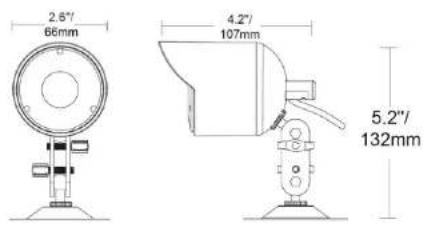
| Dimensions | 2.6" x 4.2"" x 5.2" |
| WxLxH(with stand) | 66 mm x 107 mm x 132 mm |
Dimensions
IT'S ALL ON THE WEB!

Product Information

Specification Sheets

User Manuals

Software Upgrades

Quick Start Guides

Firmware Upgrades
VISIT
www.digimerge.com
Digimerge Technologies Inc.
Copyright © 2011 Digimerge Technologies Inc. As our products are subject to continuous improvement, Digimerge reserves the right to modify product design, specifications and prices, without notice and without Incurring any obligation. E&OE
HIGH RESOLUTION
INDOOR/OUTDOOR COLOR CAMERA
MODEL: DBB23TL SERIES
natural_image
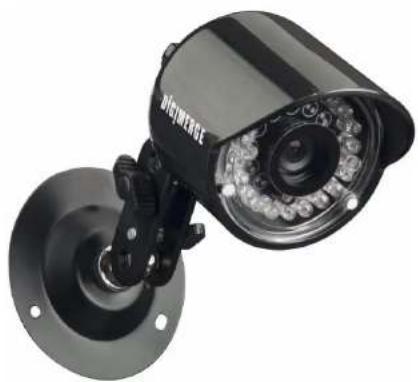
Close-up of a black surveillance camera mounted on a wall-mounted base (no visible text or symbols)QUICK START GUIDE
English Version 1.0
DIG!MERGE
www.digimerge.com
Copyright © 2011 Digimerge Technology Inc.
Contents Installing the camera

High Resolution Color Bullet Camera with Night Vision*
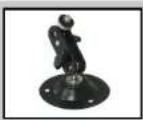
Mounting Stand*
AC Power Adapter**
WARNING - A REGULATED UL/CSA APPROVED 12V DC power supply is REQUIRED for use with this camera. Use of a non-regulated, non-conforming power supply can damage this product and will void the warranty.
* Model DBB23TL-PK4 is a 4-pack that includes four of the listed items. ** A "4-in-1" Power Adapter that provides power to four cameras may be substituted for four individual power adapters, depending on product configuration.
Features
• High resolution image sensor produces sharp and clear video at 480 TV lines of resolution
- Pure Flat™ lens eliminates image curving for an undistorted view
• Anti-glare technology ensures clear images even in strong lighting situations
• Auto Mechanical IR Cut Filter ensures accurate color reproduction in all lighting conditions
- Up to 50 ft. / 15 m night vision capability †
• Weatherproof Indoor/Outdoor housing [IP66]‡
- Ceiling or wall mountable
† IR illumination range under ideal conditions. Actual range and clarity may vary depending on scene/abstract reflection and camera application.
† Not intended for submersion in water, installation in a sheltered location recommended.
ATTENTION - Test the camera prior to selecting a permanent mounting location by temporarily connecting the cameras and cables to a TV, DVR, or Observation System.
To install the camera:
- Mount the camera stand to the desired mounting surface.
- Attach the camera to the stand at either of the two connection points.
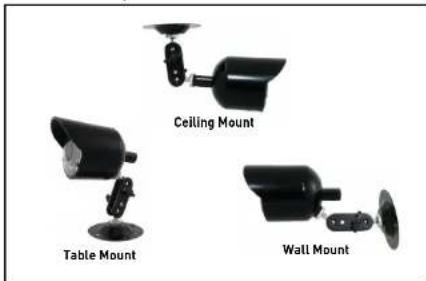
Figure 1.0 Use the stand for ceiling, table, or wall mounting.
-
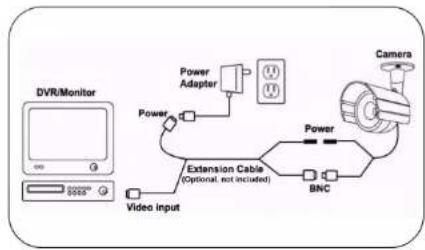
Connect the BNC end of the cable to a DVR or monitor.
-
Connect the included 12V DC Power Adaptor to the camera(s).
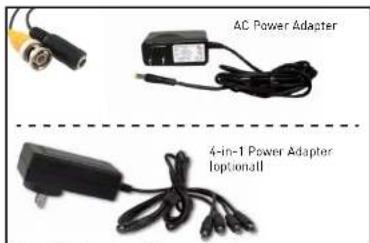
Figure 2.0 Connect an AC power adapter
ATTENTION: This camera includes an Auto Mechanical IR Cut Filter. When the camera changes between Day/Night Lighting, an audible clicking noise may be heard coming from the camera. This clicking is normal, and indicates that the camera filter is working.
Connecting the camera
Setup Diagram:
flowchart
graph TD
    A["DVR/Monitor"] -->|G| B["Extension Cable (Optional, not included)"]
    B --> C["Power Adapter"]
    C --> D["BNC"]
    D --> E["Camera"]
    B --> F["Video Input"]
    F --> G["Power"]
    G --> H["Extension Cable"]