MiniPro Dura - Väline kõvaketas Oyen Digital - Tasuta kasutusjuhend
Leidke seadme juhend tasuta MiniPro Dura Oyen Digital PDF-formaadis.

Kasutajate küsimused teemal MiniPro Dura Oyen Digital
0 küsimus selle seadme kohta. Vastake nendele, mida teate, või esitage oma.
Esita uus küsimus selle seadme kohta
Laadige alla juhend oma Väline kõvaketas PDF-formaadis tasuta! Leidke oma juhend MiniPro Dura - Oyen Digital ja võtke oma elektrooniline seade uuesti kätte. Sellel lehel on avaldatud kõik teie seadme kasutamiseks vajalikud dokumendid. MiniPro Dura kaubamärgi Oyen Digital.
KASUTUSJUHEND MiniPro Dura Oyen Digital
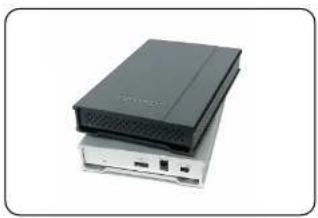
natural_image
Stacked electronic devices with ports and connectors (no visible text or symbols)MiniPro 3.1 USB-C User Guide
For more information, visit our website at www.oyendigital.com
(1) Specifications
| Interface/Ports | • USB C (USB 3.1Gcm2 Super Speed i) |
| Data Transfer | • USB 3.1 up to 10Gbus |
| System Requirements (PC) | • Windows 7/8/10 or higher |
| System Requirements (Mac) | • Mac OS 10.4 or higher |
| Chipset ASMedia 135I | |
| Operating Environment | • Temperature: 5°C - 40°C• Humidity: 10%RH - 80%RH |
| Power | • USB bus power or external DC +5W/2A |
| Enclosure Size | 4.9 x 3.2 x 0.77 Inches |
(5) Using the MiniPro
The MiniPro does not include pre-installed software. For file backup, we recommend the apps within Windows and Mac.
Using the MiniPro with Windows Backup
Windows 7:
Enter "Backup and Restore" in the search box and open the app. Click 'Set as Backup' and choose the MiniPro and click Next. Select 'Save Settings and Run Backup.'
https://spood.microsoft.com/en-us/help/17127/windows-back-up-research
Windows &
Enter "File History" in the search box and open the app. Click 'Select a drive', and choose the MiniPro. Turn on File History to start the backup.
Additional resources.
https://support.microsoft.com/en-us/hepy/17128/windows-9-fib-history
Windows 10:
Enter "Settings" in the search bar and open the app. Click 'Update & security' and select 'Backup > Add a drive.' Select the MiniPro to start the backup.
Additional resources
https://support.microsoft.com/en-us/hep-17143Windows-TO-Back-up-you-News
(5) Using the MiniPro (continued)
Using the MiniPro with Apple Time Machine
1) Format the drive as Mac OS Extended (Journalled) as described in the "Formatting the Drive" section.
2) Go to the Apple Menu > System Preferences and click on the Time Machine from a launch theory.
Time Machine Icon to launch the app.
3) Click On to enable time machine. 4) Select the MiniPro drive and choose "Use for Backup."
5) Time Machine is now backing up your Mac automatically to the MiniProg.
(2) Detailed View
MiniPro 3.1 USB-C
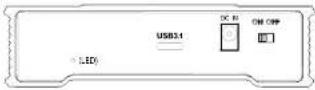
LED indicator:
Off = Power OFF
Solid = Power OF
Flashing - Read/Write Access
(3) Connecting the MiniPro
Connecting using USB C-C
1) Connect the included USB cable to a USB-C port on the computer.
2) Turn the power switch on. Wait 5-20 seconds for the computer to recognize the drive.
Connecting using USB C-A
1) Connect the included USB cable to a USB 3.1/3.0/2.0 port on the computer.
2) Turn the power switch on. Wait 5-20 seconds for the computer to recognize the drive.
Note: The MiniPro is powered using the computer's USB port. An optional 5V/2A power adapter is available for those who desire to use external power. Please visit our website for details.
(4) Formatting the Drive
The drive is pre-formatted as exFAT, which is compatible with Windows and Mac OS. For users who wish to reformat the drive, please visit the links for instructions.
To reformat using Windows:
http://byendigital.com/windows-reformat.html
To reformat using MAC OS:
http://oyendigital.com/mac-reformat.html
(6) Disconnecting the MiniPro
Windows: Close all windows and applications that are accessing the drive. Click the "Eject Hardware" (Safely Remove Hardware) icon in the system tray and highlight the drive. Wait for a few seconds until the system prompts "You may safely remove this device."
MAC: Close all windows and applications that are accessing the drive. Drag the external drive to the Trash/Eject icon to eject it. After the disk icon has disappeared from the desktop, you may safely disconnect the external drive.
(7) Warranty Information
This product includes a three (3) year repair/replacement warranty provided by Oycn Digital. This warranty is non-transferable and is limited to the original purchaser. Warranty service may be requested by completing the form at the following link: www.oyendigital.com/rma-request-form.html For our complete warranty policy, visit: www.oyendigital.com/warranty.html
(8) Safety Information
- The drive contained in your MiniPro is an electronic device and is susceptible to damage due to excessive physical shock. Please handle the unit with care.
(9) FAQs
Q: Can I use a Thunderbolt 3 cable with the MiniPro 3.1?
A: No, a Thunderbolt 3 cable such as the one included with the 2016 MacBook Pro will not function properly with the MiniPro 3.1. We recommend only using the USB-C cable included with the MiniPro.
Q: Is the MiniPro compatible with Thunderbolt 2 using a Thunderbolt 3 adapter?
A: No, the MiniPro 3.1 is not compatible with
Thunderbolt 2 using an adapter of any make or model.
For other questions please contact tech support or visit the FAQ section of our Web site (www.oyendigital.com/support.html).
Technical Support: tech@oyendigital.com