Lithe 3458 - Valgustus Sonneman - Tasuta kasutusjuhend
Leidke seadme juhend tasuta Lithe 3458 Sonneman PDF-formaadis.

Kasutajate küsimused teemal Lithe 3458 Sonneman
0 küsimus selle seadme kohta. Vastake nendele, mida teate, või esitage oma.
Esita uus küsimus selle seadme kohta
Laadige alla juhend oma Valgustus PDF-formaadis tasuta! Leidke oma juhend Lithe 3458 - Sonneman ja võtke oma elektrooniline seade uuesti kätte. Sellel lehel on avaldatud kõik teie seadme kasutamiseks vajalikud dokumendid. Lithe 3458 kaubamärgi Sonneman.
KASUTUSJUHEND Lithe 3458 Sonneman
Lithe
3453, 3454, 3456, 3458
3' Wall Lamp
4' Wall Lamp
6' Wall Lamp
8' Wall Lamp
Product Information and Warnings
IMPORTANT
- Always disconnect the power before installing or replacing Luminaires and before cleaning or other maintenance.
- Consult a qualified, licensed electrician to ensure correct branch circuit conductor.
-
Consulter un électricien qualifié pour vous assurer que les conducteurs de la dérivation sont adéquats.
-
Please read all included assembly instructions and warnings carefully before installation. Contact Customer Service if you have any questions or concerns. Before installation, please confirm that the fixture is compatible with your supply voltage and dimming system, if present.
- LEDs are highly sensitive electronic devices, and must be treated with care. Do not open any factory sealed compartments, and avoid touching the LEDs with your hands or any object.
- Although all our fixtures are equipped with protective devices, LED electronic systems are vulnerable to power surges and supply variations. Do not install LED fixtures on the same circuit as any motors, appliances, or HVAC systems.
- Do not remove or bypass any LED Driver or Transformer that is provided with the fixture, and do not replace or substitute with another power supply.
- Fixtures must be wired in parallel on independent leads; do not "daisy chain" multiple fixtures together or wire them in series.
- All factory-made splices and connections must remain intact. LED circuits are carefully designed and built, and improper connections may damage the fixture.
- The ends of coaxial pendant cords have been precisely stripped and split at the factory and must not be field cut. Excess cord or cable should be neatly coiled and reserved in the fixture canopy.
-
Any mounting hardware is provided for your convenience and should be used with discretion. Always use the appropriate hardware for the mounting surface.
-
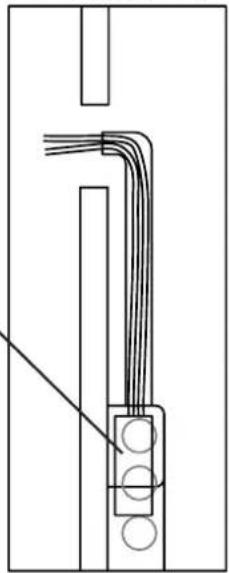
Note: This fixture must be installed with its power supply in a remote, accessible location in accordance with local electrical code.
- Shut off power to the branch circuit.
- Remove the fixture screws (E) from the main fixture body (C) and set aside. Separate the main fixture body from the mounting plate (D).
- Determine the fixture location and drill a 3/4" hole (A) at the centerpoint of the fixture.
- The power supply (B) must be installed in a remote and accessible location near the fixture location in accordance with local electrical code (Fig. 1). Make appropriate electrical connections:
a. Connect the power supply's live wire to the live supply wire.
b. Connect the power supply's neutral wire to the neutral supply wire.
c. Connect the power supply's positive (+) output wire to the necessary length of red wire (not included) to reach the fixture location.
d. Connect the power supply's negative (-) output wire
to the necessary length of black wire (not included) to reach the fixture location.
- Feed the red and black extension wires through the drilled hole (A).
- Using drywall anchors and screws or other appropriate hardware, attach the mounting plate (D) so that the center hole of the mounting plate coincides with the drilled hole (A) and the plate is level. Make sure the red and black extension wires extend through the hole in the mounting plate.
- Using the included wire nuts, connect the positive (red) wire to the fixture's positive (+) conductor and the negative (black) wire to the fixture's negative (-) conductor. Carefully insert these connections and any excess wire into the wall through the drilled hole (A).
- Fit the main fixture body (C) over the mounting plate (D) so that the tabs (F) fit inside the slots in the back of the
main fixture body. Re-insert and tighten the fixture screws (E).
- Restore power to the outlet box.
natural_image
Pure electrical circuit lines without any symbols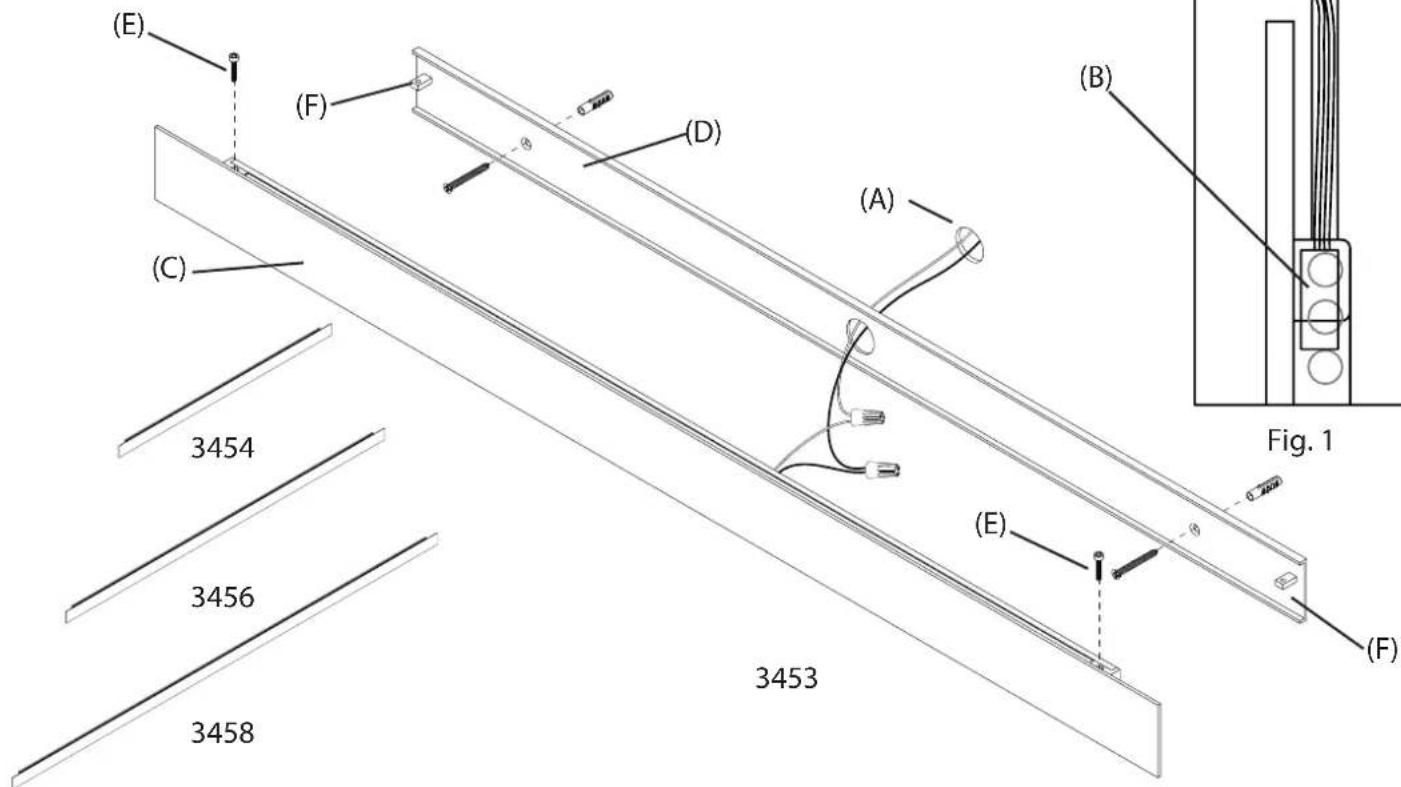
Note:
- This fixture is dimmable with Electronic Low Voltage (Trailing-Edge) type dimmers, Incandescent (Leading-Edge) type dimmers, and 0-10V type dimmers only.
Care Instructions:
Use a clean, dry cloth when dusting.
To protect the finish, avoid any harsh abrasives or chemicals.