Coconutz - Kõlar Rockustics - Tasuta kasutusjuhend
Leidke seadme juhend tasuta Coconutz Rockustics PDF-formaadis.

Kasutajate küsimused teemal Coconutz Rockustics
0 küsimus selle seadme kohta. Vastake nendele, mida teate, või esitage oma.
Esita uus küsimus selle seadme kohta
Laadige alla juhend oma Kõlar PDF-formaadis tasuta! Leidke oma juhend Coconutz - Rockustics ja võtke oma elektrooniline seade uuesti kätte. Sellel lehel on avaldatud kõik teie seadme kasutamiseks vajalikud dokumendid. Coconutz kaubamärgi Rockustics.
KASUTUSJUHEND Coconutz Rockustics

natural_image
Family playing in a pool with palm trees and stone pathways (no text or symbols visible)Please read the following instructions carefully before installing your Rockustics® Coconutz™ speaker. If you have any questions regarding installation that are not answered in the following directions, please contact your local sound contractor, or the Rockustics®/MSE Audio® technical support team.
Basic Wiring
(Diagram A) Locate speaker wire on the top of the Coconutz. If necessary, strip the wire ends and trim the wire to the appropriate length. Use the supplied silicone wire nut to connect the positive (red) leads of the speaker and input wires. Repeat this step with the negative (black) leads.
NOTE: The provided wire nuts are meant for permanent installation use only. If you are temporarily wiring the speakers, do not use these wire nuts. In the event you have used the wire nuts, and need to re-wire your system, do not attempt to unscrew the nuts. Instead, clip the wires below the nut, and follow the steps in the Basic Wiring section with a new pair of waterproof wire nuts (these are available at most hardware stores).
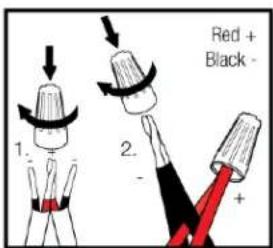
Diagram A
Mounting Instructions
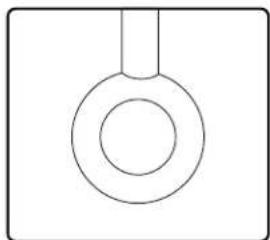
NOTE: You will need one (1) mounting hook or eyelet rated for
30lbs (not supplied) per pair of Coconutz.
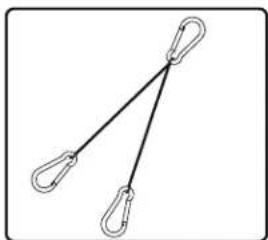
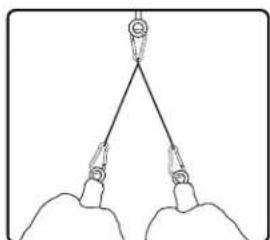
1) The Coconuts speakers are intended to be mounted using the supplied hanging cable assembly (Diagram B).
2) It will be necessary to install a hook, loop, or eyelet (not supplied) (Diagram C) that can adequately support the combined weight of speakers being installed. Be sure to use hardware that is rated for the combined total load of the speakers (30 lbs) and ensure it is properly secured to the mounting surface.
3) (Diagram D) Clip one each of the cable ends to each of the eyebolts in the Coconutz speaker.
5) Wire the speaker as described in the Basic Wiring section, ensuring the weight of the speaker is supported by the hanging cables, as opposed to the speaker wires.
natural_image
Simple line drawing of two hanging clips connected by a diagonal line (no text or symbols)Diagram B Diagram C
natural_image
Simple line drawing of a circular ring with a vertical line above it, no text or symbols present.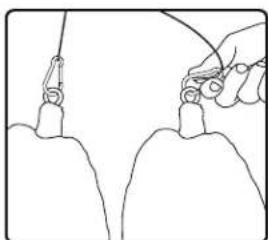
natural_image
Line drawing of a hand holding a tool over two identical objects (no text or symbols)Diagram D Diagram E
natural_image
Simple line drawing of two hands holding a triangular object with weights, no text or symbols presentOptimizing Speaker Placement for Best Sound and Aesthetics
Rockustics recommends hanging your Coconutz in bunches of 2 or 4 units. To ensure your lovely bunch of Coconutz sounds as good as it looks, hang them between 8' and 12' above ground level.
Be sure to account for the wires which will run from the speaker to your stereo or audio source. Camouflage wires by running them behind dense tree leaves or wrapping them in colored tape.
Cautions and Maintenance
All Rockustics speakers are sealed and fully weatherproof. However, DO NOT place speakers where the grille will be in the path of a sprinkler system. Sprinklers typically have a high water pressure level that can damage speaker cones if hit directly.
In the rare event the speaker grille holes accumulate build up of debris (such as soil, dust or sand), the speaker may become damaged. If build up does occur, simply rinse the grille holes with a garden hose set to a low pressure level. Accumulated debris may also promote undesired insect traffic into the speaker. Insects may eat through the speaker cone.
Chemical sprays may also cause damage to the rubber of the speaker cone. This includes bug spray, deck sealant, some fertilizers and oil based products. Speakers MUST be covered when applying these treatments or chemicals in your yard.
For environments that get snow and ice during the winter months, be sure to check that the openings and woofer cone are clear and there is no hard-packed snow or ice built up in these areas before playing. If there is ice or snow present on the cone, use a hair dryer set on a low setting to melt it away. If the speakers are not going to be used during winter months, it is recommended that they either be disconnected and brought indoors, or covered with a plastic bag to help protect the speaker components.
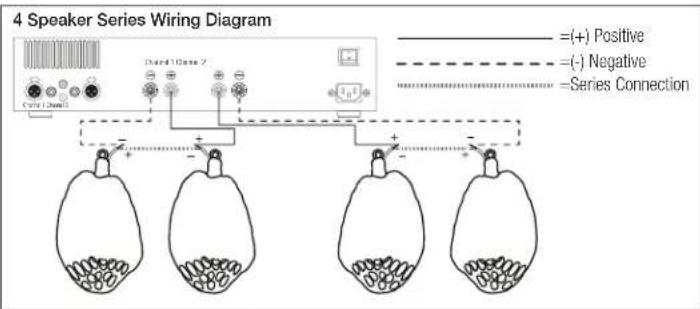
Wiring Coconutz in Series
If installing 2 units of the Coconutz, follow the wiring instructions in Diagram F for 2 speaker connection. Wire one of each speaker to the left and right channels of the amplifier, respectively.
If installing 4 units of the Coconutz, then each pair must be wired together in a series connection to each channel of the amplifier. Follow the wiring instructions in Diagram G for 4 speaker connection.
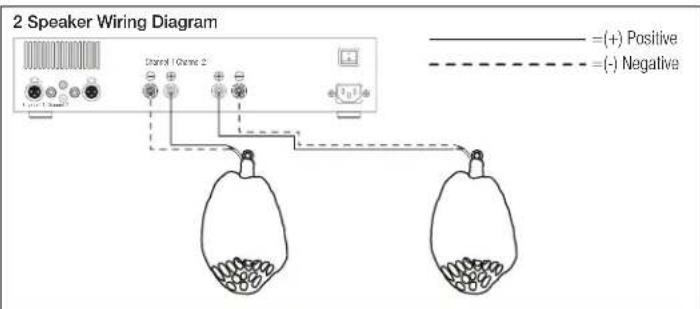
Diagram F
flowchart
graph TD
    A["Speaker Series 1"] --> B["+"]
    C["Speaker Series 2"] --> D["-"]
    E["Speaker Series 3"] --> F["-"]
    G["Speaker Series 4"] --> H["-"]
    B --> I["Series Connection"]
    D --> I
    F --> I
    H --> I
    style A fill:#f9f,stroke:#333
    style C fill:#f9f,stroke:#333
    style E fill:#f9f,stroke:#333
    style G fill:#f9f,stroke:#333
    style B fill:#ccf,stroke:#333
    style D fill:#ccf,stroke:#333
    style F fill:#ccf,stroke:#333
    style H fill:#ccf,stroke:#333
Diagram G