FS12T-BT60 - Kõlar ATLAS - Tasuta kasutusjuhend
Leidke seadme juhend tasuta FS12T-BT60 ATLAS PDF-formaadis.

Kasutajate küsimused teemal FS12T-BT60 ATLAS
0 küsimus selle seadme kohta. Vastake nendele, mida teate, või esitage oma.
Esita uus küsimus selle seadme kohta
Laadige alla juhend oma Kõlar PDF-formaadis tasuta! Leidke oma juhend FS12T-BT60 - ATLAS ja võtke oma elektrooniline seade uuesti kätte. Sellel lehel on avaldatud kõik teie seadme kasutamiseks vajalikud dokumendid. FS12T-BT60 kaubamärgi ATLAS.
KASUTUSJUHEND FS12T-BT60 ATLAS
FS12T Series
Installation Instructions
Safety Instructions
Please read carefully before installing or operating.
- Read all instructions carefully
- Heed all warnings
• Assure that the speaker is securely mounted
• Always assure amplifier power is Off before making any connections - Ensure that all electrical equipment is properly grounded
- Keep instructions for future reference
- Should any questions arise after reading this document, please call AtlasIED Tech Support at 800-876-3333
Hearing Damage
CAUTION: All professional loudspeaker systems are capable of generating very high sound pressure levels. Use care with placement and operation to avoid exposure to excessive levels that can cause permanent hearing damage.
Mounting
Mounting loudspeaker systems require training and expertise. Improper rigging of a suspended loudspeaker may result in injury, death, equipment damage, and legal liability. Installation must be carried out by fully qualified installers, in accordance with all required safety codes and standards at the place of installation.
A 5:1 design factor is a generally accepted minimum standard. However, legal requirements for overhead suspension vary by municipality. Please consult your local safety standards office before installing any product. We also recommend thoroughly checking any laws and bylaws prior to installation.
Loudspeakers flown in theaters, nightclubs, conference centers, or other places of work and entertainment must be provided with an independent, correctly rated and securely attached secondary safety — in addition to the principle suspension point(s). This secondary safety must prevent the loudspeaker from dropping more than 6" should the principle suspension device fail. If you lack the skills, training, and proper ancillary equipment to suspend a loudspeaker system, do not attempt to do so.
For additional information regarding the suspension of loudspeakers or to purchase rigging materials, please contact our friends at Allen Products, Inc.
1635 E. Burnett St. Signal Hills, CA 90755
www.adapttechgroup.com
Telephone (562) 424-1100 and Fax (562) 424-3520
Installation via Mounting Bracket (Included)
General considerations and hardware recommendations:
CAUTION: FS12T Series models weigh as much as 50 pounds (22.7 kg) – model FS12T-66. A fall from almost any height could result in serious injury or death. Assure that the loudspeaker is firmly mounted to an object that can handle its weight. Remember that wind will add considerable torque to the point of attachment. The mounting surface the FS12T loudspeaker is being attached to should be able to handle five or more times the weight of the FS12T loudspeaker (7x is recommended for locations subject to high wind forces).
Whenever the loudspeaker is mounted to a surface using the bracket, the installer must ensure that the surface is capable of safely and securely supporting the load. The hardware employed must be safely and securely attached both to the loudspeaker and the surface in question, using only the mounting holes. A general rule for soft surface installations (wood beams) is to multiply the corresponding working load limit by 75%; the result will be an approximate working load strength.
Use thread locking compound for all installations.
CAUTION: Mount the speaker such that the shear force is at a right angle to the mounting bolts, and as close to the connection, as shown:
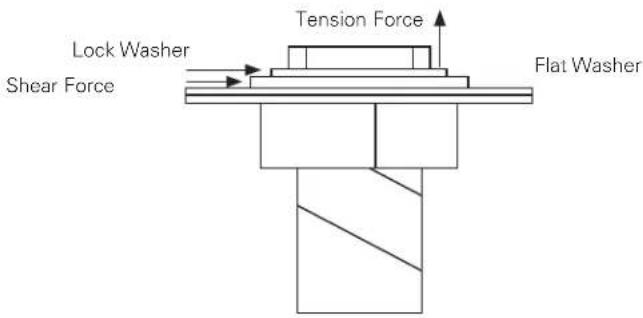
When mounting the FS12T loudspeaker to a solid surface use the proper bolts, washers, and lock washers (stainless steel A193 grade B8 is recommended for high strength outdoor installations). Do not substitute mismatched bolts and washers.
The FS12T loudspeaker may be mounted to a pole or scoreboard. For such mounting, contact the light pole or scoreboard manufacturer for proper instructions. If mounting to another surface, such as a beam, see the diagram on page 3. When in doubt contact a qualified structural/mechanical engineer for approval of the mounting materials and methods.
Mounting
CAUTION: Mounting the FS12T loudspeaker requires two people, unless it is possible to safely clamp the loudspeaker in position for alignment before mounting.
The bracket may be removed from the loudspeaker for installation convenience. When re-attaching loudspeaker to bracket be sure to tightly secure loudspeaker mounting bolts. A semi-permanent thread locking compound should also be used in this operation.
- Choose the center mounting hole or any two of the 10mm bracket mounting holes best suited for the surface you are mounting to. For best stability using 2 holes is recommended.
- When using these mounting holes 10mm (stainless steel A193 grade B8 hardware is recommended for high strength outdoor installations). Stainless flat and lock washers must also be used. Remember to use semi-permanent thread locking compound on threads.
- Use the dimensions noted on the illustration to mark the points for drilling holes.
- Choose appropriately sized bit and drill holes.
- Attach loudspeaker bracket, using bolt, flat washer, and lock washer as shown and re-attach loudspeaker to bracket.
- Secondary (safety) suspension point: Use a load rated cable or steel chain (capable of holding the loudspeaker should it come loose from the primary mounting point). This cable or chain assembly should be attached to and secured to the mounting surface via approved, load rated hardware.
FS12T Dimensions
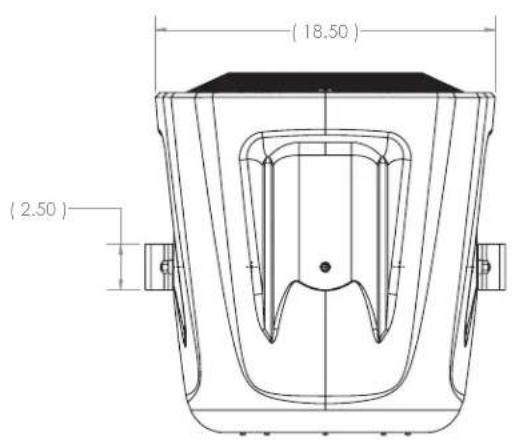
Fig. 1
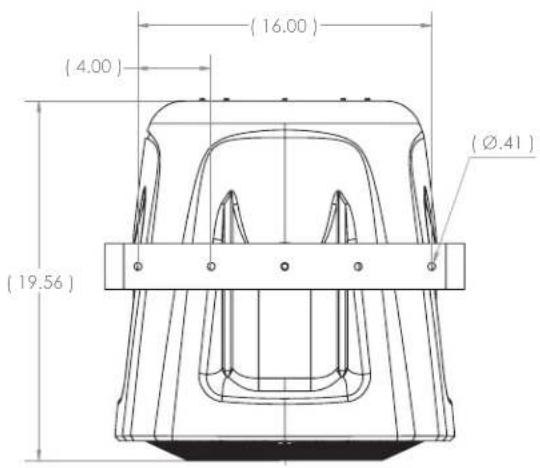
Fig. 2
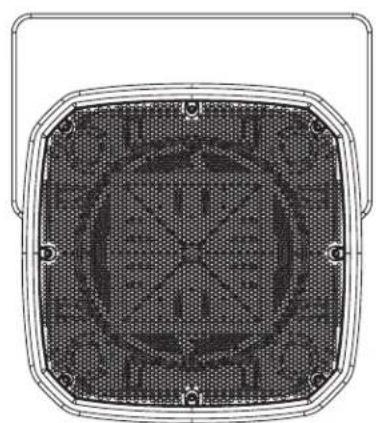
natural_image
Top-down schematic of a square grid-patterned device with circular cutouts and mounting holes (no text or symbols)Fig. 3
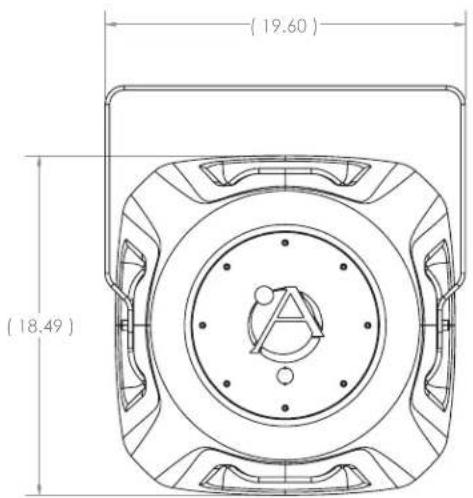
Fig. 4
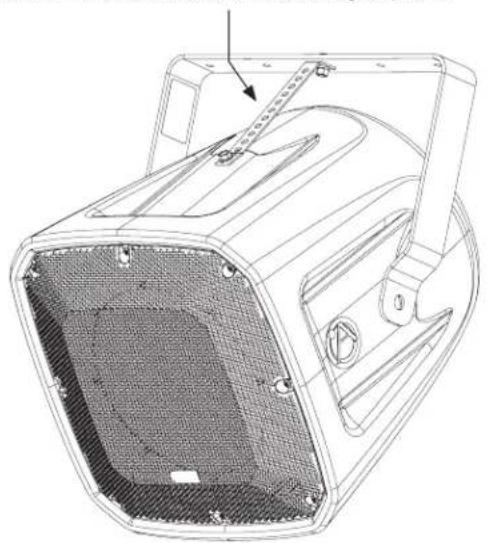
Included bracket allows for additional support for high wind environments, can be used for a tilt angle up to 50^
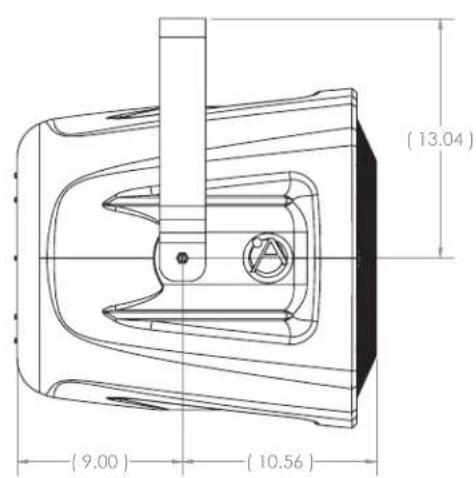
Fig. 5
natural_image
Technical line drawing of a mechanical device housing with internal components and mounting holes (no text or symbols)Fig. 6

1-800-876-3333 • support@atlasied.com • AtlasIED.com