BMX-2027 - Kategooriata BlendMount - Tasuta kasutusjuhend
Leidke seadme juhend tasuta BMX-2027 BlendMount PDF-formaadis.

Kasutajate küsimused teemal BMX-2027 BlendMount
0 küsimus selle seadme kohta. Vastake nendele, mida teate, või esitage oma.
Esita uus küsimus selle seadme kohta
Laadige alla juhend oma Kategooriata PDF-formaadis tasuta! Leidke oma juhend BMX-2027 - BlendMount ja võtke oma elektrooniline seade uuesti kätte. Sellel lehel on avaldatud kõik teie seadme kasutamiseks vajalikud dokumendid. BMX-2027 kaubamärgi BlendMount.
KASUTUSJUHEND BMX-2027 BlendMount
Your rear view mirror has minimal clearance between the back side of the mirror and the mirror stem. It is very important that this mount is installed correctly to ensure mirror adjustability is retained. PLEASE READ THESE INSTRUCTIONS THOROUGHLY BEFORE INSTALLING THIS MOUNT
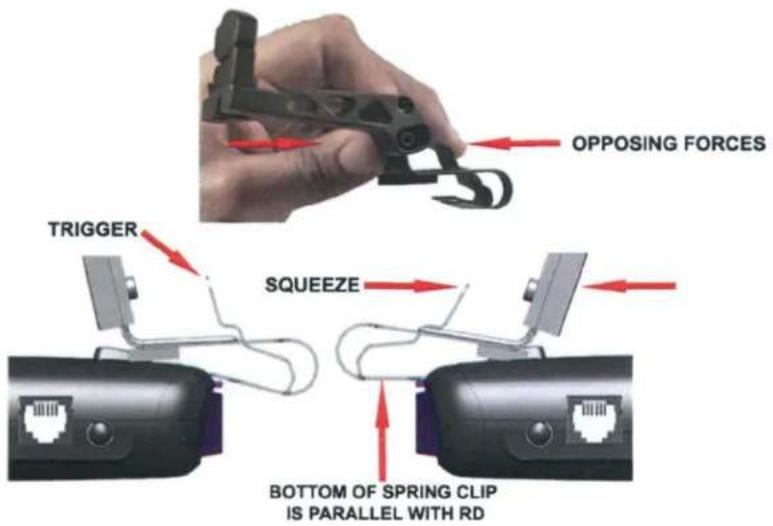
The RELEASE Button on the radar detector (RD) is NOT used with this mount. To release the tension of the spring clip, simply squeeze the TRIGGER and the back side of the mount together. This will lower the bottom portion of the spring clip allowing you to slide the RD on and off. When used properly, the spring clip avoids putting excessive pressure on the mirror stem when installing and removing the RD. The top portion of the mount should barely move when the two opposing forces are applied. The bottom of the spring clip must be parallel with the top of the RD to slide in and out. SLIDE THE RD ONTO THE SPRING CLIP AS FAR AS IT WILL GO. Release the trigger to secure the RD onto the mount. Before installing the mount onto your rear view mirror, remove and install the RD a few times so you can observe how the spring clip functions.
natural_image
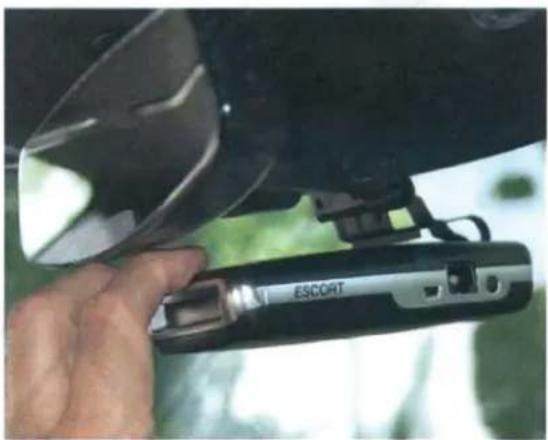
Close-up of a hand holding an ESCORT device against a vehicle hood (no visible text or symbols)With the RD adjusted right below the mirror as recommended, you will probably not be able to get your fingers between the RD and mirror to access the buttons. The spring clip allows you to push the front of the RD downward with one finger and press the buttons with another finger as shown above.
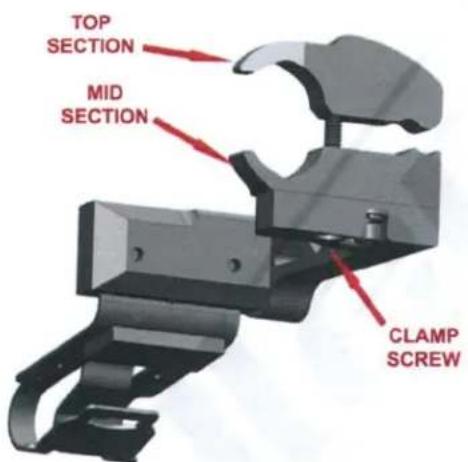
STEP 1 - Loosen the clamp screw so the top section separates from the mid section. This will provide the necessary clearance to slide the mount over the mirror stem as shown above.
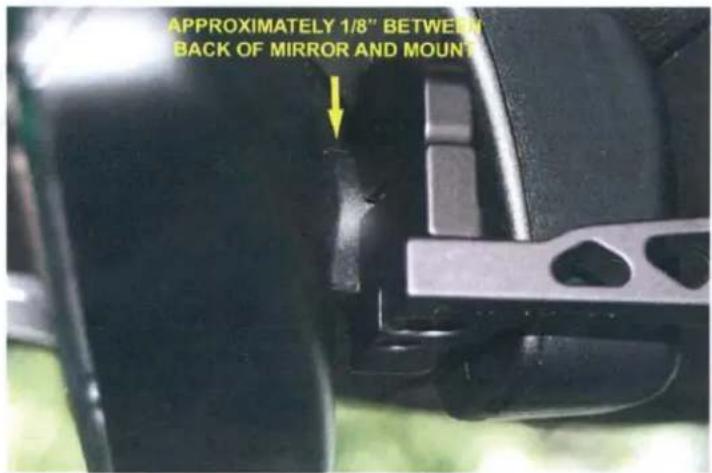
STEP 2 - Tighten the clamp screw until the Top and Mid Sections are slightly snug around the mirror stem. You should still be able to move the mount along the stem. Before fully tightening the clamp screw, slide the mount towards the windshield as far as it will go. There should be approximately 1/8" between the back of the mirror and the mount as shown above.
J28
DESIGN
Innovative Design And
Precision Manufacturing
BlendMount - US PATENT # D625,580 S, D656,811 S, D653,980 S
D690,245 S, D690,246 S, D690,247 S and other patents pending
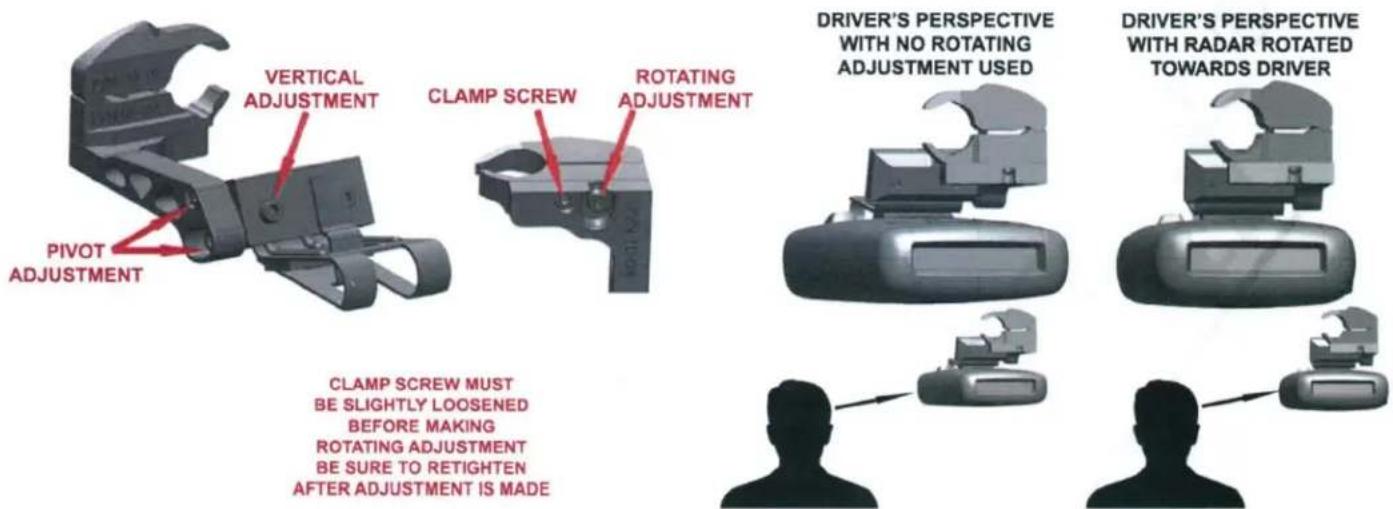
STEP 3 - Install your radar detector onto the mount. Use the adjustments shown above to adjust the RD to your desired position. We recommend adjusting the RD as close to the bottom of your mirror as you can. NOTE When the rotating adjustment is used to rotate the RD towards the driver, the footprint of the RD is reduced as shown above. Be sure to tighten all of the adjustment screws after the adjustments are made.
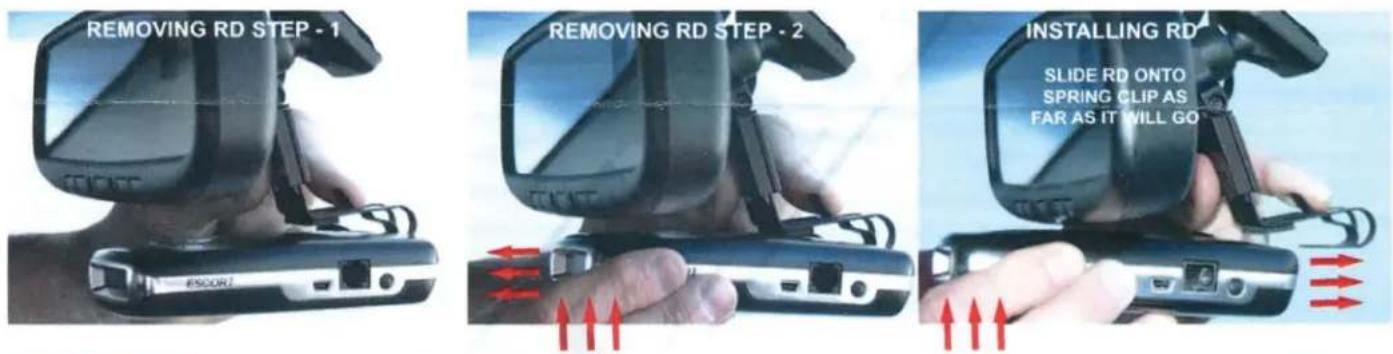
VERY IMPORTANT - When removing or installing the RD, squeeze the trigger and the back side of the mount together with one hand, and lift the front of the RD upward with the other hand before sliding the RD off or onto the spring clip. You must lift the front of the RD upward before sliding it off or onto the mount.
NOTE : This mount can get extremely hot when sitting in direct sunlight. If you intend to remove your RD frequently, you may want to install the two gray "TOUCH STRIPS" included in the tool kit. Place them where your fingers make contact with the mount. They may be trimmed with a blade or knife.
FOR MORE INFO VISIT www.blendmount.com/videos
CAUTION
DO NOT use this mount if it interferes with the adjustability or the operation of your rear view mirror in any way.
DO NOT use this mount if the radar detector creates an unsafe viewing obstruction.
DO NOT ATTEMPT TO MODIFY THIS PRODUCT. Consult the manufacturer for assistance.
All BlendMount products are accompanied with detailed installation instructions and adjustment tips. You are encouraged to contact customerservice@blendmount.com or call J28 Design at 1-888-497-8388 for further assistance.
Check the BlendMount Forum for installation tips and some vehicle specific installs.
www.blendmount.com
Your feedback is very important to us. Please email any questions or
comments you have to customerservice@blendmount.com
J28
DESIGN
Innovative Design And
Precision Manufacturing
BlendMount - US PATENT # D625,580 S, D656,811 S, D653,980 S
D690,245 S, D690,246 S, D690,247 S and other patents pending