Gourmet AWK-290SBD - Veekeetja Aroma - Tasuta kasutusjuhend
Leidke seadme juhend tasuta Gourmet AWK-290SBD Aroma PDF-formaadis.

Kasutajate küsimused teemal Gourmet AWK-290SBD Aroma
0 küsimus selle seadme kohta. Vastake nendele, mida teate, või esitage oma.
Esita uus küsimus selle seadme kohta
Laadige alla juhend oma Veekeetja PDF-formaadis tasuta! Leidke oma juhend Gourmet AWK-290SBD - Aroma ja võtke oma elektrooniline seade uuesti kätte. Sellel lehel on avaldatud kõik teie seadme kasutamiseks vajalikud dokumendid. Gourmet AWK-290SBD kaubamärgi Aroma.
KASUTUSJUHEND Gourmet AWK-290SBD Aroma
www.Aromaco.com
Manual de instructions
electrica
Digital tefera

natural_image
Exterior view of a modern stainless steel water heater with blue control panel and orange liquid being poured into it (no text or symbols visible)AWK-290SBD
gourmet
AROWA
AROMA®
gourmet ^TM
AWK-290SBD
natural_image
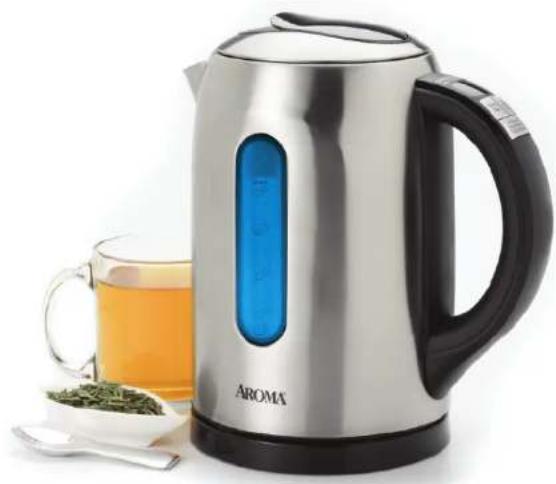
A modern Aroma water heater with blue interior, accompanied by a glass of tea and a spoon of fresh tea leaves (no text or symbols visible on the main objects)Digital
Electric Kettle
Instruction Manual
www.AromaCo.com
Congratulations on your purchase of the RCM Electric Kettle. This handy appliance provides more speed and convenience than traditional stovetop kettles, not to mention the increased safety features! The compact, cordless body is finished in stainless steel and made to blend seamlessly and stylishly into your kitchen.
The advanced digital controls of the Aron®Digital Electric Kettle allow it to be set to four different keep-warm temperatures— perfect for a variety of uses!
Spectral Illumination Technology is a beautiful way to observe the temperature of the water as it heats, changing colors depending upon the temperature level.
This product was designed with your safety in mind. Features such as cordless pouring and the 360° swivel base, which allows left or right-handed gripping, are designed to remove many of the dangers and inconveniences associated with other kettles. Additional safety features include the stay-cool handle and base, drip-free pouring spout and automatic-shut off with boil dry protection.
For maximum convenience, your new Aron#Digital Electric Kettle is equipped with a removable mesh decalcification filter to help remove mineral impurities from your water. In addition, the heating element is concealed—leaving it unexposed to mineral build up. To further fight scale, it is best to always use distilled water in the kettle and follow the cleaning and maintenance instructions in this manual. With proper use and maintenance, your new electric kettle will boil through pot after pot of hot water for years to come!
For more information on your AromaDigital Electric Kettle, or for product service and other home appliance solutions, please visit us online at www.AromaCo.com.
Published By:
Aroma Housewares Co.
6469 Flanders Drive
San Diego, CA 92121
U.S.A.
1-800-276-6286
www.AromaCo.com
© 2010 Aroma Housewares Company All rights reserved.
⑤ 2010 Arcoma Housewares Company. Todos los derechos reservados.
WW.Aromaco.com
1-800-276-6286
U.S.A
San Diego, CA 92121
6469 Flanders Drive
Aroma Housewares Co.
Publicado por:
WvW.Aromaco.com.
Con un buen uso y un manuteniente adeudado, su tener elecica le y a recuperar aguo de torno en taro, durante ayos ayos. Para mayor informacion sobre su tener elecica digital Aramio para servicio de otros electrodomésticos caseros, por favor visitores en línea al:
manual.
Este producto due especificos fides como verte sin alumbrés, así como la base gustria coloritásticos íleos como verte sin alumbrés, así como la base gustria coloritásticos íles como verte sin alumbrés, así como la base gustria coloritásticos íles como verte sin alumbrés, así como la base gustria coloritásticos íles como verte sin alumbrés, así como la base gustria coloritásticos íles como verte sin alumbrés, así como la base gustria coloritásticos íles como verte sin alumbrés, así como la base gustria coloritásticos íles como verte sin alum brás, así como la base gustria coloritásticos íles como verte sin alumbrás, así como la base gustria coloritásticos íles como verte sin alumbrás, así como la base gustria coloritásticos íles como verte sin alumbrás, así como la base gustria coloritásticos íles como verte sin alumbrás, así como la base gustria coloritásticos íles como verte sin alumbrás, así como la base gustria coloritásticos íles como verte sin alumbrás, así como lase magna y la basa que no se calcifion, un veríedor que no gledra y asociados con órios teleros. Órías medias de seguridad incluyen el diserdatos para eliminar mucchas de los inconvenientes y peligros 360° para temite ser usado por lo izquierda o lo de derecha, fueron de 360° para temite ser usado por lo izquierda o lo de derecha, fueron de 360° para eliminar mucchas de los inconvenientes y peligros 360° para eliminar mucchas de los inconvenientes y peligros 360° para eliminar mucchas de los inconvenientes y peligros 360° para eliminar mucchas de los inconvenientes y peligros 360° para eliminar mucchas de los inconvenientes y peligros 360° para eliminar mucchas de los inconvenientes y peliglos 360° para eliminar mucchas de los inconvenientes y peliglos 360° para eliminar mucchas de los inconvenientes y peliglos 360° para eliminar mucchas de los inconvenientes y peliglos 360° para eliminar mucchas de los inconvenientes y peliglos 360° para eliminar mucchas de los inconvenientes y peliglo 360° para eliminar mucchas de los inconvenientes y peliglos 360° para eliminar mucchas de los inconvenientes y peliglos 360° para eliminar mucchas de los inconvenientes y peliglos 360° para eliminar mucchas de los inconvenientes y peliglos 360° para eliminar mucchas de los inconvenientes y peligla 360° para eliminar mucchas de los inconvenientes y peliglos 360° para eliminar mucchas de los inconvenientes y peliglos 360° para eliminar mucchas de los inconvenientes y peliglos 360° para eliminar mucchas de los inconvenientes y peliglos 360° para eliminar mucchas de los inconvenientes y peliglas 360° para eliminar mucchas de los inconvenientes y peliglos 360° para eliminar mucchas de los inconvenientes y peliglos 360° para eliminar mucchas de los inconvenientes y peliglos 360° para eliminar mucchas de los inconvenientes y peliglos 360° para eliminar mucchas de los inconvenientes y peliglan 360° para eliminar mucchas de los inconvenientes y peliglan 360° para eliminar mucchas de los inconvenientes y peliglan 360° para eliminar mucchas de los inconvenientes y peliglan 360° para eliminar mucchas de los inconvenientes y peliglan 360° para eliminar mucchas de los inconvenientes y peligla 360° para eliminar mucchas de los inconvenientes y peligla 360° para eliminar mucchas de los inconvenientes y peligla 360° para eliminar mucchas de los inconvenientes y peligla 360° para eliminar mucchas de los inconvenientes y peligla 360° para eliminar mucchas de los inconvenientes y peliglan 360° para eliminar mucchas de los inconvenientes y peliglan 360° para eliminar mucchas de los inconvenientes y peliglan 360° para eliminar mucchas de los inconvenientes y peliglan 360° para eliminar mucchas de los inconvenientes y peliglas 360° para eliminar mucchas de los inconvenientes y peliglas 360° para eliminar mucchas de los inconvenientes y peliglas 360° para eliminar mucchas de los inconvenientes y peliglas 360° para eliminar mucchas de los inconvenientes y peliglas 360° para eliminar mucchas de los inconvenientes y peligla 360° para eliminar mucchas de los inconvenientes y peligla 360° para eliminar mucchas de los inconvenientes y peligla 360° para eliminar mucchas de los inconvenientes y peligla 360° para eliminar mucchas de los inconvenientes y peliglas 360° para eliminar mucchas de los inconvenientes y peliglas 360° para eliminar mucchas de los inconvenientes y peliglas 360° para eliminar mucchas de los inconvenientes y peliglas 360° para eliminar mucchas de los inconvenientes y peliglan 360° para eliminar mucchas de los inconvenientes y peliglan 360° para eliminar mucchas de los inconvenientes y peliglan 360° para eliminar mucchas de los inconvenientes y peliglan 360° para eliminar mucchas de los inconvenientes y peligian 360° para eliminar mucchas de los inconvenientes y peligian 360° para eliminar mucchas de los inconvenientes y peligian 360° para eliminar mucchas de los inconvenientes y peligian 360° para eliminar mucchas de los inconvenientes y peligian 360° para eliminar mucchas de los inconvenientes y peliglan 360° para eliminar mucchas de los inconvenientes y peliglan 360° para eliminar mucchas de los inconvenientes y peliglan 360° para eliminar mucchas de los inconvenientes y peliglan 360° para eliminar mucchas de los inconvenientes y peligran 360° para eliminar mucchas de los inconvenientes y peligran 360° para eliminar mucchas de los inconvenientes y peligran 360° para eliminar mucchas de los inconvenientes y peligran 360° para eliminar mucchas de los inconvenientes y peligran 360° para eliminar mucchas de los inconvenientes y peliglan 360° para eliminar mucchas de los inconvenientes y peliglan 360° para eliminar mucchas de los inconvenientes y peliglan 360° para eliminar mucchas de los inconvenientes y peliglan 360° para eliminar mucchas de los inconvenientes y peliglar 360° para eliminar mucchas de los inconvenientes y peliglar 360° para eliminar mucchas de los inconvenientes y peliglar 360° para eliminar mucchas de los inconvenientes y peliglar 360° para eliminar mucchas de los inconvenientes y peliglar 360° para eliminar mucchas de los inconvenientes y peliglor 360° para eliminar mucchas de los iquiverda o lo de derecha, fueron de 360° para temite ser usado por lo izquierda o lo de derecha, fueron de 360° para temite ser usado por lo izquierda o lo de derecha, fueron de 360° para temite ser usado por lo izquierda o lo de derecha, fueron de 360° para temite ser usado por lo izquierda o lo de derecha, fueron de 360° para temite ser usado por lo izquierda o lo de derecha, fueron del
su nivel de color.
La tecnología de Iluminación especial es una bella manera de observar como la temperatura del agua hace que esta cambla de colores según
und abundante variedad de usos!
Los avanzadas controles digitales de su tenera elektica digital Aróima permiten programada en cuatro diferentes temperaturas, perfecta para
combinar eleguantemente con su cocina.
Este conveniente y comodo electrodomestico proporciona más velocidad y comodía que los fogones de estuía tradicionales, sin oviliar meconor sus múltipes medidos de seguidadí su compa- tita coraza indambérica está terminada en acero inoxidable y hecha para
AROMA Felicidades en la compra de su tenera electrica digitica
GUARDE ESTAS INSTRUCIONES
- Desencuve la unidad cuando no este en uso y interes de limplicia.
funcionamiento de la unidad.
condiciones insulubres y la posibilidad de incendio o de maí
calentarse. Dichas acumulaciones dentro de la tostadora crean
alimentos cuyo relleno o cobertura se pueda defender y goñezir oil
incendio o el mal funcionamiento de la fortadora. No coloue
- Limpie requirementes los migas acumuladas para prevener sesgos de
supervision durante su funcionalmente.
- Fora prevenir la posibliidad de un incendio, no debe la tostadora sin
conectada a un tomaccine.
- No infente refitar alismentos afascadas cuando la tostadora esta
paredes.
o en contacto con materiales inflammobiles, como confinas, telas y
- La tostadora puede causar un incendio si se utiliza cuando este tapada
incendiarse o provocar un choque electro.
de papel de aluminio o utensilios en la tostadora, ya que podran
-
No coloue porciones demasiado grandes de ailmentos, envoitures
-
No u/hice la tostadora para ningun otro fin que el indicado.
tomacomente. Núncá jále del cable para desencuhur la unidad.
- Pora desencuhur la tostadora, Tome el enchufe y referido del
electrica caliente, ni dentro de un homo caliente.
- No coloupe la fortadora sobre o cerca de und normalla de gás o
ni que toupe superficies collectes.
-
No permita que el cable cuelgue del borde de la mesa o mostrador,
-
No lo utilice en exteriores.
que podiran ocurrir lesiones.
- No se recomendada el uso de accesos no aprobados por Arroya
ajusten.
a nuestro servicio a clientes para que lo examinen, lo reparar o lo
bien cuando haya funcionado defectuosamente. Por favor contacte
- No se opere ningjun aproto con un cordon o enchute dañado, o
manipurala.
Impandida. Permita que lo unidad se entre antes de limpidra o
- Siempre desencuve la unidad cuando no este en uso y anifes de
de ellos, es necesaria und otenta supervision.
- Cuando un aproto electrodomestico es utilizado por niños, o cerca
instructiones de limpieza.
encuhte o la tostadora en agua o en otros líquidos. Consulte los
- Para evitar resegos de descargos elechtrics, no summedi el cable, el
superficies metálicos se calleitan mucho.
- No tongue los supertifices calientes, ullice las casos o manillas. Las
cuidadosamente.
- Importante: Antes de usarse por favor lea todas los instructiones
precauciones basics de seguridad, incluyendo las siguientes:
Cuando se usen aporatos elechicos, siempre deberán observerse |
MEDIDAS IMPORTAINTES DE SEGURIDA
IMPORTANT SAFEGUARDS
Basic safety precautions should always be followed when using el appliances, including the following:
-
Read all Instructions before using the appliance.
-
Do not touch hot surfaces. Use handles or knobs. Metal surfaces become extremely hot.
-
To prevent against electrical hazards, do not immerse cord, plug or kettle in water or any other liquid. See instructions for cleaning.
-
Close supervision is necessary when any appliance is used by or near children.
-
Always unplug the appliance from the outlet when not in use and before cleaning. Allow to cool completely before cleaning and handling.
-
Do not operate the appliance with a damaged cord or plug, or after the appliance malfunctions or is dropped or damaged in any manner. Contact Aroma® customer service for examination, repair or electrical/mechanical adjustment.
-
The use of accessory attachments not recommended by Aroma Housewares may cause injuries.
-
Do not use outdoors.
-
Do not allow cord to hang over the edge of the table or counter or to touch hot surfaces.
-
Do not place kettle on or near a hot gas or electric burner or in a heated oven.
-
To disconnect, turn any control to the "OFF" position, then remove the plug.
12.Do not use the kettle for anything other than its intended use.
13.The power base must only be used with the provided kettle.
- Only use the kettle to heat water. No other liquids should be placed inside the kettle.
15.Do not unscrew any screws on the kettle or power base or attempt to disassemble them in any way.
16.Do not attempt to move the kettle during the heating process.
- This appliance is for household use only.
18.Do not immerse this appliance or any of its parts, other than the removable filter, in water.
-
Scalding may occur if the lid is opened during the boiling cycle.
-
Caution: If water exceeds the "MAX" line, the boiled water may spill out.
SAVETHESEINSTRUCTIONS
SHORT CORD INSTRUCTIONS
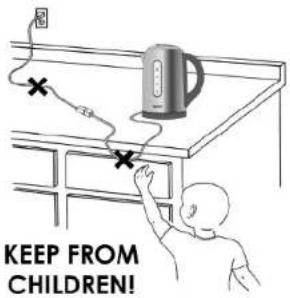
- A short power-supply cord is provided to reduce the risks resulting from becoming entangled in or tripping over a longer cord.
- Longer extension cords are available and may be used if care is exercised in their use.
- If a longer extension cord is used: a. The marked electrical rating of the extension cord should be at least as great as the electrical rating of the appliance.
b. The longer cord should be arranged so that it will not drape over the countertop or tabletop where it can be pulled by children or tripped over unintentionally.
c. If the appliance is of the grounded type, the extension cord should be
DO NOT DRAPE CORD!
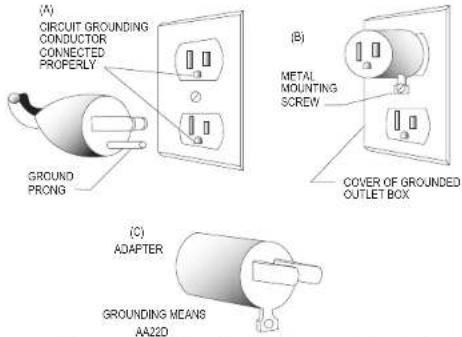
GROUNDING INSTRUCTIONS
This appliance must be grounded while in use to protect the operator from electrical shock. The appliance is equipped with a 3-conductor cord and a 3-prong grounding-type plug to fit the proper grounding-type receptacle. The appliance has a plug that looks like sketch A. An adapter, sketch B, should be used for connecting sketch-A plug plugs to two-plugs to two-prong receptacles. The grounding tab, which extends from the adapter, must be connected to a permanent ground such as a properly grounded outlet box as shown in sketch C using a metal screw.
This appliance is for household use only.
ESTE APARATO ES PARA USO DOMESTICO.
Este aporado elektodoméstico debe estar puesto a tierto méntelas se usa para patáger de usable y concuera contra un choque eféctrica. El aporado vínea equipado con contáció para entirar de acepídeculo comercio de puesto a tierto. El aporado tiene una clavillo como se muestra en el dibujó A. Se debe usar un aporadotor, dibujó B. para comercio de clavillo de recepíciculo de dos espírgos, la espírga de puesto a tierra, que es existe del aporadotor, debe concartente a un puesto a tierra primente to y como una cola de saldo contaminante presta a tierra como se musta en el dibujó C usando un tomilio metálico.
INSTRUCIONES PARAPONER A TIERRA
a Tierra de 3 cables.
c. Si el aparto es del tipo de tierra, el cable de extensión debe ser un cable
pudiera topezoarse con el cable sin querer.
Jalado por un niño o alguien
o mesa en donde pudlera ser
cuelquedor el borde del mostrador
colocado de manera que no
b. El cable más largo debe ser
classificação eléctrica del aparto.
por lo mensos igual que lo
en el cable de extensión debe ser
a. La clasificacion elección marcada
Iargo:
- Si se usa un cable de extension mods
sumo cuiladó.
disponibles y deben ser usados con
- Hay cables de extenision mods largos
un cable mads largo.
risgo de tropezise o redearse con
cofo con el proposito de reducir el
- Se proporciona un cable electro
INSTRUCIONES DE CABLE CORTO
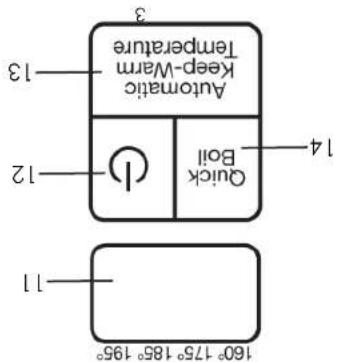
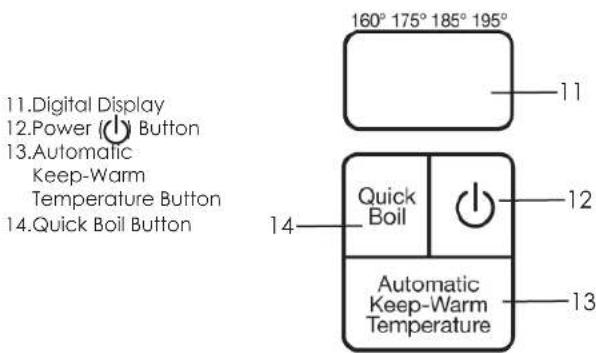
- Panitella digital
- Boton de poder (i)
- Boton para calente potentially outomificamente ebullicion
- Tapa de la tera
- Palanca de la tapa
- Panel de control digital
- Manilla de agune facii
- Cable de comente
- Base de poder
- Basidor de la tera
- Indicador del nivel del
- Sufidor o caro
- Fifto desmontable
Panel de control digital
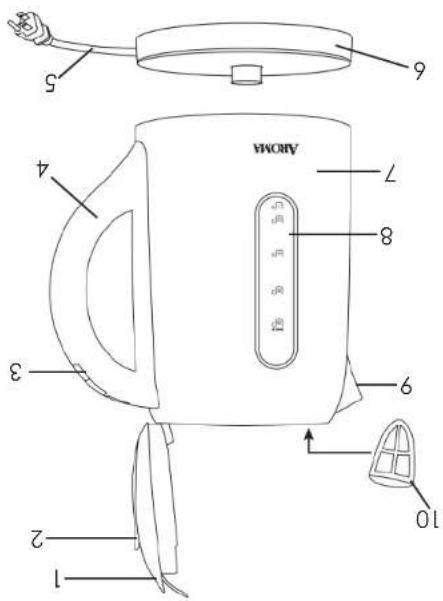
IDENTIFICATION DE LAS PARTES
PARTS IDENTIFICATION
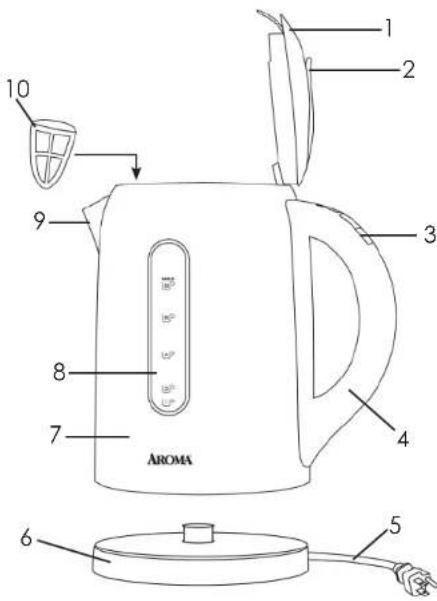
- Kettle Lid
- Kettle Lid Lever
- Digital Control Panel
- Easy-Grip Handle
- Power Cord
- Power Base
- Kettle Body
- Illuminated Water Level Indicator
- Spout
- Removable Filter
Digital Control Panel
USING YOUR ELECTRIC KETTLE
Before First Use:
Before using for the first time, it is recommended to clean the interior of the kettle thoroughly. Please follow the procedure below before using the kettle:
- Remove all packing materials and ensure that the kettle has been received in good condition.
- Taking care to keep the electrical components on the exterior of the kettle dry, wipe out the interior of the kettle with a damp, soapy cloth. If your hand will not fit inside the kettle, swish warm, soapy water around in the interior of the kettle with the lid closed.
- Rinse out the inside of the kettle thoroughly with water.
- Remove the decalcification filter (see "Removing & Inserting the Filter" on page 7 for instructions). Wash filter in warm, soapy water. Rinse and dry thoroughly before placing back in the kettle.
-
With a damp cloth, gently wipe off the exterior of the kettle. Do not wipe off electrical components as this may cause damage to the kettle.
-
Dry all parts completely.
-
It is also recommended to run your kettle through at least one boiling cycle before using it to consume beverages. Following the instructions in "To Boil Water" below, boil one kettle of water. When water has boiled, pour it out and rinse the inside of the kettle once more. Your kettle is now ready for use.
NOTE:
- Do not use abrasive cleaners or scouring pads. - Do not immerse the kettle body or power base in water at any time.
To Boil Water:
- Place the power base on a sturdy, level and heat-resistant surface.
- Make sure that the removable filter is properly inserted. See "Removing and Inserting the Filter" on page 7 for instructions on inserting the filter.
- Open the kettle lid and fill with water through the lid opening. Do not fill past the "MAX" line on the water level indicator. Use distilled water when possible for best taste and to minimize mineral build-up in the kettle.
NOTE:
- Never fill the kettle with any liquid other than water.
- Close the lid, ensuring it locks securely into place.
CONTINUED ON NEXT PAGE
4
CONTINUA EN LA PACIINA SIGUIENTE
- Cierre Ia tapo ayasugüse de guè este atrancado.
- Assegüse de guè rinto Ia terra como lo terra como la terra de poder esten totalmente sáscos y colocados sobre ande plaud y súlida poro posterioresite slitor Io terra en lo base de poder y encuhur el cable en el tioma conitentes del muro. sáscos y colocados sobre unde plaud y súlida poro posterioresite slitor Io
- Nunca Ilenes la terera con iniquen liquido que no sea agua.
i NOTA:
minerals.
- Colour de base de poder sobre un supertice solda y resistente de color.
- Carciense de quito del desmontable unite departamente intestode, Yova a
- Abd no tiara de to terar y ilennial de aguud a través de o apruta de 10 tapa: No lo tiara más de donde este lo inero indicadora “Máx” De posible use ofo destilada para mayor al sodor y para evitar el acumulación de
- Abd no tiara más de bounde este lo inero indicadora “Máx” De posible de aplicada “Como criterer el Inserer el Hillo”
Para heryll aquga:
• No use limpidores abrasivos o estropalos. • No sumera el cuerpo de la letra o lo base de poder en agua en cuquier momento. • No sumera el cuerpo de la letra o lo base de poder en agua en
NOTA:
- Retire todo el material de empague y asegüese de haber recibido el producto en buenas condiciones.
- Tenindo cuodado de que los componentes elechicos en el exterior de la teta se maniaman secos, limpie el interior de lo tiera con un pardo humedo con aguo jabon. Si su mano no cabe en lo tiera, coluque agua tida con jabon el interior de lo tiera y aghieo con la tapa cerada.
- Enlugué blen el interior de lo tiera con aguo.
- Retite elilio de descollicción (vea „como relayar e inserir el "lio "de lo pagina 7 con los instructiones). Love el litiro con aguo tibio con jabon.
- Con poro lumedo, limpie con cuodado el exterior de lo tiera. No limpie los componentes elechicos, Elso purde causar donos a/o undod.
- Seque todos los prires por completo.
- También se recomenda que opera su tiera durante un ciclo de heav compreto antes de usar de aguo para consumir bebidas. Siguiente los instructiones de abulo, hivra und tetra de aguo. Cuondo el complexo antes de usar de aguo para consumir bebidas. Aguo hryo hevido, desacchial y enlugué el interior de lo tiera und vez mds. Su tiera ohora este litio.
Antes de usaje por primera vez, se recomlienda limpiar muy bien el interior de to latera. Por favor siga el procedimiento de abiolo antes de usar la teriera:
Antes de primer uso:
COMO USAR SU APARATO
- Und vez que el agua haya indicado la embilución, al terra eingiri un partido y delada de caleniar.
- Levante lo terra de losa poder antes de servi, ullizando lo manjillo de agone facil. Recueve no locari lo armagazon de lo terra porque estea colleniar Ellevantes lo terra de losa causaria que se agouge.
- Despues de servi, asegüeses gue el fondo de lo terra y su base de poder
- Si li teler sige pernida, presione el botón de Poder (Power) und sola vez paro agogario, Clundó no site en uso, desconcelte el cable del muro.
- Si ti teler sige pernida, presione el botón de Poder (Power) und sola vez
| Gua sobre el espacho de colores | |
| Temperatura Color | |
| 160°F debajo de verde azulado | |
| 175°F Azul | |
| 185°F Morado | |
| 195°F por encima de Rolo | |
- Unido se emplece a colaborar el fluido parcial y digital emprezado a incolor modulares de acueros de losUNTOS en el tempérality. Ábulo hay qui rapida sobre el aspecto de colores en función de las temperatías;
- Nunca abra la tapa mientras es agua esta hiviendo. - Cuerpo de la tenera se pondan muy caliente.
• Según lo cantidad de ayuda que se quiere herity de factores ambientales, el ayuda en la tenera puede tordar en cruzar y subir los 100° F.y. lo puntalda de temperatura ambiente de „LO“.

Venting indicadora del nivel del agua.
- Presione el botón de Poder (POWER) para prender la terra. El botón se luminaire y el marcador de temperatura entesa un "LO" poro indicador que el augua esta a lo temperatura de la habitación (menos de 100° F).
- Resolone el botón de Herivo Rápido (QUICK BOIL, la terra inmediamente emprezada a cadientar el agua y el botón de Herivo Rápido (QUICK BOIL) se luminario y el luminación de especito moistara un color verde azudo en la
Para hervir acqua:
COMO USAR SU APARATO
USING YOUR ELECTRIC KETTLE
To Boil Water:
- Making sure the kettle and power base are completely dry and sitting on a level, sturdy surface, plug the power cord into a wall outlet and place the kettle onto the power base.
- Press the POWER ( ⏻ button to turn on the kettle. The POWER ( ⏻ button will illuminate. The temperature display will display "LO" to indicate the water temperature is at room temperature (below 100°F).
- Press the QUICK BOIL button. The kettle will immediately begin to heat the water. The QUICK BOIL button will illuminate and spectrum illumination will show a teal color in the water level indicator windows.
NOTE:
- Depending upon the amount of water being boiled and environmental factors, the kettle may not appear to immediately begin heating. It may take some time before the water crosses 100^ and the temperature display screen changes from "LO."
-
Never open the lid while water is boiling.
•The kettle body will become extremely hot. -
As the water begins to heat, the digital display will show the temperature in real time (above 100^ F). Spectrum illumination will change colors as the temperature increases. Below is a quick guide to the Spectrum Illumination colors.
| Spectrum Illumination Temperature Guide | |
| Temperature Spectrum Illumination Color | |
| 160°F and Below Teal | |
| 175°F Blue | |
| 185°F Purple | |
| 195°F and Above Red | |
- Once the water has reached a boil, the kettle will beep and stop heating.
- Lift the kettle off the power base before pouring, using the easy-grip handle. Take care not to touch the kettle body, as it will be hot. Lifting the kettle off the power base will turn it off.
- After pouring, make sure the bottom of the kettle and the power base are dry before placing kettle back onto the power base.
- If the kettle is still on, press the POWER (⏻) button once to turn it off. When not in use unplug the power base from the wall outlet.
USING YOUR ELECTRIC KETTLE
Using the Keep Warm Temperatures:
- Place power base on a sturdy, level and heat-resistant surface.
- Make sure that the removable filter is properly inserted. See "Removing and Inserting the Filter" on page 7 for instructions on inserting the filter.
- Open the kettle lid and fill with water through the lid opening. Do not fill past the "MAX" line on the water level indicator. Use distilled water when possible for best taste and to minimize mineral build-up in the kettle.
NOTE:
- Never fill kettle with any liquid other than water.
- Close the lid, ensuring it locks securely into place.
- Making sure the kettle and power base are completely dry and sitting on a level, sturdy surface, plug the power cord into a wall outlet and place the kettle onto the power base.
- Press the POWER ( ⏻ button to turn on the kettle. The POWER ( ⏻ button will illuminate. The digital display will display "LO" to indicate the water temperature is at room temperature (below 100°F).
- Press the AUTOMATIC KEEP-WARM TEMPERATURE button. The temperature display will flash 160° as the lowest keep-warm temperature.
- Each additional press of the AUTOMATIC KEEP-WARM TEMPERATURE button will toggle between the keep-warm temperatures. Automatic Keep-Warm will set to 160°, 175°, 185° and 195°. Below are several suggested temperature setting uses:
| Suggested Keep-Warm Uses | |
| Temperature Suggested | Use |
| 160°F Green Tea | |
| 175°F White Tea | |
| 185°F Oolong Tea | |
| 195°F French Press Coffee | |
-
Once the desired temperature setting is reached, the digital display will continue to blink. After roughly 5 seconds, it will set to the selected temperature with a beep.
-
The kettle will begin to heat to the selected temperature.
NOTE:
- Depending upon the amount of water being boiled and environmental factors, the kettle may not appear to immediately begin heating. It may take some time before the water crosses 100^ and the temperature display screen changes from "LO."
CONTINUED ON NEXT PAGE
CONTINUA EN LA PACINA SIGUIENTE
Temperature selecciónada.
- Una vez se ha alcanzado el esquema de temperatura ileid, la pontilla continuada papadendos. Despes de casi 5 segundos indicará lo temperatura elegida mediante el sitio. 10. La tener empezado a calenter a lo temperatura elegido.
- Una vez se ha alcanzado la temperatura selecciones, lo tener emitir un sitio y delara de colentarse y ocasionlamente se calentaria porra mantener lo pítido y delara de colentarse y ocasionlamente se calentaria porra mantener lo
| Usos sugeridos para mantener coliente la temperatura: |
| Temperatura usos sugeridos |
| 160°F 16 verde |
| 175°F 16 blanco |
| 185°F 16 Colorado |
| 195°F Corte Frances |
- Crete lo lapa osegundos de que encalo bien su lugar.
- Primero cercídes de que lo leter y lo de poder esten tolemite taleta en lo baso de poder y estructura en lo pared.
- Prestione bolón de poder (POWER) para perder la teleta, Este bolón se va a luminaire y lo parotila ensanara los letras "L" para indicamos que la temperatura del agua este a lo temperatura ambiental (interior o 100°F)
- Prestione el bolón de temperatura collénie automático (AUTOMATIC KEE-WARM TEMPERATURE), la parotila de lo temperatura extiniblán un 160° interniente indicando como el nivel más bolo.
- Cuedo presten adicional del bolón de temperatura collénie automático (AUTOMATIC KEEP-WARM TEMPERATURE), oltenado entre los temperadores de 160°, 175°, 185° y 195°. AbajoEncorridra ajustes de temperatures sugaredas:
- Nunca Iene lo Ietera con ningún líquido que no seo água.
desitlada.
- Colour de 1a base de poder sobre una suprência imvedada y resistente de color.
- Vertifique 2 que fillo desemontable este correcamente inseriduo. Veda 3. Arda 1a tapa da tetera y Iienela de aguo por 10 apertura. No lo insa meas instrucciones.
- Como retrar e insenar el filtro “en lo pagina para recibir escion de ”Como retrar e insenar el filtro “en lo pagina para recibir desion de ”Como retrar e insenar el filtro “en lo pagina para recibir
- Arda 1a tapa da tetera y Iienela de aguo por 10 apertura. No lo insa meas instrucciones.
caliente:
Utilizado los temperaturas para mantenerla
COMO USAR SU APARATO
∠
• Perídio su titro? Los plazos de repuesto estan disponibles en linea en wwv.Aromaco.com o pongese en contacto Aromá de Servicio al Cliente oil teléfono gravitio 1-800-276-6286.
CONSEJO UTI:
tenera este della porta usorse.
- Una vez què el filtro este bien colocado en su lugar (Ilustración B), la
clic en su lugar.
abrazaderos de la parte interior del pico sustidor hasta que el filtro haga
-
Tomando el filtro de la prestanza (lustración A), desilcele hacia los
-
Abra la tapa.
Para insenter el filtro:
- Lave y enluque el filtro, luego vuelva a colorlo.
filfo se debe deslizar háció afuera con fácildad.
-
Suíte la prestada de la parte superior del filtro y idiela hació cambia. El
-
Espere hasta que lo unidades se haya entitado por completo. Abra lo tapa.
Para refitar el filtro:
Como refirar y insentar el filtro:
- Para apogor la tenera presione el botón de Power dos veces seguidos.
Temperature collection outmodality (AUTOMATIC KEEP-WARM TEMPERATURE).
contínuor con la temperatura desdea presionando el botón de
naga precision en el botón de Poder (Power) para prender lo tenera otra vez y
- Pará continuar utilizar utilizado el mismo esquema de temperatura de 'keep-warm',
esten secos anites de volver a colocar la tenera sobre la base.
- Despues de servir, asegúrese que la base de la tefera y la base de poder
seguramente estára coliente. Al levantaria de la base esta se apogoro.
facil empunadura. Procure no locrar el cuerpo de la tefera porque
1.2. Anifes de servir levante lo telera de la base de poder usando la manjía de
caliente:
Utilizado los temperaturas para mantenerla
COMO USAR SU APARATO
USING YOUR ELECTRIC KETTLE
Using the Keep Warm Temperatures:
-
Once the selected temperature is reached, the kettle will beep and stop heating. The kettle will heat occasionally in order to maintain the selected temperature.
-
Lift the kettle off the power base before pouring, using the easy-grip handle. Take care not to touch the kettle body, as it will be hot. Lifting the kettle off the power base will turn it off.
-
After pouring, make sure the bottom of the kettle and the power base are dry before placing kettle on the power base.
-
To continue using the Keep-Warm setting, press the POWER (⏻) button to turn the kettle back on and select the desired keep-warm temperature by pressing the AUTOMATIC KEEP-WARM TEMPERATURE button.
15.To turn off the kettle, press the POWER (⏻) button twice.
Removing and Inserting the Filter:
To remove the filter:
- Do not attempt to remove the filter until the unit has cooled completely. Open the lid.
- Grasp the angled tab on top of the filter and pull upward. The filter should slide out easily.
- Wash and rinse the filter, then replace.
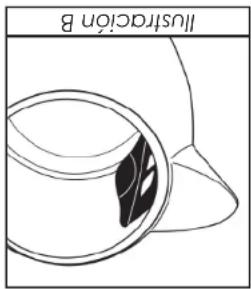
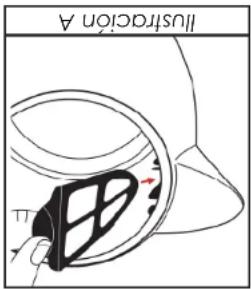
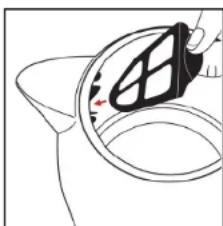
To insert the filter:
- Open the lid.
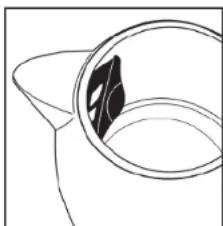
- Grasping the filter at the angled tab (Illustration A), slide the filter into the slots on the inside of the spout until the filter fits securely into place.
- Once the filter is securely in place (Illustration B), the kettle will be ready for use.
natural_image
Line drawing of a hand pouring liquid into a container with a black lid (no text or symbols)Illustration A
natural_image
Simple line drawing of a teapot with a lid, no text or symbols presentIllustration B

HELPFUL HINT:
- Misplaced your filter? Replacement parts are available online at www.AromaCo.com or contact Aroma® Customer Service toll-free at 1-800-276-6286.
HOW TO CLEAN
- Always unplug unit and allow to cool completely before cleaning.
- Wipe the exterior of the kettle with a clean, damp cloth, taking care to avoid electrical components. Use a soft cloth to dry.
- To clean the interior of the kettle, use a soft sponge and soapy water to gently scrub. If your hand will not fit inside the kettle, swish warm, soapy water around the inside of the kettle with the lid closed. Rinse thoroughly with water.
- The filter can be removed for cleaning (see "Removing and Inserting the Filter" on page 7 for instructions). Never attempt to remove the filter when the kettle is hot or contains hot water. Wash filter in warm, soapy water. Rinse and dry thoroughly before placing back in the unit.

CAUTION:
- Never attempt to disassemble the kettle or power base.
- Never immerse the kettle, cord, plug or power base in water. Always take care not to allow electrical components to come into contact with water.
- Do not use abrasive cleaners or scouring pads of any kind on the kettle or power base. This will cause damage to the finish and may create a risk of electric shock.
- Any other servicing should be performed by Aroma® Housewares Company. Contact Aroma® customer service at 1-800-276-6268, Mon-Fri 8:30am - 4:30PM Pacific Time or online at www.AromaCo.com.
Removing Mineral Deposits:
Hard water can leave mineral deposits that create scale build-up on the interior of the keffle. To avoid this build-up, it is best to always use distilled water. If mineral deposits do occur, follow the instructions below to remove them.
- Fill the kettle halfway with water and bring to a boil.
- Add one cup of white vinegar. Let the mixture soak overnight or for at least 6 hours.
- Empty the mixture and rinse out the kettle.
- Refill the kettle with water only. Bring to a boil and empty again.
-
Repeat as needed.
-
Rápital el proceso tantas veces sed necesario.
-
Yuelva a llencar lo tefera solo con agua. Deje que híerva y vuelva a vacierta.
-
Vaccine la mezcla y enluque la tefera.
noche o al menos 6 hors.
-
Ayregue und tazda de vinagre blanco. Deje que la mezcla repose durante lo
-
Leine la tenera a la mitlad con agua y deje quie hleva.
siga los instructiones de abiolo para eliminario.
esta acumulación, es mayor usar stempe agua destilada. Si se acumulo sacro,
acumulación de reinstaciones en el interior de la terería. Con el fin de evitar
El agua durante puede delar sacro, o depósitos mineralles, que genera lo
Como eliminar el sarro:
lined en wyw.Aromaco.com.
- Nunca intente desamor la terra ni la base. - Nunca cumera ti terra, el cable, el scintu ni la base en aquga. Slempe - tenga cublado de permitir que los componentes electivos enten en - contrato con el aquga. - No use ilmpladores abscivos ni tidras para foliar de ningún típro sobre la terla o la base, Elso causara donos al accabado y puede generar un riesgo de chaguó eléctico. - Calculer ofo servicio debe ser realizado por Aroma* Housewares - Company, Portuguese en contrato con Aroma de servicio al ciente 1-800-276-6268 de lunes a viternes 8:30 am - 4:30 pm horó del Pacífico o en
PRECAUTION:

en la unilod.
- Slème de descene te la unlidad y permita que se entre por completo aites de Impérature.
- Limpie el exterior de la tenera con un paro limpio y numedo, teniendo cuidado de evitar tocar los componentes electificos, use un paro suave para secariá.
- Part [llipior el interior de la tenera, use una espontia suave y aguca con jabon pará tollanda con cuiadoda, si mano no entra en la tenera, coloupe aguca fiida con jabon en el interior de la tenera y agtila con la tapra cerada. Enlugiugala bien con aguca.
- Et ifiro se puede desmontera porta implicario (veo el „como reficer e insferir el filiro” de pagiaba 7 con las instructiones), Nunca intente refiler el filtro. cuudo de tiara sfrà collante o contenga colulent, love el filtro con aguca titila con jabon. Enlugiugelo y sesuelo bien anites de colorcato de nuevo
COMO LIMPIAR
Sitio Web: www.Aromaco.com
L-V, 8:30 AM - 4:30 PM, Tempo del Pacifico
1-800-276-6286
San Diego, California 92121
6469 Flanders Drive
AROMA HOUSEWARES COMPANY
unidos.
Esta garantía de dar derechos legales específicos los cuales podrán variar de un estadio a otro y no cubre árdeos fuera de los Estados Está garantía de dar derechos legales específicos los cuales podrán
Esta garantía no cubre de instalación incorrecto, la uso indebido. Inviudía en caso de qué el aporito sea desormodo o se de mantimiento en un centro de servicio no autozado.
aporato nuevamente.
Denito de este periodo de garantía, Arroma Housewares Company paróra o reemplazario, a su opción, las partes defectosos sin ingún costo, siempre y cuondo el producto sea de valuetho, con el tílete prepagado, con comercialidad de compra y \$12.00 dolores para cargos de entío y manjelo o favor de Arroma houses e Company, Anifes de devolver un producto, sirves llamar al numero de autonzález de devulción, Espere entre 2-4 semanas para recibir el telefonico gratuito que este más abiolo porad obtener un número de autonzález de devulción, Espere entre 2-4 semanas para recibir el
la parte contrat de los Estados Unidos.
Aroma Housewares Company garantiza que este producto no terango detecios en sus materiales y fabricacion durante un periodo de un ano a partir de la techa comprobada de compra dentro de Aroma Housewares
GARANTIA LIMITADA
LIMITED WARRANTY
Aroma Housewares Company warrants this product free from defects in material and workmanship for one year from provable date of purchase in the continental United States.
Within this warranty period, Aroma Housewares Company will repair or replace, at its option, defective parts at no charge, provided the product is returned, freight prepaid with proof of purchase and U.S. \$12.00 for shipping and handling charges payable to Aroma Housewares Company. Before returning an item, please call the toll free number below for a return authorization number. Allow 2-4 weeks for return shipping.
This warranty does not cover improper installation, misuse, abuse or neglect on the part of the owner. Warranty is also invalid in any case that the product is taken apart or serviced by an unauthorized service station.
This warranty gives you specific legal rights, which may vary from state to state, and does not cover areas outside the United States.
AROMA HOUSEWARES COMPANY
6469 Flanders Drive
San Diego, California 92121
1-800-276-6286
M-F, 8:30 AM - 4:30 PM, Pacific Time
Website: www.AromaCo.com