Ergonomic 23115 - Valamu AKW - Tasuta kasutusjuhend
Leidke seadme juhend tasuta Ergonomic 23115 AKW PDF-formaadis.

Kasutajate küsimused teemal Ergonomic 23115 AKW
0 küsimus selle seadme kohta. Vastake nendele, mida teate, või esitage oma.
Esita uus küsimus selle seadme kohta
Laadige alla juhend oma Valamu PDF-formaadis tasuta! Leidke oma juhend Ergonomic 23115 - AKW ja võtke oma elektrooniline seade uuesti kätte. Sellel lehel on avaldatud kõik teie seadme kasutamiseks vajalikud dokumendid. Ergonomic 23115 kaubamärgi AKW.
KASUTUSJUHEND Ergonomic 23115 AKW
IMPORTANT SAFETY INFORMATION


ALWAYS Read all installation instructions carefully before installing this product and leave with the end user for future reference.
ALWAYS Have the wash basins installed by a trained and experienced installer.
ALWAYS Attach this wash basin to a surface using fixings matched to the type of surface and the loading conditions to be applied.
ALWAYS Take care handling the product and always use all fixings holes.
NEVER Install countersunk screws to fixing holes. This may reduce the strength and will invalidate any warranty.
NEVER Use an abrasive pad as these will scratch the ceramic surface.
Caution Making fixing holes larger will reduce the strength of the fixing brackets and invalidate any warranty or stated weight capacity.
Warranty

Guaranteed for life covers all AKW wash basins against faulty material or workmanship.
*Not covered by warranty is any damage or
defects that result from incorrect installation, improper use, accidental damage or lack of maintenance including the buildup of grime, dirt or limescale and waterborne debris.
Damage resulting from inappropriate cleaning, staining or grime ingress. Damage or defects that result from repairs, modifications undertaken by unauthorised persons who are not AKW authorised service staff or agents.
These instructions are provided to advise the minimum standards of installation and recommendations on a specific basis for the material.
Due to the very wide variability of possible installation conditions AKW cannot provide all circumstances for the installation AKW service, except very likely in connection with the information or use. The information is provided on the condition that the person receiving it shall make their own terms to determine the suitability for other particular purposes to install this AKW product in accordance with suspect instructions or the making of unauthorized medications will involve any warranty and may affect product safety.
© 2013 AKW
08-006-016-02
Orderline
01905 823299
General Enquiries
01905 823298
Technical Help line
01905 560219
technicalenquiries@akw-ltd.co.uk
Fax
01905 823297
Website
www.akw-ltd.co.uk
Quotes & orders email
orders@akw-ltd.co.uk
Enquiries email
sales@akw-ltd.co.uk
Post
AKW. Pointon Way.
Hampton Lovett.
Droitwich Spa.
WR9 0LR
For AKW news and products, scan this code OR with your device.


What to do if something goes wrong?
In the unlikely event that you should encounter a problem with this product, please contact your local installer and if this does not resolve the issue then contact AKW technical team who will provide further advice and if necessary arrange for our service engineer to visit or discuss our comprehensive after-sales service. As part of our quality and training program calls may be monitored or recorded. None of the foregoing affects your statutory rights.
Failure to install this AKW product in accordance with supplied instructions or the making of unauthorised modifications will invalidate any warranty and will affect product safety.
AKW
life. style. choice.

AKW Wash Basins
Installation and User Care Instructions


Always read all the instructions carefully BEFORE installation and leave with the end user for future reference
Essential Installer Information

Careful handling at all times.

Basins must be attached to a vertical surface using suitable fixings appropriate to the type of surface and loading conditions to be applied.
Stainless steel fixings are recommended.
Make sure all fixing holes are used. Take care not to damage surface.
Do not use countersunk screws or make any holes larger. This will invalidate any warranty.

Warning! Ceramic items must be protected from any contact with hard materials and impacts during handling and installation.
AKW cannot specify fixings for all wall types.
You should consult a fixing manufacturer if you are unsure of which type to use, stating the type and construction of the vertical surface and the version of AKW Wash basin.
Wall types such as plasterboard and Gypsum fibre board will require extra strengthening.
Make sure all fixing holes are used and do not overtighten the wall fixings.
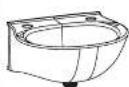
AKW-B400
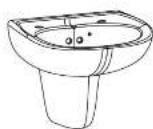
AKW-B450

AKW-B510
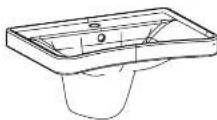
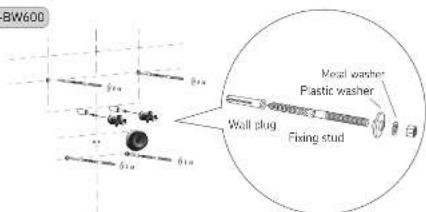
AKW-BW600
Ensure you use the correct installation method and fixings for your wash basin

Ensure isolating service valves are installed near to the installation and are easily accessible. Ensure the water supply is turned off at the isolating shut off valve.

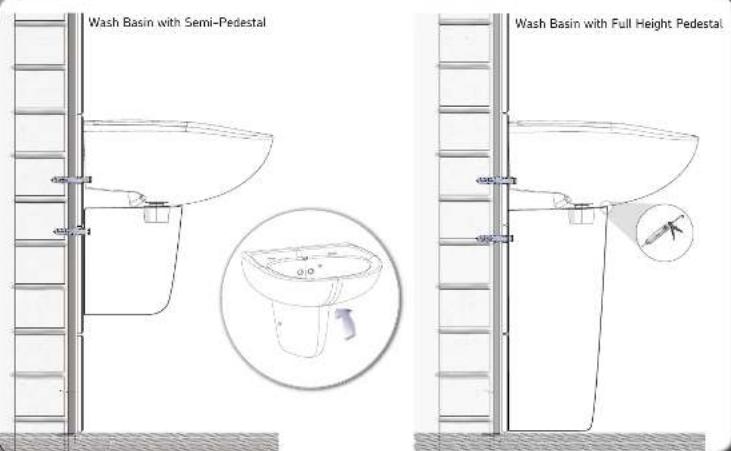
Ensure the wall area is in good condition and is able to support the wash basin. Provisionally place the wash basin and pedestal into position for marking up and test suitability.

NOTE: For Full Height Pedestal installation, rest the basin squarely on top of the pedestal, using a spirit level to ensure it is level and mark the fixing points with a pencil.
Step 1 - Positioning the wash basin Step 2 - Mo
Mark and measure the wash basin mounting positions on the wall. Provisionally mark the position of the wash basin support bracket (this is optional).
Remove the wash basin and check that the mounting holes will not interfere with the waste pipe and water supply.
Confirm all positions are correct before drilling into the wall.
1
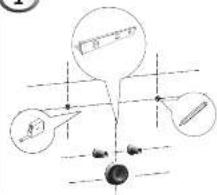
Using a tape measure and spirit level mark the mounting position on the wall.
This must be installed on a sealed or tiled surface.
2
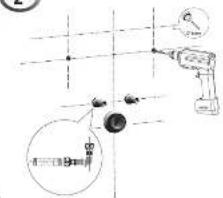
Take care when drilling into surfaces with plumbing or electrical cables.
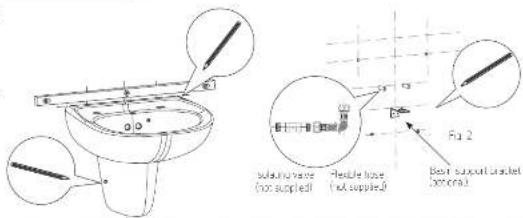
Drill mounting holes for the wall fixings. Ensure Isolation valves and flexible hoses are installed (these are not supplied).
3
For AKW-B450, AKW-B510 and AKW-BW600
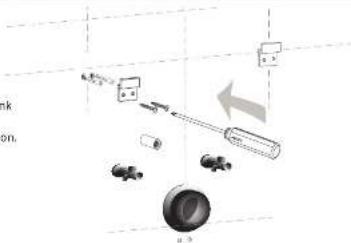
Insert wall plugs and screw the fixing studs into position. Leave enough thread showing for the wash basin, nylon washer and nut.
4
For AKW-B400
For semi-pedestals ensure the adjustable bracket and spring hooks are insert onto the fixing studs before you install the sink to the wall.
These springs are used to hook the semi-pedestals into position.
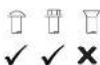
Do not use fixings with Countersunk heads.
Mount the wash basin onto the fixings and place the washers over the screw holes on the sink then screw the sink to the wall. DO NOT over tighten the fixings.
When the sink is securely in place, connect the bottle trap to the waste pipe.
Connect the flexible connectors to the supply pipes with a compression fitting.
Use an adjustable spanner to tighten the connectors whilst bracing the supply pipe with slip-joint pliers.
Apply sealant to the joints between basin and wall or floor
Turn on water supplies and run water to flush out system,
- Avoid dropping sharp objects into the sink, as this may scratch or damage the surface.
DO NOT pour strong chemicals down the sink such as bleach, ammonia, caustic soda, white spirit and sterilising
solutions. If this should accidentally happen, quickly wipe the spill away and rinse with plenty of water.
- Leaving neat bleach in the sink can cause damage. If neat bleach should come into contact with this product, please rinse thoroughly with warm soapy water.
User Care Instructions
Your ceramic wash basin must only be used for the task it is intended to perform. AKW showering and daily living products have been developed on the basis that they should be cleaned periodically to remove any water bourne debris using normal domestic bathroom cleaning materials.
Do not use abrasive products, cleaning cloths or pads as these will scratch the surface.
Do not use strong or concentrated acidic, alkaline, chlorine or other cleaning materials as this will invalidate any warranty as this may discolor or otherwise damage the products.
Do not place matches, cigarettes or naked flames on or near this product.
It is important to keep clean the taps and unions from build up of chlorine, grime and water deposits to maintain good working order and keep your AKW wash basin in good condition. After cleaning always flush with water then wipe thoroughly with a damp cloth to remove any cleaning material residues. Dry with a towel to prevent new water spots from forming.
Where disinfecting is necessary, standard established procedures for disinfecting equipment should be used with due care and attention taken of the warnings concerning possible effects of aggressive chemicals on ceramic surfaces.