XM-RSU224 - Autoradio Xomax - Tasuta kasutusjuhend
Leidke seadme juhend tasuta XM-RSU224 Xomax PDF-formaadis.

Kasutajate küsimused teemal XM-RSU224 Xomax
0 küsimus selle seadme kohta. Vastake nendele, mida teate, või esitage oma.
Esita uus küsimus selle seadme kohta
Laadige alla juhend oma Autoradio PDF-formaadis tasuta! Leidke oma juhend XM-RSU224 - Xomax ja võtke oma elektrooniline seade uuesti kätte. Sellel lehel on avaldatud kõik teie seadme kasutamiseks vajalikud dokumendid. XM-RSU224 kaubamärgi Xomax.
KASUTUSJUHEND XM-RSU224 Xomax

XOMAX
User manual
Please read this manual before using
Note on installation
- The unit is designed for 12-14V DC, negative ground operation system only. Before installing the unit.
● Make sure your vehicle is connected to DC 12V negative ground electrical system. - The negative battery terminal must be disconnected before making connections, which can reduce the damaging the unit due to short circuit.
- Be sure to connect the color coded leads correctly according to the diagram. Incorrect connections may cause the unit malfunction or damage the vehicle's electrical system.
- Be sure to connect the speaker (-) leads to the speaker (-) terminal. Never connect the left and right channel speaker cables each other or to the vehicle body.
- Do not block vents or radiator panels. Blocking them will cause heat to build up inside and may result in fire.
- After the completion, of the installation and begin to play the unit (including replacing the battery), please press the reset button on the front panel with pointed objects (such as ball-point pen) to set the unit to initial status.
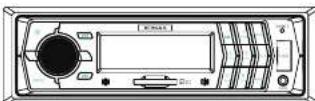
Specifications Of Common Keys
(Parts of model may not include all contents, please be subject to the actual model)
| ICON | DESCRIBE |
| ▶ | Play/pause |
| ▶▶ | Provinco(radio Selection And Track Selection) |
| ▶▶ | Detach The Front Panel |
| ■ | Stop |
| MODE/1 | Power On/off Control/mode |
| POWER | Power On/off |
| LOC | Radio Far And Near Path Selection |
| MUTE | Mute The Sound |
| IR | Remote Control Receiver |
| AUX | This Jack Is For The Out Side Audio Input |
| EQ | Sound Field/automatic Preset Station |
| CLK | Clock Function |
| RAND | Radio Band Selection |
| MODE | Mode Swth |
| AMS | Auto Scan And Auto Store |
| INT | To Play The First 10 Seconds Of Each Track |
| RDM | Random Play |
| PRG | Program Play |
| RESET/RES | Reset The System |
| RPT | Repeating The Same Track |
| LOUD | Loudness |
| DSP | Display Clock |
| CH+ | Track selection(Play/pause function when playing MP3) |
| CH- | Track selection(RPT/INT/RDM function when playing MP3) |
| 1/2/3/4/5/6 | Number Buttons |
Location of the ramote control
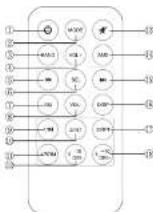
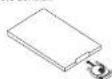
Replacing the Battery
When the range of the operation of the card remote control becomes short or no functions while operating. Replace the battery with a new button cell. Make sure the battery polarity before replace.
- Pull out the battery holder while pressing the shopper (i)

- Put the button-type battery(+) mark upward into the battery holder.
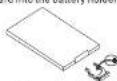
- Inser; the battery holder into the remote control.
- Rate: Some models are not equipped with remote control, you should ignore the contents about remote control.
Installation
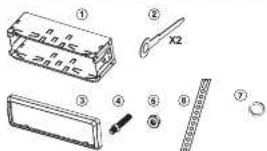
Parts List (The numbers in the list are keyed to those in the instructions.)

Warm Tips: the Below Operations Are Just For The Model Which Is Detachable Panel Fixed Panel Can Not Proceed This Operation, otherwise Will Broken The Unit.
DETACHING THE FRONT PANEL

REPLACING THE FRONT PANEL

PRECAUTIONS

Basic Operation
Power On/Off/Mode
1.Preset (POWER) button to turn on the unit, and press power for 3 seconds to turn off the unit
- Press (power/mode) smoothly to turn on the unit, and the press again to change the function: Radio → Playback → AUX-IN
Aux In Operation
Press MODE button to enter into AUX mode. It in put the AUDIO signal from 3 position. The signal displays on the LCD and there is a signal output in the speaker.
U-DISK/SD Card Playback
- Insert U Disk /SD card into USB/SD port ,U disk /SDwill play
automatically. Or press MODE button to select if 0-dick/SD is loaded. 2. Other operations please refer to details of MP3 Playback.
Preset station / AMS
AMS:Automatic Scan /Memory station
Press AMS button to scan /display the memory station by 10 seconds from 1-6 station, when start AMS function, the frequency flashes continuously until the appropriate station, then play the radio station by press 1-6 number set accordingly.
When press AMS up than 3 seconds, will start the auto memory function, the radio will select the station automatically and store it on the number buttons. Remark: The machine at most store 6 stations per each frequency, pls refer to the number button operation to use the number key
Each time this button is pressed, the radio band is changed. The indication "FM1" "FM2" "FM3" "AM1" "AM2" will appear on the display according to your selection. Without "AM" is "FM1" "FM2" "FM3"
Tuning/Selecting Tracks
- Long press
Manual Tuning : press; + or -) button continuously to select a station upward or downward respectively.
- Short press
Automatically Tuning: press(4 or 5)—button the radio automatically searches a station upward or downward respectively and plays when it finds a station.
Basic Operation
MP3 operation
- Selecting Track/F.F/REW
Press (or) choose your favorite track upward or downward respectively. Press and held (or) button to fast forward or rewind the track upward or downward respectively.
- Playing Tracks Repeatedly(By remote control)
Press "RPT" button to perform repeat playing function when you need to repeat playing the track you like.
During MP3 version
Press "RPT" button at the first time to repeat playing at the same track. "RPT" appears which indicates repeat playing one track starts. Press "RPT" button again to stop repeat.
During MP3 version. Press "RPT" button at the first time to repeat playing the same track "RPT" appears which indicates repeat playing one track starts.
Press "RPT" button at the second time to stop repeat
- Scanning Tracks Automatically (By remote control)
During playback, press RPT bottom, to play the first 10 seconds of each track on the disc, the display will show "INT". ON Which indicates INT function is already activated.
Press "INT" button once more to revert to normal play back. Display will show "INT OFF"
- Playing Tracks in Random Order (By remote control)
During playback, press "RDM" button, and "RDM" on appears on the display which indicates RDM function is carried out, THE unit plays and trach at random. Press RDM once more to return to normal plyback mode.
5 Stop Playing
During playback, press "stop" on remote button to shop the playback, LCD will show "stop" to return to normal play mode, press play.
note: during MPX mode, press STOP on remote button to stop playing. LCD appears STOP.
Specification
| General | |
| Power requirements | 12-14.4V DC |
| Load impedance | 40Hz |
| Tone controls... | 3dB@Bass 100Hz, Trolle 100Hz |
| Audio section | |
| Maximum output level | 1Vrms+3dB |
| Frequency response | 20 to 20kHz |
| Signal-to-noise radio | 85dB |
| Separation... | 80dB |
| FM Turser section | |
| Tuning range | 87.7-108(Europe/china) 87.5-107 (U.S.A.) |
| IF Range | 10-7MHz |
| Usative sensitivity (30dB) | 15dB |
| Usative-to-noise radio | .60dB |
| Sterno separation | 30dB (1 kHz) |
| Frequency response | 39-1500Hz |
| AM Tunser section(optional) | |
| Tuning range | .522-1820(Europe/china), 530-1710 (U.S.A.) |
| Usative sensitivity (30dB) | 45dB |
| Usative-to-noise radio | .50dB |
| Frequency response | 40-1500Hz |
★ Note: Due to continuous product improvement, specifications and design are subject to change without work
Trouble shooting
| Problem | Cause | Action |
| Unit will not run in (no power) | Yellow wire not connected or incorrect voltage. Best wire not connected or incorrect voltage. | Check connections for proper voltage (12-14-40VDC) |
| Black wire not connected | Check connection to ground | |
| Fuse blown | Replace fuse | |
| Unit has power (but to sound) | Speaker wires not connected | Check connections at speakers |
| One or more speaker wires touching each other or touching chassis ground | Inside all base speaker wires from each other and chassis ground | |
| Unit brown fuses | Yellow or more wire touching chassis ground | Check for pinched wire |
| Booker wires touching chassis ground | Check for pinched wire | |
| Incorrect fuse rating | Use fuse with correct rating | |
| Excessive skipping | Unit is not mounted correctly or back string is not secure. | Check mounting device and back strap support |
Kaubamärk : Xomax
Mudel : XM-RSU224
Kategooria : Autoradio