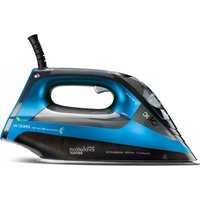
PV2030 - Iron SOLAC - Free user manual and instructions
Find the device manual for free PV2030 SOLAC in PDF.

| Product type | Steam iron |
| Brand | SOLAC |
| Model | PV2030 |
| Approximate dimensions | 30 x 15 x 20 cm |
| Approximate weight | 1.2 kg |
| Power supply | 220-240 V ~ 50/60 Hz |
| Power | 2200 W |
| Soleplate type | Metallic soleplate |
| Anti-scale system | Resin filter |
| Ironing functions | Dry ironing, steam ironing, vertical ironing, spray, super steam |
| Water tank capacity | Approx. 300 ml |
| Heating indicator light | Yes (turns off when temperature reached) |
| Self-cleaning function | Yes, via dedicated button |
| Vertical ironing | Yes, for curtains, jackets, etc. |
| Spray | Yes, via button |
| Super steam | Yes, via button (up to 5 seconds interval) |
| Temperature selector | Yes, with positions for synthetic, silk/wool, cotton, linen |
| Steam flow regulator | Yes |
| Maintenance | Clean the soleplate with eco-friendly products; empty the tank after use; monthly self-cleaning |
| Safety | Do not immerse in water; do not leave plugged in unattended; keep out of reach of children |
| Spare parts | Not specified, but use only SOLAC accessories |
Frequently Asked Questions - PV2030 SOLAC
User questions about PV2030 SOLAC
0 question about this device. Answer the ones you know or ask your own.
Ask a new question about this device
Download the instructions for your Iron in PDF format for free! Find your manual PV2030 - SOLAC and take your electronic device back in hand. On this page are published all the documents necessary for the use of your device. PV2030 by SOLAC.
USER MANUAL PV2030 SOLAC
natural_image
Illustration of two steam iron machines with attached power cord (no text or symbols)5-11 • ESPAÑOL
12-17 • ENGLISH
18-24 • FRANÇAIS
25-31 • DEUTSCH
32-38 • PORTUGUÊS
39-45 • ITALIANO
46-52 • NEDERLANDS
53-58 • ČESKY
59-65 • POLSKI
66-71 • SLOVENČINA
72-78 • MAGYAR
79-85 • българск
86-91 • HRVATSKA
92-98 • ROMÂNĂ
text_image
Supernova 220R SOlac 1 2 3 4 5 6 7 8 9 10 11 12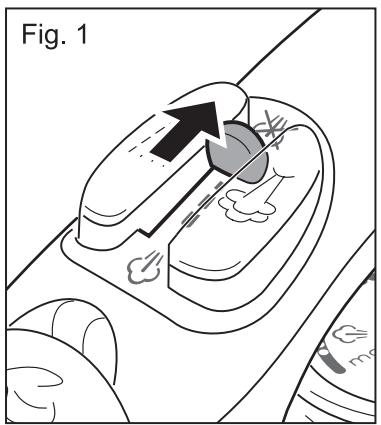
text_image
Fig. 1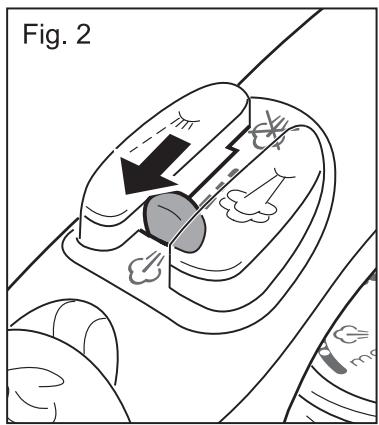
text_image
Fig. 2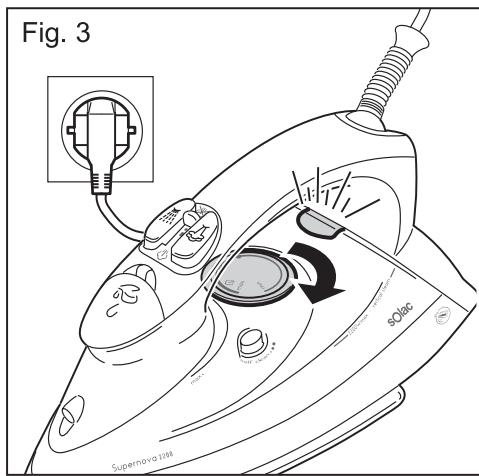
text_image
Fig. 3 Supernova 2018 Sole
natural_image
Diagram of a car's seatbelt mechanism with arrows indicating motion (no text or symbols)
text_image
Fig. 4 Supernova 2013 SOLAC


ESPAÑOL
es
1 Safety Instructions
- Read these instructions fully before using the appliance.
- This appliance is for domestic use only, not industrial. Any use other than specified could be dangerous.
- Always keep the appliance out of the reach of children and the disabled. Maximise caution when using it in their presence.
- Do not modify or repair the appliance in any way. If you detect any anomalies in the cord or any other part of the appliance, do not use it and take it to an authorised service centre.
- Do not use parts or accessories that have not been supplied or recommended by SOLAC.
- Before plugging the appliance into the mains, check that the specified voltage matches your home voltage.
- Always unplug the appliance after use and before installing or removing parts or performing any maintenance and cleaning tasks. Also unplug it in the event of a power cut. The appliance must be switched off when plugging it in or unplugging it.
- Never pull on the cord or hang the appliance from it. Always unplug the appliance by pulling on the plug, never on the cord.
- Prevent the cord from coming into contact with sharp edges or hot surfaces. Do not allow the cord to hang over the edge of a table or worktop, to avoid children pulling on it and causing the appliance to fall.
- Never immerse the appliance in water or any other liquid, nor place it in the dishwasher.
- The appliance must be connected to a power socket with a suitable ground connection.
- Do not leave the appliance connected to the mains unsupervised.
- The soleplate can get very hot when the appliance is in use. During operation, do not touch the soleplate and only hold the iron by its handle, and ensure the cord does not come into contact with the soleplate.

CAUTION! When you want to dispose of the appliance, NEVER throw it in the rubbish bin. Take it to your nearest CLEAN POINT or the waste collection centre closest to your home for processing. You will
thus be helping to take care of the environment. Ask your distributor, town council or local authority for the corresponding information.
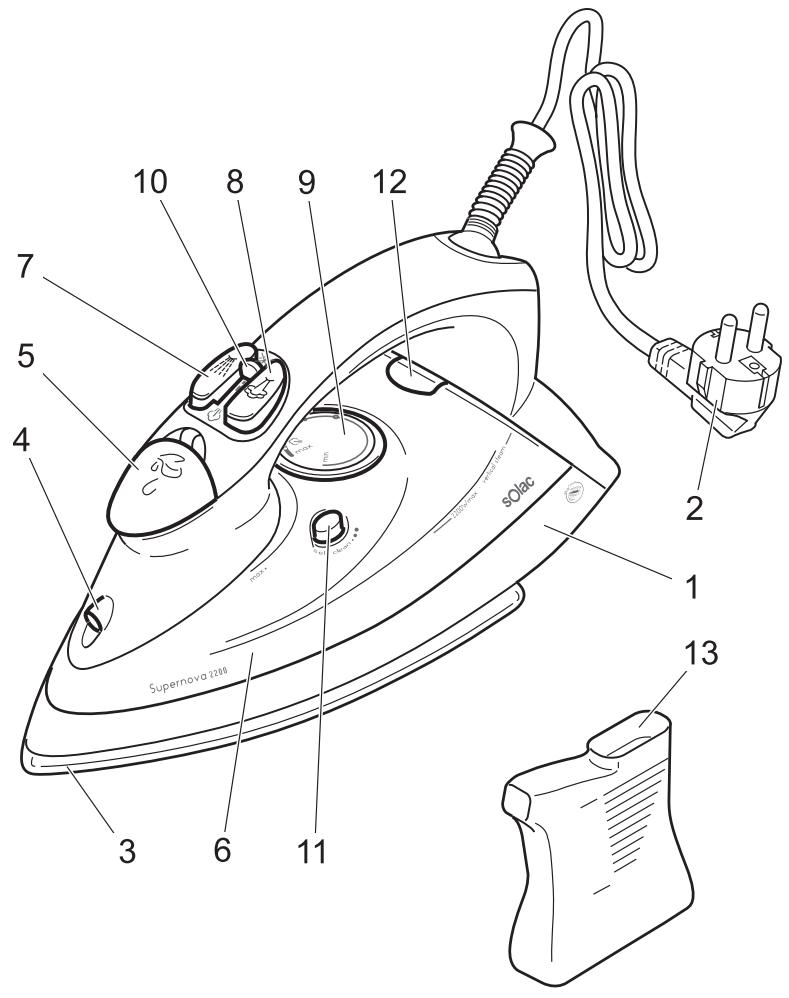
2 Description
Main components
1 Main body
2 Power cord
3 Metal soleplate
4 Spray outlet
5 Water filler opening
6 Water tank
7 Spray button
8 Supersteam button
9 Temperature selector
10 Steam flow selector
11 Self-cleaning button
12 Temperature pilot light
13 Beaker
Anti-limescale system (only Mod. PV 2030)
This iron has a built-in resin filter that retains the limescale in the water, so that the iron has a longer life.
3 Use
This appliance has been designed exclusively for ironing clothes. Do not use it for any other purpose.
Remove all transport and packaging elements.
If the appliance is hot, handle it with care and do not touch the metal soleplate.
▲ Never leave the iron in a horizontal position when the soleplate is hot. Rest it on its rear end.
When filing the water tank, always ensure the cord is unplugged and use the beaker (13).
Take care with the steam, do not aim it at people, animals or delicate objects.
▲ Always iron on stable, solid and smooth surfaces.
For very delicate garments, place a cloth between the iron and the delicate garment to avoid potential markings from the soleplate.
Before the first use
Before using it for the first time, use it to iron an old towel, so as to clean the system.
1 Fill the water tank as explained in the "Steam ironing" section.
2 Extend the cord completely and plug it into the mains. The temperature pilot light (12) comes on. Place the iron in the vertical position.
3 Set the temperature selector (9) to the MAX position and wait for a few minutes for the iron to reach the appropriate temperature (the temperature pilot will go out).
4 Set the steam selector (10) to the completely open position (fig. 2): steam will start to come out of the orifices in the soleplate.
5 Take the iron by the handle and slide the soleplate over an old towel.
6 When the water tank is empty, no more steam will be produced. The iron is ready for use.
Do not worry if the iron gives off a little smoke when used for the first time. This will go away quickly.
Selecting the temperature
- Check whether the garment to be ironed has a label indicating the ironing temperature. We recommend you sort the garments according to their required ironing temperature and begin with the garments that are ironed with the lowest temperature ( ).
SYNTHETIC FIBRES, minimum temperature ( ) SILK, WOOL, medium temperature ( ) COTTON, high temperature ( ) LINEN, MAX temperature
Ironing delicate garments at a temperature higher than necessary spoils the fabric and causes burnt residue to stick to the soleplate.
If you have any doubts about the temperature to use for a given garment, perform a test on a part which won't be seen, beginning with the lowest temperature settings.
When changing the position of the temperature selector (9), either to increase or reduce the temperature, several minutes must pass before the iron reaches the selected temperature.
Steam ironing
1 With the iron unplugged from the mains, slide the steam control (10) to the closed position (Fig. 1).
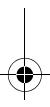
2 Open the water filler opening (5). Fill the water tank without exceeding the maximum level, using the beaker provided (13) and keeping the iron in the vertical position (Fig. 4). When the tank is full, close the cap.
When filling the tank, make sure that the water does not overflow from the water filler opening.
Use only water, with no added detergents, scents, vinegar or chemical products. Tap water can be used, unless it has an excessive amount of limescale, in which case it is recommended to use distilled or demineralised water (see table 1). Do not use ionised water for batteries.
3 Plug the iron into the mains. To obtain steam, set the temperature selector (9) between levels •• and medium and MAX, depending on the garment to be ironed. When the pilot light (12) goes off, indicating that the desired temperature has been reached, adjust the steam control (10) until the desired steam flow is obtained (Fig. 3).
Table 1
| TAP WATER HARDNESS | WATER TO BE USED IN THE IRON |
| Very soft water (up to 7° f) | 100% tap water |
| Soft water (up to 15° f) | 50% distilled water + 50% tap water |
| Medium water (up to 25° f) | 75% distilled water + 25% tap water |
| Hard water (more than 25° f) | 100% distilled water |
Supersteam
If you want more steam while ironing, press the button (8) two or three times, aim the supersteam at the desired area of the garment and pass the iron soleplate over it to dry it. This function is useful for removing creases.
• We recommend pressing the control at 5-second intervals.
- If you want more supersteam power, slide the steam control (10) to minimum.
Vertical steam
It allows you to remove creases from delicate garments without having to place them on the ironing board: jackets, overcoats, curtains, etc.
1 Fill the water tank as explained in the "Steam ironing" section.
2 Place the garment on a hanger, well away from other garments, people, animals, etc.
Do not discharge steam onto a garment hanging in the wardrobe or on a person.
3 Set the steam control (10) to the closed position and the temperature selector (9) to the MAX position.
4 Bring the iron, in the vertical position, close to the garment (between 15 and 30 cm) and press the supersteam button (8) once only. Do not place the iron too close to the garment as it could cause damage.
5 Wait a few seconds before pressing the button (8) again, so as not to damage the garment. Most creases can be removed with three blasts of steam.
Dry ironing
1 If there is water in the tank, turn the steam control (10) to the closed position (Fig. 2), to prevent water from coming out.
2 Plug in the iron and set the temperature selector (9) to the desired position. The pilot light (12) will go off when the temperature is reached.
Spray ironing
Spray can be obtained by pressing the corresponding button (7) when dry ironing or ironing with steam. The temperature level does not matter.
- Press the spray button (7) as many times as you want to use this function.
Emptying the water tank
When you finish ironing, always empty the water from the tank.
1 Place the steam selector (10) in the closed position (fig. 1).
2 Unplug the plug from the mains
3 Open the water filler opening (5) and place the iron face down over the sink, gently shaking it to completely empty the tank.
4 Wait until the iron is completely cold and store it in the vertical position in a secure place.
4 Cleaning and Maintenance
Clean the appliance before using it for the first time, immediately after each use and after not using it for a long period of time.
⚠ Unplug the appliance and allow it to cool before cleaning it.
1 Clean the outside of the iron with a damp cloth. Do not use abrasive products.
2 Use clay-based, environmentally friendly products to clean the soleplate. Do not use sharp objects.
Self-cleaning
It is advisable to carry out the self-cleaning operation about once a month, depending on the frequency of use and the hardness of the water used.
1 Ensure that the tank is half filled with water.
2 Place the iron in the vertical position.
3 Plug in the iron and turn the temperature selector (9) to the MAX position.
4 Wait for the pilot light to go off (12) indicating that the desired temperature has been reached.
5 Turn the temperature selector (9) to the MIN position and unplug the iron from the mains.
6 Place the iron in the horizontal position over a sink or an appropriate container and press the self-clean button (11), keeping the iron in this position and swinging it gently from side to side. Steam and water will come out from the holes in the iron, flushing out dirt and impurities.
Be careful when performing this operation, as the water and steam are very hot and can cause burns.
7 Place the iron in the vertical position and wait for it to cool completely.
8 Wipe the soleplate with a damp cloth.
Remember that damage caused by the effects of limescale is not covered in the warranty.