C304G2 - Coffee machine SOLAC - Free user manual and instructions
Find the device manual for free C304G2 SOLAC in PDF.

User questions about C304G2 SOLAC
0 question about this device. Answer the ones you know or ask your own.
Ask a new question about this device
Download the instructions for your Coffee machine in PDF format for free! Find your manual C304G2 - SOLAC and take your electronic device back in hand. On this page are published all the documents necessary for the use of your device. C304G2 by SOLAC.
USER MANUAL C304G2 SOLAC
natural_image
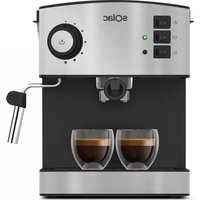
Exterior view of a semi-klahoma coffee machine (no signage or text visible on the device itself)Solac is a registered Trade Mark
11/06
5- 8 • ESPAÑOL
9-12 • ENGLISH
13-16 • FRANÇAIS
17-20 • DEUTSCH
21-24 • PORTUGUÊS
25-28 • ITALIANO
29-32 • NEDERLANDS
33-36 • ČESKY
37-40 • POLSKA
41-44 • SLOVENSKY
45-49 • MAGYAR
50-53 • българск
54-57 • HRVATSKA
58-61 · ROMANA
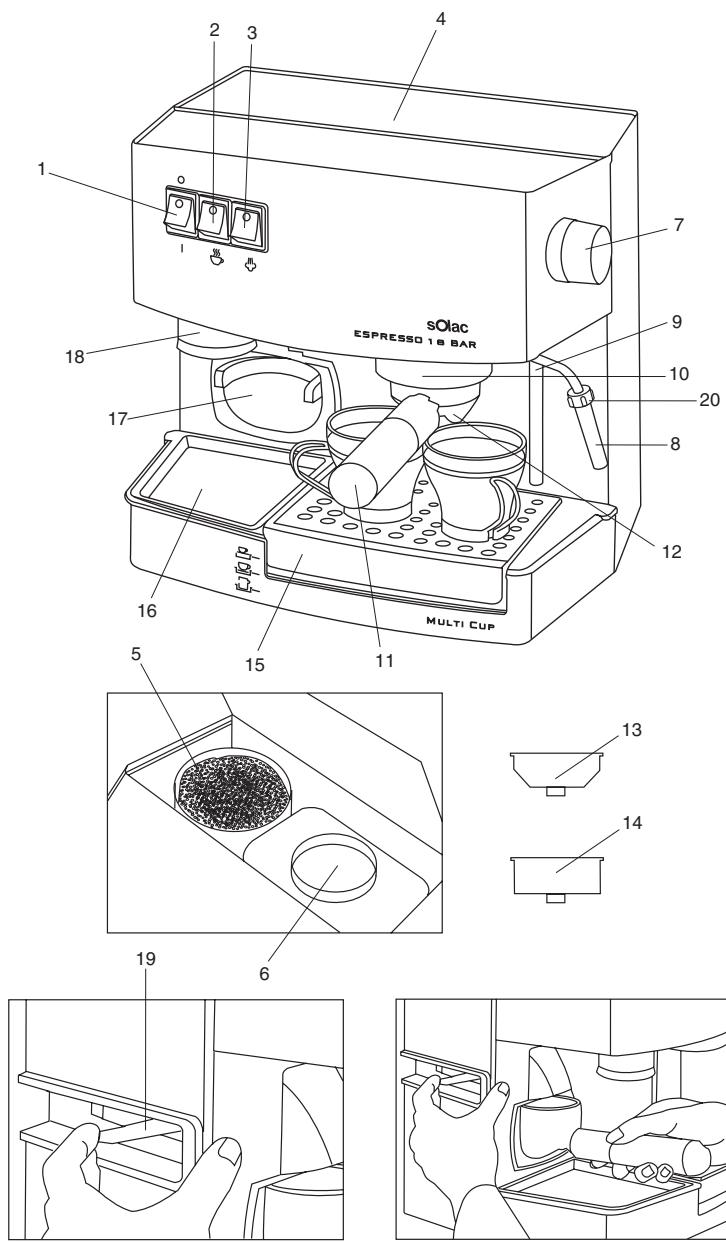
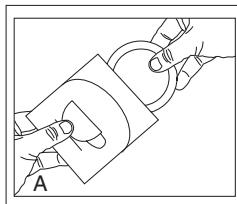
Fig. 1
natural_image
Line drawing of hands holding a device with a labeled component 'A' (no text or symbols beyond label)Fig. 2
natural_image
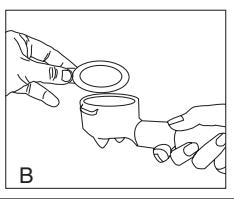
Line drawing of two hands exchanging a small object, labeled 'B' (no text or symbols on the object itself)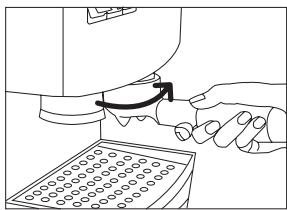
natural_image
Line drawing of a hand pressing down on a mechanical component with a curved arrow indicating motion (no text or symbols)Fig. 3
text_image
MULTI CUP A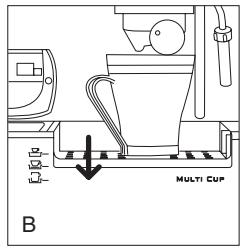
text_image
MULTI CUP B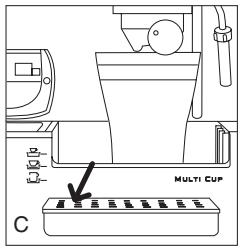
text_image
Multi Cup CFig. 4
ATENCION
- Read these instructions before using the coffee-maker.
- Do not switch the coffee machine on without making sure that the voltage stated on the nameplate matches that in your home.
- Do not operate the coffee-maker without water in the reservoir.
- Steam and water may emerge from the coffee outlet at certain times. This is not a symptom of a fault or malfunction.
- This espresso coffee-maker is a professional high pressure model (up to 18 bar) and has a built-in electric pump to draw out the maximum flavour and aroma from the coffee. It is therefore normal for the electric pump to produce a little noise and vibration when it comes into operation.
- If the power lead is damaged, it should be replaced by the manufacturer or by an authorised after-sales service shop or similar qualified personnel to prevent possible risk.
- VERY IMPORTANT! Do not immerse or wet the appliance.
- Keep it out of the reach of children.
MAIN COMPONENTS
1.- Switch with red pilot light
2.- Switch with coffee output warning light
3.- Switch with steam warning light
4.- Top cover
5.- Ground coffee receptacle (max. 250gr)
6.- Water reservoir (max. 3l)
7.- Supersteamer control
8.- Supersteamer
9.- Water level sight glass
10.- Filter holder
11.- Filter holder with handle
12.- Coffee outlet holes
13.- 1-cup filter (max 7 gr)
14.- 2-cup filter (max 14 gr)
15.- Cup-holder tray
16.- Coffee dispenser tray
17.- Filter holder guide for coffee dispenser
18.- Tamper
19.- Coffee dispenser control
20.- Steam nozzle protector
RECOMMENDATIONS
- Before first using the coffee appliance, it is best to let the water content equivalent to 8-10 cups run out through the filter holder (with no coffee in the filter).
- Never use more coffee than as indicated.
OPERATION
A.- COFFEE
a.- Preparing coffee
- Fill the reservoir with water, using the loading area (6). Make sure that the ends of the reservoir pipes are immersed in the water.
• (Fig.1) If you would like to use ground coffee, fill the coffee receptacle (5) with ground coffee. We recommend you not to use an extra-fine ground coffee. - If you want your first coffee to have a higher temperature, set the filter holder in place without coffee and let one or two cups of hot water run out in order to warm the components of the coffee-maker. In addition, we recommend you to stand the cups to be used on the top cover (4) so that they are also warmed during this operation.
- Plug the coffee-maker into the mains and turn switch (1) to position I.
- Fit the filter you want to use, for 1 or 2 cups (13 or 14), in the filter holder (11).
- Place the filter holder (11) in the guides for dispensing the coffee and slide the dispenser lever (19) forwards, until you hear a click, once or twice depending on the filter you are going to use.
- Press the filter coffee down lightly with the tamper (18).
- If you would like to use coffee tablets, open the single-serving bag. Put the 1-cup filter (13) on the filter holder (11). Put the tablet in the filter holder.
b.- Starting the coffee-maker
- Then fit the filter holder (11) to the coffee-maker.
- Make sure the filter holder is securely closed by pushing the handle firmly from left to right, otherwise it may drip (fig.3)
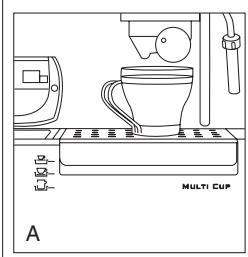
- Fit the cup-holder tray (15) according to the size of the cups you are going to use (Fig. 4):
A.- Small cups
B.- Medium-sized cups
C.- Large cups
- Place one or two cups below the coffee outlet holes (12).
- When the coffee output pilot light comes on, press the switch (2) and coffee will start to issue.
- When the desired amount of coffee has run out, turn off the switch (2). If this switch is not turned off, coffee will go on running out and your cup will overflow.
- If the filter remains stuck to the coffee-maker when you release the filter holder, you can free it instantly by pressing the coffee output switch (2) for a moment.
c.- Cleaning.
- If you have used ground coffee, clean the grounds by placing the filter holder under running water.
- If you have used the coffee tablet, remove the bag and put it in the trash.
B.- STEAM
• To heat any type of liquid using the supersteamer:
- Press the switch (1) to position I and the main switch pilot light will come on. Then turn the steam switch (3) on and wait until the steam switch pilot light comes on. This operation will last 45 seconds.
- When the pilot light comes on, insert the steamer (8) into the liquid to be heated and gradually open the supersteamer control (7). Take always the steam nozzle (8) on its protector (20), to avoid getting burns.
- When you have finished, do not forget to turn off the steam switch (3).
- If you are going to use the supersteamer (8) continually to heat quite a lot of liquid (more than 100 ml approx.), proceed as stated: once the steam has lost pressure (there is no force), close the supersteamer (7) control, press the coffee output switch (2) until a little liquid issues from the coffee outlet area. Then wait again until the steam switch pilot light (3) comes on. Repeat these steps as often as you consider necessary.
C.- HOT WATER
• To prepare tea, infusions, and so on:
- Press switch (1) to position I and the pilot light will come on. When the coffee output switch pilot light (2) comes on, place the receptacle under the steamer (8).
- Open the steamer control (7) and press the coffee output switch (2).
- When you have the desired amount of hot water, release the coffee output switch (2) and close the steamer control (7).
CLEANING AND MAINTENANCE
• Unplug the coffee-maker.
- Clean the reservoir and filter holder regularly.


- Do not use alcohol, solvents or abrasive products to clean the coffee-maker or tray, just a soft damp cloth.
- Every now and again, for more thorough cleaning of the steamer, proceed as follows: wait until the steamer cools down and unscrew its cylindrical part, in an anticlockwise direction. Wipe the steamer spindle with a damp cloth and soap the cylindrical piece. Make sure that the little hole in the top of the steamer is clear before refitting the piece.
- Fit the steamer on its spindle and screw it up in a clockwise direction.
DE-SCALING
- It is best to de-scale the appliance once a year with a special product for coffee machines so as to maintain the coffee-maker in perfect condition.
- Follow the instructions stated on the de-scaling product.
- To flush out the circuits, fill the reservoir again with water only, switch on the coffee-maker, fit the filter holder without coffee, and carry out once or twice all the steps described in the "Operation" section. During this process, press switch (3) and let steam issue for 2 minutes.