
SL1T-X - Sewing machine TOYOTA - Free user manual and instructions
Find the device manual for free SL1T-X TOYOTA in PDF.

User questions about SL1T-X TOYOTA
0 question about this device. Answer the ones you know or ask your own.
Ask a new question about this device
Download the instructions for your Sewing machine in PDF format for free! Find your manual SL1T-X - TOYOTA and take your electronic device back in hand. On this page are published all the documents necessary for the use of your device. SL1T-X by TOYOTA.
USER MANUAL SL1T-X TOYOTA
natural_image
Line drawing of a sewing machine with no visible text or symbolsSL1T-X Series All Models
TOYOTA
English
UK ONLY
IMPORTANT
PLEASE READ CAREFULLY
The wires in this mains lead are coloured in accordance with the following code:
BLUE-NEUTRAL
BROWN-LIVE (OR ACTIVE)
As the colours of the mains lead of this appliance may not correspond with the coloured markings identifying the terminals in your plug — PROCEED AS FOLLOWS: The earth plug pin is unnecessary. As the Machine is designed under double insulation structure, the earth wire is removed from the machine. The wire coloured BROWN must be connected to the terminal marked L or A or coloured RED.
The wire coloured BLUE must be connected to the terminal marked N or coloured BLACK. Neither core is to be connected to the earth terminal of a three-pin plug.
IMPORTANT SAFETY INSTRUCTIONS
When using an electrical appliance, basic safety precautions should always be followed, including the following:
Read all instructions before using (this appliance).
DANGER — To reduce the risk of electric shock:
An appliance should never be left unattended when plugged in. Always unplug this appliance from the electric outlet immediately after using and before cleaning.
WARNING — To reduce the risk of burns, fire, electric shock, or injury to persons:
- Do not allow to be used as a toy. Close attention is necessary when this appliance is used by or near children.
- Use this appliance only for its intended use as described in this manual. Use only attachments recommended by the manufacturer as contained in this manual.
- Never operate this appliance if it has a damaged cord or plug, if it is not working properly, if it has been dropped or damaged, or dropped into water. Return the appliance to the nearest authorized dealer or service center for examination, repair, electrical or mechanical adjustment.
- Never operate the appliance with any air openings blocked. Keep ventilation openings of the sewing machine and foot controller free from the accumulation of lint, dust, and loose cloth.
- Never drop or insert any object into any opening.
- Do not use outdoors.
- Do not operate where aerosol (spray) products are being used or where oxygen is being administered.
- To disconnect, turn all controls to the off ("O") position, then remove plug from outlet.
- Do not unplug by pulling on cord. To unplug, grasp the plug, not the cord.
DANGER
- Always unplug before relamping. Replace the bulb with same type rated 15 watts.
- Do not reach for an appliance that has fallen into water. Unplug immediately.
- Do not place or store appliance where it can fall or be pulled into a tub or sink. Do not place or drop into water or other liquid.
English
WARNING
- Switch off or unplug the appliance when leaving it unattened.
- Unplug the appliance before carrying out maintenance or replacing lamps.
- Keep fingers away from all moving parts. Special care is required around the sewing machine needle.
- Always use proper needle plate. The wrong plate can cause the needle to break.
- Do not use bent needles.
- Do not pull or push fabric while stitching. It may deflect the needle causing it to break.
-
Never operate on a soft surface such as a bed or couch where the air openings may be blocked.
-
Switch the sewing machine off ("O") when making any adjustments in the needle area, such as threading needle, changing needle, threading bobbin, or changing presser foot, etc.
-
Always unplug sewing machine from the electrical outlet when removing covers, lubricating, or when making any other user servicing adjustments mentioned in the instruction manual.
SAVE THESE INSTRUCTIONS
English
CONTENTS
- NAMES OF PARTS .... 1
- PREPARATION FOR SEWING ....3
Connecting Power Cord 3
Setting Telescopic Thread Stand 4
Opening The Front Panel and Side Cover 5
How to Change Threads 6
Replacing Needles 7
Threading 8
Preparation for Sewing and Checking 13
- FOUR THREAD OVEREDGING STITCH USING 2 NEEDLES..... 14
Before Sewing 14
Presser Foot Lifter 14
Beginning and Ending of Sewing 15
Adjustment of The Presser Foot Pressure 16
Thread Tension Adjustment 16
Adjustments for the Differential Feed 22
Adjustments for Size of Bite 23
How to Adjust Stitch Length 24
Sewing for Curved Seams 24
Standard Chart for the Thread Tension 25
- SETTING WASTE TRAY 26
- THREE THREAD OVEREDGING STITCH USING ONE NEEDLE 27
TWO THREAD OVERLOCK 28
- ROLL HEMMING 29
- PIN TUCKING 32
- CORDED OVERLOCK 34
- REPLACING THE CUTTING KNIVES 35
- CHANGING THE LIGHT BULB 37
- LUBRICATION 38
- TABLE OF SEWING MATERIALS, NEEDLES AND THREAD ....39
- ACCESSORIES 40
- SPECIFICATIONS 42
SL1T-X
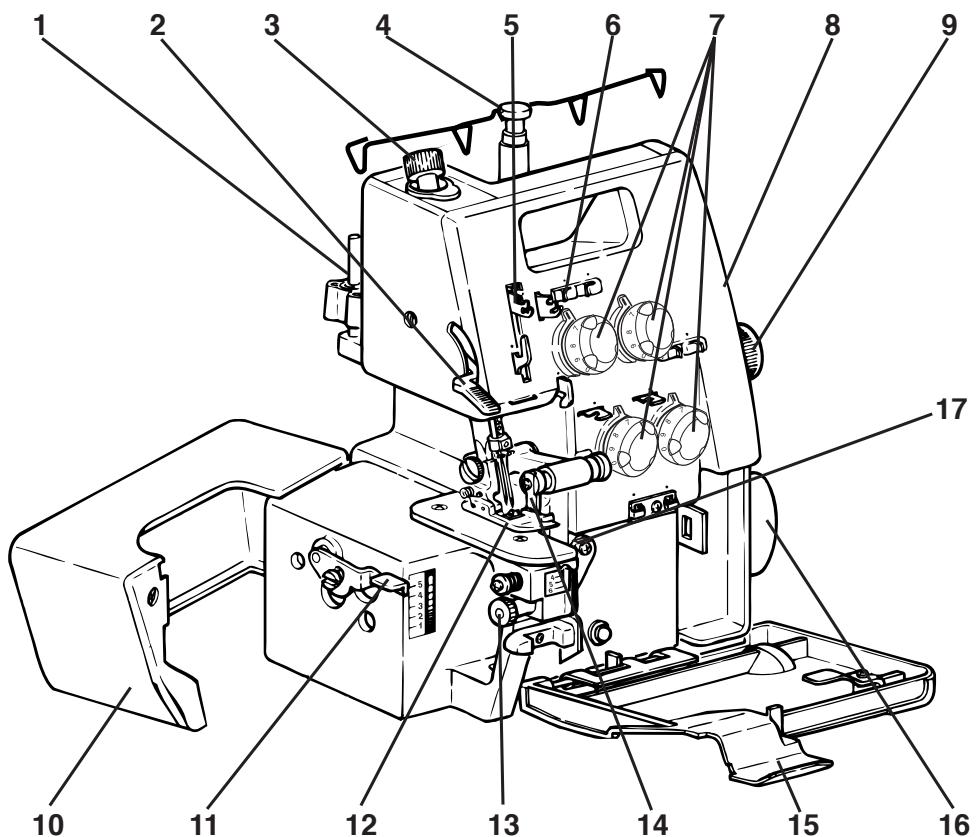
- NAMES OF PARTS / NOMBRE DE LAS PARTES / NOM DES PIECES / HAUPTTEILE DER MASCHINE / VOORNAAMSTE ONDERDELEN / ELENCO DEI COMPONENTI
text_image
Technical diagram of a sewing machine with numbered parts for identification| English | Français | Nederlands |
| 1. Spool pin2. Presser foot lifter3. Pressure regulator screw4. Telescopic thread stand5. Thread take up lever6. Thread tension support7. Thread tension dials8. Front panel9. Differential feed dial10. Side cover11. Stitch length adjuster12. Presser foot13. Bite wicith adjusting dial14. Upper knife15. Front cover16. Handwheel (Right side of machine)17. Stitch finger lever | 1. Tige porte bobine2. Levier du pied de biche3. Vis de réglage de pression du pied de biche4. Guide fil à tube télescopique5. Levier releveur de fil6. Support de tension de fil7. Boutons régulateurs de tension8. Cache avant9. Bouton d'entrainment (différentiel)10. Couvercle lateral11. Réglage de longueur de point12. Pied de biche13. Bouton de réglage de largeur de point14. Couteau superieur15. Couvercle frontal16. Volant (à droite de la machine)17. Languette d'escamotage du doigt mailleur | 1. Kloshouder2. Hendel van het persvoetje3. Schroef voor het regelen van de persvoetdruk4. Telescopische draadgeleider5. Hendel draadgeleider6. Draadgeleider7. Knoppen draadspanning8. Voorpaneel9. Knop voor het differentieel transport10. Zij-afdekplaat11. Steeklengte regelaar12. Persvoetje13. Instelknop steekbreedte14. Bovenste mes15. Voor-afdekplaat16. Handwiel (aan de rechterzijde van de machine)17. Naaitongschuifje |
| Español | Deutsch | Italiano |
| 1. Vástago porta carrete.2. Palanca alzadora.3. Tornillo ajustador de presión.4. Porta hilo telescópico (Guía hilo telescópico).5. Palanca de elevncion del hilo.6. Soporte de tensión del hilo.7. Reguladores de tensión.8. Panel frontal.9. Botón de arrastre de suministro diferencial.10. Tapa lateral.11. Botón de ajuste pie largo de puntada.12. Prensatelas.13. Botón de ajuste del ancho de la puntada.14. Cuchillo superior.15. Tapa frontal.16. Volante, lado derecho de la máquina.17. Tacón de la lengüeta de puntada | 1. Garnrollenstift2. Nähfuß Lüfterhebei3. Füßchendruck-Regulierung4. Teleskop-Fadenführung5. Gelenkfadenhebel6. Fadenführungen7. Fadenspannungen8. Vordere Verkleidung9. Differential-Transport Einstellknopf10. Seitenklappe11. Stichlängenregulierung12. Nähfuß13. Stichbreiten-Einstellung14. Beweglicher Abschneider15. Frontklappe16. Handrad (rechts an der Maschine)17. Rollsaumhebel (Kettelzungen-Einstellung) | 1. Perno portarocchetti2. Leva di sollevamento piedino premistoffa3. Vite di regolazione pressione premistoffa4. Guida-filo a tubo telescopico5. Leva di sollevamento filo6. Supporto di tensione filo7. Bottoni regolatori di tensione8. Coperchio anteriore9. Bottone di trasporto (differenziale)10. Coperchio laterale11. Regolazione lunghezza punto12. Piedino premistoffa13. Bottone di regolazione lunghezza punto14. Coltello superiore lame15. Coperchio frontale16. Volantino (a destra della macchina)17. Cursore dell'indice |
| English | Español | |
| PREPARATION FOR SEWINGConnecting Power CordConnect foot controller and power cord 12.Before plugging in your machine, be sure that the voltage is same as that of your machine.(written on a plate at back of machine).* Specifications vary from country to country. | PREPARACION PARA LA COSTURAConectando El Cable De SuministroConecte el pedal de pie y el cable de suministrostro, 1 y 2.Antes de enchufar su máquina, asegúrese que el voltaje para su máquina es el adecuado. Este está escrito sobre una placa en la parte posterior de su máquina.* Las especificaciones varían de un país a otro. | 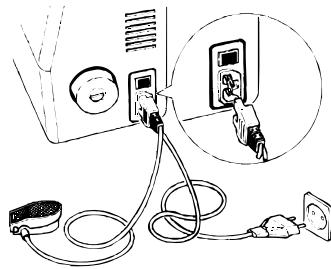 |
| Press the switch on the machine to turn on the power and the sewing light.Always switch off or unplug machine when not in use. | Presione el interruptor en la máquina para activar la máquina y encender la luz de costura.Siempre apague el interruptor o desconecte el cable de suministro mientras la máquina no esté en uso. |  |
| The more you press foot controller, the faster the machine runs.When the power switch is turned off, the machine will not operate even by pressure on the toot controller.* Electronic type of controllerThis foot controller is powerful and stable, even at a slow speed.It is posible to operate simply and produce neat finish, even detailed operation. | A mayor presión del pie sobre el pedal, mayor será la velocidad de costura de la máquina.Al apagar el interruptor, la máquina no funcionará aún si se aprieta el pedal.* Controlador de tipo electrónico.Este control de pie es potente y estable, aún a velocidades bajas.Es fácil operarlo con simplicidad y así obtener una terminación pareja y de buena apariencia. | English: Electronic type of foot controllerEspañol: Control de tipo electrónicoFrançais: Rhéostat de type électroniqueDeutsch: Elekronisher FußanlasserNederlands: Elektronisch voedpedaalItaliano: Pedale a controllo eletrónico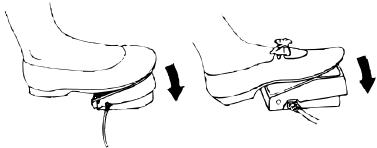 |
English
Español
Setting Telescopic Thread Stand
Extend the telescopic thread stand to its full height, then turn it until the shaft clicks into its locked position.
Instalacion Del Guía Hilos Telescópico
natural_image
Diagram of a mechanical device with rotating arms and an upward arrow, no text or symbols presentEnglish
Opening The Front Panel and Side Cover
• How to Open the Front Panel:
a. Push panel to the right as far as it will go, and
b. Pull panel down towards you.
English: Front panel
natural_image
Diagram of a sewing machine needle stitching fabric, showing hand operating the needle and arrow indicating direction (no text or symbols)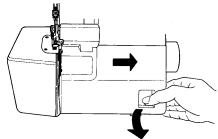
natural_image
Line drawing of a sewing machine with a hand operating the needle and a downward arrow indicating force or direction (no text or symbols)• How to Open Side Cover:
a. Push cover to the left to unlock, and b. Swing cover back away from you.
• How to Close Side Cover:
a. Push cover to the right, and b. Lock into place.
natural_image
Illustration of a hand operating a sewing machine with a curved arrow indicating rotation (no text or symbols present)Right needle threading
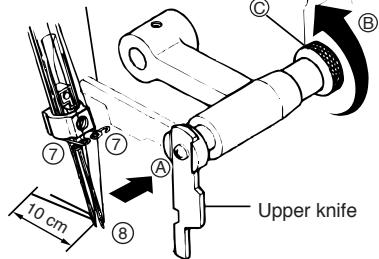
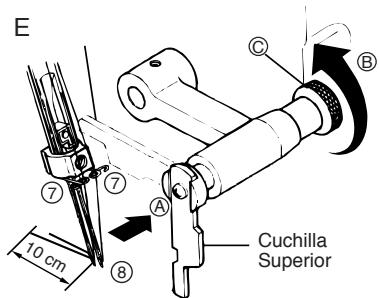
- For ease in threading, turn the moveable knife to the non-operating position. Push the upper knife holder screw from Ⓐ with the forefinger of your left hand ✦ and grasp the right end of the holder Ⓐ and turn it in the direction of arrow Ⓑ with your right hand. (Fig. E)
- Take the thread drawn from spool, and pass it through thread guide ① \~ ⑦. Then thread the eye of right-hand needle's eye ⑧ from front to back using tweezers.
Cut the thread leaving about 10cm (4") of spare thread. (Fig. E)
Left needle threading
- Take the thread drawn from spool, and pass it through thread guides ① \~ ③, ④ \~ ⑦, and thread the lefthand needle's eye ⑧ from front to back. (Fig. A, E)
- Return the moveable knife to the cutting position.
E
Non-operating position
text_image
10 cm ⑦ ⑦ A ⑧ Upper knife C B* As the upper knife is sharpened, care should be taken when moving this part.
text_image
E Cuchilla Superior 10 cm ⑦ ⑦ ⑧ A B CPreparation for Sewing and Checking
- Check that no thread slips off or snaps.
- Confirm that the upper knife moves against the lower knife correctly by turning the handwheel slowly towards you. If it is not correct, check if there is any fabric or waste thread between knives.
- Turn the handwheel towards you with your right hand to check that the thread winds around the stitch finger of the needle plate.
If the thread doesn't wind around the stitch finger of the needle plate, check if any threads are threaded incorrectly.
Revision Y Preparacion Para La Costura
natural_image
Diagram showing a device with a circular button and a separate view of its internal structure (no text or symbols)English
FOUR THREAD OVEREDGING STITCH USING 2 NEEDLES Before Sewing
After threading is completed, and when the threads are not wound around the stitch finger, gently draw out the four threads under and behind the presser foot, and turn the handwheel towards you by hand two or three times to make the thread wind on to the needle plate.
Español
natural_image
Line drawing of a hand using a tool to adjust or install a mechanical component (no text or symbols present)Presser Foot Lifter
For setting average material, there is no need to lower the presser foot lifter. When beginning to sew, push the material just in front of the presser foot and it will be fed through. For the thick material, lower the presser foot lifter, place the material under the presser foot, then raise the presser foot lifter.
Palanca Alzadora
natural_image
Technical line drawing of a sewing machine mechanism (no text or symbols)Section
3
Adjustment of the Presser Foot Pressure
The presser foot pressure is pre-adjusted for materials of medium (standard) thickness.
Adjustment is necessary only when you work on very thin or very thick materials. Accordingly, sew thinner materials with less pressure and thicker materials with more pressure. Increase the pressure of the presser foot by tightening the adjustment screw.
Ajustando La Presion Del Prensatelas
English: Tighten Loosen
Español: Apriete Afloje
Français: Serrer Desserrer
natural_image
Simple line drawing of a mechanical knob or knob component (no text or symbols)Thread Tension Adjustment
Set the balance of the tension as weak as possible.
Balance of the Loopwer thread:
When the lower looper thread is pulled to the top of material, loosen tension dial ③ counterclockwise. (or tighten tension dial ④ clockwise.) When the upper looper thread is pulled to the underside, tighten tension dial ③ clockwise.
(or loosen tension dial ④ counterclockwise.)
Ajustando La Tension Del Hilo
natural_image
Technical line drawing of a mechanical assembly with multiple circular components and mounting brackets (no text or symbols)text_image
Wrong side Lower looper thread Right-hand needle thread Right side Upper looper thread Left-hand needle thread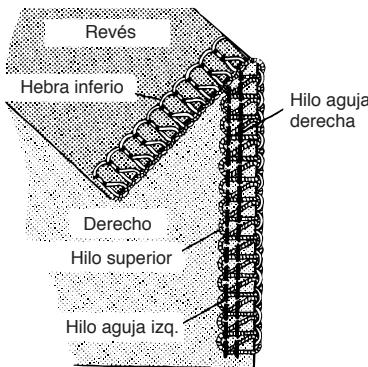
text_image
Wrong side Lower looper thread Right side Upper looper thread Left-hand needle thread Right-hand needle thread ① ② Tighten ③ Loosen ④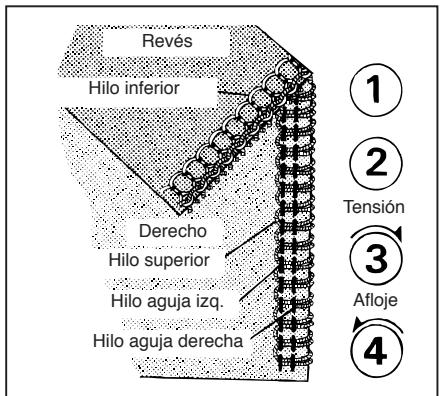
text_image
Wrong side Lower Looper Thread 1 2 Loosen 3 Tighten 4 Right side Upper looper thread Left-hand needle thread Right-hand needle thread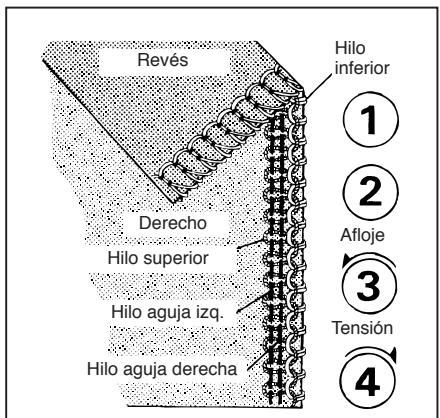
text_image
Wrong side Left-hand needle thread Lower looper thread Right side Upper looper thread Right-hand needle thread Tighten ① ② Loosen ③ Loosen ④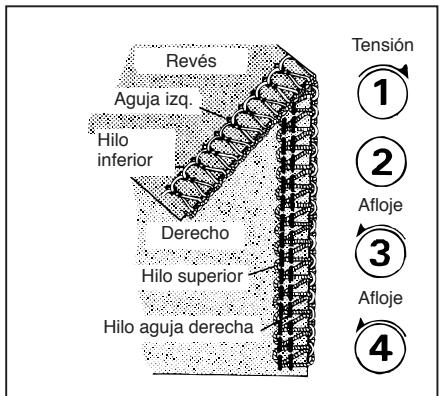
text_image
Wrong side Lower looper thread Right side Upper looper thread Left-hand needle thread Right-hand needle thread ① Tighten ② ③ ④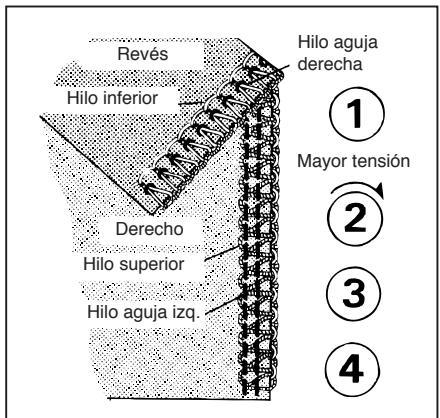
Adjustments For The Differential Feed
Differential feeding performs the function of stretching or condensing the edge of the fabric, since two independent feed dogs, one in front and one behind the needles, can be adjusted to feed at different ratio.
The function has the effect of producing a neat finish of overedging for stretchable and condensable fabrics.
* “N” indicates the neutral position.
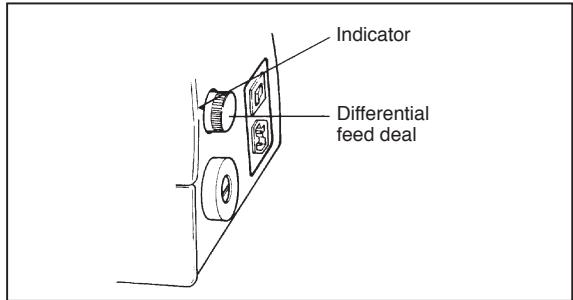
text_image
Indicator Differential feed dealRefer to the below chart and test stitch performance on a scrap of material you are going to use.
| Fabric | Differential feed ratio is set “N”. | Differential feed ratio | Result of adjustment | ||
| Stretchable materials | Knit Jersey |  | N-2 |  | |
| Unstretchable and uncondensable materials | Medium woven fabrics |  | N |  | |
| Condensable materials | Georgette |  | 0.7-N |  | |
(1) Remove the left needle.
(2) Pull the stitch finger lever towards you.
(3) Set the stitch width adjusting dial to 5.
(4) Set the stitch length adjuster to 1.
natural_image
Technical line drawing of a mechanical component with mounting holes and internal slots (no text or symbols)English
Stand chart for roll hemming
| ROLL HEMMING | FINE ROLL HEMMING | ||
| BITE WIDTH | 5 - 6 mm | 5 - 6 mm | |
| STITCH LENGTH | 1 - 1,5 mm | 1 - 1,5 mm | |
| DIFFERENTIAL FEED RATIO | N | N | |
| THREAD TENSION | NEEDLE THREAD | 1 - 4 | 1 - 4 |
| UPPER LOOPER THREAD | 1 - 4 | 2 - 4 | |
| LOWER LOOPER THREAD | 5 - 8 | 2 - 4 | |
* The figures in the above chart may be a little different according to the kind of the fabric and the threads. (See p.22 and p.39)
* For roll hem sewing, pass the needle thread to the left side (solid line) of thread guide @ as illustrated. (For normal sewing, pass it to the right side (dotted line) of thread guide @)
(3) At the beginning of sewing, gently pull the end of the thread chain.
For roll hem sewing, pull the material gently towards the rear of the machine, and you'll get neater stitches.
Español
text_image
(5) ① ② ③ ④
natural_image
Line drawing of a skis climbing a slope with rope and pulley (no text or symbols)English
Español
PIN TUCKING
Pin tucking is overlocked so avoid cutting the fabric by raising the upper knife.
Pin tucking is suited to the design of a child's clothing and a lady's blouse.
* Use the presser foot marked “A” and needle plate “A”.
(1) Remove the left or right needle to your required width. (Sew only with the one needle.)
(2) Raise the upper knife. (See p.10)
* Lower the presser foot lifter.
(3) The tension is set the same as the one for overedging. (See p.25)
* The fabric is ironed along the line of the pin tucking in advance.
* The differential feed ratio is normally "N".
PINZAS, PESPUNTES
natural_image
Mechanical assembly diagram showing a lever mechanism with rotating components and directional arrows (no text or labels)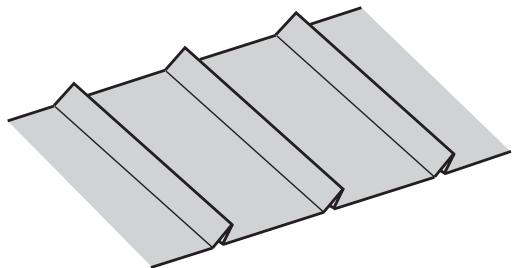
natural_image
Pure diagram of folded paper sheets without any text, numbers, or symbols| English | Español | Français |
| (4) Place the fabric under the presser foot with the hem edge in line with the side of the needle plate and start to sew.Raise up the presser lifter. | (4) Ubique la tela bajo el prensatelas con el borde de la tela en línea con el costado de la placa-aguja y proceda con la costura.Eleve la palanca alzadora. | (4) Placez le tissu sous le pied de biche avec le bord de l'ourlet en ligne avec le côté de la plaque aiguille et commencez à coudre.Relevez le releveur de pied de biche. |
| ※ Make chain-stitch at the end of the sewing. | ※ Al terminar la costura, haga unas cuantas puntadas de cadena para reforzar la costura. | ※ Faites une chainette en fin de couture. |
| (5) The hem edge is ironed to one side when your sewing is finished. | (5) El borde de la basta se plancha hacia un lado cuando se ha terminado la costura. | (5) Repassez les ourlets sur un côté lorsque la couture est terminée. |

text_image
Hem edge The side of the needle plate.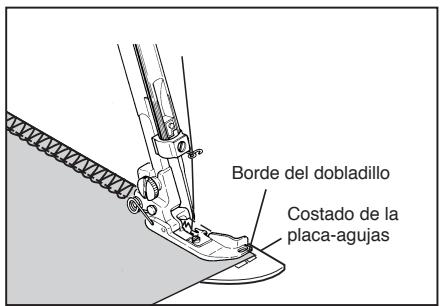
natural_image
Illustration of two spiral notebook binding sheets on a flat surface (no text or symbols)
natural_image
Diagram of two spiral notebook binding sheets on a flat surface (no text or symbols)
natural_image
Isometric illustration of a spiral notebook binding (no text or symbols)English
Español
CORDED OVERLOCK
Corded overlock can be used to strengthen stitches when joining elastic materials such as knitted fabrics. There are two ways of corded overlock. Thread cord through hole on front of foot:
(1) Place the slightly wide cord (about 3mm) under the right needle, and sew on.
(2) Sew a narrow cord, positioning it on the edge of the overlocked stitch.
COSTURA OVERLOCK ENCORDELADA
natural_image
Two-step diagram showing sewing machine stitching technique (1) and forming a flat surface (2), no text or symbols present.| English | Español | Français |
| REPLACING THE CUTTING KNIVESThe upper knife and lower knife are made of a special long-lasting steel and will seldom have to be replaced. However, when they do not cut the fabric even though they are set in the right position. Replace them in the following way: Before replacing the knife, be sure the power supply plug is take out.Move the front cover to the right, then open it toward you. | REEMPLAZANDO LOS CUCHILLOSLos cuchillos superior y inferior son hechos de acero muy durable que rara vez necesitáran ser cambiados. Sin embargo, si ellos no cortaran la tela adecuadamente, aún estando perfectamente bien ubicados, reemplácelos de la siguiente manera:Antes de reemplazar los cuchillos, asegúrese que el suministro de energía está desconectado.Mueva la tapa frontal hacia la derecha y ábrala hacia Ud. | REPLACEMENT DES COUTEAUXLe couteau supérieur et le couteau inférieur sont fabriqués dans un acier spécial longue durée et n’auront à être remplacés que rarement.De toutes façons, lorsqu’ils ne coupent plus le tissu même s’ils sont bien positionnés, remplacezles de la manière suivante:Avant de remplacer un couteau, assurez-vous que la machine est éteinte.Déplacer le capot frontal vers la droite puis l’ouvrir vers soi. |

text_image
Lower knife clamp screw Align Needle plate Lower knife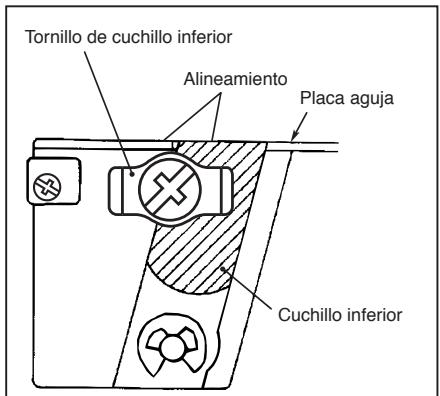
text_image
Tornillo de cuchillo inferior Alineamiento Placa aguja Cuchillo inferior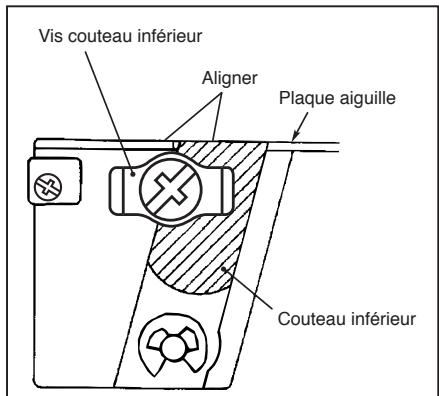
text_image
0 ~ 0.5 Upper knife Needle plate Lowest position Lower knife 1.6 ~ 2.0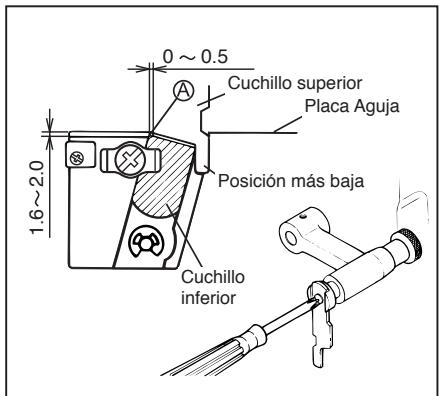
CHANGING THE LIGHT BULB
When the light does not come on even though it is switched on:
(1) Take out the power supply plug.
(2) Remove the lamp cover.
(3) Change the light bulb.
(4) Replace the lamp cover.
CAMBIANDO LA AMPOLLETA
natural_image
Technical line drawing of a mechanical device with a lever and adjustment knobs (no text or symbols)| English | Español | |
| LUBRICATION | LUBRICACIÓN |  |
| Lubrication is not necessary for this machine since the important parts are all made of a special oil impregnated sintered metal. However, one or two drops of oil will increase durability. | No es necesario lubricar éstas máquinas, ya que sus partes han sido fabricadas con un metal sinterizado impregnado con aceite. No obstante, una o dos gotas prolongarán su durabilidad. | |
| CLEANING | LIMPIEZA |  |
| First disconnect machine from power supply by removing plug from the electric outlet.1. Open front cover and side cover.2. Using a brush which may or may not be supplied with your machine. | Ante todo debe desconectar la Máquina del tomacorriente, sacando el enchufe.1. Abrir la tapa frontal y la lateral.2. Emplear el cepillo que vino con la Máquina, libérelo del polvo y suciedad acumulados. | |
| STORAGE (Option on some models) | EMBALAJA (En opción en algunos modelos) | |
| 1. When the machine is not in use, please disconnect it from the power supply by removing plug from the electric outlet.2. Using a vinyl cover which may or may not be supplied with your machine.3. Store away from bright and damp places. | 1. Cuando la Máquina esté en desuso, favor de desconectarla del toma, sacando el enchufe.2. Usar la cubierta vinílica que viene con la Máquina y tape la Máquina después de usarla.3. Guardar en lugares libres de humedad y luz. | |
| SERVICING | SERVICIO | |
| Any questions reganding service and or operation is to be addressed to the store where the machine was purchased. | Todas aquellas preguntas relacionadas con el Servicio y/o Operación, favor de dirigirlas al comercio en el cual fue adquirida la Máquina. |
English
TABLE OF SEWING MATERIALS NEEDLES AND THREAD
| HA × 1SPNeedle HA × 1T(705/130)(For home-use sewing machine) | Thread | Thread tension(Needle thread) | Overedging width(Between left needle and edge) | Stitch length | |
| Thin material(crept, georgette) | #11(80) | Polyestel (spun, filament)#60/2 Twisted thread~ #80/2 twisted thread(#80/3 Twisted thread~ #100/3 twisted thread)(Three-thread overedging stitch). | Loose | 5 mm | 2 ~ 2.5 mm |
| Medium to thick material(Serge, gabardine, etc.) | #11 or #14(80) or (90) | #60/2 Twisted thread(Three or four-threadoveredging stitch ). | Medium | 5 mm | 2.5 ~ 3 mm |
| Thick material(thick denim) | #14(90) | #50/2 Twisted thread~ #60/2 twisted thread(Three or four-threadoveredging stitch ). | Tight | 5 mm | 2.5 ~ 3 mm |
* Use ball point needles for Man-Made fibres or stretch fabrics
ACCESSORIES / ACCESORIOS / ACCESSOIRES / ZUBEHÖR / ACCESSOIRES / ACCESSORI
1 * [IMAGE] * [IMAGE] | 4* | 8    |
2 #11...2(80)HA × 1SPHA × 1T(705/130) #11...2(80)HA × 1SPHA × 1T(705/130) #14...3(90) #14...3(90) | 5* | 9 |
6 | 10    | |
3* | 7* | 11*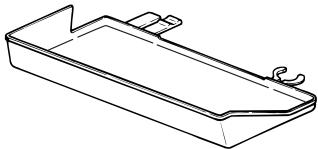 |
| English | Français | Nederlands |
| 1. Screw drivers2. Needles3. Cleaning brush4. Accessory Box5. Lower knife6. Oiler7. Vinyl cover8. Net9.Tweezers10.Spool Adapter11.Waste tray※Accessories shown below in some case are optional | 1. Tournevis2. Aiguilles3. Brosse de nettoyage4. Boite d'accessoires5. Couteau inférieur6. Huile7. Housse8. Filet9. Pinces10. Suport bobine11. Bac à déchets※Les accessoires ci-dessous sont, dans certains cas, en option | 1. Schroevedraaiers2. Naalden3. Schoonmaakborsteltje4. Accessoires doos5. Onderste mes6. Oliespuitje7. Vinyl afdekhoes8. Net9. Pincet10. Spoelhulpstuk11. Afvalbak※Accessoires als hier onder afgebeeld zijn in sommige gevallen als extra verkrijgbaar |
| Español | Deutsch | Italiano |
| 1. Destornilladores2. Agujas3. Cepillo de limpieza4. Caja de accesorios5. Cuchillo inferior6. Aceitero7. Cobertor Vinilico8. Malla9. Pinzas10. Adaptador de carrete11. Bandeja de recortes※ Los accesorios más abaso son, en alsunos ca sos, en opción | 1. Pinzette2. Nadeln3. Reinigungs-Bürste4. Zubehö-Box5. Unterer Abschneider6. Ölkännchen7. Abdeckhaube8. Netz9. Schraubenzieher10. Abdeck-Kappe11. Schnittrest-Auffänger※ Das unten abgebildete Zubehör kann Unterschiede gegenüber dem der Maschine beigepackten Zubehör aufweisen | 1. Cacciavite2. Aghi3. Pennello4. Scatola accessori5. Coltello inferiore6. Oliatore7. Copertina8. Rete9. Pinzette10. Copri- rocchetto11. Vaschetta raccoglipolvere※ Gli accessori sotto illustrati, in alcuni casi sono optional. |
English
SPECIFICATIONS
| Number of threads | 4 Threads (3 threads, 2 threads) | Stitch length | 0.8 ~ 5 mm |
| Number of needles | 2 Needles (1 needle) | Differential feed ratio | 1:0.7 ~ 2 |
| Needles | Standard HA × 1SP or HA × 1T (705/130) #11(80) #14(90) | Maximum sewing speed | 1500 RPM |
| Width between two needles | 2 mm | Machine dimensions | Width 300mm (Max. 320mm)Depth 230mm (Max. 255mm)Height 290mm (Max. 340mm~555mm) |
| Overedge width Size of bight | Standard 5mm (Range 5~7mm) | Weight (Head only) | 8.1 kg |

TOYOTA
"TOYOTA" FASHIONS YOUR FUTURE
AISIN SEIKI CO., LTD.
Kariya City 448-8650, Japan
1271029-111-D