
HCI78 - Cooker NORDMENDE - Free user manual and instructions
Find the device manual for free HCI78 NORDMENDE in PDF.


User questions about HCI78 NORDMENDE
0 question about this device. Answer the ones you know or ask your own.
Ask a new question about this device
Download the instructions for your Cooker in PDF format for free! Find your manual HCI78 - NORDMENDE and take your electronic device back in hand. On this page are published all the documents necessary for the use of your device. HCI78 by NORDMENDE.
USER MANUAL HCI78 NORDMENDE
text_image
measures measures measures measuresNORDMENDE™
HCI78FL
CONTENTS:
Safety instructions....3
Description of the appliance....5
Cooking surface and control panel 5
Operation of the appliance....7
Switching the appliance on and off....7
Switching the cooking-zones on and off....7
Automatic heat-up function....8
Residual heat indicator....8
Safety switch off function....9
Child Lock....9
Timer function (\*optional)....10
Minute minder timer....10
Cooking zone timer....10
Buzzer 11
Hints and tips....12
Installation of the appliance....14
Installation safety....14
Fitting the hob into a worktop....14
Making an electrical connection....16
Electrical connection diagram....18
Specifications....19
SAFETY INSTRUCTIONS
We have included this section for your safety. Please read this information carefully before using your hob.
WARNING:
- It is hazardous for anyone other than authorised service personal, to carry out servicing or repairs which involve the removal of covers.
- To avoid the risk of an electric shock, do not attempt repairs yourself.
- In the event of any damage that occurs as a result of improper connection or installation, the warranty will not be valid.
Correct use:
- Make sure all the packaging has been removed before you use the hob.
- Keep all packaging until you are sure that the hob is working properly.
- The electrical safety of this hob is guaranteed only if it is connected to a properly earthed system, which complies with the electrical safety standards in force. If you cannot verify that this fundamental safety requirement is in place, consult a qualified electrician.
- Do not put pressure on the power supply cable while fitting the hob.
- Never replace the power supply cable yourself. Any maintenance must be carried out by a qualified electrician with the mains supply disconnected.
- Adaptors, multiple sockets and/or extension leads must not be used.
- Built-in appliances may only be used after they have built in to suitable units and work surfaces that meet the standards.
- This hob must only be used for the purpose of heating or cooking food, any other use, for example heating rooms, is dangerous. The manufacturer will not be liable for damages resulting from improper, incorrect or negligent use.
- Do not cut bread on the glass of the hob. Glass worktop should not be used as working surfaces.
- If sharp edged dishes are scraped on the surface of the hob, it may cause damage to the surface.
- If you notice any cracks on your hob surface, disconnect it from the supply source to avoid the possibility of an electric shock..
- It is advisable to have a smoke detector fitted in your home, and have a fire blanket or extinguisher close to the hob.
SAFETY INSTRUCTIONS
Human safety:
- During operation the hob surface can get hot, small children must be kept away from the appliance.
- Users with implanted pacemakers should keep their upper body at least 30cm from induction cooking zones that are switched on.
- This appliance is not intended for use by persons (including children) with reduced physical, sensory or mental capabilities, or lack of experience and knowledge, unless they have been given supervision or instruction concerning use of the appliance by a person responsible for their safety.
- Children should be supervised to ensure that they do not play with the appliance.
Safety during use:
- Do not place objects made of metal, such as knives, forks, spoons and saucepan lids on the cooking zones, as they can get hot.
- Do not use the cooking zones with empty cookware or without cookware.
- Never leave the hob unattended when cooking with fat or oil. They can rapidly catch fire if overheated.
- Be careful when using small household appliances, such as irons, near the elements and make sure the power cable is kept well away from hot surfaces.
- Make sure all the controls are in the off position when not in use.
- Use only suitable induction cookwares with stable flat-based. Cookware for induction cooking is labelled as suitable by the manufacturer.
- Do not use flammable liquids (alcohol, petrol) near the hob when it is in use.
- When an element is turned on, a little noise may be heard, this is normal.
- There is a risk of burns from the appliance if used carelessly.
Safety when cleaning:
- For cleaning, the appliance must be switched off and cooled down.
- Do not use a steam cleaner to clean your hob.
- Harsh, abrasive cleaners should not be used as they can scratch the surface.
- To prevent misoperation of the hob, keep the control touch points clean.
DESCRIPTION OF THE APPLIANCE
Dear Customer,
Please read the instructions in this user guide before using the hob and keep it for future reference.
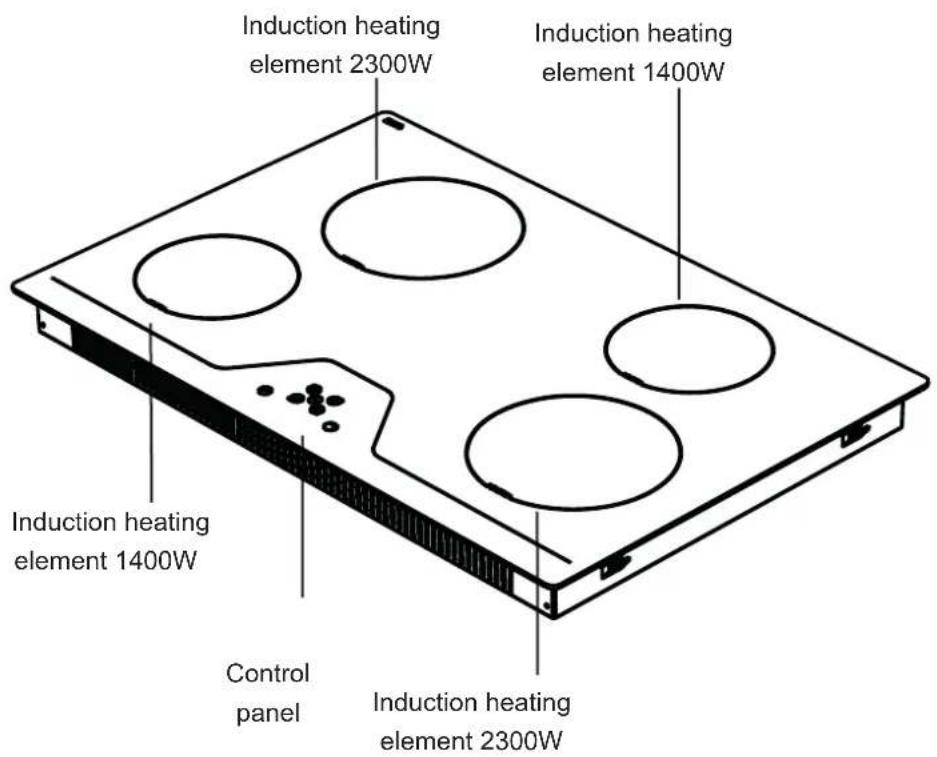
text_image
Induction heating element 2300W Induction heating element 1400W Induction heating element 1400W Control panel Induction heating element 2300WControl Panel:
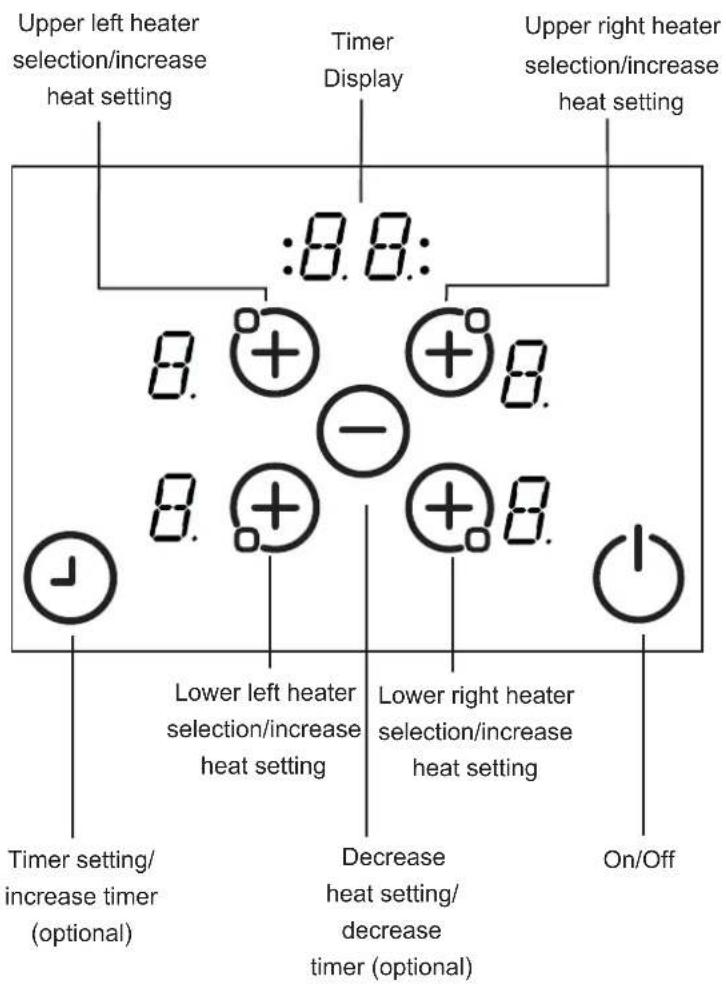
flowchart
graph TD
    A["Timer Display"] --> B[":0.8.0:"]
    C["Upper left heater selection/increase heat setting"] --> B
    D["Upper right heater selection/increase heat setting"] --> B
    E["Timer setting/increase timer (optional)"] --> F["Lower left heater selection/increase heat setting"]
    G["Decrease heat setting/decrease timer (optional)"] --> H["Lower right heater selection/increase heat setting"]
    I["On/Off"] --> J["Power"]
Use the induction cooking zones with suitable cookware.
After mains voltage is applied, all displays are come on for a moment. When this time is over, the hob is in the stand-by mode and it is ready for operation.
The hob is controlled with electronic sensors which are operated by touching the related sensors. Each sensor activation is followed by a sound signal (buzzer).
Switching the appliance on:
Switch the hob on by touching ON/OFF key ⏻. All heater displays show a static "0" and the bottom right dots blink. (If no cooking-zone is selected within 20 seconds, the hob will automatically turn off.)
Switching the appliance off:
Switch the hob off at any time by touching ⏻. ON/OFF key ⏻ has always priority in the switch off function.
Switching the cooking-zones on:
Touch the heater selection key you wish to cook on. There is a static dot indication on the selected heater display and the blinking dot on all other displays extinguish.
Select the temperature setting by using the heater selection key or decrease heat setting key . The element is now ready to cook on. For quickest boil times, select "9" and then adjust down to a lower setting as required.
Switching the cooking-zones off:
Select the element you want to switch off by pressing the heater selection key. Using key, turn the temperature down to "0". (Also using and keys simultaneously turns the temperature to "0") If the cooking zone is hot, "H" will be displayed instead of "0".
Switching all cooking-zones off:
To turn all the cooking zones off at once, touch the ⏻ key.
In the stand-by mode, an "H" appears on all cooking zones which are hot.
Automatic heat-up function :(for the models with timer)
All cooking zones are equipped with an automatic heat-up function. The automatic heat-up function sets the cooking zone to the highest setting for a certain period of time and then automatically switches back to the cooking setting that was originally set.
Switch on the appliance and select a cooking zone. Set the temperature level "9" and touch the heater selection key of the corresponding zone second time.
Then the automatic heat-up will be activated. The symbol “A” appears in the display, in alternation with the chosen setting.
If the temperature level is changed, the automatic heat-up time also changes.
When the heat-up time is over, only the selected setting will be indicated on the display.
The automatic heat-up can be activated anytime by touching the heater selection key of the corresponding zone at the temperature level "9".
Residual heat indicator:
Residual heat indicator indicates that the glass ceramic has a dangerous touch temperature in the circumference of a cooking zone.
After switching off the cooking zone, the respective display shows "H" until the assigned cooking zone temperature is in an uncritical level.
Safety switch off function:
Every cooking zone will be switched off after a defined maximum operation time if the heat setting is not modified. Every change in the cooking zone puts back the maximum operation time to the initial value of the operating time limitation. The maximum operation time depends on the selected temperature level.
| Heat setting | Safety switch off after |
| 1 - 2 | 6 Hours |
| 3 - 4 | 5 Hours |
| 5 | 4 Hours |
| 6 - 9 | 1,5 Hours |
Child Lock:
After switching on the control, the child lock function can be activated. To activate the child lock, simultaneously operate the front right heater selection key ⊕ and decrease heat setting key ⊖ and then operate the front right heater selection key ⊕ again. "L" meaning LOCKED will appear in all heater displays and the control can not be changed. (If a cooking zone is in the hot condition, "L" and "H" will be displayed in alternation.)
The hob will remain in a locked condition until it gets unlocked, even if the control has been switched off and on.
To deactivate the child lock, first switch on the hob. Simultaneously operate the front right heater selection key ⊕ and decrease heat setting key ⊖ and then operate the decrease heat setting key ⊖ again. "L" will disappear in the display and the hob will be switched off.
Timer function (\*optional):
The timer function is realized in two versions:
Minute minder timer (1..99 min):
The minute minder timer can be operated if the cooking zones are switched off. The timer display shows "00" with a blinking dot.
Touch the timer setting key ⏻ to increase the time or touch ⏱ to decrease the time. Adjustment range is between 0 and 99 minutes. If there is no operation in 10 seconds, the minute minder timer will be set and the blinking dot will disappear. After the timer is set, the time runs down according to the adjustment.
When the time is over, a signal sounds and the timer display blinks. The sound signal will be stopped automatically after 2 minutes and/or by operating any key.
The minute minder timer can be changed or switched off anytime by operating the timer setting key ⏻ and/or decrease timer key ⊖. Switching off the hob by touching ⏻ at anytime will also switch off the minute minder timer.
Cooking zone timer (1..99 min):
When the hob is switched on, an independent timer can be programmed for every cooking zone.
Select a cooking zone, then select the temperature setting and finally activate the timer setting key ⏻, the timer can be programmed as a switch off function for a cooking zone. Around the timer four LEDs are arranged. These indicate for which cooking zone the timer has been activated.
10 seconds after the last operation, the timer display changes to the timer that will run out next (in case of programming more than 1 cooking zone).
When the timer has run down, a signal sounds and the timer display shows "00" statically, the assigned cooking zone timer LED blinks. The programmed cooking zone will be switched off and the "H" will be displayed if the cooking zone is hot.
The sound signal and the blinking of the timer LED will be stopped automatically after 2 minutes and/or by operating any key.
Buzzer :
While the hob is in operation, the following activities will be signalled by means of a buzzer:
- Normal key activation with a short sound signal
- Continuous operation of keys over a longer period of time (10 seconds) with a longer, intermittent sound signal.
HINTS AND TIPS
Cookware
- Use thick, flat, smooth bottomed cookwares that are the same diameter as the element. This will help reduce cooking times.
- Cookware made of steel, enamelled steel, cast iron and stainless steel will give you the best results. In addition to this choose the vessels which are labelled by its producer as an “Appropriate for induction cooking
- You must ensure the correct size cookware is used on the correct cooking zone. A safety device will prevent the cooking zone from working if the cookware is too small. Please refer to the values below. Cookware is suitable for induction if a magnet sticks to the bottom of the cookware.
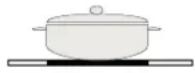
- Cookware must be placed centrally on the cooking zone. If it is not placed correctly, is displayed.
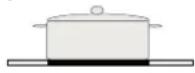
CORRECT FALSE FALSE

| Cooking Zone Diameter | Minimum Vessel Base Diamater |
| 160 mm | 110 mm |
| 200 mm | 150 mm |
Energy saving
- Induction cooking zones adapt automatically to the size of the cookware bottom up to a certain limit. However the magnetic part of the cookware bottom must have a minimum diameter depending upon the size of the cooking zone.
- Place the cookware on the cooking zone before it is switched on. If it is switched on before putting any cookware, the cooking zone will not operate and the control display shows.
- Use a lid to reduce cooking time.
- When liquid comes to the boil, reduce the temperature setting.
- Minimise the amount of liquid or fat to reduce cooking times.
- Select the proper temperature setting for the cooking applications.
Examples of cooking applications
The information given in the following table is for guidance only.
| Settings | Use for |
| 0 | Element off |
| 1 - 3 | Delicate warming |
| 4 - 5 | Gentle simmering, slow warming |
| 6 -7 | Reheating and rapid simmering |
| 8 | Boiling, saute and searing |
| 9 | Maximum heat |
| A | Automatic Heat-up |
Cleaning tips
- Do not use abrasive pads, corrosive cleaners, aerosol cleaners or sharp objects to clean the surfaces of the hob.
- To remove burnt food, soak it off with a damp cloth and washing-up liquid.
- You may use a scraper for cleaning food or residues. Sticky foods must be cleaned immediately when they spill, before the glass has cooled down.
- Be careful not to scratch the silicon adhesive placed on the edges of the glass whilst using a scraper.
- The scraper has a razor, therefore, it must be kept away from children.
- Use special ceramic hob cleaner on the hob while it is warm to touch. Rinse and wipe dry with a clean cloth or paper towel.
INSTALLATION OF THE APPLIANCE
WARNING:
The electrical connection of this hob should be carried out by a qualified electrician, according to the instructions in this guide and in compliance with the current regulations. In the event of any damage that occurs as a result of improper connection or installation, the warranty will not be valid. This appliance must be earthed.
Installation safety
- Any overhanging surface should be at least 65cm above the hob.
- Extractor fans must be fitted in accordance with the manufacturer's instructions.
- The wall in contact with the rear of the hob must be made of flameproof material.
- The power cable length should not exceed 2 metres.
Fitting the hob into a work surface
- The hob can be inserted into any worktop provited it is heat resistant up to at least 90 C.
- The distance between the rear edge of the hob and adjacent wall is dependent on wall surface. Please don't use easily combustible metarial like crtain, paper at nearby hob. Create an opening with the dimensions shown in the picture on the next page.
- Horizontal plate must be inserted 175 mm. away from the worktop bottom surface. Space between the plate and the hob must be empty and no objects may be stored or keep there.
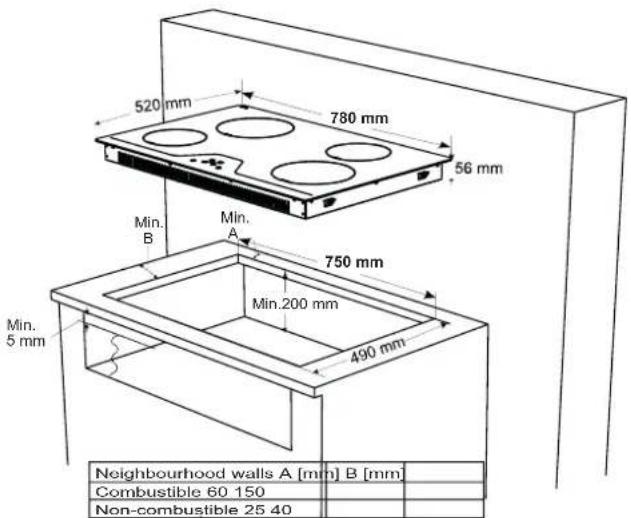
text_image
520 mm 780 mm 56 mm Min. B Min. A 750 mm Min.200 mm 490 mm Min. 5 mm Neighbourhood walls A [mm] B [mm] Combustible 60 150 Non-combustible 25 40- Apply the one-sided self-adhesive sealing tape supplied all the way round the lower edge of the cooking surface along the outer edge of the glass ceramic panel. Do not stretch it.
- Screw the 4 worktop mounting brackets on the side walls of product.
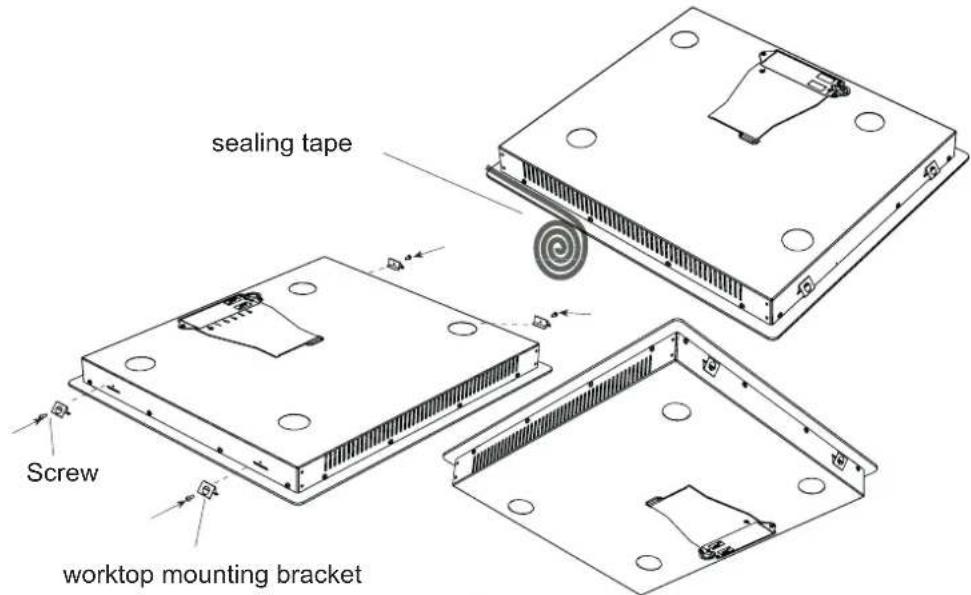
text_image
sealing tape Screw worktop mounting bracket
natural_image
Empty rectangular frame with no text, numbers, or symbols inside- Secure the hob in place by putting it into cutout on the work surface.
- Before inserting the oven, it is necessary to remove the rear kitchen element panel in the area of the oven opening, in order to supply cooling. Equally, the front part of the kitchen base must have an opening of no less than 5 mm.
Installing your hob above an oven
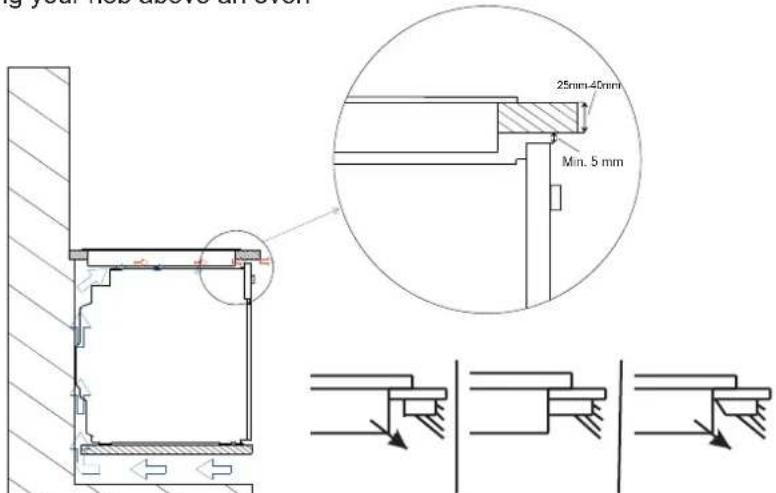
text_image
25mm 40mm Min. 5 mmEnsure that the unit crossbar does not black the air possession, make a bevel if necessary
Making an electrical connection
Before making a connection, check that:
- The mains voltage is the same as that quoted on the rating plate which is situated at the back of your hob.
- The circuit can support the appliance load (see the rating plate).
- The power supply has an earth connection, which complies with the provisions of current regulations and is in good working order.
- The fused switch is easily accessible once the hob has been installed.
If there is no dedicated hob circuit and fused switch, they must be installed by a qualified electrician before the hob is connected.
An approved suitable cable must be connected from the Consumer Unit (main fuse box) and be protected by its own 30amp fuse or Micro Circuit Breaker (MCB). The electrician must provide a double-pole switch, which disconnect both the line (live)and neutral conductors with a contact seperation of at least 3,0 mm.
The switch should be fitted to the kitchen wall, a and must be placed in an easy accessible position in accordance with IEE regulations. One and of the suitable power supply cable connects to the switch and other and connects to hob's power connections box and install the cable in accordance with the connections diagram.
The power supply cable must be positioned away from direct heat sources. It should not be subjected to a temperature rise of more than 50^ C above room temperature.
This appliance conforms with the following EU Directives:
· 73/23/EEC dated 19.02.1973 Low Voltage Directive
· 89/336/EEC dated 03.05.1989 EMC Directive inclusive of Amending Directive 92/31/EEC
· 93/68/EEC dated 22.07.1993 CE Marking Directive
· EEC/89/109 relating to contact with foods
Electrical connection diagram
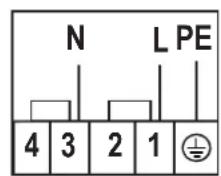
3x2,5mm² 230V 50Hz
This appliance must be earthed. For this connection a power lead of wire type H05W-F should be used.
For the induction hob, the cable must be H05VV-F 3X2,5 mm² / 60227 IEC 53. You will find the connection diagram shown on the bottom of your appliance.
Specifications
Rated Voltage 230 V
Rated Frequency 50 Hz
Total Power 7.4 kW
Stand-by power consumption 0,8 W
Noise emission <70dB(A)
Product Dimensions (mm)
Width 780
Depth 520
Worktop Cutout Dimensions (mm)
Width 750
Depth 490
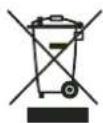
The symbol on the product or on its packaging indicates that this product may not be treated as household waste. Instead it shall be handed over to the applicable collection point for the recycling of electrical and electronic equipment. By ensuring this product is disposed of correctly, you will help prevent potential negative consequences for the environment and human health, which could otherwise be caused by inappropriate waste handling of this product. For more detailed information about recycling of this product, please contact your local city office, your household waste disposal service or the shop where you purchased the product.
07/2008 R000
52017354