Vinovilla Grande 165 Duo - Wine cellar Klarstein - Free user manual and instructions
Find the device manual for free Vinovilla Grande 165 Duo Klarstein in PDF.

User questions about Vinovilla Grande 165 Duo Klarstein
0 question about this device. Answer the ones you know or ask your own.
Ask a new question about this device
Download the instructions for your Wine cellar in PDF format for free! Find your manual Vinovilla Grande 165 Duo - Klarstein and take your electronic device back in hand. On this page are published all the documents necessary for the use of your device. Vinovilla Grande 165 Duo by Klarstein.
USER MANUAL Vinovilla Grande 165 Duo Klarstein
text_image
QR code image containing encoded data, no visible human-readable textINHALTSVERZEICHNIS
text_image
Technical diagram of a server rack with numbered components for identification and assembly reference.natural_image
Line drawing of a refrigerator with labeled components and an inset close-up showing internal wiring (no text or symbols present)natural_image
Simple line drawing of a rectangular frame with a side panel and a numbered label (2) at the bottom right corner.text_image
Technical diagram of a multi-level refrigerator with numbered labels pointing to different compartments.text_image
Technical diagram of a multi-level refrigerator with numbered labels pointing to different compartments.natural_image
Simple line drawing of a rectangular frame with a label '11' at the bottom (no text or symbols on the frame itself)natural_image
Line drawing of a refrigerator with labeled components and zoomed-in detail (no text or symbols)natural_image
Symbol of a trash bin crossed with a diagonal line, no text or numbers presentBerlin Brands Group UK Limited
PO Box 42
272 Kensington High Street
London, W8 6ND
United Kingdom
Dear Customer,
Congratulations on purchasing this device. Please read the following instructions carefully and follow them to prevent possible damages. We assume no liability for damage caused by disregard of the instructions and improper use. Scan the QR code to get access to the latest user manual and more product information.

text_image
QR code image containing encoded data, no visible human-readable textCONTENTS
Safety Instructions 26
Device Overview 29
Assembly 30
Operation 32
Changing the Door Stop 34
Equipment 38
Filling the Wine Fridge 38
Cleaning and Care 39
Troubleshooting 40
Product Data Sheet 42
Disposal Considerations 44
Manufacturer & Importer (UK) 44
TECHNICAL DATA
| Item number | 10045898 |
| Power supply 220-240 V ~ 50 Hz |
SAFETY INSTRUCTIONS
- Before use, check the voltage specified on the device label. Ensure that you only connect the device to sockets with the appropriate voltage.
- Children from the age of 8 years and mentally, sensory and physically impaired persons may only use the device if they have been informed in detail about the functions and safety precautions by a supervisor responsible for them beforehand and understand the associated risks.
• Make sure that the ventilation openings are free and cleaned regularly. - Do not use mechanical devices to speed up the defrosting process.
- Do not place electrical appliances, such as ice machines, in the refrigerator.
- Be careful not to damage the coolant circuit.
- If the power cord is damaged, it must be replaced by the manufacturer, an authorised specialist company or a similarly qualified person.
- Check the power cord regularly for any damage. Do not use the device with a damaged power cord.
- Do not handle the device, plug or power cord with wet hands.
- If possible, do not use an extension cord. If you do use one, make sure that the ampere rating of the connected device does not exceed the maximum ampere rating of the power cord.
- Leave at least 5 cm of space around the appliance to the sides and 10 cm to the rear so that the air can circulate sufficiently.
- Do not put hot food in the appliance. Let it cool down to room temperature first.
- Close the door as soon as possible after stowing food to prevent cold from escaping.
- Place the device on a firm, level surface. Do not place it on a soft surfaces, such as carpet.
- Do not place any objects on the device.
- Do not store flammable or explosive substances in the unit.
- Do not use the device outdoors.
- Do not pull the plug out of the socket by the cable. Instead, hold it securely with your hand while unplugging it.
- Make sure that the power cord does not touch any hot surfaces.
- Only connect the unit to earthed sockets.
- Do not connect the appliance to sockets to which other kitchen appliances are already connected.
- If the refrigerator goes out, breaks down or is turned off, wait 5 minutes before turning it back on, otherwise the compressor could be damaged.
This unit contains the refrigerant Isobutane (R600a), a natural gas with high environmental compatibility, but fl ammable. Although it is fl ammable, it does not damage the ozone layer or increase the greenhouse effect. The use of this refrigerant results in a slightly higher noise level of the unit. In addition to the compressor noise, you can hear the flow of refrigerant. This is unavoidable and has no negative effect on the performance of the device. Be careful during transport to avoid damage to the refrigerant circuit. Refrigerant leaks can irritate the eyes.
Special Instructions
• Children aged 3 to 8 may fill refrigerators with food and remove food.
- When positioning the unit, take care not to pinch or damage the power cord.
- Make sure that there are no power strips or power supply units on the back of the device.
To avoid contamination of food, please follow the instructions below:
- Opening the door for too long can cause a significant temperature rise in the compartments of the appliance.
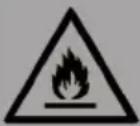
WARNING
When using, during maintenance and when disposing of the appliance, pay attention to the left symbol located on the back or on the compressor of the appliance. This symbol warns you of possible fires. There are fl ammable substances in the refrigerant lines and in the compressor. Keep the appliance away from sources of fire during use, maintenance and disposal.
Notes on correct use
• This device is intended exclusively for the storage of wine.
- This appliance is not intended for use as a built-in appliance unless explicitly stated in the instructions.
• This appliance is not suitable for freezing food.
- The racks were pre-set to allow the most efficient use of energy.
Note: It is recommended to set the temperature to 12 °C. If the temperature is set too high, the wine may spoil. If the temperature is set too low, the power consumption could increase.
Special notes on the shelves
| Shelf for glasses Shelf 1 Shelf 2 Shelf 3 Shelf 4 Shelf 5 Shelf 6 Shelf 7 Shelf 8 Shelf 9 Shelf 10 Shelf 11 Shelf 12 | ·The shelves have been pre-set to allow the most efficient use of energy. ·Only use the shelves provided by the manufacturer. ·Never block the holes in the shelves or use any other types of shelves that have not been approved by the manufacturer, which may cause poor cooling or increase energy consumption. ·We recommend that you use the shelves as shown so that the energy is used as efficiently as possible. |
Notes on ambient temperature
Install this unit in a location where the ambient temperature corresponds to the climate class indicated on the unit's nameplate.
| SN | Extended temperate | This cooling unit is designed for use at ambient temperatures of 10-32 °C. |
| N | Temperate | This cooling unit is intended for use at ambient temperatures of 16-32 °C. |
| ST | Subtropical | This cooling unit is intended for use at ambient temperatures of 16-38 °C. |
| T | Tropical | This cooling unit is intended for use at ambient temperatures of 16-43 °C. |
The ambient temperature influences the internal temperature of the wine refrigerator. For optimal operation of the wine refrigerator, we recommend an ambient temperature of 23 °C to 25 °C .
text_image
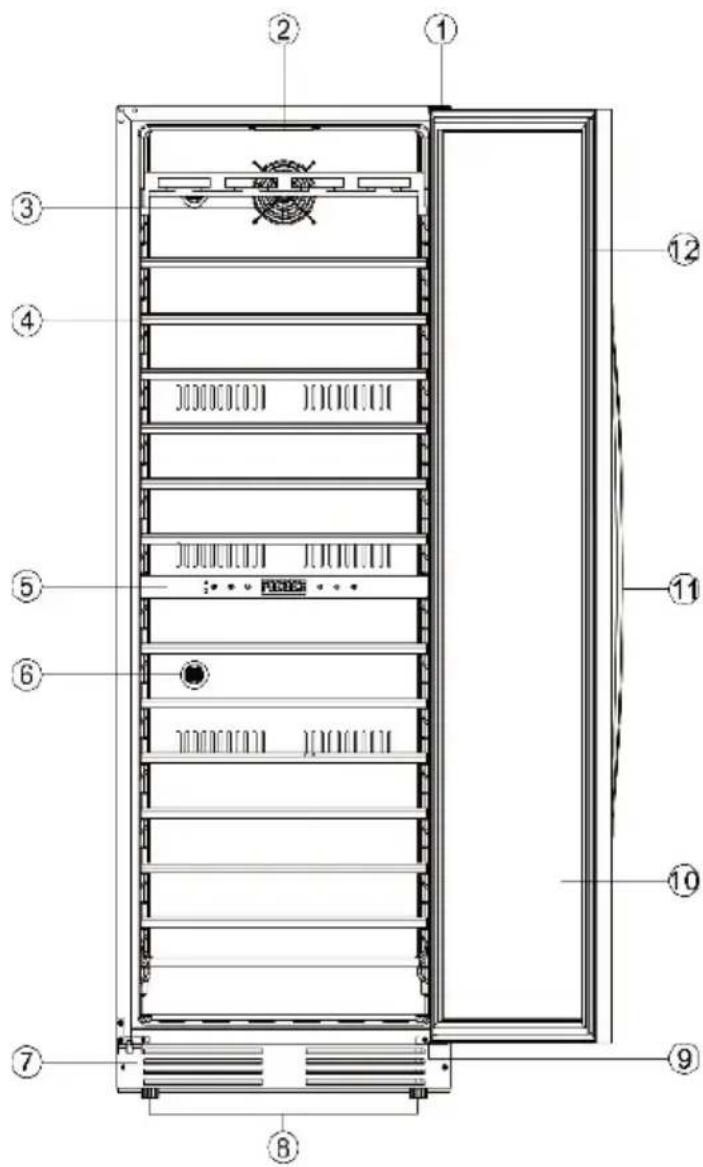
Technical diagram of a server rack with numbered components for identification and assembly reference.1 Upper door hinge
2 Light
3 Fan
4 Refrigerator compartment
5 Control panel
6 Activated carbon filter
7 Base
8 Adjustable feet
9 Lower door hinge
10 Refrigerator door
11 Door handle
12 Door seal
ASSEMBLY
Before assembly
To ensure a proper electrical connection, follow the installation instructions provided in this instruction manual.
- Remove all internal and external packaging.
- After unpacking the device, visually confirm that it is not damaged. Please do not connect a damaged device to the power supply. In case of damage, please inform the manufacturer's customer service and keep the packaging.
- It is recommended that you leave the device to stand for at least 24 hours after unpacking and before connecting it to the power supply to ensure that the coolant is evenly distributed throughout the cooling circuit.
- Before using for the first time, clean the interior of the device with a soft cloth and lukewarm water.
• To prevent the device from overheating, sufficient air circulation must be ensured. - To avoid the risk of fire, make sure that the device does not come into contact with walls or hot elements (compressor, condenser).
- The device should not be located near heaters, hot plates or gas stoves.
- Make sure that the electrical outlet you are using is still easily accessible even after the refrigerator is installed.
Installation
• This device should be placed in a dry room with good ventilation.
- To avoid overheating, ensure adequate ventilation and do not block the device's vents.
- Place the device in a location that is stable enough to support the weight of a full refrigerator. To ensure that the refrigerator is level, adjust the height on the refrigerator feet.
- To achieve the lowest possible energy consumption, do not place the device near heat sources (heaters, stoves, etc.) and do not expose it to direct sunlight. In addition, avoid placing the device in a very cold room.
- Insert the power plug of the device into an easily accessible mains socket. If you have any questions regarding grounding and/or power consumption, please contact customer service or a qualified electrician directly.
Note: Make sure that the device's on/off switch and the outlet to which it is connected are still easily accessible even after the device has been installed.
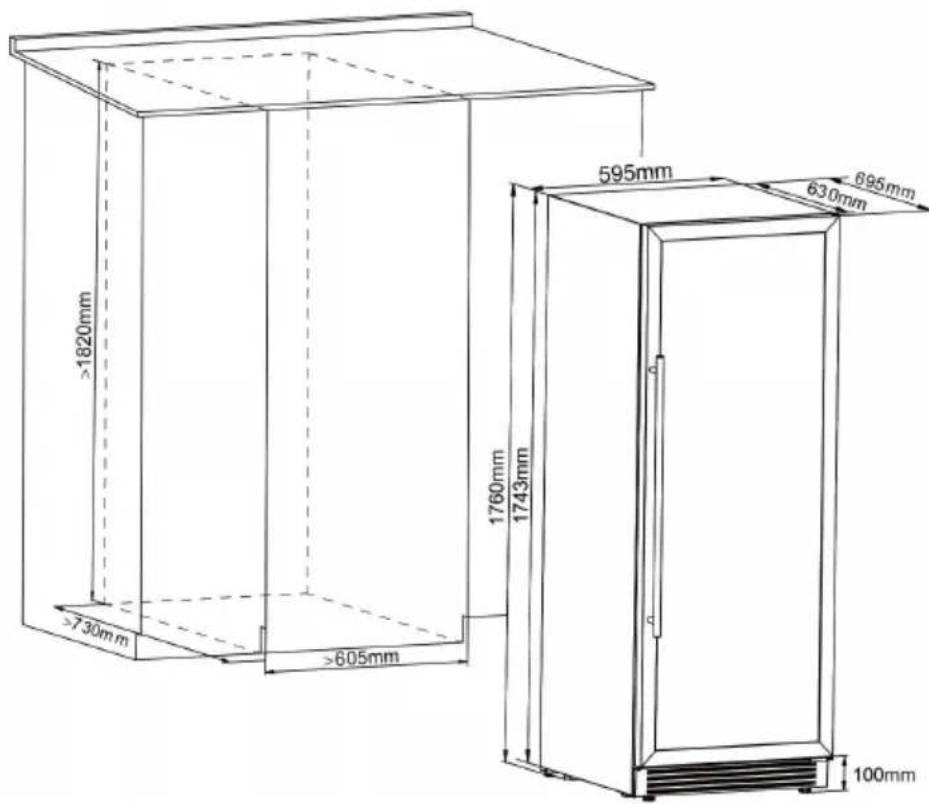
text_image
595mm 630mm 695mm 1760mm 1743mm >1820mm >730mm >605mm 100mmOPERATION
Control panel

text_image
5.12The temperature range of the upper refrigerator area and the lower refrigerator area is between 5-20 °C.
- Press and hold the symbol for 2 seconds to turn the device on or off. - You can choose between two different lighting modes. Press the symbol for 3 seconds to select the desired lighting mode.
- Light on and off mode: This is the default light setting. The light is controlled by a sensor and the refrigerator display shows the symbol. When you open the refrigerator door, the light turns on automatically. When the door is closed, the light turns off automatically.
- Light on mode: Press and hold the symbol for 3 seconds to enter lighting mode. When you are in this mode, the display will show, which means the light in the refrigerator will stay on continuously.
- Changing the lighting colour: The device is equipped with a 3-colour lighting system that allows you to select the interior lighting of the refrigerator from white to blue to orange. To change the colour of the refrigerator interior light, simply press the symbol briefly. The lighting will change from white to blue to orange.
Temperature setting
- Press the 📁 and 🔍 buttons to adjust the temperature of the device. Each time you press the respective button, the temperature changes by 1°C.
- The end buttons on the left side of the control panel are used to control the temperature of the upper refrigerator area.
- The temperature of the lower refrigerator area can be adjusted using the 📁 and buttons on the right side of the control panel.
- To change the temperature display on the display from Celsius to Fahrenheit, please press the + and - buttons on the left side of the control panel simultaneously for 3 seconds.
Warning system:
-
Refrigerator door open alarm: If the refrigerator door is opened for more than 5 minutes, the alarm will be activated, which will beep 3 times every 5 seconds and the display will show the ☐ symbol. To deactivate the alarm, you can press any button or close the refrigerator door.
-
Refrigerator low temperature alarm: If the upper refrigerator temperature is below 2 °C for more than 3 hours, the alarm will start beeping and the left side of the display will show the symbol. If the temperature of the lower refrigerator compartment is below 2 °C for more than 3 hours, the alarm will beep and the right side of the display will show the symbol. You can press any button to stop the alarm from beeping.
-
Refrigerator high temperature alarm: If the temperature of the top of the refrigerator is above 25 degrees for more than 6 hours, the alarm will start beeping and the left side of the display will show the △ symbol. If the temperature of the lower refrigerator compartment is above 25 °C for more than 6 hours, the alarm will beep and the right side of the display will show the △ symbol. You can press any button to stop the alarm from beeping.
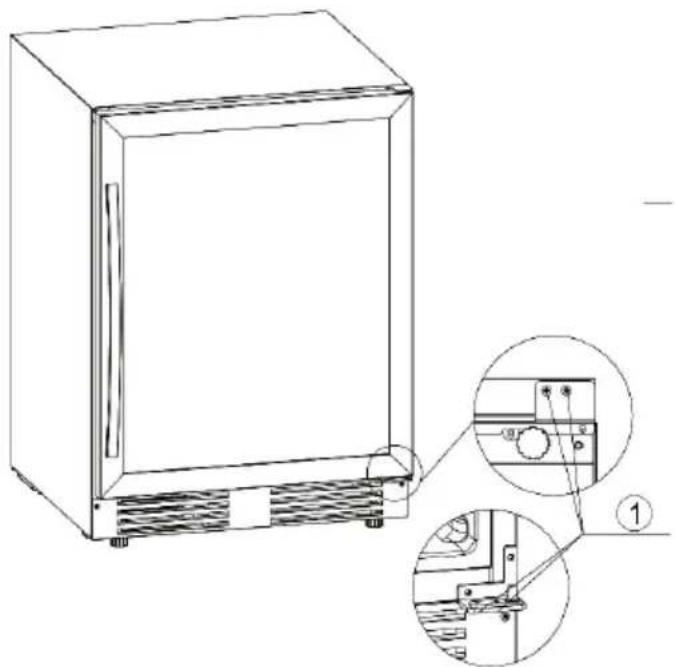
CHANGING THE DOOR STOP
In the storage bag for the user manual, there is both a left upper and a left lower door hinge, which allow you to change the side of the refrigerator door. Please follow the following instructions:
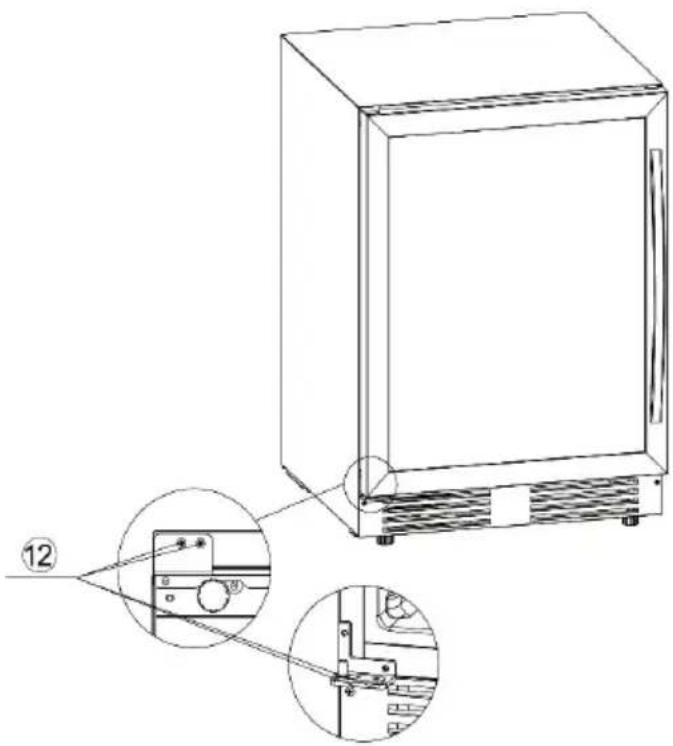
- Unscrew the two screws located on the lower door hinge at the door's pivot axis, then remove the door.
natural_image
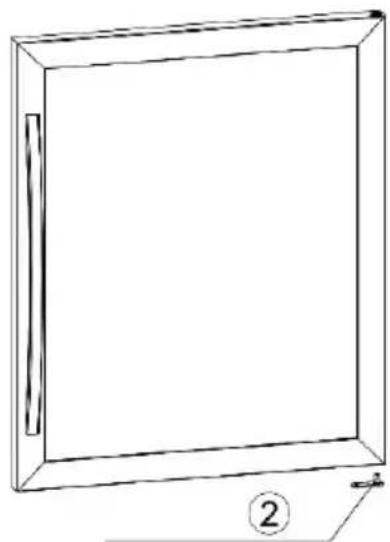
Line drawing of a refrigerator with labeled components and an inset close-up showing internal wiring (no text or symbols present)- Remove the pivot from the pivot hole on the bottom right of the door.
natural_image
Simple line drawing of a rectangular frame with a side panel and a numbered label (2) at the bottom right corner.- Remove the upper right door hinge by unscrewing 3 screws.
- Remove the lower right door hinge by unscrewing 3 screws.
- Remove the decorative plastic covers on the upper left hinge hole.
- Remove the left side door bracket.
- Attach the upper left door hinge.
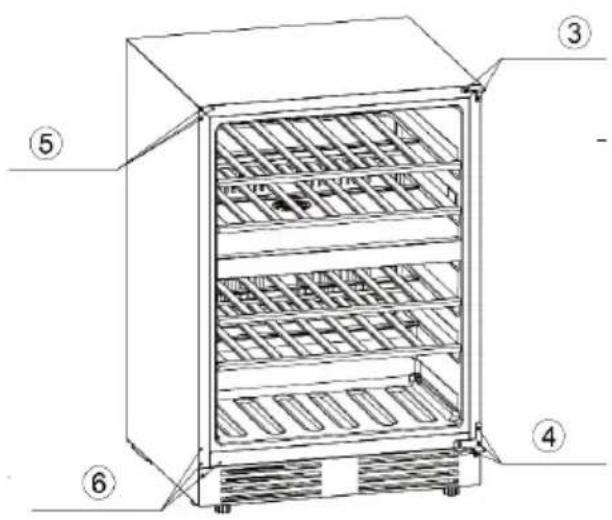
text_image
Technical diagram of a multi-level refrigerator with numbered labels pointing to different compartments.- Attach the lower left door hinge.
- Cover the upper right hinge hole with the decorative plastic cover.
- Cover the lower right hinge hole with the decorative plastic cover.
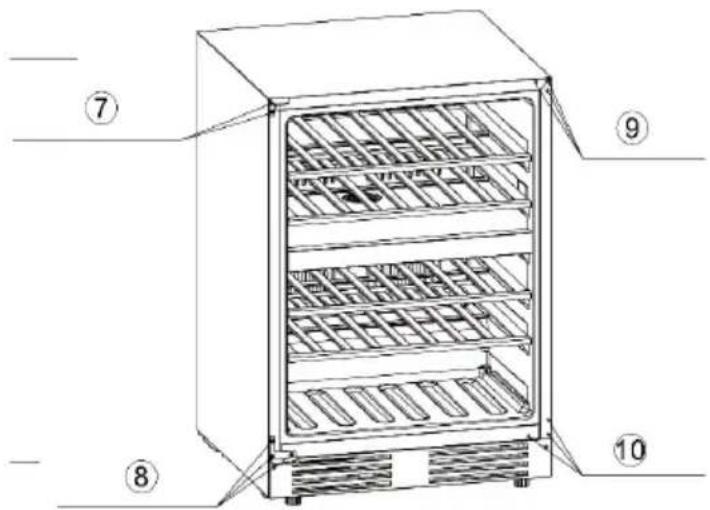
text_image
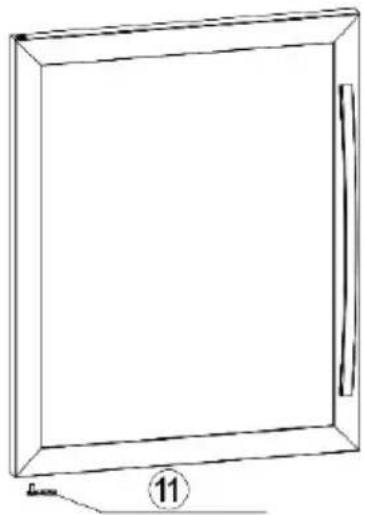
Technical diagram of a multi-level refrigerator with numbered labels pointing to different compartments.- Rotate the door 180^ and attach the door hinge in the holes provided on the lower left pivot axis of the door.
natural_image
Simple line drawing of a rectangular frame with a label '11' at the bottom (no text or symbols on the frame itself)- Hang the door on the upper left door hanger, making sure the door is flush on the top and bottom hangers. Fix the axle of the door to the lower left door hinge hole.
natural_image
Line drawing of a refrigerator with labeled components and zoomed-in detail (no text or symbols)Door handle attachment
This unit is equipped with a stainless steel door handle. To attach this, please follow the following instructions:
- Open the refrigerator door and carefully pull out the door seal where you want to mount the door handle.
- Place the washer on the screws and then insert both screws into the recesses in the door.
- Insert the handle onto the screws from the other side and then tighten the screws with a screwdriver.
- Push the door seal back to its original position.

text_image
Front Washer Screws Door Handle RearEQUIPMENT
Temperature control system
According to experts, the ideal storage temperature for wine is approximately 12 ^ , with possible variations of 10-14 ^ . Please do not confuse this with the serving temperature, which can be between 5 and 18 ^ according to the specific nature of the wine.
It is extremely important to avoid sudden temperature changes. Designed by wine lovers, this device, unlike normal refrigerators, calculates the sensitivity of Grand Cru wines to sudden temperature changes and allows a constant temperature to be maintained through a tight control system.
Anti-vibration system
The cooling compressor has been equipped with special shock absorbers (silent blocks) and the interior has been isolated from the housing by a thick layer of polyurethane foam. These features prevent the transmission of vibrations to your wines.
Automatic defrosting
Your device is equipped with an automatic defrosting circuit. When a cooling cycle ends, the cooled surfaces of the device are automatically defrosted. The defrost water is directed to a condensation evaporation tank located at the rear of the compressor. The heat produced by the compressor causes the condensation collected in the container to evaporate.
FILLING THE WINE FRIDGE
The refrigerator's maximum filling quantities in relation to bottles are guidelines that are indicative: These guidelines allow a quick assessment of the size of the appliance (similar to a capacity indication expressed in litres for refrigerators).
The guidelines refer to tests carried out on standard bottles: The standard "75 cl light Bordeaux" bottle – the standards refer to the geographical origin of each bottle shape (Bordeaux, Burgundy, Provence, etc.) and a type (traditional, heavy, light, etc.), each with its own diameter and height.
In reality, and in extreme cases, you could store more wine by stacking bottles of the same type in the refrigerator without a wine rack. However, a diverse wine cellar contains a wide range of bottles, and the practical aspects of daily use of the wine cellar limit the capacity of the wine refrigerator. For this reason, you will probably fill the wine refrigerator with fewer bottles than actually possible.
CLEANING AND CARE
- Before cleaning or servicing the appliance, please switch it off and disconnect the power cord from the wall socket.
- Before using the wine refrigerator for the first time, we recommend that you clean the inside and outside (front, sides and top) of the device with warm water and a mild detergent. Then rinse the device with clean water and allow it to dry before connecting it to the power supply again.
- When you use the device for the first time, the device may emit a peculiar smell. If this is the case, let the device run unfilled for a few hours at the lowest temperature setting. The cold will kill the smell.
- Clean the plastic cover on the steel compartments with a mild detergent and dry with a soft cloth.
- Wooden fans do not require any special care.
- Do not use metal objects, steam systems, volatile liquids, organic solutions or aggressive substances to clean the wine refrigerator.
• To remove ice, do not use sharp or pointed objects, but rather a plastic ice scraper.
TROUBLESHOOTING
Any type of electrical work should be carried out by a qualified technician.
The device should only be repaired by a designated repair workshop and only original spare parts should be used. The device is intended exclusively for home use. The manufacturer assumes no responsibility if the device is used for any other purpose.
If none of the troubleshooting suggestions given in the table work, please contact our customer service.
Attention: Always unplug the device before carrying out any maintenance or repairs on the device.
| Problem Potential cause | |
| The device does not work. • The | device is not plugged in.The device is not switched on.Check the voltage rating of the device.Check the circuit breaker and/or whether the fuse has blown. |
| The device is not cold enough. • | Check the temperature control setting.Check whether the ambient temperature is above the operating temperature of the device.The refrigerator door is being opened too often.The refrigerator door has not been closed properly.The door seal does not seal properly.There is not enough free space around the device. |
| The compressor keeps turning on and off. | The ambient temperature is high.A large number of bottles have been placed in the device.The device is being opened frequently.The door has not been closed properly.The device has not been installed correctly. |
| LED lights are not working. • The | device is not plugged in.The fuse has blown.The bulbs of the LED lights are broken.The switch for the LED lights is turned off. |
| Vibration • Make sure the device | is level. |
| The unit is making a lot of noise. | A noise similar to that of circulating water is produced by the coolant and is normal.At the end of the cooling cycle you can hear the sound of circulating water.The expansion and contraction of the inner walls can sometimes produce a cracking sound.The device is at an angle.Check whether the fan is in good condition. |
| The door does not close properly. | The device is at an angle.The door seal is dirty or damaged.The interior compartments have not been positioned correctly.The contents of the refrigerator are preventing the door from closing properly. |
| The LED display is not working properly. | The control panel is broken.The printed circuit board (PCB) is broken.The device is not plugged in.The button is not working. |
Procedure in the event of a malfunction
Despite the care we take in the production of our devices, malfunctions can never be completely ruled out. Before contacting our customer service, please check that:
- the mains plug of the device is correctly inserted into the socket.
• there is no power failure. - the malfunction is not one of those described in the table above.
Important: If the main power cable is damaged, it must be replaced by the manufacturer or a workshop recommended by the manufacturer. In any case, the cable must be replaced by a qualified electrician to avoid personal injury.
PRODUCT DATA SHEET
Information according to Regulation (EU) No. 2019/2016
| Supplier's name or trademark: Klarstein | ||||
| Supplier's address: Wallstraße 16, 10179 Berlin, DE | ||||
| Model identifier: 10045898 | ||||
| Type of refrigerating appliance: | ||||
| Low-noise appliance: No Design type: freestanding | ||||
| Wine storage appliance: Yes Other refrigerating appliance: | No | |||
| General product parameters: | ||||
| Parameter Value Parameter Value | ||||
| Overall dimensions (mm) | Height 1760 | Total volume (dm3 or L) | 425 | |
| Width | 595 | |||
| Depth | 675 | |||
| EEI | 171 | Energy efficiency class | G | |
| Airborne acoustical noise emissions (dB(A) re 1 pW) | 39 | Airborne acoustical noise emission class | C | |
| Annual energy consumption (kWh/a) | 181 | Climate class | temperate, subtropical | |
| Minimum ambient temperature (°C), for which the refrigerating appliance is suitable | 10 | Maximum ambient temperature (°C), for which the refrigerating appliance is suitable | 38 | |
| Winter setting | No | |||
| Compartment Parameters: | |||||
| Compartment type | Compartment parameters and values | ||||
| Compartment volume (dm3 or L) | Recommended temperature setting for optimised food storage (°C) These settings shall not contradict the storage conditions set out in Annex IV, Table 3 | Freezing capacity (kg/24h) | Defrosting type (auto-defrost=A, manual defrost=M) | ||
| Pantry No - - - - | |||||
| Wine storage Yes 425.0 12 - A | |||||
| Cellar No - - - - | |||||
| Fresh food No - - - - | |||||
| Chill No - - - - | |||||
| 0-star or icemaking No - - - - | |||||
| 1-star No - - - - | |||||
| 2-star No - - - - | |||||
| 3-star No - - - - | |||||
| 4-star No - - - - | |||||
| 2-star section | No - - - - | ||||
| Variable temperature compartment | - | - - - - | |||
| For wine storage appliances | |||||
| Number of standard wine bottles | 165 | ||||
| Light source parameters: | |||||
| Type of light source | - | ||||
| Energy efficiency class | - | ||||
| Minimum duration of the guarantee offered by the manufacturer: 24 months | |||||
| Additional information: | |||||
| Weblink to the manufacturer's website, where the information in point4(a) Annex of Commission Regulation (EU) 2019/2019 is found: www.klarstein.co.uk | |||||
DISPOSAL CONSIDERATIONS

natural_image
Symbol of a trash bin crossed with a diagonal line, no text or labels presentIf there is a legal regulation for the disposal of electrical and electronic devices in your country, this symbol on the product or on the packaging indicates that this product must not be disposed of with household waste. Instead, it must be taken to a collection point for the recycling of electrical and electronic equipment. By disposing of it in accordance with the rules, you are protecting the environment and the health of your fellow human beings from negative consequences. For information about the recycling and disposal of this product, please contact your local authority or your household waste disposal service.
MANUFACTURER & IMPORTER (UK)
Manufacturer:
Chal-Tec GmbH, Wallstrasse 16, 10179 Berlin, Germany.
Importer for Great Britain:
Berlin Brands Group UK Limited
PO Box 42
272 Kensington High Street
London, W8 6ND
United Kingdom
Estimado cliente,
text_image
QR code image containing encoded data, no visible human-readable textÍNDICE
text_image
Technical diagram of a server rack with numbered components for identification and assembly reference.1 Bisagra superior
2 Luz
3 Ventilador
4 Compartimento refrigerante
5 Panel de control
6 Filtro de carbón
natural_image
Line drawing of a refrigerator with side-mounted fans and a close-up inset showing the control panel (no text or symbols)natural_image
Simple line drawing of a rectangular frame with a label '②' at the bottom (no text or symbols on the frame itself)text_image
Technical diagram of a multi-level refrigerator with numbered labels pointing to different compartments.text_image
Technical diagram of a refrigerator with numbered labels pointing to different compartmentsnatural_image
Simple line drawing of a rectangular frame with a label '11' at the bottom (no text or symbols on the frame itself)natural_image
Line drawing of a refrigerator with labeled components and zoomed-in detail (no text or symbols)Montar el tirador
natural_image
Symbol of a trash bin crossed with a diagonal line, no text or numbers presentBerlin Brands Group UK Limited
PO Box 42
272 Kensington High Street
London, W8 6ND
United Kingdom
Chère cliente, cher client,
text_image
QR code image containing encoded data, no visible human-readable textSOMMAIRE
text_image
Technical diagram of a server rack with numbered components for identification and assembly reference.natural_image
Line drawing of a refrigerator with labeled components and an inset close-up showing internal parts (no text or symbols present)natural_image
Simple line drawing of a rectangular frame with a label '②' at the bottom (no text or symbols on the frame itself)text_image
Technical diagram of a multi-level refrigerator with numbered labels pointing to different compartments.text_image
Technical diagram of a multi-level refrigerator with numbered labels pointing to different compartments.natural_image
Simple line drawing of a rectangular frame with a label '11' at the bottom (no text or symbols on the frame itself)natural_image
Line drawing of a refrigerator with labeled components and zoomed-in detail (no text or symbols)FICHE DE DONNÉES PRODUIT
natural_image
Symbol of a trash bin crossed with a diagonal line, no text or numbers presentBerlin Brands Group UK Limited
PO Box 42
272 Kensington High Street
London, W8 6ND
United Kingdom
Gentile cliente,
text_image
QR code image containing encoded data, no visible human-readable textINDICE
text_image
Technical diagram of a server rack with numbered components for identification and assembly reference.natural_image
Line drawing of a refrigerator with labeled components and an inset close-up showing internal wiring (no text or symbols present)natural_image
Simple line drawing of a rectangular frame with a label '②' at the bottom (no text or symbols on the frame itself)text_image
Technical diagram of a multi-level refrigerator with numbered labels pointing to different compartments.text_image
Technical diagram of a refrigerator with numbered labels pointing to different compartmentsnatural_image
Simple line drawing of a rectangular frame with a label '11' at the bottom (no text or symbols on the frame itself)natural_image
Line drawing of a refrigerator with labeled components and zoomed-in detail (no text or symbols)Fissare la maniglia
natural_image
Symbol of a trash bin crossed with a diagonal line, no text or numbers presentPRODUTTORE E IMPORTATORE (UK)
Produttore:
Chal-Tec GmbH, Wallstraße 16, 10179 Berlino, Germania.
Berlin Brands Group UK Limited
PO Box 42
272 Kensington High Street
London, W8 6ND
United Kingdom

area
| Category | Value | |---|---| | 1 | 100 | | 2 | 100 | | 3 | 100 | | 4 | 100 | | 5 | 100 | | 6 | 100 | | 7 | 100 | | 8 | 100 | | 9 | 100 | | 10 | 100 | | 11 | 100 | | 12 | 100 | | 13 | 100 | | 14 | 100 | | 15 | 100 | | 16 | 100 | | 17 | 100 | | 18 | 100 | | 19 | 100 | | 20 | 100 | | 21 | 100 | | 22 | 100 | | 23 | 100 | | 24 | 100 | | 25 | 100 | | 26 | 100 | | 27 | 100 | | 28 | 100 | | 29 | 100 | | 30 | 100 | | 31 | 100 | | 32 | 100 | | 33 | 100 | | 34 | 100 | | 35 | 100 | | 36 | 100 | | 37 | 100 | | 38 | 100 | | 39 | 100 | | 40 | 100 | | 41 | 100 | | 42 | 100 | | 43 | 100 | | 44 | 100 | | 45 | 100 | | 46 | 100 | | 47 | 100 | | 48 | 100 | | 49 | 100 | | 50 | 100 | | 51 | 100 | | 52 | 100 | | 53 | 100 | | 54 | 100 | | 55 | 100 | | 56 | 100 | | 57 | 100 | | 58 | 100 | | 59 | 100 | | 60 | 100 | | 61 | 100 | | 62 | 100 | | 63 | 100 | | 64 | 100 | | 65 | 100 | | 66 | 100 | | 67 | 100 | | 68 | 100 | | 69 | 100 | | 70 | 100 | | 71 | 100 | | 72 | 100 | | 73 | 100 | | 74 | 100 | | 75 | 100 | | 76 | 100 | | 77 | 100 | | 78 | 100 | | 79 | 100 | | 80 | 100 | | 81 | 100 | | 82 | 100 | | 83 | 100 | | 84 | 100 | | 85 | 100 | | 86 | 100 | | 87 | 100 | | 88 | 100 | | 89 | 100 | | 90 | 100 | | 91 | 100 | | 92 | 100 | | 93 | 100 | | 94 | 100 | | 95 | 100 | | 96 | 100 | | 97 | 100 | | 98 | 100 | | 99 | 100 | | Note: The actual values in the 'Value' column are not provided in the code. I have used the label 'The Region' to represent the 'Region'. The values are estimated based on the provided code.