Ventimate - Basket Klarstein - Free user manual and instructions
Find the device manual for free Ventimate Klarstein in PDF.

User questions about Ventimate Klarstein
0 question about this device. Answer the ones you know or ask your own.
Ask a new question about this device
Download the instructions for your Basket in PDF format for free! Find your manual Ventimate - Klarstein and take your electronic device back in hand. On this page are published all the documents necessary for the use of your device. Ventimate by Klarstein.
USER MANUAL Ventimate Klarstein
text_image
COOKINGCO COOKINGCO KINGCOOKING KINGCOOKING COOKINGCO KINGCOOKING KINGCOOKING KINGCOOKING
KLARSTEIN
www.klarstein.com

area
| Category | Value | | -------- | ----- | | A | 100 | | B | 100 | | C | 100 | | D | 100 | | E | 100 | | F | 100 | | G | 100 | | H | 100 | | I | 100 | | J | 100 | | K | 100 | | L | 100 | | M | 100 | | N | 100 | | O | 100 | | P | 100 | | Q | 100 | | R | 100 | | S | 100 | | T | 100 | | U | 100 | | V | 100 | | W | 100 | | X | 100 | | Y | 100 | | Z | 100 |text_image
QR code image containing encoded data, no visible human-readable textINHALT
text_image
569mm 265mm60-cm-Modell (10046372, 10046374)
Abbildung 1

text_image
821mm 265mmnatural_image
Technical line drawing of a cabinet or enclosure with an open lid and upward arrows indicating motion (no text or symbols)Abbildung 3
natural_image
Pure technical diagram of a mechanical assembly without any text, numbers, or symbolsAbbildung 4
natural_image
Simple line drawing of a hand pressing down on a flat surface with an arrow indicating downward motion (no text or symbols)
natural_image
Simple line drawing of a hand pressing down on a laptop keyboard (no text or symbols)natural_image
Technical line drawing of a mechanical component with mesh pattern and mounting brackets (no text or symbols)①
natural_image
Technical line drawing of a mechanical device with fan and rotating component (no text or symbols)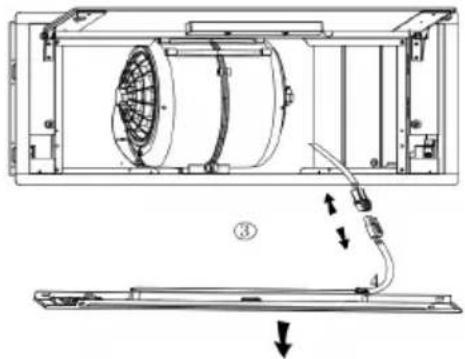
natural_image
Technical line drawing of a mechanical device with internal fan and labeled components (no text or symbols)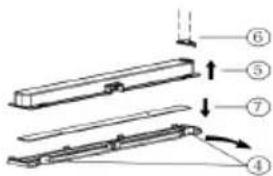
text_image
Technical diagram showing a mechanical assembly with numbered components and directional arrows indicating motion or assembly.Name: Customer service
Website: https://www.elektronik-star.de/lnfo/Impressum/
E-Mail-Adresse: info@electronic-star.de
Telefonnummer: +49303001385500
Anschrift:
Wallstraße 16
10179 berlin
Deutschland
Name: Customer service
Website: https://www.elektronik-star.de/lnfo/Impressum/
E-Mail-Adresse: info@electronic-star.de
Telefonnummer: +49303001385500
Anschrift:
Wallstraße 16
10179 berlin
Deutschland
Name: Customer service
Website: https://www.elektronik-star.de/Info/Impressum/
E-Mail-Adresse: info@electronic-star.de
Telefonnummer: +49303001385500
Anschrift:
Wallstraße 16
10179 berlin
Deutschland
Produktdatenblatt
Name: Customer service
Website: https://www.elektronik-star.de/Info/Impressum/
E-Mail-Adresse: info@electronic-star.de
Telefonnummer: +49303001385500
Anschrift:
Wallstraße 16
10179 berlin
Deutschland
natural_image
Symbol of a trash bin with crossed lines indicating no waste, and a solid rectangle below (no text or labels)Berlin Brands Group UK Limited
PO Box 42
272 Kensington High Street
London, W8 6ND
United Kingdom
Dear Customer,
Congratulations on purchasing this device. Please read the following instructions carefully and follow them to prevent possible damages. We assume no liability for damage caused by disregard of the instructions and improper use. Scan the QR code to get access to the latest user manual and more product information.

text_image
QR code image containing encoded data, no visible human-readable textCONTENT
Safety Instructions 22
Installation 24
Controls and Operation 27
Installing the Filters 29
Cleaning and Care 30
Troubleshooting 33
Product Data Sheet 34
Notes on Environmental Protection 38
Disposal Considerations 38
Manufacturer & Importer (UK) 38
TECHNICAL DATA
| Item number 10046372, 10046373, 10046374, 10046375 |
| Power supply 220-240 V ~ 50 Hz |
SAFETY INSTRUCTIONS
- Thank you for purchasing this cooker hood. Please read the instruction manual carefully before you use the cooker hood, and keep it in a safe place.
- The installation work must be carried out by a qualified electrician or competent person. Before you use the cooker hood, make sure that the voltage (V) and the frequency (Hz) indicated on the cooker hood are exactly the same as the voltage and the frequency in your home.
- The manufacturer and the agent will not bear any responsibility for the damage caused by inappropriate installation and usage.
• Children under the age of 8 must not use the cooker hood. - The appliance is not intended for commercial use, but only for household and similar environments.
- The cooker hood and its filter mesh should be cleaned regularly in order to keep it in good working order.
- Before cleaning, switch the power off at the main supply.
- Clean the cooker hood according to the instruction manual and keep the cooker hood from the danger of burning.
• Prohibit putting the cooker hood by fire. - If the appliance does not function normally, contact the manufacturer or a specialist company.
- This device may be only used by children 8 years old or older and persons with limited physical, sensory and mental capabilities and / or lack of experience and knowledge, provided that they have been instructed in use of the device by a responsible person who understands the associated risks.
- If the supply cord is damaged, it must be replaced by the manufacturer, its service agent or similarly qualified persons in order to avoid a hazard.
- If the range hood is used at the same time as appliances burning gas or other fuels, the room must be adequately ventilated.
- Do not flambé under the range hood. Accessible parts may become hot when used with cooking appliances.
Important hints on installation
- The air must not be discharged into a flue that is used for exhausting fumes from appliances burning gas or other fuels (not applicable to appliances that only discharge the air back into the room).
- Regulations concerning the discharge of air have to be fulfilled.
Important notes about the extraction mode

WARNING
Risk of poisoning from exhaust gases sucked back. Never operate the device in extraction mode simultaneously with an open flue appliance when there is not adequate airflow guaranteed.
Open flue combustion equipment (for example, gas, oil, wood or coal-fired heaters, tankless water heaters, water heaters) pulls combustion air from the room and runs it through an exhaust pipe or chimney to the outside. In the extraction mode, indoor air is removed from the kitchen and the adjacent rooms - without sufficient air intake this creates a vacuum. Toxic gases from the chimney or extraction flue can thereby be sucked back into the living spaces.
• Always ensure that a sufficient supply of fresh air is guaranteed and that the air can circulate.
- An air supply / extractor box alone does not ensure compliance with the limit value.
Safe operation is only possible when the negative pressure in the room where the appliance is located does not exceed 4 Pa (0.04 mbar). This can be achieved when the air required for combustion can flow through openings that are not closable, for example in doors, windows, in conjunction with an air supply / extractor box or through other technical measures. In any case, consult a qualified chimney sweep who can assess the entire ventilation of your house and propose appropriate measures for adequate ventilation.
If the hood is used exclusively in the recirculation mode, unrestricted operation is possible.
Important note on disassembly of the device
- Disassembly is similar to installation/assembly in reverse order.
• Take a second person to help you during disassembly to avoid injuries.
INSTALLATION
Preparation
If you have an outlet to the outside, your cooker hood can be connected as below picture by means of an extraction duct (enamel, aluminium, flexible pipe or inflammable material with an interior diameter of 150mm).
- Before installation, turn the unit off and unplug it from the outlet.
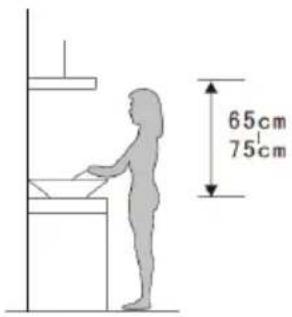
- The cooker hood should be placed at a distance of 65\~75cm above the cooking plane for best effect.
text_image
65cm 75cmInstallation (Vent outside)
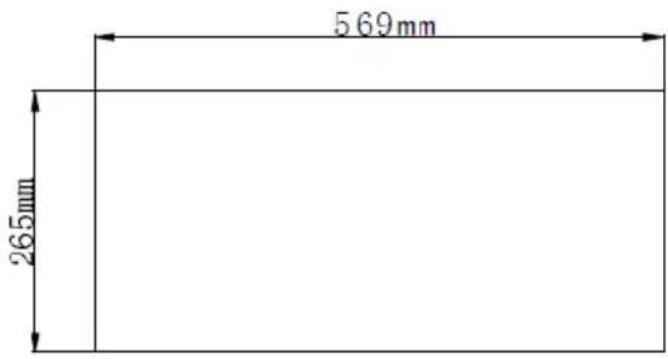
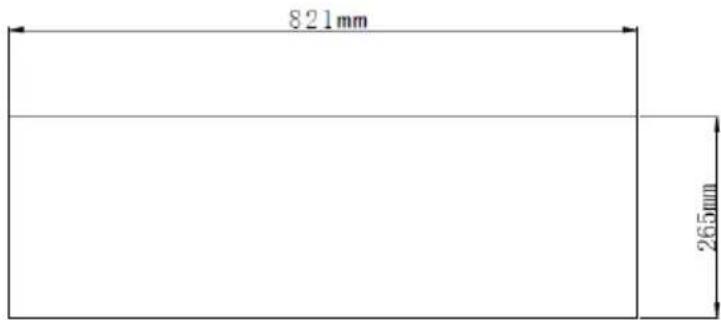
- Drill a hole in the cabinet, with the hole width 569x265(mm) for 60 cm model, 821x265(mm) for 85 cm model. See Figure 1 and 2. Ensure that the distance between the edge of the hole and the edge of the cabinet is at least 35 mm.
text_image
569mm 265mmModel 60 cm (10046372, 10046374)
Figure 1

text_image
821mm 265mmModel 85 cm (10046373, 10046375)
Figure 2
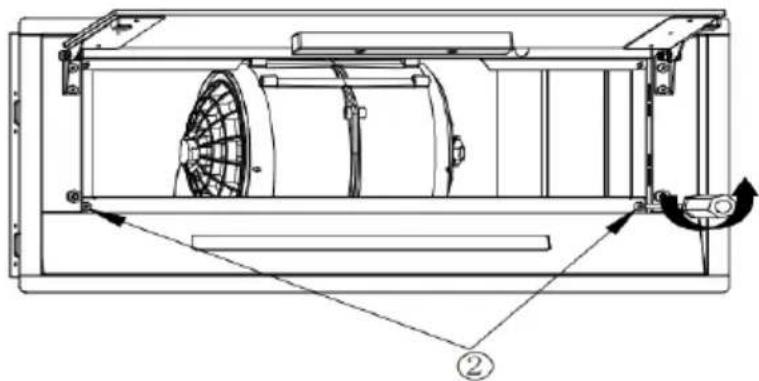
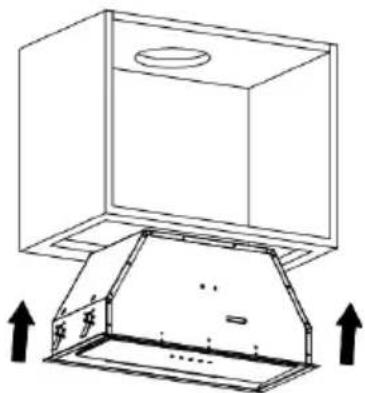
- Remove the aluminium filter, then push the cooker hood into the cabinet and use a screwdriver to tighten the screw so that the cooker hood is fixed. See Figure 3.
natural_image
Technical line drawing of a cabinet with an open lid and upward arrows indicating assembly or installation (no text or symbols)Figure 3
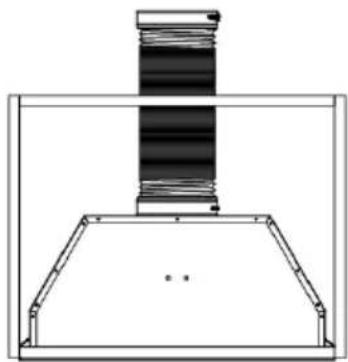
- Install the expansion tube on the outlet and lead it to the outside. Reinstall the aluminium filter. Note: The expansion tube is not included in the product. See Figure 4.
natural_image
Pure technical diagram of a mechanical assembly without any text, numbers, or symbolsFigure 4
Note: When the range hood and appliance supplied with energy other than electricity are simultaneously in operation, the negative pressure in the room must be not exceed 4 Pa ( 4 × 10^-5 Bar).

WARNING
For safety reason, please use only the same size of fixing or mounting screw which are recommended in this instruction manual. Failure to install the screws or fixing device in accordance with these instructions may result in electrical
hazards.
| - + ⓗ | |
 | Power button (on/off) |
| Decrease button | |
 | Increase button |
| Timer button | |
 | Light button (on/off) |
Power on
When the cooker hood is connected to the main power supply, the indicators on all the buttons light up. The LED display is closed, the cooker hood doesn't work and goes into standby mode.
Power button
- Press the (Power) button, the indicator for this button will light up. The hood will operate at low speed, the LED display will show "1" and the light will be on. The indicators for the Decrease, Increase and Lamp buttons will be lit. Press the Power button again, the indicators will go out, the cooker hood functions will be deactivated and the cooker hood will return to standby mode. The above steps can be repeated.
- The Increase and Lamp buttons can be used without pressing the On/Off button. When a particular function button is pressed, the cooker hood operates in that function state, except for the timer function. Pressing the power button in any mode will switch off all functions of the cooker hood.
Lamp button
- Press the (Lamp) button, the lights will come on. The lamp and power button indicators will light up. Press again, the lights go out. The indicator lights of the lamp button and the power button go out. The above steps can be repeated.
Increase button
There are three speeds, including high, medium and low.
- When you press the increase button, the indicator for this button will light up and the cooker hood will start to operate at low speed. The LED display will show "1".
- If you press the increase button again while the cooker hood is running at low speed, the cooker hood will run at medium speed and the LED display will show "2".
- If you press the increase button again when the cooker hood is operating at medium speed, the cooker hood will operate at high speed and the LED display will show "3".
- If you press the increase button again when the cooker hood is operating at high speed, the cooker hood will continue to operate at high speed.
Decrease button
- Press the decrease button to decrease the speed level and the display will show the current working speed. If you press the decrease button at high speed, the cooker hood will operate at medium speed. The indicators for the increase button, decrease button and on/off button light up. If you press the decrease button when working at medium speed, the cooker hood will work at low speed. The backlighting on the increase, the decrease and the power button will remain lit. If the speed is continuously reduced to zero, the cooker hood switches off and the control lights go out.
Timer button
- The timer button is only used for the timer function when the cooker hood is in operation. Pressing the button has no effect when the cooker hood is in standby mode or when the light is opened separately. Press the timer button once, the timer setting is 5 minutes and the indicator light of this button lights up. Press again to cancel the timer function and the indicator light goes out. When the time is up, the cooker hood switches off and the light goes out.
- If the timer is set, the timer will automatically end when the speed is adjusted.
INSTALLING THE FILTERS
Installing the grease mesh filters
To install filters, follow these four steps:
- Angle the filter into the slots at the back of the hood.
- Press the button on the filter handle.
- Release the handle when the filter is in the resting position.
- Repeat to install all filters.
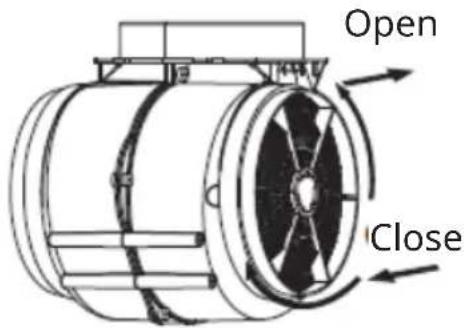
Installing carbon filters
- Disconnect the unit from the mains power supply before installing or replacing the carbon filters.
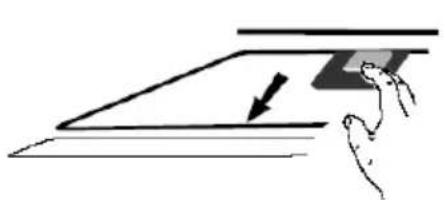
- Press the filter latch and remove the mesh filter.
natural_image
Simple line drawing of a hand pressing down on a flat surface with an arrow indicating downward motion (no text or symbols)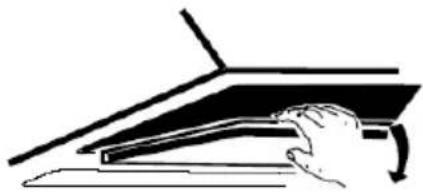
natural_image
Simple line drawing of a hand pressing down on a laptop keyboard (no text or symbols)- Turn the carbon filters on both sides of the engine anti-clockwise. Replace the carbon filters with new carbon filters.
- Replace the mesh filter.
- Connect the power supply to the socket.
text_image
Open CloseCLEANING AND CARE
- Before maintenance or cleaning, the cooker hood must be disconnected from the mains supply. Ensure that the cooker hood is disconnected from the mains supply and that the plug is removed.
- The external surfaces are susceptible to scratches and abrasions, so please follow the cleaning instructions to ensure the best possible result without damage.
- Cleaning and maintenance should be carried out when the appliance is cold, especially when cleaning.
- Avoid leaving alkaline or acidic substances (lemon juice, vinegar, etc.) on the surfaces.
- The stainless steel must be cleaned regularly (e.g. weekly) to ensure a long life expectancy. A special stainless steel cleaning fluid can be used. Ensure that you wipe with the grain of the stainless steel to avoid unsightly cross scratches.
- The inlay control panel can be cleaned with warm soapy water. Ensure that the cloth is clean and well wrung before cleaning. After cleaning, use a dry, soft cloth to remove any excess moisture.
- Use neutral detergents and avoid using harsh cleaning chemicals, strong household detergents or products containing abrasives as these will affect the appearance of the unit and may remove any artwork printed on the control panel and invalidate the manufacturer's warranty.
Monthly Cleaning for grease filter
Clean the filter every month can prevent any risk of fire. The filter collects grease, smoke and dust, so the filter is directly affecting the efficiency of the cooker hood. If not cleaned, the grease residue (potential flammable) will saturate on the filter. The filter can be cleaned by hand. Soak in water with a mild detergent for about 3 minutes, then gently brush with a soft brush. Do not apply too much pressure to avoid damaging the filter (Leave to dry naturally out of direct sunlight).
Filters should be washed separately from crockery and kitchen utensils and it is advisable not to use rinse aid.
Removing the front panel of the hood, to clean or change the grease filter:
- Inspect the front panel of the wall-mounted hood to identify the mechanisms holding it in place. These could be screws, clips, or other fasteners located along the edges or corners of the panel.
- Depending on the type of retaining mechanisms, use the appropriate tools. For screws, you'll need a screwdriver compatible with the screw head type. For clips, a flathead screwdriver or a similar tool may be required for prying them open.
- If there are screws, carefully loosen and remove them by turning them
counter clockwise until they are fully disengaged from the panel. If there are clips, gently pry them open to release the panel.
- Once the retaining mechanisms are loosened or removed, gently pull the front panel away from the hood. Apply even pressure and avoid forcing it to prevent damage to the panel or the hood itself. If the panel is stuck, gently wiggle it back and forth while pulling it away from the hood until it comes free.
- After removing the front panel, set it aside in a safe location where it won't be damaged. Take note of its orientation and any specific instructions for reinstallation.
- With the front panel removed, you now have access to the interior components of the hood for maintenance or repairs. Clean the panel thoroughly if necessary and inspect the interior for any debris or damage that may require attention.
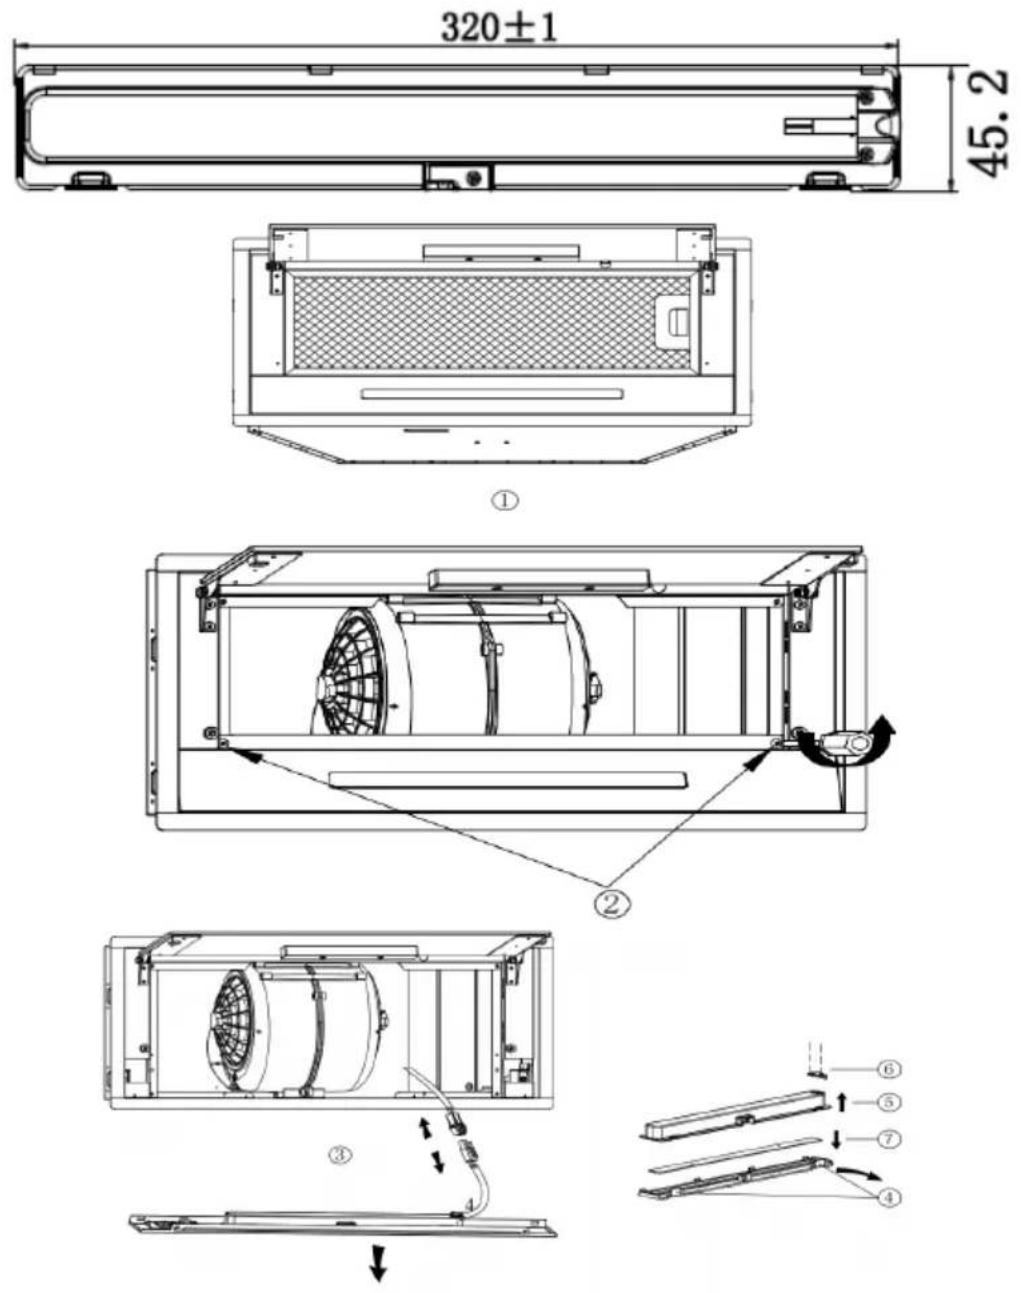
Bulb replacement
- The bulb must be replaced by the manufacturer, its service agent or a similarly qualified person.
- Always switch off the power supply before carrying out any work on the appliance. When handling the lamp, allow it to cool completely before touching it directly.
- When handling globes, use a cloth or gloves to ensure that perspiration does not come into contact with the globe as this may reduce the life of the globe.
Note: Ensure that the appliance is disconnected from the mains supply before replacing lamps. Take precautions against hazards when replacing lamps, such as wearing gloves.
- Open the sliding glass and remove the aluminium filter. See step 1.
- Unscrew 2 ST4*8mm screws from the lamp plate. See step 2.
- Disconnect the terminal of the connecting wire of the light. See step 3.
- Disassemble the light bar: prise off the translucent board, take out the outer case of the light bar upward, unscrew 2pcs ST3x6mm screws of the tension disc, and remove the circuit board. See from step 4 to step 7.
- To reinstall the lamp, follow the reverse procedure.
Note: The ILCOS D code for this lamp is DSS-5/65-S-320/45.2
LED modules: light strip
Max. wattage: 1×3.5 W
Voltage range: DC 12 V
Dimensions
TROUBLESHOOTING
| Fault Possible Cause Solution | ||
| Light on, but motor does not work. | Fan switch turned off. Select a fan switch position. | |
| Fan switch failed. Contact service center. | ||
| Motor failed. Contact service center. | ||
| Light does not work, motor does not work. | Blown house fuses. Reset/Replace fuses. | |
| Power cord loose or disconnected. | Refit cord to power outlet or switch power outlet on. | |
| Oil leakage One way valve | and the outlet are not tightly sealed. | Switch power outlet on. |
| Leakage from the connection of chimney and cover. | Take chimney down and seal. | |
| Lights not working Broken | /Faulty globes. Replace globes as per this instruction. | |
| Insufficient suction The distance between the body and the gas top too big. | Readjust the distance. | |
| The range hood is inclined | The fixing screw is not tight enough. | Tighten the suspension screw and level the hood. |

WARNING
Any electrical repairs to this appliance must conform to your local, state and federal laws. Please contact the service centre if in any doubt before undertaking any of the above. Always disconnect the unit from the power source when opening the
unit
PRODUCT DATA SHEET
Product fiche
Delegated Regulation (EU) 65/2014
Supplier name or trademark Klarstein
Model identifier 10046372
Annual Energy Consumption 11,9 kWh/annum
Energy Efficiency Class A+
Fluid Dynamic Efficiency 18,2
Fluid Dynamic Efficiency class C
Lighting Efficiency 30,2 Lux/W
Lighting Efficiency class A
Grease Filtering Efficiency 65,4%
Grease Filtering Efficiency class D
Air flow (min speed normal use) 209 m³/h
Air flow (max speed normal use) 387 m³/h
Air flow (intensive or boost use) 188 m³/h
Airborne acoustical A-weighted sound power emissions (min speed normal use)
Airborne acoustical A-weighted sound power emissions (max speed normal use)
Airborne acoustical A-weighted sound power emissions (intensive or boost use)
Power consumption in standby mode (W) 0,48 W
53 dB
64 dB
47 dB
Model placed on the Union market from 01/08/2024.

EPREL registration number: 2074371
https://eprel.ec.europa.eu/qr/2074371
Supplier: Chal-Tec GmbH (Authorised representative)
Website:
Customer care service:
Name: Customer service
Website: https://www.elektronik-star.de/lnfo/Impressum/
Email: info@electronic-star.de
Phone: +49303001385500
Address:
Wallstraße 16
10179 berlin
Germany
Product fiche
| Delegated Regulation (EU) 65/2014 | |
| Supplier name or trademark Klarstein | |
| Model identifier 10046373 | |
| Annual Energy Consumption 11,9 kWh/annum | |
| Energy Efficiency Class A+ | |
| Fluid Dynamic Efficiency 18,2 | |
| Fluid Dynamic Efficiency class C | |
| Lighting Efficiency 30,2 Lux/W | |
| Lighting Efficiency class A | |
| Grease Filtering Efficiency 65,4 % | |
| Grease Filtering Efficiency class D | |
| Air flow (min speed normal use) 209 m3/h | |
| Air flow (max speed normal use) 387 m3/h | |
| Air flow (intensive or boost use) 188 m3/h | |
| Airborne acoustical A-weighted sound power emissions (min speed normal use) | 53 dB |
| Airborne acoustical A-weighted sound power emissions (max speed normal use) | 64 dB |
| Airborne acoustical A-weighted sound power emissions (intensive or boost use) | 47 dB |
| Power consumption in standby mode (W) 0,48 W | |
Model placed on the Union market from 01/08/2024.

EPREL registration number: 2074432
https://eprel.ec.europa.eu/qr/2074432
Supplier: Chal-Tec GmbH (Authorised representative)
Website:
Customer care service:
Name: Customer service
Website: https://www.elektronik-star.de/lnfo/Impressum/
Email: info@electronic-star.de
Phone: +49303001385500
Address:
Wallstraße 16
10179 berlin
Germany
Product fiche
Delegated Regulation (EU) 65/2014
Supplier name or trademark Klarstein
Model identifier 10046374
Annual Energy Consumption 11,9 kWh/annum
Energy Efficiency Class A+
Fluid Dynamic Efficiency 18,2
Fluid Dynamic Efficiency class C
Lighting Efficiency 30,2 Lux/W
Lighting Efficiency class A
Grease Filtering Efficiency 65,4%
Grease Filtering Efficiency class D
Air flow (min speed normal use) 209 m³/h
Air flow (max speed normal use) 387 m³/h
Air flow (intensive or boost use) 188 m³/h
Airborne acoustical A-weighted sound power emissions (min speed normal use) 53 dB
Airborne acoustical A-weighted sound power emissions (max speed normal use) 64 dB
Airborne acoustical A-weighted sound power emissions (intensive or boost use) 47 dB
Power consumption in standby mode (W) 0,48 W
Model placed on the Union market from 01/08/2024.

EPREL registration number: 2074402
https://eprel.ec.europa.eu/qr/2074402
Supplier: Chal-Tec GmbH (Authorised representative)
Website:
Customer care service:
Name: Customer service
Website: https://www.elektronik-star.de/lnfo/Impressum/
Email: info@electronic-star.de
Phone: +49303001385500
Address:
Wallstraße 16
10179 berlin
Germany
Product fiche
| Delegated Regulation (EU) 65/2014 | |
| Supplier name or trademark Klarstein | |
| Model identifier 10046375 | |
| Annual Energy Consumption 11,9 kWh/annum | |
| Energy Efficiency Class A+ | |
| Fluid Dynamic Efficiency 18,2 | |
| Fluid Dynamic Efficiency class C | |
| Lighting Efficiency 30,2 Lux/W | |
| Lighting Efficiency class A | |
| Grease Filtering Efficiency 65,4 % | |
| Grease Filtering Efficiency class D | |
| Air flow (min speed normal use) 209 m3/h | |
| Air flow (max speed normal use) 387 m3/h | |
| Air flow (intensive or boost use) 188 m3/h | |
| Airborne acoustical A-weighted sound power emissions (min speed normal use) | 53 dB |
| Airborne acoustical A-weighted sound power emissions (max speed normal use) | 64 dB |
| Airborne acoustical A-weighted sound power emissions (intensive or boost use) | 47 dB |
| Power consumption in standby mode (W) 0,48 W | |
Model placed on the Union market from 01/08/2024.

EPREL registration number: 2074444
https://eprel.ec.europa.eu/qr/2074444
Supplier: Chal-Tec GmbH (Authorised representative)
Website:
Customer care service:
Name: Customer service
Website: https://www.elektronik-star.de/lnfo/Impressum/
Email: info@electronic-star.de
Phone: +49303001385500
Address:
Wallstraße 16
10179 berlin
Germany
NOTES ON ENVIRONMENTAL PROTECTION
- During cooking, make sure that there is sufficient air supply so that the cooker hood can operate efficiently and with low operating noise.
- Adjust the fan speed to the amount of steam produced during cooking. Use the intensive mode only when necessary. The lower the fan speed, the less energy is consumed.
- If large amounts of steam are produced during cooking, select a higher fan speed in good time. If the cooking steam has already dispersed in the kitchen, the cooker hood must be operated longer.
- Switch off the cooker hood when you no longer need it.
- Switch off the lighting when you no longer need it.
- Clean the filter at regular intervals and replace it if necessary to increase the effectiveness of the ventilation system and prevent fire hazards.
- Always put the lid on when cooking to reduce cooking steam and condensation.
DISPOSAL CONSIDERATIONS
natural_image
Symbol of a trash bin crossed with a diagonal line, no text or numbers presentIf there is a legal regulation for the disposal of electrical and electronic devices in your country, this symbol on the product or on the packaging indicates that this product must not be disposed of with household waste. Instead, it must be taken to a collection point for the recycling of electrical and electronic equipment. By disposing of it in accordance with the rules, you are protecting the environment and the health of your fellow human beings from negative consequences. For information about the recycling and disposal of this product, please contact your local authority or your household waste disposal service.
MANUFACTURER & IMPORTER (UK)
Manufacturer:
Chal-Tec GmbH, Wallstrasse 16, 10179 Berlin, Germany.
Importer for Great Britain:
Berlin Brands Group UK Limited
PO Box 42
272 Kensington High Street
London, W8 6ND
United Kingdom
Estimado cliente:
text_image
QR code image containing encoded data, no visible human-readable textÍNDICE
text_image
569mm 265mmModelo 60 cm (10046372, 10046374)
Figura 1

text_image
821mm 265mmModelo 85 cm (10046373, 10046375)
Figura 2
natural_image
Technical line drawing of a cabinet with an open lid and upward arrows indicating assembly or installation (no text or symbols)Figura 3
natural_image
Pure technical diagram of a mechanical assembly without any text, numbers, or symbolsFigura 4
natural_image
Simple line drawing of a hand holding a rectangular object with an arrow, no text or symbols present
natural_image
Illustration of a hand pressing down on a laptop keyboard (no text or symbols visible)natural_image
Symbol of a trash bin with crossed x and y axes, no text or labels presentBerlin Brands Group UK Limited
PO Box 42
272 Kensington High Street
London, W8 6ND
United Kingdom
Chère cliente, cher client,
text_image
QR code image containing encoded data, no visible human-readable textSOMMAIRE
text_image
569mm 265mmModèle 60 cm (10046372, 10046374)
Figure 1
text_image
821mm 265mmModèle 85 cm (10046373, 10046375)
Figure 2
natural_image
Technical line drawing of a cabinet or enclosure with an open lid and upward arrows indicating motion (no text or symbols)Figure 3
natural_image
Pure technical diagram of a mechanical assembly without any text, numbers, or symbolsFigure 4
natural_image
Simple line drawing of a hand pressing down on a flat surface with an arrow indicating direction (no text or symbols)
natural_image
Illustration of a hand pressing down on a laptop keyboard (no text or symbols visible)text_image
Open Fermer CloseNETTOYAGE ET ENTRETIEN
Nom: Customer service
Site web: https://www.elektronik-star.de/lnfo/Impressum/
Courriel: info@electronic-star.de
Téléphone: +49303001385500
Adresse:
Wallstraße 16
10179 berlin
Allemagne
Fiche de produit
Nom: Customer service
Site web: https://www.elektronik-star.de/lnfo/Impressum/
Courriel: info@electronic-star.de
Téléphone: +49303001385500
Adresse:
Wallstraße 16
10179 berlin
Allemagne
Fiche de produit
Nom: Customer service
Site web: https://www.elektronik-star.de/lnfo/Impressum/
Courriel: info@electronic-star.de
Téléphone: +49303001385500
Adresse:
Wallstraße 16
10179 berlin
Allemagne
Fiche de produit
Nom: Customer service
Site web: https://www.elektronik-star.de/lnfo/Impressum/
Courriel: info@electronic-star.de
Téléphone: +49303001385500
Adresse:
Wallstraße 16
10179 berlin
Allemagne
REMARQUES SUR LA PROTECTION DE L'ENVIRONNEMENT
natural_image
Symbol of a trash bin with crossed lines indicating no waste, and a solid black rectangle below (no text or labels)Berlin Brands Group UK Limited
PO Box 42
272 Kensington High Street
London, W8 6ND
United Kingdom
Gentile cliente,
text_image
QR code image containing encoded data, no visible human-readable textINDICE
text_image
569mm 265mmModello da 60 cm (10046372, 10046374)
Immagine 1
text_image
821mm 265mmModello da 85 cm (10046373, 10046375)
Immagine 2
natural_image
Technical line drawing of a cabinet or enclosure with an open lid and upward arrows indicating motion (no text or symbols)Immagine 3
natural_image
Pure technical diagram of a mechanical assembly without any text, numbers, or symbolsImmagine 4
natural_image
Simple line drawing of a hand pressing down on a flat surface with an arrow indicating downward motion (no text or symbols)
natural_image
Illustration of a hand pressing down on a flat surface with a curved arrow indicating motion (no text or symbols)Nome: Customer service
Sito web: https://www.elektronik-star.de/lnfo/Impressum/
E-mail: info@electronic-star.de
Nome: Customer service
Sito web: https://www.elektronik-star.de/lnfo/Impressum/
E-mail: info@electronic-star.de
Nome: Customer service
E-mail: info@electronic-star.de
Indirizzo:
Wallstraße 16
10179 berlin
Germania
https://eprel.ec.europa.eu/qr/2074402
Sito web:
Sito web: https://www.elektronik-star.de/lnfo/Impressum/
Nome: Customer service
Sito web: https://www.elektronik-star.de/lnfo/Impressum/
E-mail: info@electronic-star.de
natural_image
Symbol of a trash bin with crossed lines indicating no waste or discharge, and a solid rectangle below (no text or labels)Berlin Brands Group UK Limited
PO Box 42
272 Kensington High Street
London, W8 6ND
United Kingdom

area
| Category | Value | | -------- | ----- | | A | 100 | | B | 100 | | C | 100 | | D | 100 | | E | 100 | | F | 100 | | G | 100 | | H | 100 | | I | 100 | | J | 100 | | K | 100 | | L | 100 | | M | 100 | | N | 100 | | O | 100 | | P | 100 | | Q | 100 | | R | 100 | | S | 100 | | T | 100 | | U | 100 | | V | 100 | | W | 100 | | X | 100 | | Y | 100 | | Z | 100 |