USER MANUAL LX790i LANDXCAPE
natural_image
Close-up of a mechanical component with two labeled parts (20 and 21), no visible text or symbols on the main body.
EN The picture is only for reference
D Die Abbildung dient nur als Referenz
F L'illustration est fournie à titre indicatif uniquement
I L'immagine è a scopo esemplificativo
ES La imagen es solo de referencia
NL De afbeelding dient alleen ter referentie
PL Rysunek jedynie dla celów referencyjnych
natural_image
Top-down architectural layout diagram showing a central house surrounded by furniture and plants (no text or symbols)
A

natural_image
Close-up of a black BL-MOTOR camera with control panel and display screen, showing a close-up of the lens (no text or symbols on device body)
B
natural_image
Illustration of a robotic arm with sensor waves, positioned above a keyboard and a small vehicle (no text or symbols)
C

natural_image
Solid dark gray rectangular shape with a diagonal light edge on the right (no text or symbols)
natural_image
Close-up of a black robotic vacuum cleaner with a dial and control knob, showing no visible text or symbols.
D
text_image
IDLE
START HOME OK
E1

text_image
IdLE
START HOME OK
E2F
natural_image
Close-up of a black manual lawn mower with a circular dial showing 50 mm and 40 mm, no visible text or symbols on the device itself.
natural_image
Exterior view of a wooden fence with a black X-marked line crossing the ground (no text or symbols)
natural_image
Close-up of a vehicle rear bumper with a black arrow pointing to a specific area (no text or symbols visible)
G
H

natural_image
Solid dark gray rectangular shape with no text, symbols, or discernible features.
natural_image
Close-up of a transparent plastic mechanical component with two black arrows pointing to its side (no text or symbols visible)
-
natural_image
Close-up of a mechanical clamp or tool with a black arrow pointing to a component, no visible text or symbols.
J1
natural_image
Close-up of a transparent plastic electrical connector with two wires inserted (no visible text or symbols)
J2
natural_image
Two views of a device showing internal components with numbered annotations (13), no readable text or symbols present.
K1
text_image
USB
START HOME OK
K2
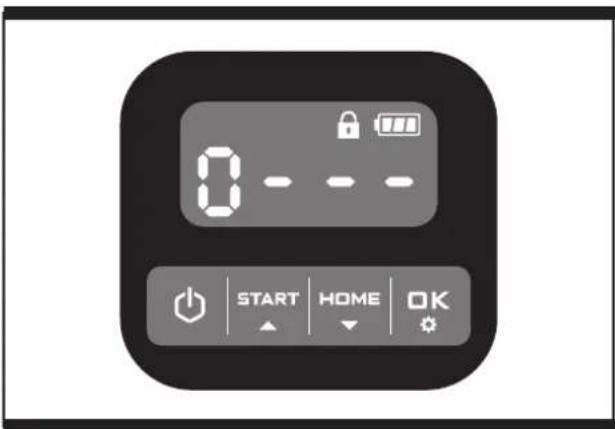
text_image
0
START HOME OK
K3
natural_image
Simple diagram with two labeled regions (1 and 2) and a central white circle, no text or symbols present.
L
natural_image
Close-up of a mechanical device's internal components, showing a central hub and mounting holes (no visible text or symbols)
M
natural_image
Black and white photo of a robotic vacuum cleaner with a brush and spray applicator (no visible text or symbols)
N
natural_image
Top-down view of a mechanical device showing internal components and a cross symbol (no text or labels)
01
natural_image
Cross-sectional diagram of a mechanical device showing internal components and a checkmark (no text or symbols)
02
natural_image
Black industrial vacuum cleaner with control panel and attached arm (no visible text or symbols)
P

natural_image
Solid dark gray rectangular shape with no text, symbols, or discernible features.
natural_image
Close-up of a camera body with screwdriver and numbered component (no text or symbols visible)
Q1
text_image
Technical diagram showing a mechanical component with labeled parts and an inset close-up view of a cable or wire assembly.
Q2
natural_image
Close-up of a car engine compartment with a magnified inset showing internal components (no text or symbols visible)
Q3
natural_image
Close-up of a mechanical component with a magnified inset showing internal wiring (no text or symbols visible)
Q4
natural_image
Interior view of a vehicle chassis showing internal components and wiring (no text or symbols visible)
05
Users can view the electronic instructions at https://landxcape-robotics.com.
1. Product Safety
1.1 General & Additional Safety Instruction
WARNING: Read all safety warnings and all instructions. Failure to follow the warnings and instructions may result in electric shock, fire and/or serious injury.
Carefully read the instructions for the safe operation of the machine.
Save all warnings and instructions for future reference.
- This appliance is not intended for use by persons (including children) with reduced physical, sensory or mental capabilities, or lack of experience and knowledge, unless they have been given supervision or instruction concerning use of the appliance by a person responsible for their safety.
- Children should be supervised to ensure that they do not play with the appliance.
- This appliance contains batteries that are only replaceable by skilled persons.
WARNING: For the purposes of recharging the battery, only use the detachable supply unit provided with this appliance.
IMPORTANT READ CAREFULLY BEFORE USE KEEP FOR FUTURE REFERENCE
SAFE OPERATION PRACTICES Training
a) Read the instructions carefully. Make sure you understand the instructions and be familiar with the controls and the proper use of the appliance.
b) Never allow people unfamiliar with these instructions or children to use the appliance. Local regulations can restrict the age of the operator.
c) The operator or user is responsible for accidents or hazards occurring to other people or their property.
Preparation
a) Ensure the correct installation of the boundary
wire as instructed.
b) Periodically inspect the area where the appliance is to be used and remove all stones, sticks, wires, bones, and other foreign objects.
c) Periodically visually inspect to see that the blades, blade bolts and cutter assembly are not worn or damaged. Replace worn or damaged blades and bolts in sets to preserve balance.
d) On multi-spindle appliances, take care as rotating one blade can cause other blades to rotate.
e) WARNING! The lawnmower shall not be operated without the guard in place.
OPERATION
1. GENERAL
a) Never operate the appliance with defective guards, or without safety devices, for example deflectors, in place.
b) Do not put hands or feet near or under rotating parts. Keep clear of the discharge opening at all times.
c) Never pick up or carry an appliance while the motor is running.
d) Operate the disabling device from the appliance:
- Before clearing a blockage;
- Before checking, cleaning or working on the appliance;
- After striking a foreign object to inspect the machine for damage;
- If the machine starts to vibrate abnormally, and to check for damage before restarting.
e) It is not permitted to modify the original design of robotic lawnmower. All modifications are made at your own risk.
f) Start robotic lawnmower according to the instructions. When the power key is switched on, make sure you keep your hands and feet away from the rotating blades. Never put your hands and feet under the mower.
g) Never lift up robotic lawnmower or carry it when the power key is switched on.
h) Do not let persons who do not know how robotic lawnmower works and behaves use the mower.
i) Do not put anything on top of robotic lawnmower or its charging station.
j) Do not allow robotic lawnmower to be used with a defective blade disc or body. Neither should it be used with defective blades, screws, nuts or
cables.
k) Always switch off robotic lawnmower when you do not intend to use the mower. Robotic lawnmower can only start when the power key is switched on and the correct PIN code has been entered.
I) Keep your hands and feet away from the rotating blades. Never place your hands or feet close to or under the body when robotic lawnmower is in operation.
m) To avoid using the machine and its peripherals in bad weather conditions especially when there is a risk of lightning.
n) Not to touch moving hazardous parts before these have come to a complete stop.
o) For machines used in public areas, that warning signs shall be placed around the working area of the machine. They shall show the substance of the following text:

WARNING! Automatic lawnmower! Keep away from the machine! Supervise children!
p) To avoid the risk of injury, please stop the mower and carry out the mower to another lawn to be mowed. Never drag or pull the mower on operation when you change the lawn to be mowed.
2. ADDITIONALLY WHEN THE APPLIANCE IS OPERATING AUTOMATICALLY
a) Do not leave the machine to operate unattended if you know that there are pets, children or people in the vicinity.
MAINTENANCE AND STORAGE
When the mower is turned upside down the power key must always be switched off.
The power key should be switched off during all work on the mower's underframe, such as cleaning or replacing the blades.
a) Keep all nuts, bolts and screws tight to be sure the appliance is in safe working condition.
b) Inspect the robotic lawnmower each week and replace worn or damaged parts for safety.
c) Check especially that the blades and blade disc are not damaged. Replace all blades and screws at the same time if necessary so that the rotating parts are balanced.
d) Ensure that only replacement cutting means of
the right type are used.
e) Ensure that batteries are charged using the correct charger recommended by the manufacturer. Incorrect use may result in electric shock, overheating or leakage of corrosive liquid from the battery.
f) In the event of leakage of electrolyte flush with water/neutralizing agent, seek medical help if it comes into contact with the eyes etc.
g) Servicing of the appliance should be according to manufacturers' instructions.
Recommendation
To connect the machine and/or its peripherals only to a supply circuit protected by a residual current device (RCD) with a tripping current of not more than 30 mA.
Residual risks
To avoid injuries, wear protective gloves when replacing the blades.
Transport
The original packaging should be used when transporting robotic lawnmower over long distances. To safely move from or within the working area:
a) Press the STOP button to stop the mower.
You select the four digit PIN code when you start the mower for the first time.
b) Always switch off robotic lawnmower if you intend to carry the mower.
c) Carry the mower by the handle at the front under the mower. Carry the mower with the blade disc away from the body.
RF exposure requirements
To satisfy RF exposure requirements, a separation distance of 200mm or more should be maintained between this device and persons during device operation.
To ensure compliance, operations at closer than this distance is not recommended. The antenna used for this transmitter must not be co-located in conjunction with any other antenna or transmitter.
This is a class III appliances and it must only be supplied at safety extra low voltage corresponding to the marking on the appliance.
Safety Warnings for battery pack inside the tool
a) Do not dismantle, open or shred battery pack.
b) Do not short-circuit a battery pack. Do not store battery packs haphazardly in a box or drawer where they may short-circuit each other or be short-circuited by conductive materials. When battery pack is not in use, keep it away from other metal objects, like paper clips, coins, keys, nails, screws or other small metal objects, that can make a connection from one terminal to another. Shorting the battery terminals together may cause burns or a fire.
c) Do not expose battery pack to heat or fire. Avoid storage in direct sunlight.
d) Do not subject battery pack to mechanical shock.
e) In the event of battery leaking, do not allow the liquid to come into contact with the skin or eyes. If contact has been made, wash the affected area with copious amounts of water and seek medical advice.
f) Keep battery pack clean and dry.
g) Recharge only with the charger specified by Landscape™. Do not use any charger other than that specifically provided for use with the equipment.
h) Do not use any battery pack which is not designed for use with the equipment.
i) Keep battery pack out of the reach of children.
j) Retain the original product literature for future reference.
k) Dispose of properly.
I) Do not mix cells of different manufacture, capacity, size or type within a device.
m) Keep the battery away from microwaves and high pressure.
n) Warning! Do not use non-rechargeable batteries.
User manual requirements for wireless product
a) Operation of this device is subject to the following two conditions:
(1) This device may not cause harmful interference, and
(2) this device must accept any interference received, including interference that may cause undesired operation.
b) Caution: Changes or modifications to this unit not expressly approved by the party responsible for compliance could void the user's authority to operate the equipment.
c) NOTE: This equipment generates, uses and can radiate radio frequency energy and, if not installed and used in accordance with the instructions, may cause harmful interference to radio communications. However, there is no guarantee that interference will not occur in a particular installation. If this equipment does cause harmful interference to radio or television reception, which can be determined by turning the equipment off and on, the user is encouraged to try to correct the interference by one or more of the following measures:
- Reorient or relocate the receiving antenna.
- Increase the separation between the equipment and receiver.
- Connect the equipment into an outlet on a circuit different from that to which the receiver is connected.
- Consult the dealer or an experienced radio/TV technician for help.

WARNING - Robotic lawnmower can be dangerous if incorrectly used.
Read through the Operator's manual carefully and understand the content before using your robotic lawnmower.

WARNING - Keep a safe distance from the machine when operating.
WARNING – Operate the disabling device before working on or lifting the machine.

WARNING - Do not ride on the machine.

Do not burn

Batteries may enter water cycle if disposed improperly, which can be hazardous for ecosystem. Do not dispose of waste batteries as unsorted municipal waste.

Li-Ion battery. This product has been marked with a symbol relating to ‘separate collection’ for all battery packs and battery pack. It will then be recycled or dismantled in order to reduce the impact on the environment. Battery packs can be hazardous for the environment and for human health since they contain hazardous substances.

Do not wash the machine with a high pressure washer

Class III appliance

Waste electrical products must not be disposed of with household waste. Please recycle where facilities exist. Check with your local authorities or retailer for recycling advice.

Read operator's manual


Detachable supply unit
2. Component List
- STOP BUTTON
- CUTTING HEIGHT ADJUSTMENT KNOB
- ON/OFF KEY
- START KEY
- HOME BUTTON
- DISPLAY
- CHARGING STRIPS
- RAIN SENSOR*
- FRONT WHEEL
- BLADE TURNING DISC
- CUTTING BLADE
- BATTERY PACK (SEE FIG. Q1)**
- USB PORT (SEE FIG. K1)**
- REAR DRIVING WHEEL
- HANDLE
- CONTACT PINS
- CHARGING BASE
- POWER ADAPTER
- WIRE PEGS
- BOUNDARY WIRE
- CHARGING BASE FIXING NAILS
- BOUNDARY WIRE DISTANCE GAUGE
- HEX KEY
- CONNECTOR*
- ULTRASONIC SENSOR*
*Not all the accessories illustrated or described are included in standard delivery. Refer to the Technical Data & Declaration of Conformity to review the options that are included with various product models.
**For different models, components' positions will be different.
Intended Use
The garden product is intended for domestic lawn mowing. It is designed to mow often, maintaining a healthier and better looking lawn than ever before. Depending on the size of your lawn, your Landscape™ may be programmed to operate at any time or frequency. It is impossible for digging, sweeping or snow cleaning.
3. Control panel

text_image
Wi-Fi
Working time
START
Starts mowing/
Selects up
POWER ON/OFF
Turns Landxcape™ on
and off
DISABLING DEVICE
Prevents operation of Landxcape™
HOME
Sends Landxcape™ to its charging base during operation with the blades rotating to cut grass on the way home and activates charging/Selects down
LOCK
BATTERY CAPACITY
DISPLAY
Displays the state of your setting
OK
Confirms any setting/Enters Wi-Fi connection mode
STOP
Stops Landxcape™ during operation
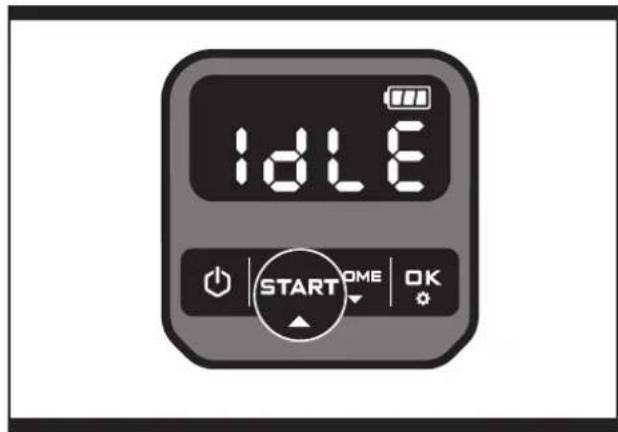
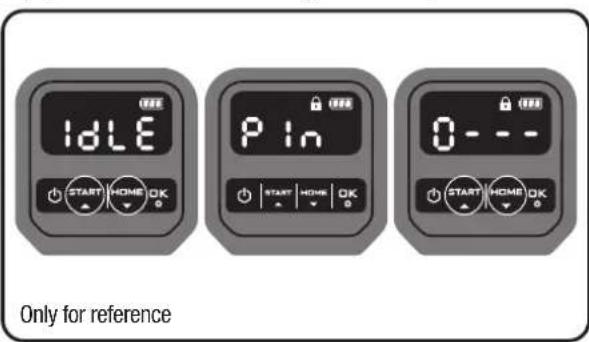
IDLE
STANDBY PAGE:
Landxcape ^TM is not in the
working hours.
Start
1) After the boundary wire installation, you can start using Landxcape ^TM (Please refer to Installation Guide for boundary wire installation).
2) Press ⏻ until Landxcape™ turns on. For the first use, input the default PIN code 0000 by pressing four times when the number 0 is blinking. (The PIN code can be changed, please refer to "4.3 Setting").
NOTE: Landxcape™ will turn off if it does not receive any input within 30 seconds after it is turned on. If you enter wrong PIN code three times, Landxcape™ will raise the alarm "di-di" and then turn off.
3) Press START, then press ETC start mowing.
4) Press home then make Landxcape ^TM go to the charging base, with the blades rotating to cut grass on the way home. Landxcape ^TM will work continuously until reaching low battery power level and then it will return to the charging base. Once charging is complete, Landxcape ^TM will automatically resume mowing or it stay in the charging base according to the mowing schedule.
NOTE: When Landxcape™ turns on, all lights on the display will be illuminated and then turn off. Check if there is any light damaged. It is recommended to shield the display with your hand when the outdoor light gets too strong.
4. Understanding Your Landxcape™
Congratulations on your new purchase of Landscape™ and welcome to the care-free life of automatic mowing. In the following, we want to help you to better understand how your Landscape™ thinks.

natural_image
Top-down architectural rendering of a simple garden layout with a small house, pathways, and surrounding vegetation (no text or symbols)
4.1 How does my Landxcape™ know what to mow?
Landxcape™ chooses its direction at random. It will make sure your entire lawn is evenly mowed without leaving unattractive mowing paths (See Fig. A).
4.2 How does my Landxcape™ know where to go?
Your Landxcape ^™ is made to work on its own. Landxcape ^™ knows when it needs to go to its charging base to charge, can sense when it is raining, can stop itself if it senses a problem, and knows to stop, draw back, and turn around when it bumps into something blocking its path. Landxcape ^™ will also automatically stop its blade turning disc from rotating if it is lifted off the ground to prevent an accident.
A. Finding the Charging Base
When your Landxcape™ needs to recharge, it will stop mowing and follow the boundary wire in an anti-clockwise direction back to its charging base. Landxcape™ is pre-programmed to mow the grass near the boundary wire twice a week. By default, Landxcape™ will mow near the boundary wire every Monday and Friday after it is powered on. If you don't want to enable boundary cut, deactivate it via your smartphone.
B. Rain sensors
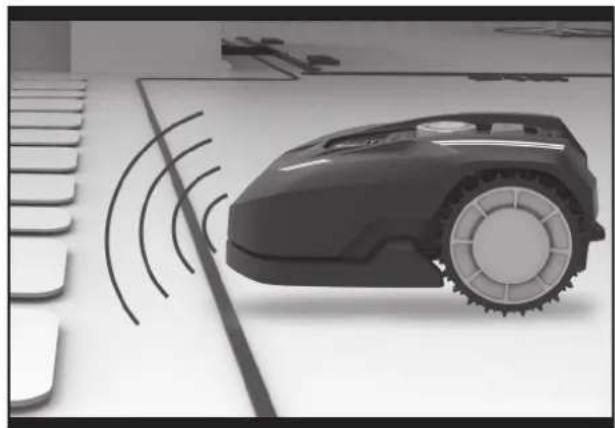
Landxcape ^™ is equipped with a rain sensor which detects rain and tells Landxcape ^™ to stop mowing and follow the boundary wire back to its charging base (See Fig. B).
Landxcape™ will resume mowing after passing the delay time. The default delay time is 180mins. The delay time setting can be changed via Landxcape™ App.
When the rain sensors are wet, Landxcape ^™ returns to its charging base. When the rain sensors are dry, Landxcape ^™ will begin the delay time countdown. If you want to exit from the rain delay, dry the sensor area, and perform a power cycle by operating the on/off key. After the power cycle has been performed, you can operate again. Or you can activate or deactivate the rain delay by using mobile App.
C. Sensing the boundary wire
Landxcape™ always obeys the border set by the boundary wire and uses sensors at its front to detect it. (See Fig. C)
D. Starting and stopping while mowing (See Fig. D, E1, E2)
To start mowing, press the on/off key and input the PIN code. Press START , then press OK you would like Landscape™ to stop mowing, simply press the STOP button on top of the mower.
If Landxcape ^™ senses something is wrong, it will display a fault message on the display. For information on these messages, refer to the Error Messages. Landxcape ^™ will turn off if it does not receive any input from the user within 20 minutes.
To resume:
- Press START, then pre
- Now Landxcape ^TM will begin to mow!
4.3 Setting
First please set the height to a desired grass level after cut (manually). And you can do the program setting manually or using mobile App.
NOTE: When doing the program setting manually, Landxcape™ will enter the standby page if it does not receive any input from the user within 30 seconds.
(1) Change PIN code
To change the PIN code, keep pressing both button buttons at the same time for 5 seconds. The icon I be blinking, and "Old Pin" will be rolling flashing. After that, the first number will be blinking, use or input the old PIN code and press to firm. The next number will be blinking. Use the same method to complete other numbers. Then, "Pin!" will be rolling flashing, the first number will be blinking and use to act the number you want and press to confirm. The next number will be blinking. Use the same method to complete other numbers. For example, the new PIN code is set to be 0326. After that, "Pin2" will be rolling flashing and the first number will be blinking again. Use the same method to input the new PIN code you set just now (in this example, then) will be rolling flashing on the display. Your PIN code has been changed successfully.
text_image
IDLE
P In
0 - - -
START HOME OK
START HOME OK
START HOME OK
Only for reference
[2] Set year, date and time
Set year, date and time are compulsory setting items. If you don't set these items, it will influence the schedule time in the following setting. These items should be set in the order of year, date and time. For the year setting, keep pressing 3 seconds until the icon and number are blinking on the display, for example, 2. Use 8 or to START HOME select the year you want. Then press confirm to finish the year setting.
![LANDXCAPE LX790i - [2] Set year, date and time - 1](/content/2026/04/732074/images/9872633e3a75e4ecdce41716d36585b05913b6b08e18f324cc7d982db8e5de7f.jpg)
Only for reference
![LANDXCAPE LX790i - [2] Set year, date and time - 2](/content/2026/04/732074/images/8e33d03b1e0d49297591eabd9be46d3bba2e466cfccd7e4893c17f1155dc3d61.jpg)
Meanwhile, the icon 📁 will be flashing again and a number will be displayed to indicate the date, for example, 📁 meaning September 29. When 📁 is flashing, use on 📄 set 📋 the number and press OK to confirm. Then 📁 will be flashing. Use the same method to select the number and press 📁 confirm to finish the date setting.
![LANDXCAPE LX790i - [2] Set year, date and time - 3](/content/2026/04/732074/images/db9e90ca20ba656792e5d39c8261a115384bebeb3a934251cca4436868af63ed.jpg)
text_image
09.29
START HOME OK
Only for reference
Meanwhile, the icon 📁 will be flashing and the time will be displayed, for example, 📋 when is blinking, use or to the 'test' function the number and press confirm. Then will be blinking, use the same method to select the number and press confirm. Now the time setting is completed and Landscape™ will enter the standby page.
![LANDXCAPE LX790i - [2] Set year, date and time - 4](/content/2026/04/732074/images/31f6bb9f1764290693f0255300c56bc436b535c970f6188684311aaca30a6769.jpg)
text_image
14:08
START HOME OK
Only for reference
![LANDXCAPE LX790i - [2] Set year, date and time - 5](/content/2026/04/732074/images/51cb3c44de49cfa6e333f8bb003e663b529cc3af5ea9dca5f8a2a2c6e24bc210.jpg)
text_image
IDLE
START HOME OK
Standby page
[3] Default working schedule
The default working time of Landxcape ^™ can be found in following table:
SCHEDULE
| AREA (m2) | SUNDAY | MONDAY | TUESDAY | WEDNESDAY | THURSDAY | FRIDAY | SATURDAY |
| 50 | / | / | work | / | / | work | / |
| 100 | / | / | work | / | / | work | / |
| 150 | / | work | / | work | / | work | / |
| 200 | / | work | work | work | work | work | / |
| 300 | / | work | work | work | work | work | / |
| 400 | / | work | work | work | work | work | / |
| 500 | / | work | work | work | work | work | / |
| 600 | / | work | work | work | work | work | / |
| 700 | / | work | work | work | work | work | / |
| 800 | / | work | work | work | work | work | / |
| 900 | / | work | work | work | work | work | / |
| 1000 | / | work | work | work | work | work | / |
(4) Set work area
Keep pressing 3 seconds. When the icon is linking, press . A number will be blinking on the display, for example, 8 50 , which is the lawn area. The working time will be automatically set according to the size of your garden. Use 977 to the lawn area, and press to confirm. Then Landscape ^TM will enter the standby page.

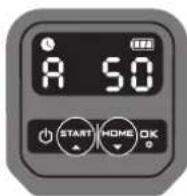
Only for reference
(5) Change default start time
The default start time of 9:00 can be changed to anytime. First, keep pressing both 📄 and 📋 buttons at the same time until the hour time is blinking. Then, press 📋 to 📋 the hour time and press 📋 to confirm. Now, the minute time is blinking. Press 📋 to 📋 set the minute time and press 📋 confirm. The start time setting is completed.
For example, set the time to 14:08, and your Landscape™ will start mowing from 14:08.


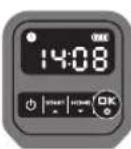

Only for reference
4.4 How efficiently will my Landxcape™ mow the grass?
Mowing times are different for every lawn depending on the factors mentioned below. Gradually adjust the time you allow Landxcape ^™ to mow each day until you find the most suitable setting.
Your Landxcape ^™ is capable of mowing areas of different sizes, although this depends on various factors, such as:
• Species of grass in your lawn and its growth rate
• Sharpness of the cutting blades
- Humidity
• Surrounding temperature
• Amount of obstacles in your Lawn
Unlike most other mowers, Landxcape™ uses a side charging system, which is able to cut the surrounding grass as much as possible. The holes on the bottom of the charging base allow the grass to grow through the base to help disguise it and create an elegant appearance.
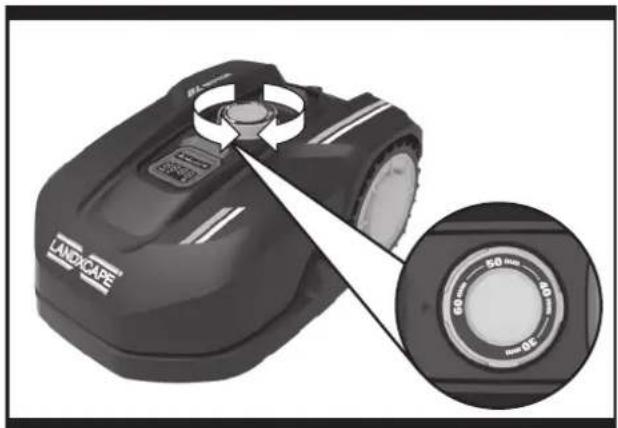
Landxcape™'s cutting height can be adjusted (refer to the Technical Data & Declaration of Conformity for specific cutting height range). Before
starting your Landscape™ for the first time, you should cut the grass to the height no more than 9 cm with your manual lawnmower. Then, set the cutting height of your Landscape™ to its maximum setting for its first time mowing. (See Fig. F)
Your Landxcape™ will cut best in dry weather. It is also feasible to let your Landxcape™ work on rainy days as long as the lawn is solid. Check and clean your mower regularly.
Your Landxcape™ is afraid of lightning storms. In case of a lightning storm, protect Landxcape™ by unplugging the charging base, disconnecting the boundary wire, and making sure Landxcape™ is not allowed to charge.
Your Landscape™ loves mowing grass and requires the cutting blades to be kept in good condition to cut at its best. Landscape™ can do most things by itself, but will sometimes need your help to prevent damage to itself.
- Never let Landxcape ^TM travel over gravel.
- Remove or prevent access to obstacles that Landxcape ^TM could accidentally climb on and damage its blade turning disc.
- Remove all debris and foreign objects from your lawn.
5. App
Your Landxcape™ is able to connect with smartphone. Using Landxcape™ App for your smartphone, you can change your Landxcape™s general settings, and view the machine's status and error messages.
Checklist before connecting your App to Landxcape™
Step 1: Check your smart phone
- Make sure the Wi-Fi that your smart phone connected is 2.4GHz instead of 5GHz.
Example:

text_image
TP-LINK_34A0
TP-LINK_5G_34A0
- Make sure the App installed on your smart phone is the latest version.
Step 2: Check your Landxcape™
- Make sure your Landscape™ is under the same router environment as your smart phone.
- Make sure the firmware on your Landscape ^™ is the latest version.
- Make sure the distance between your Landxcape™ and smart phone is as close as possible during connection (less than 3 meters).
- Make sure the distance between your Landscape ^™ and router is as close as possible during connection (less than 3 meters).
Step 3: Check your router
- Make sure your router is 2.4GHz or 2.4GHz mixed 5GHz, and please enable 2.4GHz band.
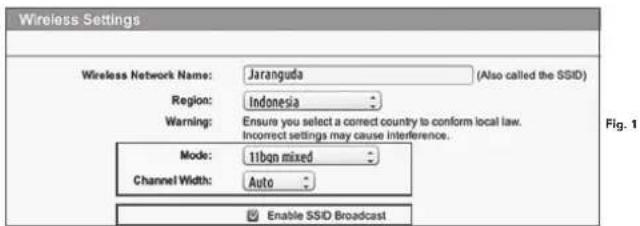
- Make sure your router 802.11 mode of wireless setting is b/g/n mixed. (See Fig. 1)
- Make sure your router channel/ band width of wireless setting is Auto or 20M or 20M mixed 40M. (See Fig. 1)
- Make sure your router Enable the SSID Broadcast function when you connect the machine with the App. And you can close it after you connect successfully. (See Fig. 1)
text_image
Wireless Settings
Wireless Network Name: Jaranguida (Also called the SSID)
Region: Indonesia
Warning: Ensure you select a correct country to conform local law.
Incorrect settings may cause interference.
Mode: 11bqn mixed
Channel Width: Auto
Enable SSD Broadcast
Fig. 1
- Make sure DHCP function is enabled. (See Fig. 2)

text_image
LAN
Bit Age 30F IP Address Network IME IP Address (first/second) Loss Time Status
8 192.168.89.1 255.255.255.0 192.168.89.2 1440
192.168.89.51
Delete OK Cancel
Fig. 2
- If you have a "Fritz!box" Router, please make sure activate "Allow communication between devices in same network" in the settings.
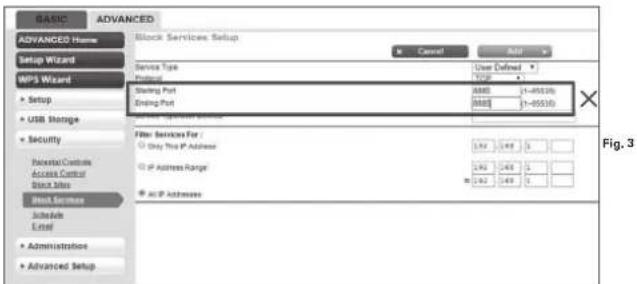
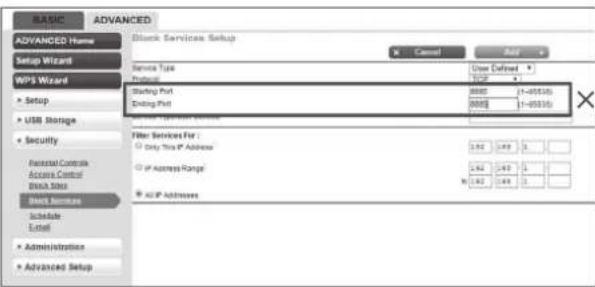
- Mare sure Port 8883 TCP is open. If it's blocked (See Fig. 3), please modify the setting.
text_image
BASIC ADVANCED
ADVANCED Home
Setup Wizard
MPS Wizard
Setup
USB Storage
Security
Receivial Controls
Access Control
Block Service
Schedules
Level
Administration
Advanced Setup
Block Services Setup
Cancel
Add
Service Type
User Defined
Protocol
Starting Port
8888 (1-49530)
Ending Port
8888 (1-49530)
Filter Services For:
Only the IP Address
IP Address Range
AC IP Address
Fig. 3
To connect smartphone to your Landxcape™:
Step 1: To download the Landxcape™ App, scan the QR code below or download it from Playstore (Google-Android), AppleStore (Apple-iOS) or our website www.landxcape-robotics.com.
Step 2: Keep pressing 📁 3 seconds, the icon will be blinking. Use 📋 to lose the icon , then press to confirm
text_image
IDLE
START HOME OK
START HOME OK
START HOME OK
Only for reference
Step 3: Enter the Landxcape™ App, and then follow the instructions to connect to your Wi-Fi.
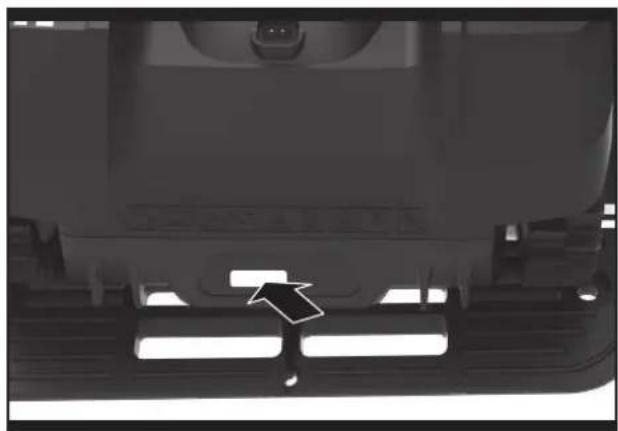
*The Serial No. can be found at the rear of Landscape™ as shown. (See Fig. G)


NOTE:
- If your Wi-Fi information changes, Landscape™ needs to be re-set according to Step 3.
- When Landxcape ^™ is located in an area with low or no Wi-Fi signal, instructions sent from the mobile App may not be executed immediately. Landxcape ^™ will receive instructions when it returns to an area with good Wi-Fi signal.
- For strong Wi-Fi signal to ensure stable connection, it is
recommended to install Wi-Fi extenders to cover areas with weak or no Wi-Fi signal.
6. Boundary Wire Basics
6.1. Pegging the Boundary Wire
Use the boundary wire distance gauge to set the correct distance between the wire and the border of your lawn (more than 26cm). This is the recommended distance. The provided distance gauge ensures proper installation.
If your neighbor also uses a Landxcape ^™ , keep a spacing of at least 1 metre between your boundary wire and your neighbor's.
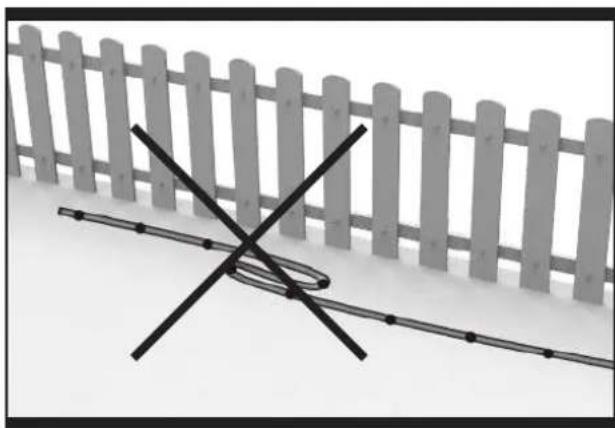
The boundary wire must outline the intended mowing area exactly. Your Landscape™ will become confused by extra bends or coils of boundary wire that are not part of its mowing area (See Fig. H). If there is excess boundary wire after the mowing area has been outlined, cut it off and store this additional wire in a separate location. It is important to leave the necessary length where it connects to the charging base so it can be connected and still remain buried.
6.2 Burying the Boundary Wire
If you are planning to bury the boundary wire, it is recommended to first peg it down. This allows you to easily change the layout if necessary before burying the wire. When the boundary wire installation is complete, have Landxcape™ follow and check the path by pressing 📂. T™ allows your Landxcape™ to adjust to its new environment.
While observing Landxcape ^™ you can easily make alterations to the boundary wire to ensure Landxcape ^™* s trouble-free tracking when locating the charging station. Confirm that Landxcape ^™ docks in the charging station successfully, and bury the wire if desired.
6.3 Joining the boundary wire
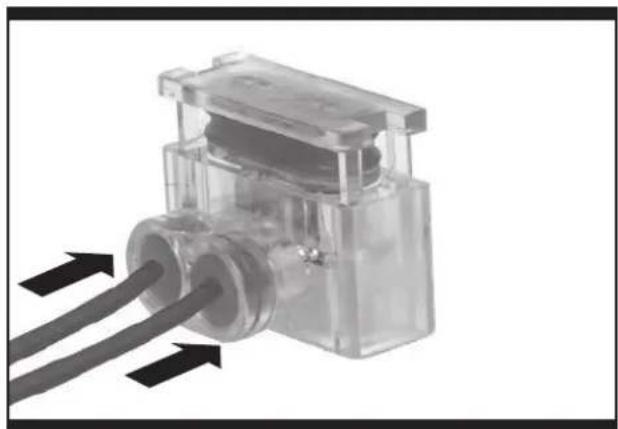
If you want to extend and splice the boundary wire, use a connector. (only for specific model, please check Technical Data & Declaration of Conformity). The connector is waterproof and provides optimal connection.
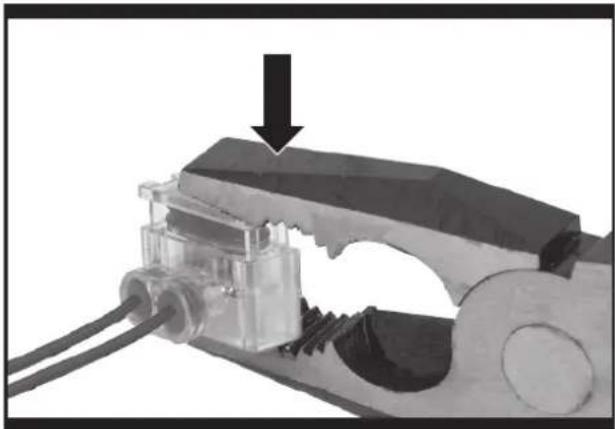
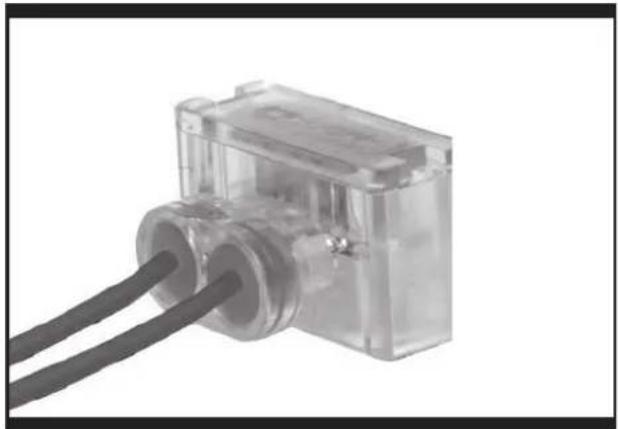
Insert both wire ends in any two of the three holes of the connector. Insert the wires fully until both wire ends are visible on the other side of the connector. (See Fig. I) Press the connector together by using a pair of pliers. (See Fig. J1, J2)

WARNING! It is not recommended to simply splice the boundary wire with insulating tape or use a screw terminal block for connection. A broken circuit may occur after a period of time as soil moisture can oxidize the wire.
7. Software update
The software can be updated when new versions become available. The latest software can be downloaded from our website www.landxcape-robotics.com.
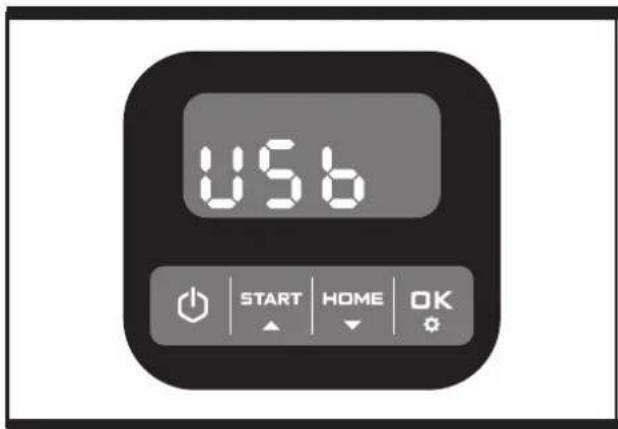
Method 1: Update via USB. See below for download and installation instructions:
(1) Locate the latest software version at: www.landxcape-robotics.com. Save the file to an empty FAT32 formatted USB (flash drive). Delete any other files on the drive and check the format. If the drive is not formatted in FAT32, please reformat the drive.
NOTE: the software update is downloaded as a zipped file. You will need to unzip or extract it before proceeding.
(2) Place Landxcape ^TM on a secure and level surface. Press turn
off your Landxcape™.
(3) Insert the USB drive (flash drive) in the port. (See Fig. K1)
(4) Turn Landscape™ on. The update will begin automatically. Wait until the display shows “SEE Fig. K2), then remove the USB drive (flash drive) and tightly close the protective cover. When the display shows “the update is complete and Landscape™ will enter the PIN page.
Method 2: Update via your smartphone. (Only for specific model, please check Technical Data & Declaration of Conformity) If your Landscape™ is connected to your smartphone via the Landscape™ App, you can check the software version.
The manual included with your Landscape ^™ is based on the default software at the time of production. Some new features/functions in the new version may not exist in the manual. If you found some settings not in the manual, please visit www.landcape-robotics.com to download the latest manual.
8. Maintenance
Your Landscape ^™ works hard and needs to be cleaned and checked from time to time. Some parts will require replacement as they become worn. Never use your Landscape ^™ with defective main switch.
Switch off the machine before carrying out any service or maintenance. Here's how to take care of your Landxcape™.
8.1 Keep it sharp

WARNING: Before cleaning, adjusting, or replacing the blades, turn your Landxcape™ OFF and put on protective

WARNING: When fitting new blades, make sure you replace ALL the blades. Always use new screws when fitting blades. This is important to ensure blade retention and balance the blade turning disc. Failure to use new screws could cause serious injury.
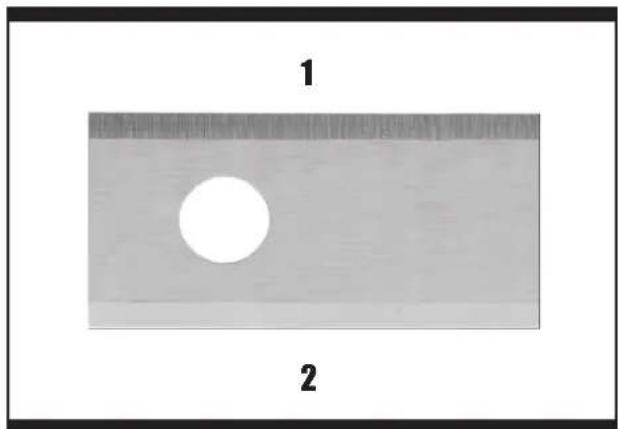
Landxcape ^™ does not cut grass like other mowers. Its cutting blades are razor sharp on 2 edges and rotate in both directions for maximum cutting capacity (See Fig. L). Each blade of your Landxcape ^™ has 2 cutting edges. The blade turning disc will make forward and reverse rotation at random to use both cutting edges and minimize the frequency of replacing the blades. Each cutting blade will last up to 2 months when it is programmed to mow everyday. Always check to see if the blades are chipped or damaged and replace them if they are. When the cutting blades are dull and worn out, they should be replaced with the spare blades provided with your Landxcape ^™ . Spare blades are also available at your nearest Landxcape ^™ retailer.
A. Replace the Blades
After some time, usually every season, your Landscape™s Blades will need to be replaced. When replacing the blades, make sure to replace ALL of them at the same time. You can replace them with one of the spare blade kits and extra blade screws supplied with your Landscape™.
Before attempting to replace your Landxcape™'s blades, turn the power off and put on protective gloves and follow these steps:
-
Gently flip Landxcape ^TM over.
-
Remove the battery cover and remove the battery.
-
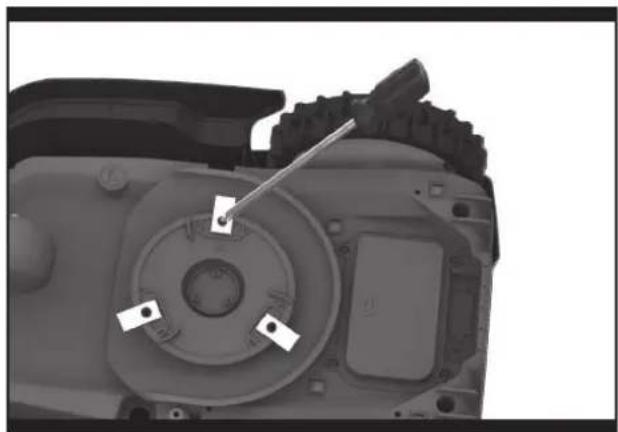
Take the screws off the blades with a screwdriver. (See Fig. M)
-
Firmly screw on the new blades.
-
Refit the battery and the battery cover.
IMPORTANT: After screwing the blade to the blade disc, make
sure the blade is able to spin freely.
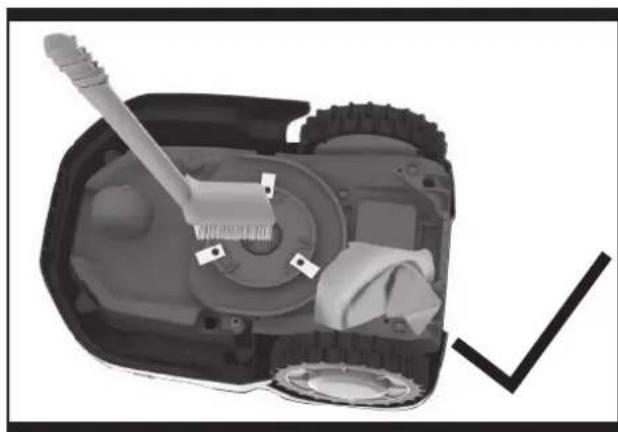
8.2 Keep it clean

WARNING: Before cleaning, turn your Landscape™ OFF. Put on protective gloves before cleaning the blade disc and do not rinse or flush with water.
A. Cleaning the body
Your Landxcape™ will live a much happier and longer life if it is cleaned regularly. Although, since your Landxcape™ is an electric machine, you will need to take care when cleaning. DO NOT use a hose, high pressure washers and do not pour running water on your Landxcape™. It is best to use a spray bottle filled with water.
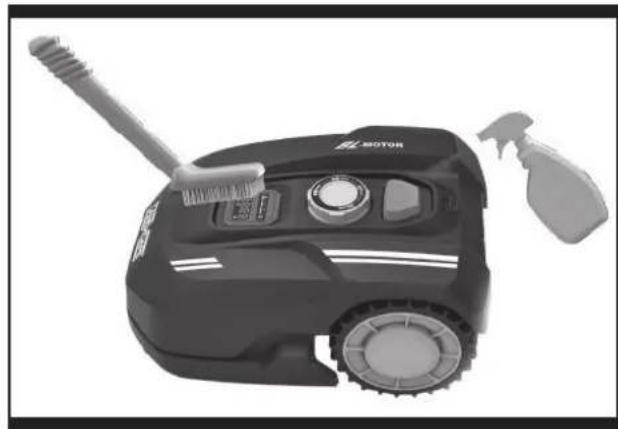
When cleaning the machine body, use a soft brush or clean cloth and avoid using solvents or polishes (See Fig. N). Lastly, remove all build up of grass clippings and debris.
B. Cleaning the Underside
Again, it is important that you power Landscape™ OFF and wear protective gloves before touching the blade turning disc.
First, flip your Landscape™ upside down to expose its underside. Here you will see the blade disc, the chassis, and the front wheel and driving wheels. Clean everything thoroughly with a soft brush or moist rag.

WARNING: NEVER clean the underside of Landscape™ with running water. Component damage can occur. (See Fig. 01,
02)
Rotate the blade disc to ensure it rotates freely. Check the blades spin freely around the fixing screws. Remove any obstructions.
IMPORTANT: Remove any lodged debris so that it does not cause a crack in the blade disc. Even the tiniest crack can decrease your Landxcape™s mowing output.
Clean the contact pins located on the charging base and the charging strips located on Landxcape ^™ using a cloth. Remove any built up grass clippings or debris around the contact pins and charge strips periodically to ensure Landxcape ^™ successfully charges each time.
8.3 Battery life
The heart of Landxcape ^™ is its 20V Li-Ion battery. For proper storage of the battery, make sure it is fully charged and kept in a cool dry place.
NOTE: The recommended Landxcape™ operation temperature is between 0-55°C.
The life-span of Landscape™'s battery depends on various factors, such as:
- The length of the mowing season in your region
- Amount of hours Landxcape ^TM mows per day
- Battery maintenance during storage
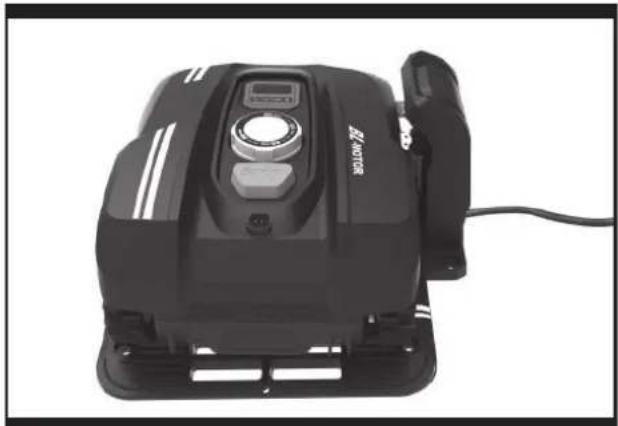
Landxcape™ can be charged manually without the boundary wire.
-
Connect the charging base to a suitable power supply. The green light on the charging base will turn on.
-
Manually dock Landxcape ^TM into the charging base while Landxcape ^TM is powered off. (See Fig. P)
-
The green light on the charging base will be flashing. Landscape™ will begin to charge.
8.4 Winter hibernation
Your Landscape™ will live longer and healthier if it is allowed to hibernate. So even though it is troublesome, we recommend storing
your Landscape™ in your shed or garage during the winter.
Before you prepare your Landscape™ for winter hibernation, we recommend you:
• Thoroughly clean your Landxcape ™
- Fully charge the battery and remove it from Landscape ^TM
- Turn power off
To maximize the battery life, fully charge the battery and remove it from Landscape™ before storage during winter.

WARNING: Protect the underside of Landxcape™ from water. NEVER store Landxcape™ upside down outdoors.
The boundary wire can be left in the ground but its ends should be protected, such as placed in a tin can with grease. If the charging base is left outside for the winter, leave the boundary wire connected.
NOTE: When bringing Landscape™ back to work after winter hibernation, make sure the charging strips and contact pins are clean. We recommend using a fine grade emery cloth to clean the contacts.
8.5 Replacing the battery

WARNING: Power off before attempting any adjustment, replacement or repair.
Before replacing the blades, turn your Landscape™ OFF and put on protective gloves.
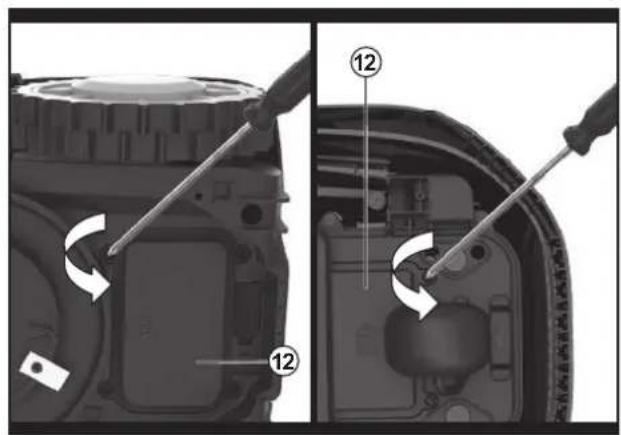
If you need to replace the battery, follow these steps:
- Gently turn your Landxcape ^TM upside down.
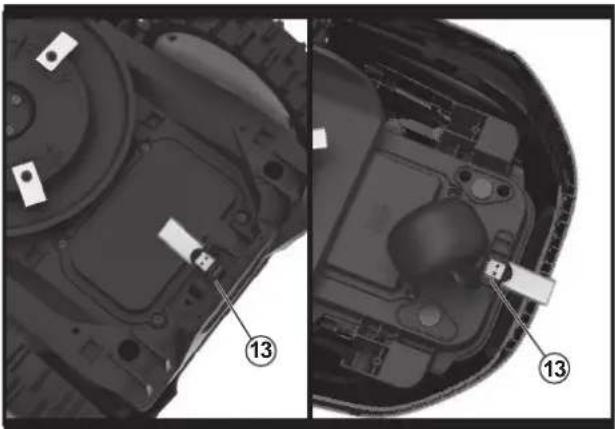
- Remove the screws on the battery cover. Remove the battery cover. (See Fig. Q1)
-
Lift out the old battery carefully. Press the latch and release the connectors. (See Fig. Q2)
NOTE: Do not pull by the cables. Hold the connectors and release the latch.
-
Connect a new original battery by attaching the connectors until they click into position. (See Fig. Q3, Q4)
-
Fit the battery as shown. (See Fig. Q5) Place the cover back in its position and tighten the screws.
9. Function Messages
| Display Message | Action | |
| -F - | Rain delay activated. No action is required. | |
10. Error Messages
NOTES
| Display Cause Action | |
| -81- | LandxcapeTM is outside working area. | 1. If LandxcapeTM is actually outside its territory: turn LandxcapeTM off, take LandxcapeTM inside its territory. Turn LandxcapeTM on. Press###on . OK2. If LandxcapeTM is inside its territory, check if the LED on the charging base is green. If not, verify that the charging base is properly connected to the charger and that the charger is connected to a suitable power supply. If they are properly connected, the boundary wires are clamped incorrectly and must be reversed.3. If the LED light on the charging base turns on red, confirm that the boundary wire is well connected to the clamps on the charging base. If the problem persists, check that the boundary wire hasn't been cut. |
| -82- | Wheel motor blocked | 1. Turn LandxcapeTM off; take LandxcapeTM to an area free of obstacles.2. Turn LandxcapeTM on. Press###on . OK3. If the error message is still displayed, turn power off; turn LandxcapeTM upside-down and check if there's anything preventing the wheels from rotating.4. Remove any obstruction, turn LandxcapeTM upright, turn power on. Press###on . OK |
| -83- | Blade disc blocked | 1. Turn LandxcapeTM off.2. Turn LandxcapeTM upside down and check if there's anything preventing the blade disc to rotate.3. Remove any obstruction.4. Turn LandxcapeTM upright and take it to an area with short grass or adjust the cutting height;5. Turn LandxcapeTM on. Press###on . OK |
| -84- | LandxcapeTM is trapped. | 1. Turn LandxcapeTM off;2. Take LandxcapeTM to an area in your lawn free of obstacles obstacles.3. Turn LandxcapeTM on. Press###on . OK4. If the error message is still displayed; turn power off; turn LandxcapeTM upside-down. Check if there is anything preventing the wheels from rotating.5. Remove any obstruction, turn LandxcapeTM upright, turn power on. Press###on . OK |
| -85- | LandxcapeTM is lifted up. | 1. Turn LandxcapeTM off.2. Take LandxcapeTM to a lawn area clear of obstacles, turn LandxcapeTM on. PressSTARTthen OK3. If the error message is still displayed: turn LandxcapeTM off, turn LandxcapeTM upside-down and check if there's anything preventing the front wheels from rotating.4. Remove any possible object, turn LandxcapeTM upright, turn LandxcapeTM on. Press### then OK |
| -86- | LandxcapeTM is upside down. | Turn LandxcapeTM upright. Press###en . OK |
| -87- | Battery error | 1. Check the battery temperature. If the temperature is too high, wait until the temperature has cooled down. Press###en . OK2. If the error message is still displayed, replace a new battery. Restart LandxcapeTM. Press###en . OK3. If the error repeatedly occurs, try to change the working schedule. |
| -88- | It takes too long for LandxcapeTM to go back to the charging base. | Manually dock LandxcapeTM in the charging base for charging. After LandxcapeTM is fully charged, Press###en . OK |
| -89- | This could be because your router lost its power or because you changed your Wi-Fi router or network provider. | Please reconnect LandxcapeTM to the Wi-Fi network it has been originally paired with. If this is not possible, contact Customer Service. |
| -88- | Error unknown. | Restart LandxcapeTM. Press [REDACTED] . If I CIC error message is still displayed, contact a service agent for help. |
- Before turning power on, always return Landxcape ^TM to its territory. If not, “-” will be displayed. This message is also displayed when Landxcape ^TM is sitting over the boundary wire when turned on.
- If for any reason—i.e. a party, children playing...—you want to park your Landxcape ^TM in the charging base: Press 📊️ on . Landxcape ^TM will go to its charging base and stay there. Press 📍 turn Landxcape ^TM off.
- If an error repeatedly occurs in the same area of your lawn, you might have a problem with the boundary wire. Please refer to the Installation Guide and check your set up with its help.
- If your lawn is divided in two separate areas connected by a corridor less than 1m, one of which is not provided with the charging base: when Landxcape™ runs out of charge, take it manually to the charging base, the charge process will start.
- If Landxcape ^TM runs abnormally once in a while, please try to restart it. If the problem is not resolved, try to removing and reinstalling the battery. If the problem is still not resolved, please contact a Landxcape ^TM service agent for help.
- Do not wash your Landxcape ^TM with a high pressure washer. This could cause damage to the battery or the machine.
11. Troubleshooting
If your Landscape ^™ does not work correctly, follow the troubleshooting guide below. If the issue persists, contact your Dealer.
| Symptom Cause Action | | |
| The LED light on the charging base does not turn on. | There is no power. | Check the charging base is connected properly to the charger and the charger is connected to a suitable power supply. |
| Red light turns on the charging base. The | boundary wire isn't connected. | Check that the boundary wire has been connected correctly to the charging base.Check there are no breaks in the boundary wire, especially in the wire ends. |
| Landxcape^TM turns on, but the blade disc does not move. | Landxcape^TM is searching for the charging base (unless you press on but to make it go to the charging base) | This is normal. Landxcape^TM needs to recharge, the blade disc does not rotate while it is searching for the charging base automatically. |
| Landxcape^TM vibrates. | Blades may be damaged. Check condition of the blade disc. | Check the blades, and replace them if damaged.Remove debris and foreign objects from the blades and blade disc. |
| Grass is being cut unevenly. | Landxcape^TM does not work enough hours per day. | Add more hours to the scheduled mowing time. |
| Mowing area is too big. | Try decreasing the size of the mowing area or adding more hours to the mowing time. |
| Blades are dull. | Change all the blades and screws in order to balance the blade disc. |
| The cutting height is too low for the length of the grass. | Raise the cutting height and then gradually lower. |
| Grass or other object has wrapped around the blade disc. | Check the blade disc and remove the grass or other object. |
| There is a build-up of grass in the blade disc or motor frame box. | Make sure the blade disc rotates easily. If need be, you may take off the blade disc and remove the debris. |
| Your Landxcape^TM is inside its territory and the boundary wire is connected.And “-” is displayed. | The boundary wire ends are clamped incorrectly. | Reverse the boundary wire ends. |
| The boundary wire is broken. Repair damaged | boundary wire with connectors. |
| The charging time is far more than the rated charging time. | Poor connection caused by debris on the charging strip. | Clean the contact pins located on the charging base and the charging strip on LandxcapeTM using a cloth. |
| The charging protection program has activated due to high temperature. | Place the charging base in a shady area or wait until the temperature has cooled down. |
| The mower does not charge. | There is no power. | Check the power cord is connected properly to the charger and the charger is connected to a suitable power supply. |
| LandxcapeTM does not operate correctly while manually charging. | Refer to manual charging in Section 8.3. |
| LandxcapeTM is starting to have shorter run-times between charges. | Something is clogging in the blade disc. Take off the blade disc and clean it. |
| LandxcapeTM is shaking heavily. | Check the blade disc and blades, remove debris and foreign objects from the blades and blade disc. |
| The battery may be exhausted or old. Replace battery. |
| LandxcapeTM is not operating at the correct time. | The clock is not set to the correct time. Set the clock to the correct time, refer to Section 4.3. |
| Programmed cutting times for LandxcapeTM are not correct. | Change the time settings for the mower to start and stop. |
| LandxcapeTM is manually docked in the charging base. | Press [IMAGE] |
| The battery does not charge as its temperature rises above 55°C in hot weather. | Wait until the battery has cooled down. |
| LandxcapeTM cannot correctly dock with the charging base. | Environmental influences. Restart LandxcapeTM. |
| Poor connection caused by debris on the charging strip. | Clean the contact pins located on the charging base and the charging strip on LandxcapeTM using a cloth. |
| The green light on the charging base turns on before charging is complete. | The charging base is overheated. | Place the charging base in a shady area or wait until the temperature has cooled down. |
| LandxcapeTM runs outside the boundary wire. | The boundary wire has been installed with tight corners. | Check the boundary wire to ensure the corners are smooth. |
| LandxcapeTM does not mow an area within a boundary wire zone. | The cutting area is larger than the allowable cutting area for LandxcapeTM. | Reduce the cutting area or use LandxcapeTM with a larger allowable cutting area. |
| LandxcapeTM reverses or rotates erratically near the boundary wire. | The boundary wire of another LandxcapeTM or another robotic mower is positioned too closely. | Ensure your LandxcapeTM boundary wire has at least 1m of space between the neighboring boundary wire. |
| In wet conditions, the boundary wire electric signal may leak were wire has been joined or repaired. | Check boundary wire joints. Insulate to provide a fully waterproof connection. |
| There is boundary wire electric signal leakage due to broken insulation. | Repair damaged boundary wire insulation with connectors. |
| There is ultrasonic sensor damaged. | Check if there is anything dirty on the ultrasonic sensor and clean it. If not, check and ensure your LandxcapeTM boundary wire has at least 1m of spacing between the neighboring boundary wire. If the problem cannot be solved, please contact LandxcapeTM service agent for help. |
| LandxcapeTM wheels skid or damage lawn. | Foreign obstacles, such as twigs and branches may be lodged under LandxcapeTM. | Remove foreign objects from underside of LandxcapeTM. |
| The lawn is too wet. Wait until lawn has dried. | |
| LandxcapeTM exits the boundary wire due to high speed when going down a hill. | The boundary wire is placed on a slope steeper than 17% (10°). | Reposition the boundary wire away from slopes that are steeper than 17% (10°). Please refer Installation Guide for details. |
 | Software update failure occurs. | Try again according to section “Software update”. |
| Landxcape^TM runs in circles; turns right or left even there is no obstacle in front of it. | There is ultrasonic sensor damaged. | Check if there is anything dirty on the ultrasonic sensor and clean it. If not, check and ensure your Landxcape^TM boundary wire has at least 1m of spacing between the neighboring boundary wire. If the problem cannot be solved, please contact Landxcape^TM service agent for help. |
| Cable between the ultrasonic sensor and the mainboard is damaged. |
| The boundary wire of another Landxcape^TM or another robotic mower is positioned too closely. |
| There is something dirty on the ultrasonic sensor and needs to be cleaned. |
| Keyboard of the mower fails to work. | Keyboard is damaged. | Restart Landxcape^TM . If the problem persists, keep pressing the on/off key for 10 seconds and then restart Landxcape^TM . If the problem cannot be solved, please contact Landxcape^TM service agent for help. |
| Poor connection for the cable between the control panel and the mainboard or the cable is damaged. |
| Keyboard needs to be reset. |
| Mower fails to avoid obstacles. | There is ultrasonic sensor damaged. | Check if there is anything dirty on the ultrasonic sensor and clean it. If not, check and ensure your Landxcape^TM boundary wire has at least 1m of spacing between the neighboring boundary wire. If the problem cannot be solved, please contact Landxcape^TM service agent for help. |
| Cable between the ultrasonic sensor and the mainboard is damaged. |
| The boundary wire of another Landxcape^TM or another robotic mower is positioned too closely. |
| There is something dirty on the ultrasonic sensor and needs to be cleaned. |
| The ultrasonic sensor failure occurs at a small probability, such as children's legs, shrubs, inclined trees or stones. | This is normal, no action is needed. |
| The obstacle is lower than 19cm. | This is normal. Ultrasonic sensor cannot detect anything lower than 19cm. |
Environmental Protection

Waste electrical products should not be disposed of with household waste. Please recycle where facilities exist. Check with your Local Authority or retailer for recycling advice.
Details regarding safe disposal of used batteries
At the end of the life of the appliance, remove the battery pack safely before disposing of the appliance. Do not throw batteries away or throw them in the normal trash can. Also do not dispose of the battery with the machine. Remove the used battery pack from the appliance and dispose of it at the nearest or convenient dedicated recycling facility. If in doubt, consult your local environmental protection department. Batteries may enter water cycle if disposed improperly, which can be hazardous for ecosystem. Do not dispose of waste batteries as unsorted municipal waste.
natural_image
Architectural layout diagram showing a small house surrounded by garden paths and trees (no text or symbols)
text_image
Wireless Settings
Wireless Network Name: Jaranguda (Also called the SSID)
Region: Indonesia
Warning: Ensure you select a correct country to conform local law.
Incorrect settings may cause interference.
Mode: 11bn mixed
Channel Width: Auto
Enable SSO Broadcast
Fig. 1
text_image
LAN
Bridge STD IP Address Ratech HEC IP header (First/First) Loss Time(Gain)
8 192.168.89.1 255.255.255.0 192.168.89.2 1440
192.168.89.51
Delete OK Cancel
Fig. 2
natural_image
Top-down architectural rendering of a simple courtyard with a small house, garden paths, and trees (no text or symbols)
text_image
Wireless Settings
Wireless Network Name: Jaranguda (Also called the SSID)
Region: Indonesia
Warning: Ensure you select a correct country to conform local law.
Incorrect settings may cause interference.
Mode: 11bqn mixed
Channel Width: Auto
Enable SSID Broadcast
Fig. 1
text_image
LAN
Bridge STD IP Address Ratek IMP IP Address (frame/last) Lane Time (min)
8 192.168.89.1 255.255.255.0 192.168.89.2 1440
192.168.89.51
Delete OK Cancel
Fig. 2
natural_image
Architectural layout diagram showing a single house surrounded by garden areas and trees (no text or symbols)
text_image
Idle
14:08
14:08
STOP
Solo per rife
text_image
Wireless Settings
Wireless Network Name: Jaranguda (Also called the SSID)
Region: Indonesia
Warning: Ensure you select a correct country to conform local law.
Incorrect settings may cause interference.
Mode: 11bqn mixed
Channel Width: Auto
Enable SSID Broadcast
Fig. 1
text_image
LAN
Bridge ID: IP Address Retected INFO IF Back (first/last) Lease Time (min)
B 192.168.89.1 255.255.255.0 192.168.89.2 1440
192.168.89.51
Delete OK Cancel
Fig. 2
natural_image
Top-down architectural rendering of a simple garden layout with a central house, surrounding pathways, and surrounding vegetation (no text or symbols)
text_image
Wireless Settings
Wireless Network Name: Jaranguda (Also called the SSID)
Region: Indonesia
Warning: Ensure you select a correct country to conform local law.
Incorrect settings may cause interference.
Mode: 11bon mixed
Channel Width: Auto
Enable SSID Broadcast
Fig. 1
text_image
LAN
Bridge ID: IP Address Network INFO IP Range (first/last) Launch Time (sina)
0 192.168.89.1 255.255.255.0 192.168.89.1 1440
192.168.89.1
192.168.89.51
Delete OK Cancel
Fig. 2
text_image
BASIC ADVANCED
ADVANCED Home
Setup Wizard
MPS Wizard
> Setup
> USB Storage
> Security
Parental Control
Access Control
Data Tools
Block Services
Schedule
Email
> Administration
> Advanced Setup
Block Services Setup
Service Type
Service Name
Starting Port
Starting Port
User Defined
TCP2
8882 1-695305
8888 1-695305
Filter Services For:
Only This IP Address:
IP Address Range:
ADP Addresses
1.92 4.68 3.
1.92 4.68 3.
1.92 4.68 3.
Fig. 3
Your Landxcape ^™ will live longer and healthier if it is allowed to hibernate. So even though it is troublesome, we recommend storing your Landxcape ^™ in your shed or garage during the winter.
Before you prepare your Landscape™ for winter hibernation, we recommend you:
natural_image
Top-down architectural rendering of a simple courtyard with a small house, garden paths, and small objects (no text or symbols)
text_image
Wireless Settings
Wireless Network Name: Jaranguda (Also called the SSID)
Region: Indonesia
Warning: Ensure you select a correct country to conform local law.
Incorrect settings may cause interference.
Mode: 11bqn mixed
Channel Width: Auto
Enable SSID Broadcast
Fig. 1
text_image
LAN
Bridge ISP IP Address Network BND IP Map (first/last) Loss Time (arc)
0 ▼ 192.168.89.1 255.255.255.0 ✓ 192.168.89.2 1440
192.168.89.51
Delete OK Cancel
Fig. 2
natural_image
3D architectural rendering of a simple courtyard with a house, garden areas, and trees (no text or symbols)
Krok 3: Check your router
text_image
Wireless Settings
Wireless Network Name: Jaranguda (Also called the SSID)
Region: Indonesia
Warning: Ensure you select a correct country to conform local law.
Incorrect settings may cause interference.
Mode: 11bon mixed
Channel Width: Auto
Enable SSID Broadcast
Fig. 1
text_image
LAN
Bridge ID: IP Address Network HCP IP regional (first/last) Lease Time (min)
8 192.168.89.1 255.255.255.0 192.168.89.2 1440
192.168.89.31
Delete OK Cancel
Fig. 2
text_image
BASIC
ADVANCED
ADVANCED Home
Setup Wizard
MPS Wizard
Setup
USB Storage
Security
Minimal Controls
Access Control
Stock Sites
Block Services
Schedule
Local
Administration
Advanced Setup
Block Services Setup
X
Cancel
Add
Service Type
Protocol
Starting Port
Ending Port
User Defined
8880
1+450300
8880
1+450300
Filter Services For:
Only This IP Address
IP Address Range
All IP Addresses
1.92 0.49 0
1.92 0.49 0
1.92 0.49 0
Fig. 3
natural_image
Top-down architectural rendering of a simple courtyard with a central house, surrounding greenery, and pathways (no text or symbols)
text_image
Wireless Settings
Wireless Network Name: Jaranguda (Also called the SSID)
Region: Indonesia
Warning: Ensure you select a correct country to conform local law.
Incorrect settings may cause interference.
Mode: 11bqn mixed
Channel Width: Auto
Enable SSID Broadcast
Fig. 1
text_image
LAN
Bridge ISP IP Address Retreats BND IP Address (furs/Net)
8 192.168.89.1 255.255.255.8 192.168.89.2 1440
192.168.89.31
Daote OK Cancel
Fig. 2
natural_image
Top-down architectural rendering of a simple garden layout with a central house, surrounding pathways, and surrounding greenery (no text or symbols)
text_image
Wireless Settings
Wireless Network Name: Jaranguda (Also called the SSID)
Region: Indonesia
Warning: Ensure you select a correct country to conform local law.
Incorrect settings may cause interference.
Mode: 11bqn mixed
Channel Width: Auto
Enable SSID Broadcast
Fig. 1
text_image
LAN
Bridge SDF IP Address Network BND IP Range (first/last) Latest Time Gains!
0 192.168.89.1 255.255.255.0 192.168.89.2 1440
192.168.89.51
Delete OK Cancel
Fig. 2
natural_image
Top-down architectural rendering of a simple courtyard with a small house, garden paths, and trees (no text or symbols)
4.1 Jak moje sekačka Landxcape™ pozná, co má sekat?
text_image
Wireless Settings
Wireless Network Name: Jaranguda (Also called the SSID)
Region: Indonesia
Warning: Ensure you select a correct country to conform local law.
Incorrect settings may cause interference.
Mode: 11bon mixed
Channel Width: Auto
Enable SSID Broadcast
Fig. 1
text_image
LAN
Bridge ISP IP Address Network IP2 IP Range (First/Test) Leave Time (start)
B 192.168.89.1 255.255.255.0 192.168.89.2 1440
192.168.89.51
Delete OK Cancel
Fig. 2
text_image
BASIC ADVANCED
ADVANCED Home
Setup Wizard
MPS Wizard
Setup
USB Storage
Security
Parental Controls
Access Control
Stack Store
Block Services
Schedule
Level
Administration
Advanced Setup
Block Services Setup
Cancel
Add
Service Type
Default
Starting Port
Ending Port
User Defined
Type
8880 1-65530
8880 1-65530
Filter Services For:
Only This IP Address
IP Address Range
AC IP Addresses
1.92 1.49 0
1.92 1.49 0
1.92 1.49 0
Fig. 3
natural_image
Top-down architectural rendering of a simple outdoor garden layout with a central house, pathways, and surrounding greenery (no text or symbols)
text_image
Wireless Settings
Wireless Network Name: Jaranguda (Also called the SSID)
Region: Indonesia
Warning: Ensure you select a correct country to conform local law.
Incorrect settings may cause interference.
Mode: 11bon mixed
Channel Width: Auto
Enable SSIO Broadcast
Fig. 1
text_image
LAN
Bridge ID: IP Address Network
192.168.89.1 255.255.255.0
IP Range (first/first)
192.168.89.2
162.168.89.51
Delete OK Cancel
Figure 2
natural_image
3D architectural rendering of a simple garden layout with a central house, surrounding pathways, and surrounding greenery (no text or symbols)
Passo 3: Check your router
text_image
Wireless Settings
Wireless Network Name: Jaranguda (Also called the SSID)
Region: Indonesia
Warning: Ensure you select a correct country to conform local law.
Incorrect settings may cause interference.
Mode: 11bon mixed
Channel Width: Auto
Enable SSD Broadcast
Fig. 1
text_image
LAN
Bridge S1F IP Address Ratek BND IP Range (first/last) Large Time (min)
8 192.168.89.1 255.255.255.0 192.168.89.2 1440
192.168.89.51
Delete OK Cancel
Fig. 2
text_image
BASIC ADVANCED
ADVANCED Theme
Setup Wizard
WPS Wizard
Setup
USB Storage
Security
Receivable/Continuous
Active Center
Block Service
Direct Service
Scheduled
Email
Administrative
Advanced Setup
Block Services Setup
Cancel Add
Service Type
Protocol
Starting Port
Ending Port
Service Type: User Defined
8000 1~455306
8000 1~455306
Filter Services For :
Only This IP Address
IP Address Range:
All IP Addresses
Fig. 3
natural_image
Top-down architectural rendering of a simple garden layout with a small house, pathways, and surrounding greenery (no text or symbols)
text_image
Wireless Settings
Wireless Network Name: Jaranguada (Also called the SSID)
Region: Indonesia
Warning: Ensure you select a correct country to conform local law.
Incorrect settings may cause interference.
Mode: 11bqn mixed
Channel Width: Auto
Enable SSD Broadcast
Fig. 1
text_image
LAN
IPv4g SIP IP Address Network IP Range (First/First) Lower Time (ms)
0 ▼ 192.168.89.1 255.255.255.0 192.168.89.2 1440
192.168.89.51
Delete OK Cancel
Fig. 2
- Ako imate usmjerivač marke "Fritz!box", morate uključiti stavku "Allow communication between devices in same network" (Omogući komunikaciju između uređaja na istoj mreži) u postavkama.
- Pazite da Port 8883 TCP bude otvoren. Ako je blokiran (Sl. 3), prilagodite postavku.
text_image
BASIC ADVANCED
ADVANCED Home
Setup Wizard
WPS Wizard
• Setup
• USB Storage
• Security
Prestal Control
Access Control
SINA 3003
Block Services
Schedule
Local
• Administration
• Advanced Setup
Block Services Setup
Cancel Reset
Service Type
Protocol
Starting Port
Ending Port
User Defined
3000
8000 (1-05516)
8000 (1-05516)
Filter Services For:
Only This IP Address
IP Address Range
All IP Addresses
3.92 3.49 3.1
3.92 3.49 3.1
3.92 3.49 3.1
Fig. 3
SHRANITE ZA KASNEJŠO UPORABO
natural_image
Architectural layout diagram showing a central house surrounded by garden paths and trees (no text or symbols)
text_image
Wireless Settings
Wireless Network Name: Jaranguda (Also called the SSID)
Region: Indonesia
Warning: Ensure you select a correct country to conform local law.
Incorrect settings may cause interference.
Mode: 11bon mixed
Channel Width: Auto
Enable SSID Broadcast
Fig. 1
text_image
LAN
Bridge STF IP Address Ratech NDC IP Range (fress/last) Loss Time (min)
D 192.168.89.1 255.255.255.0 ✓ 192.168.89.2 1440
192.168.89.51
Delete OK Cancel
Fig. 2
BEHOLD TIL SENERE BRUG
natural_image
Landscape layout diagram showing a central house surrounded by garden plots and trees, with no visible text or symbols.
text_image
Wireless Settings
Wireless Network Name: Jaranguda (Also called the SSID)
Region: Indonesia
Warning: Ensure you select a correct country to conform local law.
Incorrect settings may cause interference.
Mode: 11bn mixed
Channel Width: Auto
Enable SSID Broadcast
text_image
LAN
Bit Age 30F IP Address Network IMP IP Address (first/second) Leave Time Split
8 192.168.89.1 255.255.255.0 192.168.89.2 1440
192.168.89.51
Delete OK Cancel
Fig. 2
text_image
BASIC ADVANCED
ADVANCED Home
Setup Wizard
MPS Wizard
> Setup
> USB Storage
> Security
Initial Controls
Access Center
Start Bus
Block Services
Schedule
Level
> Administration
> Advanced Setup
Block Services Setup
Cancel
Add
Service Type
Default
Starting Port
Ending Port
User Defined
USB
1-495100
8888 (1-495100)
8888 (1-495100)
Filter Services For :
Only This IP Address
IP Address Range:
= 1.92 1.49 0
= 1.92 1.49 0
= 1.92 1.49 0
ACIP Addresses
Fig. 3
natural_image
Top-down architectural rendering of a simple outdoor garden layout with a central house, surrounding pathways, and surrounding greenery (no text or symbols)
text_image
Wireless Settings
Wireless Network Name: Jaranguda (Also called the SSID)
Region: Indonesia
Warning: Ensure you select a correct country to conform local law.
Incorrect settings may cause interference.
Mode: 11bqn mixed
Channel Width: Auto
Enable SSD Broadcast
text_image
LAN
Bit Age 07P IP Address Network HPF IP Range (first/second) Lane Time (main)
8 192.168.89.1 255.255.255.0 192.168.89.2 1440
192.168.89.51
Delete OK Cancel
Fig. 2
VEDLIKEHOLD OG LAGRING
natural_image
3D architectural rendering of a simple garden layout with a small house, pathways, and surrounding greenery (no text or symbols)
text_image
IDLE
P In
0---
Kun for referanse
text_image
Wireless Settings
Wireless Network Name: Jaranguda (Also called the SSID)
Region: Indonesia
Warning: Ensure you select a correct country to conform local law.
Incorrect settings may cause interference.
Mode: 11bqn mixed
Channel Width: Auto
Enable SSD Broadcast
text_image
LAN
Bit Age 30F IP Address Network INCP IP Address (first/second) Leave Time Split
8 192.168.89.1 255.255.255.0 192.168.89.2 1440
192.168.89.51
Delete OK Cancel
Fig. 2
natural_image
Architectural layout diagram showing a small house surrounded by garden plots and trees (no text or symbols)
(3)Default working schedule
text_image
Wireless Settings
Wireless Network Name: Jaranguda (Also called the SSID)
Region: Indonesia
Warning: Ensure you select a correct country to conform local law.
Incorrect settings may cause interference.
Mode: 11bqn mixed
Channel Width: Auto
Enable SSD Broadcast
Fig. 1
text_image
LAN
Bridge SIP IP Address Network IEP IP Range (First/Test) License Time (ms)
0 ▼ 192.168.89.1 255.255.255.0 192.168.89.2 1440
192.168.89.51
Delete OK Cancel
Fig. 2
text_image
BASIC ADVANCED
ADVANCED Home
Setup Wizard
MPS Wizard
Setup
USB Storage
Security
Internal Controls
Access Control
Stack Slots
Block Services
Schedule
Level
Administration
Advanced Setup
Block Services Setup
N Count
User Defined
Type
Starting Port
8000 1-600(3)
Green Port
8000 1-600(3)
New Service Center
Title Services For:
Only This IP Address
IP Address Range
40 IP Addresses
1.92 2.49 5
2.92 3.49 5
N 1.92 2.49 5
Fig. 3
Copyright © 2024, Positec. All Rights Reserved.
AR01535707